1
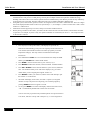
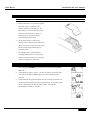
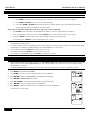
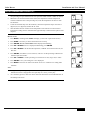
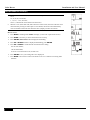
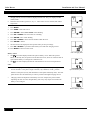
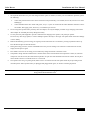
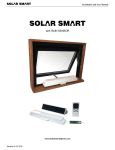
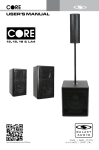
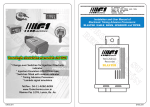
Solar Breeze Installation and User Manual Product Specifications: Rated thrusts: open 30 kg, close 15 kg. Can operate hinged window / skylight weighing up to 100 kg Time for full 20 cm extension / retraction: approximately 60/40 sec. Temperature range: -20 to 50 C. Battery capacity: 60 to 80 cycles (full stroke) when fully charged. Congratulations on your purchasing Solar Breeze, world's first commercially available solar charged, battery powered electric window/skylight operator! Soon you will be able to automatically control your window/skylight using only the power of the sun! BEFORE YOU BEGIN Install the battery pack into the operator and charge it with the AC adaptor provided for 4-8 hours. Make sure that the wall-power outlet rating matches the adaptor (115 V or 220 V). When battery is first connected, red light on the circuit board will blink for 2 minutes, which shall be ignored, and do not operate the remote during this period. Before the remote can be used to control the operator, it needs to be paired with the operator first, following instructions after installation is completed, to ensure that the system will work properly. Placement: Make sure upper and lower mounting brackets are centered on the window and its frame, edges align well, and the chain is pushing window straight up or out. One can extend / retract chain during installation process by pressing manual up and down buttons inside operator, (next to terminal blocks for receiving solar wires). Test open and close of window fully in this way after installation to ensure there is nothing interfering with smooth operation. More helpful information on installation and operation on our FAQ page at: www.SolarBreezeinfo.com Revision 11/13/2013 Solar Breeze Installation and User Manual TABLE OF CONTENTS Page Section 1 Features 2 In The Box 2 Further Items Required 3-4 Operator Installation 5 Solar Panel and Rain Sensor Installation 5 Wiring Solar Panel and Rain Sensor to the Operator 6 Remote Setup 7-8 Pairing Operator to the Remote 9 Basic Operation 9 Adjusting Max-Open Limit 10 Setting Temperature Control (TC) 11 Setting Timer to Close (P1) 12 Enable / Disable Rain Sensor Control 13 Battery Level and Solar Charging Current 14 Move Window to New Zone (RE-ZONE) 14-15 Multiple Remotes 16 Maintenance and Troubleshooting Tips FEATURES Operator Highlights: 1. Powered by replaceable solar charged battery pack, AC trickle charger included. 2. Maximum chain travel of 20 cm with option to program various [shorter] lengths. 3. Bright White cover standard. Paintable surface for custom color match. 4. Chain attached to window via quick release pin. 5. Rain sensor, temperature, and Timer control possible. 6. Work with common awning. Remote Highlights: 1. Real-time and helpful information from the operator displayed in large and readable icons: a. Open / Close status percentage. b. Operator and remote battery level percentage. c. Solar charging current (mA). d. Rain, Temperature, Timer to close. 2. 9 independent zones with up to 9 operators per zone. 3. Automatic temperature control and Timer to close functions. 4. Optional multiple remotes within one system. 5. Communication via non-directional RF, no line-of-sight needed. 6. Remote base Stand-up design with wall mount option, using common AA batteries. 1 Solar Breeze Installation and User Manual IN THE BOX Operator with battery cover remote with (2) AA batteries wall mount solar panel with wiring pigtail stainless steel mounting bracket stainless steel bracket tabs stainless steel bolts and nuts, x4 miscellaneous box of AC trickle charger (AC adaptor) operator battery pack rain sensor with lead wire and roof-mounting bracket chain clip with release pin small flat head screw driver small allen (hex) screw driver FURTHER ITEMS REQUIRED (5) fasteners for mounting the operator (2) fasteners for mounting the chain clip (4) fasteners for mounting the solar panel and bracket if needed Choice of above fasteners depends on the window frame and other specifics of your job DO NOT INSTALL THE BATTERY UNTIL DIRECTED TO DO SO 2 Solar Breeze Installation and User Manual OPERATOR INSTALLATION To ensure that the operator battery pack is sufficiently charged before installation and testing, the trickle charger should be used to charge the battery pack prior to installation for 4-8 hours. Place the battery pack into the operator battery compartment, (to protect the soldering joint on the battery, turn it away from the connector socket on the circuit board, so battery wiring exerts minimum strain on the soldering). Connect the battery connector to the socket on circuit board, pressing firmly until the plug is locked into place. Ignore the flashing red light on the circuit board, which will go off in 2 minutes. Plug the AC trickle charger to a standard wall power outlet that matches input voltage rating on the charger. Insert the DC output connector into the operator DC input jacket to charge the battery. 3 Do not power up the remote or attempt to use it at this time, see more information in next section. ` Solar Breeze 1. Installation and User Manual Align the chain clip (top mounting bracket) to be stop switch. Make sure there is no interference parallel to the operator mounting bracket, and during this process. Close window fully by pressing directly above the operator such that the chain is the other button. Operator shuts off power perpendicular to the window glass while it is closed. automatically when window is fully closed. The 2 This will ensure proper operation and prevent tabs on the chain head should be at least 0.5 cm hardware interference. away from the operator housing at this point, to make sure that the chain head is not stopping the 2. First extend the chain about 1 cm or more from its window from completely closing and sealing. fully retracted position (where tabs on chain head touches the housing), by pressing the manual button on the operator, then position the operator so the chain head mates with the chain clip. This will ensure that the window/skylight is allowed to fully close and still have tension in the chain. We suggest leaving about 1 cm exposed residual chain when window is closed. 3. Attach the operator mounting bracket using minimum 3 fasteners to ensure sufficient support for the window load on the operator. 4. Mount the chain clip to the window/skylight using two fastener holes, choose appropriate fastener for your window frame. The chain clip must be oriented as shown. 5. Adjust the chain length using two manual buttons inside the operator and attach the chain to the chain clip using the release pin. Insert pin at an angle and rotate to secure 6. To check the installation, press and hold the manual button to fully open the window. Release the button to stop at any time. Window will stop automatically when chain is fully extended and hits the internal 4 Solar Breeze Installation and User Manual SOLAR PANEL AND RAIN SENSOR INSTALLATION 1. Install the solar panel and bracket on to the exterior of the building near the operator installation. 5. Install the rain sensor and its bracket on to the 2. Tilt and rotate the solar panel towards Sun, exterior of the building near the operator, where perpendicular to the sunlight around mid-day if sensor can receive direct rain drops unobstructed. possible, resulting in about 20 to 40 degrees of tilt Tilt the bracket to ensure the sensor surface is as in most places, to maximize solar charging current. level as possible, so rain water could stay to be The panel needs to be exposed to direct sunlight for detected. it to work. 6. Route and waterproof the pigtail wirings to the 3. Depending on installation locations, bracket may not interior of the building where the operator is be necessary in certain cases. Securing the solar installed. panel onto a roof or structure with silicone (adhesive) and chosen mechanical restraint can be adequate. Make sure there is sufficient direct sunshine on panel during the day. 4. Tighten all the fasteners to secure the solar panel orientation. WIRING SOLAR PANEL AND RAIN SENSOR TO THE OPERATOR 1. At this point, the solar panel and rain sensor wiring sensor wire leads into the wiring holes marked with should be routed to the interior with any access "RAIN", no polarities here. 7. hole(s) sealed and waterproofed. 2. Cut the wiring to the required length necessary. 3. Cut back the wiring jacket 6 to 8 cm to expose individual wires inside. 4. Strip back 3 cm insulation on individual wires, fold back exposed copper wire on itself and twist, creating a thicker wire lead. 5. Loosen the four set screws on top of terminal blocks with the flat screw driver provided. 6. Insert solar panel wire leads into the wiring holes on the side of the operator associated with two polarities, blue wire is positive, the brown wire is negative. They cannot be inter-changed. Insert rain . 5 Secure the wires by tightening set screws. Solar Breeze Installation and User Manual REMOTE SETUP 1. Open the remote battery cover and install the two AA batteries (provided). Remote is now in setup mode. 2. All the screen display segments will be visible for user to review for a few seconds. Now SET and a flashing “F” will be displayed. 3. Press UP or DOWN to choose either C (Celsius) or F (Fahrenheit). Make your selection within 30 seconds or the remote will default to Fahrenheit and move to next step. 4. Press ENTER to save your selection. A flashing “M” now appears on the screen. 5. Press UP or DOWN to choose either M (main) or S (secondary). Select M for main. Note: Secondary is only used when using additional remotes are introduced into the system. Refer to 'Multiple Remotes' for more information. 6. Press ENTER to save your selection. ZONE ALL and the temperature should now be displayed. This is referred to as your “home screen”. This completes remote setup. 6 Solar Breeze Installation and User Manual PAIRING OPERATOR TO THE REMOTE Before an operator can respond to commands from the remote (not to any other RF devices), it needs to be registered with that remote. This process is called pairing. One may have multiple windows and operators installed in a large building, and wishes to have some of them opened and closed simultaneously. Solar Breeze provides an easy solution by grouping them into one ZONE. Windows within the same zone are further identified as different units. Using this system, each window (operator) needs to be assigned a zone # and a unit # within that zone. There are 2 digits that can be displayed under ZONE on the LCD, separated by a "-", for example, 5-1, where 5 means Zone 5 and 1 means window #1 within Zone 5. Solar Breeze remote supports up to 9 zones, and up to 9 windows within each zone. Before pairing a window to the remote, you need to decide a Zone and Unit # for that window, which will be used later to operate it. For example, if you have only one operator installed, we recommend you call it 1-1. You can practice this on the remote as follows: The Remote 1. Press any key to wake up the remote, if the display has powered off. Remote will automatically go into power-saving sleep mode if left alone for a few minutes (but internal electronics will wake up regularly to monitor temperature changes). This step will not be mentioned in subsequent instructions. 2. Press and hold the MODE for a few seconds till SET lits steady and PAIR flashes, press ENTER and 1 flashes under ZONE. 3. Press ZONE to choose a desired zone (cycles 1 thru 9), say 5. 4. Press ENTER to affirm this selection, and Unit number 1 behind 5 flashes. 5. Press UP or DOWN to choose the unit number (cycles 1 thru 9) within the zone. Unit numbers already in use will not be displayed, say you select 1. which means you are assigning the targeted window 5-1. 6. Press ENTER to affirm your selection, and the remote will attempt to pair the window 5-1 to the remote. 7. The FAIL will display on the LCD, since this is a practice, no targeted window is ready to be paired. In real pairing, one can attempt again by pressing ENTER until SUCC appears on LCD. 8. To exit, press MODE a few times until display returns to the home screen, - OR - it automatically default back to home after 30 seconds. You are now ready to pair the newly installed operator once practiced above a few times, and have come up with a unique # say 1-1 to be assigned to it 7 Solar Breeze Installation and User Manual The Operator Starting this process on the operator first before pairing. 1. Remove the battery cover from the operator. If the solar panel is connected to the operator and there is Sun light on it, the panel must be covered or its wiring to the operator be disconnected, to ensure no electric power to the operator before reconnecting the battery pack. 2. Disconnect the battery connector by pressing down on the tab on one side before pulling it up, then re-connect it to the circuit board, pressing firmly until the plug is locked into place. 3. The red light on the circuit board will continually blink while it is in the pairing mode for 2 minutes, which gives you plenty of time to complete the steps below. PAIRING 1. Press and hold the MODE down on Remote for a few seconds till PAIR SET is lit. 2. Following above steps to select 1-1 if only one operator is installed, then press enter. You shall see SUCC appears on LCD indicating pairing succeeds. 3. In the meantime, the operator automatically runs a full open operation (20 cm till it hits the internal stop switch), and then closes, to check the system and save the vital data for this particular window. This will take approximately 2 minutes to complete. 8 Solar Breeze Installation and User Manual BASIC OPERATION Once operator is successfully paired to the remote, the system is ready to be programmed and used. Opening and Closing a Window 1. Press ZONE to choose the zone # for that particular window(s), or ALL to operate all zones (windows). 2. Press OPEN or CLOSE to open or close the window/skylight. 3. Press either OPEN or CLOSE button during operation to stop the operator at any time, otherwise the window opens to the max-open set for that zone, see next sections. How to turn on automatic Temperature Control TC and Timer to close P1 functions 1. Press ZONE to choose the Zone # for that particular window(s), or ALL to operate all zones (windows). 2. If TC is enabled (set to non-NULL), Press and hold AUTO key for a few seconds to turn it on (TC lits up). 3. Long press AUTO key again will turn on P1 (if it's enabled), next press will turn both off. So each long press of AUTO key will cycle through TC, P1, or OFF. Remote LCD will also display AUTO to indicate when the operator is under either TC or P1 control, when AUTO disappears, it means both TC and P1 are off. TC and P1 cannot be turned on simultaneously for the same ZONE, so at any given time a window can only be automatically controlled by one condition, but different Zones can be under different TC or P1 control. If TC is disabled, long press AUTO key will only turn P1 on / off. If P1 is disabled, long press AUTO key will only turn TC on / off. If TC and P1 are both disabled, long press AUTO key will have no response. See next sections on how to set up TC and P1 for automatic controls ADJUSTING MAX-OPEN LIMIT The travel distance that the operator(s) will open a window (MAX-OPEN) can be reduced for all operators within a zone; and different zone can have different MAX-OPEN value. This may be beneficial to prevent rain or excess wind from entering when window(s) is opened. The factory MAX-OPEN limit is set to open up to 80% of full open position (20 cm) which is adjustable as follows. 1. Press MODE and 1 flashes under ZONE. 2. Press ZONE as necessary to choose the appropriate zone to be adjusted. 3. Press ENTER and SET lits. MAX-OPEN will be displayed and flashing. 4. Press ENTER and MAX-OPEN turns steady. 5. Press UP / DOWN to set the max open percentage, in increments of 10%. 6. Press ENTER to save your setting, and TC is now flashing. 7. Press MODE to return to the home screen or to continue on to set the Temperature. Control (TC), see next section. 9 Solar Breeze Installation and User Manual SETTING TEMPERATURE CONTROL (TC) Automated temperature control (TC) can be set individually for each zone, including a new percentage of open different from max-open limit when window is under its control. When TC is set and is turned on in the remote, the temperature control will open all windows within the zone to the percentage set, when the temperature reaches set value for that Zone. It will also automatically close the window(s) when the temperature drops more than 2 degrees (C) or 5 degrees (F) below the set value. This automatic function is based on the temperature at the remote’s location and new temperature reading must be maintained for approximately 5 minutes before operator will respond. How to set TC 1. Press MODE, 1 flashing under ZONE on display (or first zone # paired into remote). 2. Press ZONE as necessary to choose the desired zone to setup. 3. Press ENTER, SET lits, MAX-OPEN will be displayed and flashing. 4. Press UP or DOWN until TC is displayed and flashing, press ENTER. 5. Press UP or DOWN to set the desired temperature, or NULL to turn the function off, for this zone. 6. Press ENTER, 80% flashes (or last value set). This is to set the percentage when the TC function opens the window. 7. Press UP or DOWN to set this percentage, in increments of 10%, range 10% to 100%. 8. Press ENTER to save your setting, P1 is now displayed. 9. Press MODE a few times to return to the home screen or to continue on to setting other functions Note: Using a smaller percentage of open while under temperature controlled might be beneficial to ensure a skylight does not open fully on a warm, yet rainy day. As a cautionary practice, make sure TC is turned off when house is left unattended for an extended period of time. 10 Solar Breeze Installation and User Manual SETTING TIMER TO CLOSE (P1) Timer to close the window (P1) can be set individually for each zone. The Timer can be set to: 10, 20, 30, 40, 50 minutes; 1, 1.5, 2.0, ... 23.5, 24 hours; NULL ( to disable the Timer function for this Zone). When P1 is set (other than Null) and is turned on in the remote, the timer will start count down after last pressing of either Open or Close button, the remote will automatically close all windows within the zone when the timer (display) reaches zero minute. How to set P1 1. Press MODE, 1 flashing under ZONE on display (or first zone # paired into remote). 2. Press ZONE as necessary to choose the desired zone to setup. 3. Press ENTER, MAX-OPEN will be displayed and flashing. 4. Press UP or DOWN until P1 is displayed and flashing, press ENTER. 5. Press UP or DOWN to set the desired count-down timer setting: 0:10 to 0:50 minutes; 1:00 to 24:00 Hours, or NULL to turn the function off, for this zone. 6. Press ENTER to save your setting, ST is now displayed. 7. Press MODE a few times to return to the home screen or to continue on to setting other functions 11 Solar Breeze Installation and User Manual ENABLE / DISABLE RAIN SENSOR CONTROL If rain sensor control is enabled in the remote, operator will automatically close the window once rain is detected, if the user opens the window during the rain, operator will close the window automatically again. The window will automatically re-open to its original position (before the rain) if rain stops and sensor is dry. To avoid false actions, the operator takes multiple readings before determining if rain sensor is wet or dry, thus it takes up to a minute for the operator to react to the first rain drop. The default status for rain sensor control is enabled after each pairing operation for the operator; one can enable or disable it in the remote following steps below. Dirt, corrosion by UV light, snow, ice etc. can permanently damage the rain sensor or cause it to misfunction, morning condensation may also produce false rain signal; when these happen, one may not be able to open the window properly, so it's desirable to disable the rain sensor control for that window via remote, or simply disconnect the sensor wiring to the operator. How to enable or disable rain sensor control for a particular window unit 1. Press MODE, 1 flashing under ZONE on display (or first zone # paired into remote). 2. Press ZONE as necessary to choose the desired zone to setup. 3. Press ENTER, MAX-OPEN will be displayed and flashing. 4. Press UP or DOWN until Rain sensor icon is displayed and flashing, press ENTER. 5. Press UP or DOWN to choose the appropriate window UNIT 1 through 9 which are flashing: 6. Press ENTER to confirm your selection. 7. Press UP or DOWN to choose between ON and OFF while they are flashing, ON means to enable rain sensor control while OFF means to disable it. 8. Press ENTER to save your setting. 9. LCD displays steady ON or OFF for one second, then SUCC for 2 seconds, indicating success. Press MODE a few times to return to the home screen. 10. If setting not successful, LCD displays FAIL for 1 second, then returns to the same screen in #7 above, with flashing ON or OFF, giving user another chance to complete above process. Regardless if rain sensor control is enabled or not, the rain icon on remote display will appear if rain is detected, this icon will disappear upon next remote wake up if rain stops and sensor is dry. The remote display updates rain status only upon each wake up to save battery. If a window is opened by the user, the status indication light in operator lits steady green, if the window is closed by rain sensor control, the green light blinks. The rain sensor should be cleaned periodically, free from any blockage, stay as level as possible, also see previous section on Installation. 12 Solar Breeze Installation and User Manual BATTERY LEVEL AND SOLAR CHARGING CURRENT Both operator and remote battery levels can easily be checked on the remote. Solar charging current (in mA) can also be displayed in real time. They are displayed in ST (status) mode. Determine the window (operator) #, say 1-1, whose status is to be checked, then follow steps below: 1. Press MODE. 2. Press ZONE to select the zone #. 3. Press ENTER to affirm, MAX-OPEN will be flashing. 4. Press UP or DOWN a few times until ST is flashing. 5. Press ENTER, unit # will be flashing 6. Press UP or DOWN to choose the unit number within the zone. 7. Press ENTER to affirm. 8. The first status to be displayed is the operator battery level in percentage. 9. Press UP or DOWN to cycle thru remote battery level and solar charging current. 10. Press MODE to return to home screen. Battery Alerts Solar Charging Rate icon will be displayed when the operator battery is low. When the operator The battery is critically low, the operator will be allowed to close; however will not be able to open until the battery is recharged to a sufficient level. icon will be displayed when the remote batteries are in need of replacement. The Note: The solar charging current ranges from 0 to approximately 150 mA, depending on several variables i.e. the panel’s angle to the Sun, sky conditions, clouds, possible Operator Battery Status shadows on the panel (avoid), and maintenance of the panel itself (keep clean). The solar panel needs to face the Sun directly in order to produce meaningful charging current. Charging current also depends on the battery level. For example, the panel could be outputting 100 mA on a 50% charged battery, but it may only output 70 mA when the battery is 95% charged. Remote Battery Status 13 Solar Breeze Installation and User Manual MOVE WINDOW TO NEW ZONE (RE-ZONE) For large buildings with more than one operator installed, if more than one zone has been setup, one may want to move a window from one zone to another zone later on. For example, re-assign window 5-1 to be 1-3, assuming 1-3 is available (not taken up already). Solar Breeze makes this change possible without the need of going thru the pairing process again. The following will illustrate the process for above example. First select current # for the window, then select the zone and unit # where you want it to be re-assigned to. 1. Press and hold MODE for a few seconds, release when PAIR SET is displayed. 2. Press MODE, RE-ZONE is displayed, Press ENTER to affirm. 3. Press ZONE till 1 is displayed. 4. Press ENTER and UP or DOWN to select 1-1. 5. Press ENTER, SUCC will be displayed for 3 seconds, then PAIR is lits, and new ZONE is flashing. Press ENTER to retry if FAIL is displayed instead. 6. Press ZONE to choose the new zone 5. 7. Press ENTER and UP or DOWN to choose 5-1. 8. Press ENTER to start the re-assigning process. 9. SUCC is displayed again and the operator will run a full open and close cycle as during a pairing process 10. Screen returns to home display MULTIPLE REMOTES There are two ways to use 2 (or more) remotes inside a house or building One is to configure all remotes as main (M), (see section on Remote Setup), and pair different windows to each of them. If setup this way, each remote and its associated windows (paired to this remote) will act independently of each other, as if they are non-interacting systems. Make sure that the same window is not paired to more than one remote (set up as M); if subjected to pairing to multiple remotes, the operator will only respond to the latest remote that it has been paired to Another way is to have only one remote act as main (M), while the other remote is setup as secondary (S). For example, the main remote can be kept downstairs while the secondary remote is kept upstairs primarily to operate upstairs windows, or to extend the RF coverage to some far corners of the house. When configured this way, all windows only need to be paired to the main remote, which shall also be used to RE-ZONE, or add additional operators. This setting information can then be copied to the secondary remote (set up as S already). Thus PAIR and RE-ZONE functions are disabled on secondary remote. Only one Secondary remote can be introduced and set up to work with the main remote in this configuration Make sure that the main remote has been configured as outlined in previous sections, and all operators have been successfully paired to it. . 14 Solar Breeze Installation and User Manual Follow steps below to copy data from the main to the secondary remote. 1. Power up the secondary remote and select S, (see section for Remote Setup), press ENTER to save. 2. Press and hold MODE for a few seconds, release when SET is displayed and S in the upper-right corner is flashing. 3. Press ENTER. The secondary remote will now be waiting to receive the transmission from the main remote. It will wait for 30 seconds. 4. Take the main remote, press and hold MODE for a few seconds, release when PAIR SET is displayed. 5. Press MODE a few times, until M in the upper-right corner is flashing. 6. Press ENTER to begin transmitting the settings to the secondary remote. 7. SUCC will be displayed on a successful transfer of settings. If FAIL is displayed instead, be sure that the secondary remote is still configured to receive the transmission. Press ENTER on the main remote to retry. Note: During above data transfer process, initial MAX-OPEN setting for each zone is also transferred to the S remote, however, both M and S remotes can subsequently have independently set MAX-OPEN values as well as TC control values. This control data is stored in the remote, not in the operator, so the same window (operator) will open to a different percentage depending on the setting inside the particular remote used to open it. If both remotes have AUTO enabled, and TC has been set to non NULL value for the same zone, then windows in this zone will respond to open / close commands from both remotes depending on their temperature settings. For this reason and other considerations, to avoid confusion, it's recommended that any given zone shall be controlled primarily by one remote. If secondary remote is accidentally selected as M during a later operation, say after battery change, no harm will be done to the system, simply re-set it as S. If the main remote is lost / broken, and one buys a new remote, simply re-set the old secondary remote as the main remote, then copy its data to the new remote which shall now be set as S. 15 Solar Breeze Installation and User Manual MAINTENANCE AND TROUBLESHOOTING TIPS 1. The required maintenance for your solar charged window opener is minimal, to insure years of trouble-free operation, please do following: Clean solar panel and rain sensor surface with clear water periodically, or as needed, remove dirt, tree leaves etc from building up. Clean and lubricate the drive chain with grease, every 1-2 years. In coastal area the chain should be cleaned to remove salt residue, then apply grease, done every 3-6 months to prevent rust 2. Do not charge the operator battery with any other AC adaptor, use only the adaptor provided. Larger charging current from other adaptor for extended period may damage the battery 3. Use only the solar panel supplied to provide continuous safe charging to the operator, one panel per operator. Do not use any other larger panels, or connect multiple operators directly to one larger solar panel which could cause damage or fire to battery 4. Remote automatically goes into energy-saving sleep mode if left alone for a few minutes, pressing any button wakes it up. Press the button again for desired function 5. During most setup processes, remote will default back to the previous settings if no selection is made within 30 seconds, simply start the process again 6. Press Mode a few times to exit setup process without any change and return to the home screen 7. Temperature change must be maintained for 5 minutes at the remote location before the temperature control (TC) function will operate. For this reason, the remote shall be placed in an open area with desirable air flow from window. Do not place remote inside a drawer or enclosed area if TC is to be used 8. If an operator does not go to pairing mode, make sure it's not connected to the solar panel which may be providing it with continued power while operator battery is unplugged and plugged back again, see Section on Pairing Operation For more helpful tips please read our FAQ page at: http://www.solarbreezeinfo.com 16