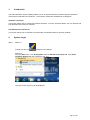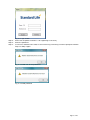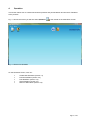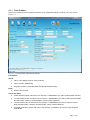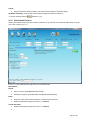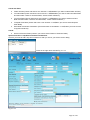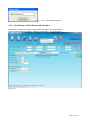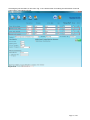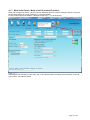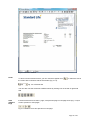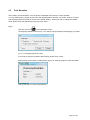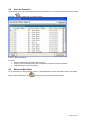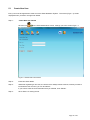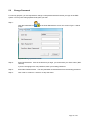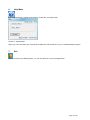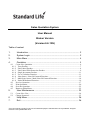
1
Sales Quotation System User Manual Broker Version (Version 6.6.13G) Table of content 1. Introduction ................................................................................... 2 2. System Login ................................................................................ 2 3. Main Menu .................................................................................... 4 4. Quotation ...................................................................................... 5 4.1 Create New Quotation .........................................................................................................6 4.1.1 Term Product ...................................................................................................................7 4.1.2 Unit Linked Product ........................................................................................................8 4.1.3 Unit Linked With Protection Product ..............................................................................9 4.1.4 Single Investment Product .............................................................................................11 4.1.5 Use of Calculate Function: ............................................................................................11 4.1.6 Joint Owner / Joint Life Insured Function: ....................................................................12 4.1.7 Multi Joint Owner / Multi Joint Life Insured Function: ................................................14 4.1.8 Partial Withdrawal Function: .........................................................................................16 4.2 Preview Quotation .............................................................................................................17 4.3 Print Quotation...................................................................................................................20 4.4 Save the Quotation .............................................................................................................22 4.5 Return to Main Menu.........................................................................................................22 User Maintenance ....................................................................... 23 5. 5.1 5.2 Create New User ................................................................................................................24 Change Password ...............................................................................................................25 6. Help Menu................................................................................... 26 7. Exit ............................................................................................. 26 This user manual is solely for the use of authorized people. Unauthorized use is prohibited. All rights reserved. Last updated Mar 2013. 1. Introduction The Sales Quotation System (SQS) enables user to create new business quotation and print illustration documents for Standard Life’s products. The functions of SQS are classified into 2 categories: Quotation (section 4) This section allows user to create new business quotation. From the quotation details, user can preview and print illustration document for customer. User Maintenance (section 5) This section allows user to maintain user information and default setting for printing quotation. 2. Step 1: System Login Method 1 Double click the icon (SQS) from the desktop. Method 2 From the Start menu, click All Programs and then Standard Life (Asia) Ltd. Click Sales Quotation System and then “SQS.exe” (Fig. 2.1). Fig. 2.1 Login Sales Quotation System from Start Menu The login screen (Fig. 2.2) will be displayed. Page 2 of 26 Step 2: Step 3: Step 4: Fig. 2.2 Login screen Enter User ID (Refer to section 5.1 for registering a new user). Enter the password. If User ID or Password is invalid, an error screen Fig.2.3 and Fig.2.4 will be prompted. Perform Step 2 or Step 3 again. Fig. 2.3 Invalid user ID and password Fig. 2.4 Invalid password Page 3 of 26 3. Main Menu After successful login, the Main Menu screen Fig.3.1 will be displayed. Title Bar Quotation User Maintenance Help Exit Fig.3.1 Main Menu screen System Bar It displays the system name that you are working on. Title It displays the section that you are working on. Menu Bar It consists of 2 menu items: Quotation (section 4), User Maintenance (section 5), Help and Exit. Within each menu item, there will be different sub-menu items. Page 4 of 26 4. Quotation This section allows user to create new business quotation and print illustration documents for Standard Life’s products. Fig. 4.1 shows the screen you will see when Quotation was clicked on the Main Menu screen. Fig. 4.1 Screen for Quotation On the Quotation Screen, user can: Create New Quotation (section 4.1) Preview Quotation (section 4.2) Print Quotation (section 4.3) Save Quotation (section 4.4) Return to Main Menu (section 4.5) Page 5 of 26 4.1 Create New Quotation To create quotation, click the new icon on the Quotation screen, it brings you to the screen. Fig.4.1.1. Fig.4.1.1 Creating New Quotation Screen Step 1: Enter Policy Owner, Life Insured and Policy Payer details. Uncheck the check box if Life Insured/Policy Payer differs from Policy Owner. Step 2: Enter the TR Name and TR Contact No. Step 3: Select product from the Product combo box, there are four types of product available: Term Product (Section 4.1.1) Unit Linked Product (Section 4.1.2) Unit Linked With Protection Product (section 4.1.3) Single Investment Product (section 4.1.4) ATTENTION: Whenever you enter new information, the figures in Quotation Summary will be removed until you click <<Preview>> icon again to recalculate the figures. Page 6 of 26 4.1.1 Term Product Select Term Product from the Product combo box (e.g. Perpetual Protector), it brings you to the screen Fig.4.1.1.1. Fig.4.1.1.1 Term Product (Perpetual Protector) Plan Details: Select: Policy Term (Maybe fixed for some products) Policy Currency (HKD/USD) Payment Frequency (Annually/Semi-annually/Quarterly/Monthly) Enter: Desired Sum Insured Check and Enter: *Rider-at-Ease (Check and enter a sum insured >= HK$200000 if you want to select Rider-at-Ease) *Accident Rider (Check and enter a sum insured >= HK$200000 if you want to select Accident Rider and then select a class for Accident Rider, “Class 1/Class 2/Class 3”) *AcciCare Rider (Check and enter a sum insured >= HK$200000 if you want to select AcciCare Rider and then select a class for Accident Rider, “Class 1/Class 2/Class 3”) *Hospital Cash Rider (Check and enter a sum insured >= HK$300 if you want to select Hospital Cash Rider) Page 7 of 26 Check: Waiver of Premium Rider (Check if you want to select Waiver of Premium Rider) Quotation Summary: It shows the Total Amount Payable per payment frequency. * Can use calculate function (Section 4.1.6) 4.1.2 Unit Linked Product Select Unit Linked Product from the Product combo box (e.g. Harvest 101 Investment Plan 2009), it brings you to the screen Fig.4.1.2.1. Fig.4.1.2.1 Unit Linked Product (Harvest 101 Investment Plan) Plan Details: Select: Policy Currency (EUR/GBP/HKD/JPY/USD) Payment Frequency (Annually/Semi-annually/Quarterly/Monthly) Enter: Premium Term (Term must be between 5 and 32 years inclusive) Desired Contribution (Amount must be >= HK$8640) Check and Enter: Desired Contribution (Amount must be >= HK$8640) Page 8 of 26 Check: Include Customer Incentive (Check if you want to select Include Customer Incentive) 4.1.3 Unit Linked With Protection Product Select Unit Linked With Protection Product from the Product combo box (e.g. LifeMaster), it brings you to the screen Fig.4.1.3.1. Fig.4.1.3.1 Unit Linked With Protection Product (LifeMaster) Plan Details: Select: Policy Currency (HKD/USD) Payment Frequency (Annually/Semi-annually/Quarterly/Monthly) Death Benefit Option (Increasing/Level) Enter: Desired Contribution (should be >= HK$4200 for LifeMaster) Desired Sum Insured (should be >= 2 times of annual contribution) Page 9 of 26 Check and Enter: *Rider-at-Ease (Check and enter a sum insured >= HK$200000 if you want to select Rider-at-Ease) *Accident Rider (Check and enter a sum insured >= HK$200000 if you want to select Accident Rider and then select a class for Accident Rider, “Class 1/Class 2/Class 3”) *AcciCare Rider (Check and enter a sum insured >= HK$200000 if you want to select AcciCare Rider and then select a class for Accident Rider, “Class 1/Class 2/Class 3”) *Hospital Cash Rider (Check and enter a sum insured >= HK$300 if you want to select Hospital Cash Rider) Scheduled Investment Contribution (Check and enter a contribution >= HK$1200 if you want to have a regular investment) Check: Waiver of Premium Rider (Check if you want to select Waiver of Premium Rider) Special Function: Lump Sum Investment Contribution Check if you want to add Lump Sum Investment. After you check, you will see a mini dialog shows in the right down side like Fig 4.1.3.2. Fig 4.1.3.2 Page 10 of 26 In the Single Top-up dialog, you can enter the number of future year and sum of investment in Top-up that you want to make Lump Sum Investment. Quotation Summary: It shows the Total Amount Payable per payment frequency. * Can use calculate function (Section 4.1.5) 4.1.4 Single Investment Product Select Single Investment Product from the Product combo box (e.g. Wealth Amplifer Investment Plan), it brings you to the screen Fig.4.1.4.1. Fig.4.1.4.1 Single Investment Product (Wealth Amplifer Investment Plan) Plan Details: Select: Policy Currency (HKD only in Wealth Amplifer Investment Plan) Payment Frequency (Single only in Wealth Amplifer Investment Plan) Enter: *Desired Contribution (Enter Contribution should be >= HK$80000) Quotation Summary: It shows the Total Amount Payable per payment frequency. 4.1.5 Use of Calculate Function: User can click icon to calculate sum insured by entering a premium. After clicked, a window Fig 4.1.5.1 will display. Then user can enter their target premium and the result will be shown in sum insured Textbox. Page 11 of 26 Fig. 4.1.5.1 Calculate Sum Insured 4.1.6 Joint Owner / Joint Life Insured Function: SQS allows creating a joint owner / joint life insured quotation for some products. For the product with these features, a different screen Fig 4.1.6.1 will be shown: Fig 4.1.6.1 Page 12 of 26 Checking the joint checkbox, a new row in Fig 4.1.6.2 will be shown for entering the information of second policy owner / second life insured: Fig 4.1.6.2 Page 13 of 26 4.1.7 Multi Joint Owner / Multi Joint Life Insured Function: Other than a single joint owner / joint life insured, SQS also allows to create a multi joint owners / multi joint life insured quotation for certain products (e. g Harvest Wealth). For the product with these features, a different screen Fig 4.1.7.1 will be shown: Fig 4.1.7.1 Checking the joint checkbox, a new row in Fig 4.1.6.2 will be shown for entering the information of second policy owner / second life insured: Page 14 of 26 To add additional policy owner, click on the “Add Owners” button (in Red). A new input form in Fig 4.1.7.2 will be shown for entering additional policy owner information. Click “Add” / “Remove” button (in orange) to insert new policy owner information or remove existing policy owner information respectively. Click “OK” to close and save the information or Click “Cancel” to close the form without saving. Fig 4.1.7.2 Page 15 of 26 4.1.8 Partial Withdrawal Function: SQS allows creating special quotation, partial withdrawal, for some products. For the product with this feature, a button will be shown in the right hand side. Clicking this button, a panel will be shown in Fig 4.1.8.1 Fig 4.1.8.1 Checking the withdrawal button, a box will be shown for entering the withdrawal year and amount: Entering the required withdrawal, close the panel by clicking the button . Page 16 of 26 4.2 Preview Quotation After creating a new Quotation, this function allows user to preview the illustration document for current quotation. Preview Click the preview icon on the Quotation screen. The language selection screen (Fig. 4.2.1) will be popup requesting the language you prefer. Fig. 4.2.1 Language selection screen Select <English>, <Traditional Chinese> and click <Preview>. A dialog will be pop up to show the progress of the calculation. Fig. 4.2.2 Progress Dialog After the calculation finished, a window (Fig. 4.2.3) will be popup to display the quotation using selected language. Page 17 of 26 Fig. 4.2.3 Preview window Zoom To zoom in and out the document, you can click the magnifier icon the combo box in left down side of the window (Fig. 4.2.4). or select the size in Fig. 4.2.4 Preview size You can also view the document in different sizes by clicking icon on the bar of right hand side View different Page If the document has more than 1 page, click previous page or next page arrow (Fig. 4.2.5) to scroll to previous or next pages. Fig. 4.2.5 Buttons to scroll to previous or next page Page 18 of 26 Print File Save Close Click to print the quotation directly. Click to save the quotation. User can save it as pdf format only. Click to quit the preview window. Page 19 of 26 4.3 Print Quotation After creating a new Quotation, user can print the illustration document for current quotation. You may select printer, number of print copy and language before printing. The printer, number of copies and language will be the same as current user's default setting. Should you wish to change the default value, please refer User Maintenance (section 5) for detail. Step 1: Click the Print icon on the Quotation screen. The language selection screen (Fig. 4.3.1) will be popup requesting the language you prefer. Fig. 4.3.1 Language selection screen If you want to save the quotation after printing, please check “Save”. After pressing “Print” button, a dialog will be pop up to show the progress of the calculation. Then screen Fig.4.3.1 will be prompted up. Page 20 of 26 Fig.4.3.1 Print screen Step 2: For changing printer, select printers in the combo box. Step 3: Enter the desired number of copies in the <Number of Copies> box. Step 4: Click <OK> for printing or <Cancel> to stop the action. Page 21 of 26 4.4 Save the Quotation SQS will save all the documents that have been printed before. If you want to search the document back, click icon , a window Fig.4.4.1 will be shown. Fig 4.4.1 Search Quotation User can: Search Quotation by keyword of Policy Owner. Choose a row of data and then click <Load Data> to load the previous quotation. Stop searching by close the window 4.5 Return to Main Menu If you are working on the Quotation screen or User Maintenance screen and want to return to the Main Menu, click the Main Menu icon , it brings you back to the Main Menu screen. Page 22 of 26 5. User Maintenance This section allows user to maintain user information and default setting for printing quotation. Fig. 5.1 shows the screen you will see when User Maintenance was clicked on the Main Menu screen. Fig. 5.1 Screen for User Maintenance On the User Maintenance screen, user can: Create New User (section 5.1) Search & Update User Details (section 5.1) Change Password (section 5.2) Page 23 of 26 5.1 Create New User Every user must be registered in order to use the Sales Quotation System. The screen (Fig 5.1.1) will be displayed when you add or change user details. Step 1: Create New User Details Click the icon on the User Maintenance screen, it brings you to the screen Fig.5.1.1. Fig.5.1.1 Create new user screen Step 2: Enter New User details. Step 3: Whenever registering a new user, the active role is always ticked. However, should you wish to inactivate the user account, you can de-select it. If you want to clear the user information that you entered, click <Reset>. Step 4: Click <Save> for saving record. Page 24 of 26 5.2 Change Password For security purpose, you are requested to change a new password at the first time you login in the SQS system. You may also change password anytime you wish. Step 1: Click the Password icon popup. on the User Maintenance screen; the screen Fig.5.2.1 will be Fig.5.2.1 Change password screen Step 2: Enter Old Password. If this is the first time you login, you should enter your User name (*NOT User ID). If you are changing into a new password, enter your existing password. Step 3: Enter New Password twice. The new password must be different from the existing password. Step 4: Click <OK> to confirm or <Cancel> to stop the action. Page 25 of 26 6. Help Menu Help menu display the following information: Version No. and Expiry Date. Section 1: System Menu When you click User Menu link, it will open the SQS user menu PDF file for you in Acrobat Reader program. 7. Exit When you finish using SQS program, you can click Exit icon to close the application. Page 26 of 26