1
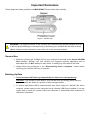
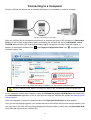
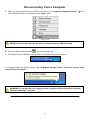
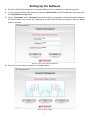
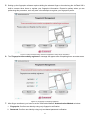
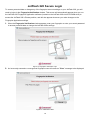
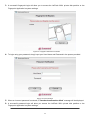
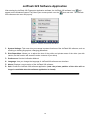
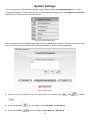
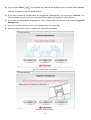
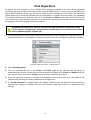
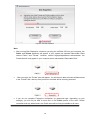
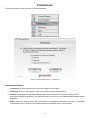
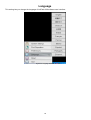
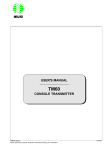
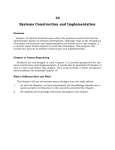
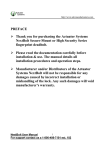
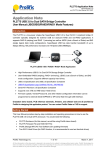
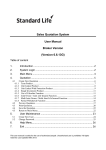
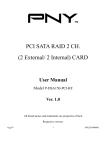
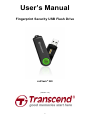
User’s Manual Fingerprint Security USB Flash Drive JetFlash® 220 (Version: 4.0) 1 Table of Contents Introduction................................................................................ 3 Features.................................................................................................................3 System Requirements............................................................................................3 General Use...........................................................................................................4 Backing Up Data ....................................................................................................4 Connecting to a Computer........................................................ 5 Disconnecting from a Computer .............................................. 6 Setting Up the Software ............................................................ 7 JetFlash 220 Secure Login ..................................................... 10 JetFlash 220 Software Application......................................... 12 System Settings....................................................................... 13 Disk Repartition ....................................................................... 15 Preferences .............................................................................. 17 Language.................................................................................. 18 Troubleshooting ...................................................................... 19 Specifications .......................................................................... 20 Two-year Limited Warranty ..................................................... 21 2 Introduction Congratulations on purchasing Transcend’s JetFlash® 220. The JetFlash 220 is a unique ultra-portable USB 2.0 Flash Drive that plugs directly into your desktop, or notebook computer and incorporates cutting-edge Fingerprint Recognition Technology. Now you can securely store confidential files, folders, documents, photos, music and e-work with the utmost confidence. This Software User’s Manual will help you get the most from your new device, please read it in detail before using the JetFlash 220. Features • Fully compatible with High-speed USB 2.0 • Advanced fingerprint recognition technology • Easy Plug and Play operation • Repartition tool for adjusting the size of the Private and Public portions of the drive • USB powered. No external power or battery needed • LED data transfer / fingerprint authorization indicator • Driverless installation System Requirements 1. A desktop or notebook computer with a working USB port. 2. The JetFlash 220 can only be used in a computer running the following Operating Systems (OS): • Windows XP (32bit/64bit) • Windows Vista (32bit/64bit) • Windows 7 (32bit/64bit) 3 Important Reminders These usage and safety guidelines are IMPORTANT! Please follow them carefully. Figure 1. JetFlash 220 WARNING! The fingerprint sensor on the JetFlash 220 is delicate and should be handled with care to prevent physical damage. Avoid squeezing or scratching your JetFlash 220 with hard or sharp objects. Always close the protective cover when not in use or during transport. General Use • Each time you plug the JetFlash 220 into your computer it will install a new Virtual CD-ROM Drive labeled “JetFlash 220” that contains the fingerprint security application and its associated files. Do NOT attempt to edit, delete, or modify any of the data on this disk. • Always follow the procedures in the “Disconnecting from a Computer” section before removing your JetFlash 220 from a computer. Backing Up Data • Transcend does NOT take any responsibility for data loss or damage during operation. If you decide to store data on your JetFlash 220, we strongly advise that you regularly backup the data to a computer or other storage medium. • To ensure High-Speed USB 2.0 data transfer rates when using your JetFlash 220 with a computer, please make sure the computer has all relevant USB drivers installed. If you are unsure how to check this, please consult the computer or motherboard User’s Manual for USB driver information. 4 Connecting to a Computer Plug the JetFlash 220 directly into an available USB port on your desktop or notebook computer. Figure 2. Connecting to a computer When the JetFlash 220 is successfully connected to a computer the drive’s LED will light up. A Removable Disk drive with a newly assigned drive letter representing the JetFlash 220 and a “JetFlash220” virtual CD-ROM drive containing the fingerprint software program will appear in the My Computer window. In and Fingerprint Application Suite icon will appear on the addition, a Removable Hardware icon Windows System Tray. Figure 3. F, G& H: are example drive letters, the letters in your "My Computer" window may differ Do NOT attempt to edit, delete, or modify any data on the JetFlash220 virtual CD-ROM drive In your computer browser (My Computer), open the JetFlash 220 virtual CD-ROM drive and double-click the JetFlash220.exe application. If this is your first time using the JetFlash 220, please see Setting Up the Software below. Scan your fingerprint or enter your password when the Fingerprint Verification window appears. Once you are successfully logged in, you will have access to the JetFlash 220’s private storage capacity, and can copy data to the flash drive by simply dragging and dropping files or folders onto the Removable Disk drive letter that represents the JetFlash 220. 5 Disconnecting from a Computer 1. When you are finished using the JetFlash 220, click on the “Fingerprint Application Suite” icon on the Windows System Tray and select the “Quit” option. Figure 4. Quit NEVER disconnect the JetFlash 220 from a Computer when its LED is flashing. 2. Select the Removable Hardware icon on the system tray. 3. The Safely Remove Hardware pop-up window will appear. Select it to continue. Figure 5. Safely Remove Hardware A message window will appear stating, “The ‘USB Mass Storage Device’ device can now be safely removed from the system.” Figure 6. Safe to Remove Hardware WARNING! To prevent data loss, always use this procedure before removing the JetFlash 220 from a Windows® computer. 6 Setting Up the Software 1. Plug the JetFlash 220 directly into an available USB port on your desktop or notebook computer. 2. In your computer browser (My Computer), open the JetFlash 220 virtual CD-ROM drive and double-click the JetFlash220.exe application. 3. Input a ”User Name” and a ”Password” and then confirm your password. User Names and Passwords are case sensitive and can be any combination of letters and numbers (no spaces). Click the ”Next” button to continue. Figure 7. Enter a user name and password 4. Use your mouse to select one of the 10 available fingers. Figure 8. Select a finger 7 5. Setting up the fingerprint software requires sliding the selected finger or thumb along the JetFlash 220’s built-in scanner three times to register your fingerprint information. Please be patient when you are performing this procedure, as it may take a few attempts to register your fingerprint profile. Figure 9. Three successful scans must be completed to confirm finger enrollment 6. The”Fingerprint successfully registered” message will appear after completing three accurate scans. Figure 10. Fingerprint successfully registered. 7. After finger enrollment, you have to set the Verification Method. Authentication Method as below: 1. Fingerprint: Confirm user identity using only fingerprint verification. 2. Password: Confirm user identity using only text-based password verification. 8 3. Both: Both a fingerprint scan and password input will be required to verify user identity. After successful fingerprint verification, you will also need to input the correct password associated with that fingerprint. 4. Either: With this setting, users will be prompted for fingerprint verification first, then if fingerprint authentication fails five times, text-based password verification will be used instead. Figure 11. Set the Verification Method. 8. Finally, please customize the size of the Private and Public areas on the JetFlash 220 by sliding the adjustment bar to the left or right. After you have divided the JetFlash 220’s Private and Public areas into your desired sizes, click on the “Format” button to begin repartitioning the drive. Figure 12. Set Disk repartition. 9 JetFlash 220 Secure Login To access protected data or change any of the fingerprint account settings on your JetFlash 220, you will need to login via the Fingerprint Verification window. This screen will automatically appear when you run the JetFlash 220 Fingerprint Application software (located on the JetFlash 220 virtual CD-ROM drive) to access the JetFlash 220’s Private partition, and will also appear whenever you make changes to the Fingerprint Application settings. 1. When the Fingerprint Verification window appears, scan your fingerprint or enter your secret password to access protected data or change the JetFlash 220’s settings. Figure 13. Fingerprint Verification Login 2. An incorrectly scanned or unrecognized fingerprint scan will cause an ”Error” message to be displayed. Figure 14. Verification Failed 10 3. A successful fingerprint login will allow you to access the JetFlash 220’s private disk partition or the Fingerprint Application’s system settings. Figure 15. Fingerprint verification successful 4. To login using your password, simply input your User Name and Password in the spaces provided. Figure 16. Input Password 5. When an incorrect password is entered, a ”Password confirmation failed” message will be displayed. 6. A successful password login will allow you access the JetFlash 220’s private disk partition or the Fingerprint Application’s system settings. 11 JetFlash 220 Software Application After starting the JetFlash 220 Fingerprint Application software, the JetFlash 220 software icon appear on the Windows System Tray. Move your mouse pointer over the will icon and click. The JetFlash 220 software main menu will pop-up. Figure 17. JetFlash 220 Software Main Menu 1. System Settings: This menu lets you manage important functions of the JetFlash 220 software, such as enrolling or deleting fingerprints, changing passwords. 2. Disk Repartition: Allows you to adjust the size of the public and private areas of the drive (use with caution, as this function will erase the entire contents of your drive) 3. Preferences: Set the Verification Method. 4. Language: Lets you change the language of JetFlash 220 software user interface. 5. About: Displays current version of the JetFlash 220 software. 6. Quit: Closes the JetFlash 220 software application (note: the private partition of the drive will no longer be available when the software application is closed) 12 System Settings You can change the JetFlash 220’s fingerprint login settings through the System Settings menu in the Fingerprint Application. System Settings can only be accessed by logging in to the Fingerprint Verification window with your fingerprint or secret password. Figure 18. System Settings menu System setting lets you manage the login data for 3 user data and the software’s 10 finger accounts of each user. In this menu you can Add new enrollments and Modify or Delete existing fingerprints. Figure 19. Management 1. Click on one of the enrolled users. You will be given the option to Add . 2. If you choose Add , you can add the new User Name and Password. 3. If you choose Edit , you can modify the User Name and Password. 13 , Edit or Delete 4. If you choose Delete , this enrolled user data will be deleted from the JetFlash 220’s database and can no longer be used for authentication. 5. If you want to delete all enrolled users and fingerprints simultaneously, you can choose ”Clear All.” You will be asked to confirm. Once you confirmed, all user data and fingerprints will be deleted. 6. If you want to management fingerprints of users, please select a user first and choose Fingerprint Management. 7. Use your mouse to select one of the 10 available fingers to add or edit. 8. Scan your finger three times to register your fingerprint information. Figure 20. Select a finger to the register Figure 21. Enroll fingerprints 14 Disk Repartition By default, the entire capacity of your JetFlash 220 is publicly accessible to all users without fingerprint verification, allowing the drive to be used just like a normal USB flash drive. To start using the JetFlash 220’s 256-bit AES fingerprint security, you will need to create a private storage are on the drive. The Repartition feature allows you to divide the JetFlash 220 into two partitions, one public and one private. The advantage of this feature is that you can customize the size of the Private and Public areas on the JetFlash 220 to suit your requirements. Any information saved to the private disk is securely protected and can only be accessed by logging in with the Fingerprint Verification software. WARNING! Partitioning the JetFlash 220 will erase any information on the disk (except for the registered fingerprints). Please backup any data that you have stored on the drive before repartitioning the JetFlash 220. 1. If you want to adjust the size of your public and private areas on your JetFlash 220, plug the drive into an available USB port on your desktop or notebook computer and run the Fingerprint Application software. Figure22. System Tray Menu – Disk Repartition 2. Select Disk Repartition. 3. You can customize the size of the Private and Public areas on the JetFlash 220 by sliding the adjustment bar to the left or right. After you have divided the JetFlash 220’s Private and Public areas into your desired sizes, click on the “Format” button to begin repartitioning the drive. 4. When the repartition process is complete, the Repartition Wizard will restore your user profile to the JetFlash 220 (Including all settings, passwords and fingerprints). 5. A “Format Complete” message window will appear confirming that the disk has been successfully repartitioned. Unplug the JetFlash 220 from your computer and plug it back in to activate the new settings. 15 Figure23. Set Disk Repartition Note: • After running Disk Repartition, whenever you plug the JetFlash 220 into your computer, the Public and Private partitions will appear in your system as separate Removable Disks named “Public” and “Private.” However, without fingerprint/password authentication, the Private disk will only appear in your computer as an inaccessible “Removable Disk.” • . After you login, the “Private” disk will appear. You will then be able to access all data stored in the “Private” disk, and any files you save to this disk will be securely protected. • If you do not complete Fingerprint Verification (or password login, depending on your settings), you will only be able to save files on the Public portion of the drive. Please remember that any data stored in the Public area will be freely accessible to all users. 16 Preferences This section allows users to set the Verification Method. Figure 24. System Settings menu – Preferences Authentication Method: 1. Fingerprint: Confirm user identity using only fingerprint verification. 2. Password: Confirm user identity using only text-based password verification. 3. Both: Both a fingerprint scan and password input will be required to verify user identity. After successful fingerprint verification, you will also need to input the correct password associated with that fingerprint. 4. Either: With this setting, users will be prompted for fingerprint verification first, then if fingerprint authentication fails five times, text-based password verification will be used instead. 17 Language This setting lets you change the language of JetFlash 220 software user interface. Figure 25. Language Window 18 Troubleshooting If a problem occurs with your JetFlash 220, please first read the information listed below before sending your JetFlash 220 in for repair. If you are unable to remedy the problem after following the suggestions below, please see the FAQ and Support pages at www.transcend-info.com or consult your dealer, service center, or local Transcend branch office. Operating System cannot detect the JetFlash 220 Check the following: 1. The JetFlash 220 can only be used with computers that are running Windows® 7/Vista/XP 2. Is your JetFlash 220 properly connected to the USB port? If not, unplug it and plug it in again. If it is properly connected, try using another available USB port. 3. Is the USB port enabled? If not, refer to the user’s manual of your computer (or motherboard) to enable it. Why is my Fingerprint not being recognized by the JetFlash 220 The built-in scanner for reading your fingerprint is very sensitive and requires a clear fingerprint scan in order to compare the scanned print with that of the saved fingerprint profile. Therefore, you need to slide your finger/thumb slowly and deliberately along the strip to register a good fingerprint image. 1. Has the finger/thumb you are scanning been setup as a recognized fingerprint? If not, open System Settings > Fingerprint Management to enroll it. 2. You might be sliding your finger/thumb too quickly across the sensor strip. Try sliding it slowly so that an accurate and even scan can be made. Why does a “Restart Computer” message window appear when I plug in my JetFlash 220? Sometimes the computer will mistakenly interpret the JetFlash 220 as a new piece of hardware that needs to be installed. You can disregard this message and click on the “Cancel” button to continue. Cannot find a file that was just copied to the JetFlash 220 You should always open a transferred file in its new location to ensure it has transferred successfully. Re-copy the file and refer to the “Disconnecting from a Computer” section to remove the JetFlash 220 after the copy process is completed. A File that was just deleted still appears Re-delete the file and refer to the “Disconnecting from a Computer” section to remove the JetFlash 220 after the delete process is completed. 19 Specifications • Dimensions (L x W x H): 70 mm × 20.5 mm × 11 mm • Weight: 13g • Certificates: CE, FCC, BSMI, KCC • Warranty: 2 Years 20 Two-year Limited Warranty This product is covered by a Two-year Limited Warranty. Should your product fail under normal use within two years from the original purchase date, Transcend will provide warranty service pursuant to the terms of the Transcend Warranty Policy. Proof of the original purchase date is required for warranty service. Transcend will inspect the product and in its sole discretion repair or replace it with a refurbished product or functional equivalent. Under special circumstances, Transcend may refund or credit the current value of the product at the time the warranty claim is made. The decision made by Transcend shall be final and binding upon you. Transcend may refuse to provide inspection, repair or replacement service for products that are out of warranty, and will charge fees if these services are provided for out-of-warranty products. Limitations Any software or digital content included with this product in disc, downloadable, or preloaded form, is not covered under this Warranty. This Warranty does not apply to any Transcend product failure caused by accident, abuse, mishandling or improper usage (including use contrary to the product description or instructions, outside the scope of the product’s intended use, or for tooling or testing purposes), alteration, abnormal mechanical or environmental conditions (including prolonged exposure to humidity), acts of nature, improper installation (including connection to incompatible equipment), or problems with electrical power (including undervoltage, overvoltage, or power supply instability). In addition, damage or alteration of warranty, quality or authenticity stickers, and/or product serial or electronic numbers, unauthorized repair or modification, or any physical damage to the product or evidence of opening or tampering with the product casing will also void this Warranty. This Warranty shall not apply to transferees of Transcend products and/or anyone who stands to profit from this Warranty without Transcend’s prior written authorization. This Warranty only applies to the product itself, and excludes integrated LCD panels, rechargeable batteries, and all product accessories (such as card adapters, cables, earphones, power adapters, and remote controls). Transcend Warranty Policy Please visit http://www.transcend-info.com/warranty to view the Transcend Warranty Policy. By using the product, you agree that you accept the terms of the Transcend Warranty Policy, which may be amended from time to time. Online registration To expedite warranty service, please access www.transcend-info.com/register to register your Transcend product within 30 days of the purchase date. Transcend Information, Inc. www.transcend-info.com *The Transcend logo is a registered trademark of Transcend Information, Inc. *All logos and marks are trademarks of their respective companies. 21