1
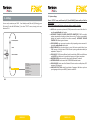
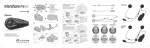
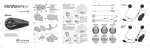
USER MANUAL
www.interphone.com
Export Dept. [email protected]
www.interphone.com
1 – Introduction
1.1Hello!
Thank you for choosing our product. InterphoneF3MC is a Bluetooth® helmet headset for
wireless entertainment and communication system between rider and passenger.
InterphoneF3MC can be installed on most helmets by attachment / detachment quick bracket.
The ergonomic shape of the unit is user-friendly also with motorbike gloves.
InterphoneF3MC is waterproof tested, up to IP67 protection degree (using the sealant
provided).
Index:
1.2 Main features
1. Introduction
4
2. Getting started
6
3. Settings
9
4.Intercom
11
5. Phone / GPS
14
6. Music Streaming 17
ENGLISH - 3
1.Intercom: InterphoneF3MC allows Bluetooth Intercom communication between
rider and passenger.
2.Phone: InterphoneF3MC has a Multipoint Bluetooth® connection for dual mobile
phone or other Bluetooth devices (mobile phone/GPS navigation).
3.Music: InterphoneF3MC is able to play music from a Bluetooth® device, supporting
A2DP and AVRCP profiles (smartphones, MP3 player etc.).
4.Vocal guide: InterphoneF3MC is equipped with a Text To Speech vocal guidance
system, that helps the user to operate each product feature and menu.
ENGLISH - 4
1.3 Box contents
2 – Getting Started
B
A
C
6
2
8
4
D
E
1
F
3
7
5
Pic.2
H
(1)
(2)
(3)
(4)
(5)
(6)
(7)
(8)
G
J
GUIDA RAPIDA IT
I
SI CONSIGLIA DI VERIFICARE LA PRESENZA
DI AGGIORNAMENTI SOFTWARE SUL SITO
WWW.INTERPHONE.COM
MFB button
UP button
DOWN button
Volume + button
Volume - button
Blue led
Red/Green/Orange led
Connector
www.interphone.com
Pic.1
A.
B.
C.
D.
E.
Bluetooth® unit
Microphone for full face helmet
Microphone for Jet/flip up helmet
Left speaker
Right speaker
2.1 Main Commands (Pic.2)
F.Velcro set for speaker/mic + spare POP
wind protection
G. Fixing plates + screwdriver
H. USB charging cable
I. USB data cable
J. Quick guide
Please refer to quick guide for installing F3MC on your helmet, provided in the box (can
be also downloaded from Interphone website), otherwise you can also check video
TUTORIAL on website www.interphone.com.
ENGLISH - 5
Power on
Press MFB button (1), led (6) flashes.
Power off
Press and hold MFB button (1) until you hear “Interphone powering
down” message. Led (7) flashes red for few seconds.
Volume
Press buttons (4) to increase or (5) to decrease.
Mute
Press button (5) for about 2 seconds.
Menu
Press buttons (2) or (3) to scroll the menu items. Press MFB button
(1) to select an item. Once selected a menu item, you come back to
“INTERCOM” menu (Standby)with a short press of MFB button.
ENGLISH - 6
If you select a wrong language, follow the steps below:
2.2 Status led (Pic.2)
Standby
BLUE led (6) flashes every 3 seconds.
Intercom active
BLUE led (6) is solid .
Interphone connected with
mobile/GPS
BLUE led (6) flashes twice every 3 seconds.
Pairing mode
BLUE (6) and RED (7) led flash alternately.
Charging
ORANGE led (7) is solid. When charging is
completed led (7) becomes solid GREEN.
Battery low
Led (7) is solid RED.
2.3 First Switch on (only twin pack)
Press MFB (1) button to turn on both units. The units are already factorypaired, wait for your language and press MFB (1) button to confirm.
Later two units will be in “INTERCOM” Standby status (Chapter 4).
1. Turn off the F3MC. (Press the MFB for 5s, or until the led lights RED). 2. Turn on the F3MC (Press the MFB for 2s).
3. Short press UP button (2).
4. Short press MFB button (1).
5. Short press UP button (2).
6. Press MFB when you hear your language.
2.6 Audio priorities
F3MC determinates the audio source priority in the following way:
1.Mobile phone
2.Intercom
3.A2DP audio (Smartphone/Player MP3)
F3MC automatically manage priority when audio sources play simultaneously, using the
sequence above.
2.4 First Switch on (only single pack)
Example:
Press MFB (1) button to turn on unit, wait for your language and press MFB (1) button
to confirm.
Unit will be in “INTERCOM” Standby status (Chapter 4).
The unit will enter in “PAIRING MODE”, choose one of these:
- Short press of MFB (1) button – pairing with mobile phone or GPS navigator.
- Short press of Up (2) button – intercom pairing with INTERPHONE device.
- Short press of DOWN (3) button – intercom pairing with other brand device(NON
INTERPHONE) ANYCOM mode.
- Long press of MFB (1) until the beep – to cancel “PAIRING MODE”. Unit will enter in
“INTERCOM” Standby status(Chapter 4) and Blue led (6) will flash every 3 seconds.
●Incoming mobile call interrupt ongoing A2DP music.
●Incoming Intercom call does not interrupt an ongoing mobile phone call; the rider,
who started the intercom call, will hear a “connection failed” message.
2.5 Language selection (after first switch on):
F3MC in Standby mode (Blue led(6) flashing), press UP button(2) and then MFB
button(1) to enter in “SETUP” menu. Press again UP button(2), “LANGUAGE
SELECTION” start, wait for your language and then press MFB button (1) to confirm it.
ENGLISH - 7
ENGLISH - 8
3.1 System settings
3 – Settings
You can easily customize your F3MC . From Standby mode (Blue led (6) flashing), press
UP button (2) and after MFB button (1) to active “SETUP” menu, entering in the main
functions Pic.3.
Once in “SETUP” menu, scroll items by UP (2) and DOWN (3) button until you find the
one you want.
Press MFB (1) button until the beep to change setting or enable a function.
INTERCOM/STAND BY
PHONE
MUSIC STREAMING
(2)
MFB
(3)
CALL ID on/off
FULLFACE HELMET/JET HELMET/AUTOMATIC VOLUME CONTROL off
VOICE ANSWER on/off
ERASE PAIRINGS
full/limited VOCAL HELP
ANYCOM SEARCH
INTERCOM DEVICE SEARCH
PAIRING MODE
LANGUAGE SELECTION
SET UP
●Call ID: when you receive a phone call, F3MC pronounce the name of the caller. It is
possible enable/disable the function.
●AUTOMATIC VOLUME: (FULLFACE HELMET/JET HELMET/OFF): F3MC can adjust
volume automatically according as helmet you are using. The user can completely
disable the function and adjust the volume manually. AUTOMATIC VOLUME
CONTROL OFF allows to gain maximum.
●VOICE ANSWER: user can answer to a phone call just speaking a voice command. It
is possible enable/disable the function.
●ERASE PAIRINGS: this function allows to cancel all devices paired before from
F3MC memory. At the first restart F3MC will enter in pairing mode automatically as
explained in Chapter 2.4.
●VOCAL HELPS: F3MC has two different levels for vocal helps: FULL for unskilled user
and LIMITED for skilled user. It is possible to choose one of these two options.
● ANYCOM SEARCH: active search for other brand’s Bluetooth® headsets.
● INTERCOM SEARCH: active search for INTERPHONE branded devices.
●PAIRING MODE: active search for Bluetooth® devices such as mobile phone, GPS
navigator, MP3 player etc.
●L ANGUAGE SELECTION: active the selection of languages. Wait when you hear
your language and then press MFB (1) button to confirm it.
Pic.3
ENGLISH - 9
ENGLISH - 10
4.1.2 Pairing with an INTERPHONE unit (not MC).
4 – Intercom
F3MC allows intercom communication (INTERCOM) in full duplex between rider and
passenger.
4.1Pairing
Before starting the communication between headsets, is necessary to pair together the
units. This process has to be done only one time. F3MC will automatically recognize devices
previously paired.
F3MC is compatible with all range of INTERPHONE device (also previous series) and by
ANYCOM function is also compatible with other brands of helmet Bluetooth headsets.
Each F3MC can be paired to only one more unit.
If a F3MC unit has been paired with a unit, running a further pairing, with
another unit, will delete the pairing with first one.
4.1.1Pairing with an INTERPHONE MC unit
With both units in Standby mode (led BLUE (6) flashing):
1.On your F3MC unit press once the UP (2) button and then press once the MFB (1)
button to activate the “SETUP” menu.
2.Press three times the UP (2) button to select “INTERCOM DEVICE SEARCH” feature,
press the MFB (1) until the beep to start the search.
3.On the other unit F3MC press UP (2) button and then press once MFB (1) button to
activate the “SETUP” menu.
4.Press UP (2) button two times, the second MC unit will go in “PAIRING MODE”.
5.After few seconds the units will be paired, intercom connection will be automatically
started (led BLUE (6) on). To stop the intercom communication press once MFB (1)
button on one of the two units.
With your unit in Standby mode (led BLUE (6) flashing):
1.Press once the UP (2) button and then press once the MFB (1) button to activate
the “SETUP” menu.
2.Press three times the UP (2) button to select “INTERCOM DEVICE SEARCH” feature,
press the MFB (1) until the beep to start the search.
3.On the second Interphone unit (previous series not “MC”), with unit off, push and
keep pressed the MFB button until the alternate flashing red/blue of unit led.
4.After few seconds the units will be paired, intercom connection will be
automatically started (led BLUE (6) on). To stop the intercom communication press
once MFB (1) button on one of the two units.
4.1.3 Pairing with units not Interphone (other brands)
With your unit in Standby mode (led BLUE (6) flashing):
1.Press once the UP (2) button and then press once the MFB (1) button to activate
the “SETUP” menu.
2.Press four times the UP (2) button to select “ANYCOM SEARCH” feature, press the
MFB (1) until the beep to start the search.
3.On the second unit NOT Interphone start the “phone search/phone pairing mode”,
see user manual of NOT Interphone unit for more details.
4.After few seconds the units will be paired, intercom connection will be
automatically started (led BLUE (6) on). To stop the intercom communication press
once MFB (1) button on your F3MC unit.
4.2 Intercom communication between two units (from “INTERCOM” menu)
To start an intercom communication between your F3MC (unit nr1 Pic. 4) and another
one (unit nr2 Pic. 4) follow these steps:
1.Pair units 1 and 2 (chapters 4.1.1/4.1.2/4.1.3), this is necessary only once.
2.With your F3MC unit in Standby mode (led BLUE (6) flashing), press once the MFB
(1) button, connection will be started. The vocal guidance will prompt a message for
intercom activation, BLUE (6) led of F3MC units will lights up. To stop the intercom
communication press once MFB (1) button on your F3MC, both units will go in
Standby mode.
1
2
Pic.4
ENGLISH - 11
ENGLISH - 12
4.3 Intercom tips
Once activated the intercom channel, communication remains active until it is manually
stopped by the rider. It is suggested to suspend the intercom conversation, if not necessary,
to optimize battery life.
5 – Phone/GPS
F3MC can be used together with Bluetooth® devices, as mobile phones, GPS devices, MP3
players.
If F3MC is paired with an other unit, it allows to connect only one Bluetooth ® devices
(phones, GPS, etc..).
To each F3MC unit is possible to connect, in the same time, max two Bluetooth® devices.
“INTERCOM” audio quality is strongly influenced by:
●proper installation of speakers and microphone inside the helmet. Always check
very carefully that speakers are placed exactly on your ears, and microphone is
placed as close as possible to your mouth. Any error on these positions will cause
an important decrease of performances.
●environment (electromagnetic interference, natural obstacles, etc.).
●aerodynamic protection of your motorcycle.
● type of helmet used.
5.1Pairing
Before using the F3MC unit with these devices, is necessary to run the pairing procedure.
This is necessary only once, after F3MC will automatically recognize and connect devices
already paired.
Pairing procedure
1.Start Bluetooth® service on mobile phone / GPS / MP3 player (check the device’s
user guide for more details).
2.With F3MC in Standby mode (led BLUE (6) flashing), press UP (2) button and then
press MFB (1) button to activate “SETUP” menu. Press UP (2) button twice, F3MC
will enter in “PAIRING MODE” .
3.Start searching for new Bluetooth® devices on mobile phone / GPS / MP3 player.
4.After few moments the device in searching mode will list “Interphone F3MC”. Select
it.
5.If prompted for a PIN number, type “0000” (four times the zero number).
6.F3MC vocal guide will confirm the successful pairing with the message “PAIRING
SUCCESSFUL, CONNECTED TO PHONE”. F3MC will go in Standby mode, the led BLUE
(6) will flash twice, every three seconds.
7.If the Bluetooth® device ask authorization to phonebook access, confirm.
If you want to pair a second device, repeat the pairing procedure from step 1).
ENGLISH - 13
ENGLISH - 14
5.2 Incoming phone calls
5.4 Phone tips
As indicated in chapter 2.6, phone calls have the highest priority and will override each
of other F3MC feature. During an incoming phone call these are the possible commands:
If two different phones are connected at the same time to a single F3MC unit, the features
“Redialling last number” e “Voice dial” can be used only with the FIRST connected phone.
The second connected phone can only receive calls, or managed by hand commands
directly on the phone.
Answer to a phone call
Push MFB (1) or pronounce loudly any
word (in case that voice answer feature is
enabled Chapter 3.1).
End a phone call
Push once the MFB (1) button.
The “Voice dial” feature could not be supported by your phone. Check the phone user
manual for more details.
Reject a phone call
Push DOWN (3) button to reject.
Otherwise wait for 15 seconds, the call
will be automatically rejected.
From “SETUP” menu is possible to change two settings for the phone usage (Caller ID ON/
OFF e Voice answer ON/OFF), see chapter 3.1 for more details.
Ringtone muting
Push UP (2) button to mute the ringtone.
Depending on the phone model it could be necessary to have an active internet connection
to use the “Voice dial” feature.
From “PHONE” menu, it is possible to go in Standby mode (led BLUE (6) flashing-menu
“INTERCOM”), pressing once the MFB (1) button.
5.5GPS
5.3Phone
All features related to phone can be activated entering into “PHONE” menu of F3MC.
With F3MC in Standby mode (led BLUE (6) flashing), push DOWN (3) button one time and
then press the MFB (1) button to activate the “PHONE” menu.
Redialling last number
Press UP(2) button to redial last number.
Voice dial
Press DOWN(3) button to activate the
voice dial feature of the phone. Follow
phone’s prompts to complete the task.
After completing the pairing between F3MC and GPS device (see chapter 5.1) is possible
to listen to vocal instructions from the GPS for the routing. The GPS will stop any intercom
communication each time that will send a vocal instruction.
Check that the GPS device is compatible with Bluetooth® headsets, “HFP”
Bluetooth® profile has to be supported by GPS. Check GPS user guide
for more details. F3MC uses the “HFP” Bluetooth® profile to manage the
connection with GPS devices.
Navigation apps, installed on smartphone devices, use the A2DP Bluetooth® profile to send
routing indications to headset. This profile doesn’t let to automatically stop the intercom
communication when needed.
Car GPS navigator usually don’t support the HFP Bluetooth® profile. For this reason these
devices can’t send vocal routing instructions to Bluetooth® headset. Check GPS user guide
for more details.
ENGLISH - 15
ENGLISH - 16
6.2 Song sharing
6 – Music streaming
With F3MC is possible to listen to music from an A2DP Bluetooth® device (smartphone,
MP3 player, etc..). To play music from these devices is necessary to pair the F3MC unit
with the music source device (Chapter 5.1).
F3MC is equipped with the “SONG SHARING” feature, to share the music streaming among
two Interphone MC units.
6.1 Music play
Start/Stop sharing
With F3MC in Standby mode (led BLUE (6) flashing), push DOWN button for three times
and then press the MFB (1) button to activate the “MUSIC STREAMING” menu.
Play/Pause
Push the MFB (1) button until the beep
to play/pause the music.
Track select
Press UP (2) or DOWN (3) button to
select the previous or the next track.
Press UP (2) button until the beep to start/stop
the song sharing with Interphone “A” (unit nr.2
chapter 4.3 - Pic.4)
Press DOWN (3) button until the beep to start/
stop the song sharing with Interphone “B” (unit
nr.2 chapter 4.3 - Pic.5)
During the sharing is possible to start an intercom session, as indicated in the following
table.
During the music listening, it is possible to go in Standby mode (led BLUE (6) flashingmenu “INTERCOM”), pressing the MFB (1) button. To resume the music listening it will be
necessary to go again into “MUSIC” menu, as described at beginning of this chapter.
On MC unit that is
sharing the music
Press the MFB (1) button to activate the
INTERCOM menu.
Press again the MFB (1) button to start an
intercom call.
On MC unit that is
receiving the music
Press the MFB (1) button to start an intercom
call.
6.3 Important informations for “MUSIC STREAMING” feature
ENGLISH - 17
●Only Bluetooth® devices supporting A2DP profile can stream stereo music to F3MC.
●Only Bluetooth® devices supporting AVRCP can be managed by F3MC.
●The song sharing feature couldn’t be used to share other audio sources , like GPS,
Phone calls or intercom calls.
●The song sharing feature is optimized to work with Interphone devices of MC range.
Using this feature, with other device, could bring a decrease of listening quality on
the headset unit, that will receive the music shared.
●The listening audio quality is strictly connected to the quality of music source
(bitrate and codec type of audio file, quality of Bluetooth® player, etc.).
ENGLISH - 18
Appendix 1
Important information
IMPORTANT INFORMATION ON THE PRODUCT BATTERY
Menu chart.
Do not store the device without charging it. Failure to do so may irreversibly damage the
capacity of the battery. Recharge the battery completely every TWO months.
INTERCOM
IMPORTANT INFORMATION ON PRODUCT WATERPROOFING
The external unit (control unit), mated to the connector on the audio kit, is classified IP67 as
per the IEC60529 standard, when used with the sealer provided in the package. Therefore,
the control unit, when mated to the connector on the audio kit, may be submerged in a
meter of freshwater for a maximum of 30 (thirty) minutes.
press MFB button to connect the last intercom paired
press to re-dial
PHONE
press to voice dial
Despite this classification, the device is not immune to greater stresses, such as prolonged
immersion or high-pressure jets of water.
press until the beep to play/pause
MUSIC STREAMING
press to select track
press up button until the beep to share
Using the device in conditions of bad weather, at high speeds, may be equivalent to
subjecting it to a high-pressure jet of water.
SET UP
CALL ID on/off
FULLFACE HELMET/JET HELMET/AUTOMATIC VOLUME CONTROL off
VOICE ANSWER on/off
ERASE PAIRINGS
full/limited VOCAL HELP
ANYCOM SEARCH
INTERCOM DEVICE SEARCH
PAIRING MODE
LANGUAGE SELECTION
press until you hear the beep
to confirm
use the arrows to scroll through the menu and use the central button to select
F3MC VOICE MENU DIAGRAM
FOLLOW THESE SUGGESTIONS CAREFULLY TO PREVENT DAMAGE TO THE DEVICE:
Do not immerse the device in freshwater over one metre deep for more than
30 minutes.
Do not store the device when it is wet: dry it with a clean, soft cloth. Dry any
water or moisture in the control unit connector and/or the audio kit connector
by applying warm air for at least 10 minutes. This will keep the contacts from
corroding.
Keep the device away from salt water, ionised water, beverages and other
liquids. If the device is exposed to liquids other than freshwater, wash it with
cold, freshwater and dry it carefully with a clean, soft cloth.
Keep the device away from high-pressure jets of water.
Be sure to reapply the sealer supplied in the package if the sealer disappears
when the device is used for a prolonged period of time.
Be sure the connector on the audio kit is inserted into the control unit completely.
Otherwise, complete protection against water and dust is not guaranteed.
ENGLISH - 19
ENGLISH - 20
Technical Specifications
Bluetooth® compliance:
Bluetooth® V.3.0 - Class II
Supported Bluetooth® profiles:
HFP
A2DP
AVRCP
Dimensions mm:
60x80x30
Weight:
44g
Range:
Up to 10 metres
Talk time:
12h
Stand-by time:
700h
Charging time:
3h
Battery type:
Rechargeable Li-ion
EQUIPMENT DISPOSAL INSTRUCTIONS FOR DOMESTIC USERS
(Applicable within the European Union and those countries with separate collection
systems)
The marking shown on the product or its literature indicates that at the end of its life
the product should not be disposed together with other household waste. To prevent
possible harm to the environment or human health from uncontrolled waste disposal,
please separate this from other types of wastes and recycle it responsibly to promote
the sustainable reuse of material resources.
Domestic users are invited to contact the sales point where the product was purchased or the local office with information regarding recycling of this type of product.
Business users should contact their supplier and check the terms and conditions of
the purchase contract. This product should not be mixed with other commercial waste
for disposal purposes.
This product has an embedded, non-replaceable battery, do not attempt to open the
product or remove the battery as this may cause injury and damage the product. When
disposing of the product, please contact your local waste disposal service in order to
remove the battery. The battery contained within the device and been designed to be
used throughout the life cycle of the product.
This product is CE marked in accordance with the provisions of the R&TTE Directive
(1999/5/EC) and the RoHS Directive (2011/65/EU). With this CE mark Cellular Italy
S.p.A. declares that this product complies with the essential requirements and other
relevant provisions of the 1999/5/EC and 2011/65/EU Directives. The user is forbidden to make changes or modifications of any kind to this device. Changes or modifications not expressly approved by Cellular Italy S.p.A. will void the user's authorisation
to operate the device. Bluetooth® is a trademark owned by Bluetooth SIG, Inc.
For more information please visit the website: www.interphone.com
ENGLISH - 21
ENGLISH - 22