1
fhlow
fast handling of a lot of work
USERMANUAL
2007
c Simon Lasselsberger
Copyright °
Permission is granted to copy, distribute and/or modify this document
under the terms of the GNU Free Documentation License, Version 1.2 or
any later version published by the Free Software Foundation; with no
Invariant Sections, no Front-Cover Texts, and no Back-Cover Texts. A
copy of the license is included in the section entitled “GNU Free
Documentation License”.
ii
Contents
1 User Manual
1.1 Installation . . . . . . . . . . . .
1.1.1 Requirements . . . . . . .
1.1.2 Traditional Way . . . . .
1.1.3 Using RubyGems . . . . .
1.1.4 Plug-ins . . . . . . . . . .
1.2 Directory Structure . . . . . . . .
1.2.1 Naming convention . . . .
1.3 Configuration . . . . . . . . . . .
1.3.1 Files . . . . . . . . . . . .
1.3.2 Syntax . . . . . . . . . . .
1.3.3 Default settings . . . . . .
1.3.4 Customizing the structure
1.4 Chip specific settings . . . . . . .
1.5 Plug-ins . . . . . . . . . . . . . .
1.5.1 Modelsim . . . . . . . . .
1.5.2 Quartus . . . . . . . . . .
1.6 Invocation . . . . . . . . . . . . .
1.6.1 Command line interface .
1.6.2 Using RunIt . . . . . . . .
1.7 RunIt . . . . . . . . . . . . . . .
1.7.1 Overview . . . . . . . . .
1.7.2 Requirements . . . . . . .
1.7.3 Installation . . . . . . . .
1.7.4 Usage . . . . . . . . . . .
Bibliography
.
.
.
.
.
.
.
.
.
.
.
.
.
.
.
.
.
.
.
.
.
.
.
.
.
.
.
.
.
.
.
.
.
.
.
.
.
.
.
.
.
.
.
.
.
.
.
.
.
.
.
.
.
.
.
.
.
.
.
.
.
.
.
.
.
.
.
.
.
.
.
.
.
.
.
.
.
.
.
.
.
.
.
.
.
.
.
.
.
.
.
.
.
.
.
.
.
.
.
.
.
.
.
.
.
.
.
.
.
.
.
.
.
.
.
.
.
.
.
.
.
.
.
.
.
.
.
.
.
.
.
.
.
.
.
.
.
.
.
.
.
.
.
.
.
.
.
.
.
.
.
.
.
.
.
.
.
.
.
.
.
.
.
.
.
.
.
.
.
.
.
.
.
.
.
.
.
.
.
.
.
.
.
.
.
.
.
.
.
.
.
.
.
.
.
.
.
.
.
.
.
.
.
.
.
.
.
.
.
.
.
.
.
.
.
.
.
.
.
.
.
.
.
.
.
.
.
.
.
.
.
.
.
.
.
.
.
.
.
.
.
.
.
.
.
.
.
.
.
.
.
.
.
.
.
.
.
.
.
.
.
.
.
.
.
.
.
.
.
.
.
.
.
.
.
.
.
.
.
.
.
.
.
.
.
.
.
.
.
.
.
.
.
.
.
.
.
.
.
.
.
.
.
.
.
.
.
.
.
.
.
.
.
.
.
.
.
.
.
.
.
.
.
.
.
.
.
.
.
.
.
.
.
.
.
.
.
.
.
.
.
.
.
.
.
.
.
.
.
.
.
.
.
.
.
.
.
.
.
.
.
.
.
.
.
.
.
.
.
.
.
.
.
.
.
.
.
.
.
.
.
.
.
.
1
1
1
1
2
2
3
4
8
8
10
14
16
16
19
19
19
22
22
25
26
26
26
26
26
30
iii
Chapter 1
User Manual
There were a lot of changes from fhlow version 1 to version 2 when you
talk about the internal structure because of the complete rewrite. Also the
usage and configuration have changed because of usability concerns but the
(default) directory structure was left nearly unchanged.
This chapter provides a complete and clear user manual of fhlow version
2 for GNU/Linux and Microsoft Windows as fhlow behaves much more the
same under both operating systems than it used to do.
1.1
1.1.1
Installation
Requirements
fhlow is written in the interpreted scripting language Ruby, so you have to
install the Ruby interpreter on your computer. It is available, for a lot of
computer platforms including GNU/Linux and Microsoft Windows, at [1].
Ruby is also shipped with the most GNU/Linux distributions, so the
package database of your distribution should be the first place to look. If you
can’t find it there you should read the official installation documentation [2].
Microsoft Windows users should use the One-Click Installer which also
includes RubyGems (see section 1.1.3 for more information).
For now fhlow is only tested with the version 1.8 of Ruby which is by
now the latest stable version and should therefore be used.
If you’d like to use RubyGems to install fhlow you have to install it
too. This is done by the One-Click Installer for Microsoft Windows. On
GNU/Linux systems you could search the package database of your distribution an install it from there or read the official installation instructions [3].
1.1.2
Traditional Way
First of all you need to download the newest fhlow version 2 package with
the attribute stable version from http://fhlow.lisuna.org and extract it, using
1
CHAPTER 1. USER MANUAL
1
2
3
4
5
6
2
# gem i n s t a l l f h l o w
Attempting l o c a l i n s t a l l a t i o n o f ’ fhlow ’
L o c a l gem f i l e not found : f h l o w ∗ . gem
Attempting remote i n s t a l l a t i o n o f ’ fhlow ’
Updating Gem s o u r c e i n d e x f o r : h t t p : / / gems . r u b y f o r g e . o r g
S u c c e s s f u l l y i n s t a l l e d fhlow − 1 . 9 1 . 0
Listing 1.1: Command line installation of fhlow using RubyGems.
tar, gzip, 7zip, winzip or something similar, to a directory of your choice.
This directory will from now on be called <fhlowRoot> .
1.1.3
Using RubyGems
Using Rubys package management system, RubyGems, will become the default way to install fhlow in future. This is a short description of RubyGems
taken from [6]:
RubyGems is a standardized packaging and installation framework for libraries and applications, making it easy to locate,
install, upgrade, and uninstall Ruby packages. It provides users
and developers with four main facilities.
1. A standardized package format,
2. A central repository for hosting packages in this format,
3. Installation and management of multiple, simultaneously
installed versions of the same library,
4. End-user tools for querying, installing, uninstalling, and
otherwise manipulating these packages.
As fhlow is a RubyForge project1 using RubyGems for installation is really simple. Just open a terminal and type: gem install fhlow. The output
will look something like Listing 1.1.
On GNU/Linux systems you need to execute this command under root
privileges otherwise you will get an error complaining about missing permissions on some directories.
1.1.4
Plug-ins
To install some plug-ins you have to download the desired plug-in package from http://fhlow.lisuna.org and extract it to the plug-in directory
(<fhlowRoot> /flw/plugins/). Each plug-in package includes two files:
1
All gem files published by projects at RubyForge are included in the RubyGems
database.
CHAPTER 1. USER MANUAL
3
<PluginName>.rb is the actual plug-in
<PluginName>.flw is the default settings files for the plug-in.
These files have to be located directly in the plug-in directory. If they
are located in subdirectories fhlow won’t be able to find the plug-in.
1.2
Directory Structure
The directory structure is organized in levels of directories that can be configured and defined in a configuration file. How you can do this is described
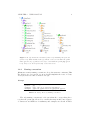
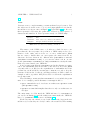
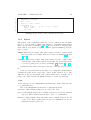
in Section 1.3.4. This section will focus on the default structure shown in
Figure 1.1.
fhlow uses directories with prefixes that represent nodes and leafs in a
tree-like hierarchy. Nodes may include other nodes and leafs but leafs include neither nodes nor leafs because they represent Units, Packages and
Libraries. These leafs include documentation in the sub directory doc, literature in the sub directory lit, source code in the subdirectory src and
dynamically created data from the plug-ins, like the work library, in the
subdirectory var.
In case of the default structure there are two node-levels: the RootNodelevel and the grp-level. The RootNode has no additional prefix because it
represents the directory that contains the structure and is called <fhlowRoot> (of course this directory does not have to have exactly this name,
you can think of this name as the absolute path to your structure). This
directory contains so called Groups (directory name prefix grp) which are
collections of leafs that belong together. For example the grpProl16 in Figure 1.1 (a) contains leafs (Units and a Package) that are needed to construct
a Prol16 CPU.
To make this more clear here is a description of the prefixes:
grp A container that holds leafs and is called a Group.
unit Represents one VHDL-entity including architectures, documentation
and literature and is called a Unit.
pkg Represents one VHDL-package including documentation and literature
and is called a Package.
lib Represents one VHDL-library including documentation and literature
and is called a Library. Libraries are used for designs that need to
instantiate components from it or post layout simulations.
For each element in the structure there is a configuration file. You will
find detailed documentation on configuration files in Section 1.3.
CHAPTER 1. USER MANUAL
(a)
4
(b)
(c)
Figure 1.1: (a) Shows the RootNode (blue icon) including Group-nodes
(violet icon) which include leafs. (b) Shows a Unit, a leaf with the prefix
unit (green icon). (c) Shows a Package, a leaf with the prefix pkg (green
icon). Gray icons show dynamically created directories.
1.2.1
Naming convention
fhlow uses a strict naming convention to keep the structure consistent. This
also helps you to keep track of your work and simplifies the reuse of Units,
Packages, Libraries and even whole Groups.
Groups
pattern
<prefix>
<grpName>
examples
<prefix><grpName>
grp
name of the Group; characters and numbers
grpProl16, grpStrobesClocks, grpGrpName, grp2107
Table 1.1: Group directory naming convention.
The only naming conventions for Groups is that the corresponding directory has the prefix grp followed by a name that may include any sequence
of characters and numbers. A summary and examples are shown in Table
CHAPTER 1. USER MANUAL
5
1.1.
Units
Units use a more complex naming convention than Groups because a Unit
also takes care about the source code of your designs which is located in the
src subdirectory. As you can see in Figure 1.1 (b) and Table 1.2 the directory
that represents a Unit uses the prefix unit followed by any sequence of
characters and numbers. A Unit represents exactly one VHDL entity.
pattern
<prefix>
<unitName>
examples
<prefix><unitName>
unit
name of the Unit; characters and numbers
unitCpu, unitAlu, unit6212, unitChar_123
Table 1.2: Unit directory naming convention.
The names of the VHDL source code files are a little bit more complex than the directory name. As you know a VHDL entity needs a declaration of the entity and it needs one ore more architectures. fhlow
has two ways to handle this: you can separate the entity from the architecture and save them in two different files (<unitName>-e.vhd and
<unitName>-<archName>-a.vhd) or you can save them both in one single file (<unitName>-<archName>-ea.vhd). <archName> is exactly the same
name as you used inside your VHDL file.
It is very important that the <unitName> used in the filename is equivalent to the <unitName> used in the name of the directory. If you use fhlow
only under Microsoft Windows the capitalisation of <unitName> is not important but you should hold your structure consistent, not only to keep the
structure clean but also because it could happen that you’d like to share for
example a whole grp with a GNU/Linux user for whom the capitalisation
is very important.
The next thing to mention is that <unitName> does not include the prefix
unit. So for example possible filenames for unitCpu would be:
• Cpu-e.vhd with the need of at least one architecture: Cpu-Rtl-a.vhd
(and Cpu-Bhv-a.vhd)
• Cpu-Rtl-ea.vhd which implies that there is only one architecture for
the Cpu.
The entity name of a Unit inside the VHDL file has to be <unitName> as
you can see in Listing 1.2 and the architecture name inside the VHDL file
has to be <archName> as you can see in Listing 1.3.
Each Unit may also include a test bench which is also kept in the src
subdirectory because they are closely bound to the actual Unit. The naming
CHAPTER 1. USER MANUAL
1
2
3
4
5
6
7
8
9
10
11
12
13
6
library i e e e ;
use i e e e . s t d l o g i c 1 1 6 4 . a l l ;
l i b r a r y work ;
use work . P r o l 1 6 . a l l ;
entity Cpu i s
port (
−− p o r t d e f i n i t i o n s
);
end Cpu ;
Listing 1.2: A cutout of the file Cpu-e.vhd of unitCpu. You can see in Line
7 that the <unitName> (Cpu) is used as entity name.
1
2
3
4
5
architecture R t l of Cpu i s
−− s i g n a l d e f i n i t i o n s
begin
−− some e n t i t y i n s t a n t i a t i o n s
end R t l ;
Listing 1.3: A cutout of the file Cpu-Rtl-a.vhd of unitCpu. You can see
in Line 1 that the <unitName> (Cpu) and the <archName> (Rtl) is used.
1
2
3
4
5
6
entity tbCpu i s
end tbCpu ;
architecture Bhv of tbCpu i s
−− some p r o c e s s e s and e n t i t y i n s t a n t i a t i o n s
end Bhv ;
Listing 1.4: A cutout of the file tbCpu-Bhv-ea.vhd of unitCpu. You can
see in Line 1 that the <unitName> (Cpu) with the prefix tb is used as entity
name. Line 4 shows the usage of <archName> (Bhv).
convention is almost equal to the design files but they are marked with the
prefix tb. unitCpu could have these test bench files:
• tbCpu-e.vhd with the need of at least one architecture: tbCpu-Bhva.vhd (and Cpu-BhvWithAssertions-a.vhd)
• tbCpu-Bhv-ea.vhd which implies that there is only one architecture
for the test bench of Cpu.
The entity name of the test bench inside the VHDL file has to be
tb<unitName> and the architecture name inside the VHDL file has to be
<archName> as you can see in Listing 1.4.
Table 1.3 shows a summary and some more examples.
CHAPTER 1. USER MANUAL
patterns
<archName>
<unitName>
examples
7
<unitName>-e.vhd
<unitName>-<archName>-a.vhd
<unitName>-<archName>-ea.vhd
tb<unitName>-e.vhd
tb<unitName>-<archName>-a.vhd
tb<unitName>-<archName>-ea.vhd
name of the architecture; characters and numbers
name of the Unit; characters and numbers
Cpu-e.vhd
Alu-Rtl-a.vhd
6212-Bhv-ea.vhd
tbChar_123-Bhv-ea.vhd
Table 1.3: Unit file naming convention.
1
2
3
4
5
6
7
library i e e e ;
use i e e e . s t d l o g i c 1 1 6 4 . a l l ;
use i e e e . n u m e r i c s t d . a l l ;
package P r o l 1 6 i s
−− some c o n s t a n t s and components
end P r o l 1 6 ;
Listing 1.5: A cutout of the file Prol16-p.vhd of pkgProl16. You can see
in Line 5 that the <pkgName> (Prol16) is used.
Packages
Packages are also a little bit more complex than Groups but much simpler
than Units because they include less source code files in their src subdirectory as you can see in Figure 1.1 (c). The name of the directory that
represents a Package is described in Table 1.4. A package may also include
a test bench to verify its correct function.
pattern
<prefix>
<pkgName>
examples
<prefix><pkgName>
pkg
name of the Package; characters and numbers
pkgProl16, pkgChar_123
Table 1.4: Package directory naming convention.
The package source code file uses the pattern <pkgName>-p.vhd. Where
<pkgName> is equal to the <pkgName> used for the name of the directory.
<pkgName> has to be used as name of the package inside the VHDL file as
well as you can see in Listing 1.5. The test bench files use the same naming
conventions as the test bench files of Units. Examples and a summary can
be found in Table 1.5.
CHAPTER 1. USER MANUAL
patterns
<archName>
<pkgName>
examples
8
<pkgName>-p.vhd
tb<pkgName>-e.vhd
tb<pkgName>-<archName>-a.vhd
tb<pkgName>-<archName>-ea.vhd
name of the architecture; characters and numbers
name of the Package; characters and numbers
Prol16-p.vhd
Char_123-p.vhd
tbChar_123-Bhv-ea.vhd
Table 1.5: Package file naming convention.
Libraries
The naming conventions for the directory containing the Library are shown
in Table 1.6.
pattern
<prefix>
<libName>
examples
<prefix><libName>
lib
name of the Library; characters and numbers
libCyclone, libChar_123
Table 1.6: Library directory naming convention.
There are no naming conventions for the source code files, because they
are most likely copied from a library of a chip manufacturer. But there is
one thing you have to take care about: the name of the Library. This name
has to be exactly the same name, as you used it in your design to instantiate
components or as your place and route program uses for your components.
fhlow creates a new Library next to the work -library with this name.
1.3
1.3.1
Configuration
Files
Each element (node or leaf) has its own configuration file named config.flw
and inherits (see Section 1.3.2 for more information) its configuration items
to it’s child elements. So each leaf contains a configuration object with all
configurations of all levels of its branch.
In addition to these hierarchical configuration files there are a few others.
They are described in Table 1.7 and 1.8. All files are loaded in this order:
1. default.flw
2. <PluginName>.flw for each Plug in
3. system.flw
CHAPTER 1. USER MANUAL
4. user.flw
5. hierarchical configuration files
In case of the default structure the order is:
(a) config.flw in <fhlowRoot>
(b) config.flw in a Group
(c) config.flw in a leaf
Filename
Location
Purpose
Information
default.flw
next to the fhlow executable, depends on the installation method.
Includes defaults for the fhlow core.
changing the default behavior is described in Section 1.3.2
Do not make changes to this file!
Filename
Location
Purpose
Information
<PluginName>.flw
<PluginDir>
Includes defaults for each Plug in.
changing the default behavior is described in Section 1.3.2
Do not make changes to this file!
Table 1.7: Default configuration files.
Filename
Location
Purpose
Information
Examples
Filename
Location
Purpose
Information
Example
user.flw
GNU/Linux : $HOME/.fhlow/user.flw
Microsoft Windows : $APPDATA\fhlow\user.flw
Per user configuration file. Optional
$HOME and $APPDATA are environment variables.
• /home/user/.fhlow/user.flw
• C:\Documents and Settings\username\Application
Data\fhlow\user.flw
system.flw
GNU/Linux : /etc/fhlow/system.flw
Microsoft
Windows
:
$ALLUSERSPROFILE\Application
Data\fhlow\system.flw
Per system configuration file. Optional
May be used for settings the paths for the tools.
$ALLUSERSPROFILE is an environment variable.
C:\Documents and Settings\All Users\Application
Data\fhlow\system.flw
Table 1.8: Additional configuration files.
9
CHAPTER 1. USER MANUAL
1
2
3
4
5
6
7
8
9
10
10
[ a S e c t i o n ] # t h i s i s a comment
Simpl eItem = someValue
name = v a l u e
# t h i s i s a n o t h e r comment
ComplexItem = {
t h i s i s a value ;
# t h i s i s a l s o a comment
aValue , 1 2 3 4 ;
l a s t value
}
Listing 1.6: An example of the configuration file syntax.
1.3.2
Syntax
The syntax of the configuration files uses sections, which are used as name
spaces to prevent name conflicts and unwanted overwriting during inheritance, as you can see in Listing 1.6 line 1 they are defined by an appropiate
name that is sourounded by square brackets ([<sectionName>]) and two
types of items:
simple: This item is a name value pair separated by the = symbol. Each
line can only hold one simple item as you can see in Listing 1.6 in lines
2 and 3.
complex: This item is a name value pair separated by the = symbol. The
value is a list of sub values separated by a semicolon (;) and surrounded
by braces ({ and }) as you can see in Listing 1.6 from line 6 to 10.
Comments start with # and run to the end of the line they are placed
in.
Units, Packages and Libraries use improved configuration items that are
basically the same as the simple and complex items described above. The
difference is the special syntax of the values which can be thought of as a
path to the desired leaf in the fhlow structure to define dependencies.
Units
A Unit uses two sections (Dependencies and Self) to define what is needed
to be build this Unit.
The section Dependencies includes 3 configuration items:
Packages defines which packages are needed by the Unit.
Units defines which architectures of which Units are needed by the demanding Unit. These architectures should be able to be synthesized.
BhvUnits defines which behavioral architectures of which Units are needed
by the Unit. These architectures are used for simulation but not for
synthesis and place and route.
CHAPTER 1. USER MANUAL
11
As you can see in Listing 1.7 the section Dependencies uses complex
configuration items exclusively. The values of Units and BhvUnits represent
paths in the directory structure to the desired Units separated by commas
and without the prefixes (grp; unit and pkg). For example unitCpu uses
the architecture Rtl of unitDataPath and the architecture Rtl of unitCoreControl to construct a Prol16 Cpu. You only have to specify the direct
dependencies because the dependencies of e.g. unitDataPath are defined in
its own configuration file. fhlow searches all dependencies recursively and
builds an internal dependency tree.
To define this dependency you have to add DataPath(Rtl) and CoreControl(Rtl) to the Units configuration item as shown in lines 2 to 7 of
Listing 1.7.
You don’t need to tell fhlow in which Group unitDataPath and unitCoreControl are located because they are located in the same Group as
unitCpu but it is no fault if your entry looks like Prol16, DataPath(Rtl)
or Prol16, CoreControl(Rtl). If hypothetically unitDataPath is located
in grpHypo the entry would look like this: Hypo, DataPath(Rtl). If you need
more than one architecture of a Unit you can add them in the parentheses by
separating them with commas (DataPath(Rtl, Struct)). Another example
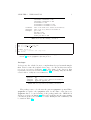
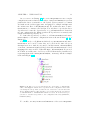
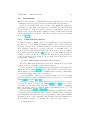
is shown in Figure 1.2.
Figure 1.2: The red colored path shows the dependency of unitDataPath to unitRegFile which can be specified in the configuration files without adding the Group name because the two Units are located in the same
Group (RegFile(Rtl)). The magenta colored path shows the dependency
of unitDataPath to unitNonSense which is located in another Group so
you have to add the Group name to the configuration file entry (NonSense,
NonSense(Rtl)).
To conclude, an entry in Units and BhvUnits of the section Dependen-
CHAPTER 1. USER MANUAL
1
2
3
4
5
6
7
8
9
10
11
12
13
14
15
16
17
18
19
20
21
22
23
12
[ Dependencies ]
Units = {
# R t l 2 i s used f o r d e m o n s t r a t i o n o f
# t h e comma s e p a r a t e d l i s t
DataPath ( Rtl , R t l 2 ) ;
CoreControl ( Rtl )
}
BhvUnits = {
memory ( beh )
}
Packages = {
Prol16
}
[ Self ]
# R t l 2 i s used f o r d e m o n s t r a t i o n o f
# t h e comma s e p a r a t e d l i s t
A r c h i t e c t u r e s = Rtl , R t l 2
BhvArchitectures =
t b A r c h i t e c t u r e s = Bhv
Listing 1.7: The configuration file of unitCpu from Figure 1.1.
cies uses the names of the Groups and Units separated by commas followed
by a comma separated list of architectures in parentheses. The name of the
Unit and the list of architectures is obligatory but you only have to specify
the name of the Group if the dependency is not located in the same Group
as the demanding Unit.
The values of the Packages configuration item in section Dependencies are also paths in the fhlow structure and underlie the same rules as
Units and BhvUnits but they do not use the architecture specification in
the parentheses.
To define the architectures that should be used by the actual Unit itself
the section Self (see Listing 1.7 line 18 to 23)is used. There are 3 items that
can be used:
Architectures define the architectures in a comma separated list that
should be used. These architectures should be able to be synthesized.
BhvArchitectures define the architectures in a comma separated list that
should be used for simulation only because they contain behavioral
VHDL code.
tbArchitecture defines the architectures of your test bench.
Packages
Packages often don’t use dependencies because their only possible dependencies are other Packages. But Packages may have a test bench (specified
CHAPTER 1. USER MANUAL
1
2
3
4
5
6
7
8
13
[ Dependencies ]
Packages = {
}
Units = {
}
[ Self ]
tbArchitectures =
Listing 1.8: The configuration file of pkgProl16 from Figure 1.1.
1
2
3
4
5
6
[ Dependencies ]
[ Self ]
Files = {
c y c l o n e a t o m s . vhd ;
c y c l o n e c o m p o n e n t s . vhd
}
Listing 1.9: A typical configuration file of a Library.
by tbArchitectures in section Self) which can have dependencies. Those
Units are defined by the configuration item Units. The Units item of Packages includes Units that are able to be synthesized and behavioral Units
because a Package can never be synthesized standalone so this item only
takes effect for simulation. Listing 1.8 shows a typical configuration file of a
Package.
Libraries
Libraries typically don’t use dependencies either, because they are designed
to stand alone and only include components. You can specify dependencies
of the types Units, BhvUnits Packages and Libraries if you need to in
the configuration section [Dependencies]. But there is only one significant
configuration item: Files. It is located in the section [Self] and holds the
names of the files located in the subdirectory src as you can see in Listing
1.9.
Inheritance
It is possible so set configuration items in e.g. a Group in order to inherit
them to all leafs in this Group but it is also possible to overwrite configuration items from higher levels in the configuration files of lower levels.
For example if you have set the default values shown in Listing 1.11 in
the configuration file of a Group and you have made the settings shown in
Listing 1.10 in a Unit in this Group the resulting configuration object of the
Unit will look like Listing 1.12. Here is what happens in detail:
• [section a] was inherited from the Group to the Unit.
CHAPTER 1. USER MANUAL
1
2
3
4
5
6
7
8
9
10
11
12
13
14
15
16
14
[ section a ]
filename = config . flw
location = in a unit
i w a s = added
complex = {
unit 1 ;
unit 2 ;
xyz
}
ow = {
2
}
[ section b]
name = 1234
Listing 1.10: File B (e.g. in a Unit). An example configuration file for
explaining the inheritance of configuration items.
– “filename” is overwritten with the same value, so in fact is was
left untouched.
– “location” has the default value “in a group” but was overwritten with “in a unit”
– “iwas = added” is added because it didn’t exist.
– “complex” has the default value “xyz; fileb” and was enhanced
with “unit_1; unit_2”. “xyz” was not added a second time.
– “ow” has the default value 2 which was completely overwritten
with 0 because of the “!” character in line 9 of Listing 1.11.
• “[section b]” and all its items were added because they didn’t exist
in the Group.
Overwriting an inherited configuration item should also be used if you
would like to change a default setting (default configuration files are shown
in Table 1.7) by making an entry in a configuration file of a higher level
with the same name in the same section as the default configuration item
but assigning a new value. For simple items this is all you need to do but
as you saw in the example values of a complex item are merged by default,
if the same complex item is set in different levels of a branch. To really
overwrite a complex item in a lower level you have to add the character “!”
to the name of the complex item. This tells fhlow to overwrite the settings
of higher levels with the actual value.
1.3.3
Default settings
The default settings for the fhlow core are set in the file default.flw
introduced in Table 1.7 and shown in Table 1.9.
Default settings for the plug ins are described in Section 1.5.
CHAPTER 1. USER MANUAL
1
2
3
4
5
6
7
8
9
10
11
15
[ section a ]
filename = config . flw
l o c a t i o n = i n a group
complex = {
xyz ;
fileb
}
ow ! = {
0
}
Listing 1.11: File A (e.g. in a Group). An example configuration file for
explaining the inheritance of configuration items.
1
2
3
4
5
6
7
8
9
10
11
12
13
14
15
16
17
[ section a ]
filename = config . flw
location = in a unit
i w a s = added
complex = {
unit 1 ;
unit 2 ;
xyz ;
fileb
}
ow = {
0
}
[ section b]
name = 1234
Listing 1.12: The result of the merge of the files from Listings 1.10 and
1.11. This file does not exist, it is only an illustration of the f hlow internal
configuration object!
Name
LeafPrefixes
Default value
{ unit, pkg, lib }
NodePrefixes
{ grp }
Description
Describes which leaf-prefixes are allowed in
which directory structure level.
Describes which node-prefixes are allowed in
which directory structure level.
Table 1.9: Default settings for section fhlow.
CHAPTER 1. USER MANUAL
1
2
3
4
5
6
7
8
9
10
11
12
13
14
16
[ Dependencies ]
Units = {
# no need t o add Prol16 , P r o l 1 6
RegFile ( Rtl )
}
BhvUnits = {
M y C o l l e c t i o n , Ge n e r i c , TestBench ( Bhv )
}
Packages = {
# no need t o add P r o l 1 6
Global , Math
}
Listing 1.13: The section Dependencies of the configuration file of
unitDataPath from Figure 1.3.
1.3.4
Customizing the structure
If you want to add more levels to the directory structure you have to overwrite the NodePrefixes item in the section fhlow in the configuration file
in the <fhlowRoot> node. To add for example a Project (prefix: prj) and a
Collection (prefix: col) as new top level (level 0) nodes and a new container
(Class) next to Group in level 1, the entries would look like Listing 1.14.
The new structure now needs Units, Packages and Libraries inside Groups
or Classes which are located inside Projects or Collections.
Because of the different prefixes in the same level (e.g. prj and col) it
is possible to create a Project and a Collection with the same name (e.g.
prjProl16 and colProl16). This is a problem when you have to specify
dependencies in the configuration files. To define the dependency exactly the
entries have to include the prefix: use prj/Prol16 or col/Prol16 instead of
just using Prol16.
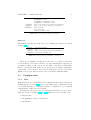
Figure 1.3 shows a few leafs and nodes in the new structure and includes
3 paths that should illustrate how to specify the relative dependencies. The
configuration file of unitDataPath is shown in Listing 1.13.
Changing the prefixes of the leafs or adding more possible leafs is not
recommended, because you need knowledge about the internal strcuture of
fhlow . Read the developer documentation if you want to know more about
this topic.
1.4
Chip specific settings
In order to define the target (the chip) of your design, the section [Target]
is used. Section 1.15 shows an example how this is done. On line 2 the actual
target is defined. This is done to easily switch between different sets of target
configurations. The name that is defined here is used to load the desired set
CHAPTER 1. USER MANUAL
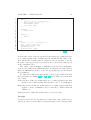
Figure 1.3: Shows a few leafs and nodes in the customized directory structure defined in Listing 1.14. The magenta path shows the dependency from
unitDataPath to unitRegFile which can be specified without adding the
Project name and the Group name because they are located in the same
Group. The blue path shows the dependency from unitDataPath to pkgMath which can be specified without adding the Project name because they
are located in the same Project. The orange path shows the dependency from
unitDataPath to unitTestBench which has to be fully specified because they
have no common nodes.
1
2
3
4
5
6
7
[ fhlow ]
NodePrefixes! = {
# l e v e l 0 −> nodes : p r j , c o l
prj , c o l ;
# l e v e l 1 −> nodes : grp , c l a s s
grp , c l a s s
}
Listing 1.14: This entry could be made to the config.flw file of
<fhlowRoot> if a Project and Collection level sould be added. Do not forget
to add the ! character to NodePrefixes to tell fhlow to completely overwrite
this item instead of merging these settings to the default value (see section
1.3.2).
17
CHAPTER 1. USER MANUAL
1
2
3
4
5
6
7
8
9
10
11
12
13
14
15
16
17
18
19
20
21
22
23
24
25
26
27
28
18
[ Targ et ]
Target = SandboxX
[ TargetSandboxX ]
Manufacturer
Family
Part
Package
SpeedGrade
=
=
=
=
=
Altera
Cyclone
EP1C6
T144C
8
Frequencies = {
i C l k −> 4 8 , d e f a u l t
}
SimulationLibraries = {
L i b r a r i e s , Cyclone
}
Pins = {
iClk
iTestMode
iScanEnable
inResetAsync
...
iMemData ( 7 )
iMemData ( 4 )
iMemData ( 9 )
}
−>
−>
−>
−>
PIN
PIN
PIN
PIN
1 , true ;
2 , true ;
113 , t r u e ;
114 , t r u e ;
−> PIN 56 , t r u e ;
−> PIN 57 , t r u e ;
−> PIN 58 , t r u e
Listing 1.15: A sample configuration of a target.
of configurations. In this example the name SandboxX tells fhlow to load
the chip specific settings from the configuration section [TargetSandboxX ].
This section contains information about the chip itself (lines 5 to 9) like
the manufacturer, the chip family, the part, the package and the speed grade.
Line 11 shows the configuration item that sets the frequencies of the
clock signals. One entry of this complex configuration item is split into three
parts: the name of the clock signal (iClk), the actual frequency of this clock
in MHz (48) and the name of the clock group (default).
To specify the libraries, that are needed for the post layout simulation,
are set using the complex configuration item SimulationLibraries shown
in line 15. This item behaves like the complex items in section [Dependencies].
The pin assignments are done using the complex configuration item Pins.
An entry of this item is also split in three parts, as you can see in line 20:
the name of the signal (iClk), the name of the pin on the chip (PIN_1) and
and information if a pull-up resistor should be added (true) to the pin or
not (false).
CHAPTER 1. USER MANUAL
1.5
19
Plug-ins
Plug-ins are used to expand the core functionality of fhlow . Most likely a
plug-in is an interface to an EDA program like Mentor Graphics Modelsim
or Altera Quartus. But in future there should be plug-ins that are able to
manipulate the directory structure by adding nodes and leafs.
How you can invoke plug-ins is described in Section 1.6.
1.5.1
Modelsim
The plug-in Modelsim is an interface to Mentor Graphics Modelsim and is
able to compile, simulate and to do the post layout simulation (plsim) of all
kinds of leafs which are also the names of the three available commands of
this plug-in.
To reproduce a waveform result of a simulation easily you can save the
waveform settings of Modelsim to the file wave.do in the src directory of
the top level leaf of your actual simulation. You can do this by clicking on
the waveform and then using File → Save. You have to navigate to the
src directory by clicking on browse an save the settings using the filename
wave.do.
The Tables 1.10, 1.11 and 1.12 show the options of the commands which
can be applied on the command line or in the configuration files. If you
run simulate a compilation is done first by calling the command compile.
To apply options to the compile command invoked by simulate you have to
define them in the configuration files.
To specify the path to the executables of Modelsim and the license the
configuration items BinDir and LicenseFile in section [Modelsim] are
used. The best location of these settings is the per machine configuration
file (see section 1.3.1).
A post layout simulation of a Unit can only be done if the files <UnitName>.sdf, which includes the timing informations, and net<UnitName><ArchitectureName>-ea.vhd, which includes the net-list of the design, exist in the share directory. This directory is the subdirectory var/share/ of
a Unit. These two files are automatically created by a place and route program. This simulation also takes care of the manufacturer libraries if they
are specified in the section [Target<TargetName>] of a configuration file.
1.5.2
Quartus
The plug-in Quartus is an interface to Altera Quartus and is able to synthesize and to do the placement and routing (placeandroute) of all Units.
This plug-in provides its results in the directory var/Quartus of the
actual top level Unit. The command placeandroute also creates the needed
files for the post layout simulation (net<UnitName>-<archName>-ea.vhd
CHAPTER 1. USER MANUAL
20
Command Line
-r, -run TIME
Configuration File
SimulateRun = TIME
Description
Simulation time.
TIME : <value> [ms|us|ns|ps]
default value: 100 ns
-c, -console
SimlateConsole = BOOL
Run simulation on command
line only.
BOOL: true or false
default value: false
-o, -options VAL
SimulateOptions = VAL
VAL will be passed directly to
vsim.
-q, -quiet
CompileQuiet = BOOL
Makes vcom quiet.
BOOL may be true or false
default value: false
-b, -buildall
CompileBuildAll = BOOL
Rebuilds all sources and libraries which are not recompiled if they exist by default
BOOL: true or false
default value: false
Table 1.10: Options of the command simulate of the Modelsim plug-in.
Command Line
-q, -quiet
Configuration File
CompileQuiet = BOOL
Description
Makes vcom quiet.
BOOL may be true or false
default value: false
-o, -options VAL
CompileOptions = VAL
VAL will be passed directly to
vcom.
-b, -buildall
CompileBuildAll = BOOL
Rebuilds all sources and libraries which are not recompiled if they exist by default.
BOOL: true or false
default value: false
Table 1.11: Options of the command compile of the Modelsim plug-in.
and <UnitName>.sdf) which are located in the directory var/share of the
actual top level Unit.
The Table 1.13 shows the options of the commands which can be applied
either on the command line or in the configuration files. To specify the path
to the executables of Quartus and the license the configuration items BinDir
and LicenseFile in section [Quartus] are used. The best location of these
settings is the per machine configuration file (see section 1.3.1).
CHAPTER 1. USER MANUAL
21
Command Line
-r, -run TIME
Configuration File
SimulateRun = TIME
Description
Simulation time.
TIME : <value> [ms|us|ns|ps]
default value: 100 ns
-c, -console
SimlateConsole = BOOL
Run simulation on command
line only.
BOOL: true or false
default value: false
-o, -options VAL
SimulateOptions = VAL
VAL will be passed directly to
vsim.
-q, -quiet
CompileQuiet = BOOL
Makes vcom quiet.
BOOL may be true or false
default value: false
-b, -buildall
CompileBuildAll = BOOL
Rebuilds all sources and libraries which are not recompiled if they exist by default
BOOL: true or false
default value: false
-s, -sdf VAL
PostLayoutSimSDF = VAL
The timing that should be used
from the SDF file.
VAL: max, typ or min
default value: max
-l, -tblabel VAL
PostLayoutSimTbLabel = VAL
The label that is used in the
testbench for the top level unit.
VAL: a string
default value: DUT
Table 1.12: Options of the command plsim of the Modelsim plug-in.
Command Line
-v,-verbose LEVEL
Configuration File
Verbose = LEVEL
Description
Affects the output.
LEVEL: 0, 1 or 2
default value: 0
Table 1.13: Options of the commands synthesize and placeandroute of
the Quartus plug-in.
CHAPTER 1. USER MANUAL
1.6
22
Invocation
fhlow by now only has a command line interface which is able to invoke all
commands registered by the plug-ins and print detailed help messages.
RunIt is a tiny GUI that can be used to start fhlow through mouse
clicks instead of invoking it directly from a command line. This is mainly
targeted at Microsoft Windows users because the command line of Microsoft
Windows is not as popular as the terminal programs on GNU/Linux systems
but RunIt may also be used there. The usage of RunIt is described in detail
in Section 1.6.2.
1.6.1
Command line interface
To make the usage of fhlow easier on a command line you should add the
bin directory to your PATH environment variable. The location of the bin
directory depends on the installation method you have used. If you have
used RubyGems this director is added already to your PATH, but if you
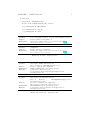
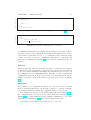
have used the traditional method the bin directory is located at <fhlowRoot> /flw/core/bin/. Figure 1.4 shows how to set the PATH environment
variable on Microsoft Windows systems. On GNU/Linux systems this depends on the shell you are using, if you are using bash [4] this can be done
by using this command:
$ export PATH=\$PATH:\fhlowRoot/flw/core/bin/
If you are using another shell please read the documentation of your shell
to find out how to manipulate environment variables.
Now you are able to invoke fhlow without typing the absolute path to the
fhlow executable. Listing 1.16 shows how fhlow is invoked on a GNU/Linux
system using bash as shell but the commands entered in the command line
are exactly the same under Microsoft Windows.
To invoke fhlow you have to type fhlow. If this is done in a working
directory that is not inside a fhlow structure you’ll get an error shown in
Listing 1.16 in the lines 1 to 9.
You have to change your working directory to the directory (or a subdirectory) of a leaf as you can see in Listing 1.16 in line 11. After you have
done this you can type fhlow again and you will see fhlow complaining
that you haven’t added a command name as argument and the top level
help output (Listing 1.16 lines 12 to 46).
The help messages are printed by the command help which takes a name
of a plug-in (and optionally the name of a subcommand of the actual plugin) as argument and prints the proper help message. As partial command
matching is used for all commands, plug-in names and subcommands, the
shortest distinct name for a command can be used. You can see that
$ fhlow help M c
CHAPTER 1. USER MANUAL
23
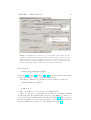
Figure 1.4: This figure shows how to set the Path environment variable
on Microsoft Windows systems. (1) Click on Environment Variables in the
System Properties dialog. (2) Select Path in the System variables list. (3)
Click on Edit. (4) Add your fhlow bin directory to the Variable value text
field by separating it with a semicolon from the previous entries.
is used instead of
$ fhlow help Modelsim compile
in Listing 1.16 in line 48 and lines 49 to 65 show the specific help message
for the subcommand compile of the plug-in Modelsim.
Invoking a command of a plug-in is done the same way. Just type
$ fhlow Modelsim compile
or
$ fhlow M c
to start a compilation of your source code with Modelsim.
There are also some options that can be added to the fhlow command
and the plug-ins. The switches that are used by the fhlow core have to be
located directly after fhlow and are described in Table 1.14. The options for
the subcommands are located after the name of the subcommand and are
described within the description of the plug-ins in section 1.5.
CHAPTER 1. USER MANUAL
1
2
3
4
5
6
7
8
9
10
11
12
13
14
15
16
17
18
19
20
21
22
23
24
25
26
27
28
29
30
31
32
33
34
35
36
37
38
39
40
41
42
43
44
45
46
47
48
49
50
51
52
53
54
55
56
57
58
59
60
61
62
63
64
65
user@host ~ $ fhlow
, - - - - - - - - - - - - - - - - - - - - - - - - - - - - - - - - - - - - - - - - - - - - - - - - - - - - - - - - - - - - - - - - - - - - - - - - - - - - - - - -+
|
fhlow - fast handling of a lot of work
|
+ - - - - - - - - - - - - - - - - - - - - - - - - - - - - - - - - - - - - - - - - - - - - - - - - - - - - - - - - - - - - - - - - - - - - - - - - - - - - - - - -+
| Error : RootNode
|
Couldn ’ t detect the fhlow root directory !
+ - - - - - - - - - - - - - - - - - - - - - - - - - - - - - - - - - - - - - - - - - - - - - - - - - - - - - - - - - - - - - - - - - - - - - - - - - - - - - - - -+
|
work done !
|
‘ - - - - - - - - - - - - - - - - - - - - - - - - - - - - - - - - - - - - - - - - - - - - - - - - - - - - - - - - - - - - - - - - - - - - - - - - - - - - - - - -+
user@host ~ $ cd < fhlowRoot >/ grpProl16 / unitCpu
user@host < fhlowRoot >/ grpProl16 / unitCpu $ fhlow
, - - - - - - - - - - - - - - - - - - - - - - - - - - - - - - - - - - - - - - - - - - - - - - - - - - - - - - - - - - - - - - - - - - - - - - - - - - - - - - - -+
|
fhlow - fast handling of a lot of work
|
+ - - - - - - - - - - - - - - - - - - - - - - - - - - - - - - - - - - - - - - - - - - - - - - - - - - - - - - - - - - - - - - - - - - - - - - - - - - - - - - - -+
| Error while parsing command line :
|
No command given
+ - - - - - - - - - - - - - - - - - - - - - - - - - - - - - - - - - - - - - - - - - - - - - - - - - - - - - - - - - - - - - - - - - - - - - - - - - - - - - - - -+
|
| Usage : fhlow < global - options > COMMAND < local - options > [ COMMAND < options > ...] [ args ]
|
try " fhlow help COMMAND [ COMMAND ]" for detailed help on commands .
|
| Available COMMANDs :
|
Modelsim
Plugin vor Modelsim .
|
compile
-> Compiles the configured sources .
|
plsim
-> Runs post layout simulation of the synthesized design .
|
simulate
-> Simulates the design .
|
|
Quartus
Plugin vor Altera Quartus .
|
placeandroute
-> Runs placement and routing of configured sources .
|
synthesize
-> Synthesizes the configured sources .
|
|
help
Provide help for individual commands
|
|
version
Show the version of the program
|
|
| < global - options >:
|
-l , -- loglevel VAL
Set the loglevel to VAL .
|
-c , -- nocolor
Disable colorful output .
|
-a , -- askexit
Asks to hit a key before exiting .
|
-h , -- help
Show help
|
-v , -- version
Show the version of the program
+ - - - - - - - - - - - - - - - - - - - - - - - - - - - - - - - - - - - - - - - - - - - - - - - - - - - - - - - - - - - - - - - - - - - - - - - - - - - - - - - -+
|
work done !
|
‘ - - - - - - - - - - - - - - - - - - - - - - - - - - - - - - - - - - - - - - - - - - - - - - - - - - - - - - - - - - - - - - - - - - - - - - - - - - - - - - - -+
user@host < fhlowRoot >/ grpProl16 / unitCpu $ fhlow help M c
, - - - - - - - - - - - - - - - - - - - - - - - - - - - - - - - - - - - - - - - - - - - - - - - - - - - - - - - - - - - - - - - - - - - - - - - - - - - - - - - -+
|
fhlow - fast handling of a lot of work
|
+ - - - - - - - - - - - - - - - - - - - - - - - - - - - - - - - - - - - - - - - - - - - - - - - - - - - - - - - - - - - - - - - - - - - - - - - - - - - - - - - -+
| compile - Compiles the configured sources .
|
| Compiles the configured sources .
|
| Usage : fhlow < global - options > Modelsim compile < local - options > [ ARGS ]
|
| < compile - options >:
|
-q , -- quiet
Make vcom quiet .
|
-o , -- options VAL
Options that will be passed to vcom
|
-b , -- buildall
Rebuilds all sources and libraries .
|
+ - - - - - - - - - - - - - - - - - - - - - - - - - - - - - - - - - - - - - - - - - - - - - - - - - - - - - - - - - - - - - - - - - - - - - - - - - - - - - - - -+
|
work done !
|
‘ - - - - - - - - - - - - - - - - - - - - - - - - - - - - - - - - - - - - - - - - - - - - - - - - - - - - - - - - - - - - - - - - - - - - - - - - - - - - - - - -+
Listing 1.16: This listing shows the output some fhlow commands on bash.
24
CHAPTER 1. USER MANUAL
Command Line
-l, -loglevel VAL
Description
sets the loglevel
VAL=3 → logfile: error
VAL=2 → logfile: error, warning
VAL=1 → logfile: error, warning, info
VAL=0 → logfile: error, warning, info, debug
All negative values cause the same logs as “VAL=0” in the
logfile but additionally print the log messages to the console.
VAL=-1 → console: error
VAL=-2 → console: error, warning
VAL=-3 → console: error, warning, info
VAL=-4 → console: error, warning, info, debug
default value: 1
-c, -nocolor
disables the ansi color escape sequences for the output
-a, -askexit
asks for a keystroke when finished
-h, -help
shows the help message; the same as fhlow help
-v, -version
shows the version of fhlow ; the same as fhlow version
25
Table 1.14: Options of the fhlow command.
1
2
3
{
”name ”
=> ” s i m u l a t e ” ,
”tooltip ”
=> ”Run f h l o w with arguments <−−a s k e x i t Modelsim
s i m u l a t e >” ,
”app ”
=> ”#{t e r m i n a l } f h l o w −−a s k e x i t Modelsim s i m u l a t e ”
,
”icon ”
=> ”m. s i m s i m u l a t e . xpm”
4
5
6
}
Listing 1.17: A sample configuration of a button that starts a simulation
using the Modelsim plug-in of fhlow . This entry can be added to the @@progs
Array in RunIts configuration file.
1.6.2
Using RunIt
To use RunIt to invoke fhlow you have to edit the configuration file of
RunIt. Listing 1.17 shows a sample configuration of a button that starts a
simulation using the Modelsim plug-in. The significant part is line 4 where
the actual command that should be invoked is set. As you can see this is
exactly the same command as you would write on the command line to start
fhlow . If you add the option -askexit fhlow will ask you to hit a key before
closing the terminal window. #{terminal} is a String that holds the name
of the terminal program, please read section 1.7 for further information.
CHAPTER 1. USER MANUAL
1.7
1.7.1
26
RunIt
Overview
RunIt is a tiny GUI that stays always on top on a specified place of your
desktop and can be used to start programs. Icons, program calls and the
names of the buttons are defined in a configuration file. The desired working
directory for the programs is set by a dialogue window.
This tool was written to support the usage fhlow and is therefore available on Microsoft Windows and GNU/Linux systems.
1.7.2
Requirements
In order to use RunIt you need:
• Ruby-1.8 (more information can be found in [1])
• wxRuby-0.6.0 (more information can be found in [5])
It is assumed from now on that these packages are installed and working.
If you have questions concerning the installation of these tools please read
their documentation.
1.7.3
Installation
First download the newest stable version of RunIt from the download section
at http://fhlow.lisuna.org and unpack it (using tar and gzip, 7zip, winzip
or something similar) to a directory of your choice. This directory will from
now on be called <RunItRoot> as you can see in Figure 1.5.
1.7.4
Usage
Configuration
There is one configuration file (settings.rb) in the directory <RunItRoot> /bin which is used to set the parameters described in Table 1.15.
As this file includes Ruby source code, it is possible to use variables to set
common data for more buttons (shown in Listing 1.18).
The best way to create a new button is to create or download an icon
(which has to have the xpm format) and save it in <RunItRoot> /bin/img/.
Then edit settings.rb and add an entry to the @@progs array.
Therefore you can define some helper variables in Ruby syntax as you
can see in Listing 1.18 in lines 2 to 4. These variables are used to set the
directory that contains the executables (binDirectory), the default options
of the programs (defaultOptions) and the terminal program that should
be used for invocation of the programs. You need to define a terminal if
your program only uses a command line as user interface. On GNU/Linux
CHAPTER 1. USER MANUAL
27
Figure 1.5: The directory structure of the RunIt package.
Systems this could be konsole -e or xterm -e. On Microsoft Windows
systems this variable should be set to start, for ordinary programs, and
start ruby for programs written in Ruby (like fhlow ).
Invocation
• GNU/Linux
Starting RunIt from the command line will most likely look like this:
$ ruby <RunItRoot>/bin/runit.rb
This command can also be used to create a menu entry or a desktop
icon. Please read the documentation of your window manager if you
don’t know to how to do this.
• Microsoft Windows
RunIt can also be started from the command prompt with a command
simmilar to this:
C:\> rubyw <RunItRoot>\bin\runit.rb
CHAPTER 1. USER MANUAL
1
2
3
4
5
6
7
8
9
10
11
12
13
14
15
16
17
18
19
20
21
22
23
24
25
28
# Some Ruby v a r i a b l e s .
binDirectory
= ’ / usr / bin / ’
d e f a u l t O p t i o n s = ’−v ’
terminal
= ’ k o n s o l e −e ’
# This Array i n c l u d e s i n f o r m a t i o n a b o u t t h e b u t t o n s .
@@progs = [
{
”name ”
=> ” l s ” ,
# The c o n s t r u c t #{d e f a u l t O p t i o n s } i n t h e l i n e 14 w i l l be
# s u s t i t u t e d by i t s v a l u e :
# ”Run < l s −v> i n t h e w o r k i n g D i r e c t o r y . ”
” t o o l t i p ” => ”Run < l s #{d e f a u l t O p t i o n s }> i n w o r k i n g D i r e c t o r y . ” ,
”app ”
”icon ”
=> ”#{t e r m i n a l } #{b i n D i r e c t o r y } l s #{d e f a u l t O p t i o n s } ” ,
=> ” l s . xpm”
”name ”
”tooltip ”
”app ”
”icon ”
=>
=>
=>
=>
},
{
”echo ” ,
”Run <echo h e l l o world >. ” ,
”#{t e r m i n a l } #{b i n D i r e c t o r y } echo h e l l o world ” ,
”echo . xpm”
}
]
Listing 1.18: A code snippet from a settings.rb file showing the useage
of ruby variables and the definition of the @@progs array.
You should use rubyw instead of ruby to start the tool because ruby
will start a separate command prompt window which is of no use.
This command can also be used to create a shortcut on your desktop
or in your start menu.
CHAPTER 1. USER MANUAL
29
Parameter
@@workingDirectoryLabelRegex
Description
This regular expression is used to
substitute
the
directory
path
with
@@workingDirectoryLabelSubstitution.
@@workingDirectoryLabelSubstitution
This string is displayed instead of the directory path in the text field.
@@defaultWorkingDirectory
This is the default working directory.
@@progs
This is an Array of Items that represent one
button in the GUI.
@@progs[n][’name’]
The name of the button. (Listing 1.18 Lines
9 and 20)
@@progs[n][’tooltip’]
The message that will be displayed when the
mouse is hoverd over the button. (Listing 1.18
Lines 9 and 20)
@@progs[n][’app’]
The command that will be executed when the
button is pressed. (Listing 1.18 Lines 9 and
20)
@@progs[n][’iconv’]
The icon that will be displayed inside the button. (Listing 1.18 Lines 9 and 20)
@@posx
The x position in pixels.
@@posy
The y position in pixels.
Table 1.15: This table shows the Parameters that are defined in <RunItRoot> /bin/settings.rb
.
Bibliography
[1] URL, http://www.ruby-lang.org. abgefragt am 23.05.2007.
[2] URL, http://www.ruby-lang.org/en/downloads/.
23.05.2007.
abgefragt
am
[3] URL, http://rubygems.org/read/chapter/3. abgefragt am 23.05.2007.
[4] URL, http://www.gnu.org/software/bash/. abgefragt am 10.05.2007.
[5] URL, http://wxruby.rubyforge.org. abgefragt am 23.05.2007.
[6] Dave Thomas, Chad Fowler, A. H.: Porgramming Ruby – The Pragmatic Programmers’ Guide. Pragmatic Bookshelf, 2. ed., 2005.
30