1
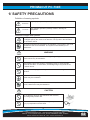
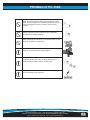
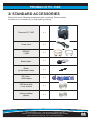
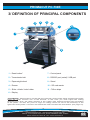
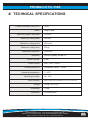
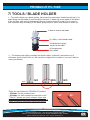
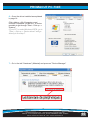
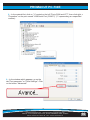
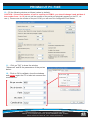
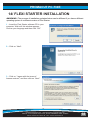
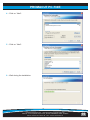
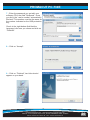
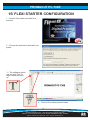
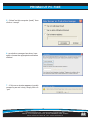
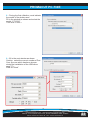
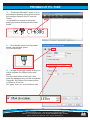
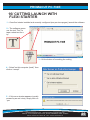
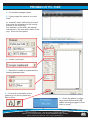
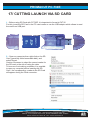
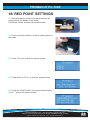
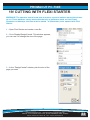
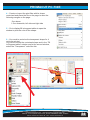
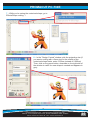
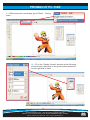
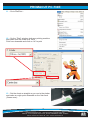
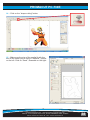
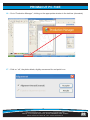
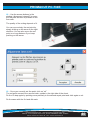
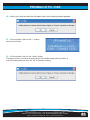
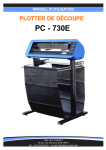
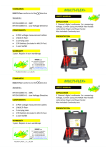
USER MANUAL
CUTTING PLOTTER
PC - 730E
[email protected] - www.promattex-international.com
Address: 7 bis impasse Denis Dulac, 94700 MAISONS-ALFORT, FRANCE
Phone: 00 33 141 79 00 45 - Fax : 00 33 143 53 93 57
PROMACUT PC-730E
TABLE OF CONTENTS
Safety precautions
p.2 - 3
Standard accessories
p.4
Definition of principal components
p.5
Technical specifications
p.6
Stand assembly
p.7
Loading of vinyl
p.8
Tools / blade holder
p.9
Control panel
p.10
Point of origin
p.11
Pressure adjustment / cutting test
p.12
Adjustment of the speed
p.13
USB driver setting + configuration of the port COM
p.14 - 17
Flexi Starter Installation
p.18 - 20
Flexi Starter Configuration
p.21 - 24
Cutting launch with Flexi Starter
p.25 - 26
Cutting launch via SD card
p.27 - 30
Red point settings
p.31 - 32
Cutting with Flexi Starter
p.33 - 41
[email protected] - www.promattex-international.com
Address: 7 bis impasse Denis Dulac, 94700 MAISONS-ALFORT, FRANCE
Phone: 00 33 141 79 00 45 - Fax : 00 33 143 53 93 57
01
PROMACUT PC-730E
1/ SAFETY PRECAUTIONS
Definition of warning symbols
Any improper operation possibly results in hazard of life.
WARNING
CAUTION
Any improper operation possibly results in damage of
equipment.
Definition of signs and symbols
The symbol is prepared to arouse operator's highly attention. The symbols
in triangles specify the cases to be attentive. The symbol in the left warns
you of electric shock.
The symbol specifies the activities to be forbidden. The symbol in the circle
specifies the acts to be forbidden. The symbol in the left tells you no
detachment.
WARNING
Do not use the power source not meeting rating voltage, otherwise fire or
electric shock may be resulted in.
If the machine gives out smoke or unpleasing smell, or noise sounds
please do not use it. In such cases, continuing using it may result in fire
or electric shock.
Do not put out the plug when the power is on to avoid damage to the
machine.
Make sure the machine grounded otherwise electric shock or mechanic
default may be resulted in.
Do not detach, repair or reconstruct the machine, otherwise fire, electric
shock, hazard of life may be resulted in.
CAUTION
Do not leak any liquid or drop metal into the machine,
such things may result in fire.
Do not touch the knife top with your finger to prevent
injury or perspiration of knife head.
[email protected] - www.promattex-international.com
Address: 7 bis impasse Denis Dulac, 94700 MAISONS-ALFORT, FRANCE
Phone: 00 33 141 79 00 45 - Fax : 00 33 143 53 93 57
02
PROMACUT PC-730E
Do not damage or random replace the supplied power
cable. Do not excessively bend, pull, bundle the power
cable or place weight on it, otherwise the power source
may be damaged even fire or electric shock is thus
incurred.
If you are not going to use the machine for a long time,
please unplug the power cable from the receptacle,
otherwise fire possibly happens.
When operating the machine, do not place either of your
hands on capstan to avoid injury.
Place the machine on a stable surface, otherwise the
machine may fall therefore get damaged.
To unplug the power cable from receptacle, please hold
the plug instead of the cable, strongly pulling of the
cable possibly results in electric shock or fire.
Any operation is forbidden in case of storm or lighting to
prevent damage of the machine.
[email protected] - www.promattex-international.com
Address: 7 bis impasse Denis Dulac, 94700 MAISONS-ALFORT, FRANCE
Phone: 00 33 141 79 00 45 - Fax : 00 33 143 53 93 57
03
PROMACUT PC-730E
2/ STANDARD ACCESSORIES
Please first check following accessories after unpacking. Please contact
the seller or our company if you find anything missing.
Promacut PC-730E
x1
Power cord
x1
RS232C
+ USB
x1
Blade holder
x1
Blade
(in the blade holder)
x1
SD Card +
USB adaptor
x1
USB driver disk
+ user manual
x1
Cutting software
(option)
x1
[email protected] - www.promattex-international.com
Address: 7 bis impasse Denis Dulac, 94700 MAISONS-ALFORT, FRANCE
Phone: 00 33 141 79 00 45 - Fax : 00 33 143 53 93 57
04
PROMACUT PC-730E
3/ DEFINITION OF PRINCIPAL COMPONENTS
3
4
5
6
8
7
2
1
11
9
10
1 – Reset button*
7 – Control panel
2 – Transmission belt
8 – RS232C port (serial) / USB port
3 – Paperweight wheel
9 – Stand
4 – Runner
10 – SD card reader
5 – Slider + blade / tools holder
11 – Teflon stripe
6 – Display
*ATTENTION : Reset buttons on the left and right side of the plotter allow resetting the plotter
when the slider touches one of the buttons. In this case you shall adjust the cutting
dimensions so that the slider remains in the cutting area without touching the extremities
of the plotter. As well, the point of origin of cutting cannot be set at the extremity of the
right side of the plotter. It must be set before the slider touches the reset button (see page 10).
[email protected] - www.promattex-international.com
Address: 7 bis impasse Denis Dulac, 94700 MAISONS-ALFORT, FRANCE
Phone: 00 33 141 79 00 45 - Fax : 00 33 143 53 93 57
05
PROMACUT PC-730E
4/ TECHNICAL SPECIFICATIONS
Central Processor Unit (CPU)
Motor
32 bit
Step by step
Maximum paper Feed width
730 mm
Maximum cutting width
635 mm
Maximum cutting speed
Maximum cutting force
Mechanism precision
Interfaces
Buffer memory
Power source
Plotting instruction
Operating temperature
Operating humidity
Size (LxWxH)
Weight
500 mm/s
600 gf
0,025 mm
RS232C (serial) & USB 2.0
4 MB
220 / 110 V - 50 Hz
Compatible DM/PL , HP/GL
5 - 35°C
30 - 70%
850 x 300 x 270 mm (850 x 950 x 1110 with stand)
22 Kg (including stand)
Guarantee
1 year
Conformity
CE certification
[email protected] - www.promattex-international.com
Address: 7 bis impasse Denis Dulac, 94700 MAISONS-ALFORT, FRANCE
Phone: 00 33 141 79 00 45 - Fax : 00 33 143 53 93 57
06
PROMACUT PC-730E
5/ STAND ASSEMBLY
[email protected] - www.promattex-international.com
Address: 7 bis impasse Denis Dulac, 94700 MAISONS-ALFORT, FRANCE
Phone: 00 33 141 79 00 45 - Fax : 00 33 143 53 93 57
07
PROMACUT PC-730E
6/ LOADING OF VINYL
1 – Place the plotter on a flat and stable area or on its stand
2 – Place the roll on the roll holder fixing it with disks:
4 – Put the vinyl on the roll holder and load the vinyl from the back of the plotter and place
it as straight as possible to avoid any movement
5 – Attention: the pinch rollers should be always placed above the scratched parts of the
driving roll to allow the proper holding of vinyl:
YES
NO
5 – Place the pinch rollers at the left and right ends side of vinyl by leaving approximately
1 cm of margin outside the rollers like below:
6 – Close down the rollers by raising the levers located at the back:
Raise to close
down rollers
[email protected] - www.promattex-international.com
Address: 7 bis impasse Denis Dulac, 94700 MAISONS-ALFORT, FRANCE
Phone: 00 33 141 79 00 45 - Fax : 00 33 143 53 93 57
Lower to
raise rollers
08
PROMACUT PC-730E
7/ TOOLS / BLADE HOLDER
1 – To install a blade on a blade holder, just press the metal stem located on the top (1) to
make bring out the blade (4) and be able to remove it. Make slip a new blade in the place
of the old one, side slicing downwards, then to screw/unscrew the cap (3) in a more or
less important way according to the blade going beyond which one wishes to obtain (4).
1/ Stem to remove the blade
2/ « Body » of the blade holder
3/ Adjustment of going
beyond of the blade
4/ Going beyond
of the blade
2 – The blade must slighty overtake the blade holder. It shouldn’t exceed the vinyl
thickness and the liner to be cut. Be careful to respect this condition if you don’t want to
wear your blades.
Vynil
NO
YES
NO
Plastic base
There are two blades for PROMACUT plotters:
- 45°blade: for thin material cuts
- 60°blade: for thick material or extra-thin cuts**.
**The 60° blades are much sharper, thiner and
more fragile and require the respect of the rule of
blade overtaking adjustment mentioned above.
60°
[email protected] - www.promattex-international.com
Address: 7 bis impasse Denis Dulac, 94700 MAISONS-ALFORT, FRANCE
Phone: 00 33 141 79 00 45 - Fax : 00 33 143 53 93 57
45°
09
PROMACUT PC-730E
8/ CONTROL PANNEL:
Display
Lower the tools holder
or switch on
the red point
On line / Off line
Raise the tolls holder
Move the slider
and the vynil
Point of origin
Settings
(pressure, speed, etc.)
Increase
(pressure,
speed...)
Escape from menu
Break
or cutting test
SD card reader
(formatted in FAT 32)
Validate the settings
(pressure, speed...)
or enter the menu
Decrease
(pressure,
speed...)
[email protected] - www.promattex-international.com
Address: 7 bis impasse Denis Dulac, 94700 MAISONS-ALFORT, FRANCE
Phone: 00 33 141 79 00 45 - Fax : 00 33 143 53 93 57
10
PROMACUT PC-730E
9/ USE OF THE CONTROL PANEL:
1 – When the plotter is lit, it initializes then the screen
posts "On Line".
2 – The state "On Line" indicates that the plotter is ready to cut, all the keys of the
keyboard are then desactivated except the key "on Line" which allows to reach the many
settings available on the plotter.
10/ POINT OF ORIGIN:
1 – Press "On Line" so that the screen shows :
Move the blade thanks to the keys (t, p, u & q) till the place desired for the beginning
of cutting knowing that the plotter cuts from the right to the left side.
Pease make the slider avoid touching the reset buttons.
Press on ± to validate the point of origin: cutting will start exactly on the place where the
blade is, the screen shows again "X=0.0 - Y=0.0".
Press "On Line" to be able to cut, the screen shows:
[email protected] - www.promattex-international.com
Address: 7 bis impasse Denis Dulac, 94700 MAISONS-ALFORT, FRANCE
Phone: 00 33 141 79 00 45 - Fax : 00 33 143 53 93 57
11
PROMACUT PC-730E
11/ PRESSURE ADJUSTMENT & CUTTING
TEST
1 – Press "On Line" so that the screen shows :
2 – Press twice on "Func", so that the screen shows:
3 – Press "Enter", the screen shows:
Press on the keys + & - to raise / reduce the pressure.
Start with a low pressure (+/- 70) not to be likely to
transpierce the vinyl.
4 – Press on « Test »: the plotter cut a rectangle.
5 – Press on the key q to advance a little bit the vinyl to be able to check that the
cutting test can be peeled correctly.
6 – If the test is not conclusive, define a new point of origin, then press on Mode to
increase/to reduce the pressure according to the cases. Press again on Test to carry out a
new test.
Repeat these stages till you obtain a satisfactory cutting.
7 – Once the setting finished, press « Enter » to validate, then press "On line" to launch
cutting.
[email protected] - www.promattex-international.com
Address: 7 bis impasse Denis Dulac, 94700 MAISONS-ALFORT, FRANCE
Phone: 00 33 141 79 00 45 - Fax : 00 33 143 53 93 57
12
PROMACUT PC-730E
12/ ADJUSTMENT OF THE SPEED
1 – Press "On Line" so that the screen shows:
2 – Press twice "Func", so that the screen shows:
3 – Press "Enter", the screen shows:
Press on the keys + & - to raise / reduce the speed.
4 – Once the setting finished, press « Enter » to
validate, then press "On line" to launch cutting.
[email protected] - www.promattex-international.com
Address: 7 bis impasse Denis Dulac, 94700 MAISONS-ALFORT, FRANCE
Phone: 00 33 141 79 00 45 - Fax : 00 33 143 53 93 57
13
PROMACUT PC-730E
13/ USB DRIVER SETTING
1 – Desactivate any anti-viruses or application programs that could interfere with the
settling of a new software.
2 – Insert the "Driver USB" CD provided with the plotter and open it
3 – Double-click on "USB DRIVERS" (see below), a black windows appears and indicates
the installation launching. When this window disappears, the driver is installed : restart the
computer.
5 – Once the computer restarted, connect the plotter with the USB cable provided, then
turn it on. On the right bottom of your screen, a message “new material detected…”
appears, a few moment after, another message indicates the end of the installation.
[email protected] - www.promattex-international.com
Address: 7 bis impasse Denis Dulac, 94700 MAISONS-ALFORT, FRANCE
Phone: 00 33 141 79 00 45 - Fax : 00 33 143 53 93 57
14
PROMACUT PC-730E
6 – Once the driver installed as explained
in page 14:
Click right on « My Computer » and
choose "Properties" (under XP). It is also
possible to go through "Start -> Set up ->
System".
if your PC is under Windows VISTA, go to
"Start -> Set up -> Device driver" and go
directly to the step 7.
7 – Go in the tab "Hardware" (Material) and press on "Device Manager"
[email protected] - www.promattex-international.com
Address: 7 bis impasse Denis Dulac, 94700 MAISONS-ALFORT, FRANCE
Phone: 00 33 141 79 00 45 - Fax : 00 33 143 53 93 57
15
PROMACUT PC-730E
8 – In the material list, click on "+" located on the left "Ports COM and LPT", then click right ->
"Properties" on the port named "USB Serial Port (COM??)" (?? representing an unspecified
number):
9 – In the window which appears, go on the
tab "Port parameter" or "Ports Settings". Click
on the button "Advanced":
[email protected] - www.promattex-international.com
Address: 7 bis impasse Denis Dulac, 94700 MAISONS-ALFORT, FRANCE
Phone: 00 33 141 79 00 45 - Fax : 00 33 143 53 93 57
16
PROMACUT PC-730E
10 – Fill the following window as follows (values by default).
CAUTION : if the actual number of port is superior to COM10, you should change it and attribute it
the number from 1 to 10 (do not use the number of the serial port physically present on the PC, «in
use »). Please note the number of the port COM, you will need it to configurate Flexi Starter.
11 – Click on "OK" to close the window
"Advanced" and fill the parameters of the port as
below :
12 – Click on OK to validate, close the windows
and restart again the PC to take into account the
modifications.
[email protected] - www.promattex-international.com
Address: 7 bis impasse Denis Dulac, 94700 MAISONS-ALFORT, FRANCE
Phone: 00 33 141 79 00 45 - Fax : 00 33 143 53 93 57
17
PROMACUT PC-730E
14/ FLEXI STARTER INSTALLATION
AWARNING ! The process of installation explained below can be different if you have a different
operating system or a different version of Flexi Starter.
1 – Insert the Flexi Starter software CD in your
computer. Wait until this window appears.
Choose your language and then click “OK”.
2 – Click on “Next”:
3 – Click on “I agree with the terms of
license contract”, and then click on “Next”:
[email protected] - www.promattex-international.com
Address: 7 bis impasse Denis Dulac, 94700 MAISONS-ALFORT, FRANCE
Phone: 00 33 141 79 00 45 - Fax : 00 33 143 53 93 57
18
PROMACUT PC-730E
4 – Click on “Next”:
5 – Click on “Next”:
6 – Wait during the installation:
[email protected] - www.promattex-international.com
Address: 7 bis impasse Denis Dulac, 94700 MAISONS-ALFORT, FRANCE
Phone: 00 33 141 79 00 45 - Fax : 00 33 143 53 93 57
19
PROMACUT PC-730E
7 – Enter the password you got with your
software CD in the field “Password”. Once
you did it, the “user's number” automatically
fills itself. This number must be the same as
the number indicated on the USB protection
key.
Check in the right bottom field that the
language is the one you chose and click on
“Finished”.
8 – Click on “Accept”:
9 – Click on “Finished”, two links should
appear on your desk:
[email protected] - www.promattex-international.com
Address: 7 bis impasse Denis Dulac, 94700 MAISONS-ALFORT, FRANCE
Phone: 00 33 141 79 00 45 - Fax : 00 33 143 53 93 57
20
PROMACUT PC-730E
15/ FLEXI STARTER CONFIGURATION
1 – Launch flexi starter and wait for a
moment
2 – Choose the method of activation you
prefer:
3 – The software opens
use the tool “Text” to
tape a short text for a
try
4 – Then hit the cutting launch button
[email protected] - www.promattex-international.com
Address: 7 bis impasse Denis Dulac, 94700 MAISONS-ALFORT, FRANCE
Phone: 00 33 141 79 00 45 - Fax : 00 33 143 53 93 57
21
PROMACUT PC-730E
5 – Select”on this computer (local)” then
click on “accept”
6 –production manager launches, here
again choose the appropriate activation
method
7 – If this error window appears (usually
caused by an anti virus), simply click on
“yes”
[email protected] - www.promattex-international.com
Address: 7 bis impasse Denis Dulac, 94700 MAISONS-ALFORT, FRANCE
Phone: 00 33 141 79 00 45 - Fax : 00 33 143 53 93 57
22
PROMACUT PC-730E
8 – During the first utilisation, must indicate
the model of the plotter used
Fill in the window as shown and select the
model “CT-630G”
Then click « next ».
9 – fill in the next window as shown
Caution: select the correct number of Port
Com (the one which has been chosen
during the installation of the USB driver
page 17)
Click on “finish”
[email protected] - www.promattex-international.com
Address: 7 bis impasse Denis Dulac, 94700 MAISONS-ALFORT, FRANCE
Phone: 00 33 141 79 00 45 - Fax : 00 33 143 53 93 57
23
PROMACUT PC-730E
10 – “Production Manager” opens, it is an
equivalent of printing queue which makes
the interface between the PC and the
Plotter
It is possible to access to advanced
setting by double clicking on the plotter
model.
11 – Once double clicked on the plotter
model, new window opens
Go to the third tab
12 – In order to get high quality cutting it is
vital to indicate the Offset of the used
blade
Tick the case”offset of the knife” then
enter the adapted value for the used blade
Generally, the Offset of the blade will be
0.025cm or 0.035 cm.
Hit “apply” then “ok” on the bottom right
[email protected] - www.promattex-international.com
Address: 7 bis impasse Denis Dulac, 94700 MAISONS-ALFORT, FRANCE
Phone: 00 33 141 79 00 45 - Fax : 00 33 143 53 93 57
24
PROMACUT PC-730E
16/ CUTTING LAUNCH WITH
FLEXI STARTER
1 – Once flexi starter installed and correctly configured (see previous pages), launch the software
2 – The software opens
use the tool “Text” to
tape a short text for a
try
3 – Hit the button of launching the cutting
4 – Select”on this computer (local)” then
click on “accept”
5 – If this error window appears (usually
caused by an anti virus), simply click on
“yes
[email protected] - www.promattex-international.com
Address: 7 bis impasse Denis Dulac, 94700 MAISONS-ALFORT, FRANCE
Phone: 00 33 141 79 00 45 - Fax : 00 33 143 53 93 57
25
PROMACUT PC-730E
4 – Production manager opens
5 – Opens again the window “to cut/to
draw”
In “material” select “defined by the user”
then enter the dimension of the cutting
surface of the used vinyl
Pay attention to the width, this should
correspond to the real width useful of the
vinyl, it can not be superior
6 – Select “send now” :
7 –Select the number of copies and the
spacing between them
8 – Choose the orientation of the
pattern to cut and if needed the
Mirror effect
9 – Check the plotter is online;
origin point defined and USB
cables correctly plugged in then
click on “send”
[email protected] - www.promattex-international.com
Address: 7 bis impasse Denis Dulac, 94700 MAISONS-ALFORT, FRANCE
Phone: 00 33 141 79 00 45 - Fax : 00 33 143 53 93 57
26
PROMACUT PC-730E
17/ CUTTING LAUNCH VIA SD CARD
1 – Before using SD Card with PC730E, it is important to format in FAT-32
For this, insert the SD Card in the PC card reader or use the USB adaptor which allows to read
the card from USB port:
2 – Open my computer then right click on the SD
Card, (generally called removable disk), and
select format.
Caution: Be aware to select the correct reader for
the SD card or the risk of losing the data.
To be sure of not making a mistake, it is possible
to open my computer before inserting the SD
Card , the corresponding reader to the SD Card
will appear during the Card connexion.
[email protected] - www.promattex-international.com
Address: 7 bis impasse Denis Dulac, 94700 MAISONS-ALFORT, FRANCE
Phone: 00 33 141 79 00 45 - Fax : 00 33 143 53 93 57
27
PROMACUT PC-730E
3 – Select the file system “FAT32”, It is
possible (but not compulsory) to give a
name to a volume.
Then click on “Start”".
4 –Click on “ok”
5 –Click on “ok”"
[email protected] - www.promattex-international.com
Address: 7 bis impasse Denis Dulac, 94700 MAISONS-ALFORT, FRANCE
Phone: 00 33 141 79 00 45 - Fax : 00 33 143 53 93 57
28
PROMACUT PC-730E
6 – To launch a cutting procedure on the
SD Card; proceed as usual to the very last
detail:
Select “Save in the file” then click on
“send”.
7 – In the opening window, select the SD Card:
8 – Give a name to the file and click on
“save”
[email protected] - www.promattex-international.com
Address: 7 bis impasse Denis Dulac, 94700 MAISONS-ALFORT, FRANCE
Phone: 00 33 141 79 00 45 - Fax : 00 33 143 53 93 57
29
PROMACUT PC-730E
9 – Insert the SD Card in the
Plotter and make an origin point
10 – Hit the “Online” button for the screen to be
11 – Press once on “fonc”, the screen displays:
12 – Press on “Enter”, the screen displays
Here” index” corresponds to the number of the file,
“Name” to the name which has been given to the
file,
“Size” to the weight of the file
Use the keys”+” and “-“ to select the file to be cutted
and then hit “Enter” button to launch the cutting.
[email protected] - www.promattex-international.com
Address: 7 bis impasse Denis Dulac, 94700 MAISONS-ALFORT, FRANCE
Phone: 00 33 141 79 00 45 - Fax : 00 33 143 53 93 57
30
PROMACUT PC-730E
18/ RED POINT SETTINGS
1 – Start by putting a sheet in the plotter and put an
origin point in the middle of the sheet.
Put the pen holder instead of the blade holder.
2 – Push on the pen holder in order to make a point on
the sheet.
3 – Press “On Line” so that the screen shows:
4 – Press twice on “Func” so that the screen shows:
5 – Press the “Enter” button, then press three times on
“Func”, ” so that the screen shows:
[email protected] - www.promattex-international.com
Address: 7 bis impasse Denis Dulac, 94700 MAISONS-ALFORT, FRANCE
Phone: 00 33 141 79 00 45 - Fax : 00 33 143 53 93 57
31
PROMACUT PC-730E
6 – The red point is now
on, move it with the
▲►▼◄ buttons until it
exactly fits with the pen's
mark.
7 – Once it fits, press the ± button, then “Enter”
8 – Press another time on the ± button and “Enter” again: the chariot automatically
moves on the plotter
9 – The screen shows: “setting done”
Try several times this setting in case it doesn't fit right the first time.
[email protected] - www.promattex-international.com
Address: 7 bis impasse Denis Dulac, 94700 MAISONS-ALFORT, FRANCE
Phone: 00 33 141 79 00 45 - Fax : 00 33 143 53 93 57
32
PROMACUT PC-730E
19/ CUTTING WITH FLEXI STARTER
WARNING! The operator has to know how to make a vectoriel pattern around the picture
to cut. These patterns can be made with the help of softwares such as Corel Draw,
Illustrator or Inkscape, the files must be saved *.ai (illustrator) to be opened with Flexi
Starter.
1 – Open Flexi Starter and create a new file
2 – Go to Display/DesignCentral. This window appears,
you can use it to change the size of the page:
3 – In the “DesignCentral” window, pick the size of the
page you want
[email protected] - www.promattex-international.com
Address: 7 bis impasse Denis Dulac, 94700 MAISONS-ALFORT, FRANCE
Phone: 00 33 141 79 00 45 - Fax : 00 33 143 53 93 57
33
PROMACUT PC-730E
4 – Create or import the print files with its shape
vectorised and place the file on the page to save the
following marges on the page:
5cm above
1.5cm downside, left side and right side
5 – Go to display/fill in/segment editor to open the
window to pick the color of the shape:
6 – You need to vectorize the transparent shape for it
not to be printed
You have to select the vectorized shape and in the “Fill
in/Segment editor” window and in the second window,
select the “Transparent” color like this:
[email protected] - www.promattex-international.com
Address: 7 bis impasse Denis Dulac, 94700 MAISONS-ALFORT, FRANCE
Phone: 00 33 141 79 00 45 - Fax : 00 33 143 53 93 57
34
PROMACUT PC-730E
7 – While you're saving the vectorized shape, go to
Effects/Shape cutting…/
8 – In the “Design Central” window, pick the projection size (if
you want a cutting with a 2mm size on the outside of the
vectorized shape basis, enter 0.200cm instead of 0.000cm)
Then, click on the green button, downside on the right side of
the window to valid: the new shape is created and appears in
grey.
[email protected] - www.promattex-international.com
Address: 7 bis impasse Denis Dulac, 94700 MAISONS-ALFORT, FRANCE
Phone: 00 33 141 79 00 45 - Fax : 00 33 143 53 93 57
35
PROMACUT PC-730E
9 – While saving the new shape, go to Effects – Cutting
mark…:
10 – Fill in the “Design Central” window as the following
picture shows, then click on the green button downside
on the right side to Valid:
[email protected] - www.promattex-international.com
Address: 7 bis impasse Denis Dulac, 94700 MAISONS-ALFORT, FRANCE
Phone: 00 33 141 79 00 45 - Fax : 00 33 143 53 93 57
36
PROMACUT PC-730E
11 – Go to File/Print…
12 – On the “Print” window, pick your printing machine
and make sure the scale is at 100%
Print from downside and click on “ok” to print
13 – Set the sheet as straight as you can in the plotter
and make an origin point downside on the first mark.
(Green zone):
[email protected] - www.promattex-international.com
Address: 7 bis impasse Denis Dulac, 94700 MAISONS-ALFORT, FRANCE
Phone: 00 33 141 79 00 45 - Fax : 00 33 143 53 93 57
37
PROMACUT PC-730E
14 – Click on the “shape cutting” button
15 – Make sure the size of the media fit with the
size of the sheet you're using in “Material”, upside
on the left. Click on “Send”, downside on the right:
[email protected] - www.promattex-international.com
Address: 7 bis impasse Denis Dulac, 94700 MAISONS-ALFORT, FRANCE
Phone: 00 33 141 79 00 45 - Fax : 00 33 143 53 93 57
38
PROMACUT PC-730E
16 – Go to “Production Manager”, clicking on the appropriate window in the task bar (downside)
17 – Click on “ok”, the plotter blade, slightly moves and the red point is on.
[email protected] - www.promattex-international.com
Address: 7 bis impasse Denis Dulac, 94700 MAISONS-ALFORT, FRANCE
Phone: 00 33 141 79 00 45 - Fax : 00 33 143 53 93 57
39
PROMACUT PC-730E
18 – Use the arrows buttons in the
window “alignement interactif” to move
the red point as near as possible to the
first mark.
The quality of the cutting depends of it.
You can move slowly the red point by
simply clicking on the arrow to the right
direction. You can also move the red
point on a long distance if you keep
pushing on this arrow.
19 – Once you correctly set the point, click on “ok”
The red point moves to the second mark, upside to the right side of the sheet.
Do the 18 step again by pointing more precisely to the second repair point and click again on ok.
Do the same with the 3rd and 4th mark.
[email protected] - www.promattex-international.com
Address: 7 bis impasse Denis Dulac, 94700 MAISONS-ALFORT, FRANCE
Phone: 00 33 141 79 00 45 - Fax : 00 33 143 53 93 57
40
PROMACUT PC-730E
20 – After you're finished with the 4th repair point, the following window appears:
21 – On the plotter, click on the ± button,
here is the screen:
22 – On the plotter, click on the “enter” button
The lame moves, it must be exactly above the middle repair point (number 4)
In the following window, click on “ok” to start the cutting
[email protected] - www.promattex-international.com
Address: 7 bis impasse Denis Dulac, 94700 MAISONS-ALFORT, FRANCE
Phone: 00 33 141 79 00 45 - Fax : 00 33 143 53 93 57
41