1
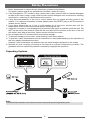
Safety Precautions 6hank you for purchasing this product Please read through these operating instructions so you will know how to operate your model properly #fter youŏve ſnished reading the instructions, keep this manual in a safe place for future reference Please don't change the fuse on the power cord without professional guidance, using improper fuse may cause damage to this unit or even cause ſre Only connect the unit to a 12-volt power supply with negative grounding Please contact your nearest dealer if one of the following symptoms is experienced: Never install this unit where the operation & condition for safe driving is impaired a 9ater or other oDLects enters the unit D 6here is smoke c Peculiar smell 6o ensure safe driving, please adLust the volume to a safe and comfortaDle level in case of emergency situations Never use the video display function in the front when driving to prevent the violation of laws & regulations and also to reduce the risk of traffic accident except for using rear view video camera Never expose this unit, amplifier, and speakers to moisture or water to prevent eleEtriE sparks or ſre 1 Safety Precautions 1 Never disassemDle or adLust the unit without any professional guidance (or details, please consult any professional car shop dealer for inSuiry 2 +f the front panel or 6(6 monitor is dirty, please use a clean silicone cloth and neutral detergent to wipe off the spot 7sing a rough cloth and non-neutral detergent such as alcohol for cleaning may result in scratching or decoloration to the monitor +f any aDnormal Dehavior of the unit is found, please refer to trouDle shooting guide of this manual +f no relevant information is found, please press the =4'5'6? key on the front panel to resume factory default +f you have parked the car in hot or cold weather for a long time, please wait until the temperature in the car Decomes normal Defore operating the unit 7sing the car heater in low temperature environment may result in moisture inside the unit, &O NO6 use the unit in this situation 'Lect the disc and wipe off the moisture on the disc +f the unit still doesn't work after a few hours, please contact the service center &o not impact the .%& monitor which could cause damage 6o prevent damage to the screen, avoid touching it with sharp oDLects 6o provide a clear demonstration and an alternative for easy understanding to the operation of this unit, graphic illustrations are used *owever, some illustrations are different from the actual images displayed on the screen Operate the unit correctly according to this manual to prevent unnecessary proDlem 6he guarantee won't De valid if the proDlem is caused Dy inappropriate operation Expanding Systems Note: 6he items listed outside of the frame are the commercial products generally sold 2 Contents Safety Precautions ...................................1 Play/Pause14 Previous/Next 15 5earch for a Folder 15 4epeat 15 4epeat #-$ 16 5hufƀe 4andom Play16 5elect #udio Mode16 5elect 5uDtitle .anguage 16 8ideo 5etup 16 PlayDack +nformation 17 &irect 6rack 'ntry 17 4otate Pictures 17 Zoom17 Before Using .............................................4 Front Panel 4 4emote %ontrol5 Notes on 4emote %ontrol 7sage 6 7ninstall $attery6 +nstall $attery 6 Basic Operations ......................................7 Parking $rake 7 Mute 7 Power On / Off 7 #udiDle $eep %onſrmation 7 Playing 5ource 5election 7 5elect Preset 'Suali\er 8 #dLust '3 Parameters 8 #dLust F#& $#. 8 5et &ate /6ime 9 5et &ate 9 5et %lock Mode 9 5et 6ime 9 Bluetooth Mode ......................................18 Pair a $luetooth &evice 18 &isconnect $luetooth &evice 18 Make a %all 18 4eceive a %all19 #dLust $luetooth 5ettings19 Settings ...................................................20 &isplay 5ystem 20 #dLust )eneral 5ettings 20 %aliDration20 #dLust 8ideo 5ettings20 #dLust sound settings21 #dLust 6ime 5ettings 21 #dLust .anguage 5ettings 21 #dLust $luetooth 5ettings21 #dLust &8& 4ating 22 #dLust 8olume 5ettings22 Radio Mode .............................................10 4adio &isplay10 5elect 4adio as Playing 5ource 10 5elect One 4adio $and 10 6une10 Preset 5tation 11 .ocal 5eeking 11 '3 5election 11 4&5 $asics12 #dLust 4&5 5ettings 12 4&5 4adio &ata 5ystem 12 #F Function 12 'ON 'nhanced Other Networks 12 6# Function 12 %6 %lock 6ime13 P6; Function 13 Other Modes............................................23 .isten to Other &evices 23 4eset 23 4eplace a Fuse23 )P5 23 Speciſcations .........................................24 Playback Mode........................................14 .oad/eLect 14 'Lect a &isc 14 6ouchscreen %ontrols14 %ontrolling PlayDack 14 %onnect a 75$ &evice 14 4emove a 75$ &evice 14 +nsert/4emove a 5& %ard14 Troubleshooting .....................................26 Wire Connections ...................................27 3 Before Using Front Panel Notice: 6he graphic in this manual is for reference only, and may De different from the actual unit 4eference to actual unit is suggested 1 Remote sensor 2 [MENU] Button: Press to switch Detween the main menu and current source 3 [NAV] Button: Press to switch to navigation mode ] Button: Press repeatedly to adLust screen Drightness 4 [ to turn off the display Press and hold 5 [ / VOL / MUTE] Knob 4otate to adLust the volume Press momentarily to activate the M76' function Press again to resume normal listening Press to turn the unit ON Press and hold to turn the unit OFF 6 Reset Button Press to reset system settings to factory default (except password and parental lock settings 7 A/V Input #ccepts a 35mm Lack through which signals from various audio/video devices can De applied to the unit 8 USB Connector %onnect a 75$ device for playDack of music/video/picture ſles 9 SD Interface Connector +nsert an 5& card for playDack of music/video ſles 10 Map Slot 6he Mini 5& card is used for the Navigation Map only, not for music or other ſles 6his may De used for ſrmware updates if reSuired 11 Disc slot 12 Internal Microphone +nternal microphone for $luetooth calls 13 [ ] Button: Press to eLect a disc 4 Before Using Remote Control 1. Return to the home menu 2. Eject the disc 3. Access to tuner source 4. Access to disc source 5. - Search an available radio station by decreasing tuning frequency - Select the previous chapter/track for playback 6. Select radio band 7. - Zoom in (Video menu of DVD/VCD) - Access to music list (Auido menu of music playing) 8. Adjust screen settings 9. Open EQ menu 10. Menu cursor 11. Enter 12. - Open route menu (DVD) - Turns on/off PBC (VCD) 13. Digit area 14. Repeat playback 15. Change to next source 16. Power on/off 17. Access to Bluetooth source 18. Access to navigation source 19. Pause playback/Start playback 20. - Search an available radio station by increasing tuning frequency - Select the next chapter/track for playback 21. - Playback disc in different angle for a scene (DVD) - Rotate (photo playing) - Access to video list 22. - Language selection for subtitle (DVD) - Access to photo list 23. Change the audio language for disc playback (DVD) 24. Increase/Decrease volume 25. Access to settings source 26. Toggle on/off audio output 27. Activate direct access mode 28. Dial/Receive a call 29. Hang up 30. Play all chapter/tracks in random order 31. - Press to clear the number one by one - Hold to clear all the numbers 5 Before Using Notes on Remote Control Usage $LPWKHUHPRWHFRQWURODWWKHUHPRWHVHQVRURQWKHXQLW 5HSODFHWKHEDWWHU\IURPWKHUHPRWHFRQWURORULQVHUWDEDWWHU\LQVXODWRULIWKHEDWWHU\KDVQRW EHHQXVHGIRUDPRQWKRUORQJHU '2127VWRUHWKHUHPRWHFRQWUROLQGLUHFWVXQOLJKWRULQKLJKWHPSHUDWXUHHQYLURQPHQWRULW PD\QRWIXQFWLRQSURSHUO\ 7KHEDWWHU\FDQZRUNIRUPRQWKVXQGHUQRUPDOFRQGLWLRQ,IWKHUHPRWHFRQWUROZRQ¶WZRUN SOHDVHFKDQJHWKHEDWWHU\ 8VH³EXWWRQVKDSHG´OLWKLXPEDWWHU\³&5´9RQO\ '2127UHFKDUJHGLVDVVHPEOHKHDWRUH[SRVHWKHEDWWHU\LQILUH ,QVHUWWKHEDWWHU\LQSURSHUGLUHFWLRQDFFRUGLQJWRWKHDQGSROHV 6WRUHWKHEDWWHU\LQDSODFHZKHUHFKLOGUHQFDQQRWUHDFKWRDYRLGWKHULVNRIDFFLGHQW Uninstall Battery Install Battery 5lide out the Dattery compartment tray at the Dottom on the Dack of the remote control 7se Dutton-shaped lithium Dattery %42025 (38Œ only +nsert the Dattery to the Dattery tray with proper direction according to the ( and (- poles PUSH IN PULL OUT 6 Basic Operations Parking Brake :KHQWKH³%5$.(´FDEOHLVFRQQHFWHGWRWKHEUDNHVZLWFKWKHGLVSOD\RQWKH7)7PRQLWRUZLOO display video only when the vehicle is applied. 3DUNLQJEUDNHIXQFWLRQLVRYHUULGGHQZKHQWKHYLGHRVRXUFHLVVHWWR5(9(56( :KHQWKHSDUNLQJEUDNHLQKLELWLVDFWLYHWKHIURQWPRQLWRUGLVSOD\V³:DUQLQJ,WLVLOOHJDOWRYLHZ YLGHRZKLOHGULYLQJRURSHUDWLQJDPRWRWYHKLFOH6HWSDUNLQJEUDNHWRYLHZYLGHR´SUHYHQWLQJ the driver from watching content while driving. Rear video screens are not affected. Mute Press = / 8O. / M76'? knoD to mute the volume from the unit Press again to restore the volume = ? is displayed on the .%& #dLusting the volume or using any of the audio setup features cancels the mute function Power On / Off Press the = / 8O. / M76'? knob on the unit to turn the unit on. The buttons on the front of the unit light up for a moment and the current mode status appears in the LCD. Press and hold the = / 8O. / M76' ? knob to power off the unit. Audible Beep Conſrmation $QDXGLEOHEHHSWRQHFRQ¿UPVHDFKIXQFWLRQVHOHFWLRQ7KH%HHSWRQHFDQEHGLVDEOHGWKURXJK the Setup menu. Playing Source Selection Press the [ MENU ] button on the front panel to change between available playing sources. The playing mode is displayed on the screen. RU7RXFKWKLVSDJHEXWWRQWRYLHZWKHILUVWRUVHFRQG SDJHRIRQVFUHHQEXWWRQV )XQFWLRQLFRQV &ORFN 7RXFKIRUTXLFNDFFHVVWR(TXDOL]HUOHYHOVHWWLQJV Volume Adjustment 7RLQFUHDVHRUGHFUHDVHWKHYROXPHOHYHOWXUQWKH= / 8O. / M76' ?NQRERQWKHIURQWSDQHO7KHYROXPHUDQJHVIURP³´WR³´ 7KH/&'RU7)7VFUHHQGLVSOD\VWKHYROXPHOHYHOIRUVHFRQGV EQ Menu 6he #udio %ontrol feature allows you to easily adLust your audio system to meet the acoustical characteristics of your vehicle, which vary depending on the type of vehicle and its measurements Proper setting of the Fader and $alance Doosts the effects of the caDin eSuali\er 7 Basic Operations Select Preset Equalizer (QWHUWKH(4VHWXSPRGH 7RXFKWKH> @LFRQLQWKHXVHULQWHUIDFHDQGWKH(4VHWXS LQWHUIDFHZLOOGLVSOD\RQWKHVFUHHQ 6HOHFW(4PRGH 7RXFKWKHGHVLUHG(4VHOHFWLRQ>2SWLRQDO@>&ODVVLF@>5RFN@ >-D]]@>7HFKQR@>3RS@DQGWKH(4PRGHZLOOFKDQJH Adjust EQ Parameters 7RDGMXVW(4SDUDPHWHUVWRXFKDQGGUDJWKHSDUDPHWHUVDGMXVWPHQW EDU >8VHU@6HWWKHGHVLUHGDXGLRHIIHFW >)ODW@6HOHFWWKHRULJLQDODXGLRHIIHFW >5HVHW@&DQFHOWKHHTXDOL]HUIXQFWLRQVHWWLQJV >/RXG2Q2II@:KHQOLVWHQLQJWRPXVLFDWORZYROXPHVWKLV IHDWXUHZLOOVHOHFWLYHO\ERRVWFHUWDLQEDVVDQGWUHEOH IUHTXHQFLHV Adjust FAD BAL <RXFDQDGMXVWIURQWEDFNOHIWULJKWEDODQFHRIWKHVSHDNHUDQGWKH VXEZRRIHUYROXPHWRJHWEDODQFHGOLVWHQLQJHIIHFWDFFRUGLQJWRWKH VXUURXQGLQJVDQG\RXULQWHUHVW (QWHUWKH(4VHWXSPRGH 7RXFKWKH> @LFRQLQWKHXVHULQWHUIDFHDQGWKH(4VHWXS LQWHUIDFHZLOOGLVSOD\RQWKHVFUHHQ $GMXVWVXEZRRIHUYROXPH 7RXFK> @> @RUGUDJ> @WRDGMXVWVXEZRRIHUYROXPHIURP WR $GMXVWIDGHUEDODQFHYDOXH 7RXFK> @> @> @> @WRDGMXVWIDGHUEDODQFHYDOXH IURPWR > @)URQWVSHDNHU > @5HDUVSHDNHU > @/HIWVSHDNHU > @5LJKWVSHDNHU Notes: 7KHSDUDPHWHUVRIWKH(4PRGHVKDVEHHQSUHVHWDQG\RXFDQ QRWFKDQJHWKHPEHVLGHVµ8VHU¶ 7KH(4PRGHZLOOFKDQJHWRµ8VHU¶DXWRPDWLFDOO\ZKHQ\RXDGMXVW WKHIUHTXHQF\YDOXHXQGHUWKHPRGHVEHVLGHVµ8VHU¶ 7KHYDOXHRI6XELVLQGHSHQGHQWRI(4PRGHDQGFDQEHDGMXVWHG VHSDUDWHO\ 8 Basic Operations Set Date /Time 1 6ouch = 5ettings? 2 6ouch = 6ime ? 6he date/time setup menu is displayed Set Date 1 6ouch = &ate ? 2 6ouch the date information on the screen # suDmenu is displayed 3 6ouch = ? or = ? to set year, month and day Set Clock Mode 1 6ouch =%lock mode? 2 6ouch =12*r? or =24*r? to switch clock mode Set Time 1 6ouch = 6ime ? 2 6ouch the time on the screen, a suDmenu is displayed 3 6ouch = ? or = ? to set hour and minute Tip: 9hen date/time is set, touch = 5ave ? to conſrm or = %ancel ? to exit 9 Radio Mode Radio Display 7RXFKWRYLHZWKH6285&(0(18DQGVHOHFWD QHZSOD\EDFNVRXUFH 2 5trong .ocal signal Droadcasting indicator 3 5tereo Droadcasting indicator 4 %urrent radio Dand indicator 5 $roadcaster information stored at the preset 6 6ouch to view more on-screen Duttons 7 6ouch to seek Dackward 8 5earch stations automatically 9 6ouch to seek forward 10 6ouch to change Detween #M/FM Dands 11 %lock 12 %urrent preset radio station 13 %urrent radio information 14 #F: #lternative FreSuency indicator 15 6#: 6rafſc #nnouncement indicator 16 4&5 setting options 17 5ave the desired radio station 18 6ouch to change Detween .ocal and &istance 19 'nter freSuency directly 20 6ouch for Suick access to 'Suali\er level settings 1 2 3 4 11 12 13 14 15 5 6 16 7 8 9 10 17 18 19 20 Select Radio as Playing Source Open the 5ource Menu and then touch =4adio? Select One Radio Band 6ouch the = and #M2 ? icon on the user interface to select one radio Dand among FM1, FM2, FM3, #M1 Tune Auto Tuning 6ouch and hold = ?/= ? icon on the user interface more than 1 second to seek a higher / lower station 6o stop searching, repeat the operation aDove or press other keys having radio functions Note: 9hen a station is received, searching stops and the station is played Manual Tuning Method 1: &uring manual tuning, the freSuency will De changed in steps 6ouch the = ?/= ? icon on the user interface to tune in a higher / lower station Method 2: 1 6ouch the numeric keypad icon = ? Numeric keyDoard is displayed, touch numDer to input freSuency 2 6ouch = ? to delete the input numDer step Dy step 3 6ouch = O- ? to enter 10 Radio Mode Preset Station 6he unit has 5 Dands, such as FM1, FM2, FM3, #M1, #M2, and each Dand can store 6 stations hence the unit can store 30 stations in total Search Stations Automatically ? to search station and store 6 strongest stations in 6ouch = current Dand automatically Manual Store 1 6une to a station ? 2 6ouch = 3 6ouch one of the channels P1 to P6 to save the select Dand Tune to a Preset Station 1 6ouch =4adio? 2 5elect a Dand (if needed 3 6ouch one of the preset channels (P1 to P6 on the screen Local Seeking 6ouch the = ? icon and choose the 4adio .ocal or &istance 9hen the = ? icon turns Dright, only stations with a strong signal strength will De detected &efault is ő&istanceŒ EQ Selection Press the = ? icon and enter the '3 setup 11 Radio Mode RDS Basics 4&5 transmits data to the radio which displays information such as station identiſcation, song artist, and song title 4&5 service availaDility varies with areas Please understand if 4&5 service is not availaDle in you area, the following service is not availaDle Adjust RDS Settings 1 +n 4adio menu, touch = ? 6he option menu is displayed 2 6ouch on the selected option to change the setting ŧ =4&5?: 6o turn on or off ő4&5Œ function ŧ =%6?: 6o turn on or off ő%lock 6imeŒ synchroni\ation function ŧ ='ON?: 6o turn on or off ő'ONŒ function ŧ =6#?: 6o turn on or off ő6#Œ function ŧ =P6;?: 6o show P6; list ŧ = 8O.?: 6RXFK> @> @WRDGMXVW7$YROXPH RDS ( Radio Data System ) 7KHXQLWSURYLGHVEDVLFIXQFWLRQVRI5'6 5'6VHUYLFHDYDLODELOLW\YDULHVZLWKDUHDV3OHDVHXQGHUVWDQGLI5'6VHUYLFHLVQRWDYDLODEOHLQ \RXUDUHDWKHIROORZLQJVHUYLFHLVQRWDYDLODEOH AF Function $OWHUQDWLYH)UHTXHQFLHV/LVWVDUHXVHGIRUWKHVDPHSURJUDPVHUYLFHDQGXVHGLQFRQMXQFWLRQZLWK WKH3,FRGH3URJUDP,GHQWLILFDWLRQFRGHWRDVVLVWDXWRPDWLFWXQLQJ 8VLQJ WKLV LQIRUPDWLRQ D UDGLR FDQ DXWRPDWLFDOO\ VHDUFK RXW DQRWKHU VWDWLRQ WKDW LV SOD\LQJ WKH VDPHPDWHULDO7KLVLVXVHIXOZKHQWKHVWDWLRQ\RXDUHOLVWHQLQJWRLVIDGLQJRXW Note: ' XULQJDXWRVZLWFKLQJUDGLRIUHTXHQF\VRPHLQWHUIHUHQFHPD\EHKHDUG 7 XUQLQJRII$)IXQFWLRQFDQVHWWOHWKLVSUREOHP EON ( Enhanced Other Networks ) 9hen 'ON data is received, the 'ON indicator lights and the 6# and #F functions are enhanced 6#: 6rafſc information can De received from the current station or stations in other network #F: 6he freSuency list of preset 4&5 stations is updated Dy 'ON data 'ON enaDles the radio to make fuller use of 4&5 information +t constantly updates the #F list of preset stations, including the one that currently tuned into +f you preset a station around the area at your home, you will later De aDle to receive the same station at an alternative freSuency, or any other station serving the same program, 'ON also keeps track of locally availaDle 6P stations for Suick reception TA Function 7KH 7$ 7UDIILF $QQRXQFHPHQW IODJ IXQFWLRQ OHWV WKH XQLW UHFHLYH WUDIILF DQQRXQFHPHQWV DXWRPDWLFDOO\QRPDWWHUZKDWPHGLDVRXUFHLVSOD\LQJEDFN7KH7$IXQFWLRQFDQEHDFWLYDWHGE\D 737UDIILF3URJUDPVWDWLRQEURDGFDVWLQJWUDIILFLQIRUPDWLRQ :KHQ7$LVDFWLYDWHGDQGDWUDIILFDQQRXQFHPHQWLVUHFHLYHGWKHFXUUHQWSOD\LQJVRXUFHZLOOEH RYHUULGGHQE\WKHWUDIILFDQQRXQFHPHQWLIWKHFXUUHQWUDGLREDQGLV)0LQGLFDWLQJWKDWWKHXQLWLV 12 Radio Mode ZDLWLQJIRUWUDIILFDQQRXQFHPHQWV 7KHXQLWUHWXUQVWRWKHRULJLQDOVRXUFHDIWHUWKHWUDIILFDQQRXQFHPHQWKDVEHHQUHFHLYHG CT (Clock Time) 6RPH VWDWLRQV EURDGFDVW WKH WLPH DQG GDWH ZLWKLQ WKH HQFRGHG 5'6 VLJQDO 7KH FORFN WLPH LV DXWRPDWLFDOO\DGMXVWHGZKHQµ&7¶LVVHWWRµ21¶ PTY Function P6; is the aDDreviation for Program 6ype which is a code defining the type of program Deing Droadcast (eg News or 4ock 6hen P6; options will display on the screen 6o view more P6; options, touch the scroll Dar and arrows on the screen 9hen one P6; option is touched (eg News, auto search for next availaDle P6; Dy increasing tuning freSuency until the P6; of the next station matches the current +f no matched P6; has Deen found, the unit will return to the original radio freSuency 13 Playback Mode Load/eject ;ou can play video, audio or images stored on the following discs: Ŗ &8& 8ideo, &8&-4, &8&-49 Ŗ 8%& Ŗ #udio %&, %&-4, %&-49 Note: 'nsure that the disc contains playaDle content Eject a Disc Press the = ? key on the front panel to eLect the disc 9hen the disc is eLected, the unit switches to the previous source Touchscreen Controls 6he touch key areas for &8& playDack are outlined Delow: #: 4eturn to the main menu $: Play the video and display playDack information %: &isplay onscreen control menu &: 6ime display Controlling Playback 6o access the on-screen controls, touch the screen except upper ? to left corner, and touch again to cancel display 6ouch = view all function icons Connect a USB Device 1 Open the 75$ door 2 +nsert the small end of the 75$ caDle to the 35 Lack and 75$ socket, then connect the other end of the caDle to your 75$ device Remove a USB Device 1 5elect other source on the main menu 2 4emove the 75$ device Insert/Remove a SD Card Ŗ +nsert 1 Open 5& card cover 2 +nsert the 5& card into the 5& card slot Play starts automatically Ŗ 1 2 3 4emove 5elect other source on the main menu Press the card unit you hear a click sound 4emove the 5& card Play/Pause 1 Once a disc, 75$ or 5& card is inserted, play starts automatically For &8& movie, if a menu appears, press = ? to start play 14 A B C Playback Mode 2 6o pause, touch = ? 6o resume play, touch = ? 3 5kip to previous / next track / chapter, press = ?/= ? key Previous/Next 6ouch = ?/= / chapter ? key on the screen to skip to previous / next track Search for a Folder For Video Files 1 6ouch = ? to display all availaDle video folders 2 6ouch a folder,then touch the desired ſle 3 6ouch the ſle again to start play For Audio Files 1 6ouch = ? to display all availaDle audio folders 2 6ouch a folder,then touch the desired ſle 3 6ouch the ſle again to start play For Picture Files 1 6ouch = ? to display all availaDle picture folders 2 6ouch a folder,then touch the desired ſle 3 6ouch the ſle again to start play For Folder Control 1 6ouch = ? to display all availaDle folders 2 6ouch a folder,then touch the desired ſle 3 6ouch the ſle again to start play Repeat For DVD/VCD movie disc: 1 6ouch Dottom half of the screen to display menu on the screen, if necessary 2 6ouch = ? to display the 2nd menu 3 6ouch = ? repeatedly to select: &8& = ? 4epeat chapter: Play the current chapter repeatedly = ? 4epeat title: Play all chapters in the title repeatedly = ? 4epeat off: Play all in the all repeatedly = ? 4epeat off: %ancel repeat play 8%& = ? 4epeat single: Play the current single repeatedly 1 = ? 4epeat all: Play all in the all repeatedly = ? 4epeat off: cancel repeat play 15 Playback Mode For CD/MP3 ſles: 1 6ouch anywhere except the upper left corner to display menu on the screen, if necessary 2 6ouch = ? repeatedly: = 1 ? 4epeat single: Play the current single repeatedly = ? 4epeat all: Play all in the all repeatedly = ? 4epeat off: %ancel repeat play Repeat A-B ;ou can repeat a speciſc of video ſle (repeat #-$ 1 6ouch the screen to display control menu, if necessary 2 6ouch = ? to display the 2nd menu, if necessary 3 6ouch = #-$ ? repeatedly to mark: 4epeat #-: the start of the section to repeat 4epeat #-$: the end of the section to repeat 6he selected section plays repeatedly 4 6o exit #-$ repeat mode, touch #-$ repeatedly, =4epeat #-$ off? is displayed Shufƀe (Random) Play ;ou can play audio tracks/ſles in random order 1 6ouch the screen to display control menu, if necessary 2 6ouch = ? to display the 2nd menu, if necessary ? on the screen repeatedly to turn random play on or off 3 6ouch = Select Audio Mode 9hen you play 8%&s, you can select an audio mode (4/./5tereo 1 &uring play, touch Dottom half of the screen to display menu on the screen, if necessary 2 6ouch = ? to display the 2nd menu 6ouch = ? repeatedly until the audio mode is selected Select Subtitle Language For &8& or &ivx discs that contain two or more suDtitle languages 1 &uring play, touch the screen to display menu on the screen, if necessary 2 6ouch = ? to display the 2nd menu 3 6ouch = ? repeatedly to select a language 6he selected language is displayed Video Setup 6ouch = ? to access video setup mode, touch = ? or = ? to set the desired effect ;ou may set the Drightness, contrast, saturation, and hue of the video output from 1 to 20 16 Playback Mode Playback Information 7RXFKWKHVFUHHQZKHQSOD\LQJEDFN'9'DQG9&'GLVFVDQGWKH SOD\EDFNLQIRUPDWLRQZLOOEHGLVSOD\HGRQWKHWRSDUHDRIWKH7)7 For DVD 'LVFW\SH '9'7LWOHLQIRUPDWLRQ³´LQGLFDWHVWKDW WKLV'9'KDVWLWOHVDQGWKHWLWOHSOD\LQJ EDFNQRZLVWKHILUVWWLWOH '9'&KDSWHULQIRUPDWLRQ³´LQGLFDWHV WKDWFXUUHQWWLWOHKDVFKDSWHUVDQGWKH FKDSWHUSOD\LQJEDFNQRZLVWKHILIWKFKDSWHU DVD T:01/08 C:005/012 For VCD 'LVFW\SH 9&'7UDFNLQIRUPDWLRQ³´LQGLFDWHVWKDW WKLV9&'KDVWUDFNVDQGWKHWUDFNSOD\LQJ EDFNQRZLVWKHILUVWWLWOH Elapsed Time (ODSVHGWLPHRIWKHFXUUHQWWUDFN 7RWDOWLPHRIWKHFXUUHQWWUDFN VCD 00:01:20 Direct Track Entry 6o select a track directly, touch the = ? icon on screen control to displaythe direct entry menu 'nter the desired track using the onscreen numDer pad Press = O- ? to the selected track Rotate Pictures 1 9hen you view pictures, touch the screen to display menu on the screen, if necessary 2 6ouch = ? to display the 2nd menu 3 6ouch = ? repeatedly to rotate the picture Zoom ;ou can \oom in pictures for a close view 1 9hen you view pictures, touch the screen to display menu on the screen, if necessary ? to display the 2nd menu 2 6ouch = ? repeatedly to \oom in the picture 3 6ouch = 17 Track:01/08 00:30:17 Bluetooth Mode ;ou can make or receive phone calls with $luetooth-enaDled phones through the unit ;ou can also listen to music from a $luetoothenaDled device Pair a Bluetooth Device 6o connect your $luetooth device to the unit, you need to pair the device to the unit Pairing needs only to De done once ;ou can pair up to five devices <RX DOVR FDQ VHDUFK IRU %OXHWRRWK GHYLFHV E\ PRELOHSKRQH 1 2 3 4 6urn on the $luetooth function on the device ? to search for $luetooth device with the device 6ouch = 5elect the Bluetooth device ID in the pairing list. 'nter default password ő0000Œ ip: 6 Ŗ 6he operational range Detween this unit and a $luetooth device is approximately 16 ft (5m Ŗ $efore you connect a $luetooth device to this unit, familiari\e yourself with the $luetooth capaDilities of the device Ŗ %ompatiDility with all $luetooth device is not guaranteed Ŗ #ny oDstacle Detween this unit and a $luetooth device can reduce the operational range Ŗ -eep this unit away from any other electronic device that may cause interference Disconnect Bluetooth Device 6o disconnect one device, touch = ? Tip Ŗ 6he device will also De disconnected when the device is moved Deyond the operational range Ŗ +f you want to reconnect the device to the unit, place it within the operational range Ć ,I\RXGRQRWZDQWWRUHFRQQHFWWKHGHYLFHWRWKHXQLWDXWRPDWLFDOO\ WRXFK> @WKHQVHW>$XWRFRQQHFW@WR>2II@ )RUGHWDLOVVHHWKH³$GMXVW%OXHWRRWK6HWWLQJV´VHFWLRQ Make a Call 1 5elect $luetooth function in the home menu 2 Pair the phone with the unit 3 5earch for phone numDer from the following list: =Phone $ook? =%all .og? =Missed calls? =4eceived calls? =&ialed calls? Or touch the numDer pad directly, then touch = ? to dial 18 Bluetooth Mode Receive a Call $y default, all incoming calls are received automaticaly 1 +f there is an incoming call, WKHVFUHHQZLOODSSHDU³,QFRPLQJ´ 2 ;ou may touch the screen to select = hang up ? or = #nswer ? 5peak into the $luetooth microphone 6ip Ŗ ;ou can select to receive calls manually Dy set =#uto answer? to =Off? status Adjust Bluetooth Settings 1 +n $luetooth menu,touch = ? 6he option menu is displayed 2 6ouch on the selected option to change the setting ŧ =$luetooth?: 6o turn on or off ő$luetoothŒ function ŧ =#uto connect?: 6o turn on or off ő#uto connectŒ function ŧ =#uto answer?: 6o turn on or off ő#uto answerŒ function ŧ =Pairing code?: 6o set paring code ŧ =Phone Dook sync?: 6o synchroni\e phone Dook, touch = O- ? on the suD-menu popped out PhoneDook sync may take several minutes to load on initial setup Tip Ŗ ;ou can also adLust $luetooth settings in the ő5ettingsŒ menu Music Mode A2DP $'3LVVKRUWIRU$GYDQFHG$XGLR'LVWULEXWLRQ3URILOH7KHPRELOH SKRQHVVXSSRUWLQJWKLVIXQFWLRQFDQWUDQVPLWVWHUHRDXGLRZKHUHDV WKHRQHVQRWVXSSRUWLQJWKLVIXQFWLRQFDQWUDQVPLWPRQRDXGLRRQO\ AVRCP $95&3LVVKRUWIRU$XGLR9LGHR5HPRWH&RQWURO3URILOH7KHPRELOH SKRQHV VXSSRUWLQJ WKLV IXQFWLRQ FDQ FRQWURO WKH SOD\EDFN RI D %OXHWRRWKDXGLRSOD\HU ,Q WKH PRGH RI WKH PXVLF SOD\HU ZRUNLQJ LI \RX ZDQW WR PDNH D SKRQHFDOO\RXFDQSUHVVWKHQXPEHUNH\VRQWKHPRELOHSKRQH $W WKH VDPH WLPH WKH PXVLF SOD\HU ZLOO VWRS 7KH 7)7 VFUHHQ ZLOO GLVSOD\³&DOOLQJ´DIWHUWKHFDOOUHFHLYHGWKHYRLFHZLOOEHWUDQVIHUUHG WRWKHXQLW:KHQWKHFDOOHQGVWKHVFUHHQZLOOGLVSOD\PXVLFSOD\LQJ PHQX ,IWKHUHLVDQLQFRPLQJSKRQHFDOOWKHPXVLFSOD\HUZLOOVWRSDQGWKH VFUHHQZLOOGLVSOD\³,QFRPLQJ´:KHQWKHFDOOHQGVWKHVFUHHQZLOO GLVSOD\PXVLFSOD\LQJPHQX 19 Settings Display System 1 6ouch the upper left corner to display main menu 2 6ouch = 5ettings ? 6he settings menu is displayed Adjust General Settings 1 2 3 4 6ouch = )eneral ?, if necessary 6ouch to highlight a setting 6ouch on the option to display/select an option 6ouch Dlank area of the screen to exit General settings Options 75# %hina Japan 4adio region 'urope 'urope (.9 O+46 .ocal 4adio range &istance $lackout Off/10s/20s &immer mode Night/&ark/Normal/$rightness $eep %aliDration On Off 5tart Description 5elect one that matches your location #dLust the display Drightness 6urn on the Deep sound 'ach time you press a Dutton, the unit Deeps 6urn off the Deep sound %aliDrate the touch screen Calibration :KHQWKHWRXFKRSHUDWLRQLVQRWVHQVLWLYHRUYDOLG\RXVKRXOG calibrate the touch screen through calibration setting function. Adjust the response positions of the touch panel as followings: 1. Press the [ Calibration ] option on the setup menu to enter. 2. Touch [ Start ] to enter. 3. Press and hold the center of [ +@IRUVHFRQGVWKH>+ ] will move automatically. 4. Aim at center of [ +@IROORZWKHSDWKDVVKRZQRIWKH¿JXUHDIWHU VWHSVIURPWRWKHV\VWHPZLOOH[LWFDOLEUDWLQJDXWRPDWLFDOO\ Adjust Video Settings 1 6ouch =8ideo? 2 6ouch an option repeatedly to select: 3 6ouch Dlank area of the screen to exit Video settings Parking Options On Off Description 'naDle video &isaDle video :KHQ LQ 3DUN ³2Q´ PRGH WKH VFUHHQ ZLOO GLVSOD\ ³:$51,1*´ >LI \RX SOD\ WKH YLGHR GLVF@7KH above warning screen will prevent the driver watching images. 20 Settings Adjust sound settings 1 6ouch =5ound? 2 6ouch an option repeatedly to select: 3 6ouch Dlank area of the screen to exit Sound settings Options On 5uDwoofer Off 80*\ 5uDwoofer ſlter 120*\ 160*\ Description 6urn on the suDwoofer 6urn off the suDwoofer 5elect suDwoofer ſlter criteria Adjust Time Settings 1 6ouch = 6ime ? 2 6ouch an option repeatedly to select: 3 6ouch Dlank area of the screen to exit Time settings &ate Options ;/M/& Description %lock 12Hr/24Hr 6ouch =12Hr? or =24Hr? to switch clock mode 6ime H / 5 / # M / 6ouch = PM 6ouch = 6ouch = ? or = ? or = ? or = ? to set year, month and day ? to set hour and minute ? to set #M/PM (only for 12Hr Adjust Language Settings 1 6ouch =.anguage? 2 6ouch an option repeatedly to select 3 6ouch Dlank area of the screen to exit Language settings Description O5& 5elect on-screen display language &8& audio 5elect &8& audio language Options availaDle depend on &8& disc &8& suDtitle 5elect &8& suDtitle language Options availaDle depend on &8& disc &isc menu 5elect &8& menu language Options availaDle depend on &8& disc Adjust Bluetooth Settings 1 6ouch =$luetooth? 2 6ouch an option repeatedly to select 3 6ouch Dlank area of the screen to exit Bluetooth settings Options $luetooth #uto connect #uto answer Pairing code Description On Off 6urn on the $luetooth function 6urn off the $luetooth function +f the pre-paired device is within the effective range, the unit re-connects On to pre-paired device automatically Off Need to re-connect manually On #nswer paired phone call automatically Off #nswer phone call manually 5et the password for pairing the unit with other $luetooth device 21 Settings Adjust DVD Rating 1 6ouch =&8& rating? 2 6ouch an option repeatedly to select 3 6ouch Dlank area of the screen to exit DVD rating 5et password 4ating level &4% .oad factory Options Description 5et password to restrict the play of discs 6he default password is 0000 -id safe #cceptaDle for children ) #cceptaDle for general viewers P) Parental guidance suggested P)-13 7nsuitaDle for children under age 13 P)-4 4ecommend parents to restrict children under 17 to view 4 4estricted recommend parents to guide children under 17 to view N%-17 7nsuitaDle for children under age 17 #dult #cceptaDle for adults only On/Off &ynamic range compression on or off 4estore to default settings Adjust Volume Settings ;ou can set different volume for different modes 1 6ouch =8olume? 6he volume setting suD-menu is displayed 2 6ouch on a source =&8&? =$luetooth? =75$? =#8-+N1? (front =5&H%? =#8-+N2? (rear =4adio? =Navigation? 3 6ouch = ? or = ? to assign value: 0 to 12 9hen switching to the source, the volume increases automatically 4 6ouch Dlank area of the screen to exit 22 Other Modes Listen to Other Devices ;ou can connect an external audio/video device to the unit 1 %onnect the external device with the supplied #8 caDle 2 6ouch the upper left corner to display the main menu 3 6ouch =#8-+N 1? Front input =#8-+N 2? 4ear input Reset 9hen the unit hangs up, you can reset it Press = 4'5'6 ? with a Dall-point pen or similar tool Tip 9hen the unit has Deen reset, all the settings will return to default settings Replace a Fuse +f there is no power, the fuse may De damaged and need to De replaced 1 6ake out the unit from dashDpard 2 %heck all electrical connections 3 $uy a fuse that matches the amperage of the damaged fuse 4 4eplace the fuse while the units power is disconnected GPS 1 6ouch the upper left corner to display home menu 2 6ouch =N#8+?, the navigation menu will display 3 4efer to the map manual to operate the navigation tool Steering Wheel Control Programming 7RXFKWKHXSSHUOHIWFRUQHUWRGLVSOD\KRPHPHQX 7RXFK>6:&@WKH6:&PHQXZLOOGLVSOD\ $GMXVWHDFKNH\ZLWKDLQGLYLGXDOIXQFWLRQ 7RXFK>3DLU@WRSURJUDP 3UHVV HDFK LQGLYLGXDO VWHHULQJ ZKHHO FRQWURO EXWWRQ IRU HDFK FRUUHVSRQGLQJIXQFWLRQ 2QFHWKHILQDOVWHHULQJZKHHOFRQWUROEXWWRQLVSURJUDPPHGWKH IXQFWLRQVDUHVDYHGDQGWKHSURJUDPPLQJZLOOHQG 7RXFK>5HVHW@WRUHVHWWKHSURJUDPPLQJ 23 4eset Speciłcations General 4eference 5upply 8oltage 128(&% Operating 8oltage 4ange 105 - 1588(&% Max Operating %urrent 15# )rounding 5ystem Negative &imensions(9:H:& 70:40:63inch 9eight(main unit 19kg FM 5ignal Noise 4atio Ů55d$ 4esidual Noise 5ensitivity (5/N30d$ 18d$z8 FreSuency 4esponse (v3d$ 20H\`125-H\ 5tation 5eeking .evel 20`28d$z8 &istortion ŭ10 5tereo 5eparation (1-H\ Ů25d$ #ntenna +mpedance 75š AM 4esidual Noise 5ensitivity (5/N20d$ 30d$z8 5electivity (v9-H\ Ů50d$ Screen 5creen si\e 62 inches(16:9 &isplay resolution 800:480 DVD Player 5/N 4atio 80d$ 6H&N ŭ01 FreSuency 4esponse (v3d$ 20H\`20-H\ Maximum Output Power4ª859 .oad +mpedance 4š AUX IN &istortion ŭ05 FreSuency 4esponse (v3d$ 20H\`20-H\ #udio +nput .evel 058rms Preout Output +mpedance 100š Output .evel 2V Video Normal Video +nput .evel (%V$5 10v02V Video +nput +mpedance75š Video Output +mpedance 75š Video Output .evel 10v02V Environment Operating 6emperature 14°F ` 140°F(-10°% ` 60°% 5toring 6emperature 4°F ` 158°F(-20°% ` 70°% Operating Humidity 45`804H 5toring Humidity 30`904H Notice: 9hen the unit is operated to extremes, such as with maximum power output for a long time, or the temperature is over 158̧, it will enter heat protection mode, the volume will De reduced automatically 6his is normal 24 Speciłcations Supported Formats: |75$ or memory ſle format: F#632 |MP3 Dit rate(date rate: 32-320 -Dps and V$4 (VariaDle $it 4ate |&irectory nesting up to a maximum of 8 levels |NumDer of alDums/folders: 99 (Max |NumDer of tracks/titles: 999 (Max |+&3 tag v20 or later |File name in 7nicode 76F8(maximum length:128 Dytes Unsupported Formats: |'mpty alDums:an empty alDum is an alDum that does not contain MP3 ſles,and is not De shown in the display |7nsupported ſle formats are skippedFor example,9ord documents(doc or Mp3 ſles with extensiondlf are ignored and not played |##%,9MV,P%M audio ſles Supported MP3 Disc Format: |+5O9660,Joliet |Maximum title numDer: 512(depending on ſle name length |Maximum alDum numDer: 255 |5upported sampling freSuencies: 32kH\,441kH\,48kH\ |5upported $it-rates: 32-320-Dps and variaDle Dit rate Supported Video Formats: |&V& ·MP4 ·:vid (optional Region Code #ccording to &V& sale region, the whole world is divided into six regions # &V& disc can De played Dack only when its region code is compatiDle with that of the player in use 4egion 1: 75#, %anada, 'ast Paciſc Ocean +slands 4egion 2: Japan, 9est 'urope, North 'urope, 'gypt, 5outh #frica, Middle 'ast 4egion 3: 6aiwan of %hina, Hong -ong of %hina, 5outh -orea, 6hailand, +ndonesia, 5outh 'ast #sia 4egion 4: #ustralia, New Zealand, Mid & south #merica, 5outh Paciſc Ocean +slands/Oceania 4egion 5: 4ussia, Mongolia, +ndia, Middle #sia, 'ast 'urope, North -orea, North #frica, North 9est #sia 4egion 6: %hinese Mainland Disc Cautions 1 &O NO6 use irregular shaped disc 2 &isc %leaning 7se a dry, soft cloth to wipe the disc from center to edge, only neutral detergent can De used 3 9hen playing a new disc New disc may have some rough spots around the inner and outer edges +f such a disc is used, remove these rough spots with a pencil or Dall-point pen, etc 25 Troubleshooting 9hat appears to De trouDle is not always serious Please check the following points Defore calling a service center Problem Cause Corrective action General Unit can not power on No/low audio output Poor sound quality or distortion Unit resets itself when engine is off Unit fuse blown. Install new fuse with correct rating. Car battery fuse blown. Install new fuse with correct rating. Illegal operation Reset the unit. Improper audio output connection. Check wiring and correct. Volume set too low. Increase volume level. Speakers damaged. Replace speakers. Heavily biased volume balance. Adjust the channel balance to center position. Speaker wiring is in contact with metal part of car. Insulate all speaker wiring connections. Pirated disc is in use. Use original disc. Speaker power rating does not match unit. Replace speakers. :URQJFRQQHFWLRQV Check wiring and correct. Speaker is shorted. Check wiring and correct. Incorrect connection between ACC and BATT. Check wiring and correct. TFT monitor :DUQLQJLQIRUPDWLRQLVVKRZQ at all times Parking break wiring is not correct. Check wiring and correct. The color system of DVD disc does not match the monitor. Adjust the color system of the DVD disc playing back or the monitor in use. )ODVKLQJLPDJHRULQWHUIHUHQFH Pirated disc is in use. appears on screen Video cable damaged. Use original disc. Replace cables. Improper video signal connections. Check wiring and correct. Disc playback %annot insert disc &isc does not play Dack P$% cannot De used during V%& playDack 4epeat or search function is invalid during V%& playDack # disc is already inside the unit 'Lect current disc and insert new one &isc is warped or scratched 7se disc in good condition &isc is dirty or wet %lean disc with soft cloth +ncompatiDle disc is used 7se compatiDle disc &isc is inserted upside down +nsert disc with laDel side up &isc region code is not compatiDle with unit 7se disc with proper region code P$% is not availaDle on the disc 7se disc with P$% availaDle P$% is on 6urn P$% off Error messages No disc $ad disc 7nknown disc 4egion 'rror &isc is dirty %lean disc with soft cloth &isc is upside down +nsert disc with laDel side up No disc inside +nsert disc &isc is dirty %lean disc with soft cloth &isc is upside down +nsert disc with laDel side up &isc format is not compatiDle with this unit 7se disc with compatiDle format &V& region code is not compatiDle with 7se disc with compatiDle region code this unit 26 Wire Connections CAMERA 27 31