1
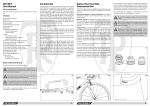
B&W International s e s a c l a i c spe & bags B&W B&W International GmbH special cases & bags Fon: 0049 (0) 54 51 / 89 46 - 0 Fax: 0049 (0) 54 51 / 89 46 - 444 Junkendiek 5 D-49479 Ibbenbüren [email protected] www. b-w-international.com Contents Thank-you for choosing a B&W bike case Thank-you for choosing a B&W bike case . . . . . . . . . . . . . . . . . . . . . . . . . . . . . . . . . . . . . . . . 1 Congratulations on your purchase of a B&W bike case. 1. bike case . . . . . . . . . . . . . . . . . . . . . . . . . . . . . . . . . . . . . . . . . . . . . . . . . . . . . . . . . . . . . . . . . . . 6 The high quality bike cases and -bags from B&W are particularly suited for safe transportation of valuable bikes. B&W cases are practical and, above all, the best quality. This means you can take your own, high-end bike safely on holiday with you with ease. Airline Travel with your bike . . . . . . . . . . . . . . . . . . . . . . . . . . . . . . . . . . . . . . . . . . . . . . . . . . . . . . . . . . . . . . . . . . . . . 3 Departure . . . . . . . . . . . . . . . . . . . . . . . . . . . . . . . . . . . . . . . . . . . . . . . . . . . . . . . . . . . . . . . . . . . . . . . . . . . . . . . . . . . . . . 3 Scope of delivery . . . . . . . . . . . . . . . . . . . . . . . . . . . . . . . . . . . . . . . . . . . . . . . . . . . . . . . . . . . . . . . . . . . . . . . . . . . . . . . 6 Anti Shock Frame (ASF) assembly . . . . . . . . . . . . . . . . . . . . . . . . . . . . . . . . . . . . . . . . . . . . . . . . . . . . . . . . . . . . . . . . 6 Packing the bike . . . . . . . . . . . . . . . . . . . . . . . . . . . . . . . . . . . . . . . . . . . . . . . . . . . . . . . . . . . . . . . . . . . . . . . . . . . . . . . . 7 Assembly on arrival . . . . . . . . . . . . . . . . . . . . . . . . . . . . . . . . . . . . . . . . . . . . . . . . . . . . . . . . . . . . . . . . . . . . . . . . . . . 17 2. bike box . . . . . . . . . . . . . . . . . . . . . . . . . . . . . . . . . . . . . . . . . . . . . . . . . . . . . . . . . . . . . . . . . . 18 Scope of delivery . . . . . . . . . . . . . . . . . . . . . . . . . . . . . . . . . . . . . . . . . . . . . . . . . . . . . . . . . . . . . . . . . . . . . . . . . . . . . 18 Packing the bike . . . . . . . . . . . . . . . . . . . . . . . . . . . . . . . . . . . . . . . . . . . . . . . . . . . . . . . . . . . . . . . . . . . . . . . . . . . . . . 18 Assembly on arrival . . . . . . . . . . . . . . . . . . . . . . . . . . . . . . . . . . . . . . . . . . . . . . . . . . . . . . . . . . . . . . . . . . . . . . . . . . . 26 3. bike bag . . . . . . . . . . . . . . . . . . . . . . . . . . . . . . . . . . . . . . . . . . . . . . . . . . . . . . . . . . . . . . . . . . 27 Scope of delivery . . . . . . . . . . . . . . . . . . . . . . . . . . . . . . . . . . . . . . . . . . . . . . . . . . . . . . . . . . . . . . . . . . . . . . . . . . . . . 27 Mounting the wheels to the base tray of the bike bag . . . . . . . . . . . . . . . . . . . . . . . . . . . . . . . . . . . . . . . . . . 27 Anti Shock Frame (ASF) assembly . . . . . . . . . . . . . . . . . . . . . . . . . . . . . . . . . . . . . . . . . . . . . . . . . . . . . . . . . . . . . . 28 Packing the bike . . . . . . . . . . . . . . . . . . . . . . . . . . . . . . . . . . . . . . . . . . . . . . . . . . . . . . . . . . . . . . . . . . . . . . . . . . . . . . 29 Assembly on arrival . . . . . . . . . . . . . . . . . . . . . . . . . . . . . . . . . . . . . . . . . . . . . . . . . . . . . . . . . . . . . . . . . . . . . . . . . . . 38 4. clapton box . . . . . . . . . . . . . . . . . . . . . . . . . . . . . . . . . . . . . . . . . . . . . . . . . . . . . . . . . . . . . . . 39 Scope of delivery . . . . . . . . . . . . . . . . . . . . . . . . . . . . . . . . . . . . . . . . . . . . . . . . . . . . . . . . . . . . . . . . . . . . . . . . . . . . . 39 Packing the bike . . . . . . . . . . . . . . . . . . . . . . . . . . . . . . . . . . . . . . . . . . . . . . . . . . . . . . . . . . . . . . . . . . . . . . . . . . . . . . 39 Defects liability and guarantee . . . . . . . . . . . . . . . . . . . . . . . . . . . . . . . . . . . . . . . . . . . . . . . 40 Publisher: B&W International GmbH special cases & bags Junkendiek 5 D-49479 Ibbenbüren Phone: +49 (0) 54 51 / 89 46 - 0 Fax: +49 (0) 54 51 / 89 46 - 444 Text, concept design, photography and graphic design Zedler – Institut für Fahrradtechnik und -Sicherheit GmbH [email protected] www.zedler.de Changes to technical details differing from the details and illustrations in the instruction manual are reserved. Liability by the publisher, editor or other third party for contributions in this brochure and the resulting damages, of whichever type, is excluded unless it is a case of gross culpability. © Copyright Reprint, translation and reproduction or other commercial use, including in extracts, as well as on electronic media, is not allowed without the previous written permission of the author and publisher. B&W To make sure you manage this easily, we have provided accurate information in this manual on how to dismantle your bike and store it in the case. Furthermore, we have also compiled useful information on air travel and provide you with tips on what you should take along with your bike. We recommend different versions of the bike case depending on the bike type: 1. bike case for trekking bikes, full-suspension mountain bikes and Triathlon bikes and equipment. 2. bike box for racing bikes (up to frame height 62 cm) or hard-tail mountain bikes. 3. bike bag, the affordable and easy to store alternative (however the plastic tray only protects the lower parts of the bike such as the chain and gears). 4. clapton box for folding bikes from Brompton Bikes and the Frog model from Riese und Müller. Should you have any questions on this manual or on our products, please contact us at [email protected] or at +49(0)5451/8946-0. Your B&W Team wishes you a good trip with our bike cases and lots of fun cycling. Edition 2, March 2012 1 B&W Airline Travel with your bike Reasons for taking your own bike: The following cases are suitable for your bike type: bike case bike box (Item no. 96002) (Item no. 96910) Air travel, freight Recommended method Air travel, freight forwarder shipment forwarder shipment of travel 1kg = 2.2 lbs. 25.4 mm = 1” bike bag (Item no. 96200) Travel by car, rail travel clapton box (Item no. 96006/N) Air travel, freight forwarder shipment 1340x910x360 mm 1140x885x295 mm 1320x840x390 mm 640x705x270 mm Outer dimensions 1255x850x320 mm 1080/780x800x250 mm 1280x820x270 mm 610x620x270 mm Inner dimensions 1330x940x370 mm 1160x900x300 mm 1320x340x330 mm 640x345x715 mm Packaging dimensions 17,1 kg 12,3 kg 9 kg 7,2 kg Weight (incl. accessories) 20 kg 15 kg 15 kg 15 kg max. load RACING and Tri-BIKES X X X - Up to frame size 62 cm X - Frame size > 62 cm X - With integrated seat post MOUNTAINBIKES X X X - Hardtail X X* X - Fully X - Downhill Bike X TREKKINGBIKES X BROMPTON BIKES/ Frog from R&M *Up to frame size 44 cm All cyclists know from their own experience: you ride your own bike much better and safer because you know the sports equipment inside and out, the seat position is right and you are thoroughly familiar with the brakes and the gears and know the condition they are in. Available space in the case can be used to store your helmet, shoes, tools and bike rucksack etc. Please note that the overall weight of the bike case should not exceed 30 kg. Before travel • • • • • Find out before booking whether the airline carries sport luggage (bike in the case) and how much the charges are. Notify the travel agent directly when booking that you want to take your own bike. This information will be passed on to the airline and you will receive separate notification. There are costs associated with registering with the airline and we have listed them for you (status as of December 2011). If you don’t receive any other notification, these costs are usually paid directly at the check-in desk. Also think about transport from the airport to the hotel. For package travel deals: notify the travel agent about bike transport from the airport to the booked hotel and back when booking otherwise additional costs may apply. Cycling event organisers: transport is frequently included in the travel cost. Inform yourself in good time before departure. Departure • • • You should generally plan more time to check-in when you travel with a bike. For early morning departures, we recommend the check-in service the evening before to save time on the day of departure. Report to the check-in desk as usual. Once you have received your boarding card, you usually have to go to a separate desk for bulky luggage. This table only serves the purpose of providing initial orientation. For the actual possibilities of use, please compare the applicable inner dimensions with the dimensions of the dismantled wheel from the front edge of the fork drop to the end of the rear derailleur and the height of the seat post to the underside of the chain wheel. At the destination airport For the bike box, the rear derailleur must be dismantled on all bikes so you should therefore measure the front edge of the fork drop to the back edge of the frame drop. The bike case usually arrives on a special conveyor belt or is handed to you through a door for bulky luggage. It is rare for it to arrive on the normal suitcase conveyor belt. A Damages to the case 2 B&W Please note that the bike bag only offers protection in the lower section in contrast to the bike box and the bike case. The top section remains susceptible to pressure and impacts. Report any damages to the case immediately to the airline. The “Lost & Found” desk usually helps you at most airports. 3 B&W B&W The following prices and conditions apply for different airlines (Status December 2011, all details provided without liability 1€ = aprox. $1.30): Airline One-way flight Short & medium haul 50 € Air Berlin Pre-registration 100 € At the airport Condor Lufthansa 50 € Pre-registration 100 € At the airport 70 € One-way flight Long haul Comments Registration 75 € Pre-registration 125 € At the airport Max. 32 kg. Packed in a cover or similar For topbonus Card Silver/ Gold or topbonus Service Card holders, 1 item of special luggage up to 32 kg will be transported free of charge if registered on time. Up to 30 kg including packaging, handled as excess baggage above this weight. Only packed bikes will be transported. Condor bike cases or bike bags are recommended as packaging. Tandem 50 % surcharge. Bikes with an electric motor will not be transported. From 15 kg to max. 32 kg or 1.41 m – 2 m. Registration during online booking necessary or subsequent registration 48 hours before departure 75 € Pre-registration 125 € At the airport 150 € Airline Iberia *) Ryanair Registration during booking or registration subsequently possible 8 hours before departure. Registration of special luggage within 24 hours after booking on service number: 01805 805 805. Registration at the airport is no longer possible. 50 € 50 € Up to 30 kg. Charged as excess Registration during TUI fly**) Pre-registration Registration in baggage above this weight. booking or registration advance From 50 Kg, special luggage subsequently required 1 day before departure. 60 € must be registered and conAt the airport 60 € firmed in writing. (Caution At the airport 1 item of special luggage is (Caution: payment is only changes possible. (Caution - changes permitted per passenger. For possible by credit card, Dependent on possible. Dependadditional sport luggage, additional fee 8.00 €. The direct debit method is airport) ent on airport) this will be charged as excess baggage. possible with registration 1 week before travel) Germanwings One-way flight Short & medium haul 75 € The amount can only be paid at the airport One-way flight Long haul Comments Registration ./. Registration during booking or registration subsequently up to 48 hours before departure. 40 € When booking online 40 € When booking online No weight limit. The bike must be packed in a transport bag or in a strong box. Bikes with an auxiliary motor will not be transported. Max. 30 kg. 50 € when 50 € when bookbooking through ing through bookbooking line or ing line or airport airport 40 € 40 € European International flights 47.60 € Within Germany Easy Jet 30 € Pre-payment 30 € Pre-payment 35 € At the airport 35 € At the airport The total weight of all items of luggage may be a maximum of 50 kg. Each individual piece of luggage may not be heavier than 32 kg. Max. 32 kg. Registration during booking or registration subsequently possible online up to 4 hours before departure. Registration at the airport possible up to 40 mins. before departure Registration during booking or registration subsequently possible online up to 3 hours before departure. Up to 2 hours before departure - registration through Call Center possible. Registration during booking or registration subsequently possible online up to 2 hours before the flight or contact customer services. Registration at the airport possible up to 1 hour before departure *) For travel destinations such as America, Nigeria, Israel or Brazil, please contact the airline to inform yourself about the possibilities of taking bikes before departure. **) TUIfly: The transport conditions for these service issues can differ for each airline. Therefore please inform yourself about the terms of the respective airline before your flight. can find current information on your airline’s website and at i You www.b-w-international.com 4 5 1. bike case B&W 1.1 Scope of delivery 1. ASF frame 2. Rear mount 3. Front mount 4. Extension 5. ASF screws 6. Adapter for front and rear quick-release levers 7. Spacer discs 8. Two wheel bags 9. bike case 10. Two keys 1.2 i Should you require adapters for the full-floating axle system of your mountain bike, please contact us at [email protected] or +49-(0)5451/8946-0. Anti Shock Frame (ASF) assembly 1.3 hinten vorne Place the bike case on the ground and open it. bike case 1.5 6 Please note that there are several positions for mounting the front wheel forks. By sliding the mounting element in the slotted hole on the extension, the ASF can be adjusted to different wheel bases. Do not turn the screw connectors very tightly otherwise you will need to readjust the setting when you pack the bike. The mounting elements for the most widespread quick-release systems are included in the scope of delivery. bike, please contact us at [email protected] or +49-(0)5451/8946-0. will need a helping hand for the first a You adjustment of the ASF. Ask someone to assist you otherwise damages may be caused. Packing the bike 1.6 1.7 Take the accessories out and place them on the floor so you have them readily available as you prepare the bike for shipment. Assemble the parts of the ASF as shown in the illustration. Insert the right adapter into the mounting element for your bike’s axle system. you require adapters for the fulli Should floating axle system of your mountain Langloch 1.4 B&W 1.8 Switch to the large chain wheel at the front and the smallest pinion on the back. This provides some protection against the sharp edges of the chain wheel. Keep a special pedal key or a long Allen wrench ready and unscrew the pedals. The right pedal has a typical right thread and is released in an anticlockwise direction. Please note that the pedals release with a jerk. Therefore use an angled wrench and position the tool so that your hands move away from the sharp teeth of the chain wheel when you turn the right pedal to release. For pedals with an inner hexagon, insert the tool from the inside of the crank into the pedal axle. Make sure that the tool is fully inserted. Apply the bike brakes and step on the rear key until the pedal releases. In contrast, the left pedal has left thread and is therefore opened in a clockwise direction. 7 B&W bike case bike case 1.1 1.2 1.3 1.4 Open the release lever on the brakes (Shimano, SRAM) on racing bikes or slide the pin in the gear brake handle on the handlebars (Campagnolo). For mechanical calliper brakes (cantilever and V-brakes); you must initially take out the cable on the brake arm. Hold the calliper with one hand and press the brake pad or brake arm together. In this position, the mostly barrel-shaped nipples of the brake cross-tension or tension sleeve (for V-brakes) can be easily taken out. For hydraulic calliper brakes from the company Magura, you open the quickrelease lever on one brake side and pull the brake out of the holder. For disc brakes (hydraulic or mechanical); you should first of all look where the brake pads or the points of wear (metal lug/pin) are. You can use them later to establish whether the pads are still in the right position after dismantling. Please read the instruction manual provided by the brake manufacturer. 1.5 1.6 B&W Open the quick-release or full-floating axles on MTBs. If the front wheel can’t be pulled out, it is due to the drop locks. These are holding pins in the wheel mount (drop end). You must open the tension nut on the quick-release slightly and remove the wheel from the locks. Remove the back wheel. To make removal of the back wheel easier, pull the rear derailleur slightly back with your hand. Lift the bike slightly and then tap the wheel so that it falls out. the transport protectors for disc g Mount brakes if you are transporting the bike without wheels. 1.7 1.8 Pull the brake lever and secure it with a strong rubber coating if you are transporting a bike with hydraulic disc brakes. Remove the nuts on both quick-releases completely, remove the springs and remove the quick-releases from the wheel axles. Make sure that you do not lose the two little springs for each wheel. necessary, read your general instruction i Ifmanual and the chapter on “handling quick-releases” and “removing wheels”. 8 9 B&W bike case bike case 1.1 Slide the quick-releases into the ASF mounting elements. Guide the springs so that the thin areas of all springs are pointing inwards on the quick-release that is on each side of a spring. 1.5 B&W Then fix the frame onto the ASF; use the quick-releases or full-floating axles on your bike. Close the wheel fixings as you would on the bike. Once everything is in place, tighten all screws on the ASF with a suitable torque key and a torque of 1012 Nm. handlebars must be driven in 90°. i The For bikes with double bridge forks on 1.2 1.3 1.4 10 Lift the bike with one hand and pull the gears slightly back with the other hand. Place the rear drop end into the rear mounting so that the top chain section runs above the mounting element. Guide the drop ends of the front wheel fork to the front mounting element. If the fork doesn’t fit, you must adjust the mounting element by loosening and sliding on the front cantilever. 1.6 1.7 1.8 which this is not possible, please order a corresponding adapter at [email protected] or contact us on +49(0)5451/8946-0. Turn the crank parallel to the chain bar and fix the right pedal eye with a cable tie to the chain bar. Also fix the chain at the point where it meets the chain wheel and where it leaves it again. This means the chain cannot fall and cause damage and the sharp edged chain wheel is somewhat defused. Switch to the lowest gear with the right gear lever so that the rear derailleur is fully on the inside. 11 B&W bike case bike case 1.1 Place the assembled bike in front of the upright bike case and make sure that no components protrude beyond the dimensions of the bike case. Optimise the alignment of the frame on the ASF if necessary once you have loosened the screws of the ASF. Tighten the screws again with 10-12 Nm. Should this still not be sufficient, please dismantle the seat and seat post if necessary, remove the rear derailleur and turn the handlebars. Removing the rear derailleur: 1.2 Turn the gears back slightly and continue to hold them in place with one hand so they do not fall uncontrolled due to the spring tension when you release the screws. Unscrew the connectors fully. Protect the chain bar either with air cushion film or foam tubes e.g. hot water tubes. Pack up the removed rear derailleur and bind it to the middle of the protected bar with copper wire. 1.5 1.6 A 1.7 Removing the handlebars: 1.3 12 Open the seat post clip on the clamp or on the frame by one or two turns. Pull the seat post out. This should be possible without too much force and without strongly turning it back and forth. Never apply force. If necessary, read your general instruction manual or ask your bike retailer. Turn the seat post clip using little force on the tool and only as far as required so that it just securely holds the seat post. Turning the screw connector on the seat post clip too tightly can damage the actual clip or the frame. Protect the whole frame with insulation tubes or with air cushion film Release the front screws on the handlebar stem by one or two turns and turn the handlebars down until the smallest possible construction width is achieved. Only turn the four screws with little force so that the handlebars are only just held in the stem. Removing the seat and seat post: 1.4 B&W Mark the insert depth of the seat post with sticky tapes. Stick a second piece of sticky tape to the same point on the frame and draw a vertical line. This makes a big difference when setting the seat height and aligning the seat at the destination. 1.8 Place the bike and the ASF in the opened bike case. Clean the seat post and protect it with insulation tubing. Store the seat and seat post on the base of the bike bag so that they cannot cause any damage. 13 B&W bike case bike case 1.1 Push the plastic hub protectors onto the axle ends. These are relatively reliable in preventing the axles pushing through the packaging or causing damages to the frame. 1.5 • • • • 1.2 1.3 1.4 Place a cotton cloth over the sprocket and slide the ends of the cloth towards the spokes on the back. This prevents the packaging becoming dirty and the cloths are useful for taking care of the bike later. Put the wheels into the wheel bags. Wrap the pedals in cotton cloth and store them in the little pockets on the wheel bags. 1.6 Wrap the tool used (pedal and Allen wrench) torque key with bits (for proper assembly) carbon lubricant if necessary chain and penetrating oil for care (no spray cans!) air pump saddle bags individually in cotton cloths. Store all of this together with this manual and your general bike instruction manual in a little box at the bottom of the bike case. the bottles into the holder on the i Insert frame so you do not forget them. 1.7 1.8 If there is any space left in the bike case, i you can slide a well packed helmet and even packed cycling shoes into the cavity. 14 • • B&W Place the wheel bags on the bike in the bike case. The sprocket on the back wheel should point inwards and the width should be as small as possible. Close the lid slowly and carefully. If the lid on the bag cannot be closed easily, check whether the wheel bags are not positioned well, whether the handlebars are too wide or whether the seat is protruding too high. Dismantle as described above if necessary. Align the wheel bags better if necessary. Close the lid slowly and carefully again. Make sure that all lock bolts cleanly slide into the counterparts. 15 B&W bike case bike case 1.1 Close the locks by pressing the keys. 1.5 B&W Insert your business card or a note with your address in the little address pocket. 1.6 Lock the bike case. generally check before travelling by a Please air with your bike in the bike case whether 1.2 damage to the frame or other components can occur due to vibrations or gravitational forces during transport. Therefore, please do not place any loose objects or tools in the bike case and you should decide yourself whether it is necessary to use additional padding material. Open up the rotating flap and turn it until the closing anchor is open. note that a bike case weighing i Please more than 30 kg may not be transported by the airline. Inform yourself in good time before departure. 1.3 Tilt the whole mechanism inwards. Turn the flap in the opposite direction and pay attention that the anchor pulls the case closed. Fold the rotating flap inwards. Assembly on arrival Assemble the bike in the reverse order to dismantling. 1.7 1.4 Place the bike case upright and tie a lashing strap around the bike case. This means that if the locks fail, the B&W lashing strap still holds the freight together. Read the information in your general bike instruction manual on setting the relevant components and especially the information on correct fixing of components (screw torque). the “before each ride” check after g Perform assembly. This manual cannot teach you the skills of a bicycle mechanic or fitter. If you are uncertain, please contact a local bike retailer or a training workshop. g BiCyClE usEr MaNual opEraTiNg iNsTruCTioNs EN 14766 Please read pages Please perform the functional Please observe 6 and 7 before your check on pages 8 and 9 before bike card on first ride! every ride! the rear cover!! MTB/Cross EN BicyclE usER manual opERating instRuctions En 14781 Please read pages Please perform the functional Please observe 6 and 7 before your check on pages 8 and 9 before bike card on first ride! every ride! the rear cover!! Road Racing En 16 17 B&W 2. bike box 2.1 Scope of delivery • • • • Bike box, including 2 keys 2 B&W wheel bags 3 spacers for the drop end at front and back 1 foam support for the bottom bracket bike box 2.5 B&W Clean the seat post and protect it with insulation tubing. Carefully put these two to one side still assembled. Switch to the large chain wheel at the front and the smallest pinion on the back. This provides some protection against the sharp edges of the chain wheel. Packing the bike 2.2 2.3 2.4 A 18 Mark the insert depth of the seat post with sticky tapes. Stick a second piece of sticky tape to the same point on the frame and draw a vertical line. This makes a big difference when setting the seat height and aligning the seat at the destination. Open the seat post clip on the clamp or on the frame by one or two turns. Pull the seat post out. This should be possible without too much force and without strongly turning it back and forth. Never apply force. If necessary, read your general instruction manual or ask your bike retailer. Turn the seat post clip using little force on the tool and only as far as required so that it just securely holds the seat post. 2.6 2.7 2.8 Keep a special pedal key or a long Allen wrench ready and unscrew the pedals. The right pedal has a typical right thread and is released in an anticlockwise direction. Please note that the pedals release with a jerk. Therefore use an angled wrench and position the tool so that your hands move away from the sharp teeth of the chain wheel when you turn the right pedal to release. For pedals with an inner hexagon insert the tool from the inside of the crank into the pedal axle. Make sure that the tool is fully inserted. Apply the bike brakes and step on the rear key until the pedal releases. In contrast, the left pedal has a left thread and is therefore opened in a clockwise direction. Turning the screw connector on the seat post clip too tightly can damage the actual clip and the frame 19 B&W bike box bike box 2.1 2.2 Open the release lever on the brakes (Shimano, SRAM) on racing bikes or slide the pin in the gear brake handle on the handlebars (Campagnolo). For mechanical calliper brakes (cantilever and V-brakes), you must initially take out the cable on the brake arm. Hold the calliper with one hand and press the brake pad or brake arm together. In this position, the mostly barrel-shaped nipples of the brake cross-tension or tension sleeve (for V-brakes) can be easily taken out. 2.5 B&W Open the quick-release or axles on fullfloating axles on MTBs. If the front wheel can’t be pulled out, it is due to the drop locks. These are holding pins in the wheel mount (drop end). You must open the tension nut on the quickrelease slightly and remove the wheel from the locks. 2.6 Remove the back wheel. To make removal of the back wheel easier, pull the rear derailleur slightly back with your hand. Lift the bike slightly and then tap the wheel so that it falls out. the transport protectors for disc g Mount brakes if you are transporting the bike without wheels. 2.3 For hydraulic calliper brakes from the company Magura, you open the quickrelease lever on one brake side and pull the brake out of the holder. 2.7 Apply the brake lever and secure with a strong rubber coating if you are transporting a bike with hydraulic disc brakes. can enter the system without a transg Air port protector and with the brake lever applied. The brake would be ineffective. 2.4 For disc brakes (hydraulic or mechanical), you should first of all look where the brake pads or the points of wear (metal lug/pin) are. You can use them later to establish whether the pads are still in the right position after dismantling. Please read the instruction manual provided by the brake manufacturer. necessary, read your general instruction i Ifmanual and the chapter on “handling quick-releases” and “removing wheels”. 20 2.8 Turn the crank parallel to the chain bar and fix the right pedal eye with a cable tie to the chain bar. Also fix the chain at the point where it meets the chain wheel and where it leaves it again. This means the chain cannot fall and cause damage and the sharp edged chain wheel is somewhat defused. This means it cannot cause scratches and the sharp edged chain wheel is covered a little. 21 B&W bike box bike box 2.1 2.2 2.3 Turn the rear derailleur back slightly and continue to hold it in place with one hand so it doesn’t fall uncontrolled due to the spring tension when you release the screws. Unscrew the connectors fully. Protect the chain bar either with air cushion film or foam tubes e.g. hot water tubes. Pack up the removed gears and bind them to the middle of the protected bar with copper wire. Insert the shorter plastic spacer into the drop end of the fork. Slide the longer spacer into the wheel axle mounts on the rear assembly. Fix the holder with plastic coated wire or cable binders to the chain bars or the drop ends. Alternative: 2.5 2.6 2.7 note that there are different spaci Please ers for racing bikes and mountain bikes. 2.4 22 Loosen the front screws on the stem of your handlebars. Remove the cover and take out the handlebars. Pack the handlebars in a bag made of film. B&W 2.8 If your stem cannot be opened at the front, loosen and remove the above Aheadset® adjustment screw plus the cover. Open the side clamping screws on the stem by one to two turns. The stem should now be able to be moved and can be taken from the shaft with the handlebars. Slide on spacers in place of the stem, which you secure with the cover and the Aheadset® adjustment screw. The frame and fork remain as one unit and you thereby reduce the packing size. Insert the bottles into the holder on the frame so you do not forget them. Protect the whole frame with insulation tubes or with air cushion film. Lift the frame up slightly and place it with the chain wheel into the supplied foam support for the bottom bracket. This is how you can prevent the chain wheel and/or bike case becoming damaged. Place the prepared bike in the B&W bike box. The handlebars or handlebar stem unit should not collide with the frame tube or fork and the bowden cables should not be bent. Protect the critical areas with additional foam. 23 B&W bike box bike box 2.1 2.2 2.3 • • • • 2.4 BicyclE usER manual opERating instRuctions En 14781 Please read pages Please perform the functional Please observe 6 and 7 before your check on pages 8 and 9 before bike card on first ride! every ride! the rear cover!! • • Wrap the whole chain belt in air cushion film so that the chain, which is always a little oily, is isolated from the rest of the freight. Place the seat post including the seat in a good position in the bottom of the bike box. Wrap the tool used (pedal and Allen wrench) torque key with bits (for proper assembly) carbon lubricant if necessary chain and penetrating oil for care (no spray cans!) air pump and saddle bags individually in cotton cloths. Store all of this together with this manual and your general bike instruction manual in a little box at the bottom of the bike case. If there is any space left in the bike case, i you can slide a well packed helmet and even packed cycling shoes into the cavity. Road Racing En 24 2.5 2.6 2.7 2.8 A B&W Remove the quick-releases from the hub and pack them in the supplied wheel bags. Make sure that you do not lose the two little springs per wheel. Also pack the pedals in the wheel bag compartments provided. Close them. If necessary, push the plastic hub protectors (available from your bike retailer) onto the axle ends. These are relatively reliable in preventing the axles pushing through the packaging or causing damages to the frame. Place a cotton cloth over the sprocket and slide the ends of the cloth towards the spokes on the back. This prevents the packaging becoming dirty and the cloths are useful for taking care of the bike later. Pack the wheels in the wheel bags and close the bags with the zips. Please generally check before travelling with your bike in the bike box whether damage to the frame or other components can occur due to vibrations or gravitational forces during transport. Therefore, please do not place any loose objects or tools in the bike bag and you should decide yourself whether it is necessary to use additional padding material. 25 B&W bike box 2.1 2.2 Place the packed wheels in the B&W bike case, the sprocket pointing inwards in the frame triangle section where it cannot cause any damage. Close the case while it is lying on the ground and make sure that nothing gets caught. Pressure must not have to be applied; otherwise you will have to move the freight around slightly. Close the locks. Place the case upright and tie the lashing strap around the bike box. This means that if the locks fail, the B&W lashing strap still holds the freight together. 3.1 Scope of delivery 1. ASF frame 2. Rear mount 3. Front mount 4. Extension 5. ASF screws 6. Adapter for rear quick-releases 7. Adapter for front quick-releases 8. Wheels with supports 9. Fixing parts for wheel supports 10. bike bag 3.2 2.3 by the airline. Inform yourself in good time before departure. 3.3 Assemble the bike in the reverse order to dismantling. BiCyClE usEr MaNual opEraTiNg iNsTruCTioNs EN 14766 Please read pages Please perform the functional Please observe 6 and 7 before your check on pages 8 and 9 before bike card on first ride! every ride! the rear cover!! Read the information in your general bike instruction manual on setting the relevant components and especially the information on correct fixing of components (screw torque). 3.4 the “before each ride” check after g Perform assembly. MTB/Cross EN manual cannot teach you the skills of g This bicycle mechanic or fitter. If you are uncertain, please contact a local bike retailer or a training workshop. you require adapters for i Should the full-floating axle system of your Mounting the wheels to the base tray of the bike bag Assembly on arrival 2.4 mountain bike, please contact us at [email protected] or +49-(0)5451/8946-0. Insert your business card or a note with your address in the little address pocket. note that a bike case weighing i Please more than 30 kg may not be transported 26 B&W 3. bike bag Place the wheel with the support on the base tray. Fix the wheel from inside with two screws measuring 4.2 x 16. Please note that the silver washers are generally used from the inside. Screw the wheel support with two screws measuring M 4 x 14 mm von from the outside onto the face end of the base tray. Fix the support with an additional M4 x 20 mm screw on the side. Make sure that the black washers/spacers are generally used on the outside. Fix the second wheel in the same way. 27 B&W bike bag back bike bag front Anti Shock Frame (ASF) assembly Packing the bike Open the bike bag. 3.5 Take the accessories out and place them on the floor so that you have them readily available as you prepare the bike for shipment. 3.1 3.2 3.3 3.4 B&W Switch to the large chain wheel at the front and the smallest pinion on the back. This provides some protection against the sharp edges of the chain wheel. Mount the parts of the ASF as shown in the illustration. Please note that there are several positions for mounting the front wheel forks. By sliding the mounting element in the slotted hole on the extension, the ASF can be adjusted to different wheel bases. Do not turn the screw connectors very tightly otherwise you will need to readjust the setting when you pack the bike. Insert the right adapter into the mounting element for your bike’s axle system. The mounting elements for the most widespread quick-release systems are included in the scope of delivery. you require adapters for the fulli Should floating axle systems of your mountain 3.6 3.7 3.8 Keep a special pedal key or a long Allen wrench ready and unscrew the pedals. The right pedal has a typical right thread and is released in an anticlockwise direction. Please note that the pedals release with a jerk. Therefore use an angled wrench and position the tool so that your hands move away from the sharp teeth of the chain wheel when you turn the right pedal to release. For pedals with an inner hexagon insert the tool from the inside of the crank into the pedal axle. Make sure that the tool is fully inserted. Apply the bike brakes and step on the rear key until the pedal releases. In contrast, the left pedal has a left thread and is therefore opened in a clockwise direction. bike, please contact us at [email protected] or +49-(0)5451/8946-0. will need a helping hand for the first a You adjustment of the ASF. Ask someone to assist you otherwise damages may be caused. 28 29 B&W bike bag bike bag 3.1 3.2 3.3 3.4 Open the release lever on the brakes (Shimano, SRAM) on racing bikes or slide the pin in the gear brake handle on the handlebars (Campagnolo). For mechanical calliper brakes (cantilever and V-brakes), you must initially take out the cable on the brake arm. Hold the calliper with one hand and press the brake pad or brake arm together. In this position, the mostly barrel-shaped nipples of the brake cross-tension or tension sleeve (for V-brakes) can be easily taken out. For hydraulic calliper brakes from the company Magura, you open the quickrelease lever on one brake side and pull the brake out of the holder. For disc brakes (hydraulic or mechanical), you should first of all look where the brake pads or the points of wear (metal lug/pin) are. You can use them later to establish whether the pads are still in the right position after dismantling. Please read the instruction manual provided by the brake manufacturer. 3.5 3.6 B&W Open the quick-releases or full-floating axles on MTBs. If the front wheel can’t be pulled out, it is due to the drop locks. These are holding pins in the wheel mount (drop end). You must open the tension nut on the quickrelease slightly and remove the wheel from the locks. Remove the back wheel. To make removal of the back wheel easier, pull the rear derailleur slightly back with your hand. Lift the bike slightly and then tap the wheel so that it falls out. the transport protectors for disc g Mount brakes if you are transporting the bike without wheels. 3.7 3.8 Pull the brake lever and secure it with a strong rubber coating if you are transporting a bike with hydraulic disc brakes. Remove the nuts on both quick-releases completely, remove the springs and remove the quick-releases from the wheel axles. Make sure that you do not lose the two little springs per wheel. necessary, read your general instruction i Ifmanual and the chapter on “handling quick-releases” and “removing wheels”. 30 31 B&W bike bag bike bag 3.1 3.2 3.3 3.4 32 Slide the quick-releases into the ASF mounting elements. Guide the springs so that the thin areas of all springs are pointing inwards on the quick-release that is on each side of a spring. Lift the bike with one hand and pull the gears slightly back with the other hand. Place the rear drop end into the rear mounting so that the top chain section runs above the mounting element. Guide the drop ends of the front wheel fork to the front mounting element. If the fork doesn’t fit, you must adjust the mounting element by loosening and sliding on the front cantilever. 3.5 3.6 3.7 3.8 B&W Then fix the frame onto the ASF; use the quick-releases or full-floating axles on your bike. Close the wheel fixings as you would on the bike. Once everything is in place, tighten all screws on the ASF with a suitable torque key and a torque of 10-12 Nm. Turn the crank parallel to the chain bar and fix the right pedal eye with a plastic coated wire or a cable tie to the chain bar protected with insulation tubing or air cushion film. Also fix the chain at the point where it meets the chain wheel and where it leaves it again. This means the chain cannot fall and cause damage and the sharp edged chain wheel is somewhat defused. Switch to the lowest gear with the right gear lever so that the rear derailleur is fully on the inside. 33 B&W bike bag bike bag 3.1 3.2 Protect the whole frame either with insulation tubing or with air cushion film. Place the bike with the ASF in the opened bike bag. 3.5 3.6 If the bike gets stuck on the rear derailleur, it needs to be unscrewed. 3.3 3.4 34 Turn the gears back slightly and continue to hold them in place with one hand so they doesn’t fall uncontrolled due to the spring tension when you release the screws. Unscrew the connectors fully. Protect the chain bar either with air cushion film or foam tubes e.g. hot water tubes. Pack up the removed gears and bind them to the middle of the protected bar with copper wire. 3.7 3.8 B&W Push the plastic hub protectors onto the axle ends. These are relatively reliable in preventing the axles pushing through the packaging or causing damages to the frame. Place a cotton cloth over the sprocket and slide the ends of the cloth towards the spokes on the back. This prevents the packaging becoming dirty and the cloths are useful for taking care of the bike later. Store the wheels in the side pockets. The sprocket on the back wheel should point inwards. Close the wheel compartments with the zips. Close the bike bag with the zip. If the zip on the bag cannot be pulled easily, check whether the handlebars are too wide or whether the seat is protruding too high. 35 B&W bike bag bike bag 3.1 Initially release the front screws on the handlebar stem by one or two rotations and turn the handlebars down until the smallest possible construction width is achieved. 3.5 3.2 3.3 Only turn the four screws with little force so that the handlebars are only just held in the stem or the clamp collars are lightly fixed. Before removing the seat and seat post, mark the insert depth of the seat post with sticky tapes. Stick a second piece of sticky tape to the same point on the frame and draw a vertical line. This makes a big difference when setting the seat height and aligning the seat at the destination. Turn the seat post clip using little force on the tool and only as far as required so that it just securely holds the seat post. A Turning the screw connector on the seat post clip too tightly can damage the actual clip or the frame. Clean the support and protect it with insulation tubing. Store the seat and seat post on the base of the bike bag so that they cannot cause any damage. 3.7 • • • • • 3.4 Open the seat post clip on the clamp or on the frame by one or two turns. Pull the seat post out. This should be possible without too much force and without strongly turning it back and forth. Never apply force. If necessary, read your general instruction manual or ask your bike retailer. 3.6 If this is not sufficient, the handlebars need to be fully removed. Protect the handlebars with air cushion film. B&W • • 3.8 Wrap the pedals, tool used (pedal and Allen wrench) torque key with bits (for proper assembly) carbon lubricant if necessary chain and penetrating oil for care (no spray cans!) air pump and saddle bags individually in cotton cloths. Store all of this together with this manual and your general bike instruction manual, if possible, in the pockets sewn into the bike bag and the rest in a little box at the bottom of the bike bag. If there is any space left in the bike bag, i you can slide a well packed helmet and even packed cycling shoes into the cavity. 36 37 B&W bike bag 4. clapton box the bottles into the holder on the i Insert frame so you do not forget them. 3.1 Close the bike bag. Secure both straps with a little padlock if necessary or with a key ring (possibly with both) so that the zip cannot be open without you wanting. your key ready for the security checks i Keep in case you need to open the bike bag 3.2 A EN 14766 Please read pages Please perform the functional Please observe 6 and 7 before your check on pages 8 and 9 before bike card on first ride! every ride! the rear cover!! MTB/Cross EN En 14781 Please perform the functional Please observe 6 and 7 before your check on pages 8 and 9 before bike card on first ride! every ride! the rear cover!! • • Packing the bike Fold your Brompton Bike or the Frog model from Riese und Müller according to the manufacturer’s instructions. Information on folding and unfolding your bike can be found in the manufacturer’s instructions for your folding bike. 4.2 Lie the clapton box down and open it. Place the prepared bike in the B&W clapton box. Protect the critical areas with additional foam. Wrap air cushion film around the bike if necessary so that the slightly oily chain is isolated from the rest of the freight. required, the available inside size can be i Ifincreased by removing a layer of foam. 4.3 4.4 manual cannot teach you the skills of g This a bicycle mechanic or fitter. If you are un- certain, please contact a local bike retailer or a training workshop. Road Racing clapton box Two keys Close the clapton box while it is lying on the ground and make sure that nothing gets caught. Pressure must not have to be applied, otherwise you will have to move the freight around slightly. Close the locks. Read the information in your general bike instruction manual on setting the relevant components and especially the information on correct fixing of components (screw torque). the “before each ride” check after g Perform assembly. BicyclE usER manual Please read pages 4.1 Scope of delivery Assemble the bike in the reverse order to dismantling. 3.4 opERating instRuctions Please generally check before travelling with your bike in the bike bag whether damage to the frame or other components can occur due to vibrations or gravitational forces during transport. Therefore, please do not place any loose objects or tools in the bike bag and you should decide yourself whether it is necessary to use additional padding material. Assembly on arrival BiCyClE usEr MaNual opEraTiNg iNsTruCTioNs again. Insert your business card or a note with your address in the little address pocket. B&W Put the clapton box upright and tie the lashing straps around the clapton box. This means that if the locks fail, the B&W lashing strap still holds the freight together. You can find further information at: iBROMPTON: http://www.brompton.co.uk RIESE UND MÜLLER: http://www.en.r-m.de En 38 39 B&W Defects liability and guarantee B&W You are using a product from the company B&W. All of our products are subject to strict quality controls. The quality controls cover the purchasing of raw materials and production and continue until the products leave our warehouse. If you have a complaint when using our products, we are pleased to remain at your disposal Defects in the sense of the warranty apply if: • The product does not correspond with the information provided in the advert/product description (technical changes reserved) • The product does not correspond with the usual use and properties Defects in the sense of the warranty do not apply if: • The product displays normal wear and tear • Damage is caused to the product, which is the own fault of the user or a third party (improper operation or incorrect storage etc) • Defects to the product exist which the user already knew about at the time of purchase A torn handle, damaged wheel, broken case or split bag are always handling errors and are not subject to warranty claims. Our product details always relate to the transport of the bike in a case or bag. Example: You have a bike case from our bike cases range and receive the case at your travel destination with damages. Immediately contact: Luggage service/lost and found office The airline is responsible and not your travel organiser!!! We generally have all attachment parts for our products (wheels, locks, handles, hinges, lid brackets and studs etc.) in stock as spare parts. Damages or cracks in the case shell generally cannot be repaired. In order to confirm this, we initially need a brief exclamation of how the damage was caused and some relevant photographs. It may be necessary to send us the case at a later point in time. You can then claim for replacement of damages against the airline with the report we prepare. B&W 40 B&W International GmbH Junkendiek 5 49479 Ibbenbüren Phone: +49 (0) 54 51 89 46-0 Fax: +49 (0) 54 51 89 46-444 URL: www.b-w-international.com 41