1
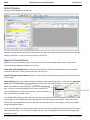
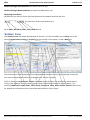
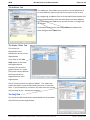
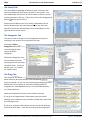
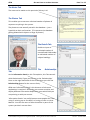
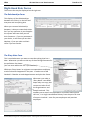
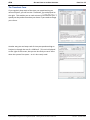
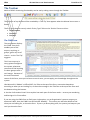
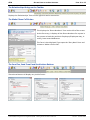
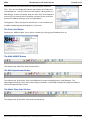
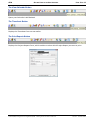
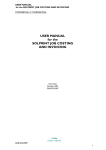
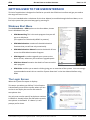
GEM GETTING USED TO THE USER INTERFACE PAGE 1 OF 13 GETTING USED TO THE USER INTERFACE This brief introduction is designed to familiarise you with the GEM User Interface and get you used to the range of Forms it uses. This is not intended to be a substitute for the User Manual, accessible through the Start Menu, or online help system that you can always get by pressing F1. Windows Start Menu The On2it Software – GEM options on the Start Menu, shown here in Windows Vista, are: GEM Networking This is the main program that you will use on a daily basis. (This appears as ‘Relationship GEM’ at present.) GEM Administration contains all the administrative functions that you will use only occasionally. GEM Administration Manual contains the details of how to use the GEM Administration Program. GEM Upgrade is used to upgrade your system to the latest version, whenever you receive an upgrade patch. GEM User Manual contains the details of how to use the main program. GEM Video enables you to watch a Video giving you an overview of the system. You are strongly recommended to watch this or read the ‘System Overview’ in the User Manual before using GEM. The Login Screen When the system first opens it displays: This warns you when your 30 Day Trial will expire. It also allows you to tell the system where you are so that it can display the correct dial codes to everywhere else. You only ever need to specify local phone numbers in GEM as it already knows the dial codes to nearly everywhere in the World. If it doesn’t, it will prompt you for them. © On2it Software Ltd O:\On2it\GEM\Training\Initial Training Modules\GEM - 1. Getting Used to the User Interface.doc Version 1 - 3 October 2009 GEM GETTING USED TO THE USER INTERFACE PAGE 2 OF 13 Initial Display Once you have logged in you will see: Well it may look like this as the form displayed on the right will depend upon the form that you last had open on that side – so you can carry on where you left off. System Conventions Before we rush into introducing you to the various forms in the system we will cover some of the conventions that apply throughout the system. Fields with a Blue Background are used to imply that the information they display are not normally required to be input, as the system will work it out for you. Double-Clicking anyone’s Name anywhere in the system will display their record on the left-hand side of the screen. Combo Boxes like this are used to select from options that may already exist. If you click the pull-down arrow on the end of the Box, you will be able to see all the pre-existing options. You can either scroll down and select the required option, or just start typing in the box - if there is a matching option it will ‘auto complete’ for you. (Combo boxes are not case-sensitive. They work better, in fact, if you always use lower-case.) You should NOT assume you are restricted to items in the pull-down list, as obviously the system could not possibly be pre-loaded with every possible Job Title of everyone in the World. So this particular Combo Box is pre-loaded with just the Job Titles of everyone who is in the system, as this then makes using existing titles easier. If you enter the Name of someone who does not exist, you will usually be given the option of creating a new record for them. This is because in GEM you are not just adding text into a box but creating links between records. © On2it Software Ltd O:\On2it\GEM\Training\Initial Training Modules\GEM - 1. Getting Used to the User Interface.doc Version 1 - 3 October 2009 GEM GETTING USED TO THE USER INTERFACE PAGE 3 OF 13 Working with Data Grids like this: Indicates the Current Record Indicates a record currently being edited Indicates an ‘Empty’ Record at the end of the record set To copy data in a particular column from the row above press the <crtl>, <shift> and <quote> Keys on your keyboard simultaneously. To Select a Record click the ‘Record Selector’ Button at the left-hand end of the Data Grid. To Delete a Record use the <Delete> Key on the Keyboard. This will delete the currently selected record. To re-size a column, simply drag the right-hand end of the column heading. To re-position a column, click the column heading to select the entire column and drag the column heading to the desired location. To sort on any column right-click in it and then select Sort Ascending or Sort Descending. The Save Button saves the current record to the database. The New Button saves the current record if has not already been saved and creates a new blank record for you. The OK Button saves the current record to the database and creates a new blank record for you. It is the same as using the Save button and then the New button. (So effectively the New and OK Buttons do the same job.) The Save and OK Buttons do not normally need to be used, as records will normally be written to the database whenever you move from one Record, Tab or Form to another. Just occasionally you may need to use them, however. This is because the pre-existing options behind Combo Boxes are normally loaded when a Form first opens. So if you have added an option that you want to see in Combo Box after the Form has loaded, you might not be able to find it. In these circumstances you will need to use the Save Button to force a Record to be written to the database and then re-open the Form in question, or use Records, Refresh from the Menu Bar to ‘re-query’ the Form. The Find Buttons are context sensitive. So if you are on the Organisations Tab, the FIND Form will look for an Organisation for you. If you are on the People Tab it will look for a Person for you. If you click the Find button nearest to the Name of the CEO or Manager it will look for someone, already in the system, to become the CEO or Manager. If you use the Find Button nearest to someone’s Wife/Partner it will look for someone to become their Wife/Partner and so on. Double-Clicking Phone Numbers or clicking Buttons alongside them, will dial phone calls for you. (Provided you have a Modem in your machine, and the phone line is connected through a ‘Y Splitter’ to both your Modem and your phone.) Double-Clicking Fax Numbers, or clicking Buttons alongside them, will send Faxes for you. © On2it Software Ltd O:\On2it\GEM\Training\Initial Training Modules\GEM - 1. Getting Used to the User Interface.doc Version 1 - 3 October 2009 GEM GETTING USED TO THE USER INTERFACE PAGE 4 OF 13 Double-Clicking E-mail Addresses will send E-mails for you. Double-Clicking a Website Address will open the Website for you. Navigating Record Sets Occasionally you will see Forms that have buttons at the bottom that look like this: The functions of the useful buttons are: Go to FIRST, PREVIOUS, NEXT, LAST, NEW Record ‘Entities’ Form The ‘Entities’ Form will always be displayed on the left. This Form enables you to Select any of the existing Organisations, People or Projects that are already in the system, or add a New one. The second row of Tabs changes dynamically dependant upon the ‘Entity Type’ selected, so that you may enter the appropriate data for an Organisation, Person or Project. The first Tab for an Organisation, Person or Project always displays; the information that makes an ‘Entity Type’ different from any other, their principal relationships and main contact details. The remaining Addresses, Depts./Subs., Staff, Family, Categories, Diary, Notes, Photos, Details Tabs and so on, display the information that is shared between different ‘Entity Types’. © On2it Software Ltd O:\On2it\GEM\Training\Initial Training Modules\GEM - 1. Getting Used to the User Interface.doc Version 1 - 3 October 2009 GEM GETTING USED TO THE USER INTERFACE PAGE 5 OF 13 The Address Tab The Addresses Tab enables you to create as many Addresses of as many Address Types as you like for everyone in the system. By recognizing an Address from its associated Phone Number the system automatically tracks who else shares the same Address. So if you change the Address for anyone of them, it changes for all of them. If someone leaves home, you simply Delete this Address for them and give them a New one. The Depts./Subs. Tab This shows the Departments and Subsidiaries of the current Organisation. If you click on the Tree View button it will show the Organisational Structure for the entire group of which it is a part. The system simply deduces this from the Parent Organisation for each Organisation. These Tree-View Forms are always ‘Modal’. This means the system will wait for you to select what you want, or close the form. If you therefore try to click on any other form the system will just beep at you - nothing else happens. The Staff Tab This shows the Work and Home contact details for all members of Staff of the current Organisation. © On2it Software Ltd O:\On2it\GEM\Training\Initial Training Modules\GEM - 1. Getting Used to the User Interface.doc Version 1 - 3 October 2009 GEM GETTING USED TO THE USER INTERFACE PAGE 6 OF 13 The Family Tab This uses GEM’s knowledge of who everyone’s Partners and Parents to deduce all their other relatives in the system. You can’t add People into this list or edit the data it contains, as the system generates it for you. That’s why it has a blue background and no at the end of the list. Please note the data in this list is totally independent of the Family Relationships that you CAN specify on the ‘Personal Contacts’ Tab of the ‘Relationships’ Form that displays on the right-hand side of the screen. The Categories Tab This can be used to assign as many Categories to anyone or anything in the system, for any purpose you like. Clicking the Select Categories Button will reveal the hierarchical nature of GEM’s Categories. The Select Categories Form will not allow you to do anything else until you have closed the form. It will just beep at you. (It is said to be ‘modal’ form.) The Diary Tab This shows all the ‘Diary Notes’ about a particular Subject from the point of view of anyone involved. So you can see incoming and outgoing E-mails, Phone Calls, Faxes, letters to and from multiple people all merged into a consolidated history in an unprecedented way – as is illustrated here. Notes are listed with the most recent notes at the top. If you go to an Organisation’s Diary Notes you can see the dealings you’ve had with every member of staff even those that are no-longer there. If you go to a Person’s Diary Notes you can see all the dealings you’ve had with them – even the ones for previous employers. © On2it Software Ltd O:\On2it\GEM\Training\Initial Training Modules\GEM - 1. Getting Used to the User Interface.doc Version 1 - 3 October 2009 GEM GETTING USED TO THE USER INTERFACE PAGE 7 OF 13 The Notes Tab The notes we’ve made on this particular Tab say it all. The Photos Tab This enables you to store an unlimited number of photos of anyone or anything in the system. The photos are not actually stored in the database – just a hyperlink to their real location. (This prevents the database getting bloated with objects as large as photos.) The Details Tab Enable to input an unlimited number of user defined Fields under an unlimited number of subject headings. The Relationships Tab As the Information Panel on this Tab explains, this Tab controls which Relationship Types you will see on the ‘Relationships’ Form on the right-hand side of the screen when you click the Relationships Button for the current Entity. GEM uses ‘Information Panels’ this wherever a little more explanation is required. Often they are context sensitive and display different information dependent upon which field you are pointing at with your mouse. ‘Information Panels’ are useful because most people don’t like using F1 to bring up on-line HELP, or having to refer to a User Manual. You will see more of these therefore in parts of the system you don’t use too often. © On2it Software Ltd O:\On2it\GEM\Training\Initial Training Modules\GEM - 1. Getting Used to the User Interface.doc Version 1 - 3 October 2009 GEM GETTING USED TO THE USER INTERFACE PAGE 8 OF 13 Right-Hand Side Forms The Forms that may be displayed on the right are: The Relationships Form This displays all the Relationships between the ‘Entity’ on the left and everyone and everything else. When you create a Relationship between, it always creates both sides. So if you say someone is your Supplier the system will know that you are their Customer. If you say someone is your Uncle, it will know you are their Nephew, if you are male and their niece if you are female. The Diary Note Form This is used whenever you want to record anything that has a date. Whenever you want to do any of those things illustrated in the pull-down list shown: (You can even add to the list if you need to.) GEM uses ‘Diary Notes’ to originate correspondence and keep track of what has happened in the past. It makes use of MS Outlook’s Calendar to make Appointments and plan the future. Whenever you make a ‘Diary Notes’ note GEM keeps only one copy, but creates an index for all the Organisations and People involved. This enables you to see all correspondence and notes about phone calls etc., in a single consolidated history from the point of view of anyone involved – even for past employees and previous employers. © On2it Software Ltd O:\On2it\GEM\Training\Initial Training Modules\GEM - 1. Getting Used to the User Interface.doc Version 1 - 3 October 2009 GEM GETTING USED TO THE USER INTERFACE PAGE 9 OF 13 The Timesheet Form If you regularly keep track of the time you spend working on various Projects, you will see the ‘Timesheet’ Form displayed on the right. This enables you to track minute by minute how you spend your day and accumulate your hours if you need to charge your clients. Another way you can keep track of time you spend working on Projects is through the use of a ‘JOB Card’. This too is displayed on the right of the screen, but you are less likely to see it there when the system first opens – as it is less rarely used. © On2it Software Ltd O:\On2it\GEM\Training\Initial Training Modules\GEM - 1. Getting Used to the User Interface.doc Version 1 - 3 October 2009 GEM GETTING USED TO THE USER INTERFACE PAGE 10 OF 13 The Toolbar Much of GEM’s remaining functionality can be see by taking a tour through the Toolbar: The function of any Button will be revealed by a ‘Tool Tip’ that appears when the Mouse hovers over a Button. The first three buttons merely switch ‘Entity Type’ Tabs on the ‘Entities’ Form to either : Organisations, People or Projects. The FIND Form The next button displays the ‘FIND’ Form that enables you to find anyone, anything, or groups, given any set of criteria – as the ‘Tool Tip’ suggests. This Form crops up in many guises throughout the system, whenever you want to find anything or select groups to do a mail-merge. Because of the multi-functional nature of this form, once you’ve learnt to use it once, you can apply your knowledge throughout the system. Like Microsoft’s ‘Ribbon’ in Office 2007, the Tabs at the top of the form, customise themselves according to what you are looking for, as does the message in the Title Bar at the top of the form and the buttons along the bottom. It also has ‘Information Panels’ that explain how each part of the Form works – to save you wondering and having to hit F1 too often. If you are using the FIND Form to find just a single option; say an Organisation’s parent company or someone’s Wife, then the FIND Form will behave ‘Modally’. This means you will ether HAVE to find what you are looking for, or close the form. If you try to do anything else, the system just beeps at you until you close the form. © On2it Software Ltd O:\On2it\GEM\Training\Initial Training Modules\GEM - 1. Getting Used to the User Interface.doc Version 1 - 3 October 2009 GEM GETTING USED TO THE USER INTERFACE PAGE 11 OF 13 The Relationships Button on the Toolbar Displays the ‘Relationships’ Form on the right that we’ve seen earlier. The Make Phone Call Button This displays the ‘Phone Numbers’ Form on the left of the screen. As the Form says, it displays all the Phone Numbers for anyone in the system as both they and their Employers/Employees may, in reality, have several Addresses. This form is also displayed if you open the ‘Diary Note’ Form and choose to ‘Make a Phone Call’. The Send Fax, Send E-mail and Send Letters Buttons These three Buttons all display very similar Forms: © On2it Software Ltd O:\On2it\GEM\Training\Initial Training Modules\GEM - 1. Getting Used to the User Interface.doc Version 1 - 3 October 2009 GEM GETTING USED TO THE USER INTERFACE PAGE 12 OF 13 They are actually the same Form that simply displays a different Title. They are also displayed however you choose to initiate your correspondence. You can start from the Toolbar, a Diary Note or a Mail-Merge. It does not matter how you start, they all end up here so that you can choose which Template you want to use, and how you wish to address and sign your correspondence. The Signature Tab is the same for all of them. It even enables you to add a password protected signature, if you wish. The Print Label Button Displays the ‘Address Label’ Form, which is handy for printing parcel labels and so on. The MAIL-MERGE Button This displays the FIND Form that we saw earlier. The ADD Appointment Button This displays the ‘Diary Note’ Form preconfigured to create an Appointment in MS Outlook. The advantage of doing this way, rather than doing in Outlook, is that GEM automatically adds the Address of who the Appointment is with. The Make ‘Diary Note’ Button This displays the ‘Diary Note’ Form that we saw earlier. © On2it Software Ltd O:\On2it\GEM\Training\Initial Training Modules\GEM - 1. Getting Used to the User Interface.doc Version 1 - 3 October 2009 GEM GETTING USED TO THE USER INTERFACE PAGE 13 OF 13 The View Calendar Button Opens your Calendar in MS Outlook. The Timesheet Button Displays the Timesheet Form we saw earlier. The Print Reports Button Displays the Projects Reports Form, which enables to select which Project Report you want to print. © On2it Software Ltd O:\On2it\GEM\Training\Initial Training Modules\GEM - 1. Getting Used to the User Interface.doc Version 1 - 3 October 2009