1
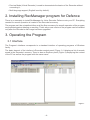
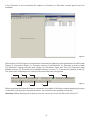
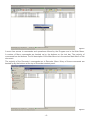
RecManager for Defence
User Manual
Version: February, 2011
© TS-Market
Contents
1. Overlook................................................................................ 3
Glossary ............................................................................................................ 3
What is Rec Manager Program ......................................................................... 3
Main Program Features:..................................................................................... 3
2. Installing RecManager program for Defence......................... 4
3. Operating the Program.......................................................... 4
3.1 Interface ...................................................................................................... 4
3.2 Program StartUp.......................................................................................... 7
3.3 Main Menu.................................................................................................... 8
4. Recorder’s settings.............................................................. 10
4.1 General settings:........................................................................................ 11
4.2 Files settings.............................................................................................. 12
4.3 Additional settings:..................................................................................... 13
5. Technical Support................................................................ 14
--
1. Overlook
Glossary
• Recording – an audio recording that is made by an audio recorder (or downloaded from
a computer) and saved in the recorder’s memory.
• Demo-mode – a program operating mode when the recorder is not connected, but
emulated by the program. It is intended to demonstrate the basics of the Program and
the settings of a particular model of the Recorder. In this mode, the program works as the
recorder is connected.
• Default Folder – a previously set folder (chosen by a user) that some commands use
to upload recordings and files from the recorder.
• Digital Watermark – additional data that are added at the recording (enable to
identify time and date of the record, Recorder’s serial number and type as well as the
attempts to modify the record)
• Firmware (built-in program) – a program that provides the recorder operation
(stored in the energy-independent memory of the Recorder and provides the Recorder’s
functionality, namely: recording, responding to control buttons, indication etc.)
What is Rec Manager Program
The Rec Manager for Defence (hereinafter referred to as the Program) is an application that works
with Edic-mini Defence recorders.
The program is available for Windows XP(SP2, SP3)/Windows Vista/ Windows 7. For normal
program functionality, computer hardware should be the same as the one recommended for the
normal operation of the user’s operational system.
Main Program Features:
• Reviewing the recorder’s memory;
• Uploading recordings from the recorder to a PC;
• Erasing recordings from the recorder’s memory;
• Showing the status of the recordings (uploaded/not uploaded);
• Reading off information about markers of the uploaded records (markers are created only
for records made by this particular Recorder. They store information about the Recorder on
which a record has been performed; and helps to identify time and date of the record; as well
as the attempts to modify it)
• Synchronizing of the recorder clock with the clock of the computer;
• Showing the rechargeable battery’s status;
• Setting of the recorder’s parameters;
• Formatting the recorder’s memory;
--
• Preview Mode (Virtual Recorder) is used to demonstrate the basics of the Recorder without
connecting it;
• Multi-language support (English is set by default).
2. Installing RecManager program for Defence
There is no necessity to install RecManager for Voice Recorder Defence onto your PC. Everything
needed for smooth operation is located in the Recorder’s memory.
The program can’t be uninstalled either as all the files necessary for smooth operation of the program
are protected against deleting or rewriting. That’s why a new version of the program can be installed
only after the Recorder’s disk image has been upgraded.
3. Operating the Program
3.1 Interface
The Program’s interface corresponds to a standard interface of operating programs of Windows
family.
The basic element of the interface is Recorder content panel (Figure 1). It displays a list of records
saved in the Recorder’s memory. There is also an Explorer panel (Figure 2) displaying the content
of the PC as well as the program with the same name.
--
Figure 1.
If the Recorder is not connected the majority of functions of Recorder content panel won’t be
available.
Figure 2.
At the bottom of the Program’s window there is a status bar displaying information about the Recorder
(Figure 3): Recorder’s Model (1); Firmware version of the Recorder (2); Recorder’s serial number
(3); Recorder’s charge indicator and voltage (4); Recorder’s Date and Time (5); Recorder’s total
writable memory (6), Recorder’s free writable memory in hours (7), Free memory capacity in Mb (8).
The status bar is displayed only after the Recorder has been recognized.
1
2
3
4
5
6
7
Figure 3.
8
When operating the Recorder there is a window in the middle of the Main window displaying the type
of operation and operation completion status. No operations are possible during this.
Attention! When displaying the window onto the screen don’t turn the Recorder off the PC.
--
Figure 4.
A more free access to commands and operations offered by the Program are in the Main Menu.
A number of Menu commands are backed up by the buttons on the tool bar. The majority of
commands has hot buttons. The full description of the Main Menu is in the section Main Menu of this
document.
The majority of the Recorder’s commands are in Recorder Menu. Many of these commands are
backed up by the buttons at the top of Recorder content panel.
Figure 5.
--
In the same way the commands that refer to Explorer panel are located in the Menu with the same
name. There is also Explorer Window enabling either to display or hide this panel. Some of the
commands demand this panel to be visible, which refers to practically all Explorer commands, as
well as to Copy to PC and Move to PC.
Figure 6.
The Program can interact with the Recorder only via Standard (USB 1.1) connection. Preview Mode
is used to demonstrate the basics of the Recorder, operate the Program while the Recorder is off.
To apply Preview Mode copy the Recorder’s content onto a removable media, launch the Program
and select this type of connection.
Attention! Don’t use Preview Mode with the program launched from the internal memory of the
Recorder. This may cause program’s error.
Notwithstanding the type of connection the program exchanges data with the Recorder. But the
access to all functions is provided only at the connection via USB 1.1 interface. There is no direct
connection with the Recorder in Preview Mode and therefore there is no access to some service
information, serial number, charging status, clock etc. The command Synchronize Clock isn’t active
either.
Preview Mode connection is virtual emulating work with real Recorder.
3.2 Program StartUp
When connecting the Recorder to the PC it is recognized as a removable storage. After the removable
storage has been opened its main folder contains the program file RecManager.exe.
When being launched the program is initiating connection with the Recorder. If the Recorder is
recognized Recorder content panel is displayed in record show mode. There is a status bar at the
bottom side of the window.
--
When connecting the Recorder to the PC the LED at the front edge flashes for a short period of time,
then goes out. Then the LED flashes when exchanging data with the PC. It’s not recommended to
switch off the Recorder to avoid data loss and other errors.
After the program has recognized the Recorder it sets whether the firmware version is compatible
with the program’s one. In case they are incompatible the program gives the names of firmware
versions it can work with. To upgrade the program upgrade the Recorder’s disk image.
When connecting it is also proved that the Recorder’s
content is protected with password (see Recorder’s
settings, Recorder’s Password). With the password
being applied a dialogue window is displayed to enter
the password for further operating the Recorder.
With a wrong password entered the program offers
to reset password by erasing the Recorder’s content
Figure 7.
including settings. With this operation accepted the
program clears the Recorder’s memory
and resets its settings within a few
seconds. After that connect the recorder
off the PC, then connect it again or press
the button Upgrade Recorder’s Content
and the program will switch to its standard
mode. With the reset refused the program
Figure 8.
asks to enter password again until a right one is entered (after that the program switches to its
standard mode of operating the Recorder), or the Recorder is turned off or Cancel button is pressed.
In the latter case RecManager works as if the Recorder isn’t connected at all.
3.3 Main Menu
This section describes the structure of the Main Menu and gives a detailed description of its
options.
File →
Exit — to exit the program
Recorder →
Figure 9.
Refresh content — forcedly upgrades (gets from the Recorder again) the settings,
lists of records stored in the Recorder’s memory; usually it is automatic.
Records — switches the Recorder content panel in to a mode of showing recordings that
are in the recorder’s memory.
Copy To PC — copies the items (recordings or files) selected in the Recorder content
panel to the current folder of the Explorer panel. While copying recordings, the result file
names are created on the base of a mask that is set in the program settings. While copying
files their names stay the same. If there already is a file with the same name in the computer,
the program suggests overwriting the file, changing the file name, or canceling the command.
This command is active when the Explorer panel is visible.
Move To PC — is analogous to Copy To PC command, but after the command is
finished, copied items are deleted.
--
Copy to default folder — copies selected in the
Recorder content panel items (recordings) into a default
folder that is set in the program settings. The Explorer panel
can be invisible.
Move to default folder — is analogous to Copy to
Default Folder command, but after the command is finished,
copied items are deleted.
Erase selected items — erases from the recorder’s
memory items (recordings) selected in the Recorder content
panel.
Format recorder memory — erases all the items
from the recorder’s memory.
Synchronize clock — sets the current PC time in the
recorder.
Settings — shows a dialog window where you can see and
change the recorder’s settings. The settings are described in
detail in the section Recorder’s settings.
Figure 10.
Connect — attempts to connect to recorder by means of the current type of connection.
Disconnect — disconnects from the recorder. It is recommended, that this command is
activated before the recorder is disconnected from the PC.
Connect type — the current type of connection can be chosen in the menu of this
command. After the type of connection is chosen, the command Connect is automatically
implemented.
Explorer →
Show wave-file info — shows a window with characteristics of the chosen in the
Explorer panel audio file along with the information about the file’s digital watermarks - markers
to check file’s integrity; Recorder to have made the recording; time and date of the record.
Besides if the recording is made through telephone circuit with
the help of RecAdapter, there would be an attempt to show
the phone number of the call performed.
Go to default folder — sets a default folder of the
program settings as a current folder of the Explorer panel.
Set current folder as default — sets the current
folder as a default folder.
New folder — creates a new folder in the current folder.
Delete — erases selected in the Explorer panel items.
Refresh — refreshes the Explorer panel content.
--
Figure 11.
Folders — shows/hides the folders’ directories.
Explorer window — shows/hides the Explorer panel
Notes: Along with abovementioned functions of the Explorer panel, the list of folders and
files
supports a content menu for all the items. Use the right mouse button or a correspondent
button of the keyboard to call this menu. This menu is identical to the menu of the Explorer
for Windows.
Language →
— allows to choose a language for the program interface.
Figure 12.
About…→
— shows a dialog window with the information about the
producer and the program version.
Figure 13.
4. Recorder’s settings
Figure 14.
The dialogue window with the Recorder’s settings is called from Recorder | Settings…
- 10 -
To adjust settings use options of Settings or the corresponding buttons of the Toolbar of this dialogue
window.
The alterations are saved only after Store settings has been chosen (Figure 15, 4).
In case of undesired alterations the command Restore settings helps go back to the settings
installed earlier (Figure 15, 3) if Store settings hasn’t been accomplished.
Save to file
(Figure 15, 2).
command is intended to save current settings into the external file
Load from file command is intended for uploading recording settings from an ealier
saved file (Figure 15, 1).
Factory settings command adjusts settings by default (Figure 15, 5)
4.1 General settings:
General settings are situated in the insertion General.
1
2
3
4
5
Figure 15.
Control type — Switch is indicated without the opportunity to change it.
Circular recording — turns on circular recording mode. Enabled – turns on circular
recording mode. Buffer size — the recorder’s memory space can be distributed according to
the user’s desire to use memory for circular recording.
- 11 -
Compression — sets one of the types of compression, which is for the recording. In
the Recorder Defence there is a setting “without compression” by default without the option
to change this setting.
Bit rate — sets the sampling frequency for the recording (20000 Hz can be activated only
for the mode “without compression” as well as in the Recorder Defence it is set by default
without the option to change this setting.
As higher frequency band and “without compression” mode provide high quality of sound the
Recorder Defence fixed particularly these settings.
Amplifier settings
— this group of parameters is responsible for the microphone
amplifier operation mode. This is set by default without the option to modify it in order to
achieve better recording quality.
4.2 Files settings
Folder Files has the following settings:
Figure 16.
On recorder connect — this group of switches specifies operations to be carried out
automatically when connecting the Recorder (or when launching the program if the Recorder
is already connected at the time it was launched). With the option Auto download records to
default folder activated the records will be uploaded into the default folder the path to which
is specified in the field Default folder. To change a default folder press “>>” button near the
field and specify the corresponding folder in the appeared window (it can also be set from
Explorer panel). You can also specify the desired uploading options: Non-downloaded records
- 12 -
– uploading of records marked by the status Non-downloaded; Delete records after download
– deleting records uploaded at this operation.
File name mask — setting the mask, basing on which file name will be given, when the
recording is uploaded to the PC. The example result is displayed in the bar Example result.
Restrictions — allows to forbid deletion of non-uploaded recordings with Disable erasing
of non-downloaded records.
If when uploading records onto the PC the size of the final file is more than 2000 Mb, it would
be split into several files with the size no more than 2000 Mb.
4.3 Additional settings:
The additional settings are situated in the insertion Advanced.
Figure 17.
Recorder password — in this field you can specify a password which will be needed
to connect the Recorder to the PC. If the password has been changed when saving settings
the program asks to repeat password. In case the data don’t match the password remains
the same. The password may contain from 1 to 7 symbols, taking into account both language
and the register. To deactivate password protection the field must be cleared, i.e. a blank
password must be entered.
- 13 -
Synchronize recorder time with system time
— allows automatic
synchronization of the recorder clock with the computer’s clock. This will be performed
automatically at each connection to the PC.
Ticked “Simplified settings” will change the appearance in the Tab “General”, but that won’t
affect anything, as the option to change these settings is switched off.
5. Technical Support
If you haven’t found a solution, you can always address Technical Support service. Technical
Support is available via e-mail: [email protected]. We are constantly upgrading our software and
documentation. You can always download a new software version for free and get information on the
items from our website: http://www.ts-market.com.
- 14 -