1
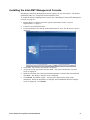
Intel® Active Management
Technology
Setup and Configuration Service
Installation and User Manual
July 2007
Version 3.1.2
Information in this document is provided in connection with Intel products. No
license, express or implied, by estoppels or otherwise, to any intellectual property
rights is granted by this document. Except as provided in Intel's Terms and
Conditions of Sale for such products, Intel assumes no liability whatsoever, and Intel
disclaims any express or implied warranty, relating to sale and/or use of Intel
products including liability or warranties relating to fitness for a particular purpose,
merchantability, or infringement of any patent, copyright or other intellectual
property right. Intel products are not intended for use in medical, life saving, or life
sustaining applications.
Intel may make changes to specifications and product descriptions at any time,
without notice.
The API and software may contain design defects or errors known as errata which
may cause the product to deviate from published specifications. Current characterized
errata are available on request.
This document and the software described in it are furnished under license and may
only be used or copied in accordance with the terms of the license. This document
may be reproduced, in whole or in part, solely for the purpose of end user
documentation in support of products that use the Setup and Configuration Server or
its components, so long as proper attribution is provided to Intel and all proprietary
marks are preserved. Intel Corporation assumes no responsibility or liability for any
errors or inaccuracies that may appear in this document or any software that may be
provided in association with this document. Except as permitted by such license, no
part of this document may be reproduced, stored in a retrieval system, or transmitted
in any form or by any means without the express written consent of Intel Corporation.
Contact your local Intel sales office or your distributor to obtain the latest specifications and before placing your product order.
Copies of documents which have an ordering number and are referenced in this document or other Intel literature may be obtained by calling 1-800-548-4725 or by
visiting Intel's web site at http://www.intel.com.
Copyright © 2006, 2007 Intel Corporation
Intel, the Intel logo, and Pentium are trademarks or registered trademarks of Intel
Corporation or its subsidiaries in the United States and other countries.
* Third party other names and brands may be claimed as the property of others.
ii
Table of Contents
Setup and Configuration Service Overview
Introduction to Intel SCS
Setup and Configuration Process
SCS Database Preparation
Preparation of Platform Containing Intel AMT Device
Setup and Configuration Steps
Intel AMT SCS Functional Flow
Setup and Configuration Operational Overview
Pre-Setup and Configuration
Setup and Configuration
Integration with Active Directory
Gathering Security Information
Management and Maintenance
Configuring Intel AMT in a Secure Environment
Support for Wireless Environments
Protecting Against Platforms Masquerading as an Intel AMT Device
The SCS Database
Considerations
Database Security
Backup & Restore
SCS and Active Directory Tasks and Permissions
Active Directory Schema
AMT Object
Computer Object
Intel AMT Device Configuration Information
Environment Prerequisites and Installation
System Requirements
Environment Overview
Description of Intel SCS Components
Intel SCS Console
List of Required Microsoft Components
Environment Prerequisites
.NET Framework 2.0
Microsoft SQL Server Express
Enable SQL Server and Windows Authentication Mode
SQL Server Verification
Internet Information Services (IIS) 6.0
IIS Verification
Microsoft Certificate Authority
Installing the Microsoft CA
Exporting and Installing the CA Root Certificate
Adding the SCS User to the Web Services Template
Secure the Connection to IIS Using SSL
Installing a CA Certificate to Authenticate IIS
Installing an Intel AMT Client Certificate for TLS Mutual Authentication
Active Directory (AD) and Changes to the AD Schema
Adding an OU for AMT Objects
Updating the Schema for Intel AMT
Installation of the SCS Server Components
Installing the Intel SCS Server Components
Upgrading the Intel SCS to a New Version
Silent Install
Installing the Intel AMT Management Console
Post Installation Operations
Intel AMT Configuration and the DNS
iii
1
2
3
3
4
4
5
6
6
7
7
7
8
8
9
9
10
10
11
11
12
12
12
12
13
14
15
17
17
17
17
19
19
20
22
23
24
25
26
26
29
30
31
32
33
34
34
35
36
36
40
41
45
46
46
Intel SCS
Intel AMT Devices
AMTConfig Service Verification
Quick Start and System Test
Recommended Daily Workflow
46
46
47
48
51
Intel AMT Preparation
52
Preparation Without a USB Device
Using a USB Storage Device for Factory Mode Setup
Requirements
Preparation
Initializing a Platform
Moving to Setup Mode
Preparing Intel AMT for Future Configuration
Remote Configuration
Overview of Remote Configuration Flow
Intel AMT Release 3.0 Additional Features
Remote Configuration Tool
Intel SCS Console
53
57
57
57
57
57
58
58
59
62
62
65
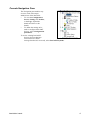
SCS Console Overview
Using the SCS Console for the First time
Console Navigation Pane
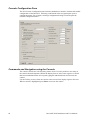
Console Configuration Pane
Commands and Navigation using the Console
Logging In
Configuring Main Service Settings
Defining General Parameters
Configuring Profiles
Viewing Existing Profiles
Adding a Profile
Defining Wireless Profiles
Defining 802.1x Profiles
Configuring Pre-Setup and Configuration Security Keys
Configuring Users
Viewing Existing Users
Adding a User
Configuration Parameters per Device
Viewing Defined Intel AMT Devices
Defining a New Intel AMT Device Record
Filtering the Display
Configuring Existing Intel AMT Devices
Viewing Intel AMT Devices and Reviewing the Details of a Device
Ad Hoc Operations on an Individual Intel AMT Device
Filtering the Display
Global Operations
Maintenance Policies
Intel AMT SCS Console Logs
Filtering a Log Display
SOAP API
66
66
67
68
68
69
70
70
74
74
74
86
87
89
93
93
93
95
95
96
97
98
98
99
101
101
104
106
108
109
Overview of the SOAP API
SOAP Faults
110
111
SCS Support Content
112
SCS Tools
Command Line Tools
Add new Intel AMT Properties
Database Dump
Administrative Tools
Active Directory Schema
113
113
113
113
113
113
iv
Using a Script to Import Intel AMT Configuration Properties
Environment Variables
Output File Format
Script Functionality
Sample Scripts
Server Script
Client Script
Remote Configuration Tool
Defining a New Template for an Enterprise CA
Internationalization of SCS Messages
Retrieving a Certificate for Use by a Posture Validation Server
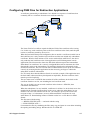
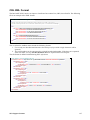
Configuring PEM Files for Redirection Applications
CRL XML Format
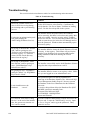
Troubleshooting
Windows Service Error Codes
Log Mapping
Glossary
115
115
115
116
116
116
117
117
118
123
124
125
127
128
130
131
132
v
Chapter 1
SETUP AND CONFIGURATION SERVICE
OVERVIEW
This section contains:
•
“Introduction to Intel SCS” on page 2
•
“Setup and Configuration Process” on page 3
•
“Intel AMT SCS Functional Flow” on page 5
•
“Setup and Configuration Operational Overview” on page 6
•
“The SCS Database” on page 10
•
“SCS and Active Directory Tasks and Permissions” on page 12
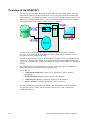
Setup and Configuration Service Overview
1
Introduction to Intel SCS
The Intel® Active Management Technology (Intel® AMT) Setup and Configuration
Service (Intel SCS or SCS) provides an enterprise with the tools to set up and configure
Intel AMT devices.
Intel AMT is an integral part of Intel® vPro™ and Intel® Centrino® Pro processor
technology. Intel AMT enhances the ability of IT organizations to manage enterprise
computing facilities. Intel AMT operates independently of the platform processor and
operating system. Remote platform management applications can access Intel AMT
securely even when the platform is turned off, as long as the platform is connected to line
power and to a network.
Intel AMT can:
•
discover platform assets using data retained in non-volatile storage
•
heal systems remotely even when the operating system is down
•
protect against malicious software attacks by making it easier to keep software and
virus protection consistent and up-to-date across the enterprise
•
limit the effect of “malware” and platform misuse by containing outbreaks and software tampering on the managed client, isolating the infected network element from
the rest of the network
The platform can be viewed as having two separate elements:
•
a host processor running a general purpose operating system such as Windows* XP
•
an Intel AMT device operating independently of the host. The Intel AMT firmware
executes on the Intel® Management Engine (Intel® ME).
When an Intel AMT enabled platform is delivered, the Intel AMT device is present but
disabled. The Intel AMT device must undergo setup and configuration before it is
operational. In Enterprise environments, the setup and configuration must be done over
the network interface.
In addition to the term “Setup and Configuration,” the process of enabling an Intel AMT
device is also called “provisioning.”
The Intel AMT Setup and Configuration Service performs all the necessary steps to make
an Intel AMT device operational. This includes Intel AMT Release 1.0/2.0/2.1/2.2/2.5/3.0
devices.
Once the Intel SCS has been installed and its database has been loaded with initial data,
setup and configuration starts when an Intel AMT device sends a message called a “Hello”
2
Intel AMT SCS Installation And User Manual
message to the SCS. The SCS and the Intel AMT device communicate securely as the
SCS generates and sends the device:
•
certificates from a public key infrastructure (PKI)
•
access control lists (ACLs)
•
other setup parameters, as defined in a profile of setup and configuration information
specific to the platform or to a family of platforms
The SCS also registers the Intel AMT device in Active Directory and in its own secure
database. The SCS is used for various maintenance functions, such as updating passwords
and ACLs, and keeps logs of all performed transactions.
The SCS components can be distributed across several platforms. It is recommended, for
performance reasons, to configure a distributed installation except for demo purposes or
for small enterprise installations.
It is possible to have multiple instances of the SCS installed across an enterprise, but there
is only one SCS database for the enterprise.
The major elements of the SCS are:
•
a Windows service (the SCS Main Service)
•
a secure database
•
a SOAP API
•
a console application (the Intel SCS Console)
Intended Use of this Manual
The Intel AMT SCS is provided to ISVs as a binary executable. The source code of the SCS
Console is included in the product distribution, as well as a description of the SOAP API. ISVs
are expected to add value to the Console or to create their own equivalent using the API. The
Intel AMT SCS will not be provided to end users directly by Intel. Rather, it will be part of an
ISV’s product offering, either stand-alone or embedded in a management console product. This
manual is designed to be used by ISVs to learn about the SCS and its components. The manual
can also be used as a basis for creating end user documentation for IT staff.
Setup and Configuration Process
For setup and configuration to proceed, the SCS database and server require preparation, as well as the
platform containing the Intel AMT device. Once the preparation is complete, connecting the platform to the
network starts the setup and configuration process.
SCS Database Preparation
Before setup and configuration can begin, the SCS server database must be configured with basic
information:
•
SCS service configuration parameters
•
Profiles that define the setup parameters for the Intel AMT-enabled platforms to be
configured
•
Entries identifying each Intel AMT device to be configured, with a link to a profile
•
A list of valid TLS-PSK keys that match what is installed on the Intel AMT devices
awaiting configuration.
At this point, the SCS service waits for a configuration request from an Intel AMT device.
Setup and Configuration Service Overview
3
Preparation of Platform Containing Intel AMT Device
An Intel AMT Release 2.0/2.1/2.5 device must have its MEBx password changed from the default
password. A TLS-PSK key and identifier must be loaded into the device. The values are entered manually
by the IT administrator through the BIOS extension, or the administrator can use a USB key with values
exported from the SCS; or the values may have been preloaded by an OEM. This is the minimum
requirement, although other parameters may be required. See “Intel AMT Preparation” on page 52 for more
information. The platform can now be connected to a network in common with the SCS server.
An Intel AMT Release 2.2/3.0 device can be connected to the network without a password change or entry
of any parameters to the BIOS extension, using a mechanism called “Remote Configuration”. See “Remote
Configuration” on page 58.
Intel AMT devices configured by the SCS receive their IP addresses from a DHCP server. The SCS does
not support static IP addresses.
Setup and Configuration Steps
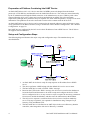
The following diagram illustrates the major setup and configuration steps. The numbered steps are
described below.
1. An Intel AMT device that is ready for setup requests an IP address from a DHCP
server.
2. The device performs a DNS lookup with the default SCS service server name.
3. The Intel AMT device sends a TCP/IP “Hello” message.
4. Based on the UUID in the “Hello” message, the SCS service searches the database to
locate the Profile and host name to be used to setup and configure the device. If the
SCS is configured to do so, it may execute a script to acquire the necessary parameters
from sources outside the database, and then store the information in the database.
5. The SCS service requests a certificate for the device from a Certificate Authority
server. This step is optional. It is required for installations using Transport Layer
Security (TLS) and Mutual TLS.
6. The Intel AMT device is defined as an AMT object in the Active Directory domain
controller, when integration with Active Directory is enabled.
4
Intel AMT SCS Installation And User Manual
7. The SCS service completes setup and configuration using SOAP commands.
All critical parameters are kept in the secure database. The Administrator configures the
SCS service, defines profiles, updates individual device parameters, and so on from the
Intel SCS Console. The console communicates only with the SOAP API, which queries
and updates the database. All instances of the SCS service poll the database periodically or
query and update the database as needed as part of the setup and configuration process.
All of the above steps are described in this guide.
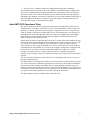
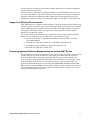
Intel AMT SCS Functional Flow
The SCS is designed to perform setup and configuration of multiple Intel AMT devices
simultaneously. All requests to the SCS for service are maintained in a queue in the SCS
database. A “thread” performs the processing for each portion of a task. A single thread
waits for “Hello” messages from Intel AMT devices. This thread passes the message to a
queuing thread, which then adds this request for setup and configuration to the database
queue. Requests via the SOAP API to perform an update to an Intel AMT device are
added to the queue directly by the API.
Worker threads in the SCS poll the queue for tasks. A worker thread will perform all steps
required for setup and configuration except those that are relatively time consuming, such
as a request to a Certificate Authority for a certificate or a request to add an entry to
Active Directory. These tasks are handed off to a slow worker thread. If a task cannot be
completed due to unavailability of a resource (for example, configuration cannot proceed
because there is no profile associated with an Intel AMT device that sent a “Hello”
message), the task is passed to a delayer thread to wait for a defined period before
retrying. As processing for requests completes, threads are freed up to process subsequent
requests.
The SCS logs all transactions so that if the service is interrupted, the service can recover
partially completed tasks.
IT administration can configure the number of worker and slow worker threads, the queue
size, and various times to maximize performance of the SCS. In an enterprise installation
that has the potential of many Intel AMT devices requesting setup simultaneously, the
number of worker threads can be increased, consistent with the number of processors and
the amount of memory installed in the server platform. See “Defining General Parameters”
on page 70 for the tuning parameters accessible from the SCS Console.
The figure below presents a simplified flow within the SCS.
Setup and Configuration Service Overview
5
D
e
ay
el
d
sk
Ta
SCS Operational Flow
Setup and Configuration Operational Overview
The primary purpose of the Intel SCS is to deliver the Intel AMT Setup and Configuration
settings to the Intel AMT devices. Intel AMT devices can be located on, for example, a
desktop computer, a mobile computer, or a workstation.
This process includes pre-setup and configuration; setup and configuration; integration
with Active Directory, gathering security information, and maintenance.
Pre-Setup and Configuration
Intel SCS generates data used to configure Intel AMT devices. This data includes:
•
PPS, PID and MEBx password generation
•
USB key file containing a list of PPS, PID and MEBx password sets
Remote configuration does not use these values.
6
Intel AMT SCS Installation And User Manual
Setup and Configuration
Intel SCS delivers initial values to Intel AMT devices. Before Setup and configuration
begins, administrators add these initial values to the database. The administrator enters the
values into Profiles, or into descriptions of individual Intel AMT devices, or the
information is generated automatically: The information includes:
•
•
•
•
•
•
•
•
•
•
•
•
•
•
•
•
Administrator account credentials (Username and password)
Access control list (ACL) entries for Digest and/or Kerberos user accounts
Networking settings (Host Name and domain name)
RSA key pair and X.509 certificate for TLS (TLS Certificate and RSA private
key) (automatic)
Pseudo Random Number Generator (PRNG) value
Intel AMT Kerberos secret key (generated automatically), SPNs, operational
parameters
Time and date (automatic)
Trusted root certificates (Mutual TLS)
Trusted domain name suffixes (Mutual TLS)
Certificate Revocation Lists (CRLs)
Power-policy options
Replacement PID/PPS
Wireless Profiles
802.1x Profiles
NAC Profiles
Third-party data storage parameters (not implemented in this release)
The information is used to communicate securely with an Intel AMT device to configure it
and to create an Active Directory entry.
Integration with Active Directory
Intel SCS integrates the Intel AMT device with Microsoft Active Directory by creating a
directory entry based on the Intel-Management-Engine class. The SCS installation
includes scripts used by the administrator to:
•
Extend the Active Directory schema to support the Intel-Management-Engine
class
•
Populate the Intel-Management-Engine attributes
During setup, Intel SCS:
•
•
Creates an Active Directory object representing the Intel AMT device
Creates an attribute for connecting the AD computer object to the AMT object.
Gathering Security Information
Intel SCS collects required operational security parameters.
•
•
As part of setting up the SCS, the administrator defines Active Directory users
and permissions for those administrators and operators that will work with Intel
SCS. The administrator uses scripts to define the necessary groups and users
within Active Directory, and then uses the SCS User commands to define which
users have specific permissions to operate the service.
When TLS is enabled, the SCS interfaces with the Microsoft Certificate
Authority to obtain a TLS certificate each time it sets up an Intel AMT device.
Setup and Configuration Service Overview
7
Management and Maintenance
Intel SCS also facilitates life cycle management and maintenance operations. These daily
tasks can include:
•
Entering the properties of new Intel AMT devices, such as the UUID, FQDN,
profiles, and AD Organizational Unit (required for adding new Intel AMTenabled platforms)
•
Generating a dataset of PID/PPS/password data for export to a USB key
•
Importing TLS-PSK lists from an OEM
•
Handling certificate expirations and certificate renewals
•
Delivery of Certificate Revocations Lists (CRL)
•
Updating local account passwords
•
Checking the logs
•
Handling exceptions
•
Doing ad-hoc configuration operations (Single Intel AMT device / All Intel
AMT devices):
•
Performing un-provisioning
•
Performing re-provisioning
•
Updating system clock
•
Doing daily database backup
In addition to these tasks, certain maintenance tasks that enhance the security of the Intel
AMT devices can be performed automatically. These include:
•
Reissuing digital certificates before they expire
•
Updating passwords
•
Updating random number generator seeds
•
Synchronizing the system clock
•
Performing re-configuration periodically to ensure that all Intel AMT devices
have the latest profile information
Configuring Intel AMT in a Secure Environment
Intel AMT supports Transport Layer Security (TLS) for secure communications between
Intel AMT devices and management console applications. Use of TLS is recommended in
an Enterprise environment. TLS is a protocol intended to secure and authenticate
communications across a public network by using data encryption. It depends on the
existence of a public key infrastructure (PKI).
A PKI enables users of an unsecured network to securely and privately exchange
information through the use of an asymmetric public and private cryptographic key pair.
The key pair is obtained and shared through a trusted authority, known as a Certificate
Authority (CA). The CA generates digital certificates that can identify an individual or an
organization. The PKI includes directory services that can store and, when necessary,
revoke the certificates.
The SCS SOAP API requires a certificate so it can be hosted by the Microsoft Internet
Information Server (IIS). This is necessary even in environments when TLS will not be
used. If TLS will be used with Intel AMT devices, then there must be access to the
Microsoft Certificate Authority as the SCS requires it to enroll for certificates on behalf of
each Intel AMT device.
The Microsoft CA can be installed as Stand-alone CA or as an Enterprise CA. An
Enterprise CA can be configured only in conjunction with Active Directory. A Standalone CA can operate with or without Active Directory, but if Active Directory is not
8
Intel AMT SCS Installation And User Manual
present, there can be only one SCS instance and the Stand-alone CA must be installed on
the same platform as the SCS.
A PKI may have a hierarchy of Certificate Authorities, with subordinate CAs and a root
CA. This is beyond the scope of this discussion. IT personnel who manage a facility that
depends on PKI need in-depth knowledge of PKI protocols and supporting tools. The
installation example later shows how to install a single tier Enterprise or Stand-alone CA.
Support for Wireless Environments
Intel AMT Release 2.5 supports mobile platforms. The SCS configures Intel AMT devices
with this version so that they can receive management traffic over wireless links. The SCS
supports defining wireless profiles and 802.1x profiles. Intel AMT Releases 2.5 and 3.0
also support wired 802.1x links. See page 85 for wireless profile and 802.1x profile
definition using the SCS console.
The SCS has been tested with the Cisco* Aironet 1200 Access Point and the following
Radius servers (authentication with EAP-GTC is for wired 802.1x only):
• Cisco ACS: With 802.1x EAP-TLS, EAP-PEAP, EAP-FAST/GTC and EAPFAST/MS-CHAPv2
• Funk Odyssey: With 802.1x EAP-TLS, EAP-PEAP and EAP-TTLS
• Meetinghouse Aegis: With 802.1x EAP-GTC and EAP-TLS
• Microsoft IAS: With 802.1x EAP-TLS
Protecting Against Platforms Masquerading as an Intel AMT Device
The SCS starts its setup and configuration process upon receipt of a “Hello” message from
an Intel AMT device. If the SCS receives a request from an Intel AMT device that is
recorded in the database as having completed setup, the request will be ignored. This
protects against a rogue platform masquerading as an Intel AMT device waiting for setup.
If the Intel AMT device was reset to the Factory Setup (pre-provisioning) state by an
application other than the SCS or by entering an Un-provision command using the ME
BIOS extension (see the MEBx menu on page 55), then the device must be removed from
the SCS database before setup can take place. See “Delete AMT” on page 101 to do this
using the SCS Management Console.
Setup and Configuration Service Overview
9
The SCS Database
A Setup and Configuration Domain has only one SCS database. This supports deployment
of a platform containing Intel AMT in any segment of the enterprise, which may be an
entire enterprise network or a subset of it. Both the Setup and Configuration Service and
the SOAP API access the database directly. Thus all SCS service instances share a
common set of service configuration parameters. This localizes the impact of changes in
database components.
The database stores configuration data that includes:
•
Shared objects that are generated, stored, and organized as Profiles before they are
requested. Profiles contain values such as:
•
An Access Control List, that is, a list of authorized Intel AMT device users and
their privileges in accessing device capabilities
•
Trusted root certificates
•
Kerberos options
•
TLS and mutual authentication settings
•
Power-saving options
•
Wireless profiles
•
802.1x profiles
•
Per-Intel AMT device data objects defined before configuration can start. The data in
these objects includes:
•
Administrator password
•
Host name, TLS settings, UUID
•
A link to one of the Profiles
•
Logs of all transactions performed by the SCS, including transactions in progress and
any detected errors.
•
A queue containing operations used to configure Intel AMT devices.
The Intel AMT database requires Microsoft* SQL Server 2000, Microsoft SQL Server
2005, or Microsoft SQL Server 2005 Express Edition (SQL Server Express).
The database contains sensitive secrets, such as passwords and keys. If this data is
compromised, it can result in major security problems for the enterprise. Make certain that
access to the database is controlled, by limited permissions, a strong password and by
limited physical access to the database server and the database itself.
Considerations
For optimal performance, the Intel SCS must have adequate access to the database. These
issues must be taken into consideration:
•
•
•
•
10
If the database is accessed via a WAN, ensure that the areas of the database used by
the Intel SCS are accessible from all installations of the SCS.
Ensure that there is adequate bandwidth to access the database.
The location of the database can affect performance. Attempt to locate the database
at a central site.
The database must be reliably available, so techniques such as replication, clustering,
and backup and restore should be used.
Intel AMT SCS Installation And User Manual
Database Security
Because the data in the database is extremely sensitive, it is recommended that the
connection to the database be secure. See “Enable SQL Server and Windows
Authentication Mode” step 8 on page 24 for the steps required to configure a secure
database connection. Also, consider the use of disk volume encryption. Limit access to
physical copies of the database.
Database stored procedures may be executed only by the users that have appropriate
permissions to use them. There are two types of database users, Windows Service users
and API users. The console application defines SCS users and user permissions that are
saved in the database.
Where possible, limit the network connectivity to the database server. Limit it, for
example, to those servers that need to connect to it, i.e., those servers hosting instances of
the SCS. Use a separate physical LAN or a dedicated VLAN to establish isolation.
Backup & Restore
We recommend that an Administrator perform a daily backup of the Intel SCS database.
The default name of the Intel SCS database is “IntelAMT.” Be sure that the backup is
stored securely, preferably encrypted.
Setup and Configuration Service Overview
11
SCS and Active Directory Tasks and Permissions
Interaction between Management Console applications and the Intel AMT API is
optionally authenticated with the Integrated Windows Authentication mode via the API
authentication mechanisms.
The Active Directory (AD) service is used optionally to authenticate between ISV
management console applications and Intel AMT devices. To enable use of AD, the
following tasks have to be completed:
•
Create instances of Intel-Management-Engine, which is the special class added
to the AD schema each time the SCS completes setup and configuration of an
Intel AMT device. These instances are called “AMT objects.”
•
Periodically change the password of these objects automatically.
•
Delete an AMT object when it is no longer needed.
To enable Intel AMT use of AD, the following permissions have to be granted to user
accounts associated with the SCS (This is the user account entered when the SCS service
is started, as defined during installation on page 37):
•
“Create/Delete Intel-Management-Engine objects” permission in the relevant
Organization Unit (OU) where objects are created.
•
Full Control over Intel-Management-Engine objects
One way to do this is by using the “Delegate Control Wizard of the Active Directory Users
and Computers” MMC.
Active Directory Schema
The Intel SCS installation contains an .LDF AD schema extension definition and a script
that is used to extend the Active Directory schema for Intel AMT.
For more information, see “Active Directory (AD) and Changes to the AD Schema” on
page 34.
AMT Object
The Intel SCS Active Directory BuildSchema script, when executed by the administrator,
creates the new object class Intel-Management-Engine. Objects created with this class,
called AMT objects, are used to represent the Intel AMT device itself.
For more information, see “Active Directory (AD) and Changes to the AD Schema” on
page 34.
Computer Object
Deploying a platform containing Intel AMT creates a new object in the AD which
identifies the host on the Intel AMT enabled platform. This occurs independently of the
Intel AMT setup process, and happens when the host joins the local domain.
For more information, see “Active Directory (AD) and Changes to the AD Schema” on
page 34.
12
Intel AMT SCS Installation And User Manual
Intel AMT Device Configuration Information
The SCS needs identification information for each Intel AMT device to know its FQDN,
which Profile to use and where to put the AMT object in Active Directory. The identifying
parameter for a device and the platform that it is on is the platform UUID. Entering the
information manually in an enterprise environment is not practical on a large scale. Also,
the FQDN will change as a machine is moved around in the enterprise and assigned to
different individuals. The SCS supports multiple methods for loading configuration
information, each with its uses, advantages and disadvantages.
Source of Configuration Information: Database or Script
The SCS can be configured to locate Intel AMT device configuration information in one
of two ways: either from within the SCS database or via a script. When the SCS receives a
“Hello” message from a device it will look in the SCS database for a configuration entry
matching the UUID in the “Hello” message. If there is no match, and the there is no script,
the SCS will revisit the queued “Hello” message periodically to see if an entry was added
to the database. If the script option was selected, the SCS will activate a script to find the
necessary information, given the UUID and the source IP in the “Hello” message. When
the SCS receives the configuration from the script, it stores the information in the
database.
Adding device information to the SCS database manually
This is the simplest approach but it is the most difficult for IT personnel. They have to
manually enter the UUID along with the other parameters into the New Intel AMT table.
The SCS Console has a page that supports this method. See “Configuration Parameters per
Device” on page 95.
Adding device information to the SCS database using the SOAP API
The SOAP API has a method called AddServiceNewAMTProperties that adds an
entry to SCS database table. An external management console can acquire the platform
information using scripts, its own database, or a local agent, and pass the information to
the SCS either before or after the Intel AMT device starts sending “Hello” messages.
Remote Configuration Tool
The Remote Configuration Tool (RCT) is a client-based tool that captures platform
information and sends it directly to the SCS. See page 62.
Scripting Option
This option acquires the configuration information using a script if the required parameters
are not in the New Intel AMT database table. The SCS runs a script that retrieves the
parameters from an external source
The SCS distribution and documentation include sample scripts and directions for several
of these options. See “Using a Script to Import New Intel AMT Properties” on page 115.
Setup and Configuration Service Overview
13
Chapter 2
ENVIRONMENT PREREQUISITES AND
INSTALLATION
This section contains:
•
“System Requirements” on page 15
•
“Environment Overview” on page 17
•
“Environment Prerequisites” on page 19
•
“.NET Framework 2.0” on page 19
•
“Microsoft SQL Server Express” on page 20
•
“Internet Information Services (IIS) 6.0” on page 24
•
“Microsoft Certificate Authority” on page 26
•
“Active Directory (AD) and Changes to the AD Schema” on page 34
•
“Installation of the SCS Server Components” on page 36
•
“Installing the Intel AMT Management Console” on page 45
•
“Post Installation Operations” on page 46
14
Intel AMT SCS Installation And User Manual
System Requirements
In a typical installation, components of the Intel AMT Setup and Configuration Service
(SCS) can be installed on more than one computer or on the same computer, depending on
the enterprise requirements. This section lists the system requirements for the computers
supporting various components of the SCS.
If Active Directory is not used, the Certificate Authority must be installed on the same
platform as the SCS. The database must be accessible and the database credentials known
to the person installing the Intel SCS.
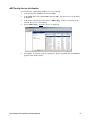
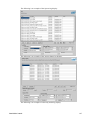
Table 1: Requirements for Computer Running the SCS Windows Service, the SOAP API, and the IIS
Platform Processor
Dual Core Intel® Xeon™ Processor 5XXX
series
Memory
2 to 4 GB RAM
Operating System
Windows Server 2003 with Service Pack 1
Hard Disk
525 MB
Platform
.NET Framework 2.0
Internet Information Services (IIS) 6.0
Networking
PCI-X 10/100/1000T
Table 2:
Requirements for Computer Running SQL Server
PC Processor
Intel® Pentium® III processor - 600 MHz
minimum
1 GHz or faster is recommended
Memory
192 MB minimum
512 MB or more is recommended
Operating System
Windows Server 2003 with Service Pack 1
Hard Disk
525 MB
Platform
.NET Framework 2.0
Networking
Minimum Ethernet 10BASE-T
Environment Prerequisites and Installation
15
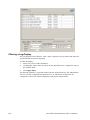
Table 3:
Requirements for Computer Running the Console
PC Processor
Intel Pentium 4 processor or higher (or
compatible)
Memory
256 MB minimum
Operating System
Windows 2000, XP, or 2003
Hard Disk
80 MB
Platform
.NET Framework 2.0
Networking
Minimum Ethernet 10BASE-T
USB ports
For export of security keys
Internet Browser
Microsoft IE 5.5 or 6
The following Microsoft system patches should be applied to the appropriate operating systems for
interactions with Intel AMT systems to operate properly:
Table 4: Required System Patches
Operating System
Patch ID and Link
KB889388
Windows Server 2003
(http://support.microsoft.com/kb/889388)
16
Windows Server 2003
and XP
KB908209
Windows Server 2003
and XP
KB899900
(http://support.microsoft.com/kb/908209)
(http://support.microsoft.com/kb/899900)
Intel AMT SCS Installation And User Manual
Environment Overview
The Intel SCS includes several components. They can be installed on a single computer or
on separate computers.
In addition, the environment must include several pre-installed and configured Microsoft
components.
Description of Intel SCS Components
The following are components of the Intel SCS.
Main Service
This is the software component that processes Setup and Configuration Service requests
from Intel AMT devices and is implemented as a Windows Service. For complete details,
see “Setup and Configuration Operational Overview” on page 6.
SOAP API
This is the Application Programming Interface (API) that Independent Software Vendors
(ISVs) use to create and productize a User Interface. It is used by the SCS Console to
interact with the Main Service indirectly via the database server.
Database Server
This is the repository that stores the Setup and Configuration data, organized according to
the SCS database schema, and installed as a database instance in Microsoft SQL Server.
Administrative Tools
Active Directory Schema
These are scripts that extend the Active Directory schema for Intel AMT. See
“Active Directory (AD) and Changes to the AD Schema” on page 34 and the script
description on page 113.
Intel SCS Console
The Intel SCS Console is an application that is installed separately from the SCS. It is an
open application that uses the SCS SOAP API to manage the SCS and the SCS database.
The source is distributed with the SCS. An ISV can take the source, add value to it and
integrate it into a Management Console product.
List of Required Microsoft Components
The following Microsoft components must be installed and configured for the Intel SCS to
function.
•
•
•
•
.NET Framework 2.0 is a prerequisite for the installation of SQL Server or SQL
Server Express, the Intel SCS Main Service, and the SCS console.
Either Microsoft SQL Server 2005 or Microsoft SQL Server 2005 Express Edition
(SQL Server Express) is required. This manual describes installation of the Express
edition, but if the full edition is exists, it may be used. The Express Edition is a data
management product for embedded application clients, light Web applications, and
local data stores.
Intel SCS requires that Microsoft’s Internet Information Services 6.0 (IIS 6.0) be
installed and configured. IIS is Microsoft's HTTP server. IIS adds full HTTP
capability to the Windows operating system. IIS should be installed before the
Certificate Authority is installed.
If TCPIP Layer Security (TLS) is required in an installation, then Intel SCS requires
that Microsoft’s Certificate Authority (CA) be installed.
Environment Prerequisites and Installation
17
Microsoft’s Active Directory (AD) is a directory service that is integrated with Windows
2003 Server. AD is an optional environment pre-requisite. Intel SCS uses AD for:
•
Kerberos authentication using AMT objects
•
User lists
The Intel AMT installation adds a script that extends the AD schema for Intel AMT
and that creates several new attributes.
18
Intel AMT SCS Installation And User Manual
Environment Prerequisites
This section details the environment required by the various Intel AMT Setup and
Configuration Service components. The section “System Requirements” on page 15
specifies which components require which environment elements.
.NET Framework 2.0
.NET Framework 2.0 is a prerequisite for the installation of both SQL Server Express and
the Intel SCS Windows Service. For summary information about .NET Framework and a
download link, see:
http://www.microsoft.com/downloads/details.aspx?familyid=0856eacb-4362-4b0d-8eddaab15c5e04f5&displaylang=en
To install .NET Framework 2.0:
1. Install the Windows Installer 3.0 or later, if it is not already installed. See
http://www.microsoft.com/downloads/details.aspx?familyid=5FBC5470-B259-4733A914-A956122E08E8&displaylang=en
2. Ensure that all instances of Microsoft Internet Explorer are closed.
3. Double-click the installation file named dotnetfx.exe. The installation files are
extracted and the Welcome to Setup screen is displayed.
4. Click Next. The End-User License Agreement is displayed.
5. Select the I accept the terms checkbox and click Install. A message is displayed
indicating that “Setup is configuring the install.”
6.
Setup then installs the components. An installation progress bar is displayed.
Installation may take a few minutes. Upon completion, the Setup Complete screen is
displayed.
Click Finish.
Environment Prerequisites and Installation
19
Microsoft SQL Server Express
Microsoft SQL Server 2005 Express Edition (SQL Server Express) is a data management
product for embedded application clients, light Web applications, and local data stores.
Designed for easy deployment and rapid prototyping, SQL Server Express is available at
no cost.
There are various editions of Microsoft SQL Server. For an overview, see:
http://www.microsoft.com/sql/prodinfo/features/compare-features.mspx
This manual only describes installation of the Express edition. An Enterprise solution will
require the full SQL Server 2005 or SQL Server 2000 application.
For detailed information about SQL Server Express and a download link, see:
http://www.microsoft.com/downloads/details.aspx?familyid=220549b5-0b07-4448-8848dcc397514b41&displaylang=en
For summary information about SQL Server Express and a download link, see:
http://msdn.microsoft.com/vstudio/express/sql/download/
To install the SQL Server 2005 Express Edition:
1. Ensure that .NET Framework is installed.
2. Ensure that the server meets the system requirements listed in Table 2: ,
“Requirements for Computer Running SQL Server” on page 15.
3. Double-click the installation file named sqlexpr.exe. The installation files are
extracted and the Installation Options screen is displayed.
4. Select Install SQL Server 2005 Express Edition and click Next. The End-User
License Agreement is displayed.
5. Select the I accept the licensing terms checkbox and click Next. A message is
displayed indicating that “Setup is configuring the install.” The Installing Prerequisites screen is displayed.
6. Click Install. Setup installs the necessary components. A message is displayed
indicating that “The required components were installed successfully.”
7. Click Next. The Welcome to the Microsoft SQL Server Installation Wizard screen is
displayed.
8. Click Next. The System Configuration Check screen is displayed and the Wizard
inspects the system.
If the Wizard detects problems, it will display the status of the problem and, possibly, a
message. The status “Warning” will usually allow the installation to continue. However,
the status Error indicates that the installation cannot continue. View the accompanying
message and click Exit. Then, correct the error and try again.
9.
If all checks are successful, click Next. The Registration Information screen is
displayed.
10. Enter your name and the company name.
11. Select or clear the Hide advanced configuration options checkbox. When the
checkbox is cleared, the Instance Name, Service Account, User Instances, and
Collation can also be configured.
Select the “Hide advanced configuration options” checkbox and accept the default settings.
This manual does not document the advanced configuration options.
20
Intel AMT SCS Installation And User Manual
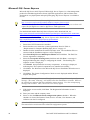
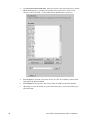
12. Click Next. The Feature Selection screen is displayed.
13. As pictured above, select the following features. For each feature, select the Will be
installed on local hard drive option:
•
Data Files
•
Shared Tools
•
Connectivity Components
14. Click Next. The Authentication Mode screen is displayed.
15. Select Mixed Mode.
16. Enter the sa logon password (sa is the default SQL server Login ID), confirm the
entry, and click Next. This password will be used by any application to log in to the
SQL service. This same password is entered when the SCS is installed and provides
another level of security.
The Error and Usage Report screen is displayed.
17. Select or clear the error handling options and click Next. The Ready to Install screen
is displayed.
Environment Prerequisites and Installation
21
18. Click Install. The Setup Progress screen is displayed.
19. Click Next when the setup is finished.
20. Click Finish.
We recommend that the SQL Server Management Studio Express tool be installed
now, as it is needed for initial setup of the database server. It is a free, easy-to-use
graphical management tool for managing SQL Server 2005 Express Edition. Download
of this program and installation instructions can be found at:
http://www.microsoft.com/downloads/details.aspx?familyid=C243A5AE-4BD1-4E3D94B8-5A0F62BF7796&displaylang=en
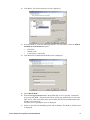
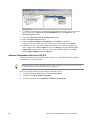
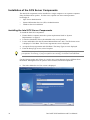
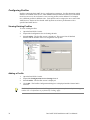
Enable SQL Server and Windows Authentication Mode
Following installation, enable the SQL Server:
1.
2.
Click the Windows Start button and click All Programs.
From the Microsoft SQL Server 2005 program group, select SQL Server Management Studio Express. The Connect to Server window is displayed.
3.
Enter the Server name if it is not already displayed, select Windows Authentication,
and click Connect.
Right-click on the root node. A popup menu is displayed.
4.
22
Intel AMT SCS Installation And User Manual
5.
6.
7.
8.
Select Properties. The Server Properties Window is displayed.
Select the Security page.
In the Server authentication section, select SQL Server and Windows Authentication mode.
Click OK.
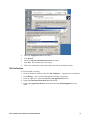
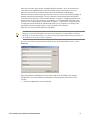
SQL Server Verification
To verify that the SQL server is running:
1. On the computer where the SQL Server is installed, click the Windows Start button
and click All Programs.
2. From the Microsoft SQL Server 2005 program group, select Configuration Tools >
SQL Server Configuration Manager. The SQL Server Configuration Manager
opens.
3. From the left pane, select SQL Server 2005 Services.
4. In the right pane, check the State column and ensure that SQL Server and SQL Server
Browser are both running.
If they are not, select each, right-click, and from the popup menu, select Start. It may
be necessary the first time after installation to right-click on the server or server
browser entry, select Properties, select the Service tab and change the Start Mode
to Automatic, and then start the server and/or the browser.
5. Expand the SQL Server 2005 Network Configuration branch.
6. Select the Protocols for SQLEXPRESS branch.
7. Ensure that Shared Memory, Named Pipes, and TCP/IP are enabled.
If they are not, select each, right-click, and from the popup menu, select Enable.
Environment Prerequisites and Installation
23
8. To enable secured database communication using the internal SQL Server encryption
option, right click on Protocols for SQLEXPRESS and select Properties. Set
ForceEncryption to Yes.
9. Expand the SQL Native Client Configuration branch.
10. Select the Client Protocols branch.
11. Ensure that Shared Memory, Named Pipes, and TCP/IP are enabled.
If they are not, select each, right-click, and from the popup menu, select Enable.
12. If database service is currently running, restart the service so that the changes take
affect. (Right-click on My Computer, and select Manage. Open the Services and
Applications element in the control tree and select Services. Right-click on SQL
Server (SQLEXPRESS) and select Restart.
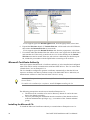
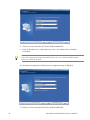
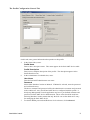
Internet Information Services (IIS) 6.0
Internet Information Services is Microsoft's HTTP server. IIS adds full HTTP capability
to the Windows operating system.
Install IIS before installing the Microsoft Certificate Authority on the same server so that
Certificate Authority web enrollment can be supported.
If IIS is not already enabled on this platform, enable the service:
1. Click the Windows Start button and select Control Panel.
2. Double-click Add or Remove Programs.
3. From the left panel, click Add/Remove Windows Components.
24
Intel AMT SCS Installation And User Manual
4.
5.
6.
7.
8.
Select the Application Server checkbox.
Click Details.
Select the Internet Information Services checkbox.
Click OK. IIS installation process begins.
Follow the installation wizard instructions and choose the default options.
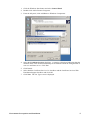
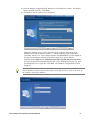
IIS Verification
To verify that IIS is running:
1.
2.
3.
4.
5.
From the Windows desktop, right-click My Computer. A popup menu is displayed.
Click Manage. The Computer Management Window is displayed.
From the right pane, expand the Services and Applications branch.
Expand the Internet Information Services branch.
Expand the Application Pools branch and ensure that DefaultAppPool is in run
mode.
Environment Prerequisites and Installation
25
If it is stopped, right-click DefaultAppPool and, from the popup menu, select Start.
6. Expand the Web Sites branch. If Default Web Site will be used as the SCS Website,
then ensure that Default Web Site is in run mode.
If it is stopped, right-click Default Web Site and, from the popup menu, select Start.
7. If a website other than Default Web Site will be used, create (right-click on Web Sites)
and start that site. If the newly created web site is to use the default port 80, Default
Web Site must not be started. If the new web site has a dedicated port other than port
80, include the port number with the FQDN when connecting to the web site.
Microsoft Certificate Authority
Intel SCS requires that Microsoft’s Certificate Authority (CA) be installed and configured
when TLS will be used in communications with Intel AMT devices. The CA can be either
a Stand-alone CA or an Enterprise CA.
The CA should be configured to generate certificates automatically so that the SCS can
request a certificate each time it performs a setup of an Intel AMT device. Otherwise, an
Administrator will have to intervene each time a device is set up.
Microsoft’s Enterprise CA requires Microsoft Windows 2003 Enterprise Edition with
Service Pack 1.
To enable web enrollment for certificates, install IIS before installing the CA.
The following prerequisites must be met to install an Enterprise CA:
• The host must be a member of an Active Directory domain. It can be the same
host as the domain controller.
• The user performing the installation must be a member of the domain and have
sufficient administration privileges (e.g., is a member of the “Domain Admins”
group).
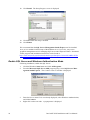
Installing the Microsoft CA
To install the Microsoft Certificate Authority as a stand-alone or Enterprise root CA:
26
Intel AMT SCS Installation And User Manual
1. Click the Windows Start button and select Control Panel.
2. Double-click Add or Remove Programs.
3. From the left panel, click Add/Remove Windows Components.
4. Select the Certificate Services checkbox. A warning is displayed indicating that the
machine name or the domain membership of the machine cannot be changed while it
acts as a certificate server. Click Yes.
5. Click Details.
6. Select both the Certificate Services CA checkbox and the Certificate Services Web
Enrollment Support checkbox and click OK.
7. Click Next. The CA Type screen is displayed.
Environment Prerequisites and Installation
27
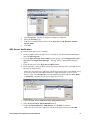
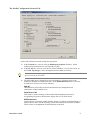
8. Select either Enterprise root CA or Stand-alone root CA and click Next. The CA
Identifying Information screen is displayed.
9. Enter the CA Identifying Information.
a. Enter the Common Name: The name by which the CA will be known.
b. Enter the distinguished name suffix: This is the domain suffix of the host. It
will be generated automatically in an AD environment. Click Next.
10. Choose the default location for the Certificate Database Settings and click Next.
There may be a message requesting to stop IIS. Click Yes.
11. There may be a message saying that ASP has to be enabled to use web enrollment
Services. Click on Yes. The installation will run to completion.
12. Configure the CA to automatically issue certificates. This option is recommended as it
allows the SCS to process Intel AMT device setups automatically without operator
intervention.
28
Intel AMT SCS Installation And User Manual
a.
b.
c.
d.
e.
f.
Click the Windows Start button > Administrative Tools > Certificate
Authority. The Certificate Authority Management Console opens.
Right-click on the first sub-branch, which will be the Common Name selected
above. A popup menu is displayed.
Click Properties and click the Policy Module tab.
Click Properties and select Follow the settings in the certificate template, if
applicable. Otherwise, automatically issue the certificate.
Click OK, respond to the message, and click OK. The Certificate Authority
Management Console returns to focus.
Right-click on the Common Name, right-click, and select All Tasks> Start
Service.
Exporting and Installing the CA Root Certificate
The CA root certificate should be stored locally on any platform that authenticates
certificates from this CA. This includes:
• Clients of IIS (if IIS used this CA for its certificate), for example, the SCS Console
• Platforms running Management Console applications that authenticate Intel AMT
devices that have TLS enabled in their profile, especially the SCS, when it
interacts with Intel AMT devices after setup.
• Intel AMT devices need this certificate for authenticating clients when TLS mutual
authentication is used, if this CA was used to issue client certificates. The
certificate must be included in the Profile for devices supporting mutual
authentication. See “Installing an Intel AMT Client Certificate for TLS Mutual
Authentication” on page 33.
The following steps show how to save the certificate as a file, and then install it as a
trusted root certificate.
1. Export the CA certificate. There are multiple ways to do this. This procedure describes
one of them.
Environment Prerequisites and Installation
29
a.
Click the Windows Start button > Administrative Tools > Certificate
Authority.
b. Right-click on the first sub-branch. A popup menu is displayed.
c. Click Properties and click the General tab.
d. Select the certificate and click View Certificate.
e. Click the Details tab and click Copy to file.
f. Follow the steps in the Wizard: Select an export format (any of the options is
acceptable), name the certificate file, and save it in a known location. A message
indicates that the export was successful. Click OK. The Details tab returns to
focus.
g. Click OK > OK. The Certificate Authority Management Console returns to
focus.
2. Install the CA root certificate in the certificate store as a trusted root certificate. This
step is not required if the CA is installed on the local platform.
a. Find the certificate. If it was exported directly to another computer, find it on
the other computer. If it was exported to a USB key, move it from the USB key
to the computer.
b. Right-click on the certificate and, from the popup menu, select Install
Certificate. The welcome screen of the Certificate Import Wizard is displayed.
Click Next.
c. Select Place all certificates in the following store and click Browse. The
Select Certificate Store window opens.
d.
e.
Select Trusted Root Certification Authorities and click OK.
Click Next > Finish. A message indicates that the import was successful. Click
OK.
Adding the SCS User to the Web Services Template
If the Intel AMT platform will be configured for TLS (see page 77) the SCS will be
required to request server certificates for each Intel AMT device. When the SCS works
with an Enterprise CA, the SCS user needs to have permission to use the Web Services
template for this purpose. Perform the following steps (see “Defining a New Template for
an Enterprise CA” on page 118 for additional details):
1.
Enter mmc in a command window.
2.
Press Ctrl+M followed by Alt+D.
30
Intel AMT SCS Installation And User Manual
3.
4.
5.
6.
7.
Select Certificate Templates and click Add, Close, and OK.
Right click on the relevant template in the list in the right pane (Web Services, and
repeat for any other templates to be used in this installation) and choose
Properties.
Select the Security tab.
Add a group or use an existing group that includes the SCS user and check all
permissions for it except the Full control option.
Click OK.
Secure the Connection to IIS Using SSL
Connection to IIS requires a digital certificate. A certificate can be purchased from an
outside vendor such as Verisign. If the Microsoft CA was installed because TLS will be
used for Intel AMT communications in the enterprise, use that CA as a source for a
certificate.
Installing a Certificate on IIS
Each instance of IIS that supports SCS requires a server certificate installed for the website
that supports the SCS. This will be either the Default Web Site or another user-specified
site (see page 38). The following procedure shows how to create and install a server
certificate using a Microsoft CA (either an enterprise CA or a standalone CA). Perform the
following steps on the platform where IIS is installed:
1.
2.
3.
4.
5.
6.
7.
Right-click on My Computer and select Manage.
Open the Internet Information Services (IIS) Manager branch.
Open Web Sites.
Right-click on Default Web Site (or the user-defined site) and select Properties.
Select the Directory Security tab.
Under Secure Communications, select Server Certificate…
The IIS Certificate wizard opens. Select Create a new certificate and click Next.
The process proceeds differently depending on the type of CA used.
Perform the following steps to create and install a certificate using an Enterprise CA:
1.
2.
Select Send the request immediately to an online certificate authority and click
Next.
Proceed through the Wizard, entering the requested parameters:
• Provide a name for the certificate.
• Leave the bit length at 1024
• Enter an organization name and an organizational unit.
• Enter the platform FQDN as the Common Name.
• Enter geographical information.
Environment Prerequisites and Installation
31
3.
4.
On the Choose a Certificate Authority pane, select the Enterprise CA from the
displayed list.
Select Next and finish the Wizard. The Enterprise CA will generate the certificate
and the wizard will install it.
Perform the following steps to create and install a certificate using a standalone CA:
1.
2.
3.
4.
5.
6.
7.
8.
9.
10.
11.
12.
13.
14.
Select Prepare the request now but send it later and click Next.
Proceed through the Wizard, entering the requested parameters:
• Provide a name for the certificate.
• Leave the bit length at 1024
• Enter an organization name and an organizational unit.
• Enter the platform FQDN as the Common Name.
• Enter geographical information.
• Enter a file name and location to store the certificate request.
Select Next and finish the Wizard.
Open the Standalone CA from a browser window by entering the URL of the CA.
Click Request a certificate.
Click Advanced Certificate Request.
Click Submit a certificate request… The browser opens a window with a field
named Saved Request where the text of the certificate request can be pasted.
Open the certificate request in a text editor such as Notepad.
Select the body of the request, without the Start certificate and End certificate lines.
Copy the request body from the text editor and paste it into the Saved Request
window. Click Submit.
Select DER format and Download Certificate. Save the resulting certificate.
Return to the Default Web Site (or user-defined web site) Properties>Directory
Security>Server Certificate.
Select Process pending request and install the certificate.
Locate the saved certificate. Select Next on the remaining panes and Finish to
complete certificate installation.
Installing a CA Certificate to Authenticate IIS
A client application requires a root certificate from the CA that issued the IIS certificate
so that it can authenticate IIS. This applies to the platform running the SCS Console
application.
Install the CA issuer certificate in the console’s trusted root certificate store
a. Open a web browser.
b. Enter the address of the CA Server web interface. In the following example,
ca_machine is the host name of the CA Server:
http://ca_machine/certsrv
c. Click Download a CA certificate, certificate chain or CRL.
d. Click Download a CA certificate.
e.
f.
g.
32
Click Save and save the .cer file in a known location.
Right click on the saved certificate and select Install Certificate.
Select Next on all options on the Certificate Import Wizard. The wizard will
display the default SSL port (443). Select Next in this display also.
Intel AMT SCS Installation And User Manual
Installing an Intel AMT Client Certificate for TLS Mutual Authentication
If TLS Mutual Authentication will be used, issue an Intel AMT client certificate and install the certificate in
the certificate store of the service user. This includes the SCS application and any Management Console
applications. There are differences in the process when working with a Standalone CA and an Enterprise
CA. The procedure for an Enterprise CA is described below.
Creating and Installing a Client Certificate Using a Standalone CA
This procedure must be performed on the SCS host by the same user as the one that will be
identified as the SCS service user (see page 37.)
1. Run Internet Explorer as the SCS user (Start>Programs>right-click Internet Explorer
>Run as….
2. In the Run As dialog click The Following User and enter the username and password
of the SCS user (the name must be in the format domain\username).
3. Press OK
4. Enter the following address: http://ca_machine/certsrv (where “ca_machine” is the
FQDN of the platform hosting the CA).
5. Click Request a certificate.
6. Click advanced certificate request.
7. Click Create and submit a request to this CA.
8. Complete the request form. Ensure that the following critical parameters are
completed correctly:
•
The Name field must be the fully qualified name (FQDN) of the host
running the SCS or Management Console. To find this name, from the
Windows desktop, right-click My Computer, select Properties, and click
the Computer Name tab.
•
The Type of Certificate Needed field must be Other.
•
In the OID field, enter the client certificate OID and the remote certificate
OID. The complete OID value must appear as:
1.3.6.1.5.5.7.3.2,2.16.840.1.113741.1.2.1
•
•
Select 1024, 1536, or 2048 as a key size.
Select the Mark keys as exportable checkbox.
9. Click Submit. Depending on the selected parameters, one or more confirmation
messages are displayed. If the resulting page says “Certificate Pending”, perform step
10. Otherwise, skip to step 11. The behavior depends on how the CA policy module
was configured.
10. Issue the certificate.
A. Click the Windows Start button > Administrative Tools > Certificate
Authority. The Certificate Authority Management Console is displayed.
B. Expand the first sub-branch and click Pending Requests.
C. Right-click on your request and, from the popup menu, select All Tasks >
Issue.
D. Return to the CA web enrollment home page and select View the Status of
a Pending Certificate Request. Click on the relevant certificate request.
Environment Prerequisites and Installation
33
11. Click Install this certificate.
Creating and Installing a Client Certificate Using an Enterprise CA
1. Create and install a template that supports generating Intel AMT client certificates.
(See “Defining a New Template for an Enterprise CA” on page 118).
2. Run Internet Explorer as the SCS user (Start>Programs>right-click Internet Explorer
>Run as….
3. In the Run As dialog click The Following User and enter the username and password
of the SCS user (the name must be in the format domain\username).
4. Press OK
5. Enter the following address: http://ca_machine/certsrv (where “ca_machine” is the
FQDN of the platform hosting the CA).
6. Click Request a certificate.
7. Click advanced certificate request.
8. Click Create and submit a request to this CA.
9. Select the template to be used (the one created in step 1).
10. Set the key size to 1024.
11. Click Submit. The CA may display the following warning message. Click Yes.
12. The CA will display a “Certificate Issued” page. Click Install this certificate. There
may be another warning message. Click Yes.
Active Directory (AD) and Changes to the AD Schema
AD provides users with a single network logon and a single point of administration and
replication. It provides Kerberos Authentication, DNS and X.500 naming standards, as
well as Lightweight Directory Access Protocol (LDAP). It also includes several important
protocols and various useful APIs.
This manual assumes that AD is installed. For installation instructions, see Microsoft
documentation.
Adding an OU for AMT Objects
Active Directory allows dividing a domain into substructures called organizational units
(OUs). OUs are container objects that can be nested within other OUs. An OU can contain
Users, Groups, and other OUs. OUs are part of the Active Directory scheme for managing
privileges and accesses. One of the parameters that must be specified for each Intel AMT
device before it can be setup in an AD environment is the OU where it will be installed.
The OU created for holding AMT objects does not need special privileges. However, if the
SCS user does not have sufficient permissions to add users to Active Directory, the SCS
will not be able to add new entries to the OU. The SCS user needs “Create/Delete IntelManagement-Engine objects” permission in the OU as well as full control over IntelManagement-Engine object.
34
Intel AMT SCS Installation And User Manual
To add an OU to an Active Directory domain, in an Active Directory management
window, open the domain, right-click on Accounts, select New/Organizational Unit and
supply the desired OU name.
In an installation with Intel AMT-based platforms deployed in multiple domains, add an
OU to each domain.
Updating the Schema for Intel AMT
Installation of the SCS optionally adds a schema definition and script that are used to
extend the Active Directory schema for Intel AMT. When the Administrator runs it, the
script creates a new class – Intel-Management-Engine – based on the AD computer object,
with the following new attributes:
•
Intel-Management-Engine-Version (received in the “Hello” message from the
Intel AMT device)
•
Intel-Management-Engine-Host-Computer (a link to the platform computer
object created when the host joins the domain)
•
Intel-Management-Engine-Platform-UUID (received in the “Hello” message)
•
Intel-Management-Engine-Host-Computer-BL (added to the computer object
class as a back link to an AMT object)
•
“Intel-Management-Engine-Host-computer-BL” (added to the top computer
object class)
When the SCS performs setup for an Intel AMT device, the SCS service:
•
creates an AMT Object with the first three attributes listed above
•
creates a link between the attribute “Intel-Management-Engine-Host-Computer”
in the AMT Object and the AMT Host object
•
creates a link between the attribute “Intel-Management-Engine-Host-ComputerBL” found on the AMT Host and the AMT Object.
Active Directory will display the AMT Object as the representation of the Intel AMT
device itself and show it as having the type Intel-Management-Engine.
Environment Prerequisites and Installation
35
Installation of the SCS Server Components
The Intel SCS components can be installed on a single computer or on separate computers.
Setup facilitates those options. In either case, required user intervention presumes
knowledge of:
•
•
•
SQL Server administration
Internet Information Services (IIS) 6.0 administration
Windows Service installation
Installing the Intel SCS Server Components
To install the Intel SCS components:
1. Ensure that the computer meets the system requirements listed in “System
Requirements” on page 15.
2. Locate the distribution files as downloaded to the server platform.
3. Locate and double-click the file named AMTConfServer.exe. The Welcome screen
is displayed. Click Next. The License Agreement screen is displayed.
4. Accept the license agreement and click Next. The Setup Type screen is displayed.
5. From the Setup Type screen, select Complete.
Intel SCS Setup inspects the computer’s software. Messages are displayed if any of the
prerequisites are missing. If any prerequisites are missing, click Cancel and add them.
Use the Custom option only if there is a need to use a target directory that is different from
the default. Although there is an option to select features, install all components.
6. The Select Main Service User screen is displayed.
36
Intel AMT SCS Installation And User Manual
Enter the user name in the format “NetBIOS Name\Username”. In an Active Directory
environment, the NetBIOS name will be the domain name. In the absence of Active
Directory, this will be the computer name where the installation is taking place.
This user must have the necessary permissions to run as a service. The installer prompts to
add this permission automatically. The user must have all the permissions described in
“SCS and Active Directory Tasks and Permissions” on page 12, including permissions to
access the CA. In an Active Directory environment, it is recommended to configure the
SCS user to have the property “Password never expires.” Otherwise, it will be necessary
to change the password, both in AD and in the SCS service properties, according to the
organization password update policy (every few months, for example).
Enter the User name and Password and click Next.
In a TLS environment, the SCS user must have permissions to issue certificates (Issue and
Manage Certificates and Request Certificates permission) on a stand-alone certificate
authority (CA). On an Enterprise CA, the user must have Read and Enroll permissions on
the template to be used to create certificates.
If a new user will be created later that will be the one associated with the service, select
New User.
Enter the parameters defining this user and select OK, then click Next. The installer
validates the user account and may prompt that it will add proper permissions to the
account.
7. The IIS Configuration screen is displayed.
Environment Prerequisites and Installation
37
8. Select a web site from the list of sites defined within IIS.
9. Enter the IIS Web Server Virtual Directory name. The default name is AMTSCS.
Click Next.
The Virtual Directory name must be unique. If a Virtual Directory already exists with this
name, the existing Virtual Directory will be preserved. As a result, the SOAP Virtual
Directory will not be created.
10. The Remote Configuration IIS Web Server Configuration page is displayed.
11. Select a web site from the list of sites defined within IIS.
38
Intel AMT SCS Installation And User Manual
12. Enter the Remote Configuration IIS Web Server Virtual Directory name. The default
name is AMTSCS_RCFG. Click Next.
13. The Database Server Login screen is displayed.
Define the database server—that is, the name of the computer functioning as the
database server and the database instance— and the connection type. In the above
screenshot, the server is “local” and the instance is SQLEXPRESS. Use the FQDN of
the SQL server platform when the SCS and the SQL server are on different
platforms. Select SQL Server authentication using Login ID and password below
and enter the password defined during the SQL server installation (see page 21). sa is
the default SQL server Login ID. Click Next. The Database Configuration screen is
displayed.
The default Server name is the name of the local computer. In an environment with one
shared database and more than one Intel SCS, ensure that the Server name is the name of
the computer hosting the database.
Environment Prerequisites and Installation
39
14. If Database Schema is being installed, enter both the Database Name—that is, the
name assigned to the database; the default name is IntelAMT—and the Console User
Name.
15. There may be a notice displayed saying that the user does not have necessary
privileges. Click Yes to assign the user the necessary privileges.
If the database was previously installed, the installer displays a notice asking if the
database should be replaced. Respond “No” to this request. Install the database only once.
11. From the Ready to Install screen, click Install. Installation begins. A progress bar
indicates the status of the installation. When the installation is complete, the
InstallShield Wizard* Complete screen is displayed.
The Installation Complete screen has a reminder to run the scripts required to add the the
IntelManagementEngine class to Active Directory. To do this, run BuildSchema.vbs at
[installdrive]:\Program Files\Intel\AMTConfServer\AdminScripts\Active Directory
Schema. Optionally, select the checkbox to start the SCS immediately.
12. Click Finish.
Upgrading the Intel SCS to a New Version
If there is an existing version of the SCS already installed and a new version is to be
installed, perform the following steps:
1. Using locally available tools, backup the database.
2. Start installation of the new version of the SCS as described above.
3. If the new version has a newer version of the database schema, a message is displayed
reminding the user to perform a database backup. Do so now if step 2 was skipped.
4. Continue with the installation. The installer will update the database so that it
conforms to the latest version of the schema.
40
Intel AMT SCS Installation And User Manual
Silent Install
The SCS installation image is an InstallShield* executable. Besides the interactive install
described above, the SCS can be installed from a command line using a script file to
respond to the installer questions. This capability is called “silent install”. Another
application can invoke the silent install with a properly prepared installation script. This
can be used by ISVs that wish to embed the SCS into their application.
The usage is:
AMTConfServer.exe /s /f1”c:\scsinstall.iss” /f2”c:\scsinstall.log”
where scsinstall.iss is the install script and scsinstall.log is the log file
created by the installer.
Note: As with any script-driven application, the parameters included in the script
must be verified before activating the script. The silent install assumes that the
supplied values are correct.
Create an install script from a GUI-based installation sequence by running the installer with
the record option:
AMTConfServer.exe /r
The following example of an scsinstall.iss script provides the necessary parameters to the
installer for a standard install. The highlighted parameters are those that must be
customized per installation.
[InstallShield Silent]
Version=v7.00
File=Response File
[File Transfer]
OverwrittenReadOnly=NoToAll
[{DA4F4037-6EB2-4309-86EB-A8902CBC12EC}-DlgOrder]
Dlg0={DA4F4037-6EB2-4309-86EB-A8902CBC12EC}-OnAppSearch-0
Count=15
Dlg1={DA4F4037-6EB2-4309-86EB-A8902CBC12EC}-SdWelcome-0
Dlg2={DA4F4037-6EB2-4309-86EB-A8902CBC12EC}-SdLicense2Rtf-0
Dlg3={DA4F4037-6EB2-4309-86EB-A8902CBC12EC}-SetupType2-0
Dlg4={DA4F4037-6EB2-4309-86EB-A8902CBC12EC}-IntelFlow-0
Dlg5={DA4F4037-6EB2-4309-86EB-A8902CBC12EC}-AskYesNo-0
Dlg6={DA4F4037-6EB2-4309-86EB-A8902CBC12EC}-OnMainServiceInitialize-0
Dlg7={DA4F4037-6EB2-4309-86EB-A8902CBC12EC}-IISDialog-0
Dlg8={DA4F4037-6EB2-4309-86EB-A8902CBC12EC}-IISRCFGDialog-0
Dlg8={DA4F4037-6EB2-4309-86EB-A8902CBC12EC}-SQLServerSelectLogin-0
Dlg9={DA4F4037-6EB2-4309-86EB-A8902CBC12EC}-DBDialog-0
Dlg10={DA4F4037-6EB2-4309-86EB-A8902CBC12EC}-SdStartCopy2-0
Dlg11={DA4F4037-6EB2-4309-86EB-A8902CBC12EC}-MainService_Installed-0
Dlg12={DA4F4037-6EB2-4309-86EB-A8902CBC12EC}-DatabaseSchema_Installed-0
Dlg13={DA4F4037-6EB2-4309-86EB-A8902CBC12EC}-AskYesNo-1
Dlg14={DA4F4037-6EB2-4309-86EB-A8902CBC12EC}-SdFinish-0
[{DA4F4037-6EB2-4309-86EB-A8902CBC12EC}-OnAppSearch-0]
## If the user is not administrator, the installer displays a warning
## message. In silent install, a warning message will terminate the
## installer, so the Admin_logged_On parameter was added:
## 1: Allow installation even if the user is not an administrator
## 0: Don’t allow install without Admin permissions.
Admin_Logged_On=1
## Allow installation if .NET 2.0 is not installed.
NET_2.0_Exists=1
[{DA4F4037-6EB2-4309-86EB-A8902CBC12EC}-SdWelcome-0]
Result=1
[{DA4F4037-6EB2-4309-86EB-A8902CBC12EC}-SdLicense2Rtf-0]
Result=1
[{DA4F4037-6EB2-4309-86EB-A8902CBC12EC}-SetupType2-0]
Environment Prerequisites and Installation
41
Result=304
[{DA4F4037-6EB2-4309-86EB-A8902CBC12EC}-IntelFlow-0]
## This warning message is presented in case the user selects to install SOAP
API (on IIS) and IIS6 is not installed.
## Allow installation of SOAP API even if IIS6 is not installed.
IIS6_Warning=1
[{DA4F4037-6EB2-4309-86EB-A8902CBC12EC}-AskYesNo-0]
## Ignored
Result=1
[{DA4F4037-6EB2-4309-86EB-A8902CBC12EC}-OnMainServiceInitialize-0]
## Domain/User/Password for the main service.
## Note: when running in silent mode the Domain/User/Password is not validated!
Domain_User=DOMAIN\user
Password=password
[{DA4F4037-6EB2-4309-86EB-A8902CBC12EC}-IISDialog-0]
## The IIS SOAP API virtual directory name and
## web site name. The web site named must exist before installation.
SOAP_Name=AMTSCS
Result=1
SOAP_Web_Site_Name=Default Web Site
SOAP_Secure_Connection=0
SOAP_Application_Pool_Name=DefaultAppPool
[{DA4F4037-6EB2-4309-86EB-A8902CBC12EC}-IISRCFGDialog-0]
## The IIS SOAP API virtual directory name and
## web site name used by the RCT. The web site named must exist before
## installation.
SOAP_Name=AMTSCS_RCFG
Result=1
SOAP_Web_Site_Name=Default Web Site
SOAP_Secure_Connection=0
SOAP_Application_Pool_Name=AMTSCS Remote Configuration
[{DA4F4037-6EB2-4309-86EB-A8902CBC12EC}-SQLServerSelectLogin-0]
## User/Password for SQL Server login
## To use Windows authentication simply use blank values, for example:
## szUser=' '.
## Note: The User/Password is not validated in silent mode. If access
## is denied the installation will fail when it tries unsuccessfully
## to access the DB.
szUser=sa
szPass=sa
## Name and Instance of the SQL Server.
szServer=(local)\SQLEXPRESS
szAuthen=1
Result=1
[{DA4F4037-6EB2-4309-86EB-A8902CBC12EC}-DBDialog-0]
## Database name.
DB_Name=IntelAMT
## Application user to add when installing the Database
App_User=DOMAIN\user
Result=1
[{DA4F4037-6EB2-4309-86EB-A8902CBC12EC}-SdStartCopy2-0]
Result=1
## If there is an existing database, this parameter determines if the
## installer should update to a newer schema. 1=yes; 0=no
## If the installed DB has a newer schema than the version being installed,
## the installation will continue without updating the DB.
## If the installer attempts to update the DB and fails (for example, there
## are other users still active attached to the DB), then the install will
## fail.
42
Intel AMT SCS Installation And User Manual
Update_DB=1
[Application]
Name=Intel® Active Management Technology Setup and Configuration Server
Version=3.1.0.5.1
Company=Intel
Lang=0009
[{DA4F4037-6EB2-4309-86EB-A8902CBC12EC}-MainService_Installed-0]
## If the user selected to run the service does not have sufficient
## permissions in local security policy to run
## as a service, the installer will add the necessary privileges if
## Set_Privileges is 1 (0 to ignore).
Set_Privileges=1
[{DA4F4037-6EB2-4309-86EB-A8902CBC12EC}-DatabaseSchema_Installed-0]
## When installing, the Database might be already installed. The
## Use_Exist_DB parameter tells the installer what to do.
## 1: The existing DB will be used; 0: delete the DB and recreate it.
Use_Exist_DB=1
[{DA4F4037-6EB2-4309-86EB-A8902CBC12EC}-AskYesNo-1]
## ignored
Result=1
[{DA4F4037-6EB2-4309-86EB-A8902CBC12EC}-SdFinish-0]
Result=1
# bOpt1 controls whether or not to start the windows service after the
# installation.
# bOpt1=0: do not start the service; bOpt1=1: start the windows service.
bOpt1=0
bOpt2=0
[{0027D675-4029-47F6-B217-77C6EB1389CB}-DlgOrder]
Count=0
Use the following script to perform a silent uninstall. The highlighted fields must match
the corresponding fields in the install script.
[InstallShield Silent]
Version=v7.00
File=Response File
[File Transfer]
OverwrittenReadOnly=NoToAll
[{DA4F4037-6EB2-4309-86EB-A8902CBC12EC}-DlgOrder]
Dlg0={DA4F4037-6EB2-4309-86EB-A8902CBC12EC}-MessageBox-0
Count=6
Dlg1={DA4F4037-6EB2-4309-86EB-A8902CBC12EC}-DatabaseSchema_UnInstalling-0
Dlg2={DA4F4037-6EB2-4309-86EB-A8902CBC12EC}-SQLLogin-0
Dlg3={DA4F4037-6EB2-4309-86EB-A8902CBC12EC}-AskYesNo-0
Dlg4={DA4F4037-6EB2-4309-86EB-A8902CBC12EC}-SdFinish-0
Dlg5={DA4F4037-6EB2-4309-86EB-A8902CBC12EC}-SdFinishReboot-0
[{DA4F4037-6EB2-4309-86EB-A8902CBC12EC}-MessageBox-0]
Result=6
[Application]
Name=Intel® Active Management Technology Setup and Configuration Server
Version=3.1.0.5.1
Company=Intel
Lang=0009
[{DA4F4037-6EB2-4309-86EB-A8902CBC12EC}-DatabaseSchema_UnInstalling-0]
# Whether or not to remove the DB when uninstalling. 1: Yes; 0: No
Remove_DB=1
[{DA4F4037-6EB2-4309-86EB-A8902CBC12EC}-SQLLogin-0]
## User/Password for SQL Server login
Environment Prerequisites and Installation
43
## To use Windows authentication simply use blank values, for example:
## szUser=' '.
## Note: The User/Password is not validated in silent mode. If access
## is denied the uninstall will fail when it tries unsuccessfully
## to access the DB.
szUser=sa
szPass=sa
Result=1
[{DA4F4037-6EB2-4309-86EB-A8902CBC12EC}-AskYesNo-0]
# ignored
Result=0
[{DA4F4037-6EB2-4309-86EB-A8902CBC12EC}-SdFinish-0]
Result=1
bOpt1=0
bOpt2=0
[{DA4F4037-6EB2-4309-86EB-A8902CBC12EC}-SdFinishReboot-0]
## If the SOAP API cannot be removed, the uninstaller may request a reboot.
## BootOption=0 ignores the request; BootOption=1: uninstaller does reboot
## To avoid the reboot request, be sure no clients request access to SOAP
## API after IIS restart.
Result=1
BootOption=0
[{951D2E35-5A48-4ED3-8BA4-78205D908B8C}-DlgOrder]
Count=0
44
Intel AMT SCS Installation And User Manual
Installing the Intel AMT Management Console
Installing the Intel SCS Management Console requires no user intervention. The default
installation folder is C:\Program Files\Intel\AMTConsole.
To install the Intel SCS Management Console: See “Installing the Intel AMT Management
Console” on page 45.
1. Ensure that the computer meets the system requirements listed in “System
Requirements” on page 15.
2. Locate the SCS distribution files.
3. Locate and double-click the file named AMTConsole.exe. The Welcome screen is
displayed.
4. Click Next. The License Agreement is displayed.
5. Accept the license agreement and click Next. The Choose Destination Location
screen is displayed.
6. Define the location where the Intel SCS Management Console will be installed and
click Next. The Ready to Install screen is displayed.
7. Click Install. Installation begins. A progress bar indicates the status of the
installation. When the installation is complete, the InstallShield Wizard Complete
screen is displayed. Click Finish.
Environment Prerequisites and Installation
45
Post Installation Operations
After the components of the Intel SCS are installed, we recommend completing the
following procedures.
Intel AMT Configuration and the DNS
Intel AMT device setup and configuration requires the presence of a Domain Name
System (DNS) Server. The DNS must have information for two entities:
The SCS Server must be registered in the DNS.
A configured, operational Intel AMT device must be registered within DNS.
Intel SCS
The platform running the SCS Service (the Main Service) must be registered in the DNS
as “ProvisionServer”. If there is more than one instance of the SCS running, then only one
instance should be registered.
The registered SCS instance will receive all “Hello” messages and will pass processing to
other instances if it is too busy to keep up with processing. If the registered instance of the
service is stopped, for whatever reason, no processing will be done of new “Hello”
messages, even when other instances of the service are running.
To register a server in the DNS as “ProvisionServer” when the server itself has a different
hostname, add a CNAME (canonical name”) record to the DNS. To do this with a
Microsoft DNS server, open the MMC DNS branch, open the Forward Lookup Zones
branch, right-click the entry for the server running the SCS, and select New Alias. Then
enter “ProvisionServer as the alias name.
Intel AMT Devices
Ensure that the DNS is configured with the Fully Qualified Domain Names (FQDN)
of the Intel AMT-enabled machines that are being configured.
Intel AMT devices must be configured to have the same FQDN as the host OS. This
stems from the fact the Intel AMT device is not a secure DNS client and it relies on the
host OS to maintain the DNS record. For this reason, the Intel AMT device snoops the
DHCP requests and responses issued by the host OS. The Intel AMT device then uses the
IP provided by the DHCP to the host OS as its own.
When the host OS is down, the Intel AMT device requests DNS registration of its configured FQDN from the DHCP (option 81). This works only if the DNS and DHCP are
configured to operate in this way. This is a default feature of Microsoft DNS and DHCP
servers.
When an Intel SCS contacts a configured Intel AMT device, it uses the FQDN of the Intel
AMT device. When using TLS and/or Kerberos, this is essential, as the platform and the
Intel AMT device are identified in certificates and Kerberos tickets with the FQDN. This
necessitates that the DNS server contain a Host (A) record for every configured Intel AMT
device.
This is the responsibility of the Administrator.
There are several methods to do this:
•
Manual entry of the Host (A) record
•
A successful boot of the host OS that registers a DNS entry with the same name.
This method is good as long as the IP lease and DNS entry are maintained.
•
Configure DNS and DHCP to enable AMT use of option 81.
46
Intel AMT SCS Installation And User Manual
AMTConfig Service Verification
To verify that the AMTConfig Windows service is running:
1.
2.
3.
4.
5.
Click the Windows Start button and click Run.
In the Open field, enter services.msc and click OK. The Services (Local) Window
is displayed.
In the Status column, check the status of AMTConfig. If there is no listing in the
column, the service is not running.
Select AMTConfig. “Start the service” is displayed.
Click Start. A progress message is displayed. When completed, the word Started
appears in the Status column.
Environment Prerequisites and Installation
47
Quick Start and System Test
This procedure is a summary of the Intel SCS Management Console section which begins
on page 66. However, it can also be completed as a test to ensure that the system is
configured and running properly.
1.
2.
3.
4.
5.
Log-in to the Intel SCS Console. For details, see “Logging In” on page 69.
Add a new profile. For details, see “Configuring Profiles” on page 74.
a. From the navigation panel of the Intel SCS Console, expand the Configuration
Service Settings branch and select Profiles.
b. Click Add. The Profile Configuration dialog box is displayed and the General
tab is selected.
c. Configure the new profile and save it.
Add configuration properties for Intel AMT devices. For details, see “Configuration
Parameters per Device” on page 95.
a. From the navigation panel of the Intel SCS Console, select Configuration
Parameters. The New Intel AMT Systems table is displayed.
b. Click Add. The New Intel AMT Device Properties dialog box is displayed.
c. Enter the New Intel AMT device properties and click OK.
If Intel AMT Release 1.0 devices need to be setup and configured, enable this
capability.
a. From the navigation panel of the Intel SCS Console, expand the Configuration
Service Settings branch and select General. The General screen is displayed.
b. Select the Intel AMT 1.0 Provisioning checkbox.
c. A confirmation message is displayed. Confirm the selection.
d. Click Apply.
If Intel AMT Release 1.0 devices are installed and need to be setup using the SCS,
configure the BIOS administrator password for Intel AMT 1.0.
All Intel AMT Release 1.0 devices must be configured via the MEBx to this administrator
password.
a.
6.
48
From the navigation panel of the Intel SCS Console, expand the Configuration
Service Settings branch and select Profiles.
b. Select the profile being used and click Edit.
c. Under Password, select Manual, then enter the new password twice in the
displayed fields.
d. Click Apply.
Configure the BIOS administrator password for Intel® AMT 2.0/2.1. For details, see
“Configuring Pre-Setup and Configuration Security Keys” on page 89.
a. From the navigation panel of the Intel SCS Console, expand the Configuration
Service Settings branch and select Security Keys.
b. Select a TLS-PSK entry. (If there are no entries, click Create Pre-Provision
data to create entries.)
c. Click View.
d. Copy or print the properties of the selected entry.
Intel AMT SCS Installation And User Manual
e.
7.
The Administrator must enter these values in the appropriate place in the Intel
AMT device BIOS screen.
If using TLS based Authentication, configure the CA parameters.
a. From the navigation panel of the Intel SCS Console, expand the Configuration
Service Settings branch and select Profiles.
b. Enable TLS and, if applicable, mutual authentication.
c. Select the profile being used and click Edit.
d. Click the Network tab.
e. Configure the TLS server certificate details.
f. If using Mutual Authentication, select the Mutual Authentication button. Locate
one or more trusted certificates and add any available CTRL information.
g. Click Apply.
Without a proper CA configuration, the SCS service will not be able to work with TLS based
Authentication.
Improper Network settings can cause some of the SCS service’s features to malfunction.
For example, changing only the Network Interface to TLS Server Authentication causes an
API failure.
8.
Test the Intel SCS Main Service.
a. Click the Windows Start button > Administrative Tools > Services.
b. Right-click on AMT Config and, from the popup menu, select Start. A
progress bar indicates the advancement of the start-up.
c. Click the Windows Start button > Administrative Tools > Event Viewer.
d. Click Application.
e. In the Information entries, double-click the AMTConfig message. A popup
message should say “Service Started Successfully.”
Environment Prerequisites and Installation
49
f.
g.
50
Click OK. The Event Viewer returns to focus.
From the File menu, click Exit.
Intel AMT SCS Installation And User Manual
Recommended Daily Workflow
After the Intel SCS components are installed and the first Intel AMT devices are
configured and operational, we recommend that the following tasks be completed on a
regular basis (preferably daily):
•
•
•
•
•
Check for new Intel AMT devices.
Optionally, authorize provisioning of new Intel AMT systems.
Review the list of “Existing Intel AMT Systems” for anomalies – devices that have
not completed setup and configuration, pending addition of information to the device
definition (e.g., a missing UUID or FQDN).
Review the logs. Note anomalies and fix them. See “Intel AMT SCS Console Logs”
on page 106.
Backup the database.
Environment Prerequisites and Installation
51
Chapter 3
INTEL AMT PREPARATION
This section contains:
•
“Preparation Without a USB Device” on page 53
•
“Using a USB Storage Device for Factory Mode Setup” on page 57
•
“Preparing Intel AMT for Future Configuration” on page 58
•
“Remote Configuration” on page 58
52
Intel AMT SCS Installation And User Manual
This section describes the steps required to prepare an Intel AMT device to receive its
configuration settings from the Intel SCS. An Intel AMT device is considered in Factory
Mode until it is ready to send “Hello” messages to the SCS. Once the appropriate
preparation is performed, the device transitions to Setup Mode, sending “Hello” messages
periodically until it receives a response from an SCS. When setup and configuration is
complete, the Intel AMT device is in Operational Mode. There are four possibilities:
•
•
•
•
During power up, if the BIOS implementation supports this capability, the Intel AMT
device first checks for the presence of a USB storage device. If the device is present,
the setup proceeds as described in “Using a USB Storage Device for Factory Mode
Setup” on page 57. The PID/PPS pair is installed and, optionally, the Intel
Management Engine BIOS extension password may be changed.
If there is no USB device or USB enablement is not supported, the technician enters
the BIOS extension using the method defined by the BIOS vendor. The BIOS
implementation may require that the user enable the BIOS extension from the BIOS.
The PID/PPS pair is entered manually as described below, based on values generated
by the SCS.
If the device was prepared for configuration with a PID-PPS pair by an OEM or by
previous IT actions, then no further preparation is needed: It is already in Setup
Mode. The Intel AMT device will send “Hello” messages once it is connected to the
network.
Intel AMT Releases 2.2 and 3.0 have an option for Remote Configuration and do not
need any of the above three approaches. See “Remote Configuration” on page 58.
Preparation Without a USB Device
If there is no USB device or USB enablement is not supported, the platform displays the
BIOS startup screen, and then the BIOS Extensions will be processed.
Intel AMT reference platforms display a screen prompting the user to press <Ctrl+P>.
Pressing <Ctrl+P> passes control to the Intel Management Engine BIOS extension
(MEBx) Main Menu. This step may vary as a function of an OEM-provided BIOS.
Follow the manufacturer’s directions for accessing the ME BIOS sub-menu. Steps 1
through 11 or some subset of them may not be required.
Perform the following steps:
1. Enter the MEBx default password. The default password is admin.
2. Change the default password to a new value. This step is required.
The password must contain at least eight characters, including an upper-case letter, a
lower-case letter, numbers, and one of the @ # $ % ^ & * symbols at a minimum.
3.
4.
5.
6.
7.
This password is either generated by the SCS or entered manually in the SCS security
keys definition. The Intel AMT device uses this password for authentication during
Setup and Configuration. Once Setup mode has begun, a management console
application can change the Intel AMT device password without modifying the MEBx
password.
Select Intel ME Platform Configuration. A warning message is displayed saying
that a reset will occur after configuration is complete.
Enter Y.
Select Intel ME Features Control.
Select Manageability Feature Selection.
Select Intel AMT and return to the previous menu.
Intel AMT Preparation
53
8.
9.
10.
11.
12.
13.
14.
15.
54
Select the Intel ME Power Control menu.
(Intel AMT Release 2.0/2.1/2.2) Set the following power control settings:
•
Intel ME State upon Initial Power-On = ON
•
Intel ME ON in Host Sleep States = Always
•
Intel ME Visual LED Indicator = ON
(Intel AMT Release 2.5) Select from one of the following choices (OEMs can select
which options will be available in this list):
Mobile: On in S0
(The Intel ME and Intel AMT are on
only when the host is on—this is the
default setting.)
Mobile: On in S0, S3/AC
(The Intel ME and Intel AMT are on
when the host is on or when the host is
in S3, as long as the platform is
connected to AC power.)
Mobile: On in S0, S3/AC, S4-5/AC
(The Intel ME and Intel AMT are on
when the host is on or when the host is
in S3 to S5, as long as the platform is
connected to AC power.)
Mobile: On in S0, ME WoL in S3/AC
(The Intel ME and Intel AMT are on
when the host is on. When the host is in
S3 and the platform is connected to AC
power, the ME will shut down after a
defined period of time, but will awaken
when it receives a network message –
Wake on LAN.)
Mobile: On in S0, WoL in S3/AC S4-5/AC (The Intel ME and Intel AMT are on
when the host is on. When the host is in
S3 to S5 and the platform is connected
to AC power, the ME will shut down
after a defined period of time, but will
awaken when it receives a network
message –Wake on LAN.)
(Intel AMT Release 3.0) Select Desktop: ON in S0, S3, S4-5.
Return to the previous menu.
Exit all menus. The computer will restart.
Press <Ctrl+P> and enter the Main Menu.
Select Intel AMT Configuration and press Enter. The Intel BIOS extension screen
is displayed.
Intel AMT SCS Installation And User Manual
16. Configure the parameters as described in the following sections.
Host Name
This parameter is set by the SCS.
TCP/IP Settings
Enable the network interface and DHCP. These are the default settings in enterprise
mode and are required for interoperability with the SCS. The Intel AMT device will
share the IP address received from a DHCP server with the host platform. The SCS
does not support static IP addresses for the host and the Intel AMT device.
SCS Service IP Address (“Provisioning Server”)
By default, the SCS Service IP address is set to 0.0.0.0. A value of 0.0.0.0 means that
the Intel AMT device will attempt to obtain the actual IP address of the SCA by
performing a DNS lookup for a host named "ProvisionServer". If the DNS is unable
to resolve the host name, the IP address of the SCS must be supplied manually. The
name ProvisionServer can be configured by an OEM to a different value, so verify
the delivered value of this parameter.
By default, port 9971 is used to establish a connection to the SCS. This default may
be changed by an OEM. If the SCS has been configured to listen on a different port,
then enter the actual port the SCS is listening on.
Setup Type (“Provision Model”)
The default setup type of Intel AMT is Enterprise. The Small Business Setup option
is used in environments where infrastructure required for TLS is not available, and
configuration can be completed from the BIOS menu. The SCS service does not
support Small Business setups.
The Setup Type menu also allows selection of Legacy Mode. In Legacy Mode, Intel
AMT Releases 2.0, 2.1, 2.2, 2.5, and 3.0 have the capabilities of Intel AMT Release
1.0. This allows use of third-party products developed to run with Intel AMT
Release 1.0.
Virtual Local Area Network (VLAN) Settings
Set by the SCS
PID-PPS
The Provisioning ID (PID) and the Provisioning Pre-Shared Key (PPS) settings are
required for establishing secure communication during the Setup and Configuration
of Intel AMT Release 2.0/2.1 platforms. These settings are not available for Intel
Intel AMT Preparation
55
AMT Release 1.0 platforms and for Intel AMT Release 2.0/2.1 platforms configured
in Legacy Mode.
The SCS service generates a file of PID-PPS pairs used either for manual installation
or for loading onto a USB storage device. To load a PID/PPS pair manually:
1. At the SCS Console, print the values to be installed manually from the security
keys screen, and then mark the selected keys as “used” so they will not be
installed on more than one platform.
2. At the platform being prepared for configuration, enter the values as prompted
when the “Set PID and PPS” menu item is selected.
The PID-PPS pair may have been preloaded by a platform OEM or loaded using a
USB storage device. See “Using a USB Storage Device for Factory Mode Setup” on
page 57.
The PID and PPS are 64-bit quantities made up of ASCII codes of some combination
of characters – capital alphabet characters (A–Z), and numbers (0–9).
The PID is an eight character entry of the form: XXXX-XXXX and is sent in
unencrypted format in the “Hello” message.
The PPS is a thirty-two character quantity of the form:
XXXX-XXXX-XXXX-XXXX-XXXX-XXXX-XXXX-XXXX and is a secret shared
between the Intel AMT device and the SCA.
Here is an example pair:
PID: 0000-037M
PPS: NKLD-G5DC-RRNQ-E9YZ-ZIJL-7LFL-VJED-69XJ
The firmware checks for checksum characters embedded in the values. The last
character of the PID is expected to be a checksum of the previous seven characters,
and the fourth character in each group of four characters in the PPS is expected to be
a checksum of the previous three characters. This check is made to reduce the possibility of operator error when entering these values.
Intel strongly recommends that Intel AMT Release 1.0 platforms be configured on an
isolated network to minimize the opportunities for exposing security information,
since Setup and Configuration traffic is sent without encryption for these types of
platforms. If the Setup and Configuration Service requires access to both a
production network and a private isolated network, then equip the server with more
than one network interface. One network interface can be used to establish isolated
network connections to Intel AMT devices to be configured, and the second network
interface can be used to connect to the production network.
Other Settings
The SOL/IDER, Remote Firmware Update and Set PRTC menu options are not
required for setup and configuration. The SOL/IDER option enables the Intel AMT
device redirection capabilities. The Remote Firmware Update option enables the
ability to perform remote updates to the firmware. The Set PRTC allows an
Administrator to set the programmable real-time clock to a correct value if the clock
lost its value inadvertently in a situation where it could not be reset remotely.
Exit Intel AMT Configuration
Highlight the Return to Previous Menu option and press Enter. Upon exiting the
Intel AMT BIOS extension, the Intel AMT device will enter Setup Mode and begin
sending “Hello” messages to the SCS service.
“Hello” Message Retry Frequency
The Intel AMT device sends “Hello” messages according to the following algorithm:
•
56
5 retries on 1 minute intervals
Intel AMT SCS Installation And User Manual
•
•
5 retries on 10 minute intervals.
5 retries on 1 hour intervals.
The retry algorithm will restart after a firmware reset, which requires disconnecting AC
power from the platform containing the Intel AMT device.
Using a USB Storage Device for Factory Mode Setup
The Factory mode setup process can be simplified by using a USB key containing a file of
PID/PPS pairs and replacement passwords, when the BIOS supports this method. This
method can be used for one-touch configuration if all the defaults listed below are suitable
for an enterprise installation. Even if additional parameters need to be changed, the USB
key can install the PID and PPS without the problem of operator error. Use this method
also for preparing platforms for future Intel AMT configuration.
Requirements
The following items are required to be able to use a USB key for Intel AMT device
configuration:
•
•
•
A dedicated USB key with no data on it.
The function within the SCS service that generates a file of PID/PPS/password
triplets in the proper format.
Good security procedures for controlling the USB key.
Preparation
All that is required is to execute the SCS function, which will do the following:
1. Create a list of PID/PPS/password triplets. (See “Configuring Pre-Setup and
Configuration Security Keys” on page 89).
2. Use the export function to create a file to write to the USB key. The SCS
automatically formats the key file format to FAT16 and copies the file to the key.
Initializing a Platform
To install the PID/PPS information on an Intel AMT device an Administrator will:
1. Take the platform out of the box and connect cables, a monitor, and a keyboard.
2. Connect the USB key to a USB port.
3. Turn on the platform.
The BIOS on the platform will detect the presence of the USB key, read the next available
entry in the file, authenticate the password, save the PID/PPS values, optionally update
with the replacement password, and mark the entry on the USB key as “used”. A message
displayed on the monitor informs the technician that the process is complete. The
Administrator powers down the platform.
Moving to Setup Mode
The platform may now be ready for moving to Setup mode, if the default parameters are
appropriate for the specific enterprise. The critical defaults are:
•
•
DHCP mode with no domain defined
Setup and Configuration Service with the default host name and port
Intel AMT Preparation
57
•
No DNS IP defined (The DHCP server must be configured to provide a DNS IP,
which will be required to discover the IP of the Setup and Configuration Server)
If these defaults are acceptable, the platform can now be connected to the network and
powered on. Otherwise, the Administrator can power on the platform, enter the MEBx
sub-menu and configure additional parameters.
Preparing Intel AMT for Future Configuration
A user may wish to postpone Intel AMT device setup and configuration until a later date.
An OEM may supply platforms with a PID-PPS pair already written to the Intel AMT
device Flash memory. In this case, the platform may be already prepared for
configuration, as described earlier. The OEM will have to securely deliver a file of the
PID-PPS pairs to the customer IT organization for use in the setup and configuration
process. The import function on the SCS Console Security Keys screen can import such a
file. The platform will start sending “Hello” messages as soon as it is powered on and
connected to a network. If no SCS server is present to respond to the messages, the
platform will have to be disconnected from AC power and then reconnected to start the
“Hello” sequence again, as described on page 56.
It is also possible to prepare the Intel AMT-based platform for configuration without
entering Setup Mode. Either use a USB storage device, as described above or follow the
Factory Mode Setup steps, but under the TCP/IP menu item, select Y at the “Disable
Network Interface?” option. Enter a PID-PPS pair as well. When the time comes to
configure and enable the Intel AMT device, re-enter the BIOS sub-menu and change the
TCP/IP settings to make the network interface operational by responding Y to “Enable
Network Interface” and setting DHCP as the IP source..
Remote Configuration
Remote Configuration is a feature added with Intel AMT Releases 2.2 and 3.0. It
eliminates the need for IT personnel to manually install a PID/PSK pair to enable setup.
The Remote Configuration process depends on several Intel AMT enhancements:
Embedded hashed root certificates
The Intel AMT device contains one or more root certificate hashes from worldwide SSL
certificate providers in the firmware image. As part of the “Hello” message, the Intel AMT
device sends all of the hashes to the SCS. When the SCS authenticates to the Intel AMT
device, it must do so with a certificate compatible with one of the hashed root certificates.
Self-signed certificate
The Intel AMT device produces a self-signed certificate that it uses to authenticate to the
SCS. The SCS must be configured to accept such a certificate.
One-time password (OTP)
Security policy may require use of a one-time password to improve security. The Remote
configuration Tool (RCT) running on the local host requests the OTP from the SCS and
sends it to the Intel AMT device. The SCS saves the OTP in the database entry associated
with the specific Intel AMT device, and uses it to validate the connection to the device.
Limited network access
The network interface opens for a limited period of time to send “Hello” messages and to
complete the setup and configuration process. After 24 hours, the interface will close if the
setup and configuration time was not extended by a network command from the SCS.
58
Intel AMT SCS Installation And User Manual
Overview of Remote Configuration Flow
Initial Conditions
Before Remote Configuration begins, the following initial conditions must be met:
1. The Intel AMT device is configured to receive its IP address from a DHCP server. The
DHCP server supports option 15 and will return the local domain suffix.
2. The Intel AMT device is pre-programmed with at least one active root certificate hash.
3. For the delayed installation sequence described below (“delayed” meaning that the
Intel AMT device was not setup immediately upon being connected to the network—
see “Bare Metal Setup and Configuration” on page 62), the Remote Configuration
Tool must be executed on the host platform.
4. The SCS is registered with a DNS server accessible to the Intel AMT device with the
name “Provisionserver” (or the name defined by the OEM) and is in either the same
domain as the device or it is in a domain with the same suffix.
5. The SCS has a certificate with the appropriate OID or OU that traces to a CA which
has a root certificate hash stored in the Intel AMT device.
The OID in the Extended Key Usage field must be a Server Authentication Certificate
with an Intel setup extension:
1.3.6.1.5.5.7.3.1,2.16.840.1.113741.1.2.3
or
the OU value in the Subject field must be “Intel(R) Client Setup Certificate”. The
Subject CN must be either the FQDN of the platform running the service (for
example, Provisionserver.west.yourenterprise.com), or the domain suffix of the
platform (for example, *.west.yourenterprise.com or *.yourenterprise.com).
6. The SCS is configured to allow remote configuration. The checkbox on the Console
Service Settings/General screen for Allow configuration with certificate-based
configuration must be checked. One-time password required should be checked if
one-time passwords will be used. See page 70.
Intel AMT Preparation
59
Acquiring and Configuring a Certificate that Supports Remote Configuration
Contact one of the vendors whose root certificate hashes are built into the Intel AMT
firmware. A list of the hashes should be provided by the platform vendor. Go to the
vendor’s website and purchase an “SSL certificate” For example, the following link to
Verisign’s* site http://www.verisign.com/ssl/buy-ssl-certificates/index.html shows how to
purchase an appropriate certificate. The site documents in detail the steps required to
request, enroll, install and move an SSL certificate. The following settings are required for
the certificate to be compatible for Remote Configuration use:
• The OU or the OID must match the values defined above, in step 5 (the OU is the
usual value entered when purchasing a certificate commercially).
• The CN must match the SCS platform domain suffix (for example,
“ProvisionServer.yourenterprise.com” or “*.yourenterprise.com”).
• The keys should be exportable to support IT key backup policies.
• The request type should be PKCS10.
After completion, export the acquired certificate in p7c format.
Selecting the Certificate Used by the SCS for Remote Configuration
The SCS only works with one Remote Configuration certificate at a time, matching one of
the hashes in the Intel AMT devices in the enterprise. Perform the following two steps to
select the desired certificate.
1. Install the certificate created above in the System Certificate Store on the platform
where the SCS executes. Follow the following steps:
a. Open certificates (local computer) using the Microsoft Management Console
(MMC). To add the certificates plug-in to the MMC,
i. Select file/add snap-in.
ii. Select Add….
iii. Select Certificates.
iv. Select computer account; click Next.
v. Select Local computer; click Next.
vi. Select Finish; Close; select Certificates and click OK.
b. In the console tree, click the logical store where the MMC will import the
certificate.
c. On the Action menu, point to All Tasks and then click Import to start the
Certificate Import Wizard.
d. Type the path and file name of the certificate to be imported or click Browse
and navigate to the file.
e. Select Automatically select the certificate store based on the type of
certificate.
2. Invoke the loadcert utility, located at <install_root>:\Program
files\Intel\AMTConfServer\Tools. Double-click on loadcert.exe. Select the certificate
that was just imported. The utility will report any problems in the certificates that it
detects that would prevent using it as a Remote Configuration certificate.
Steps leading to the start of Setup and Configuration
Once the above preparations are complete, the following steps are performed:
60
Intel AMT SCS Installation And User Manual
1. IT activates the Remote Control Tool
(RCT), via a startup script or an
enablement script.
2. The RCT detects Intel AMT and
requests the UUID and the FQDN.
3. Intel AMT device returns the values
to the RCT.
4. The RCT sends the platform
information to the SCS.
5. The RCT requests a one-time
password (OTP) from the SCS.
6. The SCS sends an OTP to the RCT.
7. The RCT sends the OTP to the Intel
AMT device and commands it to
open the network interface.
The Intel AMT device generates a
self-signed certificate. This process
may take up to seven minutes to
generate the necessary keys.
8. The Intel AMT device starts sending
version 3 “Hello” messages.
9. Setup and configuration begins using
the PKI-CH protocol. The SCS
requests the Intel AMT device to
send an OTP. The device responds
with the value it received from the
RCT.
Remote Configuration Setup and Configuration Process
1. After the RCT commands the Intel AMT device to start configuration, the device opens
its network interface for 24 hours, and starts sending “Hello” messages. Note: The
interface is open for 24 hours (configurable by the OEM) only the first time that it is
enabled. If the time runs out before setup and configuration completes or the Intel
AMT device is unprovisioned or partially unprovisioned, any subsequent calls from the
RCT to start configuration will open the interface for only six hours.
2. The SCS extracts the hashes from the “Hello” message.
3. The SCS sends a certificate chain that includes a trusted root certificate matching one
of the received hashes.
4. The Intel AMT device validates the SCS certificate: It checks that the OID or the OU is
correct as described above, and that it is derived from a certificate authority that
matches one of the root certificate hashes.
5. The Intel AMT device verifies that the domain suffix matches the DNS suffix in the
SCS certificate.
6. The SCS and the Intel AMT device perform a complete mutual authentication session
key exchange:
a. The Intel AMT device uses a self-signed certificate, sending its public key.
b. The SCS creates a TLS session master key, encrypts it with the Intel AMT
device public key, and sends it to the Intel AMT device.
Intel AMT Preparation
61
c. The device decrypts the master key with its private key. The key is the shared
secret used to establish the setup and configuration TLS session.
7. One Time Password verification: The SCS requests the OTP from the Intel AMT
device. The device sends the OTP securely. The SCS verifies the OTP for correctness.
8. Setup and configuration continues. At some point before the SCS sends a
CommitChanges command to complete the setup and configuration process, it must
send a SetMEBx password command to change the password from its default.
9. Since the Intel AMT device network interface is open for a limited period after sending
the first “Hello” message, the SCS can command the device to extend this period by up
to an additional 24 hours.
Intel AMT Release 3.0 Additional Features
Simplified One-Touch
Intel AMT Release 3.0 supports a one-touch configuration mechanism that avoids the
possibility of a malicious user masquerading as the SCS. If an IT administrator enters the
FQDN of the SCS via the MEBx menu, then in Step 5 above, the Intel AMT device
verifies that the FQDN in the SCS client certificate matches the entered value.
Bare Metal Setup and Configuration
With Intel AMT Release 3.0, a platform containing Intel AMT can be configured by the
manufacturer to start sending “Hello” messages as soon as the platform is connected to
AC power and to the network. There may be no operating system up and running on the
host, thus the name “bare metal”. With no operating system, there is no way to run the
Remote Configuration Tool to install a One Time Password. This mode allows entering an
optional FQDN for the SCS. Either the manufacturer adds it before delivery or an IT
administrator adds it, as described in Simplified One-Touch. The Intel AMT device will
acquire an IP address from a DHCP server, and then start sending “Hello” messages.
There is no OTP to exchange in this case; otherwise, the setup and configuration flow is
the same. The SCS cannot setup Bare Metal platforms when an OTP is required. (See page
71).
Remote Configuration Tool
The Remote Configuration process includes the Remote Configuration Tool (RCT) that
runs on the host. RCT.exe is included in the SCS distribution. It does the following:
• It sends platform identification information directly to the SCS API, eliminating
the need for a separate script to perform this function. The RCT can be used for
this purpose for all Intel AMT releases from 2.0 onwards. The platform
information includes the UUID and FQDN and, optionally, the SCS Profile and
Active Directory Operational Unit to be used when configuring the platform.
• It checks that the platform is configured for Intel AMT manageability. If it is not,
the RCT optionally transitions the platform to Intel AMT manageability. The RCT
must be re-run after a restart of the platform to complete the following steps if the
transition was required.
• If the platform is configured for Remote Configuration mode, the RCT requests an
OTP from the SCS. The tool sends the OTP to the Intel AMT device and
commands the device to start configuration and open the network interface.
• If the platform has already started remote configuration, but it has not completed
the process, the tool will request an OTP and send it to the platform and command
it once again to open the network interface.
62
Intel AMT SCS Installation And User Manual
•
If the platform does not support remote configuration or is has already started
setup and configuration using a PID/PPS pair, or it has already completed setup
and configuration, the tool exits with a status code indicating the platform state.
The RCT has the following command interface:
rct
/s <full URL of SCS, including port, if this is a nonstandard port>
This URL is the one that was defined for remote
configuration use when the SCS was installed. (for
example /AMTSCS_RCFG)
[/p profile-id]
This optional field is the numerical profile ID shown
on SCS Console profile page.
[/o <organizational unit>] This is the optional Active Directory OU where the
Intel AMT device AMT object will be placed, in
LDAP format. This is a string with no embedded
blank characters.
[/t on|off]
If the RCT detects that the platform manageability
mode is not Intel AMT Manageability, “on” indicates
that the RCT will transition the platform to Intel AMT
Manageability mode. “off” indicates that the tool
should not perform the transition. If this optional
parameter is not provided, the default value is “off”.
For example,
rct /s https://ProvisionServer.yourenterprise.com/amtscs_rcfg /p 3
/o OU=AMT_Users,DC=East,DC=yourenterprise,DC=com /t on
Transitioning to Intel AMT Manageability mode does not take affect until the platform
reboots. Therefore, the IT script that activates the RCT should schedule it to re-run at the
next startup to complete initiation of setup and configuration.
RCT Messages
The RCT returns a message code that describes the state that the tool detected. The table
below itemizes the codes and their meaning.
Table 5: RCT Return Codes
Return Value Meaning
0
All operations succeeded; interface opened.
1
Setup and configuration already completed.
2
Platform is already in setup and configuration mode.
3
Platform does not support Intel AMT.
4
Unable to connect to Intel AMT device (drivers may not be installed on the host).
5
SCS Internal error.
6
Unable to authenticate to the SCS.
7
Unable to connect to the SCS. This may be due to a number of causes, such as TCP
error, HTTP error, server not found, etc.
8
Error code received from SCS.
9
Requires one-touch: this platform either does not support remote configuration and
requires a PID/PPS pair before setup and configuration can start, or the MEBx
Intel AMT Preparation
63
Return Value
10
Meaning
password has not been changed from its default value.
Invalid input parameters.
11
Manageability mode is not Intel AMT and transitioning to Intel AMT was not
enabled.
12
Manageability mode changed to Intel AMT. The platform must be restarted and the
RCT re-executed before setup and configuration can start.
13
Transition to Intel AMT Manageability mode did not succeed.
14
Internal error
RCT Logging
The RCT logs its actions in two ways:
• Windows event log: The RCT logs each action it takes as well as any errors that
occur.
• RCT log: The RCT creates a file called rctlog.txt with more detailed information
about the last execution of the tool. The tool deletes the previous log before
creating a new one for the current execution. The tool creates the log in the same
directory as the executable.
User Permissions for the Remote Configuration Tool
The RCT user requires special permissions so the tool can perform its functions.
• The RCT must be run from the Local System account to retrieve platform
information and to communicate with Intel AMT via the Management Interface
driver.
• The platform must have a Client Configuration Role. See “Adding a User” on
page 93. A straightforward way to do this is to define a Group for all platforms
with Intel AMT that need setup and configuration, grant the group the Client
Configuration role, and add platforms to this group when they are added to the
domain or when it is time to configure the Intel AMT capability. Note that the
default Domain Computers Group cannot be granted the Client Configuration role.
RCT Source
The SCS delivery includes the RCT source files and supporting libraries. The RCT source
demonstrates how to work with the host interface to Intel AMT and with the SCS SOAP
API. ISVs can use the RCT source as a starting point for creation of tools more specific to
their applications. To compile the RCT project, see the readme file included with the
distribution.
64
Intel AMT SCS Installation And User Manual
Chapter 4
INTEL SCS CONSOLE
This section includes
•
“SCS Console Overview” on page 66
•
“Logging In” on page 69
•
“Defining General Parameters” on page 70
•
“Configuring Profiles” on page 74
•
“Configuring Pre-Setup and Configuration Security Keys” on page 89
•
“Configuring Users” on page 93
•
“Configuration Parameters per Device” on page 95
•
“Configuring Existing Intel AMT Devices” on page 98
•
“Maintenance Policies” on page 104
•
“Intel AMT SCS Console Logs” on page 106
Intel SCS Console
65
SCS Console Overview
The SOAP API used to query and manage the SCS service is available for ISVs to create
their own interface to the SCS. The Intel SCS also includes an implementation of such an
interface, a software component with a graphic user interface. This component, called the
SCS Console, supports stand-alone operation of Intel SCS. The SCS distribution includes
documentation of the API, the WSDLs that define the interface functions, sample
applications, and the full source of the SCS console. ISVs can add value to the console and
incorporate it into their Management Console products.
The SCS Console works by communicating with the SOAP API that, in turn, updates and
accesses the SCS database. The API does not interact with the SCS service directly. There
are pairs of get/set SOAP calls to update and retrieve database parameters. For example,
to change the Power Policy parameter for a selected Profile, the SCS Console first fetches
the data from the database using the SOAP API call getProfilePowerPolicy. After
the Administrator sets the new policy via the console GUI, the console performs the SOAP
API call setProfilePowerPolicy to save the changes in the database.
Using the SCS Console for the First time
To use the SCS Console and the SCS for the first time, perform the following steps, as
described in sections of this chapter.
1. Configure the Main (SCS) Service settings. See page 70.
2. Add Users who have the appropriate privileges to use and to administer the SCS. See
page 93.
3. Create one or more Profiles with settings for groups of Intel AMT devices. Profile
parameters include the administrative username and password, use of TLS and mutual
authentication, the certificates and certificate servers to be used, Digest and Kerberos
ACL entries. See page 74.
4. Create entries in the New Intel AMT Systems list for all platforms to be setup and
configured. See page 95.
5. Create keys (PID/PPS/current password/new password sets) to prepare Intel AMT
devices for configuration.
There is now adequate information in the SCS database to respond to “Hello” messages
automatically.
There are two panes on the SCS Console: the Navigation Pane and the Configuration
Pane.
66
Intel AMT SCS Installation And User Manual
Console Navigation Pane
The Navigation pane enables easy
access to each of the major
subdivisions of the Intel SCS.
•
To view the Configuration
Service Settings, the Profiles,
or the Logs, expand the
branch and select a subbranch.
•
To define the settings to be
used to configure Intel AMT
devices, select Configuration
parameters.
To review existing Intel AMT
devices (devices that have
sent at least one “Hello”
message that the SCS received), select Intel AMT Systems.
Intel SCS Console
67
Console Configuration Pane
The SCS Console Configuration pane includes standard user interface elements that enable
configuration of the Intel SCS. Selecting a sub-branch in the navigation pane opens a
configuration pane. For example, selecting Configuration Settings /General opens the
General Configuration Pane.
Commands and Navigation using the Console
The console controls are activated using mouse clicks. It is also possible to use many of
the controls from the keyboard. When the display focus is in the same region as a control
that has an underlined letter in its legend, typing the underlined letter will activate the
control.
Use the Tab key to move from one control to the next and one display region to the next.
When a control is highlighted, press Enter to activate the control.
68
Intel AMT SCS Installation And User Manual
Logging In
To log-in to the Intel SCS Console:
1. Click the Windows Start button to select the Intel AMT Configuration program
group.
2. Select Intel AMT SCS Console. The Console displays the log-in screen.
3. Enter the SOAP web service URL path including the virtual directory. The entry
format is:
https://FQDN/<Virtual Directory>
For example: https://provisionserver.yourenterprise.com/AMTSCS
In this example, provisionserver.yourenterprise.com is the FQDN of the
IIS host of the web service and AMTSCS is the virtual directory of soap web service in
the IIS host. If the web server expects a port number other than port 80, include the
port number after the FQDN. For example,
https://provisionserver.yourenterprise.com:123/AMTSCS
A file named “amtconsole.log” is generated in the console install directory. It contains a
log of transactions of the client application.
The Intel SCS Console opens.
If the application does not open, there may be a security problem. See “Secure the
Connection to IIS Using SSL” on page 31.
Intel SCS Console
69
Configuring Main Service Settings
Use the Intel SCS Console to configure, control, and manage the Intel SCS Main Service.
Defining General Parameters
General settings define the configuration of the Intel AMT Main Service. The Intel AMT
1.0 Provisioning and Integrate with Active Directory options can be changed dynamically.
All of the other parameters on this pane will not take effect until the SCS service is
stopped and restarted.
To configure General settings:
1. Open the AMT Setup and Configuration Console.
2. Expand the Configuration Service Settings branch.
3. Select General. The General screen is displayed.
4.
Define the General parameters:
TCP Listen Port
Each instance of Intel SCS listens for “Hello” messages from Intel AMT devices on a
defined TCP port. Enter the TCP port used for listening. The default port is 9971.
Intel AMT 1.0 Provisioning
Selecting this checkbox enables the SCS to recognize and configure Intel AMT
Release 1.0 devices. Intel AMT Releases 2.0, 2.1, 2.2, 2.5, and 3.0 are backward
compatible with Release 1.0 when they are configured in Legacy mode. However,
Release 1.0 does not support encryption during the initial phases of setup and
configuration.
70
Intel AMT SCS Installation And User Manual
Since the Intel AMT Release 1.0 sends SOAP setup and configuration messages in the clear,
setup and configuration of Intel AMT Release 1.0 devices or devices running in Legacy
mode should only be done on an isolated network.
Integrate with Active Directory
Selecting this checkbox will cause the SCS server to add AMT objects to Active
Directory. This enables the use of Kerberos authentication and the AD users list. This
option must be selected to configure an Intel AMT device for wireless and 802.1x.
AMT requires authorization before provisioning
When the SCS receives a “Hello” message from an Intel AMT device, setup and
configuration will proceed automatically, unless this checkbox is selected. Selecting
this checkbox requires the Console operator to authorize setup and configuration via
the Operations function on the Intel AMT Systems pane. See “Ad Hoc Operations on
an Individual Intel AMT Device” on page 99.
Allow Remote Configuration
Intel AMT Releases 2.2 and 3.0 support Remote Configuration. As part of this
feature, the Intel AMT device sends a self-signed certificate for the TLS Mutual
Authentication process. This certificate is used for setup and configuration only. The
device creates the self-signed certificate just before sending the first “Hello”
message. Selecting this checkbox enables the SCS to accept self-signed certificates
from Intel AMT devices.
One time password required
Selecting this checkbox adds an additional security feature. An enterprise policy may
require a one-time password (OTP) exchange between the SCS and the Intel AMT
device requesting setup (See page 61). If an operator entered the OTP manually on
the platform containing the Intel AMT device, then an SCS operator must enter it via
the Operations function on the Intel AMT Systems pane. See “Ad Hoc Operations on
an Individual Intel AMT Device” on page 99.
So-called “Bare-Metal” platforms are certain platforms that contain Intel AMT Release 3.0
or higher that are configured by the manufacturer to start sending Remote Configuration
“Hello” messages as soon as they are connected to the network. Bare Metal platforms do
not support one-time passwords. Therefore, selecting the One time Password Required
option prevents configuring bare-metal platforms.
First common name (CN) in certificate subject name
Client certificates used to validate Intel AMT with RADIUS servers or other external
servers must be in a format compatible with those servers. In particular, the Common
Name must be in the form that the server expects. When the SCS requests a
certificate for an Intel AMT device, the SCS-generated certificate request will use the
selection made here for the Common Name in the request.
The selection box provides three choices:
•
Fully qualified domain name –FQDN of the Intel AMT device
•
Host name – Host name of the platform
•
SAM account name – Active Directory account name for the AMT object
The Funk RADIUS server expects a host name. Cisco ACS and Microsoft IAS
require a SAM account name. All others tested with the SCS accept an FQDN.
Log Level
Intel SCS Console
71
Logs can be recorded at several levels. The more detail recorded, the more system
resources and bandwidth must be allocated.
5.
Select a Get New Intel AMT Properties option. This option determines how the
SCS acquires the necessary information defining the Intel AMT device properties.
•
From DB
When this option is selected, the SCS searches for properties in the
Configuration parameters table stored in the SCS database.
•
Get AMT Configuration From Script
When this option is selected, the SCS first searches the Configuration
parameters table for a matching entry, based on the UUID in the “Hello”
message. If there is no matching entry, the SCS determines the properties by
invoking a script written by the controlling enterprise and which either refers to
an independent database or file or requests the identifying information from the
host platform. After the script returns the required information, the SCS stores
the information in the Configuration data table. See “Using a Script to Import
New Intel AMT Properties” on page 115.
•
Script Location
Enter the path to the location of the script on the platform where the SCS
executes. If there is more than one instance of the service running in the domain,
the script must be in the same location on all platforms running the service.
(e.g., C:\program files\intel\AMTConfserver\scripts\)
Warning: If the script is not in the location defined here, the SCS will not complete setup for
any Intel AMT devices.
6.
Enter the Service Maintenance parameters. These are the parameters used to tune the
performance of the SCS, as described in “Intel AMT SCS Functional Flow” on page
5.
Queue Polling Period
This parameter determines how frequently the Intel SCS checks the queue in the
database for new tasks.
Max Queue Size
This parameter sets the maximum permitted length of the database queue. If the
queue is full when the server or the API tries to add an additional entry, the entry will
be lost.
The following three parameters define quantities for several multithreading
transactions that are processed by the Intel SCS.
No. of Worker Threads
This parameter limits the number of Worker Threads permitted simultaneously.
No. of Slow Worker Threads
This parameter limits the number of Slow Worker Threads permitted simultaneously.
Delayer Polling Time
When a process fails, it is sent to the Delayer. A process may fail because
information is missing. For example, an Intel AMT device sends a “Hello” message
before the device has an entry in the New Intel AMT devices list, so there is no
72
Intel AMT SCS Installation And User Manual
profile associated with the device and configuration cannot complete. The Delayer is
a thread that manages rerunning delayed processes. This parameter determines how
frequently the Delayer attempts to rerun a process.
Keep Log Time
This parameter determines how long log entries are saved.
Keep Security Audit Time
This parameter determines how long security status entries are saved.
7.
Intel SCS Console
Click Apply.
73
Configuring Profiles
Profiles contain the Intel AMT device configuration parameters. Profiles determine which
features are enabled in the device, what authentication mechanism will be used, and which
users have access to device features. One or many profiles can be defined. For example,
use a different profile for different sites. Each profile can be assigned to one or more Intel
AMT devices. Entries in New Intel® AMT Systems associate a profile name with a
specific Intel AMT device.
Viewing Existing Profiles
To view existing Profiles:
1.
2.
3.
Open the Intel SCS Console.
Expand the Configuration Service Settings branch.
Select Profiles. The Profiles screen is displayed. This screen lists all defined
Profiles and the number of devices assigned to each profile.
Adding a Profile
1.
2.
3.
4.
Open the Intel SCS Console.
Expand the Configuration Service Settings branch.
Select Profiles. The Profiles screen is displayed.
Click Add. The Profile Configuration dialog box is displayed and the General tab is
selected.
Each Profile tab is self contained. Changes to a tab require confirmation before moving to
another tab. Confirmation is performed by clicking Apply.
74
Intel AMT SCS Installation And User Manual
The Profile Configuration General Tab
On this tab, enter general information that pertains to this profile.
5.
In the General box, enter:
Profile Name
Enter a short, descriptive name. This name appears in the Intel AMT devices table.
Profile Description
Enter a more complete description of the profile. The description appears in the
Profile Details screen.
6.
In the Administrator Credentials box, enter:
User Name
Enter the Intel AMT administrator user name.
Password
Select either Random Creation or Manual. If Manual is selected, enter the password
and confirm the entry.
The above username and password will be the administrative username and password
in the Admin ACL entry for all Intel AMT devices configured with this profile. A
third-party Management Console application may have a pre-defined username and
password for Intel AMT device administration. Those values should be used here.
Selecting Random Creation means that only the SCS can use the admin ACL entry
for managing the Intel AMT device.
7.
Intel SCS Console
To edit the MEBx password and Kerberos clock tolerance, click Advanced.
75
8.
AMT 1.0 BIOS Password If Intel AMT Release 1.0 Provisioning is enabled on the
General Settings screen (see page 70), this password must also be defined. Enter and
confirm the entry. The password entered here must be entered via the MEBx on every
Intel AMT Release 1.0 platform associated with this profile.
9. New MEBx password for certificate based configuration: Enter and confirm the
password used during Remote Configuration. The Remote Configuration process
requires that the MEBx password be changed before the setup and configuration can
complete.
10. Enter Kerberos Max Clock Tolerance—This is the allowable difference between the
clock of an Intel AMT device and the timestamp of a received message. This is part
of the mechanism used to eliminate “replay” attacks.
11. Click OK.
12. Click Apply.
76
Intel AMT SCS Installation And User Manual
The Profile Configuration Network Tab
On this tab, define the network settings for this profile.
13. In the General box, select or clear the Enable ping response checkbox. When
enabled, the Intel AMT device will respond to a ping.
14. In the VLAN box, select or clear the Use VLAN checkbox. If a VLAN is used, set
the VLAN Tag Integer, used to distinguish between different VLANs.
Be careful when configuring the VLAN value. If the value is incorrect, the Intel AMT
devices will not be accessible.
15. The Intel AMT device includes three special interfaces, or features, that can be
enabled or disabled at configuration time. In the Enabled Interfaces box, select the
checkboxes to activate one or more interface.
Web UI
Administrators can use this browser-based interface for management and
maintenance of Intel AMT devices.
Serial Over LAN
This feature is used to manage an Intel AMT-enabled platform remotely by
encapsulating keystrokes and character display data in a TCP/IP stream.
IDE Redirection
Use this feature to remotely enable, disable, format or configure individual floppy or
IDE CD drives and to reload operating systems and software from remote locations.
These actions are independent of and transparent to the host.
Intel SCS Console
77
16. In the TLS-PSK box, select an option. The Encrypted option limits setup and
configuration to platforms that support encryption. The Plain Text option limits
setup to platforms that do not support encryption. Both allows a mix of platforms. Do
not select either the Plain Text or Both options if all platforms containing Intel AMT
devices in the enterprise are supposed to support encryption. Use an unencrypted
PSK only in cases where Intel® AMT does not support encryption due to import
restrictions.
17. In the TLS Settings box, select or clear the Use TLS checkbox. When TLS is
enabled, the Intel AMT device will require a server certificate used to authenticate
itself with other applications. If mutual TLS authentication is enabled, then any
applications that interact with the device will need to supply client certificates that
the device will use to authenticate the applications. When Use TLS is selected,
configure the interfaces to indicate which will use TLS or mutual TLS or neither.
Only three server and client certificates can be associated with a single profile. These
include the Server certificate required for TLS and any client certificates required for
802.1x profiles or for NAC posture signing. In a normal installation, a single client
certificate would be purchased for all applications in the facility. If a profile requires more
than three certificates ,setup of an Intel AMT device based on this profile will fail.
Local Interface
When enabled, host communications with the Intel AMT device will require TLS or
TLS with mutual authentication.
Network Interface
When enabled, network communications with the Intel AMT device will use TLS or
TLS with mutual authentication.
18. TLS Server Certificate: Identify the certificate authority (CA) associated with this
profile that will be used to generate server certificates for the Intel AMT devices
associated with the profile. Selecting the
the CA information.
control opens a window for entering
To add a new CA to the list, select Add.
This will open a window for entering CA parameters.
78
Intel AMT SCS Installation And User Manual
CA Host Name
Enter the FQDN of the computer that handles, stores and issues digital certificates. It
is the platform hosting the Microsoft CA used to generate individual certificates for
Intel AMT devices.
Name
Enter the name of the CA. The name is listed in the CA Administration Manager.
Click the Windows Start button > Administrative Tools > Certificate Authority.
The name is listed in the first sub-branch in the left pane.
Type
Windows Server 2003 Certificate Services supports two types of CAs, Enterprise and
Stand-alone. Enterprise CAs are integrated with Active Directory and use
information stored in Active Directory. Stand-alone CAs do not require Active
Directory but require that all information about the requested certificate type be
included in the certificate request.
Templates cannot be edited when using a Stand-alone CA. The default template is
WebServer.
Certificate Template
When working with an Enterprise CA, enter the name of the Certificate Template to
be used. The name must be the LDAP name stored in Active Directory. When the
template is displayed using the CA management tools, it is the Template Name and
not the Template Display Name. A template allows customization of the content of
the certificates issued by the Certificate Services. The template defaults to
WebServer. If a custom template is defined, the template must support the Server
Authentication application policy. The SCS user must have Read and Enroll
permissions on an Enterprise CA WebServer template or custom template. See
“Defining a New Template for an Enterprise CA” on page 118.
Intel SCS Console
79
19. Click OK/OK.
Applications using the Intel AMT redirection library with TLS require additional steps for
authentication with Intel AMT devices to be performed successfully. See “Configuring PEM
Files for Redirection Applications” on page 125.
20. Mutual Authentication: Selecting this option opens a template for entering TLS
Mutual Authentication settings.
21. In the Trusted Certificates box, click Import to add a list of Trusted Root Certificates. These are the issuers of the client certificates that the Intel AMT device will
recognize as authentic. These certificates are stored in the database, and then sent to
the Intel AMT device during setup and configuration. Intel AMT can accept up to
four trusted root certificates, so no more than four should be added to a profile. See
“Exporting and Installing the CA Root Certificate” on page 29. Select Add to display
the Trusted Root Certificates template.
a. Select Import, navigate to where the root certificate is stored and select the
certificate.
b. Alternatively, in an Active Directory environment, select Get from CA, pick
a CA from a displayed list of known CAs and select OK.
c. If there is a root certificate displayed that should not be sent to the Intel AMT
devices using the profile, select the certificate, and then select Remove.
d. Select OK.
22. Service Mutual Authentication Certificate This feature is not implemented; the SCS
uses the first Intel AMT remote client certificate in the SCS user’s personal
certificate store (A certificate with the dedicated OID).
23. Import a Certificate Revocation List (CRL). The CRL is a list of entries which
indicate which certificates have been revoked. The CRL contains certificate authority
URLs and the serial numbers of revoked certificates. See “CRL XML Format” on
page 125 for the xml file format.
80
Intel AMT SCS Installation And User Manual
Enter information about the list into the Description field.
24. Define the Fully Qualified Domain Name suffixes that will be used by mutual
authentication. The Intel AMT device will validate that any client certificates used by
the SCS or Management Consoles have one of the listed suffixes in the certificate
subject.
25. Click OK. Click Apply.
The Profile Configuration ACL Tab
26. Use the ACL (Access Control List) tab to review users already associated with this
profile and to add new users and define their access privileges. User identification
and realm selection must be coordinated with the requirements and instructions of
third-party Management Consoles.
27. Click Add. The New ACL Entry dialog box is displayed.
Intel SCS Console
81
28. Select one of the following:
•
Digest User
Digest authentication is a password-based authentication. If selected, enter the
user name. Then, enter the new password and confirm the entry.
•
Kerberos User
Select this option only if the profile has Active Directory enabled. To complete
the entry:
i.
Click the
control. The Select User dialog box is displayed.
ii.
29.
30.
31.
32.
33.
82
Enter all or part of a user name. The user must be an individual for Digest
ACL entries but can be a Group for a Kerberos ACL entry.
iii. Click Check Names. The Intel SCS searches the AD and completes or
confirms the user name.
iv. Click OK.
Select an Access Permission. This parameter defines user access, that is, locations
from where the user is allowed to perform an action. A user might be limited to local
actions or might also be able to perform actions from the network.
•
Local Access
The user is limited to access to the Intel AMT device via the local host.
•
Network Access
The user can execute an action via the network.
•
Any
The user can execute an action both locally or from the network (This option is
not recommended).
Select the realms—that is, specific functional capabilities such as Redirection or PT
Administration—available to this ACL entry.
Optionally, add additional ACL entries.
Click OK.
Click Apply.
Intel AMT SCS Installation And User Manual
The Profile Configuration Power Policy Tab
Use the Power Policy settings to determine the highest power state (as defined by the
ACPI specification) when the Intel AMT devices assigned this profile will be active or
will activate from a sleep state. S0 is the normal working state of a computer platform. S1
to S5 are successively deeper sleep states. A platform in S5 is shut down but still
connected to AC power.
AMT is ON in the following host sleep states
This parameter defines the highest power state at which Intel AMT will operate while
the device is connected to AC power. Note that this includes operation in higher
power states. For example, if the platform is in S3 and this parameter is set to Host is
ON (S0), the Intel AMT device will not operate until the platform returns to S0.
Idle Timeout
Once the Intel AMT device wakes up and the host system is not turned on, this
parameter determines the minimum time (in minutes) that the Intel AMT device will
remain operable when there is no activity. The device will return to a sleep state after
the idle timeout period. The timeout timer is restarted whenever the device is serving
requests. If the value of the parameter is zero, the device will remain on when there is
no activity.
For example, the AMT is ON parameter is set to Host is ON (S0) or in Standby
(S3). When the platform transitions to S3, the Intel AMT device will remain awake
until there is no activity for the number of minutes set in the Idle Timeout. At that
point the device reduces power. Any network access to the Intel AMT device will
cause it to wake up and restart the timeout timer. This parameter should be set to
three minutes at a minimum.
Click Apply.
Intel SCS Console
83
The NAC Tab
The NAC Tab is used to identify the certificate used to sign NAC posture messages.
Selecting Enabled NAC means that the NAC Posture generation capability will be enabled
in Intel AMT devices configured using this profile.
See “Retrieving a Certificate for Use by a Posture Validation Server” on page 124 for a
description of how to export the certificate designated here so its public key is available
for validating the signature created using the private key.
Enter a definition for the certificate source (CA identification information) that the SCS
will use to create a certificate for signing NAC postures.
If the certificate source (Certificate Authority name) and template type are the same for the
TLS Server Authentication certificate, the NAC posture signature certificate, and the 802.1x
server authentication certificate, the SCS will request one certificate and configure the Intel
AMT device to use it for all of these purposes.
Only three server and client certificates can be associated with a single profile. These
include the Server certificate required for TLS and any client certificates required for
802.1x profiles or for NAC posture signing. In a normal installation, a single client
certificate would be purchased for all applications in the facility. If a profile requires more
than three certificates ,setup of an Intel AMT device based on this profile will fail.
84
Intel AMT SCS Installation And User Manual
The Wireless Profiles Tab
Use the Wireless Profiles Tab to select wireless profiles to use to configure mobile
platforms. (This tab applies only to Intel AMT Release 2.5.) See “Defining Wireless
Profiles” on page 86 for information on creating wireless profiles. When the Intel AMT
device on a mobile platform is active in S3, S4, or S5 power states, it will attempt to
authenticate according to the selected wireless profiles in order of priority. The SCS
allows up to fifteen wireless profiles to be added to a profile.
Note that Integrate with Active Directory must be selected on the General Configuration
page to be able to configure an Intel AMT device with a wireless profile.
Select from the available wireless profiles and move the desired ones to Selected Wireless
Profiles using the
list.
control. Use the
control to remove a selected profile from the
Use the
and
controls to adjust the relative priorities of the profiles. The profile at
the top of the list will have the highest priority.
The Wired 802.1x Tab
Use the Wired 802.1x tab to select an optional 802.1x profile, used by the Intel AMT
device to authenticate on a wired LAN when the device is active in S3, S4 or S5 power
states. (This tab applies only to Intel AMT Releases 2.5 and 3.0.) See “Defining 802.1x
Profiles” on page 87. Note that Integrate with Active Directory must be selected on the
General Configuration page to be able to configure an Intel AMT device with a wired
802.1x profile.
Intel SCS Console
85
Select the
control to display a list of defined profiles and select one of them.
Select Add to define a new profile. Select OK/OK to complete the profile selection.
Defining Wireless Profiles
A wireless profile defines which protocol will be used between an Intel AMT device and a
wireless access point. If the Intel AMT device is to receive manageability messages over a
wireless connection, there must be a wireless profile installed on the device that
corresponds with the wireless profile active on the host. The profiles conform to IEEE
802.11i. Select Wireless Profiles in the left-hand pane of the Console display and select
86
Intel AMT SCS Installation And User Manual
Add… to create a new profile, Edit… to modify an existing profile or Delete to delete an
existing profile.
Profile Name
Enter a name for this profile.
SSID
Enter an optional Service Set ID: a 1 to 32 character string naming a specific
wireless LAN.
Security Settings
Select a Key Management scheme (WPA or RSN) and an Encryption Algorithm
(TKIP or COMP). These choices must correspond to the settings used in the specific
wireless LAN environment.
Authentication
Either provide a passphrase (a strong password) or select an 802.1x profile.
The passphrase must be at least eight characters and contain an upper-case letter, a lowercase letter, numbers, and one of the @ # $ % ^ & * symbols at a minimum.
control to display a
To assign an 802.1x profile to the wireless profile, select the
list of defined 802.1x profiles, and then select one of them. Select Add to define a
new profile. Select OK/OK to complete the profile definition.
Defining 802.1x Profiles
IEEE802.1x defines an extendable set of layer 2 protocols used to authenticate LAN
Intel SCS Console
87
communications. The profiles defined here can apply to any Intel AMT Profile, and
apply to either wired or wireless connections. This capability only applies to Intel
AMT releases 2.5 and 3.0. Select 802.1x Profiles in the left-hand pane of the
Console display and select Add… to create a new profile, Edit… to modify an
existing profile, or Delete to delete an existing profile.
Profile Name
Enter a name for the new 802.1x profile.
Protocol
Select from one of the available options. The client and server authentication
methods enabled on the 802.1x Profile tab vary according to the protocol selected:
Table 6: 802.1x Protocol Options
Protocol
Client Authentication Options
Server Authentication
Options
EAP-TLS
Client Certificate required
Trusted root for Radius
server certificate required
EAP-TTLS
(MS-CHAP v2)
Client Certificate required,
Roaming Identity optional
Trusted root for Radius
server certificate required
EAP-PEAP
(MS-CHAP v2)
Not required
Trusted root for Radius
server certificate required
EAP (GTC)
Not required
Not required
EAP-FAST
(MS-CHAP v2)
Client Certificate required,
Roaming Identity optional
Trusted root for Radius
server certificate required
EAP-FAST
(GTC)
Client Certificate required,
Roaming Identity optional
Trusted root for Radius
server certificate required
Client Authentication
88
Intel AMT SCS Installation And User Manual
The client authentication options require defining a source for a client certificate for
authenticating an Intel AMT device to a Radius server.
Client Certificate
control to enter a path to a certificate authority and select a template
Select the
defined for creating the appropriate client certificate. See “Defining a New Template
for an Enterprise CA” on page 118 for information about creating a template for
802.1x client certificates. Defining a template requires an Enterprise CA, which
requires presence of Active Directory.
Only three server and client certificates can be associated with a single profile. These
include the Server certificate required for TLS and any client certificates required for
802.1x profiles or for NAC posture signing. In a normal installation, a single client
certificate would be purchased for all applications in the facility. If a profile requires more
than three certificates, setup of an Intel AMT device based on this profile will fail.
Roaming Identity
Selecting this checkbox enables roaming. The user will have an identity of
“Anonymous”.
Radius Server Authentication
Provide a link to the certificate authority that was the source of the server certificate
installed on the Radius server. The SCS will install a root certificate from that CA in
Intel AMT devices configured with this profile.
Trusted Root CA for Radius server certificate
control to add a root certificate from the CA.
Use the
Radius Server Certificate Subject Name
Enter the subject name in the certificate installed in the Radius server. The
Full/Suffix selection below this field indicates whether this is the FQDN of the
Radius server or the domain name suffix of the Radius server.
Configuring Pre-Setup and Configuration Security Keys
Setup and configuration of Intel AMT Release 2.0/2.1/2.5 devices is done using the TLSPSK (Pre-Shared Key) protocol. The protocol requires a security key installed both in the
Intel AMT device and in the SCS database. This pane is used to generate the pre-shared
keys and associated parameters. Each key has four elements: the key itself (PPS), an
identifier sent in the clear by the Intel AMT device in the “Hello” message (called a PID),
an initial MEBx password, and a replacement MEBx password. See “PID-PPS” on page
55 for additional information. Sets of these parameters can be exported to a USB key and
installed in new Intel AMT devices. Alternately, an OEM may ship platforms with
PID/PPS pairs and a default password already installed. In this case, the file from the
OEM must be imported into the SCS database. The third option, entering the PID and PPS
manually, is also described at the above reference.
To configure the Security Keys:
1. Open the Intel SCS Console.
2. Expand the Configuration Service Settings branch.
3. Select Security Keys. The Security Keys screen is displayed.
Intel SCS Console
89
4.
Click Create Pre-Provision data. Intel SCS creates a list of Security Keys. See the
MEBx Settings pane to configure the number of keys generated. Each record
consists of an 8 byte PID, a 32 byte PPS and the administrator’s password.
5.
Select Export to write the current list of keys to a file on a USB Key in the format
expected by the platform BIOS.
Select Import to incorporate a file of keys from an OEM into the SCS database.
6.
7.
90
Optionally, to view the details of a particular Security Key, select the Security Key
and click View.
Intel AMT SCS Installation And User Manual
This screen is used to print and reserve a single set of security parameters that will be
used to configure an Intel AMT device manually:
First print the parameters using the Print option, then select Mark as Used so that the
key will not be used with more than one Intel AMT device.
The following information is displayed:
PID (Provisioning ID)
The PID is the 8 character identification string sent in the clear in the “Hello”
message.
PPS (Provisioning Pre-Shared Key)
The PPS is a 32 character key string that is the secret shared between the Intel AMT
device and the SCS service.
Factory Default MEBx Password
The factory default MEBx password is the password assigned when the Intel AMT
device is preconfigured, whether by an OEM or from a previous installation. The
default value is “admin”.
New MEBx Password
The New MEBx password is assigned to the Intel AMT device during setup and
configuration.
Print prints the parameters of the single displayed key. Before the print request
executes, the SCS displays the following message:
Mark as Used removes the selected key from the visible list. It will remain in the
database but will not be exported to a USB Key. Select this if the keys were printed.
Intel SCS Console
91
8.
To set the passwords, and the maximum number of security keys that can be stored
on a single USB key, click MEBx Settings.
a.
Enter a number in the Number of security keys field.
This number determines the number of keys created by clicking Create Pre-Provision data
and how many keys are exported when Export is clicked.
b.
c.
d.
Select the factory-assigned OEM password. If it is not in the dropdown list, add
it to the list by performing the following steps:
i.
Click within the Current Password field. The content is selected.
ii. Begin typing. The old content disappears but is not deleted.
iii. Enter the new Current Password.
iv. Click OK. The new OEM MEBx password is added to the list.
In the New MEBx Password box, select either Random or Manual. If Manual is
selected, enter the new password. This will be the MEBx password after setup
and configuration completes.
Click OK.
Passwords are stored in the Intel AMT table saved in the database.
92
Intel AMT SCS Installation And User Manual
Configuring Users
The Users list defines identities with access to the Intel SCS Console. Each user is
assigned a role which defines the permissions allotted to the user. See below for the
permissions associated with each role. The console supports assigning a role to a defined
group of users. This is a more manageable approach. Create an SCS Admins Group, for
example, and assign it the Administrator role. Then IT can add users to the group or delete
users from it without having to do this from the SCS console.
To improve performance, the SCS maintains a cache of users that access the service. This
reduces the number of times that the service needs to access directory services to validate
a user. If a user is moved from one group to another, the SCS will continue to use the
cache entry to validate the user, and validation may fail as a result. To avoid this failure,
flush the cache by restarting IIS.
Viewing Existing Users
To view a list of existing users:
1.
2.
3.
Open the Intel SCS Console.
Expand the Configuration Service Settings branch.
Select Users. The Users table is displayed.
Adding a User
To add a new user:
1.
2.
3.
4.
5.
Open the Intel SCS Console.
Expand the Configuration Service Settings branch.
Select Users. The Users table is displayed.
Click Add. The New User dialog box is displayed.
Click Select User. The Select dialog box is displayed.
6.
7.
Enter all or part of a user name.
Click Check Name. The Intel SCS searches the AD and completes or confirms the
user name.
Click OK.
From the Role dropdown menu, select a role:
8.
9.
Intel SCS Console
93
Enterprise Administrator
The Enterprise Administrator has access to all Intel SCS Console configuration and
management screens, fields, and parameters.
Administrator
The Administrator role has the same permissions as the Enterprise Administrator but
does not have permission to create or edit Profiles, or access to the Users, General
Configuration or Maintenance functions.
Operator
The Operator role has access to the following:
•
•
•
•
Access Security Keys on the Configuration Service Settings branch.
View the Status table on the Intel AMT Systems branch.
View the standard log and the security audit log.
Access the complete configuration parameters branch.
Log Viewer
This role allows a user to view the standard log and the security audit log.
Configuration Client
Users with this role can add platform parameters and request a one-time password
(OTP).
The Configuration Client role is required by all platforms executing a client script
that communicates directly with the SCS API. This includes the Remote
Configuration Tool (RCT). Add IT-defined groups that contain all computers in each
domain that the SCS supports. The SCS does not grant the Configuration Client role
to the default Domain Computers Group.
10. Click OK.
Never remove the user that is used by the SCS service when it is started. Removing this user
causes the service to fail.
94
Intel AMT SCS Installation And User Manual
Configuration Parameters per Device
The SCS maintains two lists of Intel AMT devices:
A list of device information entered into the database by the administrator,
provided by a script, or entered by external calls to the API. Each entry relates a
specific Intel AMT device (defined by its UUID and FQDN) to a Profile and an
Active Directory storage location. The SCS Console displays and manages this
list with the Configuration Parameters branch of the tree.
• A list of Intel AMT devices that have sent “Hello” messages to the SCS. These
devices may have been configured or not. The administrator can update the
configuration of one or all of the already configured devices, among other
operations. The console performs these functions and manages the list from the
Intel AMT Systems branch of the tree.
This section describes the “Configuration Parameters” features. The opening screen shows
a list of Intel AMT devices that are known to the SCS service. A device requires an entry
in this database table for the SCS service to complete setup and configuration. If there is
no entry, configuration will not complete due to the lack of critical setup information.
The SCS may be configured to acquire the necessary Intel AMT device information using
a script that executes when the SCS receives a “Hello” message. In this case, the script
will create an entry in the table for the device.
Viewing Defined Intel AMT Devices
To view a list of Intel AMT Devices already defined in the SCS database:
1.
2.
Open the Intel SCS Console.
Select Configuration Parameters. The screen displays a list of Intel AMT devices,
ordered by UUID. The display can be ordered by any of the columns by clicking on
the column header, or it can be paged through using the controls below the table.
The UUID is a unique value for a specific Intel AMT device and its platform. The
FQDN (Fully Qualified Domain Name) is the combination of host name and domain
Intel SCS Console
95
3.
that is unique for the platform containing the device. The Active Directory
Organizational Unit determines where the AMT object for this device should be
placed in the directory system. The profile name is the profile to be used to configure
this device.
To filter the view, select a filter options from the bottom of the screen and click
Apply Filter.
Defining a New Intel AMT Device Record
When the AddServicNewAmtProperties.exe program is included in a platform initial
configuration script, it can be used to create an entry in the SCS database without
additional operator intervention. Use the console to add devices one by one.
To add a new Intel AMT device to the table manually:
1.
2.
3.
Open the Intel SCS Console.
Select Configuration parameters. The New Intel AMT Systems table is displayed.
Click Add. The Edit New Intel AMT Properties dialog box is displayed.
4.
Enter the parameters.
UUID
This is the 128-bit value represented as a hexadecimal string that uniquely identifies
an Intel AMT device. Enter the UUID in the format shown, with hyphens separating
the sub-strings.
FQDN (Fully Qualified Domain Name)
Enter the combined host name and the domain where the platform will be installed.
Active Directory Organizational Unit
The AD element where the AMT object will be located after setup and configuration
is completed. A value must be entered for this parameter even if Active Directory use
is not enabled. If use of Active Directory is possible in the future, select values for
this field that will be usable with the AD deployment.
Profile
Enter the profile to be used for this device.
5.
96
Click OK.
Intel AMT SCS Installation And User Manual
Filtering the Display
The display of potential Intel AMT devices can be filtered. When filtered, only devices
that match the specific filtering criteria are displayed.
To filter the display:
1. Select one or more of the checkboxes.
2. As applicable, either select an entry from the dropdown list or complete the entry in
the available field.
3. Click Apply Filter.
To sort by a specific parameter, click on the appropriate column title. Click again to
alternate between an ascending and a descending sort.
Intel SCS Console
97
Configuring Existing Intel AMT Devices
Use the Intel AMT Devices screen to view the status of all Intel AMT devices that have
sent a “Hello” message at least once to the SCS, review details about a single Intel AMT
device, and configure an individual Intel AMT device.
Viewing Intel AMT Devices and Reviewing the Details of a Device
To view a list of existing Intel AMT devices:
98
1.
2.
Open the Intel SCS Console.
Select Intel AMT Systems. The Intel AMT Systems table is displayed.
3.
Optionally, to review specific details about the configuration of a device, select a
device and click Details. The Details screen has two tabs (see below). The General
pane shows basic information for the Intel AMT device, while the Status pane show
the last time that certain functions were performed on the device.
Intel AMT SCS Installation And User Manual
Ad Hoc Operations on an Individual Intel AMT Device
To configure a single, Intel AMT device that has sent at least one “Hello” message:
1.
2.
3.
Intel SCS Console
Open the Intel SCS Console.
Select Intel AMT Systems. The Intel AMT Systems table is displayed.
Select a device and click Operations. The Operations screen is displayed.
99
4.
To perform an operation, click a button.
Security
Set ACL
This operation updates the list of Intel AMT users—according to the ACL entries in
the profile—and their access privileges. See also “The Profile Configuration ACL
Tab” on page 81.
Set CRL
This operation updates the list of revoked certificates.
Renew RNG Key
This operation replaces the random number generator seed.
Provisioning
Re-Provision
This operation applies all the current settings in the profile associated with the Intel
AMT device.
When there is an enabled active wireless profile on the Intel AMT device, that profile
cannot be disabled by an external command, since this might break the only manageability
connection with the device. During reprovisioning, if there is a wireless profile with the
same name as the active profile in the configuration profile associated with the device, the
SCS will define a profile with the same name with an appended underscore and download it
to the device. For example, if the active profile is named WP1, the SCS will install a profile
named WP1_.
Un-Provision
This operation disables the Intel AMT device and leaves it without any Setup and
Configuration parameters. There are two modes:
100
Intel AMT SCS Installation And User Manual
•
•
Full unprovisioning:
Deletes all data from the Intel AMT device. The Intel AMT device is not
functional.
Partial unprovisioning:
Deletes all data on every Intel AMT device except for the PID, PPS, admin
ACL settings, host name, domain name, and provisioning server IP and port
number. The device will immediately start sending “Hello” messages. The SCS
will setup and configure the device according to the profile associated with it.
General
Host name
Changes the host name of the selected device in the SCS database.
Delete AMT
This operation deletes the selected Intel AMT device from the database. A warning
message is displayed which requires confirmation of intent to delete.
Other
Set Power Policy
This operation updates the power policy according to the parameters defined in the
profile. See also “The Profile Configuration Power Policy Tab” on page 83.
Sync Clock
This operation synchronizes the clocks between the Intel AMT device and the SCS
service.
Authorization
When AMT requires authorization before provisioning is selected on the General
page, an operator must select AuthorizeAMT on the Device Operations page for a
selected Intel AMT device before setup and configuration can continue.
One time password
When One time password required is selected on the General page, the OTP used
when starting the Remote Configuration process should be entered here to allow
setup and configuration to proceed.
Filtering the Display
The display of existing Intel AMT devices can be filtered. When filtered, only Intel AMT
devices that match the specific filtering criteria are displayed.
To filter the display:
1. Select one or more of the checkboxes.
2. As applicable, either select an entry from the dropdown list or complete the entry in
the available field.
3. Click Apply Filter.
Global Operations
To apply new settings to all existing Intel AMT devices:
1.
2.
3.
Intel SCS Console
Open the Intel SCS Console.
Expand the Intel AMT Systems branch.
Select Global Operations. The Global Operations page is displayed.
101
4.
To perform an operation, click a button.
Re-Provision
This operation applies all the current settings in the profile associated with each Intel
AMT device. See page 100 for a note on re-provisioning wireless profiles.
Un-Provision
This operation disables each Intel AMT device and leaves it without any Setup and
Configuration parameters. There are two modes:
•
•
Full unprovisioning:
Deletes all data from each Intel AMT device. The Intel AMT devices are not
functional.
Partial unprovisioning:
Deletes all data on every Intel AMT device except for the PID, PPS, admin
ACL settings, host name, domain name, and provisioning server IP and port
number. The devices will immediately start sending “Hello” messages. The
SCS will setup and configure the devices according to the profiles associated
with them.
Set ACL
This operation updates the list of Intel AMT users—according to the ACL entries in
the profile associated with each device—and their access privileges. See also “The
Profile Configuration ACL Tab” on page 81.
Set CRL
This operation updates the list of revoked certificates.
Renew RNG Key
This operation resets the random number generator key for each device.
Set Power Policy
This operation updates the power policy for all devices according to the parameters
defined in the profiles. See also “The Profile Configuration Power Policy Tab” on
page 83.
102
Intel AMT SCS Installation And User Manual
Sync Clock
This operation synchronizes the clocks of the Intel AMT devices with the SCS
service.
Intel SCS Console
103
Maintenance Policies
The Maintenance Policies pane defines actions that the SCS will perform periodically on
all configured Intel AMT devices. The items enabled with a checkbox can be used to
implement a specific site security policy.
If TLS is not enabled, maintenance messages to the Intel AMT devices are sent in the clear,
without encryption. It is recommended that in non-TLS environments, passwords for the
AMT objects in Active Directory should be configured as “Password Never Expires”. The
maintenance function should be used only to synchronize the Intel AMT clock.
Re-provision Intel® AMT
If this item is checked, all parameters in each device will be updated according to the latest
values in the associated profile. New certificates and passwords will be issued. See page
100 for a note on re-provisioning wireless profiles.
104
Intel AMT SCS Installation And User Manual
Change Intel® AMT Administrator Password
The administrative user has access to all functions of the Intel AMT device. Only the SCS
has access to this ACL entry. When this option is selected, the administrative password is
changed periodically to either a randomly-generated password or to a fixed password. The
option used is defined on the Profiles Configuration General Tab for the profile associated
with each Intel AMT device. Normally, this maintenance function is used only with the
random password option.
Renew Pseudo Random Generator Seed
When this option is selected, the SCS generates and sends a new random number
generator seed to each Intel AMT device.
Synchronize Intel® AMT Clock
This option synchronizes the clock in each Intel AMT device to the clock on the SCS
platform. This operation is critical when using Kerberos authentication. It ensures that the
clocks do not differ by more than the Kerberos Max Clock Tolerance defined in the
Profiles.
Intel SCS Console
105
Intel AMT SCS Console Logs
The Intel AMT Console logs activity into the database. There are three log categories:
System Log
This log displays system-wide actions. This includes actions that succeeded and actions
that failed. In particular, this log highlights failed actions.
Actions Status
This log displays asynchronous actions—such as global operations or operations per Intel
AMT device—that are entered into the queue. Their status in the queue is also displayed.
The Name field shows the attempted action, the Status field shows success or failure or
whether an action is queued, delayed or in progress.
The SCS checks its queues every five minutes to see if it is time to perform a scheduled
maintenance task. The SCS records this in the Actions Status log as a maintenance task,
even if no other activity was performed. Each of the maintenance events are noted as a
CleanLog and ClearRequestStatus event. Note that an actual CleanLog event occurs only
once every 24 hours.
Security Audit
This log displays potential breaches in security, such as unauthorized attempts to log-in
and unauthorized attempts to perform the re-provision function on all Intel AMT devices.
The security log also registers valid events that have security impact, such as user log-ins.
The SCS logs the following events in the security log:
Table 7: SCS Security Log Events
Message Type
Event
Error
Cannot contact CA server - Process delayed.
Error
Certificate cannot be issued - Process interrupted.
Error
Cannot request CA - Process interrupted.
Error
Working without CA - Process interrupted.
Error
Invalid network TLS authentication value
Error
Error
Error
Error
Error
Fail to delete Certificate
User is not authorized
Failed to remove profile.
Unexpected exception when requesting certificate: - Process
interrupted.
Cannot contact unprovisioned Intel AMT device without
PID/PPS.
Cannot obtain connection to Intel AMT device on nn.
Informational
Certificate request already under submission - Process delayed.
Informational
Informational
Informational
Informational
Informational
Informational
Informational
Set Certificate Template
User logged in.
Modify user account nn.
Set EACL.
Set FPACL.
Set general parameters for profile.
Adding TLS server certificate.
Error
106
Intel AMT SCS Installation And User Manual
The following is an example of the System log display:
The following is an example of the Actions Status log display:
The following is an example of a Security Audit log display:
Intel SCS Console
107
Filtering a Log Display
The Log Displays can be filtered. After a filter is applied, only log entries that match the
specific filtering criteria are displayed.
To filter the display:
1. Select one or more of the checkboxes.
2. As applicable, either select an entry from the dropdown list or complete the entry in
the available field.
3. Click Apply Filter.
The filtering capability is especially useful with the Action Status log. The administrator
can view recently configured Intel AMT devices, or which ones are queued to be
configured or which ones failed configuration and require manual action.
108
Intel AMT SCS Installation And User Manual
Chapter 5
SOAP API
This section includes
•
“Overview of the SOAP API” on page 110
•
“SOAP Faults” on page 111
SOAP API
109
Overview of the SOAP API
The SCS service receives a stimulus from Intel AMT devices sending “Hello” messages
requesting that they be configured. The SCS service polls and updates the database and
Active Directory. An external application such as the SCS Console configures the service
indirectly by sending SOAP requests via the SOAP API to modify or query the database.
The SOAP API does not interact with the SCS service directly.
An ISV-developed Management Console can also use the SOAP API for platform
discovery: It can query the SCS database for a list of configured Intel AMT devices or a
list of those devices configured recently.
The API is implemented with three .dll files that are installed on the same platform as the
SCS service. An application addresses the API with SOAP requests addressed to the IIS
web server virtual directory, in this case AMTSCS, requests are directed to the appropriate
API dll.
The API functions are segmented into four groups, and each group has a WSDL that
defines the parameters of each function within the group.
The groups are:
• Authentication Interface: Used to log in, define users, and set database
parameters
• Profile Interface: Manages Profile objects in the database
• AMT Interface: Manages AMT System objects in the database
• Service Interface: manages all other SCS service functions
The SCS distribution includes the four WSDLs, the SOAP API description document
Configuration Service SOAP API.doc and the Console source code, contained in
AMTConsoleSln.zip.
110
Intel AMT SCS Installation And User Manual
SOAP Faults
Each API may throw a standard SOAP Fault Response. The structure of the SOAP Fault
response depends on the client request SOAP version.
SOAP Fault version 1.1
<SOAP-ENV:Fault>
<faultcode>301</faultcode>
<faultstring xsi:type="xsd:string">User is not authorized</faultstring>
<detail>Profile get error 301: Action not allowed for the user</detail>
</SOAP-ENV:Fault>
SOAP Fault version 1.2
<SOAP-ENV:Fault>
<SOAP-ENV:Code>
<SOAP-ENV:Value>SOAP-ENV:Sender</SOAP-ENV:Value>
<SOAP-ENV:Subcode>
<SOAP-ENV:Value>301</SOAP-ENV:Value>
</SOAP-ENV:Subcode>
</SOAP-ENV:Code>
<SOAP-ENV:Reason>
<SOAP-ENV:Text>User is not authorized</SOAP-ENV:Text>
</SOAP-ENV:Reason>
<SOAP-ENV:Detail>Profile get error 301: Action not allowed for the user</SOAPENV:Detail>
</SOAP-ENV:Fault>
SOAP API
111
Chapter 6
SCS SUPPORT CONTENT
This section includes:
•
“SCS Tools” on page 113
•
“Using a Script to Import Intel AMT Configuration Properties” on page 115
•
“Defining a New Template for an Enterprise CA” on page 118
•
“Internationalization of SCS Messages” on page 123
•
“Retrieving a Certificate for Use by a Posture Validation Server” on page 124
•
“Configuring PEM Files for Redirection Applications” on page 125
•
“CRL XML Format” on page 127
•
“Troubleshooting” on page 128
•
“Windows Service Error Codes” on page 130
•
“Log Mapping” on page 131
•
“Glossary” on page 132
112
Intel AMT SCS Installation And User Manual
SCS Tools
This section describes the command line and administrative tools installed with the SCS.
Command Line Tools
Add new Intel AMT Properties
The Administrator can use this command line tool to add a new record to the NewAMTs
table in the SCS database. The tool runs on the platform host and retrieves the UUID and
the platform FQDN. It takes as input the URL of the IIS virtual directory so it can send a
request to the SOAP API to add the entry to the database. It also takes as input the Profile
name and the AD OU where the entry should be stored.
The trusted root certificate for the IIS instance on the SCS service platform must be
installed on the host to enable the tool to send the entry to the database.
1.
Navigate to the directory named:
[InstallDrive]:\Program Files\Intel\AMTConfServer\Tools
From the command line, run: AddServicNewAMTProperties.exe The function
displays a usage message.
2.
Database Dump
The Administrator uses this tool to dump the contents of the setup and configuration
database. The tool uses ADO.NET and Window authentication to access the database.
1. Navigate to the directory named:
[InstallDrive]:\Program Files\Intel\AMTConfServer\Tools
2. From the command line, run: DumpDB.exe A usage message will be printed. The
parameters are: DB Server name/Server Instance, and DB name. Optionally provide a
DB User and password for SQL Server authentication.
The program dumps the DB contents to a file in the same directory as the command.
Administrative Tools
Administrative Tools are vbs scripts that extend and test the Active Directory schema.
They are located in folders under
[InstallDrive]:\Program Files\Intel\AMTConfServer\AdminScripts
We recommend running the scripts from the command line prompt using cscript, for
example: "cscript myscript.vbs". This ensures that, instead of opening separate messages,
all messages are printed on the command line.
Active Directory Schema
This folder contains three scripts.
BuildSchema.VBS
Extends the Active Directory Schema to support the Intel-Management-Engine class.
This script is run only once per domain.
The file IntelAMT.LDF must be in the same folder.
Parameters: None.
SCS Support Content
113
CheckSchemaExists.VBS
Checks that the Schema is properly extended.
Parameters: None.
ExportSchema.VBS
Exports the portion of the Intel-Management-Engine Schema to
IntelAMTExport.LDF.
Parameters: None.
114
Intel AMT SCS Installation And User Manual
Using a Script to Import Intel AMT Configuration Properties
When the SCS is configured to use a script to obtain information about an Intel AMT
device that sent a setup request, the following occurs:
• The Intel AMT device sends a “Hello” message.
• When the SCS receives the “Hello” message, it first searches the New Intel AMT
table for a matching UUID entry.
• If there is no matching entry, the SCS sets environment variables based on values
in the message.
• The SCS activates the script.
• The script locates the necessary parameters and creates a file consisting of an XML
fragment.
• When the script completes, the SCS reads the file and adds an entry to the New
Intel AMT table using the values returned by the script in the file.
• The SCS performs setup and configuration using the information in the file.
Environment Variables
The SCS sets the following environment variables to pass values to a script:
• CS_AMT_UUID: The UUID from the Hello message
• CS_AMT_STATUS: status of the device to be setup— “U” (Unprovisioned), “I”
(In provisioning), or “P” (Already provisioned)
• CS_AMT_ADDRESS: The value depends on the value of the previous parameter.
o If CS_AMT_STATUS = “U” or “I”, CS_AMT_ADDRESS = the source IP
address from the Hello message.
o If CS_AMT_STATUS = “P”, CS_AMT_ADDRESS = the FQDN of the
Intel AMT device to be set up.
• CS_OUT_FILE_NAME: A file name generated by the SCS. The script returns the
Intel AMT properties in a file with this name in the same directory as the script in
the format described below.
Output File Format
The output file generated by a script must be an XML fragment interpretable by the SCS.
The fragment has the tag amtConfiguration and contains the following attributes:
• fqdn: The FQDN of the platform containing the Intel AMT device
• addn: The Active Directory OU to be used for this device or “NA” when the SCS
is not integrated with Active Directory.
• profile or profile_id: Either the SCS Profile name or the index of the profile to be
used when setting up this device (only one of these can be used).
The file will have the structure shown in the following examples:
<amtConfiguration fqdn=“jonesr.west.yourenterprise.com”
addn=”OU=AMTDevs,DC=west,DC=yourenterprise,DC=com”
profile=”Standard_user”/>
or
<amtConfiguration fqdn=“jonesr.west.yourenterprise.com”
addn=”OU=AMTDevs,DC=west,DC=yourenterprise,DC=com”
profile_id=”2”/>
SCS Support Content
115
Script Functionality
Script functionality is the responsibility of the ISV or the IT organization. The script may
retrieve the information from an external source or from the platform containing the Intel
AMT device, or some combination of the two methods. For example, the script may
request the FQDN from the platform using the IP address, then determine the Active
Directory OU and SCS Profile based on the FQDN.
Sample Scripts
The SCS distribution includes several sample scripts. They each have advantages and
disadvantages. The scripts take two approaches to acquiring the necessary device data. The
first approach is a Server Script that requests the data remotely from the platform sending
the “Hello” message. The second approach is a pair of scripts: a Client Script that runs on
the host processor of a platform containing Intel AMT and requests the platform
information and writes it to a database, and a Server Script that reads the database entry
and returns it to the SCS. In either case, the controlling enterprise has to modify these
scripts for local use.
Server Script
The Server Script approach requires a copy of the script only on the platform running the
SCS. It has the disadvantage of requiring the SCS user to have administrator permissions
on every client (see box below).
The SCS distribution includes a script called GetConfigProperties.vbs. The script sends a
WMI query to the host platform that sent the “Hello” message, and therefore requires that
the host is operational and running a version of Microsoft Windows that processes WMI
queries.
The SCS user requires appropriate permissions to invoke WMI remotely. To use this script,
the SCS user must be an administrator on the local host (a member of the local
Administrators group).
The sample script has a 30 second timeout in case WMI freezes on the host; however, the
script may require 10 to 20 seconds to execute normally, due to WMI timing on the host.
The script:
1. Validates the environment variables.
2. Using the WMI protocol, requests the Win32_ComputerSystemProduct object to
recover the platform UUID from the host platform.
3. Using the WMI protocol, requests the Win32_ComputerSystem object to recover
the platform name and domain from the host platform.
4. Creates the FQDN by concatenating the name and domain.
5. Validates that the returned UUID is the same as the UUID environment variable.
6. Creates an amtConfiguration XML fragment using the FQDN and a hard-coded
OU and profile name.
7. Writes the fragment to an output file.
The script is run by executing runscript.bat, which invokes cScript.exe, the command-line
version of the Windows script host. The script writes output files to the same directory as
the one containing the script and runscript.bat. The distribution also includes testme.bat, a
batch file that sets the environment variables and then invokes the script.
116
Intel AMT SCS Installation And User Manual
On the General Properties pane of the SCS Console, select Get New Intel AMT
Properties/Get Intel AMT Configuration from Script and enter the path name to the
batch file on each platform running the SCS, for example:
C:\program files\intel\AMTConfserver\scripts\runscript.bat
See Step 5 on page 72.
Client Script
The sample client script has the advantage of requiring only local system privileges. It has
the disadvantage of requiring an auxiliary database and deployment to all client platforms.
This approach has three elements:
• A database accessible to all machines in the Active Directory group account. Each row
in this database contains information about a platform that has Intel AMT on it. The
unique key is the UUID. The client platforms only have Add Row privileges to this
database. The sample includes an SQL file, CreateAuxDB.SQL, that creates the
database in SQL Server.
• A client script named AddConfigPropertiesToAuxDB.vbs that runs at least once on
each client platform. The client script reads the UUID and the FQDN and writes them
to the database.
• A server script named GetConfigPropertiesFromAuxDB.vbs that searches the database
for an entry that matches the UUID in a “Hello’ message and returns the UUID,
FQDN, Profile name, and Active Directory OU to the SCS. The sample script returns a
a profile and OU based on the FQDN. The SCS would call this script on receipt of a
“Hello” message when there is no entry in the SCS database for the UUID in the
“Hello” message.
The client script:
1. Sets up script parameters.
2. Using the WMI protocol, requests the Win32_ComputerSystemProduct object to
recover the platform UUID and FQDN.
3. Writes a record to the database.
The server script:
1. Queries the database using the UUID.
2. Erases the row in the database so future updates by the client script will be
successful, for example, after changing the FQDN of the platform.
3. Builds an XML fragment with the returned parameters.
4. Returns the XML fragment to the SCS.
Add the path to the batch file that executes the script to the General Properties page of the
SCS Console. As with the server script, GetConfigPropertiesFromAuxDB.vbs can be
executed with runscript.bat and tested with testme.bat.
Remote Configuration Tool
The Remote Configuration Tool (described above on page 62) eliminates the need for a
script by sending platform description information directly to the SCS via calls to the
SOAP API. The tool executes on the Intel AMT Host platform.
SCS Support Content
117
Defining a New Template for an Enterprise CA
When requesting a certificate from a standalone CA, it is possible to change many of the
fields in the certificate request manually. This is not true for an Enterprise CA certificate
request. The parameters in a template are largely predefined. This is particularly the case
for certificates that the SCS requests automatically for an individual Intel AMT device.
The following procedures show how to define a certificate template, how to give the SCS
user the necessary rights to create certificates from that template, and add the template to
the list of templates known to the Enterprise CA.
Organizational security policies may determine certain template properties, such as
certificate expiration. Adjust the values in the following examples to the local policy.
The following conditions require creation of an Enterprise CA template:
• Creating a Mutual Authentication client certificate for use by the SCS or a
Management Console. Rather than filling in fields manually in the user template,
as with a standalone CA, first define a template with the necessary parameters and
then request a certificate using the template. The procedure below shows specific
steps required for the Intel AMT client certificate template.
• Creating a client certificate to install in an Intel AMT device so it can authenticate
to a Radius server, as a requirement of IEEE802.1x. The SCS creates this
certificate automatically for each device that requires one.
Using an Enterprise CA to generate server certificates for Intel AMT devices does not
require a customized template, but it does require that the SCS user have Read and Enroll
permissions for the default WebServer template.
Use the following procedure to create a template based on an existing default template.
1. Log onto the platform running the Enterprise CA. The user must have Administrator
permissions on this platform.
2. Click Start/Run, type MMC and click OK.
3. A Microsoft Management Console window will open. Select File/ Add/Remove
Snap-in. Click Add… .
4. From the displayed list, select Certificate Template, click Add, then Close, then
click OK in the previous window.
5. Select Certificate Template on the console display. Select User from the list of
displayed templates. Right-click and choose Duplicate Template.
118
Intel AMT SCS Installation And User Manual
The new display is a tabbed form called Properties of New Template.
6. Set the Template display name to “SCS User” or some other meaningful name. For
example, name a template used to generate 802.1x client certificates “802.1x”.
Redefine the validity and renewal periods as required by local policy. Click Apply.
7. Select the Request Handling tab and click the CSPs… button.
8. Select the Microsoft Strong Cryptographic Provider checkbox. Click OK and
Apply.
9. Select the Subject Name tab and select the Supply in the Request radio button. Click
Apply.
10. Select the Security tab. Select Administrator (or the SCS user or the group the SCS
user is in) and assign Read and Enroll permissions. The SCS user must be added to
this list if the SCS requests certificates using this template. Click Apply.
SCS Support Content
119
11. Select Add… to add a user that is not already in the template list. Then set the
permissions for the added user.
An 802.1x certificate does not need changes to the Extensions. Skip to step 16.
To build a template for a Mutual Authentication client certificate, perform the following
four steps:
12. Select the Extensions tab.
13. Select Application Policies and Edit…
120
Intel AMT SCS Installation And User Manual
14. Select Add…/New…
15. Enter the following name: intel_oid (or something similar). Enter the second half of
the OID (the first half is generated automatically as this is a client certificate):
2.16.840.1.113741.1.2.1
Select OK/OK.
16. Select OK to save the completed template.
Now that the template has been created, add it to the list of templates known to the CA.
17. Open the Certificate Authority by selecting Start/Programs/Administrative
Tools/Certificate Authority.
18. Select Certificate Templates in the navigation tree and right-click. Select
SCS Support Content
121
New/Certificate Template to Issue.
19. The newly created template will appear in the Enable Certificate Templates window.
Select the template and click OK. The new template will now appear in the list of
templates.
122
Intel AMT SCS Installation And User Manual
Internationalization of SCS Messages
The SCS was designed to support internationalization of the user interface. The service
and the associated API display all status, warning, and error messages based on a single
file. The application executables retrieve a message based on a message number and the
current language on the platform where the application executes. If the message file
supports the current language, then the file will return the message in the proper language.
If the file does not support the current language, it will return the message in English. See
the document Internationalization of SCS Messages.doc for the steps required to add an
additional language to the message file.
SCS Support Content
123
Retrieving a Certificate for Use by a Posture Validation Server
The Cisco NAC scheme uses a Posture Validation Server (PVS) to check each posture
type for validity. A PVS can check the fields in the posture and the signature in the
posture. The signature is a hash of fields in the posture encrypted using the private key of a
PKI public-private key pair. The PVS validates the signature by calculating a hash over
the same fields, decrypting the signature using the public key, and comparing the results.
The key pair used by Intel AMT is in the certificate specified on the NAC tab of the
profile used to set up the Intel AMT device. The PVS needs this certificate to perform
signature validation. The SCS API includes a function to recover the certificate for a
selected Intel AMT device.
The Intel AMT SDK includes a sample PVS that expects the certificates to be in DER
format, with a name set to the serial number of the certificate. The following procedure
retrieves a certificate from the SCS database, converts the certificate to DER format, and
renames it with the certificate serial number. This is a manual procedure. IT organizations
or ISVs supporting this functionality should provide scripts to accomplish the same thing
on an enterprise scale.
1. Extract the certificate by executing the SCS API SOAP function GetAMTCertificate.
The function accepts either the FQDN or the UUID to identify a unique Intel AMT
device. See the SCS API document for details of the function.
2. Save the returned certificate as a .cer file. This file is in Base-64 format.
3. Double-click on the certificate file. Select the Details tab and Copy to File…
4. In the Certificate Export Wizard, Select DER encoded binary as the file format.
5. Name the file temporarily and complete the wizard. The resulting file is still a .cer
file, but its contents will be in the DER format.
6. Double-click again on the certificate, select the Details tab, select the serial number
and copy it.
7. Rename the newly exported certificate by pasting the serial number over the
temporary name.
8. Remove the blanks in the name so that it is a continuous hexadecimal number.
9. Move the renamed certificate to the CERT folder in the directory containing the PVS
sample executable.
124
Intel AMT SCS Installation And User Manual
Configuring PEM Files for Redirection Applications
A certificate generated by a subordinate CA is linked to a sequence of certificates that
eventually link to a certificate from the root certificate authority.
c
b je
Su
Leaf
Certificate
t fie
ld
ct
bje
Su
Certificate
from
Subordinate
CA
ld
Fi e
Certificate
from Root CA
Certificate
from
Subordinate
CA
The Issuer Field of a certificate equals the Subject Field of the certificate of the issuing
CA. In this way, each certificate points to the next certificate in the chain, until the path
reaches a certificate created by the root CA.
When the Intel AMT Setup and Configuration Server enrolls a certificate (installs it in an
Intel AMT device) it only sends the leaf certificate and does not include any subordinate
certificates. When a client initiates a TLS session with an Intel AMT device, the device
only sends the leaf certificate to the client application (an ISV Management console
application).The client needs to know the full chain and must acquire the intermediate
subordinate CA certificates. In a correctly configured Microsoft environment, the client
dynamically retrieves the intermediate CA certificates based on the information in the
issued leaf certificate. This can succeed if the IT administrator has set up the environment
correctly by ensuring that the application has the necessary privileges to obtain the
subordinate certificate information.
If a TLS stack other than the Microsoft stack is used (for example, if the application uses
the Intel AMT redirection library that depends on OpenSSL), then the certificate chain
must be provided explicitly.
The user must create a .PEM file that contains all of the certificates in the chain to the
certificate from the root CA, not including the leaf certificate itself.
The way to do this is to convert each certificate in the chain to a .PEM file, then
concatenate the PEM files.
When the subordinate CA was installed, certificates for all the CAs in the chain were also
installed in the Trusted Certificate Store on the server where the subordinate CA was
installed. Go to the web interface for the CA, (for example, open a web browser and
navigate to http://<CA hostname>/certcrv) and download the certificates for each
subordinate CA. Downloading in Base 64 format results in a .cer file that is in PEM
format.
The file starts with the string
-----BEGIN CERTIFICATE----- and ends with the string
-----END CERTIFICATE-----.
Concatenate the files by combining the files using copy and paste in a text editor including
the opening and ending strings. Rename the file as a PEM file.
SCS Support Content
125
The resultant file is used as an input to the redirection library function
IMR_SetCertificateInfo (see the Redirection Library Design Guide).
126
Intel AMT SCS Installation And User Manual
CRL XML Format
The Intel AMT SCS Console can import a Certificate Revocation List (CRL) into a Profile. The following
file is an example of the XML format.
<?xml version="1.0" encoding="UTF-8"?>
<!-This file maps the untrusted certificates serial number to the URI of the issuer.
The URI value represents the a valid CRL distribution point of a Certificate Authority.
-->
<crl>
<uri name="http://crl.myenterprise.com/pki/mscorp/crl/mswww(2).crl">
<cert serialnumber="15 27 82 20 00 00 00 00 00 01"/>
<cert serialnumber="15-27-82-20-00-00-00-00-00-02"/>
<cert serialnumber="15278220000000000003"/>
</uri>
<uri name="http://corppki/crl/mswww(2).crl">
<cert serialnumber="15 27 82 20 00 00 00 00 00 04"/>
<cert serialnumber="15 27 82 20 00 00 00 00 00 05"/>
</uri>
</crl>
The serialnumber attribute must contain the following format:
1. Use exactly two hexadecimal characters for each byte (a byte with a single character will be
ignored).
2. The serial number can be represented as a single hexadecimal number. If the bytes are separated
from each other, use any non-hexadecimal character separator between each pair.
The file format is defined with following XSL style sheet:
<?xml version="1.0" encoding="UTF-8"?>
<xs:schema xmlns:xs="http://www.w3.org/2001/XMLSchema" elementFormDefault="qualified">
<xs:element name="cert">
<xs:complexType>
<xs:attribute name="serialnumber" type="xs:base64Binary" use="required"/>
</xs:complexType>
</xs:element>
<xs:element name="crl">
<xs:complexType>
<xs:sequence>
<xs:element ref="uri" maxOccurs="unbounded"/>
</xs:sequence>
</xs:complexType>
</xs:element>
<xs:element name="uri">
<xs:complexType>
<xs:sequence>
<xs:element ref="cert" maxOccurs="unbounded"/>
</xs:sequence>
<xs:attribute name="name" type="xs:string" use="required"/>
</xs:complexType>
</xs:element>
</xs:schema>
SCS Support Content
127
Troubleshooting
This section includes miscellaneous tables for troubleshooting and maintenance.
Table 8: Troubleshooting
128
Symptom
Solution
Received “Cannot contact CA”
error in SCS Service log during
provisioning and re-provisioning
process.
On the SCS Console, select Profile > Certificate tab.
Verify that the “CA Server Name” field has no leading
spaces. Do this for each profile in the system.
I’m having an authentication problem when running the
AMTConfig (Windows Service).
The installer inserts the password for the windows
service correctly, but there is a local security policy that
needs to be added. Once the security policy is added,
the service can run. To overcome this problem, the user
needs to open the service in the Service Manager and reenter the password. Windows then automatically opens
the security policy.
I'm trying to uninstall the “SOAP
API” and I'm getting an error:
“Failed to extract SOAP directory
from the registry” or “Failed to
extract SOAP virtual directory
name from the registry”
The installer failed to locate the SOAP Directory/Virtual
Directory in the registry. This failure will prevent the
installer from disabling web extensions added earlier
during installation and from deleting the Virtual
Directory.
I'm trying to uninstall the “Database schema” and I'm getting an
error: “Build Database script
failed! Error code:X”
The installer successfully ran the build Database Schema
script, but the script returned error code X.
I'm getting an error: “RegDBCreateKeyEx failed.” Or “RegDBSetKeyValueEx failed.”
The installer failed to create or set registry values. Make
sure you are logged-in as an Administrator user.
I can't install/remove the
Database.
“xxxxx”
This problem might occur during installation or
removing of the Database Schema, The “Microsoft SQL
Server Management Studio Express” does not present
the Database in the list of Databases but the Database
files exist.
To resolve this problem delete the Database files (LDF
and MDF extension) manually from:
“Program Files\Microsoft SQL
Server\MSSQL.1\MSSQL\Data”
Restart and reinstall.
I've checked “Start AMT Config
Service” at the end of the installation, but got an error that the service can't be started.
Open the Windows Management Console and select the
Services tab. Locate the “AMTConfig” service. Open
it. Go to “Log on” and re-type the password. Then,
restart the service.
Intel AMT SCS Installation And User Manual
Symptom
Solution
IIS application pool has a protection from rapid failures in a given
time (default 5 failures in 5 minutes). If that condition occurs the
application pool shuts down.
1.
2.
Restart the default application pool.
If that does not help, restart the IIS.
The server seems to be stuck: The
symptoms are 100% CPU usage
for more than 10 minutes and the
service does not respond to setup
requests from Intel AMT devices.
1.
On the Console Configuration Service Settings /
General pane, decrease the number of threads.
2.
Restart the service.
SCS Support Content
129
Windows Service Error Codes
Table 9: Windows Service Error Codes
Error
Code
Causing Scenario/Symptom
Possible Resolutions
1.
21
SOAP_TCP_ERROR
1. Configure Intel AMT device
2. SCS service tries to reconnect to
the Intel AMT device using its
FQDN
3. Error code 21 appears in SCS service log.
2.
1.
2.
22
SOAP_HTTP_ERROR
1. Perform any action upon Intel
AMT device
2. Error code 22 appears in SCS service log
1.
23
SOAP_SSL_ERROR
1. Perform any action upon Intel
AMT device
2. Error code 23 appears in SCS service log
3.
2.
1.
4099/2057
130
Invalid Parameter/Data missing
1. Perform setup and configuration of
an Intel AMT device
2. Error code 4099/2057 appears in
SCS service log
2.
The Intel AMT device’s FQDN
might not been configured in the
DNS.
To verify this, try to ping the
Intel AMT device using its
FQDN.
No available web service on the
Intel AMT device.
The service use invalid HTTP
protocol (unencrypted).
Check that the Intel AMT
device’s status is synchronized
with its status as it appears in the
Intel AMT device’s table view in
the Console.
Intel AMT device’s certificate is
not valid.
Manually repeat setup and
configuration of the device (to
force generation of a new
certificate).
Invalid data or data missing in
Intel AMT device’s profile
configuration.
Open the problematic profile
configuration dialog in the
Console and re-configure the
missing/inappropriate
parameters.
Intel AMT SCS Installation And User Manual
Log Mapping
Several logs on the service platform capture messages that can be used to analyze events,
including difficulties with installation or performance problems during execution.
Additional logs and tools can aid in looking a performance issues and other problems. The
following table lists the location of installation logs and the GUI console execution log.
Table 10: Log Mapping
Component Name
Log File
Windows Service + Web
Service + DB + Client
Sample Installation
[InstallDrive]:\Program Files\InstallShield Installation Information\DA4F4037-6EB2-4309-86EB-A8902CBC12EC\setup.ilg
GUI Console Installation
[InstallDrive]:\Program Files\InstallShield Installation Information\66469B6E-D328-4416-BD1E-C4692C4A1A96\setup.ilg
GUI Console
[InstallDrive]:\Program Files\Intel\AMTConsole\amtconsole.log
Other Logging Sources
The Management Console displays the three logs kept within the SCS database—the
system log, the actions status log and the security log—and can export these logs for
further analysis.
The Windows* Event log contains errors that cannot be written to the database, for
example, failure to connect to the database or an SCS crash. Look for SCS message in
both the Application and System sections of the log.
Use network tracing tools such as Ethereal to analyze low level connection problems.
Errors using the SOAP API may be recorded in the IIS log file.
Enabling the SCS Debug Log
The SCS will produce a detailed debug log if it is configured specially to do so. To enable
the debug log, do the following:
1. Run regedit.
2. Open HKEY_LOCAL_MACHINE\SOFTWARE\Intel\AMTConfServer.
3. Create a new key with the name “Log”.
4. Create a New String Value “LogLevel” in Log.
5. Set LogLevel to “V”.
SCS will create log file in folder C:\ This is a fixed location, regardless of the root drive
where the service is installed.
SCS Support Content
131
Glossary
132
Term
Definition
Access Control List (ACL)
A set of data associated with a file, directory or other network resource that defines the permissions that users,
groups, processes or devices have for accessing it.
In Intel AMT, a list of users and their access privileges.
Active Directory (AD)
Active Directory is an advanced, hierarchical directory service that comes with Windows 2000/2003 servers. It is
LDAP (Lightweight Directory Access Protocol—a protocol
used to access a directory listing) compliant and built on the
Internet's Domain Naming System (DNS). Workgroups are
given domain names, just like Web sites, and any LDAPcompliant client (Windows, Mac, Unix, etc.) can gain
access to it.
AD OU
Active Directory Organizational
Unit
Organizational Units (OUs) within an Active Directory are a
way to delegate control over part of the directory to a user
or group of users. Subsets of users, groups and/or
computers can be delegated to different groups, allowing a
greater degree of control and granularity without the need to
run dedicated domain controllers for that group.
Intel AMT
Intel Active Management Technology is a technology
developed by Intel that enables Administrators to remotely
manage and repair networked computers even when they are
powered down. Three primary features of Intel AMT are
better asset management, reduced downtime and minimized
desk-side visits, also called by Intel the “discover, heal and
protect process.”
API
Application Programming Interface: A language and message
format used by an application program to communicate with
the operating system or some other control program such as a
database management system (DBMS) or communications
protocol. APIs are implemented by writing function calls in
the program, which provide the linkage to the required
subroutine for execution. Thus, an API implies that some
program module is available in the computer to perform the
operation or that it must be linked into the existing program to
perform the tasks.
Authentication
A security measure designed to establish the validity of a
transmission, message, or originator.
Intel AMT SCS Installation And User Manual
Term
Definition
Authentication Server (AS)
A Kerberos element in a KDS that recognizes a client at
log-on time based on information in its trusted database.
Authenticator
An authentication protocol string created each time
authentication occurs and sent with the ticket to the server.
It contains a time-stamp encrypted in the session key that
can reliably show that the authentication request actually
came from the client identified in the ticket.
Authorization
The process of determining what types of activities are permitted. Usually, authorization is in the context of
authentication: once you have authenticated a user, the user
may be authorized for different types of access or activity.
CRL
Certificate Revocation Lists.
The CRL is a list of time stamped entries which indicate
which lists have been revoked.
Domain
Part of the DNS (domain naming system) name that
specifies details about a host. A domain is the main
subdivision of Internet addresses, the last three letters after
the final dot, and it tells you what kind of organization you
are dealing with.
In the context of Active Directory, every host is a member
of a domain. A user logs in to the domain of which he is a
member.
DNS
A system for converting host names and domain names into
IP addresses on the Internet or on local networks that use
the TCP/IP protocol. For example, when a Web site address
is given to the DNS, DNS servers return the IP address of
the server associated with that name.
EACL
Enterprise Access Control List
FPACL
Factory Partners Access Control List
FQDN
Fully qualified domain name: the human-readable name
corresponding to the IP address of a network interface, as
found on a computer, router or other networked device. It
includes both its host name and its domain name.
Group
In Active Directory, a collection of users and objects that
share properties and permissions. A group may have another
group as a member. The second group is then a sub-group of
the first group.
GSS-API
Generic Security Services Application Programming Interface. The generic API for performing client-server authentication.
SCS Support Content
133
134
Term
Definition
ISV
Independent Software Vendors that develop applications
that use Intel AMT capabilities.
Kerberos
An Access Control System that was developed at MIT in the
1980s. The Kerberos concept uses a “master ticket”
obtained at logon, which is used to obtain additional
“service tickets” when a particular resource is required. It is
named after a mythological creature.
Key
A key is a piece of information that controls the operation of
a cryptography algorithm. In encryption, a key specifies the
particular transformation of plaintext into ciphertext, or vice
versa during decryption. Keys are also used in other cryptographic algorithms, such as digital signature schemes and
keyed-hash functions (also known as MACs), often used for
authentication.
Key Distribution Center
(KDC)
In the Kerberos protocol, a trusted third party that has secret
information (passwords) for all clients and services under its
supervision.
Mutual Authentication
Mutual authentication, also known as two-way authentication, is a process whereby two parties, typically a client and
a server, authenticate each other in such a way that both
parties are assured of the others' identity. In mutual
authentication, the server also requests a certificate from the
client.
Provisioning
Provisioning deals with planning, setting up and configuring
the hardware, software and networks that deliver access to
data and network resources for the users.
Proxy
A firewall mechanism that replaces the IP address of a host
on the internal (protected) network with its own IP address
for all traffic passing through it. A software agent that acts
on behalf of a user, typical proxies accept a connection from
a user, make a decision as to whether or not the user or
client IP address is permitted to use the proxy, perhaps does
additional authentication, and then completes a connection
on behalf of the user to a remote destination.
PSK
Pre-Shared Key
The use of secret passwords or encryption keys that are
entered into both sides of the message exchange ahead of
time. Pre-shared keys are typed into the clients and servers
(authentication servers, access points, etc.) or entered via
floppy, CD-ROM or smart card. Contrast with “serverbased keys,” in which one side generates a key and sends it
to the other side during the authentication session.
Intel AMT SCS Installation And User Manual
Term
Definition
RC4-HMAC
An encryption type based on the RC4 encryption algorithm
that uses an MD5 HMAC for checksum. It is included in the
Windows implementation of Kerberos.
Realm
In Kerberos, a realm is the same as an Active Directory
domain. Kerberos V5 expects realms to have all capital
letters.
Intel AMT functionality is divided among different realms,
for example, the Storage Realm and the Storage Administration Realm. ACLs associate a user or an SID with one or
more realms.
RNG
Random Number Generator
A computer Random Number Generator is a software routine that implements an algorithm to generate random
numbers. Modern cryptography rests on the assumption that
ciphers can be constructed whose output is indistinguishable
from random noise without knowledge of a secret key used
in the algorithm. See “Key”.
Schema
A conceptual model of the structure of a database that
defines the data contents and relationships.
The Microsoft Active Directory schema contains formal
definitions of every object class that can be created. One of
these objects is the computer object. The Intel Management-Engine-Class, based on the computer object, is
added to the Active Directory schema and used to define
AMT objects.
The SCS database schema defines the data tables
maintained in the database and the relationships of the
tables.
Security Identifier (SID)
A numeric value that identifies a logged-on user who has
been authenticated by Active Directory or a user group.
SOAP
Simple Object Access
Protocol
A message-based protocol based on XML for accessing services on the Web. SOAP employs XML syntax to send text
commands across the Internet using HTTP.
SOL/IDER
Serial-over-LAN/IDE-Redirection
The proprietary protocols defined for Intel AMT for
redirecting keyboard/text or floppy disk/CD transfers from a
local host to a remote workstation.
SPEGNO
Simple and Protected GSSAPI Negotiation Mechanism
SPNEGO is a standard GSS-API pseudo-mechanism for
peers to determine which GSS-API mechanisms are shared,
select one and then establish a security context with it.
SPN
A service principal name - the name by which a client
uniquely identifies an instance of a service.
Ticket Granting Server (TGS)
A Kerberos element in a KDC that creates tickets used to by
clients to access servers.
SCS Support Content
135
Term
Definition
TLS
Transport Layer Security
A protocol intended to secure and authenticate
communications across a public network by using data
encryption. TLS uses digital certificates to authenticate the
user as well as authenticate the network (in a wireless network,
the user could be logging on to a rogue access point).
The TLS client uses the public key from the server to
encrypt a random number and send it back to the server.
The random number, combined with additional random
numbers previously sent to each other, is used to generate a
secret session key to encrypt the subsequent message
exchange.
Token
In Kerberos, a fixed length element that contains a user's
SID and includes the user's rights and group memberships.
UUID
Universally Unique Identifier
A UUID is an identifier standard used in software
construction. The intent of UUIDs is to enable distributed
systems to uniquely identify information without central
coordination. Thus, anyone can create a UUID and use it to
identify something. Information labelled with UUIDs can
therefore be combined into a single database without need to
resolve name conflicts.
A UUID is essentially a 16-byte number and in its canonical
form a UUID may look like this:
550E8400-E29B-11D4-A716-446655440000
VLAN
Virtual LAN
136
A VLAN is a logical subgroup within a local area network that
is created via software rather than manually moving cables in
the wiring closet. It combines user stations and network
devices into a single unit regardless of the physical LAN segment they are attached to and thereby allows traffic to flow
more efficiently within populations of mutual interest.
Intel AMT SCS Installation And User Manual