1
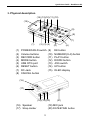
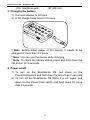
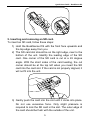
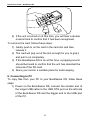
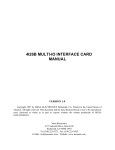
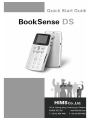
- Table of Contents -
1. What is in the box? ................................................... 1
2. Physical description .................................................. 3
3. Charging the battery ................................................. 3
4. Power on/off.............................................................. 3
5. Inserting and removing an SD card. ......................... 3
6. Connecting to PC...................................................... 3
7. Switching among the BookSense DS programs....... 3
8. Adjusting Volume ...................................................... 3
9. Navigating files and folders in the file list .................. 3
10. Play/Pause.............................................................. 3
11. Recording ............................................................... 3
12. Check Date & Time................................................. 3
13. Switch storage device ............................................. 3
14. Use help mode........................................................ 3
15. Lock Switch............................................................. 3
Quick Start Guide – BookSense DS Thank you for purchasing the BookSense DS. The BookSense
DS is a digital audio player that is manufactured by HIMS Co,
LTD, the creator of the popular SENSE product line. It is a very
convenient, portable device which can play digital books, audio
files, text files, and DAISY content. You can use the built-in digital
recorder to record various items, such as lectures and music
from the FM radio.
Getting Started: This Quick Start Guide shows you how to charge
the battery, how to switch the unit on and off, how to get help and
how to prevent the accidental pressing of buttons.
For further information, please refer to the “User Manual”.
1. What’s in the box?
You should find the below items in the BookSense DS packing box.
1) BookSense DS
2) AC adaptor
3) Long USB Cable to connect the BookSense DS to a PC
4) Short USB cable to connect a USB memory stick to the
BookSense DS
5) Earbuds
6) SD card (including User Manual)
7) Silicon case
8) Lanyard
1
Quick Start Guide – BookSense DS 9) Quick Start Guide
2
Quick Start Guide – BookSense DS 2. Physical description (14) (13)(12)(11) (10)
(15)
(9)
(8)
(7)
(1)
(1)
(2)
(3)
(4)
(5)
(6)
(7)
(8)
(2) (3) (4)
POWER/HOLD switch
Volume buttons
RECORD button
MODE button
USB OTG port
RESET button
DC-Jack
CANCEL button
(9)
(10)
(11)
(12)
(13)
(14)
(15)
(6)
(5)
OK button
NUMERIC(0~9) button
PLAY button
DOWN button
JOG switch
UP button
OLED display
(16)
(17)
(18) (19) (20)
(16) Speaker
(17) Strap Holder
(21)
(19) MIC jack
(20) DATE&TIME button
3
Quick Start Guide – BookSense DS (18) Earphone jack
(21) SD slot
3. Charging the battery
1) Connect adapter to DC-jack.
2) A full charge takes about 2.5 hours.
* Note: Before initial usage of the device, it needs to be
charged for more than 2.5 hours.
* Note: You can use the device while charging.
* Note: To check the battery status, press and hold down the
OK button for 2 seconds.
4. Power on/off
1) To turn on the BookSense DS, pull down on the
Power/Hold switch and hold down for more than 2 seconds.
2) To turn off the BookSense DS While it is on, again, pull
down on the Power/Hold switch and hold down for more
than 2 seconds.
4
Quick Start Guide – BookSense DS 5. Inserting and removing an SD card.
To insert an SD card, follow these steps:
1) Hold the BookSense DS with the front face upwards and
the top edge away from you.
2) The SD card slot should be on the right edge, near to the
bottom of the unit. Identify the leading edge of the SD
card. One corner of the SD card is cut at a 45 degree
angle. With the short sides of the card leading, the cut
corner should be at the top left when you insert the SD
card into the card slot. If the card is not properly aligned, it
will not fit into the unit.
3) Gently push the card into the slot until it clicks into place.
Do not use excessive force. Only slight pressure is
required to lock the SD card in the slot. The outer edge of
the card should be flush with the outside of the unit.
5
Quick Start Guide – BookSense DS 4) If the unit is turned on at this time, you will hear a double
musical tone to confirm that it has been recognised.
To remove the card, follow these steps:
1) Gently push in on the card in the card slot and then
release it.
2) The card will pop out of the slot enough for you to grip it
and pull it out completely.
3) If the BookSense DS is on at this time, a popping sound
should be heard to confirm that the unit has detected the
removal of the SD card.
4) Store your card in a suitable place for safe keeping.
6. Connecting to PC
To copy files from your PC to your BookSense DS, follow these
steps:
1) Power on the BookSense DS, connect the smaller end of
the longer USB cable to the USB OTG port on the left side
of the BookSense DS and the bigger end to the USB port
of the PC.
6
Quick Start Guide – BookSense DS 2) Once you connect to your PC, click the “my computer”
icon on your PC. ‘BookSense DS’ should appear as a
removable disk labled “BOOKSENSEDS”. If you have an
SD card inserted, another removable disk should appear
as well.
3) Copy the files from your PC and paste into specific folders
under ‘BOOKSENSEDS’ or ‘removable disk’
* Note: While connected to the PC, the BookSense DS will not
be operational.
* Note: If an SD card is not inserted, you will not be able to
access the second “removable disk”.
7. Switching among the BookSense DS programs
The BookSense DS provides 4 different programs.
1) Media 2) DAISY 3) Document Reader 4)Radio
To rotate between the various BookSense DS programs, press
the Mode button while the BookSense DS is turned on. The
Mode button is located in the center of the BookSense DS, right
below the JOG SWITCH. The programs in the rotation are Media
Player, DAISY Player, Document Reader and FM Radio.
Each time you switch to a new program, the BookSense DS will
speak the name of the program it switches to as well as the
7
Quick Start Guide – BookSense DS name of the currently selected file or folder. If you were reading a
book or listening to a file the last time you used the program, the
BookSense DS will resume from where you left off.
8. Adjusting Volume
Increase/decrease volume: Volume Up/Volume Down buttons.
There are separate volume settings for headphones and the
internal speaker. The
audio source currently being used is
adjusted when using the volume buttons.
8
Quick Start Guide – BookSense DS 9. Navigating files and folders in the file list
The following buttons are used to navigate the directory structure
of the BookSense DS.
1) Move to next file or folder: Press the “down” button.
2) Move to previous file or folder: Press the “Up” button.
3) Open sub folder: Flick the Jog Switch to the right.
4) Move back a level in a folder structure: Flick the Jog
Switch to the Left.
5) Move up 5 items in list: Number 1 button.
6) Move down 5 items in list: Number 4 button.
7) Move up 10 items in list: Number 2 button.
8) Move down 10 items in list: Number 5 button.
9) Move to top of file list: Number 3 button.
10) Move to bottom of file list: Number 6 button.
* Note: Please note that navigating the files and folders in the
BookSense DS can only be done while the BookSense DS is in
the file browser, (not while playing a book or file).
10. Play/Pause
Once you have selected the file or folder you wish to play, press
the Play button or the OK button to load it and start playback.
Press the Play button during playback to pause the file, and
press the Play button again to restart playback. If you wish to
stop playing the current file, press the Cancel button to exit and
return to the file list.
9
Quick Start Guide – BookSense DS 11. Recording
The following steps outline the various ways to create a recording.
1) First connect the desired source if you wish to use
anything other than the internal microphone. The internal
microphone is the default.
2) Set recording settings: Press the Menu key, arrow to
Global options, then to Recording settings. Use the arrow
keys to change the settings, then press the OK or the
Menu button to save.
3) Start recording: Press and hold down the Record button
for 2 seconds.
4) Pause recording: A quick press of the Record button.
5) Re-start recording: Press the Record button quickly once
more.
6) Stop recording: Press the Play button or OK button then
choose "Yes" or "No" with the Left or Right arrow buttons
to choose whether or not to playback the recording.
7) Insert mark while recording: Press the Number 1 on the
numeric keypad. Up to 20 marks can be inserted (not
available in Radio mode).
* Note: Switch to Radio mode if you want to record from the
FM radio.
12. Check Date & Time
To check the date and time quickly, press the Date/Time button
once. Both the date and time will be spoken.
13. Switch storage device
Press and hold Number 0 for more than 2 seconds. Rotates
through available devices; BookSense DS can have SD card,
10
Quick Start Guide – BookSense DS USB device, and the additional option of flash disk which is the
4GB internal memory.
14. Use help mode
Before you start to learn about the main features of the
BookSense DS, it is worth knowing how to get help as you are
learning. No matter what program you are using, BookSense DS
provides a built in help mode. As the function of the buttons
varies depending on which mode you are in, there is much to
learn so this is a very useful feature.
To turn on Help Mode, press and hold down the Jog Switch for 2
seconds. The unit will say “help mode enabled”. Pressing any
key, now results in BookSense DS announcing information on
the function of that key for the mode you are currently using.
To turn off Help Mode, press and hold down the Jog Switch for 2
seconds. The unit says, “help mode disabled" and it is returned
to normal operation.
15. HOLD Switch
At times you may wish to lock the controls of the BookSense DS
to avoid accidentally operating the unit. This can be done by
using the Lock Switch. It is located at the left side of the device.
Click the POWER/HOLD switch up if you want to put the device
in hold status. If the BookSense DS is in hold status, buttons will
not function if they are pressed, regardless if the device is on/off.
Just click down the POWER/ HOLD switch when you want to
unlock the keyboard.
* Note: Locking the unit will prevent any key from performing its
function, including the Play button and the Date/Time button.
11