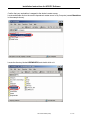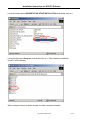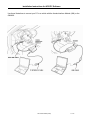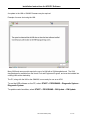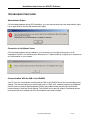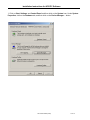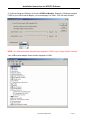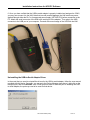
1
Installation Instructions for HDS PC Software
CONTENTS
INSTALLATION
Preparation………………………………………………............ 1
Installation Instructions…………………………………………. 2
TROUBLESHOOTING GUIDE
Administrator Rights……………………………………………. 9
Connection to the Master Server……………………………… 9
Communication With the HIM or the GNA600…………......... 9
Communication of the HIM With the Vehicle………………… 10
Communication of the GNA600 With the Vehicle…………… 10
Network Connection……………………………………………. 10
Immobi System Access………………………………………… 11
HDS Automatic Update………………………………………… 11
APPENDIX: USB-to-Serial Adapter for the Honda Diagnostic System
Introduction……………………………………………………… 12
System Requirements……………………………………......... 12
Installing the device…………………………………………….. 12
Verifying the Installation……………………………………….. 12
Uninstalling the USB-to-Serial Adapter Driver………………. 18
DISCLAIMER………………………………………………….………… 19
These instructions guide you through the installation of the Honda Diagnostic System (HDS) software
onto a personal computer.
Preparation
Before installing the HDS PC software, your dealer’s system administrator must configure your
computer as an iN (Interactive Network) workstation and network it with your service department’s
master server. You must install and run the Electronic Parts Catalog on the PC before the HDS PC
software can be installed. American Honda Special Tools Hotline will not support any concerns
for computers not configured as iN workstations.
Go to the iN Minimum Requirements on the Support page of the iN Website for hardware, software,
and operating system requirements for your computer. Additionally, the PC operating system must
be either Windows 2000 or Windows XP Professional. Windows XP Home Edition or Vista
cannot be used. American Honda Special Tools Hotline will not support any concerns for
computers not meeting the above requirements.
The latest version of the Honda Diagnostic System software must be installed on your service
department’s master server.
In order to install the HDS, the logged-in user must have administrator rights.
Installation Instructions
NOTE: The screen shots that follow show a specific installation that may vary from your actual
situation. They are shown for illustration purposes only.
First, confirm that the hn2000a (for Honda) or hn2000b (for Acura) folder and hn2000.ini file are
located on the workstation’s C: drive.
2006 American Honda Motor Co., Inc. – All Rights Reserved
AST 32229-35062 (0706)
1 of 19
Installation Instructions for HDS PC Software
Double-click on My Computer.
Double-click on the C: drive.
AST 32229-35062 (0706)
2 of 19
Installation Instructions for HDS PC Software
Double-click on the hn2000a folder for Honda dealers or hn2000b for Acura dealers.
Confirm that the HN2000.INI file is in that folder. If it is not, the workstation was not configured correctly.
Contact your dealer’s IT administrator before proceeding.
AST 32229-35062 (0706)
3 of 19
Installation Instructions for HDS PC Software
Confirm that your workstation is mapped to the dealer’s master server.
Locate and double-click on the service department master server in My Computer (named Mastdrivec
in the example shown).
Locate the directory labeled HORWA05DS, and double-click on it.
AST 32229-35062 (0706)
4 of 19
Installation Instructions for HDS PC Software
Locate the folder labeled WORKSTATION SETUP INSTALLATION, and double-click on it.
Locate the file named Setup.exe, and double-click on it. (This initiates the installation
of the PC HDS software).
When prompted, enter your dealer number and other required information.
AST 32229-35062 (0706)
5 of 19
Installation Instructions for HDS PC Software
Deselect the HDS Pocket Tester version when prompted for Installation Program Options, then
select Next. Continue to use your dealership’s Techcart for updating your Pocket Tester as required.
HDS installation to your PC then continues. Please select the appropriate response to any
subsequent prompts from the InstallShield Wizard.
AST 32229-35062 (0706)
6 of 19
Installation Instructions for HDS PC Software
Use these illustrations to connect your PC to a vehicle with the Honda Interface Module (HIM) or the
GNA600.
AST 32229-35062 (0706)
7 of 19
Installation Instructions for HDS PC Software
An update to the HIM or GNA600 firmware may be required.
Example of screen shot using the HIM:
Many 2006 and newer models require the use of a HIM with a CAN daughterboard. The CAN
daughterboard is available from the Honda Tool and Equipment Program, and must be installed into
existing HIMs at the dealership.
The PC, along with the HIM or the GNA600, is now ready for use as an HDS.
To run the HDS software on the PC, select START > PROGRAMS > Diagnostic System >
Diagnostic System.
To update control modules, select START > PROGRAMS > CM Update > CM Update.
AST 32229-35062 (0706)
8 of 19
Installation Instructions for HDS PC Software
TROUBLESHOOTING GUIDE
Administrator Rights
If this message appears during HDS installation, your user account does not have administrator rights.
Log in again with an account with administrator rights.
Connection to the Master Server
If this message appears during installation, your computer is not configured correctly as an iN
workstation or there is no internet access. Request your IT administrator to configure your computer as
an iN workstation on your network.
Communication With the HIM or the GNA600
Your PC may not communicate correctly with the HIM or the GNA600 due to the communications port
settings. The communications port used must be set to COM1. Also, installed programs for peripheral
devices such as personal digital assistants (PDAs) and portable media players may interfere with
communications. American Honda Special Tools Hotline will not provide support if peripheral devices
inconsistent with the intended use of an iN workstation have been installed.
AST 32229-35062 (0706)
9 of 19
Installation Instructions for HDS PC Software
Communication of the HIM With the Vehicle
Connect the HIM to the DLC on the vehicle, then turn the ignition switch to ON (II). If the PGM-FI
system is reprogrammable, after about 20 seconds, the green light should stay on. On vehicles that do
not have reprogrammable PGM-FI systems, the green and yellow lights flash together. If the lights do
not work as described, make sure the ignition switch is at ON (II), and then check the HIM on a knowngood vehicle. If the HIM works on the known-good vehicle, refer to the appropriate service manual to
troubleshoot the DLC circuit in the vehicle you are working on. If the HIM does not work on the knowngood vehicle, the HIM or its cable may be faulty.
Important Note: Many 2006 and newer models require the use of a HIM that includes a CAN
daughterboard. The CAN daughterboard is available from the Honda Tool and Equipment Program.
Communication of the GNA600 With the vehicle
Connect the GNA600 to the DLC on the vehicle, then turn the ignition switch to ON (II). After it does a
self-check, the light patterns change continuously for about 30 seconds. After the lights stay the same
for several seconds, the GNA600 should communicate with the vehicle. If it does not, an error message
displays on the PC. Follow the on-screen instructions, refer to the GNA600 user guide, or check the
GNA600 on a known-good vehicle. If the GNA600 works on the known-good vehicle, refer to the
appropriate service manual to troubleshoot the DLC circuit in the vehicle you are working on. If the
GNA600 does not work on the known-good vehicle, the GNA600 or its cable may be faulty.
Network Connection
When connected to the master server, your PC automatically sends HDS data files to American Honda
according to a built-in scheduler.
If this screen appears when you launch the HDS, the upload was unsuccessful due to a network
problem:
AST 32229-35062 (0706)
10 of 19
Installation Instructions for HDS PC Software
You need to correct the network problem and run the Honda Network Test (HNT) program. This icon
was installed to your desktop during the HDS installation.
Immobi System Access
If you are unable to access the Immobi system in the HDS, your installation was done with either an
invalid dealer number or incorrect configuration as an iN workstation. Confirm the correct iN workstation
configuration with your system administrator, and correct the dealer number using the F12 screen on
the HDS.
HDS Automatic Update
If your computer is connected to the network during the midnight hour, an updated version of the HDS
is installed automatically when it becomes available on the master server. If the automatic update does
not occur, confirm the network connection and iN workstation configuration with your IT administrator.
AST 32229-35062 (0706)
11 of 19
Installation Instructions for HDS PC Software
APPENDIX:
USB-to-Serial Adapter for the Honda Diagnostic System
Introduction
This appendix is for users of the Honda Diagnostic System (HDS) software with the Honda Interface
Module (HIM) and a computer that has a USB port but not an RS232 DB 9-pin male serial port. A USBto-serial adapter may be used to communicate between the HIM and your computer. American Honda
Motor Co., Inc., has tested these adapters:
•
•
•
IO Gear USB to Serial/PDA Converter Cable (GUC232A)
Micro Innovations USB to RS232 Serial Adapter
Coolgear USBG-232 USB-to-Serial Adapter
All these adapters are designed to work with Microsoft Windows XP Professional/2000 operating
systems.
System Requirements
•
•
•
•
•
•
•
PC with an AMD or Intel 1.0GHz or faster processor with 256MB of RAM
CD-ROM optical drive
Windows 2000 or Windows XP Professional operating system
Latest version of the HDS software
USB-to-serial DB 9-pin adapter
Software driver provided by the USB-to-serial adapter manufacturer
HIM
IMPORTANT NOTE: The USB-to-serial adapter works with the HIM only if the USB-to-serial adapter is
mapped to COM1.
Installing the Device
This section gives general guidance on how to install the USB-to-serial adapter under the Windows
2000 or Windows XP operating systems. It is best to read and follow the installation manual that came
with your USB-to-serial adapter.
Note: It is strongly recommended you exit all Windows programs prior to installing your
USB-to-serial adapter software drivers. Installation procedures may be unique with each manufacturer.
Always read and follow the manufacturer’s recommendations.
AST 32229-35062 (0706)
12 of 19
Installation Instructions for HDS PC Software
The following details how to install the IO Gear USB to Serial Converter under Windows XP. This
procedure is representative of the installation of other USB-to-serial adapters and for computers using
the Windows XP Professional operating system.
1. Power up your computer and boot to Windows. Make sure you have administrator privileges to install
software on your system.
2. Install the driver software that came with your USB-to-serial adapter. Some manufacturers request
that you install the software drivers prior to plugging in the USB-to-serial adapter. Others request that
the USB-to-serial adapter be plugged in first, and have Windows browse for the software provided on a
CD-ROM. During installation, Windows may prompt you that this device driver has not yet passed
Windows 2000 or XP compatibility. Click Continue Anyway.
3. Windows then starts to install the software driver for your USB-to-serial adapter. Once installation is
complete, Windows prompts you that it has finished installing the software. Click Finish to complete the
setup. It is best to reboot your system before plugging in the USB-to-serial adapter.
Verifying the Installation
This section details how to verify that the USB-to-serial adapter was properly installed. You also need
to determine the COM port assignment made by Windows for the USB-to-serial adapter.
To verify if the device is properly installed and to determine the COM port assignment of the USB-toserial adapter:
AST 32229-35062 (0706)
13 of 19
Installation Instructions for HDS PC Software
1. Click on Start, Settings, and Control Panel, and then click on the System icon. Under System
Properties, click on the Hardware tab, and then click on the Device Manager… button.
AST 32229-35062 (0706)
14 of 19
Installation Instructions for HDS PC Software
2. Double-click on Ports (COM & LPT). If the USB-to-serial adapter is already plugged in, you will see
the USB-to-serial (COM4) device listed. This means that Windows has assigned the USB-to-serial
adapter to the COM4 port.
The COM port assignment of the USB-to-serial adapter varies, depending on your computer hardware
setup and configuration. Windows checks which COM port is free in your computer and automatically
assigns a port number to the USB-to-serial adapter.
IMPORTANT NOTE: The HIM functions only on COM1.
AST 32229-35062 (0706)
15 of 19
Installation Instructions for HDS PC Software
3. If the USB-to-serial adapter is not already on COM1, you must assign the COM port of the USB-toserial adapter to the COM1 port number. Double-click on the USB-to-serial COM port to view
properties.
4. Under the USB-to-serial COM port properties, click on the Port Settings tab.
Click on the Advanced… button.
AST 32229-35062 (0706)
16 of 19
Installation Instructions for HDS PC Software
5. Under the Advanced Settings, click on the COM Port Number. Example: If Windows assigned
COM4 to your USB-to-serial adapter, you must reassign it to COM1. Click OK when finished.
NOTE: Any other device that was previously assigned to COM1 may no longer function correctly.
Your USB-to-serial adapter should now be assigned to COM1.
AST 32229-35062 (0706)
17 of 19
Installation Instructions for HDS PC Software
6. Once you have verified that the USB-to-serial adapter is properly installed and assigned to COM1,
you may now connect it to the HIM. Note that to avoid possible damage, the HIM must have power
applied through either the DLC or its approved power supply (VET2001723) before connection to the
PC. Attach the serial connector of the HIM to the serial port of the adapter. Then plug in the USB
connector to the USB port of your computer. Proceed with normal usage of the HDS with the HIM.
Uninstalling the USB-to-Serial Adapter Driver
In the event that you need to uninstall the drivers for the USB-to-serial adapter, follow the user manual
provided with the device. Generally, you can go to the Device Manager (see above), right-click on the
assigned port, and click Uninstall. If the COM1 port was used for a device prior to installing the USBto-serial adapter, the port may need to be reset for that device.
AST 32229-35062 (0706)
18 of 19
Installation Instructions for HDS PC Software
Disclaimer
Information in this document is subject to change without notice. American Honda Motor Co., Inc., does
not make any representations or warranties (implied or otherwise) regarding the accuracy and
completeness of this document and shall in no event be liable for any loss of profit or any other
commercial damage, including but not limited to special, incidental, consequential, or other damages.
Commercial product used does not constitute an endorsement or recommendation. No part of this
document may be reproduced or transmitted in any form by any means without the express written
permission of America Honda Motor Co., Inc. All brand names and product names used in this
document are trademarks or registered trademarks of their respective holders.
AST 32229-35062 (0706)
19 of 19