1
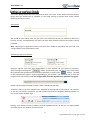
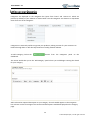
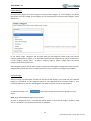
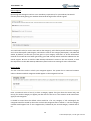
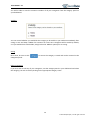
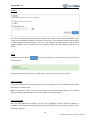
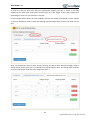
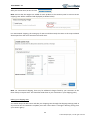
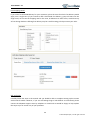
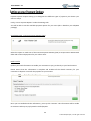
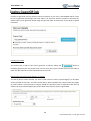
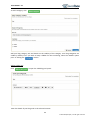
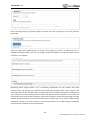
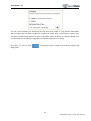
User Manual v 1.0 0 © 2014 ShopBox (Pvt.) Ltd. All rights reserved User Manual v 1.0 .............................................................................................................................. 2 ....................................................................................................... 4 ............................................................................................... 9 ............................................................................................................. 9 ......................................................................................................... 12 ......................................................................................................................... 16 .............................................................................................................................. 25 .......................................................................................................... 28 ............................................................................................. 35 ........................................................................................................... 37 ..................................................................................................... 40 ........................................................................................................................ 42 .................................................................................................................... 44 ................................................................... 48 ............................................................................................... 49 ............................................................................................. 52 ........................................................................................................ 54 ..................................................................................................................... 57 ..................................................................................................................... 59 ......................................................................................................................................... 60 ............................................................................................................................ 61 1 © 2014 ShopBox (Pvt.) Ltd. All rights reserved User Manual v 1.0 After verifying your email and you log back in to your account, you will be met by the dashboard displaying the ‘Get Started’ panel. This guide will assist you in setting up your store as a first-time user of the ShopBox platform. Below is a breakdown of the dashboard to assist with getting you oriented with our platform. Your store URL The settings dropdown contains the store settings and ShopBox account settings Dashboard Panel Tabs View/edit your profile settings including changing your login passwords or to Sign out. Panel Content (In this case, the ‘Get Started’ Panel is displayed.) Click to view your storefront Storefront password protection It should be noted that adjacent to your store URL you will find within parenthesis ‘Password Protected’ and a ‘Launch Store’ button (As shown in below). The Password protection is enabled by default for all new registrations to prevent public access to your website during the construction process of your store. To view your store front, you would need to enter a password when you access your store URL. Your password is automatically generated and can be viewed or changed by clicking . When you are ready, you may click the and allow public access to your store. button to remove the password protection 2 © 2014 ShopBox (Pvt.) Ltd. All rights reserved User Manual v 1.0 Using the Get Started Guide It is recommended to follow the Get Started guide to assist you through the steps of setting up your store. Each step contains a link to the relevant panels on the dashboard which will open in a new tab/window when clicked. After you set up and familiarise yourself with the basic tasks of the get started guide, you will be able to select the ‘Fine Tune Your Site’ tab situated on the guide to take you through some of the more advanced, albeit optional, features of the platform which could help improve sales and your chances of achieving greater success in your business. Note: You will always be able to refer back to the Get Started guide by clicking the tab located on the top of dashboard panel as shown below. Following the initial log-in, all consecutive log-ins will no longer direct you to the Get Started guide, but will direct you instead to the Dashboard home panel which will display your recent orders and other notifications. Help buttons If you run into any difficulty, you will find ‘Help’ buttons located on most panels which would take you to the relevant sections of this manual with detailed explainations and screenshots to help you understand what to do in no time. 3 © 2014 ShopBox (Pvt.) Ltd. All rights reserved User Manual v 1.0 Your store details contain the basic information about your store. These details would be the first things that you would have to complete in the initial setting up process with certain details appearing across your store. Store Name This would be your official name for your store. You would find this on your website as well as on invoices and any correspondence your store will have with customers and any third party service providers. Note: Following the registration process, the store name would be auto-filled with your URL. This can be edited to your desired store name. Uploading a Logo and a Favicon Upload a logo for your store. This would appear on your website and your emails to customers. Select the logo by clicking the button and browsing for the file on your local drives. Once selected, the upload process would only commence as soon as the button (located on the bottom of the page) is clicked. Depending on your browser, you would be able to view the progress from your status bar. Do not navigate away from the page while the upload is in progress. Please note that logos should be in either .JPG or .PNG file formats only. A favicon is the icon for your website and is displayed on the page tab of your browser. For example, as you can see circled in red below, you will find the favicon for the ShopBox dashboard which is a tiny version of the ShopBox Logo. Initially, your website would, by default, have the ShopBox favicon set but you can easily upload your own to give your website a personal touch. 4 © 2014 ShopBox (Pvt.) Ltd. All rights reserved User Manual v 1.0 Most web browsers can only display favicons in the .ICO file format and can usually support resolutions of no more than 32 pixels by 32 pixels. If you do not already have a favicon within these criteria, you could (at your own risk) use one of the many available free ‘favicon generators’ which can be searched online and would normally take no more than a couple of minutes to create. Uploading the favicon would be the same process as uploading the logo. Be sure to the file has been selected. when Account & Contact Emails The ShopBox platform has 2 email fields. During initial setup, these fields would be populated with the email address you provided during the registration process and can be edited to the email addresses you desire. The Account Email address would be used to connect your account with ShopBox. You will use this address to log in to your ShopBox merchant account and will receive any notifications regarding your store and account such as new orders from customers and reminders from ShopBox. Your customers would not be able to see this email address and can be used solely for Store management tasks. The Contact Email would be your public email address and would be displayed on your website under the ‘Contact Us’ section as well as on invoices. You would use this email for interacting with your customers. You could use the same email address for both fields or use different email addresses for each to separate one area from the other. It is entirely up to you. Plan Details This is a summary of the plan you are currently signed up on. The button can be clicked if you wish to renew your plan when close to the expiry date. Any days remaining on your plan would be carried over unless you are upgrading to a higher-tiered plan. 5 © 2014 ShopBox (Pvt.) Ltd. All rights reserved User Manual v 1.0 Store Address Details Enter the contact details of your store. This is required for displaying on your invoices and will also be displayed in the ‘Contact Us’ section of your store. If you have a physical storefront, you could enter your operating hours, or leave it blank. Social Media Accounts Enter the URLs of your social media pages into their respective fields. These would show up on the footer of your website so that your customers can follow you across all the differet types of social media accounts. 6 © 2014 ShopBox (Pvt.) Ltd. All rights reserved User Manual v 1.0 Search Engines Optimising your search engine results is not a mandatory requirement for your website, but would certainly assist with getting your website discovered through online search engines. You could add a title for your homepage (usually your store name), add a few keywords about your homepage and a short description (you could mention what it is you are selling, etc.). All the information entered here would be required at a later stage when you are generating your XML sitemap which would be submitted to the search engines. For more information on that, visit the ‘XML Sitemap submission’ section in this user manual, or click the help button on the XML Sitemap Submission panel under store settings. Standards & Formats This field would be set to Sri Lankan time by default and cannot be changed. 7 © 2014 ShopBox (Pvt.) Ltd. All rights reserved User Manual v 1.0 Storefront Password You can protect your storefront with a password if you wish to prevent public access to your website for certain situations such as website construction. After you initially complete the registration process, your website would be protected with a unique automatically generated password which you would be able to view from this section. You may even enter a message such as “Under Construction”, for your website visitors to keep them informed. If you wish to remove the storefront password to allow public access, just uncheck the ‘Password Protect your storefront’ box or click the launch button you would find at the top of the dashboard page. Saving Once done, be sure to click to ensure the any changes would be saved. 8 © 2014 ShopBox (Pvt.) Ltd. All rights reserved User Manual v 1.0 The sliders banners would be displayed on your home page. The image below shows a website with an example slider banner which is located between the navigation bar and the featured products section. You could have a single banner or several rotating banners automatically changing between each one. To add a slider banner, click from the Template Settings panel. 9 © 2014 ShopBox (Pvt.) Ltd. All rights reserved User Manual v 1.0 Title and Description You may add a title and a description to your banner which would appear overlaid on the image. This is not mandatory and can be left blank if desired. The image of the sample slider banner in the previous page shows the title towards the centre-bottom of the image. Slider Image Upload an image to be used as a banner. The accepted file types are JPG, PNG. The accepted dimensions are 970 pixels by 400 pixels. It should be noted that if uploading images not within this dimension, some cropping of the image may occur (i.e. parts of the image would be cut off). Please ensure you upload an image within the specified dimensions to avoid any cropping. Link URL Banners could be configured to link to a certain page when clicked. All you would need to do is enter the URL of the webpage you would like to link to. You can enter a link from within your website (a product page, blog page or category) or even link to an external webpage like your Facebook account. A customer who clicks on the banner would be taken to the page specified. 10 © 2014 ShopBox (Pvt.) Ltd. All rights reserved User Manual v 1.0 Tip: Upload a banner promoting a sale item and link to that item page so that customers could get more information or view the product. Alternatively, you could just leave the link URL blank if you do not want the banner to link to anything. Visibility Select whether you would like to have your slider banner visible to the public or not. Visibility of the banners could be viewed straight from the Template Settings panel, letting you know which banners you have active allowing you to easily manage the sliders. Saving Once done, be sure to click the Template Settings panel. to ensure the slider banner is saved and can be accessed in Editing Sliders If you wish to make changes to a slider banner like, edit the visibility or change a Link URL, click on the View Details icon of the specific slider from the Template Settings panel. 11 © 2014 ShopBox (Pvt.) Ltd. All rights reserved User Manual v 1.0 Categories are displayed on the navigation bar (apart from ‘home’ and ‘contact us’ which are present by default) of your website as shown below. The sub-categories are shown as a drop-down menu from one of the categories. Categories are extremely useful to organise your products, making it easier for your customers to browse through them. It will also help maintain a visually pleasant website. To add a category, click on the dashboard. button from the Categories panel on the This action would take you to the ‘Add Category’ panel where you could begin entering the details for your category. Add a title and an optional description to your category. The title would appear on the navigation bar as shown on the first image of this section and descriptions would be displayed on the category page. 12 © 2014 ShopBox (Pvt.) Ltd. All rights reserved User Manual v 1.0 Parent Category You could then choose to set the category as a parent/main category, or a sub-category of a parent like shown in the first image. If the category you are creating will be a parent/main category, select ‘No Parent’. In the above image, categories will be listed with the sub-categories listed under their parent category prededed by a hyphen (-). It should be noted that sub-categories can only be created once a main category already exists. To place a category under a parent, simply select the parent category from the dropdown box. Sub-categories come in handy when trying to avoid overcrowding the navigation bar with too many category tabs and will also assist in making it easier for your customers to navigate your website. Featured Image Select an image you would like to feature as the face of the category. You could see your featured image as a thumbnail on the categories panel of your dashboard and it will be visible to your customers when they click the ‘All Categories’ link from the footer section of your website. To upload an image, click device. and browse for the file you wish to upload from your Note: Only JPG and PNG file types are permitted. Alt Text, or Alternative Text, is optional and will be shown in the event an image is unable to load due to a customer’s slow internet connection for example. 13 © 2014 ShopBox (Pvt.) Ltd. All rights reserved User Manual v 1.0 Search Engines Optimising Search Engine results is not a mandatory requirement, for your website, but would certainly assist with getting your website discovered through online search engines. You could add a title (or use the same title as the category), add a few keywords about this category and a short description (which again, could be the same as the category description). The SEO URL would, by default, use the title you have given to your category. And that’s it. All the information entered here would be used when generating your XML sitemap which would be submitted to the search engines. Be sure to read the ‘XML Sitemap submission’ section in this user manual, or click the help button on the XML Sitemap Submission panel under store settings for more information. Display Order You can control the order in which your categories appear. The system has a numerical sortation order to determine which categories would appear on the navigation bar first. Enter a numerical value of one (1) to have a category appear first (just after the ‘Home’ tab), and two (2) for another category to appear just after the first and so on. The sortation order would even apply to sub-categories. It should be noted that the default value would be 1 for any category. If left unchanged, the categories would be sorted by the order at which the categories were created. I.e. The first category created would appear first on the navigation bar, followed by the second category created and so on. 14 © 2014 ShopBox (Pvt.) Ltd. All rights reserved User Manual v 1.0 You will be able to view the sortation numbers of all your categories from the category panel on your dashboard. Visibility You can control whether you would like this category to be visible on your website immediately after saving or save and keep it hidden for activation at a later time. Categories will be visible by default, so if you would like it to be hidden, simply select the ‘Hidden’ option prior to saving. Saving Once done, be sure to click Categories panel. to ensure the category is saved and can be accessed in the Editing Categories If you ever wish to edit any of your categories, visit the Category Panel in your dashboard and select the category you wish to edit by clicking on the appropriate category name. 15 © 2014 ShopBox (Pvt.) Ltd. All rights reserved User Manual v 1.0 Products are displayed under relevant categories or featured on your home page. Below is a screenshot of how products are displayed on one of our templates. Important: If you have not created a category and/or associated sub categories, please complete that step prior to proceeding any further. Start adding products Select Products Panel on the ShopBox dashboard and then ‘Add Product’. 16 © 2014 ShopBox (Pvt.) Ltd. All rights reserved User Manual v 1.0 Product name and description This information of your product will be visible to your customers. Complete additional information for your product Before continuing, it is important to note that products could be added as a single item type (E.g. a cupcake) or could contain several options/variants (E.g. a T-shirt can have several size variants such small, medium and large). If your product contains variants, please pay attention to any Variants notes which would contain additional instructions for variants when completing the following fields. Ensure you also decide which of your variants you would designate as the ‘Main’ variant which would be the default option displayed when the product is clicked/accessed. Product Code / SKU: A Stock Keeping Unit (SKU) is for your own reference of your product and would be a unique code you should designate each of your different products (Example: For Raspberry Delight, an SKU could be RBD001). Variants: Each variant, too, would have its own unique SKU, this could be in the form of an additional letter designating each variant (E.g. add an ‘S’ for small). For this field, you should enter a separate unique product code which could be used to define the entire grouping of the product. 17 © 2014 ShopBox (Pvt.) Ltd. All rights reserved User Manual v 1.0 Barcode: Optional code could be entered if your products have any barcode units such as UPC or ISBN. Cost price: Optional –This is not visible to customers and is only used for your reference. Selling price: This is a Mandatory field (all prices are denoted in LKR). Variants: If you have differently priced variants, please enter the price for the main variant. The individual variant prices will need to be input under the variants section. Discounts on Selling Price: If your product will be on discount, you may input the value of the discount in this field to denote that this product is on discount with the net price displayed (as shown in the example below). Variants: Please enter the discount as featured in your main variant. Net price: This will be calculated automatically and displayed to your customers. It will normally be the same as the selling price unless a discount has been entered, at which point it will display the difference between the selling price and the discount amount. Taxable product: Please select this checkbox, only if you are required to collect taxes on this product. It is the merchant’s responsibility to determine whether any of their sales are liable for VAT or other taxes. Please ensure that you have included the correct taxation figures under Taxes. By default, taxes would be calculated and added to the Total price of the product. If you are already including tax in your displayed price, you can change this option in the Taxes Panel found under store settings. Product Weight: This is in kilograms and should be filled if you offer delivery of your product with your shipping fees dependent on the weight of the product. Variants: Enter the weight of your main variant. 18 © 2014 ShopBox (Pvt.) Ltd. All rights reserved User Manual v 1.0 Track Inventory: If you would like the platform to track your stock, please tick the ‘Track Inventory for this product’ checkbox. Once clicked, enter a value in the ‘Quantity in Stock field’ (Variants: please leave the ‘Quantity in Stock’ field at 0 if you have variants. The variants will have individual stock quantities which will be added in the Variants/Options section.) The information on stock quantity will be used to automatically track the number of stock you have remaining in your inventory as orders are made. You will be able to view your stock levels from your Products Overview Report in the Reports Panel. If your inventory level reaches 0, your product would automatically display ‘SOLD OUT’ for that specific product or option. If you wish to allow purchases even if stock levels reach 0, click the ‘Allow customers to purchase this product, even if it is not in stock’ checkbox. Variants/Options As explained earlier, variants (or options) or used if you have products which come in several variations of sizes, colours or types of materials (For example, a pair of shoes of a particular design can come in a variation of shoe sizes). Select the ‘This product has multiple options’ checkbox (shown above) if your product contains any options/variants (If you do not have any variants, leave this box unchecked and continue on to the next section). When selected, the following will be displayed: 19 © 2014 ShopBox (Pvt.) Ltd. All rights reserved User Manual v 1.0 Select the options you would like to activate (by ticking the checkbox) and type in and enter the values as shown below: After selecting your options and entering the corresponding values, select the ‘Generate variants based on the options above’ checkbox. After the variants are generated, you may enter the Pricing details, SKU, Barcode, Weight and quantity for each of your variants (as seen in the screenshot above). It is here that you would also be able to designate which would be the main variant to match some of the information entered in the earlier section. If you have opted to track inventory for this product, you would need to enter the quantity in stock of each variant in the Quantity fields of the respective variant. Note: It is important you generate all your variant options prior to saving as no new options can be added when returning to edit the product. (E.g. if you generated size variants only, you will not be able to add any color variants if you return to edit the product after saving). 20 © 2014 ShopBox (Pvt.) Ltd. All rights reserved User Manual v 1.0 Selecting a Category and Entering Product Tags By selecting a category, you will place your product in an appropriate section of your online store. Click on the text box to view all available categories or start typing to search for specific categories. Select a category by clicking on it. You can feature the same product in several categories of your store by selecting multiple categories. Note: If you have not created a specific category beforehand, you will need to create that category from the Categories Panel before proceeding. You could save your product at this point without entering a category (click save on the bottom of the page), and return to edit the product after you have created the specific category to enter it into this section. Your product would not be displayed on your storefront until a category has been selected. Tags (key words) are useful to help customers locate certain items when they search your website. To add a tag, simply type the word (or words) and hit enter. Product Photos The importance of selecting good pictures cannot be understated in presenting your products to your clients. 21 © 2014 ShopBox (Pvt.) Ltd. All rights reserved User Manual v 1.0 To upload an image, click device. and browse for the file you wish to upload from your Note: Only .JPG and .PNG file types can be uploaded. You may upload several images for a product. Select an image you would like to designate as the main image. This main image will be featured as the thumbnail for the product and would be the first image seen when the product is selected. ‘Alt Text’ is optional and will be shown in the event an image is unable to load due to a customer’s slow internet connection, for example. The alt text would also be displayed when a user points at the image with the mouse. Search Engine Search Engine optimisation is not a mandatory requirement for your website, but would certainly assist with directing web traffic through online search engines. You could add a title (or use the same title as the product), add a few keywords about this product and a short description of the product. The SEO URL would, by default, use the title you have given to your product. All the information entered here would be used when generating your XML sitemap which would be submitted to the search engines. Be sure to read the ‘XML Sitemap submission’ section in this user manual, or click the help button on the XML Sitemap Submission panel under store settings for more information. 22 © 2014 ShopBox (Pvt.) Ltd. All rights reserved User Manual v 1.0 Visibility You can control whether you would like this product to be visible on your website immediately after saving or save and keep it hidden for activation at a later time. You could even select a date and time to automatically publish the product so that it can be visible to the public. Products will be set to visible by default, so if you would like it to be hidden, simply select the ‘Hidden’ option prior to saving. Saving Once done, be sure to click Products panel. to ensure the product is saved and can be accessed in the Once you have saved your product, you will see the “Success!” banner (as shown above). Editing Products If you ever wish to edit any of your products, visit the Product Panel in your dashboard and select the product you wish to edit. Note: As mentioned earlier, no new variant options can be added during editing. You would be required to delete all the variants and start the variants section over again. Featured Products Once you have added your products, you may opt to highlight a select number of products as ‘Featured’. Your featured products will be prominently listed on your home page as shown in the following screenshot. 23 © 2014 ShopBox (Pvt.) Ltd. All rights reserved User Manual v 1.0 To feature a product, select the button from the Products Panel. By clicking on the respective products, you can set/remove products as being featured. Be sure to click the button to save any changes to your featured products. 24 © 2014 ShopBox (Pvt.) Ltd. All rights reserved User Manual v 1.0 A page is useful for adding further details about your store. The pages would be listed on the footer section of your website under ‘Information’ (as shown below): Pages should be related to letting your customers know more about your store. Examples of pages would be: About Us FAQ’s Sizing Charts Careers Press Releases Remember, your policies such as Shipping and Refunds would be added in the Store Terms & Policies settings page found under Settings>Store Settings>Store Terms & Policies. It is recommended to avoid overcrowding the Information section with too many pages with six being the ideal maximum. For your own discussion articles, please note that we also provide a blog feature which is available on certain packages. To add a page, click on the button in the Pages panel on the dashboard. 25 © 2014 ShopBox (Pvt.) Ltd. All rights reserved User Manual v 1.0 Page Details Give your page a name in the title section and enter your intended content into the content section. Search Engines Optimising search engine results is not a mandatory requirement for your website, but could certainly assist with getting your website discovered through online search engines. You could add a title (or use the same title as the page), add a few keywords about this page and a short description of what the page is about. The SEO URL would, by default, use the title you have given to your page. And that’s it. All the information entered here would be used when generating your XML sitemap which would be submitted to the search engines. Be sure to read the ‘XML Sitemap submission’ section in this user manual, or click the help button on the XML Sitemap Submission panel under Store Settings for more information. 26 © 2014 ShopBox (Pvt.) Ltd. All rights reserved User Manual v 1.0 Visibility You can control whether you would like this page to be visible on your website immediately after saving or save and keep it hidden for activation at a later time. Pages will be set to visible by default, so if you would like it to be hidden, simply select the ‘Hidden’ option prior to saving. Saving Once done, be sure to click Pages panel. to ensure the page is saved and can be accessed in the Editing Pages If you ever wish to edit any of your pages, visit the Pages Panel in your dashboard and select the page you wish to edit by clicking on the appropriate page name. 27 © 2014 ShopBox (Pvt.) Ltd. All rights reserved User Manual v 1.0 The shipping module determines the shipping cost customers would see for the items they order appearing on the checkout stage of their purchase transaction. It will also restrict delivery to only the locations you designate to prevent any orders for delivery outside of your delivery areas. Whether you offer shipping for free, have a constant shipping rate, or charge variable shipping rates according to certain parameters; the shipping module will allow you to customise your shipping rates accordingly. Rates for shipping are usually determined by the courier you have partnered with. Please ensure you are aware of the shipping charges before proceeding with determining a pricing strategy for shipping. Selecting Your Shipping Type Select the type of shipping your store would offer. i.e. Pick up from Store or Ship by Shipping Agency or both. 28 © 2014 ShopBox (Pvt.) Ltd. All rights reserved User Manual v 1.0 If you are offering Pick up from Store, all you would need to do is enter some instructions for the customer into the text box (pictured below) such as ‘Contact us with your order number to arrange a pick up time’ and click . If you are offering shipping to your customer, select ‘Shipping by Shipping Agency’ where you would be required to enter the name of the shipper and the email address specified by the shipper to use when notifying them of a shipment ready to be dispatched and taken to your customer. Click to save these details. Next, you would select where you would ship your products to: locally or internationally. To determine where you will be able to ship is your responsibility and whether you have an agreement with the courier to ship internationally. It should also be noted that Sri Lanka may require licensing and fees when commercially shipping overseas, so please refer to the relevant authorities for clarification. 29 © 2014 ShopBox (Pvt.) Ltd. All rights reserved User Manual v 1.0 Setting up shipping rates Your courier agency would have provided you with the rates for shipping your products. Ensure you have that document ready to continue with this step. The courier would determine the rates for shipping products of varying weights/prices and destinations. We would need to enter those rates in order to automatically determine the shipping costs when a customer is ordering a product for delivery. Firstly, you would need to check the shipping rates document to determine whether the shipper is charging by weight or by amount (total price of order) and select the appropriate option. You would then be required to create your delivery zones. Zones consist of the cities/locations which fall under the same delivery rates. 30 © 2014 ShopBox (Pvt.) Ltd. All rights reserved User Manual v 1.0 Click on the button to create a zone and list which cities would belong to that zone. Select the cities from the left panel to add to the zone list on the right panel and be sure to click . For example, if shipping to Colombo, Wattala, Kelaniya and Dehiwala-Mt. Lavinia and Kotte are the same rates, group them into a single zone and so on for the other cities within your delivery range. Note: Undesignated cities would mean shipping would not be available to those locations and your customers would not be able to select them during the checkout process (as shown below). 31 © 2014 ShopBox (Pvt.) Ltd. All rights reserved User Manual v 1.0 To enter the rates for each zone, select the appropriate shipping rate tab, i.e. either to calculate shipping by the total price of the order (amount-wise) or by the weight of the order (weight-wise) depending on which rate you selected to activate. In the example shown below, the user decided to activate the shipping rate based on order weight, so the user would then need to select the shipping rate tab (weight-wise) to enter the values for this rate. Then, set the different rates for each zone by entering the rate for their respective weight range as shown below. (Please note that if you would have several delivery zones, you would need to set the rates for each weight range within the respective zones.) 32 © 2014 ShopBox (Pvt.) Ltd. All rights reserved User Manual v 1.0 After you set the rates, be sure to click . Note: Ensure that the weights are added for each product in the Products panel to ensure correct shipping rates will be calculated and displayed (as shown below). For international shipping, the setting up of rates would be exactly the same as the steps outlined above apart from the list of countries instead of cities. Note: For international shipping, there may be additional charges faced by your customers in the form of duty or import taxes. This should be made clear to your customers in your shipping policy. Editing your shipping rates You would always be able return and edit your shipping rates through the Shipping settings panel at any time. Be sure to remember to update your rates if ever there is a change in delivery pricing from your courier agency. 33 © 2014 ShopBox (Pvt.) Ltd. All rights reserved User Manual v 1.0 Free shipping zones? If you intend to offer free delivery for your customers, place the cities for which free delivery would apply into a single zone (If you intend to offer island-wide free delivery, group all cities into the single zone). Do not set the shipping rate for this zone, all deliveries to these cities, would show up as free during checkout. Offering free delivery may be a useful strategy to help increase your sales. Still confused? Carefully follow the steps in the manual and you should be able to complete setting up this section with minimal trouble. However, if you are still finding things a little difficult to understand, please contact the ShopBox support team by telephone or email and we would be happy to help explain the steps to you or answer any of your questions. 34 © 2014 ShopBox (Pvt.) Ltd. All rights reserved User Manual v 1.0 Payment options require setting up to designate the different types of payment you choose your store to accept. Firstly, access ‘Payment Options’ under the Settings Tab. You will be able to see the available payment options for your store (this is based on your ShopBox package). Visa/MasterCard - Internet Payment Gateway (IPG) Select this option to make use of the Internet Payment Gateway (IPG) to accept VISA or MasterCard debit and credit card payments for your online store. Bank Transfer Update your bank information to enable your customers to pay you directly to your bank account. Please ensure that this information is complete and includes all the details necessary for your customers to deposit or transfer the payment to your account. Once you are satisfied with the information, you may click ‘Activate’. This information will be visible to customers who opt to pay by Bank Transfer/Deposit. 35 © 2014 ShopBox (Pvt.) Ltd. All rights reserved User Manual v 1.0 On completion of checkout, your customers would be requested to email you a copy of the deposit/transfer receipt along with the order details which you would then be able to use to confirm the receipt of the payment at your bank. Cash On Delivery If selecting Cash on Delivery (COD), you may provide vital information to customers who opt to pay via this method. Please ensure that your channel for delivery (third party/shipper) supports this method of payment. Add any instructions for your customers to note when utilising this payment method. Deactivating payment options To deactivate any payment option, select the corresponding ‘Deactivate’ button. 36 © 2014 ShopBox (Pvt.) Ltd. All rights reserved User Manual v 1.0 Whenever customers place an order on your website, you will be notified immediately by email and all of your orders would be available on your Orders dashboard panel. Specific orders could be located by refining the criteria on the search function available on the top of the panel. For example: if you would like to locate orders which are pending shipment, you could select “pending” under delivery status and click search. To view/manage an order, click on the corresponding order number. All the details regarding the order are displayed in the order page. Updating order statuses Managing your orders involve updating statuses which are necessary for automated email messages to be generated and sent to the customers and the shipping agency, and it will also be required for accounting and reporting purposes. Payment status Payments are recorded from every transaction and in order to help keep track of payments from all the different payment options, a payment status setting has been provided. This helps record all the different statuses a merchant is likely to encounter from any commercial transaction. 37 © 2014 ShopBox (Pvt.) Ltd. All rights reserved User Manual v 1.0 The statuses would reflect accounting reports and also generate email notifications to be sent to customers if transactions were successful. Following is a run through of the different payment statuses and which processes they may affect. Received: The payment for the order has been received and accounted for by the merchant. Setting this status sends a notification to the customer. This status is also a criteria to finalising the order to receive an order status of ‘Complete’ on your dashboard. Failed: Payment has failed to be received. Pending: Awaiting payment, or confirmation of whether payment has been received. Refund: When the merchant returns the payment back to the customer. Setting this status would inform the customer that a refund has been processed. Chargeback: This applies to credit card payments. A chargeback is performed by the customer through their bank/credit card company and is essentially a recall of their funds without prior engagement with the merchant. This status would not initiate any action but is purely for accounting and records purposes only. *Note: All payments made through the IPG (Internet Payment Gateway) would update the payment status automatically (except for chargeback). Cash on delivery and bank transfer payment methods should only be manually updated when receipt of payment has been confirmed. Delivery Status Each stage would need to be updated manually. Be sure to update statuses promptly to ensure your customers and shippers are kept notified and your records kept up-to-date. Following is a description of each shipping status and what actions occur when the status has been saved. Notify shipper: Will automatically send out a message to your shipping agent containing the shipping details and that the order is awaiting collection from your store. Dispatched: Will notify the customer when the order is with the courier and en route for delivery. Additional information may have to be entered (if any) which would be provided in the email such as the shipping agency name, the tracking number and the date of dispatch. 38 © 2014 ShopBox (Pvt.) Ltd. All rights reserved User Manual v 1.0 Delivered: Notifies the customer that delivery is complete which also thereby completes the process of the order for your records and accounts. Returned: Notifies the customer that the order has been returned to the merchant by the courier. Cancelled: Notifies the customer that the order has been cancelled due to certain/unforeseen circumstances and requires further communication between both parties to arrive at an acceptable solution. *Note: for purchases made using the Web POS feature, Delivery status would automatically be set to delivered. Order Status This is the overall status of the order and would either show as Complete or Incomplete depending on the Payment and Shipping statuses. A ‘VOID’ status can be manually selected for complete orders which you may have to mark it as utilized. This is used for orders involving events passes/tickets where a ticket can be voided once used to gain access to a venue, etc. Just click the dropdown box and select the ‘VOID’ order status. Printing You can print an Order invoice using the button. Saving Once done, be sure to click to ensure the statuses are saved. 39 © 2014 ShopBox (Pvt.) Ltd. All rights reserved User Manual v 1.0 Coupons or gift cards are very useful to attract customers to your store, and ShopBox makes it easy for you to generate and manage your own codes. You could use discount coupons to promote any special sales or even generate unique single-use gift card codes to reward any of your loyal or special customers. Creating your codes You could create a code of your own or generate a code by clicking the button to randomly generate your own unique code. You can set a limit on the number of uses for the code or check the ‘No Limit’ box to allow unlimited use of the code. Defining the type/value of the discount or voucher You will be able to select whether you want a fixed amount in LKR or a percentage (%) to be taken off the final bill of the order. You will even be able to specify whether the coupon would only apply for orders above a certain amount. Coupons would be required to have an expiration date and, by default, the system would display the present date of the day the coupon is generated. 40 © 2014 ShopBox (Pvt.) Ltd. All rights reserved User Manual v 1.0 In the example shown above, a coupon for a LKR 500 voucher/gift card is being created. The fixed LKR amount field is selected and a value of LKR 500 set to be taken off for orders of any value (orders over the value of zero LKR). The expiry of this coupon has been set to the 21st of June 2014. Saving Once done, be sure to click Coupons/Gift Card panel. to ensure the coupon is saved and can be viewed in the The coupon code can be posted on media or marketing material or even emailed to customers, and they would need to apply the code during the checkout process. *Note: When customers apply a voucher or gift card to their orders, the value of the order cannot be lower than the value of the voucher. For example, if a customer has an order total of LKR 400, they would not be able to apply a voucher of value LKR 500. 41 © 2014 ShopBox (Pvt.) Ltd. All rights reserved User Manual v 1.0 Deals can be submitted to the ShopBox deals section for approval. Any deals which we feel are worthy of being featured in our Deals section, would be approved and it won’t cost you a thing! Prerequisites for submitting a deal for approval To submit a deal, your product should already be designated as discounted on your store. This can be done by adding a discount on the selling price of the product, from the products panel as shown in the screenshot below. (Note: Before proceeding, it is recommended to add a deal as an entirely separate product in the product panel. That is to say, if you have an existing product temporarily on discount, and you wish add that to the deals section, it would be advisable to submit it as an entirely separate and newly created product with a unique SKU, while setting the usual full-priced product to ‘hidden’, if you wish. This would help separate the amount of stock you would like to have available for the period of the deal, and be displayed separately for your records.) Selecting a product for submission as a deal Click on select product, and all your products with discounts would be displayed. Select the product you wish to submit to ShopBox Deals. 42 © 2014 ShopBox (Pvt.) Ltd. All rights reserved User Manual v 1.0 Visibility and setting deal duration The visibility of the product is determined by the ShopBox Admin Team and will be visible on the deals section once approved. You will be notified by email when a product has been approved or not. Set the start date & time and the end date & time of the deal and click to submit the deal. You would be able to view all your submitted deals from the Deals panel on the dashboard. You would be notified by email if your deal has been approved or rejected. Things to consider: - Once a deal has been submitted, it cannot be edited; submitted deals can only be deleted. - If the product attached to the submitted deal is edited in any way, the deal would be removed from the ShopBox deals section automatically and with immediate effect without any notification. You would still be able to re-submit the deal which would need to be approved again before appearing on the ShopBox Deals page. 43 © 2014 ShopBox (Pvt.) Ltd. All rights reserved User Manual v 1.0 Blogs are useful for engaging with your customers and to share advice or to discuss about new products/offerings. Activating your blog The blog feature is a very handy tool to communicate news or your views with your customers and followers, but if blogging doesn’t suit you, we provide the option to leave it off your website. Check the box to activate the blog feature to be displayed on your website and click to enable the blog section to be visible on your storefront. Managing a blog category A blog category is useful for organising your blogs and would be displayed on a panel in the Blog section of your store. You can add blogs to the relevant categories, and your customers or followers could click on the relevant categories to view the blog posts linked to them. Click on from the Blogs Panel to edit and add categories. You would be able to view all your blog categories along with their visibility statuses. Click on the Detail icon to edit each category. 44 © 2014 ShopBox (Pvt.) Ltd. All rights reserved User Manual v 1.0 To add a category, click . Add your blog category title and decide on the visibility of this category. Your blog categories are visible by default, but if you wish to keep it hidden for the time being, select the ‘Hidden’ option prior to clicking the button. Adding a blog post Click to open the ‘Add blog post’ panel. Enter the details of your blog such as the title and content. 45 © 2014 ShopBox (Pvt.) Ltd. All rights reserved User Manual v 1.0 Select the blog category to place the blog post under and enter a few tags to assist any searches performed. Select an image which would appear on the top of the blog post. Alt Text, or Alternative Text, is optional and will be shown in the event an image is unable to load due to a customer’s slow internet connection, for example. Optimising search engine results is not a mandatory requirement for your website, but could certainly assist with getting your website discovered/noticed through online search engines. You could add a title (or use the same title as the blog post), add a few keywords about this blog and a short description of what the blog article is about. The SEO URL would, by default, use the title you have given to your blog. All the information entered here would be used when generating your XML sitemap, which would have to be submitted to the search engines. Be sure to read the ‘XML Sitemap submission’ section in this user manual, or click the help button on the XML Sitemap Submission panel under Store Settings for more information. 46 © 2014 ShopBox (Pvt.) Ltd. All rights reserved User Manual v 1.0 You can control whether you would like this blog post to be visible on your website immediately after saving or save and keep it hidden for activation at a later time. You could even select a date and time to automatically publish the post to the public. Posts will be set to visible by default, so if you would like it to be hidden, simply select the ‘Hidden’ option prior to saving. Once done, be sure to click Blogs panel. to ensure the post is saved and can be accessed in the 47 © 2014 ShopBox (Pvt.) Ltd. All rights reserved User Manual v 1.0 Google Analytics is a tool provided by Google and can be used by websites for learning about your site audience by tracking the number of visitors to your store, from where those visits are coming from and also what sorts of devices they are using. Such information is critical in helping you formulate an effective marketing plan and may help save you money on marketing expenses by showing you which channels you should focus on primarily. For more information on Google Analytics, visit www.google.com/analytics or click the button which will take you to the Google Analytics website. In order to use Google Analytics with your store, you will need to sign up for an account on the Analytics web site (Follow the instructions on the Google Analytics website). Be sure to copy the supplied tracking code on completion. Go back to your ShopBox Dashboard and paste the Google Analytics tracking code into the ‘Google Analytics Code’ field (as shown below) and . You will now be able to begin learning about your website audience by visiting your Google Analytics account or by using the Google Analytics app on your smartphone. *Please note that ShopBox is in no way affiliated with Google Inc. and only allows linking your website to Google Analytics as a third party application. 48 © 2014 ShopBox (Pvt.) Ltd. All rights reserved User Manual v 1.0 An XML Sitemap is a map of the different sections of your site generated in XML file format. You would need to submit this file to the various search engines to optimize your store links in search results. Before generating a sitemap, you would need to enter search engine related data into your webpages. You would have seen these sections when creating your each categories, products, webpages, and your individual pages and would look similar to what is shown below: Click tools. and then copy and paste the sitemap into the search engine’s webmaster Below, you would find the links to a few popular search engine webmaster pages where you will need to upload the XML sitemap file, once generated. You would need to register for an account with each search engine which would usually be free. Follow the instructions provided by the search engines carefully. Please note that ShopBox is in no way affiliated with any of the search engines mentioned. Google: You will need a Google Webmasters account before you can submit your sitemap. You can sign up/sign in at http://www.google.lk/webmasters/ For help submitting your sitemap to Google please https://support.google.com/webmasters/answer/183669?hl=en visit the following URL: Bing: You will need a Bing Webmasters Tools account before you can submit your sitemap. You can sign up/sign in at http://www.bing.com/toolbox/webmaster For help submitting your sitemap to Bing please visit the http://www.bing.com/webmaster/help/how-to-submit-sitemaps-82a15bd4 following URL: 49 © 2014 ShopBox (Pvt.) Ltd. All rights reserved User Manual v 1.0 Yahoo!: This used to be managed through Yahoo! Site explorer however with the completion of algorithmic transition from Yahoo! to Bing now Yahoo! Search has merged Site Explorer into Bing Webmaster Tools. Webmasters should now be using the Bing Webmaster Tools to ensure that their websites continue to get high quality organic search traffic from Bing and Yahoo!. Follow the same steps as Bing. 50 © 2014 ShopBox (Pvt.) Ltd. All rights reserved User Manual v 1.0 51 © 2014 ShopBox (Pvt.) Ltd. All rights reserved User Manual v 1.0 Certain products you offer for sale may be liable for taxes. It is the responsibility of each merchant to determine whether or not they are liable to collect government taxes for their products. Any products which are taxable will need to be designated as a taxable product from the respective product page (as shown below). This panel is available for you to adjust your tax rates as required (Tax rates would be displayed on invoices along with the total tax amount). Currently, tax rates can only be adjusted for Sri Lanka. Taxes can be calculated in one of two ways. Taxes can be calculated as a percentage of the final bill amount, or taxes could already be included in the pricing. Examples of both methods are shown below with the first image showing taxes added on to the item price and the following example showing tax already included in the pricing. 52 © 2014 ShopBox (Pvt.) Ltd. All rights reserved User Manual v 1.0 For instances where tax has already been included in your displayed product price (as shown in the second example above), select the “All taxes are included in my prices” checkbox. This means that the taxes have already been factored into your final product price. To calculate the tax amount breakdown from your final pricing, ShopBox would use the equation shown below. Note: This equation is used to calculate the tax amount if taxes are already included in your displayed pricing of each of your products. Saving Once done, be sure to click to ensure that any changes are saved. 53 © 2014 ShopBox (Pvt.) Ltd. All rights reserved User Manual v 1.0 The Web-based Point-of-sales feature enables you to bring ShopBox into your physical store! Use the Web POS feature as you would a cash register in your store. Web POS enables you to record all your orders and inventory from your physical sales and print invoices to supply to customers. The Web POS feature also enables you to track your product inventory in real-time for both your online and store sales. All you need is an internet-enabled device like a laptop or a tablet to access the ShopBox dashboard. Select the products All products would be displayed in the POS system. It is possible to search for specific products using the available search function. To add an item to the shopping cart, select the desired product to open the product page and select add to cart. On the top right you will see the amount of items present in the cart. If you wish to clear the cart, just click the ‘trash’ button situated next to the items in your cart notification. When you have completed selecting the products, click to proceed. 54 © 2014 ShopBox (Pvt.) Ltd. All rights reserved User Manual v 1.0 Selecting a customer The next page would show the items in your cart and the subtotal amount. Before proceeding, you would be required to select the relevant customer tab, i.e. Select a registered customer from your customer database, enter details of a new customer or proceed with checkout as an anonymous walk-in customer. These details are required for the invoice receipt and order records. After you enter/select the customer details, click checkout stage. to proceed to the next Order Review & Payment Confirmation Review the order details and the total amount which is inclusive of taxes (if any). Any voucher code can be applied at the ‘use coupon code’ section to adjust the total price amount. Select the desired payment mode and click to complete the transaction. 55 © 2014 ShopBox (Pvt.) Ltd. All rights reserved User Manual v 1.0 Payments are collected in cash, cheque or (if already obtained from your financial institution) via a separate card swipe machine. It should be noted that IPG payments cannot be performed using the Web POS feature and are only for purchases made by your customers online, through your store website. Printing Invoices After confirming and paying, the invoice for the order would be produced. The invoice would contain all the order and customer details (if any) along with the store details. To print the invoice, click the button. 56 © 2014 ShopBox (Pvt.) Ltd. All rights reserved User Manual v 1.0 Manage staff access by assigning permissions to your staff to determine the different areas of the platform they should have access to. Use the staff access table to determine the permissions each user role would have access to. The Staff Access settings panel would display a list of all the staff added and the roles they have been assigned. To add a staff member, click the button on the Staff Access settings panel. Enter the details of the staff member you wish to add and assign the role according to the permissions you wish to grant that staff member. The permissions for each role can be seen on the table in the following page of this manual (it is also located on the Add Staff Member page below the staff member details). Note: Your staff would be able to change their password from the Manage Profile tab (located on the top right) after they log in to their account. Only Administrators and the Store Owner can change user roles and staff email addresses. It should also be noted that the Store Owner’s account cannot be deleted. 57 © 2014 ShopBox (Pvt.) Ltd. All rights reserved User Manual v 1.0 Permissions for each role 58 © 2014 ShopBox (Pvt.) Ltd. All rights reserved User Manual v 1.0 Deleting your store would mean a complete and permanent deactivation of your store which includes the removal of your store from the public domain including all of the content, reports and your store’s URL. Once action is performed, it cannot be reversed. As this is a permanent action, you may want to first talk to us about your reasons for leaving and we shall see if we may a solution in place for the issues you might be facing with our platform. Contact us via email on [email protected] or call us on (+94) 774 670 090. If you are sure you would like to proceed with deleting your store, click the button (located on the bottom of the Store Settings panel) which will then prompt you to confirm this action by entering your account password prior to proceeding. Once you enter your password, press the button and your site would immediately cease to be available, and you would be redirected to the merchant login page with a ‘Store Deleted’ confirmation message. It is our regret to see you go, and it would be appreciated if you could give us your reason for leaving by emailing us on [email protected] . We value your feedback and we hope it would assist us in improving to better serve our customers and clients. 59 © 2014 ShopBox (Pvt.) Ltd. All rights reserved User Manual v 1.0 Analytics: A tool to help keep track of the visitors to your store. This does not collect personal information about your visitors, only aggregate information such as demographics and number of page/site visits and the origins of those visits (from which page they came). This could help you formulate marketing plans or product strategies to improve sales. Dashboard: The back-end/control-panels of your store. The dashboard is where you would make changes to your store’s appearance and settings, as well as manage your products, orders or your other day-to-day activities of your website. Favicon: A favicon is the icon of a website and is displayed on the page tab of the web browser. IPG: Internet Payment Gateway. This is the secure system used to process online credit card payments and is supplied through a licensed banking institution. Merchants: Businesses trading in goods and/or services for sale to customers. SEO: Search Engine Optimisation is a marketing tool which assists in optimising your website in search engine results. This can be done using several methods to help get your website at the top of relevant searches. Sitemaps and page tags may assist in optimising your website to reach the right individuals when they perform the relevant searches. Shopping Cart: An ecommerce feature which allows users to select items from an online store intended for eventual purchase. Items are added to the cart by while browsing the products and when ready to proceed with the order, the customer selects checkout. Template: A predefined layout of a website each with its distinctive settings, options and designs. URL: This is the address or link a website or page. The URL is seen on the browser address bar. Variants: (or options) are the different variations a single product may have, such as sizes and colors. For example, products like shoes and clothes would have different sizes. Web POS: Web-based Point of Sales. A Point of Sales system records your transactions and sales to help keep track of inventory and earnings. Web-based means that the POS system is operated online via a web browser and in this case would be linked to your secure ShopBox account. XML Sitemap: The sitemap is the structure of your website which is saved in the XML file type when generated via ShopBox. This file is then submitted to search engines to display a basic structure of your site in public search results. 60 © 2014 ShopBox (Pvt.) Ltd. All rights reserved User Manual v 1.0 Support E: [email protected] T: (+94) 774 670 090 Enquiries/Information E: [email protected] T: (+94) 753 111 222 Feedback [email protected] Billing [email protected] 61 © 2014 ShopBox (Pvt.) Ltd. All rights reserved