1
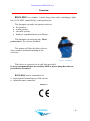
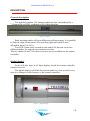
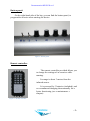
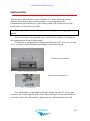
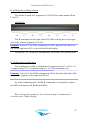
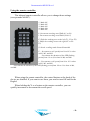
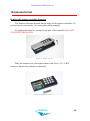
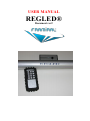
USER MANUAL REGLED® Document rev2 Documentation REGLED rev2 Overview REGLED® is a cylinder, 1 meter long, 6cms wide, containing a light bar of 126 LED, controlled by a microprocessor. The therapist can make the patient work on: the fixation, ocular pursuit, saccadic system, head/eye synchronization (oscillopsy). The therapist can associate the ‘Head pointer lazer’ for a better feedback. The patient will then be able to have a better control and understanding of the exercises. Figure 1 - Headpointer This device is powered via a wall plug provided. It is not recommended to use another kind of power plug than the one provided by Framiral. REGLED® can be controlled via: button panel located on top of the device, infrared remote controller. PRODUCT -1- Documentation REGLED rev2 DESCRIPTION General description: The light bar contains 126 luminous adjacent dots, materialized by a 7.62mm wide red LED, rendering a 960.12mm long bar. Figure 2 - Regled Each operating mode will set a different scrolling strategy. It is possible to limit de range of movement. The scrolling light movement is also adjustable from 10 to 99°/s. Two LED (5mm wide) located at each end of the bar can run in two different modes, for extreme excentration exercises. The two modes (6 and 7) for these exercises are not available on the remote controller. Digital display: On the left side, there is a 2 digits display, beside the remote controller infrared receiver. The digital display will flash the current mode for a few seconds every time it is changed via the buttons, or the remote controller. Figure 3 – Digital display -2- Documentation REGLED rev2 Button panel: On the right-hand side of the bar, you can find the button panel, to program the exercise when starting the device. Figure 4 – Button panel Remote controller: The remote controller provided allows you to change the settings of an exercise while running. Its range is about 3 meters from the infrared sensor. It is powered by 3 batteries (included), and we recommend changing them annually for a better functioning (see « maintenance » chapter). Figure 5 – Remote controller -3- Documentation REGLED rev2 INSTALLATION The device is calibrated to run at a distance of 1 meter from the patient. Indeed, the luminous dot scrolling speed (°/s) corresponds to the instantaneous speed of the eye in its socket (head still) or the speed of the head relative to the neck (eye still). Any other distance from the patient would give a wrong angular speed. The device has to be mounted on a vertical wall, at about 1.2m high so the sitting patient’s head is horizontal. The device is mounted on a rotating wall bracket (360° free), so you can use it vertically or horizontally depending on the clinical need. Wall bracket installation Figure 6 – Mounting the Regled Wall bracket mounting kit. Figure 7 – Wall mounting The wall bracket is mounted on the bar. Rotate the bar 90° so you can access to the 2 holes spaced apart 8cms. Mark the spots on the wall, drill the two holes, insert the wall anchors, and screw the wall bracket to the wall. -4- Documentation REGLED rev2 Electric connection: You can plug the transfo to 110V or 220V, with the appropriate plug socket (EU/US). Connect the other end at the back of the device. Figure 9 - Transfo Figure 8 – Bar side connection The device can be left connected all the time with no risk. The power consumption on Sleep mode is almost null (less than 20mW). Power on/off : A power switch is located on the Regled to turn it on and off (M/A). Every time the device is turned on, it will apply the current button settings. Figure 10 - ON/OFF switch -5- Documentation REGLED rev2 USING THE REGLED Set the initial parameters: Figure 11 - Buttons M: Operating modes: M1: scrolling left to right, M2: scrolling right to left, M3: alternate scrolling (left – right - left), M4: random spot: unpredictable, M5: random pursuit: unpredictable direction, delay, speed, M6: alternate extreme spots: the two external LED alternatively turn on, at stable frequency, M7: random extreme: the two external LED randomly turn on . S: Linear or Sinusoidal: Switch from linear scrolling to sinusoidal. For mode M1, M2 et M3 only. V: Scrolling speed: °/s – check that the distance between the device and the patient is 1m. The speed varies from 10 to 99°/s for M1, M2 and M3 mode. For the M4, M6 and M7 modes, the frequency is specified in 1/10s from 1.0 to 9.9 seconds. -6- Documentation REGLED rev2 F: Shifting the scrolling window: The led bar is made of 8 segments of 16 LED, here under marked from F1 to F8: SEGMENTS: F8 F7 F6 F5 F4 F3 F2 F1 The F command sets the right end of the LED working area to the right end of the selected segment (F1 to F8). Example: if set to F5, the LED working area will be from the left end of the bar, to the right end of F5, so the left half of the Regled. The special ‘FC’ mode will automatically center the LED working area. L: Width of the working area: The working area width is divided into 8 segments from L1 to L8. L1 is 1 segment long, L2 is 2 segments long etc…L8 is the maximum size. Example: if set to L2, the LED working area will be from the right end of the selected Fx segment, to the right end of Fx-2. So when combining the L and the F commands, it is possible to adjust the LED working area on Width and Offset. When setting the parameters, the selected setting is displayed for 3 seconds on the 2 digits display. -7- Documentation REGLED rev2 Using the remote controller: The infrared remote controller allows you to change those settings (except mode M6/M7): 1: Mode M1 2: Mode M2 3: Mode M3 4: Mode M4 5: Mode M5 L: Increments working area Width (L1 to L8) l: Decrements working area Width (L8 à L1) F: Shifts the working area to the left (F1 - F8 to FC) f: Shifts the working area to the right (FC to F8 F1) S: Switch scrolling mode Linear/Sinusoidal V: - Increments scroll speed from 10 to 99°/s when in M1, M2, and M3. - Increments the duration of the LED flashing period from 1.0s to 9,9s when in M4, and M6. v: - Decrements scroll speed from 99 to 10°/s when in M1, M2, and M3. - Decrements the duration of the LED flashing period from 9.9s to 1.0s when in M4, and M6. When using the remote controller, the control buttons at the back of the device are disabled. If you want to use them, you need to turn Off and On the Regled. When holding the V or v button on the remote controller, you can quickly increment or decrement the scroll speed. -8- Documentation REGLED rev2 MAINTENANCE No maintenance is necessary. The device is made to be set up in a low humidity location, at room temperature (10 to 35°C). Avoid liquid splashes on the device and the remote controller. Remove dust regularly with a dry cloth. -9- Documentation REGLED rev2 TROUBLESHOOTING Replace the remote controller batteries: The batteries lifetime depends on the usage of the remote controller. To prevent any inconvenience, you can replace them annually. To replace the batteries, unclip the top part of the controller (DO NOT UNSCREW THE BACK). Figure 12 – Replace batteries Take the batteries out, and replace them with AAA 1,5V / LR03 batteries. Ensure the polarity is respected. Figure 13 – Replace the batteries - 10 - Documentation REGLED rev2 Table of Illustrations Figure 1 - Headpointer ............................................................................... - 1 Figure 2 - Regled ........................................................................................ - 2 Figure 3 – Digital display............................................................................. - 2 Figure 4 – Button panel .............................................................................. - 3 Figure 5 – Remote controller...................................................................... - 3 Figure 6 – Mounting the Regled ................................................................. - 4 Figure 7 – Wall mounting ........................................................................... - 4 Figure 8 – Bar side connection ................................................................... - 5 Figure 9 - Transfo ....................................................................................... - 5 Figure 10 - ON/OFF switch ......................................................................... - 5 Figure 11 - Buttons ..................................................................................... - 6 Figure 12 – Replace batteries ................................................................... - 10 Figure 13 – Replace the batteries ............................................................. - 10 - - 11 - Documentation REGLED rev2 FRAMIRAL 107, avenue Jean Maubert 06130 GRASSE FRANCE Tel: +33 422 480 107 Fax: +33 956 372 472 Email: [email protected] - 12 -