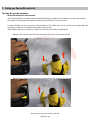
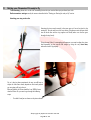
1
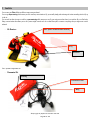
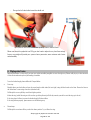
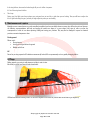
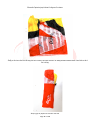
User’s Guide Please read carefully this manual before using your equipment for the first time. ©Copyright by Opale-‐Paramodels 2013 FR Page 1 sur 14 Thanks for having chosen an Opale-Parmodels product. We truly believe this radio-controlled paraglider is going to give you hours of enjoyment and will enable you to go through new outstanding piloting experiences. This user’s guide content includes all the information you need to get your wing fly and to ensure you will take good care of it. A good knowledge of your equipment will allow you to safely make the most of its performances for your greatest pleasure! Thanks for giving this manual to the new owner in case you decided to sell you radio-controlled paragldier. Best regards, The Opale-Parmodels Team Safety Information You should be properly insured according to the country regulation you are using our equipment in. You hereby accept the inherent risk of flying radio-‐controlled models. Using our equipment in a bad way may increase risks. Neither Opale-‐Paramodels nor any other seller will be liable for any damage caused by any accident whatever the circumstances are. The way our equipment is used is incumbent upon the final user, including towards the law. ©Copyright by Opale-‐Paramodels 2013 FR Page 2 sur 14 Summary 1. 2. 3. 4. 5. 6. 7. 8. The Kits…...................................……………………….……………………………………………………………………………………………………….4 Getting your Soaring Kit ready to fly………….….….………………………………………………………………………………………………..5 Getting your Paramotoring Kit ready to fly.………….…………..…….…………………………………………………………………………8 Adjusting the brakes length……………………….…………………………………………………………………………………………………………9 Maintenance and repairs……………………………..………………………………………………………………………..……………………………10 Folding your wing…………………………………………..…………………………………………………………………………………………………….10 Technical specifications………………………………………………………………………………………..…………………………………………….12 Lines drawing………………………………………..……………………………………………………………………………………………………………..13 ©Copyright by Opale-‐Paramodels 2013 FR Page 3 sur 14 1 Les kits You can use your Pulse 1.4 in two different ways once purchased. You can go slope-soaring which means you don’t need any motorization to fly, you actually simply take advantage of onsite ascending winds to fly up in the air. You can add an electric motor as well to go paramotoring which means you can fly your wing even when there is not wind at all or on flat lands. Using a motorization also allows you to carry some weight around, such as a scaled-down pilot, a camera or anything else you might want to stick onboard. - Kit Soaring : Pilot (Refer to Manuel Pilot manual) Wing Rucksack Extra : optional 700gr ballast kit - Paramotor Kit: Innerbag Paramotor Frame Wing ©Copyright by Opale-‐Paramodels 2013 FR Page 4 sur 14 2 Getting your Soaring Kit ready to fly First step: Set you radio transmitter Get the pilot linked with the radio transmitter You first need to identify the two cable connectors located inside the harness compartment. Then, please refer to your radio transmitter user manual to find the appropriate information to connect them (and the battery) to the radio receiver. To operate efficiently your wing, you need your radio transmitter to have a Delta mixer. In case you don’t own a programmable radio transmitter, you need to get an extra Delta mixing module to get the job done. Using the Delta mix allows you to operate your wing the exact same way as the full-size one which means: - Moving the stick to the left moves the left arm down and the right one up, so that the wing turns left. - Moving the stick to the right moves the left arm up and the right one down, so that the wing turns right. ©Copyright by Opale-‐Paramodels 2013 FR Page 5 sur 14 - Moving the stick down moves the arms down thus braking and slowing down the wing. Doing so allows you to reach the minimum speed before deflating. - Moving the stick up moves the arms up thus accelerating the wing and so enabling it to reach its maximum speed. We recommend the very ends of the arms to travel between 8 and 10 cm (3.15 to 3.94 in) from the lowest position to the highest. If your pilot have the Speedbar System ( Max Pilot), please refer to his manual in order to make the right settings. Second step: get the ballast in position Please take the small bag containing the ballasts . Those ballasts will be very useful on the flying site. Indeed, you will need to adjust the amount of ballast depending on the desired speed you want to reach but also depending on the flying style you are on (easy, acrobatic…). The more weight you add the more speed you get and the more abilities the wing has to go through the air and stay quiet fighting against wind turbulences. The radio transmitter sticks will feel firmer in your hands and the wing will be more reactive when turning right or left. If you remove some ballast the wing will be easier to fly and will react in a softer way. So, it will be easier to fly up thermal winds when climatic conditions are not too strong. Generally, the weaker the wind is, the less weight you should bring up. You would be inspired adding ballast should the wind strengthen. A side zip allows you to put the ballast inside the harness. You then need to move it forward right under the pilot’s legs to ensure the overall system is deadly horizontal when being suspended under the lines. ©Copyright by Opale-‐Paramodels 2013 FR Page 6 sur 14 The illustrating below shows you where you should put the ballast: Your pilot and its harness are now ready for the wing to be installed. Troisième étape : Fixation de l’aile sur le pilote Fasten and secure the risers to the pilot as show on the picture above (Red risers to Red strap on the harness) If you pilot have the speedbar system, please refer to his manual for the settings Once the risers are fastened to the pilot, it is very important that you unleash the brake lines (rear lines) which are tied to the last ring (the knot is done at the factory plant to prevent any damage due to transportation, including to avoid the lines to get tangled up). Then, ensure it goes through this ring and can move freely ©Copyright by Opale-‐Paramodels 2013 FR Page 7 sur 14 3. Getting your Paramotor Kit ready to fly Trike mounting: please refer to the trike assembling instruction you received when you purchased your trike. Radio transmitter settings: exactly the same as described in the “Getting you Soaring kit ready to fly” section. Attaching your wing to the trike: Fastening the risers works exactly in the same way as it has to be done for the soaring kit. The red mark has to be front-facing. Then please untie the knot which ties the brake line and the ring together and finally make sure the line goes through the ring freely. Given the new Pulse 1.4 outstanding performances, you need to adjust the risers level depending on the overall trike weight by using the very front lines, otherwise it won’t fly properly. So, as it has just been mentionned, the way you will have to adjust the front lines closely depends on how much payload you are going to lift up in the air. When not loaded, the A lines should be 1 cm (0.39 in) lower than the B lines. So, you need to go through the following steps: - Tie a lark’s head just as shown on the picture above ©Copyright by Opale-‐Paramodels 2013 FR Page 8 sur 14 - Then get the lark’s head coiled around the shackle rod Your A lines are now around a centimeter (0.39 in) shorter than the B lines: Please note that with a payload of over 2.6 kg you don’t need to adjust the very front lines settings. Anyway, more weight will provide your system a better penetration, more resistance and a better maneuverability. 4 Réglage des freins Adjusting the brakes is a key step if you want your radio-controlled paraglider to react the right way. Please really do pay a close attention to this section otherwise you may be heading to troubles. To set the brakes length, please follow the 3 steps bellow: • First step: Roughly adjust your brake lines to have the same length on both sides (left and right) using the black mark on the lines. Secure the lines to the servomotor’s arms using a bow knot (shoelace knot). Pull the pilot’s arms up till they reach their higher position. Inflate the wing (unfold the wing on a flat surface, grab the pilot and pull it firmly towards yourself to send the wing up in the air). If the wing doesn’t inflate, increase the brakes length till it does inflate. If the wing inflates properly, please move on to the following step. • Second step: Pull the pilot’s arms down till they reach their lower position. Try to inflate the wing. ©Copyright by Opale-‐Paramodels 2013 FR Page 9 sur 14 It the wing inflates, decrease the brakes length till you can’t inflate it anymore. It’s fine if the wing doesn’t inflate. • Third step: During your first flight, watch any tendency your wing may have to turn left or right when you are braking. Then you will have to adjust the left or right brake length to get a perfectly straight trajectory when you are braking. 5. Maintenance and repairs Materials we use to manufacture our radio-controlled paragliders have been carefully chosen to ensure they will last long in time. However, the following recommendations will help you keeping you model even longer in a great shape. Early signs of wear are often the consequences of a lack of care when operating, folding and storing your products. They may also be damaged if exposed to chemical products, excessive dampness or heat. On the ground : Please avoid : • Strong impacts • Letting your wing unfold on the ground • Walking on the lines UV Do not let you wing exposed to UV radiations unnecessarily. Indeed, UVs are permanently and very quickly damaging fabrics. 6. Pliage Folding properly your wing is really important to help it resist in time. We advise you to fold your wing the way shown below: Pull both ends towards the wing center. Put the risers together at the centre to prevent them and the lines to get tangled up. ©Copyright by Opale-‐Paramodels 2013 FR Page 10 sur 14 Renouvelez l’opération jusqu’à obtenir la largeur d’un caisson. Finally put the risers back onto the wing and fold it 3 times in the other direction. The folding obtained should be about a hand wide so that it fits in its bag. ©Copyright by Opale-‐Paramodels 2013 FR Page 11 sur 14 Storage Dampness really is the worst enemy of your paraglider, thus accelerating your product ageing by altering the fabric, the lines and the reinforcements. Your wing has to stay dry… So, don’t store your paraglider for some time still having sand, salt, mud or any other material on it that may intrude and go mouldy into the cells. Always allow your paraglider to dry naturally before storing it in a dry place. Open the bag as often as you can to help your wing breathe and release any dampness it might have accumulated. Never carry or store your wing close to chemical products such as petrol, oils or any other solvent. Never let your wing exposed to extreme heat such as your car boot on a sunny day. Cleaning Use only clear water without adding any abrasive agent or any detergent. Please only clean or rinse your wing if necessary (contact with salt water…). Repairs Tiny holes on the fabric can be repaired using some self-adhesive fabric. Damaged lines have to be replaced. You will need to inflate your wing after every single repair to ensure it will react properly once it is up in the air. Major repairs such as cell walls replacements have to be done by specialists. Warranty Your wing is guaranteed against any manufacturing defect. Should the user damage / cut a line or tear apart pieces of fabric, repairs and replacements pieces are not covered by the guarantee and the repair cost will be charged to the user. 7. Features • • • • • • • • Flat Area: 1.4 Flat Wingspan : 2.7m Aspect Ratio: 5 .2 Number of cells : 30 Fabric: Ultra light nylon Lines material: Aramid Kevlar 0.3 et 0,45mm fingertrapped Reinforced risers with stainless steel ring and nylon strap Weight : 280gr ©Copyright by Opale-‐Paramodels 2013 FR Page 12 sur 14 8. Bridle Lines If one or more lines are cut or broken, please follow to Opale Paramodels the reference of the bridle ©Copyright by Opale-‐Paramodels 2013 FR Page 13 sur 14 a1 ,927 a2 ,906 a3 ,904 a4 ,909 a5 ,572 a6 ,525 a7 ,493 b1 ,916 b2 ,896 b3 ,896 b4 ,902 b5 ,560 b6 ,519 b7 ,493 c1 ,954 c2 ,935 c3 ,933 c4 ,932 c5 ,584 c6 ,538 c7 ,505 A1 ,550 A2 ,850 T1 ,1000 B1 ,550 C1 ,850 t1 ,309 t2 ,291 t3 ,302 K1 ,900 KM1 ,423 KM2 ,388 KM3 ,373 k1 ,461 k2 ,407 k3 ,377 k4 ,369 k5 ,367 k6 ,334 k7 ,320 k8 ,326 k9 ,324 k10 ,311 k11 ,309 k12 ,337 ©Copyright by Opale-‐Paramodels 2013 FR Page 14 sur 14