1
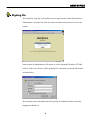
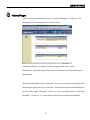
SENTRYFILE
Version 3
User’s Manual
Version 3.2
SENTRYFILE
USER’S MANUAL
Table Of Contents
Table Of Contents...................................................................................................................................... 2
Signing On ................................................................................................................................................. 4
SentryFile Interface ................................................................................................................................... 6
HomePage .................................................................................................................................................. 7
Searching For Documents .......................................................................................................................... 9
Quick Search ............................................................................................................................ 10
Index Search............................................................................................................................. 12
Full-Text Search....................................................................................................................... 14
Browse...................................................................................................................................... 15
Results Display........................................................................................................................ 16
Viewing Documents ................................................................................................................................ 18
Save To Disk ........................................................................................................................... 20
Annotations.............................................................................................................................. 21
Email........................................................................................................................................ 23
Append .................................................................................................................................... 24
Delete....................................................................................................................................... 26
Modify ..................................................................................................................................... 28
Save To Bookshelf .................................................................................................................. 30
2
SENTRYFILE
USER’S MANUAL
Saved Searches ........................................................................................................................ 31
Uploading Documents.............................................................................................................................. 32
Upload (Softcopy).................................................................................................................... 33
Scan & Upload (Hardcopy)...................................................................................................... 36
Management............................................................................................................................................. 39
Global Options ......................................................................................................................... 40
Cabinets.................................................................................................................................... 42
Groups ...................................................................................................................................... 43
Users......................................................................................................................................... 44
Rights ....................................................................................................................................... 45
Messages .................................................................................................................................. 46
Recycle Bin .............................................................................................................................. 47
Server ....................................................................................................................................... 48
Sign Out ................................................................................................................................... 49
3
SENTRYFILE
USER’S MANUAL
Signing On
The SentryFile “Sign On” screen allows users to sign into the system (shown below).
Administrator’s must provide each user with a username and password to access the
system.
Some SentryFile administrators will choose to use the integrated Windows NT/2000
userlist. In this case, the user will be prompted for a username, password and domain
as shown below.
The username, password and domain will typically be identical to those used when
logging onto Windows.
4
SENTRYFILE
USER’S MANUAL
5
SENTRYFILE
USER’S MANUAL
SentryFile Interface
The SentryFile interface is designed in 3 sections. At the top of the screen is a listing
of system sections that you can access. On the left side of the screen is a listing of the
functions that you can perform within each system section. The main area of the screen
is where all content is displayed.
Navigate through the site using both the system sections and system functions frames.
Prompts will be displayed in the content frame.
6
SENTRYFILE
USER’S MANUAL
HomePage
After a user logs into SentryFile the user’s personal “Homepage” is displayed. The
homepage acts as a starting point for all user sessions.
Available to the user is a listing of system messages posted by the system
administrator. System messages help to keep users informed of information from the
administrator.
The Personal Bookshelf is the location where users can save their most frequently used
documents for quick retrieval at a later time. Items listed in the Personal Bookshelf can
be retrieved by simply clicking the “View” icon. Users can manage their own Personal
Bookshelf. Use the red “X” icon to delete an item from your Personal Bookshelf.
7
SENTRYFILE
USER’S MANUAL
The Saved Searches listing is the location where users can save their most frequently
performed searches for quick access later. Saved Searches are very similar to the
Personal Bookshelf however, a Saved Search stores a set of search parameters, and not
a single document. Users can perform a Saved Search again by simply clicking on the
“Search” icon.
More will be discussed later about adding documents to your Personal Bookshelf and
saving your search parameters as a Saved Search.
8
SENTRYFILE
USER’S MANUAL
Searching For Documents
Searching for documents can be access by clicking the “Search” icon along the top
system sections frame. This will display the list of search types in the left frame. By
default the “Quick Search” is displayed in the content area. Users can select a different
type of search by clicking the appropriate icon on the left frame.
9
SENTRYFILE
USER’S MANUAL
Quick Search
The Quick Search is the convenient and simple method to search for documents. The
Quick Search allows you to enter keywords, all records that contain matching keywords
within the text based fields of the index data will be displayed. This is an extremely
effective way to find most files within the system.
To use the Quick Search you must first select a cabinet to search through. Click the
“down arrow” beside the “Cabinet” drop down list. Next, you must define your search
parameters. Enter your search parameters into the “keywords”field. Lastly, click the
“Search” button to perform the search. See sample below:
Once you click the “Search” button the system will generate your search results and
display them in the content frame. See below:
10
SENTRYFILE
USER’S MANUAL
11
SENTRYFILE
USER’S MANUAL
Index Search
The Index Search is the most powerful method of searching for documents. All
documents within SentryFile are assigned “index data” when they are uploaded to the
system. The Index Search allows you to find documents based on the “index data” for
the documents.
To use the Index Search you must first select a cabinet to search through. Click the
“down arrow” beside the “Choose Cabinet” drop down list. When you choose a
different Cabinet the index fields displayed will change to those for the selected
Cabinet. Next, you must define your search parameters. You may enter as little or as
much information into the search form as you like. The more data you enter, the more
concise your results will be. Fill in search parameters into the index fields to formulate
your search. Then, you can choose how your results will be sorted. Choose the field
that you would like to use to sort your results, and choose wether you would like the
results in ascending or descending order. Lastly, click the “Search” button to perform
the search. See sample below:
12
SENTRYFILE
USER’S MANUAL
Once you click the “Search” button the system will generate your search results and
display them in the content frame. See below:
13
SENTRYFILE
USER’S MANUAL
Full-Text Search
Full-Text Search allows you to search for documents based on the text within the
documents. Not all file formats are supported for full-text searching. Typically
Microsoft Office documents such as Word, Excel, Powerpoint are supported along with
Adobe Acrobat PDF files. Also, more generic files formats are also support such as
plain text files (.TXT) and Web Pages (.HTML).
To perform a Full-Text Search first click the “Full-Text Search” icon on the left frame.
This will load the Full-Text Search form. Next, choose the cabinet that you would like
to search by using the Cabinet drop down box. Enter the keywords that you would like
to locate and press the “Search” button.
The results are displayed in a similar fashion as the Index Search shown earlier.
14
SENTRYFILE
USER’S MANUAL
Browse
Browse allows you to display a complete listing of all the documents stored within a
Cabinet. There a only a few parameter that you must select to Browse a Cabinet. First,
you must select the Cabinet from the “Choose Cabinet” drop down box. Then select
the sort options and click the “Search” button to display the contents of the Cabinet.
The results are displayed in a similar fashion as the Index Search and Full-Text Search
shown earlier
15
SENTRYFILE
USER’S MANUAL
Results Display
No matter which search method you use, the results display is always the same. Each
document is listed with a “Record Number” attribute. Next to the “Record Number” is
a listing of operations that you can perform on/with this document. There can be up to
7 different operations depending on the rights that you have been given. Below the
operations bar is the index data for the document. The bottom bar shows the filename
of the document and allows you to add the document to your Personal Bookshelf (more
on this later).
At the bottom of each screen there is a summary showing how many documents were
found. If there were more than 10 documents found there would also be a “Next”
button to allow you to view the rest of the results.
16
SENTRYFILE
USER’S MANUAL
Below the summary is the “Save This Search” feature. This allows you to store the
search parameters for quick access (more on this later).
17
SENTRYFILE
USER’S MANUAL
Viewing Documents
To view a document simply click the “View Document” link along the operations bar
for the current record.
If the document is capable of being displayed within the web browser then it will open
in the content frame. See below
18
SENTRYFILE
USER’S MANUAL
To get back to your results just click the “Back to Results” arrow icon that appeared in
the left frame. If the document you selected is not capable of being viewed within the
web browse then a “Save File” dialog box will appear. You can either choose to open
the file immediately or save the file to disk and open it later.
Typical documents that can be viewed within the browser are Acrobat PDF, TIF, Word
DOC, Excel XLS, Powerpoint PPT, plain text TXT, web pages HTML.
19
SENTRYFILE
USER’S MANUAL
Save To Disk
The Save To Disk feature allows you to download a file to your local computer. This
will avoid having the file open within the web browser.
This is useful if you would like to save a PDF file to your local computer.
The file you download will need to be opened later with a compatible application.
20
SENTRYFILE
USER’S MANUAL
Annotations
Annotations allow you to make quick notes about documents within the system. To
access the annotation for a documents simply click the “Annotations” link along the top
functions bar for the document.
The Annotations are displayed in a list format along with the date the annotation was
created and which user posted the annotation. You can add additional annotation by
clicking the white “+” icon along the top of the page. This will display the field where
you can enter the annotation. Click the “Add Note” button to add the annotation to the
system. (see below)
21
SENTRYFILE
USER’S MANUAL
22
SENTRYFILE
USER’S MANUAL
Email
The Email function allows you to email a document directly to someone without having
to attach the document to a message in your email client.
Click the “Email” link along the top operations bar to display the email form. Then fill
in the Recipients email address, your email address, a subject, and a message. Click the
“Send” button to send the file along with your message.
23
SENTRYFILE
USER’S MANUAL
Append
The Append feature allow you to add additional pages to the current document. The
document must be a PDF file for this operation to be available. You can append a PDF
file or a TIF file to the current document.
Click the Append link to bring up the append pages form.
You can either choose an exiting file by clicking the “Browse” button, or scan a new
file by clicking the “Scan” Button on the scanner ActiveX interface. If you select and
24
SENTRYFILE
USER’S MANUAL
existing TIF document, click the “Preview” button to load the file in the scanner
ActiveX interface. This will allow you to clean the pages before appending.
Once you are happy with the pages click the “Append Document” button to upload the
pages to the system and automatically append them to the existing document.
25
SENTRYFILE
USER’S MANUAL
Delete
The delete function allows you to remove documents from the system. The Delete
operations work very much like deleting files in the Windows operating system. When
you click the Delete link the document is inserted into the “Recycle Bin”.
To delete a document simply click the Delete link. You will be prompted to ensure that
you want to delete the file. If you accept, you will be given a message informing you
that the document has been added to the Recycle Bin.
26
SENTRYFILE
USER’S MANUAL
27
SENTRYFILE
USER’S MANUAL
Modify
The Modify operation allows you to change the index data for the current document.
To use the modify operation simply click the Modify link.
This will change the results display so that you can modify the index data for the
current document.
When you have completed your modification of the index data click the “Apply
Modifications” button. Please note that if you modify the value of the field that you are
28
SENTRYFILE
USER’S MANUAL
using to sort your results the record will move to the appropriate location given the new
values.
29
SENTRYFILE
USER’S MANUAL
Save To Bookshelf
Save To Bookshelf allows you to place document on your Personal Bookshelf. The
Personal Bookshelf is the location where users can save their most frequently used
documents for quick retrieval at a later time. Items listed in the Personal Bookshelf can
be retrieved by simply clicking the “View” icon. Users can manage their own Personal
Bookshelf. Use the red “X” icon to delete an item from your Personal Bookshelf.
To add a document to the Personal Bookshelf simply give it a name and click the
“Save” button.
30
SENTRYFILE
USER’S MANUAL
Saved Searches
The Saved Searches operation allows you to save your most frequently performed
searches for quick access later. Saved Searches are very similar to the Personal
Bookshelf however, a Saved Search stores a set of search parameters, and not a single
document. Users can perform a Saved Search again by simply clicking on the “Search”
icon.
To Add a Saved Search just give your search a name and click the “Save” button.
31
SENTRYFILE
USER’S MANUAL
Uploading Documents
There are two methods to upload documents into SentryFile. You can either Upload a
document you currently have on your computer (softcopy) or you can Scan & Upload
paper documents using your Twain Compatible scanner (hardcopy).
You can choose the appropriate method by selecting the icon from the left frame.
32
SENTRYFILE
USER’S MANUAL
Upload (Softcopy)
To Upload softcopy choose the Upload icon from the left frame. This will display the
Upload form.
Choose the “Browse” button to display a “Choose File” dialog box.
Select the file you would like to upload and click the “Open” button.
33
SENTRYFILE
USER’S MANUAL
You can click the “Preview” button to preview the document within the preview area.
Typically, documents that can be previewed are: .pdf (Acrobat PDF), .doc (Microsoft
Word), .ppt (Microsoft Powerpoint) .xls (Microsoft Excel), .html (HTML Web Pages).
Finally, choose the appropriate Cabinet and set your index data. When complete, click
the Upload Document button to insert the document into SentryFile.
You will be given a confirmation screen to summarize your upload.
34
SENTRYFILE
USER’S MANUAL
TIF documents can be converted to PDF after they have been uploaded. If you would
like to convert your TIF file to PDF place a checkmark in the “Convert Document To
PDF” box and click “Process Document”.
You will be given a confirmation message to indicate that the conversion to PDF was
successful.
35
SENTRYFILE
USER’S MANUAL
Scan & Upload (Hardcopy)
To Scan & Upload hardcopy documents choose the Scan & Upload icon from the left
frame. This will display the scanner ActiveX interface and the upload form.
Click the “Select Scanner” button to display a list of all installed scanners.
Select the scanner you would like to use and click the “Select” button.
Next, click the “Scan” button. This will load your Scanner’s Interface. Use the
interface to scan the documents into the scanner control.
36
SENTRYFILE
USER’S MANUAL
Use the buttons along the top of the Scanner ActiveX Control to manipulate the
document. Features include, delete page, negative image, deskew, despeckle, page
rotation, zoom in/out and scan-append pages.
Finally, choose the appropriate Cabinet and set your index data. When complete, click
the Upload Document button to insert the document into SentryFile.
You will be given a confirmation screen to summarize your upload.
37
SENTRYFILE
USER’S MANUAL
TIF documents can be converted to PDF after they have been uploaded. If you would
like to convert your TIF file to PDF place a checkmark in the “Convert Document To
PDF” box and click “Process Document”.
You will be given a confirmation message to indicate that the conversion to PDF was
successful.
38
SENTRYFILE
USER’S MANUAL
Management
All SentryFile Management can be done through the web browser. Not all users are
given acces to the management functions of the system. The Management section
allows you to manage Global Options, Cabinets, Users, Groups, Rights, System
Messages, Recycle Bin and Server Info.
39
SENTRYFILE
USER’S MANUAL
Global Options
Gobal Options are system properties that apply to all users. To access the Global
Options click the “Global Options” icon on the left frame.
Enable Full-Text Search allows you to Enable/Disable Full-Text Searching for all
users. Full-Text Searching can be a server intensive operation and some administrators
may prefer to disable it.
Enable Process Folders allows you to Enable/Disable the use of Process Folders.
Process Folders are used to integrate third party application into SentryFile. If third
party application are not used, it is convenient to disable the Process Folders feature.
Show License to Users Logging in allows you to enable/diable displaying your own
corporate privacy policy. The policy can be entered into the “License Text” field.
40
SENTRYFILE
USER’S MANUAL
Authentication Scheme allows you to choose which method SentryFile will use to
authenticate users accessing the system. There are two options, they are Internal – uses
the built in SentryFile authentication mechanism and Windows NT/2000 where
SentryFile will authenticate users against a Windows NT/2000 domain.
41
SENTRYFILE
USER’S MANUAL
Cabinets
Cabinets allow you to create and manage the Cabinet and index fields within the
SentryFile system.
“+” icons are used to add Cabinet and Fields, while red “X” icons
are used to delete Cabinets and fields. Blue arrow icons are used to modify the names
of Cabinets and Fields.
42
SENTRYFILE
USER’S MANUAL
Groups
Groups allows you to manage the groups and group members within SentryFile.
Groups can have a variety of permissions to access various parts of the Managements
area. The permissions include Global Options, Add Cabinets, Manage Groups, Manage
Users, Manage Rights, Manage System Messages, View Server Info. “+” icons are
used to add Groups and add users to a group, while red “X” icons are used to remove a
group or remove a user from a group. Blue arrow icons are used to modify the
permissions of the group.
43
SENTRYFILE
USER’S MANUAL
Users
Users allows you to manage the users within SentryFile.
Users can have a variety of permissions to access various parts of the Managements
area. The permissions include Global Options, Add Cabinets, Manage Groups, Manage
Users, Manage Rights, Manage System Messages, View Server Info. “+” icons are
used to add users, while red “X” icons are used to remove a user. Blue arrow icons are
used to modify the permissions of the user.
44
SENTRYFILE
USER’S MANUAL
Rights
Rights allows you to manage who can access what documents within the system and
what operations they can perform with those documents.
Users and groups can be assigned the rights to do specific operations on specific
Cabinets. The rights are Search/View Documents, Upload Documents, Add/View
Annotations, Email Documents, Modify Index Data Values, Delete Documents,
Append Pages to PDF Documents, Manage documents in the Recycle Bin, and Manage
the Index Fields for a Cabinet.
“+” icons are used to give rights to users/groups for a cabinet , while red “X” icons are
used to remove a user/group’s rights to a cabinet. Blue arrow icons are used to modify
the rights of the user/group within the Cabinet.
45
SENTRYFILE
USER’S MANUAL
Messages
Messages allows you to communicate information to other users of the SentryFile
system. To add a message simply click the white “+” icon and enter your message. To
delete a message click the red “X” icon.
46
SENTRYFILE
USER’S MANUAL
Recycle Bin
The Recycle Bin shows which documents have be deleted by users. Users with access
to the Recycle Bin have the ability to permanently delete documents or restore
documents.
The user will only be able to view documents within the recycle bin which he has
recycle bin rights for.
47
SENTRYFILE
USER’S MANUAL
Server
The Server area gives information about the SentryFile server. This information
includes the server address, application path, free hard drive space, the number of users
within the system, and the number of cabinets within the system.
48
SENTRYFILE
USER’S MANUAL
Sign Out
To sign out of SentryFile click the “Sign Out” icon in the top right corner of the screen.
You will be asked to confirm whether you want to sign out, if you choose “OK” then
you will be returned to the Sign In screen.
Because web browsers cache the pages you have visited you should close your browser
to flush the history. Otherwise a malicious user could use the “Back” button to view
data that you viewed during your session. A malicious user would not be able to access
any new content, when you sign out your security credentials are removed. This means
the malicious user might be able to view data from your history, but he will not be able
to make new requests.
49