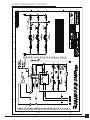
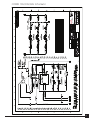
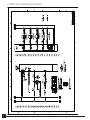
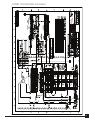
1
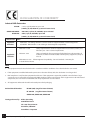
COMBIPASTEURIZERS
Owner Manual
COMBI Models: 10G, 30G, 60G
rev102015
Ce Declaration Of Conformity
2
Introduction3
Disclaimers3
Product Warranty
4
Product Registration
4
Important Safety Instructions
4
Receiving Your Pasteurizer
5
Installation5
COMBIPASTEURIZERS
Owner Manual
Models: 10G, 30G, 60G
TABLE OF CONTENTS
Preparing the Machine
Unpacking the COMBI 60G
Mounting the Control Panel
Mounting the COMBI 10G onto the Base
Connecting the Stirring Shaft
Lid Storage
Connecting the Milk Spigot
Choosing and Preparing a Location
Connecting the Hoses for Water-Cooling
Electrical Requirements International Installations: 10G, 30G & 60G External Fuse Board
5
5
5
6
6
6
7
7
7
8
8
9
First Use Of Pasteurizer.
10
Charging the System
10
Cleaning The System 11
Energy and Time Saving Tips
11
When Service Is Required
11
Using And Programming The Touchscreen Controller
12
Controller Button Legend
12
Adjusting Settings
13
Resetting the Password
13
Selecting a Language
14
Setting Date and Time
14
Calibrating Thermocouple Temperature
14
Celcius/Fahenhiet15
Adjusting the Agitator Hold 16
Adjusting Feed and Cool Temperatures
17
Downloading Pasteurization Data
17
Using Your Pasteurizer
18
PASTEURIZE18
Repeat Last 18
Feed Now
19
To Store
20
Feed Later Milk Only
21
WARM22
COOL23
Installation And Use Of A Bag Guard
24
Quality Control And System Monitoring
24
Time & Temp For Proper Pasteurization
24
Helpful Hints For Successful Pasteurization
25
Trouble Shooting Combi Pasteurizers
26
Accessories30
Combi 10G/30G/60G Schematic
31
Combi 10G/30G/60G Main Enclosure Subpanel
36
Combi 10G/30G/60G Panel Wiring Schematic
39
Combi 10G/30G/60G Top Subpanel
40
10G Replacement Parts
42
30G Replacement Parts
43
60G Replacement Parts
44
NOTES:45
For parts list and ordering
visit www.dairytechinc.com
You may also see the last pages of this user manual.
Contact Dairy Tech, Inc.
Dairy Tech, Inc.
34824 CR 29
Greeley, CO 80631
Toll Free: 1-866-384-2697
Local: 1-970-674-1888
Fax: 1-970-686-5871
Hours: M – F 7am – 4pm, MST
Web:
www.DairyTechInc.com
rev102015
eMail:[email protected]
Combi Pasteurizer Owner Manual | 10G, 30G & 60G
1
CE DECLARATION OF CONFORMITY
Industrial Milk Pasteurizer
DT30W: ~ 120 V, 1 ph, PE, 50/60 Hz, up to 10 A
(~240 V, 2 ph, PE, 50/60 Hz, up to 50 A heater circuit)
COMBI 10G/10GEU: ~200-240 V, 1 phase, PE, 50/60 Hz, up to 15 A total
DT30W-EU: ~240 V, 1 ph, PE, 50/60 Hz, up to 10 A
(~240 V, 1 ph, PE, 50/60 Hz, up to 30 A heater circuit)
Year of Issue:
Applicable
Directives:
Applicable
Standards:
2015
•
2006/95/EC - Low Voltage Directive - Laws for electrical equipment within certain voltage limits
•
89/336/EEC - EMC Directive - Laws relating to electromagnetic compatibility
•
EN 61010-1: 1998 Safety requirements for electrical equipment for measurement, control, and
laboratory use – Part 1: General requirements
•
EN 55011: 1998 Limits and methods of measurement of radio disturbance characteristics of
industrial, scientific and medical (ISM) radio-frequency equipment. (Group 2,
Class A)
•
EN 61000-6-2: 1999
•
Industrial Environments
Electromagnetic Compatibility – Generic Standards – Immunity for
NOTE:
1. This equipment must be installed and used in accordance with the conditions of use described in the user manual.
2. If this equipment is modified without the permission or direction of Dairy Tech, this declaration is no longer valid.
3. EMC compliance is only for that equipment listed above. If this equipment is expanded, modified or installed into a larger
system, the user is responsible to guarantee the EMC compliance of the overall system. If this equipment is used with external
components, the user must insure that EMC and safety requirements are not violated.
4. All equipment is HiPot and Ground-bond tested prior to final packaging.
Declared Model Numbers: DT30W (30G) (30 gallon Internal Heater)
DT 30W-EU
COMBI 10G, COMBI 30G, COMBI 60G
(30 gallon Internal Heater)
Testing performed by : Aldous Consulting
2845 Willow Tree Ln
Lab: 1625 Sharp Point Dr
Fort Collins, CO 80525
2
Scott Aldous - Proprietor
Dairy Tech, Incorporated | All Rights Reserved
INTRODUCTION
Thank you for purchasing a Dairy Tech, Inc. Combi Pasteurizer.
Your satisfaction with this product is very important to us.
This guide will help you understand how your pasteurizer
operates, and how to get the most benefit from it for you and
your dairy operation.
DISCLAIMERS
THIS PASTEURIZER IS INTENDED TO BE USED IN THE
MANNER DESCRIBED IN THIS USE AND CARE GUIDE. IT
IS NOT INTENDED TO PASTEURIZE MILK OR OTHER
GOODS FOR HUMAN CONSUMPTION.
Dairy Tech, Inc. has provided this use and care guide to assist
you in the assembly, installation, and maintenance of your
Combi Series Batch Pasteurizer (the “Pasteurizer”). Serious
injury and even death to persons and livestock can occur
from improper installation and use of the Pasteurizer. Serious
property damage can result from improper installation
and use of the Pasteurizer. We recommend professional
installation by qualified plumbers and electricians familiar
with such devices
DAIRY TECH, INC. RECOMMENDS THAT
INSTALLATION OF ANY ELECTRICAL, MECHANICAL,
GAS OR PLUMBING DEVICES REQUIRED FOR THE
INSTALLATION, OPERATION AND MAINTENANCE OF
THE DAIRY TECH PASTEURIZERS BE DONE ONLY BY
QUALIFIED INDIVIDUALS.
It is your responsibility or the responsibility of the electrician,
plumber or other qualified installation expert to obtain all
necessary permits and certifications required by your town,
county, state or other jurisdiction before installation of the
Pasteurizer. It is your responsibility to read and understand
the operational requirements of the pasteurizer before
using it and to observe all safety precautions. It is also your
responsibility to see that your personnel are properly trained
to operate and maintain the Pasteurizer.
DAIRY TECH, INC. PROVIDES YOU WITH
INSTRUCTIONS AND WARNINGS IN THIS USE AND
CARE GUIDE, BUT WE ARE UNABLE TO COVER ALL
POSSIBLE CONDITIONS AND SITUATIONS THAT MAY
OCCUR IN YOUR DAIRY OPERATION. IT MUST BE
UNDERSTOOD THAT COMMON SENSE, CAUTION AND
CAREFULNESS ARE FACTORS WHICH CANNOT BE BUILT
INTO THE PASTEURIZER. THESE FACTORS
MUST BE SUPPLIED BY THE PERSON(S) INSTALLING,
MAINTAINING OR OPERATING THE PASTEURIZER.
rev102015
Under no circumstances is Dairy Tech, Inc., its directors,
officers, shareholders or employees responsible for damage
to property or injury to persons or livestock resulting from
the improper installation or use of the Pasteurizer. Installation
by an unqualified individual and improper use and improper
maintenance may also void any equipment warranty that
Dairy Tech, Inc. offers.
This use and care guide is based on information and data
considered to be accurate; however, no warranty is expressed
or implied regarding the accuracy of the information or data
herein or the results to be obtained from the use of this data
or information.
PLEASE READ THIS GUIDE CAREFULLY
AND THOROUGHLY BEFORE INSTALLING AND
OPERATING THE PASTEURIZER.
If you believe the pasteurizer is operating incorrectly, please
refer to the trouble shooting guide included with these
instructions before calling our service department. If you
still have questions, contact your local representative or call
1-866-384-2697 extension 2 and we will help you to address
your needs.
Warning:
Hot Surface
Warning:
High Voltage
Caution:
Important
Information
For your safety, the recommendations and information
in this manual must be followed to minimize the risk
of serious burn or electrocution, as well as to prevent
property damage, personal injury, or death.
If you are burned by the heating coil, hot water, steam or
hot milk: Contact a physician or other medical personnel for
expert advice, or go to an emergency treatment facility.
Do not feed pasteurized milk to calves without first cooling
it back down so that it is no hotter than 110°F (43°C). Milk
hotter than 110° can cause severe burns to the calves.
Combi Pasteurizer Owner Manual | 10G, 30G & 60G
3
Did You Know?
IMPORTANT SAFETY INSTRUCTIONS
WARNING: To reduce the risk of electric shock,
burns, serious injury or death to persons when
using the Pasteurizer, follow these basic
precautions:
PRODUCT WARRANTY
This product is warranted to be free of manufacturing defects
for up to 12 months from the date of purchase. All parts will
be covered by a free replacement guarantee not including
shipping or service. This warranty is intended for equipment
in use under normal operating conditions and does not cover
damages incurred by improper use or unforeseen acts of
nature. Determination of covered defects, damages or repairs
is at the discretion of Dairy Tech, Inc. This warranty covers
only the cost of replacement parts at Dairy Tech, Inc. current
pricing. Service is not covered by this warranty. Parts replaced
under warranty must be returned to:
Dairy Tech, Inc.
34824 CR 29
Greeley, CO 80631
Parts not returned will be charged to customer at retail
pricing.
PRODUCT REGISTRATION
If this product was purchased directly from Dairy Tech in
Windsor, CO, it has already been registered and no further
action is required. If the product was purchased by a
distributor or other representative, please call Dairy Tech, Inc.
at 866-384-2697 within 10 days to register the product.
Failure to do so may result in a decreased or voided warranty
period for your unit. When calling, please have the serial
number which can be found on the back side of the control
housing or back panel.
You may also register on-line at www.dairytechinc.com
where you can “Contact Us”, fill in your information and in
the notes type the product model and serial number and the
word “Register”.
1.
Read all instructions before using the Pasteurizer.
2.
Do not turn on the pasteurizer without first filling with
water around the heating elements as directed on page 12.
3.
Always disconnect the electrical power before
attempting service. All power sources must be
disconnected before the cover is removed for repair.
4.
Do not allow children to operate or play around the
Pasteurizer. Close observation of children is necessary
when the unit is used with children nearby.
5.
Do not reach into the Pasteurizer when the power is on
and the paddle is turning as this can cause serious harm.
6.
Hot Surfaces include the lid, plumbing fixtures, electrical
fixtures, hoses, heater body, milk cabinet surfaces,
draining water and the milk or colostrum. Touching these
surfaces during operation may result in severe burns.
7.
This equipment is designed to operate in an ambient
temperature range of 35°F (2°C) – 100°F (38°C), altitude
up to 2000m, maximum relative humidity 80% for
temperatures up to 31°C decreasing linearly to50% RH at
40°C, for indoor use only.
8.
Do not try to change the settings in the pasteurizer controller
without consulting a technical expert at Dairy Tech, Inc.
9.
Do not repair or replace any part of the Pasteurizer, or
attempt any servicing unless specifically recommended
in the trouble-shooting portion of this manual. Any
modifications made to the unit beyond these instructions
will void all warranties.
10. Always clean the unit immediately after each use,
according to the instructions in the “Cleaning of your
Pasteurizer” section of this manual. Build up of residue on
the propeller or tank will decrease heating and cooling
efficiency, as well as harbor potentially harmful pathogens.
11. During the heating cycle, always make certain the
Pasteurizer lid is firmly seated on the pot of milk. The lid
will be hot. Do not touch while in operation.
12. Use the pasteurizer only for its intended purpose. DO
NOT use for milk intended for human consumption as
this product has not been approved for such use.
13. Do not touch the tank of milk, motor, hoses, lid, handle or
brass fittings while the unit is hot and working.
14. Do not attempt to tilt the machine while it is full. It is
extremely heavy and can cause severe injury to the
operator and may cause failure of the support structures.
15. To prevent severe burns, always allow the milk or colostrum
to cool completely before handling or feeding to calves.
16. The Pasteurizer must be electrically grounded. DO NOT modify
the plug that is provided with the Pasteurizer; if it will not fit the
outlet, have an electrician install a proper electrical outlet.
17. The pasteurizer must be installed on a level surface to
evenly distribute weight to all the support structures.
4
Dairy Tech, Incorporated | All Rights Reserved
RECEIVING YOUR PASTEURIZER
Mounting the Control Panel
Use care when unpacking your Combi Pasteurizer. It will
have arrived in one box or crate. Please make a note of any
cautionary labels that are used on the carton suggesting
orientation, where to cut with a knife, fragile, etc. For COMBI
10G Models, save the bottom half of the powder coated
shipping container for use as a pasteurizer stand
The pasteurizing unit is typically shipped with the control box
detached and packed in the tank of the unit. Mounting of the
control box will be required. Gently remove the controller
from the milk pot. Four mounting holes are provided on the
top surface of the unit. Using the bolts that are provided,
attach the control unit in an upright fashion to the top lid of
the pasteurizer. The screw slots may allow some adjustment
of the propeller and shaft if required later. The electrical
connections are already made. Use care to not stretch these
connections. See the next figure for the COMBI 10G and
COMBI 30G.
INSTALLATION
Preparing the Machine
WARNING: INSTALL THE UNIT
ACCORDING TO THE INSTALLATION
INSTRUCTIONS. TO REDUCE THE RISK OF
FIRE, ELECTRIC SHOCK, SERIOUS INJURY
OR DEATH TO PERSONS, READ THE IMPORTANT
SAFETY INSTRUCTIONS BEFORE OPERATING THIS
PASTEURIZER.
3
4
1
Unpacking the COMBI 60G
2
MP-Spigot fills
buckets and bottles
Remove screws to unpack,
then turn tabs inward for
installation of unit.
Here is another image shown below of the COMBI 60G which
has side mounting screws to secure the control box to the top
of the cabinet.
3
1
rev102015
2
4
Attach 4 bolts here to
secure control panel.
Combi Pasteurizer Owner Manual | 10G, 30G & 60G
5
Mounting the COMBI 10G onto the Base
Connecting the Stirring Shaft
The COMBI 30G and COMBI 60G each come with a fully
assembled leg stand to support the machines. The COMBI
10G is shipped to you in specially designed box that is half
metal and half cardboard. You can discard the top cardboard
half after removing straps and carefully lifting off of the
machine. With an assistant, carefully lift the pasteurizer out
of the metal powder coated box and set the COMBI 10G to
the side. Turn the white box over and move it to the location
where you wish to install the machine. Lift the pasteurizer
and place it on the box so that the sides and front line up
with the mounting holes. You will find two mounting brackets
and hardware which you can use to secure the COMBI 10G
cabinet to the support box. Refer to the illustration below.
The motor shaft must also be attached by inserting it
through the side entry of the coupler, followed by right-hand
threading of the shaft into the coupler. The shaft can be
gripped at the knurling located midway on the shaft. Only
finger tighten as shown in the next image.
Fender washers and
bolts go inside front
legs, on top of the
front feet and secure
front of pasteruizer
Dairy Tech recommends that the stirring shaft be removed
from the coupler any time the pasteurizer is being moved.
This will help to avoid a bend in the shaft. A bent shaft can
result in premature failure of the drive motor. Treat the shaft
with due care any time it is not in the machine.
Bracket goes here
and on opposite
side. Secure with
screws provided
Coupler
Lid Storage
Platform for the
pasteurizer is made
by turning the metal
half of the shipping
box upside down.
The lid is packaged with the unit and can be hung on either
side of the pasteurizer by the 2 holes at the top of the tab.
This provides a convenient place to store the lid while the
unit is being cleaned or filled. See below for proper lid
storage.
Lid hanger can mount on
either side of unit
Lid hangs on side
of pasteurizer when
not in use.
6
Dairy Tech, Incorporated | All Rights Reserved
Connecting the Milk Spigot
Connecting the Hoses for Water-Cooling
Combi Pasteurizers come supplied with the highest quality
304SS butterfly drain valve. These are installed on the front
flange of the tank drain much the same as connections are
made to a bulk tank flange using the clamps provided. Please
see the diagram below. Make certain to include the gasket
between each fitting. These parts can then be easily removed
for thorough cleaning in a sink.
WATER-COOLED UNITS: A 6’ black supply hose is supplied
with the machine. This hose with factory ends supplies all
the cold water to cool the product when pasteurization is
finished. It can connect to any normal domestic pressure
cold water source including a hose but it MUST BE ON AT
ALL TIMES DURING OPERATION. Using the supplied hose,
attach one end to the threaded solenoid valve on the back
of the unit, with the other end going to a regular hose bib
supply. Pressure reduction is provided by the orifice of the
solenoid valve. A relief valve is incorporated into the design
of the COMBI 30G and COMBI 10G with a port coming out of
the bottom of the unit toward the right rear. The COMBI 60G
Model contains dual pressure relief ports. Should the drain
line be raised too high or blocked, pressure will relieve itself
by opening this valve which will spill water onto the floor. This
protects the metal milk tanks from implosion in high pressure
situations. Take care to avoid situations where any back
pressure exists on the drain line, this will void the warranty.
Spigot for filling Bottles
and Buckets
Adapter for filling Perfect
Udder® Bags
Choosing and Preparing a Location
Criteria for Selecting a Location
a) Choose an indoor spot that will be protected from the
elements. Extreme heat will allow milk spoilage and
freezing temperatures will damage the unit.
b) Cold water is required to be connected to the unit for
water cooling the milk or colostrum, and a nearby hot
water source is necessary for proper cleaning.
c) Floor drains will allow for proper cleaning and rinsing
of the product as well as to clean up milk spills.
WATER DRAIN: This 4’ black hose is connected internally and
takes cold water out of the unit once it has absorbed heat
during the cooling cycle. It should be directed to a drain,
cistern, stock tank or other collection system. Do not connect
the drain hose to another hose or to any system that
can create back-pressure. This will cause damage to the
cooling jacket and void the warranty. If you wish to salvage
the waste water, direct the drain line to a 5 gallon bucket
and place an inexpensive sump pump in that bucket to send
water where it needs to go. This prevents any back pressure
to the unit.
It is important to keep water turned on anytime the
pasteurizer is in operation to prevent damage to the heating
elements.
Water Drain Hose
DO NOT KINK, BLOCK
OR OTHERWISE
PREVENT WATER
FROM EXITING.
d) Power requirements are 240vac 30 or 50 amp circuit
breaker rated for use as branch circuit protection.
All 3 Models can also be ordered for 3 phase electric
supplies. See local voltages for correct connection
requirements.
e) Floor space requirements are approx. 1 yd² (1M²)
f ) Avoiding extremely drafty areas will improve heating
efficiency of the unit.
Clean Cold Water Suppley
into Pasteurizer
g) Always have 2 people lift and carry the unit grasping
with both hands on the sides of the unit. The supports
of the legs can be used for lifting. Never attempt to
move the unit while it is full of milk or water.
rev102015
Combi Pasteurizer Owner Manual | 10G, 30G & 60G
7
ELECTRICAL REQUIREMENTS
International Installations: 10G, 30G & 60G
The standard electrical cord emerging from the back of
the machine should be plugged directly into a 240vac 1P,
grounded receptacle on a 30amp breaker for COMBI 10G
Models, a 30amp breaker for COMBI 30G Models and a 50amp
breaker for COMBI 60G Models. Take special note of the
electrical label on the back of the machine to be sure. Failure
to meet these requirements will void the warranty and could
result in serious damage to the unit, bodily injury or death.
The receptacle should be fitted with a water resistant cover
for added protection.
Some International models are not supplied with power cords
per local electrical ordinances. Follow the labels attached to
the back of the machine for specific wiring instructions in
these instances.
ALL CONNECTIONS SHOULD BE PERFORMED
BY AN ELECTRICIAN OR OTHER TRAINED
PERSONNEL.
•
The receptacle should be sharing minimal usage with
other equipment to avoid unexpected outages and
tripping of the breaker. If the power is lost, but returns
within 1 hour, the cycle will resume automatically in most
instances.
•
COMBI 10G units at full power are rated at 22 amps at
230vac. Do not install on circuit breakers greater than
30 amps.
•
COMBI 30G units at full power are rated at 26 amps at
230vac. Do not install on a circuit breaker greater than
30 amps.
•
COMBI 60G units at full power are rated at 40 amps at
230vac. Do not install on circuit breaker greater than 50
amps.
•
European Installations must be done with a switch or
circuit breaker disconnect within reach of the equipment
for power down, which should be labeled as such.
•
DO NOT use an extension cord to operate the unit other
than the one provided.
•
Check your electrical system to make certain it is properly
grounded to avoid the possibility of electrical shock.
This type of power
cord may be installed
on 60G units
This type of power cord
may be installed on 10G
or 30G units
The pasteurizer is equipped with a cord having an equipment
grounding conductor and a grounding plug. BEFORE
INSERTING THE PLUG, MAKE CERTAIN THAT THE POWER
SWITCH IS SET TO “OFF” OR THE PUSH BUTTON SWITCH IS
IN THE POPPED OUT POSITION. The plug must be inserted
into an appropriate outlet that is installed and grounded
in accordance with all local codes and ordinances. DO NOT
modify the plug provided with the Pasteurizer; if it will not fit
the receptacle, have a proper outlet or new plug end installed
by a qualified electrician.
DO NOT TURN THE PASTEURIZER ON UNTIL
YOU ARE TOLD TO DO SO. FAILURE TO FOLLOW
THIS INSTRUCTION MAY DAMAGE THE UNIT
AND VOID THE WARRANTY.
8
Dairy Tech, Incorporated | All Rights Reserved
External Fuse Board
The unit is equipped with 4 external fuses on the back of the
unit. These fuses protect delicate electronics and also serve as
a troubleshooting guide in cases of system malfunction. The
layout of the fuses is shown below, as well as on the unit itself.
Refer to Trouble Shooting for further information.
WARNING: Component Ratings
Touch Screen Control:
YN80 Gear Motor:
120-240vac, 1amp, 1P, 50-60Hz
1250RPM, 240vac, 1P,1 amp,
60Hz
YN80 Direct Drive Motors: 225RPM, 240vac, 1P, 1 amp, 5060Hz
Heater COMBI 10G:
L10A8-1E24, 1250watt, 240vac,
1P/3P, 20 amp, 50-60Hz
Heater COMBI 30G:
N14A20-1E24, 1850watt,
240vac, 18amp,1P/3P, 50-60Hz
Heater COMBI 60G:
N24-A23, 3000watt, 240vac,
36amp, 1P/3P, 50-60Hz
Cooling Fan:
240vac, 1P, 0.5amp, 50-60Hz
For parts list and ordering
visit www.dairytechinc.com
You may also see the last pages of this user manual.
Contact Dairy Tech, Inc.
COMBI Models use ¼” x 1 ¼” fast-blow style fuses
F1
Line 1 2A 250vac
F2
Line 2, 2A 250vac
F3
Motor, Fan, Valve 1A 250vac
E4
24VDC supply, 1A 250vac
Dairy Tech, Inc.
34824 CR 29
Greeley, CO 80631
Toll Free:
1-866-384-2697
Local:
1-970-674-1888
Fax:
1-970-686-5871
Hours:
M – F 7am – 4pm, MST
Web:
www.DairyTechInc.com
eMail:
rev102015
[email protected]
Combi Pasteurizer Owner Manual | 10G, 30G & 60G
9
FI RST USE OF PASTEURIZER.
3.
Select “WATER VALVE OFF”
00/00/00
XX.XX °F
DO NOT TURN THE PASTEURIZER ON UNTIL
YOU ARE TOLD TO DO SO. FAILURE TO FOLLOW THIS
INSTRUCTION MAY DAMAGE THE UNIT AND
VOID THE WARRANTY.
THE SYSTEM MUST BE CHARGED WITH WATER TO
PREVENT DAMAGE TO THE HEATING ELEMENTS.
4.
PID Off
Mixer Off
Heaters Off
Water Valve Off
It will now display “WATER VALVE ON” indicating the
valve is open
F1
XX.XX °F
Charging the System
00/00/00
Pasteurize
F2
F3
00/00/00
F4
ESC
18:00
Mixer Off
After installation is complete, attach the cold water supply
hose and turn on the water. Turn the unit on and wait for
home screen to appear.
XX.XX °F
18:00
Water Valve ON
18:00
Warm
Cool
Logging Card OK
This will call for cooling water to fill the water jacket of the
pasteurizer. It may take several minutes for the water jacket to
F1 water. F2
F3
F4
ESC
fill with
Cold Water
Supply
VX:XXX
Select “SETTINGS”
2.
Select “MANUAL”
00/00/00
XX.XX °F
Language
18:00
Date & Time
System Profiles
Back of Pasteurizer
5.
Manual
F1
10
F2
F3
Water Jacket
Water Discharge
1.
Hose
Home Screen
F4
Dairy Tech, Incorporated | All Rights Reserved
ESC
Once water is flowing freely from the discharge line, press
“Water Valve ON” once more to turn off the valve.
XX.XX °F
00/00/00
18:00
PID Off
Mixer Off
Heaters Off
Water Valve Off
This step will not be necessary in future uses unless the tank
is drained. The water valve will open and close as needed
F1in operation.
F2
F3
F4
ESC
while
BEFORE USING THIS UNIT FOR THE FIRST TIME,
WASH OUT THE INSIDE OF THE DRUM WITH
HOT SOAPY WATER AND RINSE CLEAN. INITIAL
CLEANING OF THE MILK POT IS NECESSARY TO REMOVE
DIRT AND CONTAMINATION FROM TRANSIT.
CLEANING THE SYSTEM
Filling and Emptying the Milk Drum
While some dairies may elect to have the milk line pump
directly into the pasteurizer, most dairies will be dealing
with volumes that can be dumped into the unit from milk
cans or collection buckets. You ay need to provide a sturdy
step for short employees who may have trouble comfortably
dumping milk into the unit.
•
Try to avoid excessive splashing or spilling of the product
as it is being poured into the unit.
•
Clean spills with a damp cloth as quickly as possible.
•
Do not overfill the pot as the milk will splash out from
under the lid while being stirred.
To remove the milk: Open the spigot to fill buckets, bottles or
storage bags. DO NOT TILT THE EQUIPMENT TO GET MILK OUT!
This may cause undue stress on the support system and could
potentially damage the unit or harm the operator. Any residual
milk or colostrum can easily be wiped or brushed from the unit
Energy and Time Saving Tips
1.
Pasteurize the milk as quickly as possible after collection
to take advantage of the heat already in the milk to
improve energy efficiency. This will also prevent the
immediate heavy growth of bacteria in this fresh product.
2.
Avoid placing the unit in an area of high drafts to prevent
convection heat losses while pasteurizing.
3.
Colostrum can be stored in the refrigerator for 24-48
hours if it is handled cleanly once it has been pasteurized.
Filling Perfect Udder® Colostrum management bags
allows for a disposable system that makes it easy to keep
track of dates and colostrum quality. These bags also
allow the product to be warmed more quickly when they
are needed for the newborn and can then be fed without
recontamination of the product.
(Be sure the equipment is powered OFF)
1.
With the stir motor stopped, raise the lid from the milk
pot and place it on the hook on either side of the unit
after thorough cleaning in a sink.
2.
Perform a warm water rinse to remove milk and dirt.
3.
Clean the following milk surfaces with hot water and an
appropriate disinfectant. Go over all the exposed surface
areas with the included scrub brushes and appropriate
disinfectants. A mild abrasive pad may be used to remove
any residue on the following components:
•
4.
5.
Motor shaft, coupler and propeller (shaft can be
unthreaded for cleaning by grasping the coupler with
the slot facing forward and unthread the shaft by
grasping the knurling mid shaft for a better grip.)
•
Thermocouple well at bottom of pot
•
Underside of the pasteurizer lid
•
Milk tank and drain spigot/valve
•
Accessory spigots, pitchers or hoses
Stubborn residues may be cleaned with a scour sponge
if necessary. Avoid the use of acids as they may corrode
some of the brass or aluminum parts on the equipment.
Follow manufacturers handling recommendations for all
chemicals.
Spray the stainless steel surfaces with a disinfectant and
allow it to dry on the surface. This will help to eliminate
the build-up of a biofilm.
These can be ordered at:
www.calfology.com or at
www.dairytechinc.com.
4.
Do not dip bottles into the tank for filling as this will likely
contaminate the product with bacteria from the bottom
and sides of the bottles.
5.
Always wear nitrile or latex gloves when handling the
milk or colostrum to prevent the spread of pathogens
from the skin surface.
WHEN SERVICE IS REQUIRED
If you purchased the Pasteurizer from an authorized dealer, contact
them directly with inquiries or repair questions. For prompt service,
work through the troubleshooting guide in this manual to give an
accurate description of the problem.
The Dairy Tech, Inc. service department can also assist when
needed 1-866-384-2697 extension 2
Repair by an unauthorized service technician will void the warranty.
rev102015
Combi Pasteurizer Owner Manual | 10G, 30G & 60G
11
USING AND PROGRAMMING THE TOUCHSCREEN CONTROLLER
Be sure the pasteurizer is charged with water using the instructions on page 10 prior to the first use of your pasteurizer.
Temperature
Month/Date/Year
Time
00/00/00
XX.XX °F
Pasteurize
18:00
Warm
Logging Card OK
Cool
Program Version
VX:XXX
Settings
F1
F2
F3
F4
ESC
CONTROLLER BUTTON LEGEND
Pasteurize
Warm
Cool
Settings
Back
Repeat Last
Feed Now
Store
Feed Later
Home
Adjust Down
Adjust Up
XXX.XX
Information
12
STOP
Dairy Tech, Incorporated | All Rights Reserved
Adjustable Setting
ADJUSTING SETTINGS
5.
Select “ENTER NEW PASSWORD”
System Profile
Pasteurize Temperature
DO NOT ALTER SETTINGS IN THE CONTROLLER
WITHOUT CONSULTING A DAIRY TECH
REPRESENTATIVE. ANY UNAUTHORIZED
ADJUSTMENTS WILL VOID THE PRODUCT WARRANTY
AND MAY LEAD TO SERIOUS HEALTH CONSEQUENCES FOR
THE CALVES.
Dwell Time
System
Select “SETTINGS”
6.
2.
Select “SYSTEM PROFILES”
00/00/00
XX.XX °F
Language
Enter New Password
Enter New Password
0
Date & Time
Ok
Cancel
7.
Enter password of choice, then press “RETURN/BACK” .
Keep your new password in a
safe place. If at any time the new
password is lost or cannot be
remembered, the system has
default password that can
retrieved by contacting your Dairy
Tech Dealer or our Service
Department.
Variable 428
Manual
3.
Home
1
6
A
Select “ENTER PASSWORD”
XX.XX °F
F1
F2
00/00/00
F3
F4
140.0 °F
H M S
00:60:00
A new password screen will appear that shows the
default password “0”, or the last password saved.
Selecting this
allow
F1
F2box will open
F3 a new screen
F4 that will
ESC
you to create your new password.
18:00
System Profiles
18:00
Factory Reset
Resetting the Password
1.
00/00/00
XX.XX °F
*** IMPORTANT WARNING***
2
7
B
End
3
8
C
4
9
D
(Dec)
Esc
5 +/0 .
E F
Exp Base
Del
18:00
ESC
Reset Password
8.
If you are satisfied with your new password, press “OK” to
save or press “Cancel” to keep the previous password.
Enter New Password
Enter Password
0
Cancel
Enter Password
F114
7
+/-
4.
Esc
2
5
8
0
3
6
9
.
F2Del
This information
isF4
protected byESC
a
F3
password. You will be asked to enter a
password to continue.
9.
Ok
Select “BACK” to complete
Enter the default password, “0” and press “RETURN/
BACK”. You now have access to the “SYSTEM PROFILES”.
rev102015
Combi Pasteurizer Owner Manual | 10G, 30G & 60G
13
Selecting a Language
1.
Select “SETTINGS”
2.
Select “LANGUAGE”
To adjust any of the fields, select the desired box with a blue
outline.
DATE: The First box is for the MONTH, and has a range
from 01 to 12, the Second Box is for DAY and has a range
from 01 to 31, and the Third Box is for YEAR and has a
range from 01 to 99. The First box is active and ready
00/00/00
XX.XX °F
Language
TIME: First box is for HOUR and has a range from 01 to
24, the Second box is for MINUTES and has a range from
01 to 59. The Third Box is for SECONDS and has a range
from 01 to 59. Time is set as Military Time.
18:00
Date & Time
00/00/00
XX.XX °F
System Profiles
18:00
M
D
Y
Click to Change Date
01
/ 01 / 16
Click to Change Time
10
:
H
M
55
:
S
16
Manual
3.
Select a language from list on screen
F1
F2
XX.XX °F
F3
Language
English
ESC
18:00
Spanish
German
Danish
1/2
F1
1
4
7
+/-
4.
F2
F3
F4
ESC
Setting Date and Time
2.
After selecting a field to adjust, a keypad will appear.
2
5
8
0
0
3
6
9
.
F2
Esc
Del
F3
F4
ESC
Enter the desired number and select
“RETURN/BACK” to complete the change.
Repeat this step as needed until all fields
are correct.
Select “BACK” to save your changes
Select “BACK” to save your changes
F1
1.
3.
Portugues
Italian
F2
English
4.
F4
00/00/00
Select “SETTINGS”
Calibrating Thermocouple Temperature
It is a good idea to double check program temperatures.Allow a
cycle to climb to the pasteurization temperature and level out for
five minutes. Now it is okay to check the batch temperature of the
colostrum or milk with a high quality thermometer. If the control
reads high, reduce offset, if the control reads low, increase offset.
1.
Select “SETTINGS”
2.
Select “SYSTEM PROFILES”
Select “DATE & TIME”
00/00/00
XX.XX °F
Language
18:00
Date & Time
00/00/00
XX.XX °F
Language
System Profiles
18:00
Date & Time
System Profiles
Manual
Manual
14
F1Tech, Incorporated
F2
F4
Dairy
| AllF3
Rights Reserved
ESC
F1
F2
F3
F4
ESC
Enter Password
1
4
7
+/-
2
5
8
0
3
6
9
.
Esc
Del
This information is protected by a
password. You will be asked to enter a
password to continue.
3.
Enter your password, then press “RETURN/BACK”. You
now have access to the “SYSTEM PROFILES”.
4.
Select “SYSTEM”
Celcius/Fahenhiet
Changing from Farenheit to Celcius is simple.
1.
Select “SETTINGS”
2.
Select “SYSTEM PROFILES”
00/00/00
XX.XX °F
00/00/00
XX.XX °F
18:00
System Profile
Pasteurize Temperature
Language
140.0 °F
H M S
00:60:00
Dwell Time
18:00
Date & Time
System Profiles
Factory Reset
Manual
System
5.
Enter New Password
Enter Password
Select “SCALE TEMPERATURE”
F1
F2
XX.XX °F
F1
00/00/00
F3
Maximum Feed Adjust
120.0 °F
Minimum Feed Adjust
90.0 °F
Maximum Cool Adjust
120.0 °F
Minimum Cool Adjust
70.0 °F
Scale Temperature
F4
1
4
7
+/-
ESC
18:00
°F
PID
PID Values
Values
°C
Manual
2
5
8
0
3
6
9
.
Esc
Del
F2
F3
F4
3.
Enter your password, then press “RETURN/BACK”. You
now have access to the “SYSTEM PROFILES”.
4.
Select “SYSTEM”
00/00/00
XX.XX °F
18:00
System Profile
Pasteurize Temperature
Stirring
Dwell Time
You will need to adjust the additive variable. You can adjust
the temperature by a (+,-) degree.
F1
F2
XX.XX °F
Measured Temperature
F3
00/00/00
F4
Scale & Offset
F1
1
4
7
+/-
6.
2
5
8
0
0
3
6
9
.
Esc
Del
F2
140.0 °F
H M S
00:60:00
Factory Reset
ESC
18:00
System
Enter New Password
Scaled Temperature
5.
999.9 Deg F * -9.999 + -9.999 =
ESC
This information is protected by a
password. You will be asked to enter a
password to continue.
999.9 Deg F
Select °F or °C
F1
XX.XX °F
F2
00/00/00
F3
Maximum Feed Adjust
120.0 °F
Minimum Feed Adjust
90.0 °F
Maximum Cool Adjust
120.0 °F
Minimum Cool Adjust
70.0 °F
Enter the desired number and select
“RETURN/BACK”
to
complete ESC
the
F3
F4
change. Repeat this step as needed
until all fields are correct.
Scale Temperature
F4
PID
PID Values
Values
Manual
ESC
18:00
°F
°C
Stirring
Select “BACK” to save your changes
F1
rev102015
F2
F3
F4
ESC
Combi Pasteurizer Owner Manual | 10G, 30G & 60G
15
Your temperature choice will be reflected throughout the
program.
00/00/00
XX.XX °C
Maximum Feed Adjust
48.9 °C
Minimum Feed Adjust
32.2 °C
Maximum Cool Adjust
48.9 °C
Minimum Cool Adjust
21.1 °C
4.
Select “SYSTEM”
Factory Reset
System
Scale Temperature
Select “BACK” to save your changes
F1
F2
F3
F4
Select “STIRRING”
F1
XX.XX °F
ESC
Adjusting the Agitator Hold
When running the profile “Pasteurize to Feed Later” the motor
can be set to periodically stir for a specific amount of time.
1.
00/00/00
Language
00/00/00
F3
120.0 °F
Minimum Feed Adjust
90.0 °F
Maximum Cool Adjust
120.0 °F
Minimum Cool Adjust
70.0 °F
Scale Temperature
Select “SYSTEM PROFILES”
XX.XX °F
F2
Maximum Feed Adjust
Select “SETTINGS”
6.
2.
Enter New Password
Stirring
5.
6.
140.0 °F
H M S
00:60:00
Dwell Time
°C
Manual
18:00
System Profile
Pasteurize Temperature
°F
PID
PID Values
Values
00/00/00
XX.XX °F
18:00
ESC
18:00
°F
PID
PID Values
Values
°C
Manual
Stirring
From this screen the user can adjust how long you want
the agitator to run during the holding time by selecting
one of the “BLUE”
F1
F2 highlighted
F3 fields. F4
ESC
00/00/00
XX.XX °F
18:00
F4
18:00
Agitation In Hold
Date & Time
Every
System Profiles
99
Run for
m
99
m
Manual
After selecting a field to adjust, a keypad will appear.
Enter Password
F14
1
7
+/-
3.
16
2
5
8
0
3
6
9
.
Esc
Del
F2
F1
This information
isF4
protected byESC
a
F3
password. You will be asked to enter a
password to continue.
Enter your password, then press “RETURN/BACK”. You
now have access to the “SYSTEM PROFILES”.
Dairy Tech, Incorporated | All Rights Reserved
1
4
7
+/-
7.
2
5
8
0
0
3
6
9
.
F2Enter theF3
F4 and select
ESC
desired number
Esc
Del
“RETURN/BACK” to complete the change.
Repeat this step as needed until all fields
are correct.
Select “BACK” to save your changes
Adjusting Feed and Cool Temperatures
5.
Dairy Tech Inc. has designed the feeding temperature
parameters and cooling temperature parameters to reflect
university and industry research.
Adjust the “FEED” or “COOL” temperatures by touching
the BLUE box that contains the temperature you want to
change.
Currently, each controller is set up to have the below
parameters for feeding and cooling temperatures:
•
•
Maximum Feeding Temperature: 115 degrees
Minimum Feeding Temperature: 98 degrees
•
•
Maximum Cooling Temperature: 90 degrees
Minimum Cooling Temperature: 65 degrees
Maximum Feed Adjust
120.0 °F
Minimum Feed Adjust
90.0 °F
Maximum Cool Adjust
120.0 °F
Minimum Cool Adjust
70.0 °F
Scale Temperature
To change Maximum Feed and Cool Temperatures:
1.
Select “SETTINGS”
1
4
7
+/-
Select “SYSTEM PROFILES”
00/00/00
XX.XX °F
18:00
°F
PID
PID Values
Values
Manual
°C
Stirring
After selecting a field to adjust, a keypad will appear.
F1
2.
00/00/00
XX.XX °F
Language
18:00
Date & Time
6.
2
5
8
0
0
3
6
9
.
F2
Esc
Del
F3
F4
ESC
Enter the desired number and select
“RETURN/BACK” to complete the change.
Repeat this step as needed until all fields
are correct.
Select “BACK” to save your changes
System Profiles
Downloading Pasteurization Data
Manual
Enter Password
F11
4
7
+/-
2
5
8
0
3
6
9
.
Esc
F2Del
A micro-SD card is located on the right hand side of
the controller. You will see the word “SD” above the slot
containing the card.
This information
isF4
protected byESC
a
F3
password. You will be asked to enter a
password to continue.
3.
Enter your password, then press “RETURN/BACK”. You
now have access to the “SYSTEM PROFILES”.
4.
Select “SYSTEM”
00/00/00
XX.XX °F
System Profile
Pasteurize Temperature
Dwell Time
18:00
140.0 °F
H M S
00:60:00
Factory Reset
System
F1
rev102015
F2
When Data is needed, please remove the Micro SD Card and
connect to adapter of choice.
** Please note that the SD Adapter card is located
with the extra fuses. The user will be able to input the
micro-SD card to the large SD Adapter. This can easily
be adapted to a USB connector. **
Enter New Password
F3
F4
ESC
Connect Large SD Card to a USB Connector then attach USB
connection to a computer and wait for documents to load.
You will find an excel file of the data.
Combi Pasteurizer Owner Manual | 10G, 30G & 60G
17
USING YOUR PASTEURIZER
Warning: The aluminum and stainless steel
drums and lids can cause severe burns if
handled before the product is completely
cooled. Always finish the cooling cycle before handling
the milk. Grasp the lid by the handles and do not handle
the milk or colostrum unless it has cooled.
REPEAT LAST
Selecting the “REPEAT LAST” Pasteurization Option
will open a screen that shows the parameters of the last
Pasteurization Option ran.
This example shows a “Pasteurize, Feed Later” Option.
00/00/00
XX.XX °F
18:00
PASTEURIZE FEED LATER
PASTEURIZE TEMP: 140°F
DWELL: 60:00
FEED TEMPERATURE 105°F
PASTEURIZE
A
When “PASTEURIZE” is selected, four profile options will
appear. These options dictate what will occur when
pasteurization is complete.
1.
2.
3.
4.
REPEAT LAST
FEED NOW
TO STORE
FEED LATER MILK ONLY
XX.XX °F
00/00/00
To Store
: 30
B
16
:
30
50°F
ADJUST
You have 3 choices: BACK, ADJUST or START
18:00
1.
Press “BACK” button and return to the
“Pasteurize” menu to select from one of the other
3 options
2.
Press “ADJUST” to change the current
settings. Please refer to the “ADJUST
PROGRAM SETTINGS” instructions listed in the FEED
LATER Pasteurize Options section.
3.
Feed Now
05
START
PASTEURIZE
Repeat
Last
120°F
60°F
COOL TEMPERATURE
Feed Later
MILK ONLY
ADJUST
START
program.
When you are satisfied with your
adjustments, press “START” to begin the
Once the program is in progress, the screen will indicate
which stage the program is in.
Upon completion, the Controller Screen will indicate
“COMPLETE”.
Pressing the “HOME” button will take the operator
back to HOME screen.
18
Dairy Tech, Incorporated | All Rights Reserved
XX.XX °F
00/00/00
18:00
PASTEURIZE FEED NOW
PASTEURIZE TEMP: 140°F
FEED NOW
50°F
START
A screen will show all the parameters of the last “FEED NOW”
program ran.
00/00/00
3.
18:00
PASTEURIZE FEED NOW
PASTEURIZE TEMP: 140°F
120°F
ADJUST
When you are satisfied with your
adjustments, press “START” to begin
START
the program.
DWELL: 60:00
120°F
FEED TEMPERATURE 105°F
Selecting the “Feed Now” Pasteurization Option allows you
to pasteurize milk then feed at a selected temperature when
pasteurization is complete.
XX.XX °F
DWELL: 60:00
Once the program is in progress, the screen will indicate
which stage the program is in.
FEED TEMPERATURE 105°F
50°F
START
2.
Press “BACK” button and return to the
“Pasteurize” menu to select from one of the other
3 options
ADJUST
Press “ADJUST” to change the current
settings.
Adjusting Program Settings
Pressing the “ADJUST” button will highlight all available
adjustments that can be made to the current program.
A BLUE BOX will indicate the current active fields to be
adjusted.
XX.XX °F
00/00/00
18:00
DWELL: 60:00
Increasing Temp to 140°F
CURRENT TEMP 130°F
Upon completion, the Controller Screen will indicate
“COMPLETE”.
XX.XX °F
00/00/00
18:00
PASTEURIZE FEED NOW
120°F
FEED TEMPERATURE 105°F
50°F
START
18:00
PROGRAM COMPLETE
PASTEURIZE FEED NOW
PASTEURIZE TEMP: 140°F
00/00/00
PASTEURIZE FEED NOW
ADJUST
You have 3 choices: BACK, ADJUST or START
1.
XX.XX °F
Pressing the “HOME” button will take the operator
back to HOME screen.
ADJUST
Use the arrow buttons to adjust the
setting in the active BLUE BOX up or down.
To activate a different field, simply touch it and it will turn
BLUE to indicate that it is now active.
rev102015
Combi Pasteurizer Owner Manual | 10G, 30G & 60G
19
XX.XX °F
00/00/00
18:00
PASTEURIZE TO STORE
PASTEURIZE TEMP: 140°F
TO STORE
COOL TEMPERATURE
Selecting the “To Store” Pasteurization Option allows you
to pasteurize, then cool colostrum to be stored in the
refrigerator or the freezer. This profile is recommended for use
with Perfect Udder® Bags.
A screen will show all the parameters of the last “TO STORE”
program ran.
00/00/00
XX.XX °F
18:00
PASTEURIZE TEMP: 140°F
DWELL: 60:00
COOL TEMPERATURE
120°F
60°F
START
3.
START
XX.XX °F
2.
ADJUST
When you are satisfied with your
adjustments, press “START” to begin the
00/00/00
18:00
PASTEURIZE TO STORE
ADJUST
You have 3 choices: BACK, ADJUST or START
1.
60°F
Once the program is in progress, the screen will indicate
which stage the program is in.
50°F
START
120°F
50°F
program.
PASTEURIZE TO STORE
DWELL: 60:00
Cooling to 60°F
CURRENT TEMP 110°F
Press “BACK” button and return to the
“Pasteurize” menu to select from one of the other
3 options
ADJUST
Press “ADJUST” to change the current
settings.
Adjusting Program Settings
Pressing the “ADJUST” button will highlight all available
adjustments that can be made to the current program.
A BLUE BOX will indicate the current active fields to be
adjusted.
XX.XX °F
00/00/00
Upon completion, the Controller Screen will indicate
“COMPLETE”.
XX.XX °F
00/00/00
18:00
PASTEURIZE TO STORE
PROGRAM COMPLETE
18:00
PASTEURIZE TO STORE
PASTEURIZE TEMP: 140°F
DWELL: 60:00
COOL TEMPERATURE
120°F
60°F
50°F
START
ADJUST
Use the arrow buttons to adjust the
setting in the active BLUE BOX up or down.
To activate a different field, simply touch it and it will turn
BLUE to indicate that it is now active.
20
Dairy Tech, Incorporated | All Rights Reserved
Pressing the “HOME” button will take the operator
back to HOME screen.
00/00/00
XX.XX °F
18:00
PASTEURIZE FEED LATER
PASTEURIZE TEMP: 140°F
FEED TEMPERATURE 105°F
Selecting the “Feed Later Milk Only” Pasteurization Option
will allow you to pasteurize milk and feed later at a specified
time.
A
18:00
DWELL: 60:00
120°F
FEED TEMPERATURE 105°F
A
05
B
: 30
START
16
:
30
3.
You have 3 choices: BACK, ADJUST or START
1.
2.
Press “BACK” button and return to the
“Pasteurize” menu to select from one of the other
3 options
ADJUST
16
:
30
50°F
ADJUST
NOTE: Be aware that if the desired Time to warm the
milk is missing, the machine will continue running. **
50°F
ADJUST
B
This is an either “A” or “B” option, not both at the same
time. After you run Option A in the morning, you will
need to select Option B to have this machine ready for
the second feeding.
60°F
COOL TEMPERATURE
: 30
There are 2 options for START TIME, “A” and “B”. This
gives you the ability to set up 2 program start times - for
instance, a morning feed and an evening feed.
PASTEURIZE FEED LATER
PASTEURIZE TEMP: 140°F
05
START
A screen will show all the parameters of the last “FEED LATER
MILK ONLY” program ran.
00/00/00
120°F
60°F
COOL TEMPERATURE
FEED LATER MILK ONLY
XX.XX °F
DWELL: 60:00
START
program.
When you are satisfied with your
adjustments, press “START” to begin the
Once the program is in progress, the screen will indicate
which stage the program is in.
XX.XX °F
Press “ADJUST” to change the current
settings.
00/00/00
18:00
PASTEURIZE FEED LATER
Adjusting Program Settings
Pressing the “ADJUST” button will highlight all available
adjustments that can be made to the current program.
A BLUE BOX will indicate the current active fields to be
adjusted.
00/00/00
XX.XX °F
18:00
Upon completion, the Controller Screen will indicate
“COMPLETE”.
PASTEURIZE FEED LATER
PASTEURIZE TEMP: 140°F
DWELL: 60:00
120°F
60°F
COOL TEMPERATURE
05
: 30
START
B
16
:
30
00/00/00
18:00
50°F
ADJUST
Use the arrow buttons to adjust the
setting in the active BLUE BOX up or
down. To activate a different field, simply touch it and it
will turn BLUE to indicate that it is now active.
rev102015
XX.XX °F
PASTEURIZE FEED LATER
FEED TEMPERATURE 105°F
A
COOLING TO 60°F
CURRENT TEMP 130°F
PROGRAM COMPLETE
Pressing the “HOME” button will take the operator
back to HOME screen.
Combi Pasteurizer Owner Manual | 10G, 30G & 60G
21
3.
START
When you are satisfied with your
adjustments, press “START” to begin the
program.
Once the program is in progress, the screen will indicate
which stage the program is in.
XX.XX °F
WARM
00/00/00
XX.XX °F
120°F
FEED TEMPERATURE 105°F
ADJUST
You have 3 choices: BACK, ADJUST or START
2.
00/00/00
18:00
WARM
PROGRAM COMPLETE
Press “BACK” button and return to the
“Pasteurize” menu to select from one of the other
3 options
ADJUST
Press “ADJUST” to change the current
settings.
Adjusting Program Settings
Pressing the “ADJUST” button will highlight all available
adjustments that can be made to the current program.
A BLUE BOX will indicate the current active field to be
modified.
XX.XX °F
00/00/00
18:00
WARM
120°F
FEED TEMPERATURE 105°F
50°F
START
ADJUST
Use the arrow buttons to adjust the setting
in the active BLUE BOX up or down.
22
Upon completion, the Controller Screen will indicate
“COMPLETE”.
XX.XX °F
50°F
1.
Increasing Temp to 105°F
CURRENT TEMP 80°F
18:00
WARM
START
18:00
WARM
Warm is to be used when you would like to warm pasteurized
milk or colostrum to a feeding temperature.
Pressing the “WARM” button will open a new screen with the
WARM Header showing all the parameters of the last WARM
program ran.
00/00/00
Dairy Tech, Incorporated | All Rights Reserved
Pressing the “HOME” button will take the operator
back to HOME screen.
3.
START
program.
When you are satisfied with your
adjustments, press “START” to begin the
Once the program is in progress, the screen will indicate
which stage the program is in.
Cooling to 65°F
CURRENT TEMP 80°F
Pressing the “COOL” button will open a new screen with the
COOL Header showing all the parameters of the last COOL
program ran.
00/00/00
18:00
COOL
120°F
COOL TEMPERATURE
2.
00/00/00
18:00
COOL
ADJUST
You have 3 choices: BACK, ADJUST or START
1.
Upon completion, the Controller Screen will indicate
“COMPLETE”.
XX.XX °F
65°F
50°F
START
18:00
COOL
Cool is to be used when you would like to cool pasteurized
milk or colostrum to a lower temperature for storage or to be
held for a later feeding.
XX.XX °F
00/00/00
XX.XX °F
COOL
PROGRAM COMPLETE
Press “BACK” button and return to the
“Pasteurize” menu to select from one of the other
3 options
ADJUST
Press “ADJUST” to change the current
settings.
Pressing the “HOME” button will take the operator
back to HOME screen.
Adjusting Program Settings
Pressing the “ADJUST” button will highlight all available
adjustments that can be made to the current program.
A BLUE BOX will indicate the current active field to be
modified.
00/00/00
XX.XX °F
18:00
COOL
120°F
COOL TEMPERATURE
65°F
50°F
START
ADJUST
Use the arrow buttons to adjust the setting
in the active BLUE BOX up or down.
rev102015
Combi Pasteurizer Owner Manual | 10G, 30G & 60G
23
INSTALLATION AND USE OF A BAG
GUARD
QUALITY CONTROL AND SYSTEM
MONITORING
A Perfect Udder bag guard is included with each pasteurizer.
Perfect Udder® is a unique colostrum management system in
a bag. This allows for collection, pasteurization, storage and
feeding of correct amounts of colostrum in a timely manner
to your calves.
The following recommendations should be carried out when
the system is first installed and then on a monthly schedule
to make certain that the pasteurization process is working
adequately.
1.
Follow all instructions for proper installation by
thoroughly reading the manual.
2.
Use quality milk and colostrum in the machine. The
process can be overwhelmed if there are too many
bacteria to begin with.
3.
Handle the milk cleanly after pasteurization to prevent
recontamination.
4.
Verify display temperatures periodically with a second
thermometer to be sure that the displayed reading
matches closely with a trusted calibrated source.
TIME & TEMP FOR PROPER
PASTEURIZATION
The purpose of the bag guard is to protect the colostrum
bags from contacting the propeller of the machine. The
guard is to be used only when Perfect Udder® bags are being
pasteurized in a batch of milk or a water bath. Always be
certain to choose a profile of 140°F (60°C) for 60 minutes for
colostrum. Clean the bag guard thoroughly after each use.
DO NOT LAY BAGS ON DRY RACK. USE OF THE
BAG GUARD WITHOUT ENOUGH WATER OR
MILK TO SUBMERGE THE BAG(S) WILL NOT
ALLOW THE PASTEURIZER TO FUNCTION PROPERLY AND
WILL DAMAGE THE HEATERS OF THE UNIT.
24
Dairy Tech, Incorporated | All Rights Reserved
·
Milk 145°F(63°C)/30 minutes or
161°F(72°C)/30 seconds
·
Colostrum 140°F (60°C)/ 60 minutes
THESE ARE THE RESEARCH RECOMMENDED
COMBINATIONS BUT WE RECOMMEND
ALWAYS USING THE COLOSTRUM SETTINGS TO
PROTECT THE SMALL AMOUNT OF IMMUNOGLOBULIN
THAT IS IN NORMAL MILK EVERYDAY.
HELPFUL HINTS FOR SUCCESSFUL
PASTEURIZATION
4. Are there ways to preserve the milk
or colostrum if refrigeration is not an
option?
Time pasteurization so that it happens as quickly as possible
after harvest of the milk or colostrum. If pasteurization is not
going to be started for more than a couple of hours, it will be
important to first cool the milk or colostrum so that spoilage
and pathogenic bacteria do not multiply in the product.
Yes. Potassium sorbate and other
preservatives can be added to
milk or colostrum that is already
pasteurized and this will help
to prevent the growth of any
remaining bacteria in the
product. It is important to note
that K-sorbate will not kill existing
bacteria but will prevent any
new growth. Do not add it prior
to pasteurization as it will cause
a lower pH and the symptoms
described above including
thickened or separated product
and bad flavors.
1. Will I need to add anything to the milk after it has
been pasteurized?
Not Usually. There are certain vitamins that are heat
sensitive and may be decreased in concentration due to
the pasteurization process but to our knowledge, no cases
of deficiency or hypovitaminosis have been attributed to
proper pasteurization. There may be circumstances due
to regional or farm-specific conditions that would dictate
supplementation of vitamins, minerals or even added fat/
protein. Always check with your local veterinarian if there are
such suspicions and treat according to their instructions.
2.
What if the milk becomes spoiled before I pasteurize it?
This condition is fairly common and can happen at times
even when the same successful routines have been followed.
There are spoilage bacteria in milk and colostrum that release
acid as their by-products. This is usually lactic acid but there
are also others. The release of acid from these proliferating
bacteria then drives down the pH of the milk making it more
acidic. Once the product is pasteurized it is safe for the calves
to drink, but this can lead to rancid odors and flavors that
might decrease consumption by the calves. Digestibility
might also be different which can lead to scours. In cases of
severe drop in pH, the milk will separate completely with
a very thick layer of “cheese” on top or thick like pudding
throughout the product. This is not due to overheating, it
is due to the fact that protein denaturation and separation
is made worse by the added heat of the pasteurization
process. Heat combined with spoiled milk of low pH is a bad
recipe which is why we recommend that you always try to
pasteurize as soon as possible after harvest.
3. What is the optimal routine for handling milk?
We recommend that milk and colostrum be pasteurized
immediately after harvest and then either fed at once or
cleanly transferred to a refrigerated holding vessel. The milk
can then be warmed to body temperature prior to feeding.
rev102015
5. Do I need to add milk extenders
when using waste milk on the
dairy?
This will depend on the fluctuations in
the milk supply. It is best to test the total
solids of the waste milk to see what the
average looks like over a one week
period. If total milk solids are too
low you may want to discuss with
your veterinarian whether to add
an additional feeding or add more
solids in the form of powder to your
waste milk. Our recommendation is 3
feedings per day of quality pasteurized
whole milk.
6. Will I harm immunoglobulins if I
pasteurize colostrum?
NO. When done properly colostrum can be successfully
pasteurized to eliminate the same pathogens that can be
found in the milk. These pathogens are even more dangerous
in colostrum since these bacteria and viruses can easily
pass through the gut wall along with the large proteins
that impart immunity to the calf. Colostrum can be safely
pasteurized at 140F for 60 minutes to remove all pathogens
without significant damage to immunoglobulins. Colostrum
pasteurization should be as much a part of herd biosecurity
as milk pasteurization.
Combi Pasteurizer Owner Manual | 10G, 30G & 60G
25
TROUBLE SHOOTING COMBI
PASTEURIZERS
•
•
•
•
This guide is intended for use as a
troubleshooting directive. All electrical tests
and diagnostics should be performed only
by those skilled in the electrical profession
1. No Power to the Control Panel
a.
Check to be certain unit is plugged into 240vac
outlet and that there is power at the outlet.
b.
Be certain that breakers in panel box are not tripped
All electrical testing and repairs should be
performed by an experienced professional
or technician trained in the electrical trade
Serious injury or death may result from
improperly testing or handling this
equipment
This unit contains HIGH VOLTAGE electricity
that can cause serious harm or death
26
Dairy Tech, Incorporated | All Rights Reserved
If the breakers are being tripped, the system
is likely being shorted to ground. Look for
any blown fuses to indicate trouble areas and
consult the fuse layout for more detail. Have the
system checked by a certified electrician before
operating.
ii.
Also check the heating element fuses located
behind the rear panel.
c.
Check fuses 1 & 2 on the back of the control panel.
These are the Line 1 and Line 2 supply fuses. If
blown, replace with appropriate fuse. DO NOT
REPLACE WITH OVERSIZED FUSES.
d.
Check the toggle switch to see if it is lit when
switched on. This should indicate that power is
getting to the switch. Check for 240vac power
between the bottom switch terminals. Once the
switch is flipped check for 240VAC at the top two
terminals on the switch. Replace if necessary.
e.
The control itself could be malfunctioning or
internally damaged. This is only rarely seen. Call for
assistance.
All parts can be ordered at our website
www.DairyTechInc.com
i.
2. Milk Does Not Heat.
a.
Heat components: Control calls for heat by signaling
the SS Relays for each element separately. The
elements are also wired through the heater Hi-Limit
Thermostat on the back of the tank.
b.
Is there power getting to the SSRs? Check voltage
from Pin 1 on each SSR back to L2. This tells us if
power to the SSR. Once activated, check 240VAC
power from Pin 2 on the SSR to be certain the relay
is closing. If no power, check the breaker but power
will also be off to the unit.
c.
Is the DC signal from the control arriving at the SSR
at pins 3 & 4? Check across these pins for 24VDC
and troubleshoot controller if no signal here during
heating cycle. See diagram.
3. 240vac is Getting to the Heating Elements but Still
No Heat.
a.
Check for continuity through the heating elements. If
no continuity, replace the heating element with the
included spare or order a replacement from Dairy
Tech, Inc.
HEATING ELEMENTS: The heater elements are
replaced when necessary by removing the back panel
after disconnecting all power to the unit. Electrical
connections to the elements are disconnected from the
relays and thermostat. Loosen the 4 bolts that attach
the heating element. Use caution when removing to
retain the O-ring which is necessary for installation of the
replacement element.
Take this opportunity with the element out of the hole to
inspect for excessive amounts of deposits in the heater
reservoir. Flush deposits out with a hose. If severe, the
unit can be tipped forward at a slight angle and a gallon
of vinegar can be poured into the element hole until it
is full. This acid will help to remove other deposits in the
heater reservoir and on other elements. Leave vinegar in
place for several hours for best results. Severe deposits
may also warrant the installation of a water softener for
this piece of equipment.
4. Milk Does Not Get to Temperature, but the Heater is
Hot or Heats Slowly.
a.
There are two (2) or three (3)active heating elements
in each unit depending on the model. Check
resistance on each element with the power off to
determine if one needs replacing.
b.
Make certain that the agitator motor is turning
during the cycle. It should be on during heating,
timing, and cooling cycles. Replace if it is not
working.
c.
Check the bottom of the milk tank to make certain
that it is being cleaned properly after each use. If
there is milk build up or significant sticking, the unit
is not being cleaned properly and heat transfer will
be decreased, but more importantly, this is a prime
opportunity for pathogens to grow.
d.
Milk level is not high enough. The thermocouple
needs to be fully covered in milk as it measures
milk temperature at the tip. Also, too little milk will
not allow optimal stirring which will decrease heat
transfer and give false temperature readings.
e.
Cold water is coming into the system. If there is
a leak in the system, such as a leaking cold water
solenoid valve, the heater cannot keep up and the
milk will not heat properly. Repair the leak or replace
the valve.
Replace the element using the O-ring and reconnect the
wires the opposite of their removal.
5. Water is Leaking Out of the Bottom of the Unit
a.
rev102015
Look under the machine on the sloping back floor,
right side as you face the machine from the front.
There is a pressure relief valve located here that will
purge water if the drain line becomes occluded or
pressures to the tank are too high. Check that the
line is not blocked or kinked. See diagram below
Combi Pasteurizer Owner Manual | 10G, 30G & 60G
27
6. Milk Will Not Cool
a.
At the end of the heating and time-out cycle, the
cooling solenoid valve should automatically open
and allow water to drain from the machine.
i.
Make certain the discharge drain is not blocked,
kinked or obstructed with back pressure of any
kind
ii.
Make certain the cold water supply to the unit is
always on … it is common to find that someone
has shut the valve not knowing its importance.
7. Error Messages
a.
Jacket Water Not Detected
This error message indicates that there is not enough
water in the water jacket to function properly. Follow
the “Charge the System” instructions on page 13.
b.
Water Heaters Over Temperature
This error message indicates that there is a failed
sensor (thermocouple wire), broken connection,
or an internal input circuit has failed. Check the
thermocouple wire and the connections into the
back of the control at terminals #2(purple +) and
#3(red -).
iii. Make certain that the user did not initiate a
“Heat Only” cycle after which the unit does
not cool the milk automatically. Use the “Full
pasteurization cycles” to make sure it goes
through all steps.
Check the cooling solenoid valve.
Water Discharge
Hose
b.
Step 1: Unplug machine from power source. After
machine is safely unplugged, remove the
back panel and locate the “Thermostat Re-Set
Button” and press it one time.
Reset Button
Back of Pasteurizer
i.
ii.
c.
Troubleshoot valve by pressing SETTINGS –
MANUAL – then WATER VALVE. Is there power
to the solenoid valve? If the power is on and the
machine has water but it will not flow, replace
the valve.
No power to the valve: Check the Circulation
fuse (F3). Replace if necessary and check for
power to the fuse from the control.
Check the water supply to make sure screens and
filters are free from debris and kinks in the hoses.
Step 2: If the error message returns, replace
thermocouple.
c.
Error Loggin Card
This error message indicates that the SD card is not
inserted properly or has failed.
Step 1: Unplug machine from power source. After
machine is safely unplugged, remove the top
of the Control Box and locate the SD card.
Check connection by gently pressing the SD
card into place. It should “Click” into place. If
connection is correct, your SD card may have
failed
Step 2: If the card does not fasten properly or
becomes unreadable, please contact Dairy
Tech, Inc to order a new SD card. These cards
are pre-formatted to work with our new
Touch-Screen controller. Regular off-the-shelf
SD Cards will not work.
28
Dairy Tech, Incorporated | All Rights Reserved
8. Temperature Display is Erratic or Incorrect.
a.
Troubleshooting the thermocouple system
The thermocouples are polar sensitive and will yield
erratic numbers, or even move down in temp when
the process is heating, if they are wired in reverse.
The unit may also flash an unusually high number
and then immediately indicate that the cycle has
ended. Make certain that purple or white leads
are positive (+) and red leads are negative (-) at all
junctions.
9. Milk is Separated or Congealed
a.
a.
Call for instructions to make certain the clock is set
for the correct time of day.
b.
Make certain that the steps for using the delay start
are being followed exactly.
c.
The control output could be damaged.
12. Cycle Starts Automatically When Toggle Is Switched On
a.
The most common cause for milk or colostrum
to separate or congeal is acidification of the milk
caused by two processes:
i.
ii.
b.
11. Delay Start Does Not Come On Automatically
Fermentation of the milk by bacteria will cause
the release of lactic acid and other acidic byproducts resulting in a lower pH of the milk.
This in turn allows it to separate. The heat of
pasteurization will exacerbate this problem. To
control this, cool the milk during holding stages
or pasteurize the milk sooner after collection to
prevent the start of fermentation.
Acidic cleaners are not being rinsed from the
system. Rinse properly before each use. Dairy
Tech, Inc. does not reccomend using acids to
clean as this can cause severe damage to the
cabinet and pose a safety risk for the employees.
Thickened milk or colostrum that is stuck to the tank
may be due to:
i.
Improper stirring (make certain the propeller is
moving during heating, time out and cooling
cycles)
ii.
Temperatures that are too high (rarely a problem
since our units cannot superheat water).
10. Stir Motor is NOT Turning
a.
Check the fuse for the motor F3
b.
If the fuse is good, make certain that the wire to the
motor has not been damaged or pulled out of the
terminal block high.
c.
If there is power to the motor and it will not turn,
replace the motor.
d.
If there is no power to the motor and the fuse is
good, check the control.
Following a brief power failure - less than 5 minutes
- your pasteurizer is equipped with a security feature
that reminds it to come back on to its last unfinished
cycle once power is restored. This will also occur if
someone shuts the unit off prior to completion of
its assigned cycles, and the unit will automatically
restart when the toggle switch or power is restored.
If a long time period has elapsed, the control will
reset itself, if not it will restart and must be reset by
using the ABORT PROFILE command as listed on the
control.
13. Cooling Solenoid Valve Will Not Stop Running
a.
Check the power supply to the valve. IF there is
power keeping it open during unwanted times, the
control could be malfunctioning, especially if the
cold output LED # is on at the wrong times. Replace
Control.
b.
It is possible that some debris has held the solenoid
open. Disconnect power and remove tubing from
valve inside cabinet. Blow into the supply hose
to eject any debris from the valve or force water
backward through the valve. The valve may need to
be replaced if it is powering properly but not closing
when the solenoid closes.
For parts list and ordering
visit www.dairytechinc.com
You may also see the last pages of this user manual.
Contact Dairy Tech, Inc.
Dairy Tech, Inc.
34824 CR 29
Greeley, CO 80631
Toll Free:
1-866-384-2697
Local:
1-970-674-1888
Fax:
1-970-686-5871
Hours:
M – F 7am – 4pm, MST
Web:
www.DairyTechInc.com
eMail:
rev102015
[email protected]
Combi Pasteurizer Owner Manual | 10G, 30G & 60G
29
ACCESSORIES
WARM
Recaliente
再加熱する。再び温める。
FEED
Genopvarmning
Alimente
Erwärmen
授乳する。乳を飲ませる。
再加热
Fodring
Füttern
饲喂
STORE
Almacene
蓄え。備え。貯蔵。
Opbevaring
Lagern
冷藏
RECYCLE
Recicle
再利用する。
Genbruges IKKE
Entsorgen
可回收
PASTEURIZE
Perfect Udder®
COLOSTRUM MANAGEMENT SYSTEM
Pasteurice
低温殺菌を行う。
Pasteurisering
Pasteurisieren
巴氏杀菌
Perfect Udder® KITS
Perfect Udder® Colostrum Management Kit contains:
50
3
1
3
5
Colostrum Bags (2L, 3L, or 4L)
Nipple Assemblies
Nipple Assembly Tool
Standard Feed Tubes
Freezer Sheets
COLLECT
RECORD
The Perfect Udder® Colostrum Management System is the solution
for handling colostrum, from harvest to feeding, without fear of
re-contamination. Our patented design allows the colostrum to be
pasteurized, refrigerated, frozen, warmed and fed through a nipple or
esophageal feeder all from the same bag.
Registre
記録する。
Registrering
Kennzeichnen
记录
TEST
Evalue
試験。検査。
Kontrollering
Testen
检测
Colecte
集める。
Opsamling
Melken
收集
CUSTOMIZED KITS ALSO AVAILABLE
Create your own kit. Choose the bag volume (2L, 3L or 4L), then
select your choice of feeding attachments:
❍ 3 Nipple Assemblies
❍ 5 Standard Feed Tubes
❍ 3 Nipple Assemblies & 3 Standard Feed Tubes
❍ 3 Nipple Assemblies & 2 Deluxe Feed Tubes
❍ 3 Deluxe Feed Tubes
❍ Bags Only
Sample kits available upon request!
Perfect Udder® ACCESSORIES
STANDARD ESOPHAGEAL FEED TUBES
10 Pack 20” length
BAG GUARD COMBI PASTEURIZER
10G, 30G, 60G
Stainless steel guard prevents the Perfect Udder®
bags from being damaged by the agitator in our
Combi Pasteurizers.
DELUXE BAG FILLER
Allows hands-free accurate filling of either the 3L or 4L bags.
Just pour colostrum into the wide top opening to the required
fill line and tilt to fill the bags. Easy to assemble and clean.
Dishwasher safe.
30
Dairy Tech, Incorporated | All Rights Reserved
DELUXE ESOPHAGEAL FEED TUBES
5 Pack 50” length includes pinch clamp
and flexible section for flow control
NIPPLE ASSEMBLIES
5 Pack of nipple assemblies
BAG CADDY
Turns any Perfect Udder® bag into a rigid bottle
for easy handling at the calf. Easy to clean.
STANDARD BAG FILLER
Holds the Perfect Udder® bag and funnel
for you while you fill.
COMBI 10G/30G/60G SCHEMATIC
rev102015
Combi Pasteurizer Owner Manual | 10G, 30G & 60G
31
COMBI 10G/30G/60G Schematic
32
Dairy Tech, Incorporated | All Rights Reserved
COMBI 10G/30G/60G Schematic
rev102015
Combi Pasteurizer Owner Manual | 10G, 30G & 60G
33
COMBI 10G/30G/60G Schematic
34
Dairy Tech, Incorporated | All Rights Reserved
COMBI 10G/30G/60G Schematic
rev102015
Combi Pasteurizer Owner Manual | 10G, 30G & 60G
35
COMBI 10G/30G/60G MAIN ENCLOSURE SUBPANEL
36
Dairy Tech, Incorporated | All Rights Reserved
COMBI 10G/30G/60G Main Enclosure Subpanel
rev102015
Combi Pasteurizer Owner Manual | 10G, 30G & 60G
37
COMBI 10G/30G/60G Main Enclosure Subpanel
38
Dairy Tech, Incorporated | All Rights Reserved
COMBI 10G/30G/60G PANEL WIRING SCHEMATIC
rev102015
Combi Pasteurizer Owner Manual | 10G, 30G & 60G
39
COMBI 10G/30G/60G TOP SUBPANEL
40
Dairy Tech, Incorporated | All Rights Reserved
COMBI 10G/30G/60G Top Subpanel
rev102015
Combi Pasteurizer Owner Manual | 10G, 30G & 60G
41
10G REPLACEMENT PARTS
42
Part #
Description
BM-10G-Tank
10 gallon double walled stainless steel tank 2B finish inside with graduations.
Model DT30G units
BH-LidSS
10G Milk Tank Lid
BE-Element1250-flange
1250w teflon coated heating element flanged style for bolt-in to DT10G Apasteurizers 2014 and newer models
ME-Control-Touch
Unitronics Touch Screen 430
ME-fan220v
220v AC Fan 1
ME-fanfilt
filter screen for AE-fan
ME-motorChainAssy240v
240vac chain drive motor assy
MP-valveSS1”
304SS 1.25” sanitary butterfly valve Assembly:
ME-switch220v
red toggle - led switch 220
MP-hose_Supply
3/4 GHTsupply hose
ME-corddryer
6’ 4-wire dryer cord 30amp
BM-F02014-Shaft
10G Stir Shaft
BM-2015-10G_Prop
Stir Prop 10G
MP-valveclampSS1”
1” SS valve clamp
ME-tccolette
F01173A brass collets split compression fitting for thermocouples in Platinum
Series/Combi pasteurizers
MP-valrelief
308312US-0430S020-2833 1/2 barb x 1/4NPT 5psi relief valve Used in all
Platinum/Combi Series pasteurizers to relieve back pressure in double walled
tanks.
DP-Hosebla
WHD H20108BK 1’ WHD black 1/2”ID hose - Sold by the foot (12”)
ME-Thermstat
NEW Image
MP-ValAppliance230v
230vac appliance solenoid valve, 3/4 GHT male X 12mm out, 1/4 male wire
terminals for model 10G, 30G, 60G, and MilkWorks/12B Pasteurizer and
Warmer Models.
MH-brushbottle
1.5 Nylon Brush with small end for narrow tube cleaning.
MP-Spigot
F02161B sanitary exit spout attachment for Stainless Steel flange 1”
JH-ferrule
NEW Image
BE-TC-2-G
NEW Image
ME-PowerSupply24VDC
60W 24VDC power supply 100-240VAC
ME-RelaySlim
SPDT 6A slim relay
ME-RelaySS-TabSSR SSR 20amp - solid state relay 20A used on most pasteurizer models prior to 2013
ME-termBlock14AWG-Ground
ground terminal block
ME-TermBlock4awg-Ground
ground terminal block 4awg
ME-termJump2
terminal block 2-way jumper
ME-termJump3
terminal block jumper 3
ME-termJump4
4 way terminal block jumper
ME-termJumpLg
4awg terminal block jumper
3 Fuse Holder Dairy Tech, Incorporated | All Rights Reserved
30G REPLACEMENT PARTS
Part #
Description
AM-30GTank
30 gallon double walled stainless steel tank 2B finish inside with graduations.
Model DT30G units
AM-LidSS
Stainless steel lid for DT30G
BE-element1850-flange
1850w teflon coated heating element flanged style for bolt-in to DT30G pasteurizers 2014 and newer models
ME-Control-Touch
Unitronics Touch Screen 430
ME-fan220v
220v AC Fan 1
ME-fanfilt
filter screen for AE-fan
ME-motorChainAssy240v
240vac chain drive motor assy
MP-valveSS1”
304SS 1.25” sanitary butterfly valve Assembly:
ME-switch220v
red toggle - led switch 220
MP-hose_Supply
3/4 GHTsupply hose
ME-corddryer
6’ 4-wire dryer cord 30amp
AM-shaft30G
Stir Shaft - 30G 20inch
MM-2345_Prop30/60G
Stir Prop - 30G&60G
MP-valveclampSS1”
“1”” SS valve clamp”
ME-tccolette
thermocouple col
MP-valrelief
1/2 barb X 1/4 NPT 5psi relief
DP-Hosebla
“500” WHD Black 1/2” ID Hose
ME-thermstat
NEW Image
MP-ValAppliance230v
230VAC Appliance Solenoid Valve
MH-brushbottle
1.5 Nylon Brush
MP-Spigot
Cust Flanged Spigot 1” Stainless Steel
JH-ferrule
NEW Image
AE-TC-2.5-G
NEW Image
ME-PowerSupply24VDC
60W 24VDC power supply 100-240VAC
ME-RelaySlim
SPDT 6A slim relay
ME-RelaySS-TabSSR SSR 20amp
ME-termBlock14AWG-Ground
ground terminal block
ME-TermBlock4awg-Ground
ground terminal block 4awg
ME-termJump2
terminal block 2-way jumper
ME-termJump3
terminal block jumper 3
ME-termJump4
4 way terminal block jumper
ME-termJumpLg
4awg terminal block jumper
3 Fuse Holder rev102015
Combi Pasteurizer Owner Manual | 10G, 30G & 60G
43
60G REPLACEMENT PARTS
44
Part #
Description
JM-tank60g
DT60G stainless steel tank with #2 polish, etched volume graduations, 3 heating tubes, double walled jacket and 1.25: flanged spout for milk exit.
60G Milk Tank Lid
JM-Lid-White
JE-Element 3000w flange
3000w teflon coated heating element flanged style for bolt-in to DT60G pasteurizers 2014 and newer models
ME-Control-Touch
Unitronics Touch Screen 430
ME-fan220v
220v AC Fan 1
ME-fanfilt
filter screen for AE-fan
ME-motorChainAssy240v
240vac chain drive motor assy
MP-valveSS1”
304SS 1.25” sanitary butterfly valve Assembly:
ME-switch220v
red toggle - led switch 220
MP-hose_Supply
3/4 GHT supply hose
ME-corddryer
6’ 4-wire dryer cord 30amp
jm-2548-StirShaft 60G Stir Shaft
MM-2345_Prop30/60G
Stir Prop - 30G&60G
MP-valveclampSS1”
“1”” SS valve clamp”
ME-tccolette
thermocouple col
MP-valrelief
1/2 barb X 1/4 NPT 5psi relief
DP-Hosebla
“500” WHD Black 1/2” ID Hose
ME-thermstat
NEW Image
MP-ValAppliance230v
230VAC Appliance Solenoid Valve
MH-brushbottle
1.5 Nylon Brush
MP-Spigot
Cust Flanged Spigot 1” Stainless Steel
JH-ferrule
NEW Image
AE-TC-2.5-G
NEW Image
ME-PowerSupply24VDC
60W 24VDC power supply 100-240VAC
ME-RelaySlim
SPDT 6A slim relay
ME-RelaySS-TabSSR SSR 20amp
ME-termBlock14AWG-Ground
ground terminal block
ME-TermBlock4awg-Ground
ground terminal block 4awg
ME-termJump2
terminal block 2-way jumper
ME-termJump3
terminal block jumper 3
ME-termJump4
4 way terminal block jumper
ME-termJumpLg
4awg terminal block jumper
3 Fuse Holder Dairy Tech, Incorporated | All Rights Reserved
NOTES:
____________________________________________________________________________________________________
____________________________________________________________________________________________________
____________________________________________________________________________________________________
____________________________________________________________________________________________________
____________________________________________________________________________________________________
____________________________________________________________________________________________________
____________________________________________________________________________________________________
____________________________________________________________________________________________________
____________________________________________________________________________________________________
____________________________________________________________________________________________________
____________________________________________________________________________________________________
____________________________________________________________________________________________________
____________________________________________________________________________________________________
____________________________________________________________________________________________________
____________________________________________________________________________________________________
____________________________________________________________________________________________________
____________________________________________________________________________________________________
____________________________________________________________________________________________________
____________________________________________________________________________________________________
____________________________________________________________________________________________________
____________________________________________________________________________________________________
____________________________________________________________________________________________________
____________________________________________________________________________________________________
____________________________________________________________________________________________________
____________________________________________________________________________________________________
____________________________________________________________________________________________________
____________________________________________________________________________________________________
____________________________________________________________________________________________________
____________________________________________________________________________________________________
____________________________________________________________________________________________________
rev102015
Combi Pasteurizer Owner Manual | 10G, 30G & 60G
45
MADE IN U.S.A.
For parts list and ordering
visit www.DairyTechInc.com
You may also see the last pages of this user manual.
Contact Dairy Tech, Inc.
Dairy Tech, Inc.
34824 CR 29
Greeley, CO 80631
Toll Free:
1-866-384-2697
Local:
1-970-674-1888
Fax:
1-970-686-5871
Hours:
M – F 7am – 4pm, MST
Web:
www.DairyTechInc.com
eMail:
46
Dairy Tech, Incorporated | All Rights Reserved
[email protected]