1
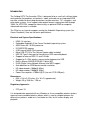
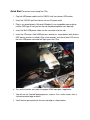
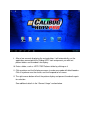
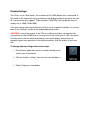
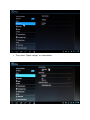
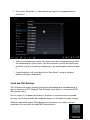
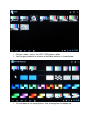
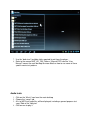
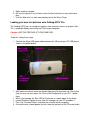
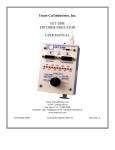
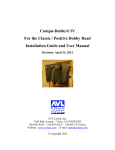
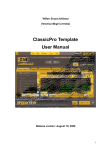
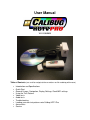
User Manual
V1.2 1/30/2013
Table of Contents (use scroll to navigate to these sections or click and drag with mouse)
•
•
•
•
•
•
•
•
•
•
Introduction and Specifications
Quick Start
General Usage – Navigation, Display Settings, Clock/WiFi settings
Using the Test Patterns
Video tests
Audio tests
Troubleshooting
Loading your own test patterns onto Calibug HDTV Pro
Accessories
Service
Introduction
The Calibug HDTV Pro (hereafter CPro) is designed to be a small self-sufficient video
testing device that produces test patterns, video, and audio via an integrated HDMI
interface suitable for direct plug connections to video monitors, TV's, recorders, and
other video systems. It can support video output formats ranging from 480i through
1080i. For NTSC/PAL composite video testing, an optional HDMI to composite
video/audio converter is available.
The CPro has an internal computer running the Android 4.0 operating system (Ice
Cream Sandwich). Here are the basic specifications:
Electrical and System Specifications:
•
•
•
•
•
•
•
•
•
•
•
•
•
•
•
HDMI 1.4 interface
Embedded Android 4.0 (Ice Cream Sandwich) operating system
ARM Cortex A5 1.0 GHz processor
512 MB DDR3 memory
4 GB internal NAND Flash memory
Micro USB OTG (On-The-Go) port (power cable included)
USB 2.0 Type A host port for connecting a USB mouse/keyboard
Support for external USB 1.2 and 2.0 hubs
Support for 2.4 GHz wireless mouse and/or keyboard via USB
Built-in Atheros AR6103 IEEE 802.11b/g/n WiFi
DLNA (Digital Living Network Alliance) and WPS support
Auto detection for HDMI device/monitor resolution
HD video decoder (1080p @ 60 fps)
HD video encoder (1080p @ 30 fps)
Power Consumption: ≤ 700mA @ 5V (via mini OTG USB port)
Dimensions:
• 0.54 x 1.04 x 3.22-inches (H x W x D, approximate)
• Weight: 30 g / 0.06 lbs / 1.06 oz
Regulatory Approvals:
•
FCC part 15
It is designed to be operated with any Windows or Linux compatible wired or wireless
mouse or mouse enabled wireless pointer which is used to navigate between the
different test patterns, audio tests, and video test files for full screen display and
playback.
Quick Start To connect and startup the CPro
1. Plug the USB power cable into the 120VAC wall transformer USB socket.
2. Insert the 120VAC wall transformer into an AC power outlet.
3. Plug in any wired/wireless Microsoft Windows/Linux compatible mouse device
into the USB type A host port on the end (keyboard optional, not required).
4. Insert the Mini-USB power cable into the connector into the side.
5. Insert the CPro into a free HDMI port on a monitor as shown below (with wireless
USB mouse receiver installed). After a few seconds, an internal blue LED next to
the mini USB power connector will light up on the CPro.
6. Turn on the monitor and select the proper HDMI input port if applicable.
7. You will see the “Android” bootup process screens, first a static screen, then a
stylized animated logo on black.
8. You’ll then be presented with the main desktop as shown below:
9. After a few seconds displaying the main desktop, it will automatically run the
application connected to the Calibug HDTV icon and present you with test
pattern folders and thumbnails for display.
10. Enter a folder, such as HDTV 720P Patterns folder by clicking on it
11. Click a pattern and it will display onscreen in underscan mode with black borders.
Click it anywhere near the center, and it will expand to full screen.
12. The right mouse button will exit the pattern display and present thumbnails again
for selection.
See additional details in the “General Usage” section below.
General Usage
Navigation:
To exit from the current page - click the right mouse button or use the “back” icon:
Clicking the back icon (or right mouse button) multiple times may allow you to leave the
application, depending on how the application is set to respond.
To leave the current application – click on the “home” icon:
To see what applications are running, and to choose one of them to be full screen –
click on the multi-select icon:
To change the audio output level – click on the minus or plus speaker icons:
To power off the CPro device – click on the power button icon. The screen will go dark,
and you can then remove the CPro power cable:
Note that the blue LED will remain illuminated until you remove the power cable.
Display Settings:
The CPro is set to “Auto Detect” the resolution of the HDMI device that is connected. In
this mode, it will choose the native resolution of the display monitor or device to set itself
to. If your monitor only supports 720p resolution (1280x720) it will not be able to run a
display test at 1080i (1920x1080).
If for some reason you need to force the CPro to run at a specific resolution, this can be
done in the “Settings” section of the Android operating system.
CAUTION: if you set the output of the CPro to a display resolution not supported by
your monitor or other HDMI device, you may lose visual control over it. The only reason
you may need to do this would be because your monitor/display device does not
properly support auto detection of the display resolution. Use this feature at your own
risk.
To change display settings follow these steps
1. Exit whatever application you are using by clicking on the
“home” icon at the bottom.
2. Click on the blue “settings” icon from the main desktop =>
3. Select “Display as show below:
4. Then select “Output settings” as shown below:
5. Then select “Resolution” as shown below you’ll get a list of supported device
resolutions:
6. Select the resolution you require, the screen may flicker and go dark briefly while
the monitor/display system resets. You will be asked if you wish to keep the new
resolution setting. If everything is displaying as you would expect, choose to keep
it.
7. If you do nothing, it will revert back to the “Auto Detect” setting or whatever
previous setting you had chosen.
Clock and WiFi Settings:
The CPro does not contain a battery to maintain timekeeping while not powered up. It
gets its time from an NTP (Network Time Protocol) server when it is connected to WiFi
with Internet access.
For this reason, if you power up the device, and there is no Internet access available,
you may see the time and date be completely wrong as it will default to factory settings.
While not required for regular CPro operation of test patterns, test videos, and test
audio tones, you may wish to enable WiFi/Internet access.
Choose the settings icon from the desktop =>
Then choose “wireless and networks”.
Make sure that WiFi is turned on. If it is not, click the “ON” word.
You may need to power up again to detect your network.
Once your WiFi network is displayed in the right hand column, you’ll then be able to
select it and if it is security enabled, logon with a password.
Once you have WiFi Internet access established, you will be able to do the following
things:
•
Get the correct setting of time and date
•
Use the web browser
•
Get new applications from the Google “Play” account if you wish. A “Play account
of your own is required.
Using the Test Patterns
When first powered up the CPro will present a page showing different folders with
different sized test patterns in it from 1080i down to 480i:
1. Click on a folder, such as the HDTV 720P patterns folder.
2. You’ll be presented with a selection of individual patterns as shown below.
3. To scroll down to see more patterns, click and drag from the bottom up.
4. To display a pattern, click it. It will display in “underscan” mode where there is
black around the edges.
5. To see the pattern full screen click once in the center of the pattern and it will
expand to fill the screen.
6. You can exit from a pattern being displayed in two ways:
a. Use the right mouse button to go back
b. Click on the back icon in the lower left. You may need to mouse over it to
make it visible.
7. Use the back icon or the right mouse button to back out of the pattern folder to
choose another or to exit the QuickPic display program.
8. Consult external manuals and references as to which patterns are best for the
equipment tests you wish to do. See also the Video Tests section and the
companion manual to this one titled AVS_HD_709_Patterns_Manual.PDF which
has specific test procedures.
Video tests
The video tests feature allows you to play test pattern movies as well as regular movies
with audio to test your display device.
1. To access the Video tests, click on the “Video Player” icon on the main desktop.
It will open this display.
2. Click on the folder “sdcard” and then the folder “Movies”
3. You’ll then see the lists of test pattern movies and subfolders with specific
patterns similar to what is show below.
4. Click on any movie to play it
5. While playing, don’t move the mouse and the player controls will disappear.
6. While playing, right click on the mouse to exit the movie
7. Use the “back icon” (multiple clicks required) to exit from the player.
8. Refer to the manual AVS_HD_709_Patterns_Manual.PDF from the “User
Manual” icon on the main desktop for more detail on how to use some of these
specific movie test patterns
Audio tests
1. Click on the “Music” icon from the main desktop
2. Choose the “songs” tab.
3. A list of MP3 test audio files will be displayed, including a general purpose test
song “Ride of the Valkyries”
4. Click on one to play it
5. Adjust audio as needed
6. Be sure to stop music or test tones when finished, otherwise it may continue to
play.
7. Use the “back icon” or right mouse button to exit the Music Player
Loading your own test patterns onto Calibug HDTV Pro
The Calibug HDTV pro can accept test patterns from external sources as graphics files.
This is accomplished by connecting the CPro to your computer.
Caution: USE THIS FEATURE AT YOUR OWN RISK.
To do this, follow these steps.
1. Connect the Micro USB power cable between the CPro and your PC USB port as
shown in the photo below.
2. Wait about one minute while the Android Operating System boots up. During that
time you may see messages like “Device Not Recognized” on your PC – ignore
them.
3. When it has booted, the Blue LED will illuminate as shown above in the photo.
4. Locate Windows Explorer or any other file manager on your PC and open it.
5. Press the “Function Button” and watch for new disk drives to appear.
6. A new disk drive should appear that will show the contents of the CPro root folder
7. You can copy/update/replace graphic, video, and audio files in the following
folders with your own custom files without worry:
a. Pictures
b. Movies
c. Music
8. Do not copy files or delete or move files in any of the other folders as you may
corrupt the software configuration of the CPro.
9. Alternately, you can connect a USB hub to the CPro, and plug in a USB flash
drive, and then use the Android File Manager program to copy files from the USB
drive to the content folders.
10. You can also back up files using any of the three methods above or restore files
from the included HDTV Calibug CD ROM
11. If you find that there is little space left on the CPro internal SD memory, you may
wish to consider deleting test pattern files that you don’t need or don’t often use
to make way for other patterns that you want to copy into the CPro.
Troubleshooting
Common Problems and Solutions
P: Device won’t boot, blue LED does not turn on.
S: Check the AC wall power supply and USB cables to make sure they are inserted
properly into the supply and the CPro. Note the CPro cannot be powered from the larger
USB “A” connector. Be sure to give the device enough time. It takes just over a minute
to fully boot.
P: Device boots, Blue LED turns on, but I cannot see it on my HD monitor even
though it is plugged in.
S: You may have the wrong HDMI port of your monitor or device selected. Check your
user’s manual on how to select the correct port or move the CPro to a different port. It is
also possible that your monitor may not support the current display mode you have
selected. On another monitor, you may need to change the display settings for
resolution and scan rate. The default is set for “Auto Detect”. See next item.
P: Device boots, Blue LED turns on, but I cannot see it on my HD monitor even
though it is plugged in and the correct HDMI port is selected.
S: Your monitor may not be able to display the resolution/refresh frequency the CPro is
producing. Some monitors (especially cheaper ones) may only offer a limited set of
display modes. See the section above on “Display Settings” to make sure you have
the CPro set for “Auto Detect” You may need to locate another monitor to perform this
action.
If that fails to work, you may need to look up the native display resolution and refresh
frequency for your monitor or device under test. Most HDTV devices support 720P 60
Hertz refresh rate at a minimum.
P: The device does not turn on, no Blue LED, no display on HD monitor even after
waiting two minutes.
S: Your AC power supply may not be supplying power. Check the cable and the AC wall
outlet to make sure that they are firmly plugged in and that the AC wall outlet is
supplying power. Alternately if you are attempting to power from a PC or other USB
port, you may not be providing enough power from the port to power the CPRo. Some
USB ports don’t provide enough current.
P: I’ve accidentally erased some test patterns/videos from the CPRo
S: Backup files are available for restoring your CPro on the included CD ROM. See the
section on “Loading your own test patterns onto Calibug HDTV Pro” to restore
these. You may have to copy the files to your PC or a flash drive first.
Accessories
Most commonly available USB enabled I/O and storage accessories can be plugged
into the CPro USB “A” connector (the larger of the two) for use with it, these include:
•
•
•
•
•
•
USB wired mice
USB wireless mice
USB flash drive
USB hub (active powered hub only)
USB keyboard
USB CD ROM/DVD or portable hard drive (via active powered hub only due to
current requirements)
To use more than one USB device at a time, a powered USB hub is required.
The smaller Micro USB connector is only used for supplying power and connecting to a
PC. It cannot connect to the accessory devices listed above.
Service
Your CPro is warranted for 90 days from the date of sale.
Should your CPro device need service, please contact:
ItWorks
3008 Cohasset Rd
Chico, CA 95973
Tel: 530-899-8434
Fax: 530-899-3333
Web: www.itworks.com
Email: [email protected]