1
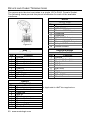
AP-010-BT and AP-100-BT Access Point Device with Bluetooth® Wireless Technology Installation Guide Copyright © 2008 Metrologic Instruments Inc. All rights reserved. No part of this work may be reproduced, transmitted, or stored in any form or by any means without prior written consent, except by reviewer, who may quote brief passages in a review, or provided for in the Copyright Act of 1976. Trademarks Metrologic is a registered trademark of Metrologic Instruments, Inc. Products identified in this document are hereby acknowledged as trademarks, registered or otherwise, of Metrologic Instruments, Inc. or their respective companies. TABLE OF CONTENTS Introduction Product Overview ............................................................................................. 1 Base Kit Components and Optional Accessories ............................................. 1 Components ..................................................................................................... 2 Mounting Specifications.................................................................................... 3 Cable Removal................................................................................................. 3 Product Labels ................................................................................................. 4 Installation Cable to Access Point Connection ................................................................... 5 RS232 Host Connections ................................................................................. 5 USB Host Connections..................................................................................... 6 Keyboard Wedge Host Connections ................................................................ 6 RS485 Host Connections ................................................................................. 6 Establishing Communication Between the Scanner and the Access Point Device......................................... 7 Access Point Device Operation Page/Disconnect Button ................................................................................... 8 Visual Indicators ............................................................................................... 8 Configuration Procedures Metro Protocol Compatibility............................................................................. 9 CodeXML Protocol Compatibility.................................................................... 10 Access Point Device Configuration in CodeXML Mode .................................. 11 Optional Configuration Bar Codes .................................................................. 12 ii TABLE OF CONTENTS Uploading and Downloading Settings Uploading Settings via MetroSet2 .................................................................. 15 Downloading Settings via MetroSet2.............................................................. 16 Upgrading the Firmware ..................................................................................... 17 Upgrading the Firmware in the Access Point Device...................................... 17 Upgrading FocusBT Firmware via the Access Point Device........................... 18 Design Specifications ......................................................................................... 19 Device and Cable Terminations Device Pinout ................................................................................................. 20 Cable Pinout Connections .............................................................................. 21 Regulatory Compliance EMC ............................................................................................................... 23 Limited Warranty ................................................................................................ 25 Index .................................................................................................................. 26 Contact Information and Office Locations........................................................... 27 iii INTRODUCTION ® Honeywell’s access point devices with Bluetooth wireless technology provide customers with a flexible and convenient solution for wireless communication in a variety of environments, including retail, healthcare, and manufacturing. The access point device separates charging functions from communication functions, allowing the user to optimize the available radio range. Choose from Class II (10 meters) Bluetooth communication or Class I (100 meters) to meet the specific needs of the application. ACCESS POINT INTERFACE SUPPORT Interfaces supported include: AP-010-BT OR • • AP-100-BT S • • RS232 RS485S USB Keyboard Wedge ® Applicable for IBM Host applications. Base Kit Components and Optional Accessories BASIC KIT Part # AP-010-BT Description Access Point Device (Class 2 radio: 10 m) OR OR AP-100-BT Access Point Device (Class 1 radio: 100 m) 70-79035 Access Point Device with Bluetooth® Wireless Technology Installation Guide* * Available for download at www.metrologic.com OPTIONAL ACCESSORIES Part # Description AC to DC Power Transformer- Regulated 5.2VDC @ 1A output. 46-00525 90VAC-255VAC United States, Canada, and Japan 46-00526 90VAC-255VAC Continental European 46-00527 90VAC-255VAC United Kingdom 46-00528 90VAC-255VAC Australia 46-00529 90VAC-255VAC China 1 INTRODUCTION OPTIONAL ACCESSORIES Part # Description 55-55500-3 RS232 Straight PowerLink Cable, Black 55-55502-N-3 Keyboard Wedge Straight Cable, Black 55-55512-3 RS485S Applications,Straight PowerLink Cable 55-55535-N-3 USB Type A Straight Cable, Black 55-55567-3 AUX Cable, Black S Applicable for IBM® host applications. Other items may be ordered for the specific protocol being used. To order additional items, contact the dealer, distributor or call Metrologic’s Customer Service Department at 1-800-ID-METRO or 1-800-436-3876. Components ITEM NO. 2 DESCRIPTION 1 Page/Disconnect Button & Blue LED (see page 8) 2 Mounting Holes, Qty. 2 3 10-Pin RJ45, Female Socket 4 Pinhole for Cable Release (see page 5) 5 Address Bar Code www.metrologic.com LOCATION Figure 1. Components INTRODUCTION Mounting Specifications 1. 2. Drill two, 1.6 mm pilot holes in the mounting surface. The pilot holes should be located on a common centerline and be spaced 68.80 mm (2.70") apart. Secure the access point device to the mounting surface with the M2.5 x 1.1 - 10 mm, Phillips wood screws provided with the access point. Figure 2. Mounting Specifications Cable Removal Turn off power to the host system before removing the cable from the access point device. If the cable is a PowerLink cable, disconnect the power supply on the cable. Figure 3. Cable Removal 1. 2. 3. 4. Locate the small pinhole on the top of the access point device (see figure above). Bend an ordinary paperclip into the shape shown above. Insert the paperclip into the pinhole on the device. Apply pressure to release the connector’s lock. Pull on the cable’s strain-relief to remove the cable. 3 INTRODUCTION Product Labels The serial number label located on the bottom of the access point device provides important information including the model number, date of manufacture, serial number, address bar code, safety and regulatory information. An additional copy of the address bar code is location on the top of the device near the Honeywell logo. The figure below provides examples of the labels and their locations on the access point device. Figure 4. Label Location with Examples Caution To maintain compliance with applicable standards, all circuits connected to the scanner must meet the requirements for SELV (Safety Extra Low Voltage) according to EN/IEC 60950-1. To maintain compliance with standard CSA C22.2 No. 60950-1/UL 60950-1 and norm EN/IEC 60950-1, the power source should meet applicable performance requirements for a limited power source. The AP-010-BT and AP-100-BT are intended for use with Listed UL computer and/or Listed PS with LPS/Class 2 output. 4 www.metrologic.com INSTALLATION Cable to Access Point Connection 1. Align the tab on the modular connector with the pinhole on the access point device (see figure below). 2. Insert the modular connector into the device’s socket. 3. Test the cable’s connection to ensure the connector lock has engaged. Important: If the cable is not fully latched, the unit can power intermittently. 4. Refer to pages 5 – 6 for the appropriate host connections applicable to the interface type. Figure 5. Cable Installation RS232 Host Connections 1. Turn off power to the host system. 2. Connect the female, 9-Pin D-type connector to a dedicated RS232 communication port on the host system. 3. Plug the external power supply into the power jack on the PowerLink cable. Figure 6. RS232 Host Connections Check the AC input requirements of the power supply verify the voltage matches the AC outlet. The outlet must be located near the equipment. See caution information on page 4. 4. Connect AC power to the transformer. 5. Turn on power to the host system. 5 INSTALLATION USB Host Connections 1. Turn off power to the host system. 2. Plug the USB connector into the to a dedicated USB serial port. 3. Turn on power to the host system. Figure 7. USB Host Connections Keyboard Wedge Host Connections 1. Turn off power to the host system. 2. Disconnect the keyboard from the host system. 3. Connect the “Y” ends of the communication cable to the keyboard and the keyboard port on the host system. If necessary, use the male/female adapter cable supplied with the device for proper connections. 4. Figure 8. KBW Host Connections Turn on power to the host system. RS485S Host Connections 1. Turn off power to the host system. 2. Connect the SDL connector into a dedicated Port 9 on the host system. 3. Plug the external power supply into the power jack on the PowerLink cable Figure 9. RS485 Host Connections Check the AC input requirements of the power supply verify the voltage matches the AC outlet. The outlet must be located near the equipment. See caution information on page 4. 4. Connect AC power to the transformer. 5. Turn on power to the host system. S 6 ® Applicable for IBM Host applications. www.metrologic.com ESTABLISHING COMMUNICATION Between the Scanner and the Access Point Device To establish communication between the scanner and access point device: 1. Connect the access point device to the host system (see pages 5 - 6). 2. Scan the address bar code on the access point device to establish a communication connection between the scanner and the access point device. Figure 10. Address Bar Code 3. If successful, the scanner will respond with two beeps and the LED's on both the scanner and access point device will stop flashing. Important Note: The communication link between the scanner and the access point device is determined by the last address code scanned. 7 ACCESS POINT DEVICE OPERATION Page/Disconnect Button The access point has a button located on the top of the device that can be used to either page the scanner or disconnect the communication link between the scanner and the access point. Figure 11. The page and disconnect button features are not supported in CodeXML protocol mode. The scanner must be configured for the Metro protocol mode for feature functionality. Refer to page 9 for more information on Metro Protocol Compatibility. To page the scanner: 1. 2. 3. 4. Press the page button on the top of the access point device. The scanner will start to beep and alternately flash the LEDs. Locate the scanner. Pull the scanner’s trigger or press the page button on the top of the access point to stop paging. To disconnect communication: 1. Press and hold down the button on the access point device for more than 3 seconds. The blue LED on the access point device will start to flash indicating there is no communication link established. To re-establish communication: 1. Scan the address bar code on access point device with the scanner. Visual Indicators The page/disconnect button is also the blue LED status indicator (see figure above). The activity of the blue LED reflects the connection, operation and communication status of the access point device. If the blue LED is: • not illuminated, the access point device is not receiving power. • flashing on and off, the access point device is receiving power but does not have a communication link to a scanner. • always illuminated there is a communication link established between the access point device and a scanner. After a successful scan, the Blue LED will temporarily turn off while data is being sent to the host system. The LED will turn back on when data transmission is complete. 8 www.metrologic.com CONFIGURATION PROCEDURES The following information is for replacement applications or situations requiring scanner reconfiguration. Some of the configuration procedures require the user to scan the recall defaults bar code. If the recall defaults code is scanned, the scanner’s factory pre-configurations and custom configurations will be lost. The scanner will need to be reconfigured in order to work with the access point device. Metro Protocol Compatibility By default, the Metro protocol is enabled before the access point device and scanner leave the factory. The protocol supports page/disconnect functions, scanner firmware upgrades through the access point device, and all features supported by the Code XML protocol. When a scanner is using the Metro protocol, configuration data is stored in the access point device. The stored data is automatically sent to the scanner when a communication link is established between the scanner and the access point device. Scanned data and custom configuration settings will be lost if a communication link is not established between the scanner and the access point. Scanner configuration changes can be done either by scanning configuration bar codes in the MetroSelect Single-Line Configuration Guide (MLPN 00-02544x), or with the MetroSet2® program, version 3.2.0.16 or higher. Metro Protocol Firmware Requirements Scanner Model and REV FocusBT (A) FocusBT (B) Focus BT (F) Firmware Version 40268 or higher 40268 or higher all versions are compatible To configure a scanner to use the Metro protocol: 1. Scan the Recall Defaults bar code then the Enable Metro Protocol bar code. Enable Metro Protocol Recall Defaults ³ 9 9 9 9 9 8 ³ 1 2 5 6 1 4 2. Scan the address bar code located on the top of the access point device (see Figure 11, on page 8) to establish a communication link between the scanner and access point. 3. The scanner will beep and the access point’s blue LED will flash once. 4. The scanner will receive the configuration from the access point device automatically. 9 CONFIGURATION PROCEDURES CodeXML Protocol Compatibility The CodeXML protocol does not support page/disconnect button functions, or scanner firmware upgrades through the access point device and Metroset2. When a scanner is using the CodeXML protocol, configuration data is stored in the scanner. The stored data is not transmitted to the access point device. Special configuration steps are required for the customization of system formats and protocols. Instructions on how to configure a scanner in the CodeXML protocol mode via the access point device are outlined on page 11. CodeXML Firmware Requirements Scanner Model Focus BT Firmware Version 15701 or higher To configure a scanner to use the CodeXML protocol: 1. Scan the Disable Metrologic Protocol bar code. Disable Metro Protocol ³ 2. 1 2 5 6 0 4 Scan the Recall Defaults bar code. Recall Defaults ³ 3. 9 9 9 9 9 8 Scan the Enable CodeXML Protocol bar code. Enable CodeXML Protocol ³ 1 2 5 6 1 7 4. Scan the address bar code located on the top of the access point device (see Figure 11, on page 8) to establish a communication link between the scanner and access point. 5. The scanner will beep to indicate a connection has been established. 10 www.metrologic.com CONFIGURATION PROCEDURES Access Point Device Configuration in CodeXML Mode When a scanner is using the CodeXML protocol all configuration data is stored in the scanner. Since the data is not transmitted to the access point device, the following process is required to configure the device for custom system formats or protocol requirements. To configure the access point device: 1. Verify a communication link is established between the scanner and access point. 2. Scan the Disable CodeXML Protocol bar code. Disable CodeXML Protocol ³ 3. 1 2 5 6 0 7 Scan the Enable Metro Protocol bar code. Enable Metro Protocol ³ 4. 1 2 5 6 1 4 Scan all configuration bar codes required for the custom configuration (i.e. keyboard type, country keyboard type, suffix or prefix settings). Country keyboard bar codes are located on page 14. Additional configuration bar codes can be found in the MetroSelect SingleLine Configuration Guide (PN 00-02544x) and the Area Imaging Supplemental Configuration Guide (PN 00-02281x). 5. Scan the Disable Metro Protocol bar code. Disable Metro Protocol ³ 6. 1 2 5 6 0 4 Scan the Enable CodeXML Protocol bar code. Enable CodeXML Protocol ³ † 1 2 5 6 1 7 MetroSet2 (version 3.2.0.16 or higher) can also be used for access point configuration if the device is connected to an RS232 com port or a USB serial port. 11 CONFIGURATION PROCEDURES Optional Configuration Bar Codes The following bar codes are for reference only. Suffix Characters Disable Carriage Return Suffix ³ 1 1 6 6 0 3 Enable Carriage Return Suffix ³ 1 1 6 6 1 3 The scanner transmits a carriage return after each bar code. Disable Line Feed Suffix ³ 1 1 6 6 0 2 Enable Line Feed Suffix ³ 1 1 6 6 1 2 The scanner transmits a line feed after each bar code. Disabled when keyboard wedge defaults are loaded. Disable CodeXML New Line Suffix ³ 1 2 5 6 0 Enable CodeXML New Line Suffix 6 ³ Disable Protocol Disable CodeXML Protocol ³ 1 2 5 6 0 7 Disable Metro Protocol ³ 1 2 5 6 0 4 12 www.metrologic.com 1 2 5 6 1 6 CONFIGURATION PROCEDURES The following bar codes require an established communication link between the access point device and a scanner using the Metro Protocol. Default settings are marked with an asterisk ( * ). ® Send Bluetooth Software Version ³ 9 9 8 0 4 4 Send Address ³ 9 9 8 0 4 5 Communications Load Keyboard Wedge Defaults Load RS232 Defaults ³ 9 9 9 9 9 2 Load USB IBM OEM Defaults ³ 9 9 9 9 7 0 ³ 9 9 9 9 9 4 Load RS485 Defaults ³ 9 9 9 9 5 2 3 0 0 LED Disable LED * Enable LED ³ 1 1 8 3 1 0 * Enable LED Flash when Disconnected ³ 1 2 3 7 1 1 2 3 1 1 8 Disable LED Flash when Disconnected 2 * Bright LED ³ ³ ³ 1 2 3 7 0 2 3 9 1 6 Dim LED 9 0 6 ³ 1 2 13 CONFIGURATION PROCEDURES Country/Scan Code Table Selects * Enable USA Keyboard ³ 4 1 6 2 6 Enable Swiss Keyboard 0 ³ Enable Spanish Keyboard ³ 4 1 6 2 5 0 ³ 4 1 6 2 3 0 4 1 6 2 1 4 1 6 2 1 0 ³ 0 1 6 2 9 0 4 1 6 2 1 4 1 6 2 4 0 4 1 6 2 2 0 2 4 1 6 2 0 0 0 14 www.metrologic.com 4 1 6 2 7 0 Enable Russian Keyboard ³ Enable Turkish Keyboard ³ 0 0 Enable Sweden/Finland Keyboard 4 8 Enable IBM 4700 Financial Keyboard ³ ³ 2 Enable Belgium Keyboard Enable Japanese Keyboard ³ 6 Enable French Keyboard ³ Enable UK Keyboard ³ 1 Enable Italian Keyboard ³ Enable German Keyboard 4 4 1 6 2 1 3 0 Enable Slovenian Keyboard ³ 4 1 6 2 1 1 0 UPLOADING AND DOWNLOADING SETTINGS Uploading Settings via MetroSet2 † The upload feature in MetroSet2 allows the user to retrieve the current software number and configuration settings of an access point device connected to a personal computer. To upload settings via MetroSet2: 1. Verify the access point device is connected to the host system and a communication link has been established with a scanner. 2. Start the MetroSet2 software. 3. Click on the plus sign (+) next to POS Scanners to expand the supported scanner list. 4. Choose the Focus BT with Access Point‡ from the list. 5. Click on the Upload button. 6. A communications window will open displaying the progress of the upload. A message will appear in the window when the upgrade is complete. 7. Click on the Tools menu at the top of the screen. 8. Select View Current Settings from the drop down list. 9. The Scanner Settings window will open listing the custom settings uploaded from the access point device. Default settings will not be listed (see example in Figure 13). Figure 12. Scanner Communications Figure 13. Scanner Settings All the settings shown in Figure 13 are for illustrative purposes only and will differ depending upon the configuration. † Minimum system requirements: A personal computer with Microsoft® Windows® 95 or greater with an available RS232 serial or USB port and MetroSet2 (minimum software version 3.2.016). ‡ Scanner model is application dependent. 15 UPLOADING AND DOWNLOADING SETTINGS Downloading Settings via MetroSet2 The download† feature in MetroSet2 allows the user to download custom configuration settings selected in MetroSet2 to the access point and the linked scanner ‡. To download settings via MetroSet2: 1. Verify the access point device is connected to the host system and a communication link has been established with a scanner. 2. Start the MetroSet2† software. 3. Click on the plus sign (+) next to POS Scanners to expand the supported scanner list. 4. Choose Focus BT with Access Point ‡ from the list. 5. Select an interface (i.e. RS232, Keyboard Wedge, USB) then click OK. 6. Select and modify the configuration options in the Scanner Functions Menu. 7. Choose Save As from the File menu to save the configuration. 8. Click on the Down button. 9. A communications window will open displaying the progress of the download. The unit will beep and a message will appear in the window when the download is complete. Figure 14. Global Defaults Page † Minimum system requirements: A personal computer with Microsoft® Windows® 95 or greater with an available RS232 serial or USB port and MetroSet2 (minimum software version 3.2.016). ‡ Scanner model is application dependent. 16 www.metrologic.com UPGRADING THE FIRMWARE Upgrading the Firmware in the Access Point Device The access point device is part of Metrologic's product series with flash upgradeable firmware. The upgrade process requires, a new firmware file supplied to the customer by a customer service representative and Metrologic's MetroSet2 software. A personal computer running Windows 95 or greater with an available RS232 serial or USB port is required to complete the upgrade. Do not use the standard cable supplied with Keyboard Wedge or RS485 Access Point interface kits for firmware upgrades. If using USB or RS232 for the upgrade process, the standard USB or RS232 cable provided with the scanner can be used. To upgrade the firmware in the access point device: 1. Plug the unit into a serial communication port on the host system. 2. Start the MetroSet2 software. 3. Click on the plus sign (+) next to POS Scanners to expand the supported scanner list. 4. Choose the Focus BT with Access Point from the list. 5. Click on the Configure Focus BT with Access Point Scanner button. 6. Select the interface from the Prompt Window. 7. Choose AP NEC or AP Silabs from the options list located on the left side of the screen to upgrade firmware in Access Point device. 8. Click on the Select File button in the window. 9. Locate and open the flash upgrade file supplied by Metrologic. 10. Select the COM port that the scanner is connected to on the host system. 11. Verify the settings listed in the Flash Utility window. 12. Click on the Flash Scanner button to begin the flash upgrade. 13. A message will appear on the screen when the upgrade is complete. Metrologic's customer service department can be reached at 1-800-ID-METRO or 1-800-436-3876. MetroSet2 is available for download, at no additional cost, from http://www.metrologic.com/corporate/download. 17 UPGRADING THE FIRMWARE Upgrading FocusBT Firmware via the Access Point Device With MetroSet2, scanner firmware upgrades can be accomplished through the communication link between the access point device and scanner. This feature is not supported in scanners using the CodeXML protocol. The scanner must be in Metro protocol mode. Do not use the standard cable supplied with Keyboard Wedge, USB or RS485 Access Point interface kits for firmware upgrades. If using RS232 for the upgrade process, the standard RS232 cable provided with the scanner can be used. To upgrade the firmware in FocusBT via the access point device: 1. Plug the unit into a serial communication port on the host system. 2. Start the MetroSet2 software. 3. Click on the plus sign (+) next to POS Scanners to expand the supported scanner list. 4. Choose the Focus BT with Access Point from the list. 5. Click on the Configure Focus BT with Access Point Scanner button. 6. Select the interface from the Prompt Window. 7. Choose FocusBT from the options list located on the left side of the screen to upgrade FocusBT firmware. 8. Click on the Select File button in the window. 9. Locate and open the flash upgrade file supplied by Metrologic. 10. Select the COM port that the scanner is connected to on the host system. 11. Verify the settings listed in the Flash Utility window. 12. Click on the Flash Scanner button to begin the flash upgrade. 13. A message will appear on the screen when the upgrade is complete. Metrologic's customer service department can be reached at 1-800-ID-METRO or 1-800-436-3876. MetroSet2 is available for download, at no additional cost, from http://www.metrologic.com/corporate/download. 18 www.metrologic.com DESIGN SPECIFICATIONS Access Point Device OPERATIONAL System Interfaces: Indicator: RS232, Keyboard Wedge, RS485S, USB S Applicable for IBM® Host applications. Blue LED MECHANICAL Length: 111 mm (4.4") Width: 77 mm (3.0") Height: 16 mm (0.6") Weight: 75 g ( 2.7 oz ) ELECTRICAL AP-010-BT Input Voltage: Power: Current: DC Transformers: Wireless Technology: Radio Range: AP-100-BT 5.0VDC ± 0.25V 5.0VDC ± 0.25V 0.8 W (Maximum) 0.85 W (Maximum) 160 mA (Maximum) 170 mA (Maximum) Class II; 5.2VDC@ 1A Class II; 5.2VDC@ 1A Bluetooth V2.0 Bluetooth V2.0 10 m (33 ft) 100 m (328 ft) For regulatory compliance information, see pages 23 –24. ENVIRONMENTAL Temperature: Humidity: Shock: Environmental Sealing: Operating 0°C to 40°C (32°F to 104°F) Storage -20°C to 60°C (-4°F to 140°F) 5% to 95% relative humidity, non-condensing Designed to withstand 1.5 m (5 ft.) drops IP54 Specifications are subject to change without notice. 19 DEVICE AND CABLE TERMINATIONS The access point device terminates to a single 10-Pin RJ45, Female Socket. The following charts provide the pinout information for each of the available interfaces. Figure 15 Pin 1 2 3 4 5 6 7 8 9 10 USB 10-Pin, RJ45 Function Ground Tied to Pin4 in Cable Reserved Tied to Pin2 in Cable Reserved USB D+ Tied to Pin9 in Cable USB DPC +5VDC Shield Ground Pin 1 2 3 4 5 6 7 8 9 10 RS485S 10-Pin, RJ45 Function Ground Tied to Pin6 in Cable Reserved IBM A+ IBM BTied to Pin2 in Cable Reserved Reserved Adapt +5VDC Shield Ground 20 www.metrologic.com S Pin 1 2 3 4 5 6 7 8 9 10 RS232 10-Pin, RJ45 Function Ground CTS RS232 Input Receive RS232 Input Reserved Reserved RTS RS232 Output Reserved Transmit RS232 Output Adapt +5VDC Shield Ground Pin 1 2 3 4 5 6 7 8 9 10 Keyboard Wedge 10-Pin, RJ45 Function Ground Tied to Pin3 in Cable Tied to Pin2 in Cable PC Data PC Clock KB Clock Reserved KB Data PC +5VDC Shield Ground ® Applicable for IBM Host applications. DEVICE AND CABLE TERMINATIONS Cable Pinout Connections RS232 PowerLink Cable MLPN 55-55500 Pin Function 1 Shield Ground 2 CTS 3 RXD 4 Reserved 5 Reserved 6 RTS 7 Reserved 8 TXD 9 +5VDC 9-Pin D-Type Connector USB Communication Cable MLPN 55-55535 Pin 1 Function PC +5V/V_USB 2 D- 3 D+ 4 Ground Non-Locking, Type A Shield Shield RS485S Cable MLPN Pin 1 2 3 4 S 55-55512 Function Ground IBM A+ IBM BReserved SDL A Key ® Applicable for IBM Host applications. 21 DEVICE AND CABLE TERMINATIONS Cable Pinout Connections Keyboard Wedge Cable MLPN 55-55502 Pin 1 2 3 4 5 Pin 1 2 3 4 5 6 Function Keyboard Clock Keyboard Data No Connect Power Ground +5 Volts DC Function PC Data No Connect Power Ground +5 Volts DC PC Clock No Connect 5-Pin DIN, Female 6-Pin DIN, Male Metrologic will supply an adapter cable with a 5-pin DIN male connector on one end and a 6-pin mini DIN female connector on the other. According to the termination required, connect the appropriate end of the adapter cable to the PowerLink cable, leaving the necessary termination exposed for connecting to the keyboard and the keyboard port on the PC. Keyboard Wedge Adapter Cable Pin 1 2 3 4 5 Pin 1 2 3 4 5 6 Function PC Clock PC Data No Connect Power Ground +5VDC Function Keyboard Data No Connect Power Ground +5VDC Keyboard Clock No Connect 22 www.metrologic.com 5-Pin DIN, Male 6-pin Mini DIN, Female REGULATORY COMPLIANCE EMC Emissions FCC Part 15, ICES-003, CISPR 22, EN 55022, EN300 328 V1.6.1, EN310 489-17 V1.2.1 Immunity CISPR 24, EN 55024 Note: Immunity performance is not guaranteed for scanner cables greater than 3 meters in length when fully extended. Changes or modifications not expressly approved by the party responsible for compliance could void the user’s authority to operate the equipment. Class A Devices The following is applicable when the cable is greater in length than 3 meters (9.8 feet) when fully extended: Les instructions ci-dessous s’appliquent aux cables de dépassant 3 métres (9.8 pieds) de long en extension maximale: Folgendes trifft zu, wenn das kabel länger als 3 Meter ist: This equipment has been tested and found to comply with limits for a Class A digital device, pursuant to part 15 of the FCC Rules. These limits are designed to provide reasonable protection against harmful interference when the equipment is operated in a commercial environment. This equipment generates, uses and can radiate radio frequency energy and, if not installed and used in accordance with the instruction manual, may cause harmful interference to radio communications. Operation of this equipment in a residential area is likely to cause harmful interference, in which case the user will be required to correct the interference at their own expense. Any unauthorized changes or modifications to this equipment could void the user’s authority to operate this device. This device complies with part 15 of the FCC Rules. Operation is subject to the following two conditions: (1) This device may not cause harmful interference, and (2) this device must accept any interference received, including interference that may cause undesired operation. Notice This Class A digital apparatus complies with Canadian ICES-003. Remarque Cet appareil numérique de classe A est conforme à la norme canadienne NMB-003. European Standard Warning This is a class A product. In a domestic environment this product may cause radio interference in which case the user may be required to take adequate measures. Funkstöreigenschaften nach EN55022:1998 Warnung! Dies ist eine Einrichtung der Klasse A. Diese Einrichtung kann im Wohnbereich Funkstörungen verursachen. In diesem Fall kann vom Betreiber verlangt werden, angemessene Massnahmen durchzuführen. Standard Europeo Attenzione Questo e’ un prodotto di classe A. Se usato in vicinanza di residenze private potrebbe causare interferenze radio che potrebbero richiedere all’utilizzatore opportune misure. Attention Ce produit est de classe “A”. Dans un environnement domestique, ce produit peut être la cause d’interférences radio. Dans ce cas l’utiliseteur peut être amené à predre les mesures adéquates. 23 REGULATORY COMPLIANCE Changes or modifications not expressly approved by the party responsible for compliance could void the user’s authority to operate the equipment. Class B Devices The following is applicable when the cable is less than 3 meters (9.8 feet) in length when fully extended: Les instructions ci-dessous s’appliquent aux cables de ne dépassant pas 3 métres (9.8 pieds) de long en extension maximale: Folgendes trifft zu, wenn das kabel kürzer als 3 Meter ist: This device complies with Part 15 of the FCC Rules. Operation is subject to the following two conditions: (1) This device may not cause harmful interference, and (2) this device must accept any interference received, including interference that may cause undesired operation. This equipment has been tested and found to comply with the limits for a Class B digital device, pursuant to Part 15 of the FCC rules. These limits are designed to provide reasonable protection against harmful interference in a residential installation. This equipment generates, uses and can radiate radio frequency energy and, if not installed and used in accordance with the instructions, may cause harmful interference to radio communications. However, there is no guarantee that interference will not occur in a particular installation. If this equipment does cause harmful interference to radio or television reception, which can be determined by turning the equipment off and on, the user is encouraged to try to correct the interference by one or more of the following measures: • Reorient or relocate the receiving antenna • Increase the separation between the equipment and receiver • Connect the equipment into an outlet on a circuit different from that to which the receiver is connected • Consult the dealer or an experienced radio/TV technician for help Notice This Class B digital apparatus complies with Canadian ICES-003. Remarque Cet appareil numérique de classe B est conforme à la norme canadienne NMB-003. Exposure to Radio Frequency Energy The radiated output power of this intentional wireless radio is far below the FCC radio frequency exposure limits. The internal wireless radio operates within guidelines found in radio frequency safety standards and recommendations, which reflect the consensus of the scientific community. The level of energy emitted is far less than the electromagnetic energy emitted by wireless devices such as mobile phones. However, the use of wireless radios may be restricted in some situations or environments, such as aboard airplanes. If you are unsure of restrictions, you are encouraged to ask for authorization before turning on the wireless radio. For more information from the US FCC about exposure to RF energy, see: www.fcc.gov/oet/rfsafety. For information about the scientific research related to RF energy exposure, see the EMF Research Database maintained by the World Health Organization at: www.who.int/emf. 24 www.metrologic.com LIMITED WARRANTY The AP-010-BT and AP-100-BT access point devices are manufactured by Metrologic at its Suzhou, China facility. The AP-010-BT and AP-100-BT access point devices have a two (2) year limited warranty from the date of manufacture. Metrologic warrants and represents that allAP-010-BT and AP-100-BT access point devices are free of all defects in material, workmanship and design, and have been produced and labeled in compliance with all applicable U.S. Federal, state and local laws, regulations and ordinances pertaining to their production and labeling. This warranty is limited to repair, replacement of product or refund of product price at the sole discretion of Metrologic. Faulty equipment must be returned to one of the following Metrologic repair facilities: Blackwood, New Jersey, USA; Madrid, Spain; or Suzhou, China. To do this, contact the appropriate Metrologic Customer Service/Repair Department to obtain a Returned Material Authorization (RMA) number. In the event that it is determined the equipment failure is covered under this warranty, Metrologic shall, at its sole option, repair the Product or replace the Product with a functionally equivalent unit and return such repaired or replaced Product without charge for service or return freight, whether distributor, dealer/reseller, or retail consumer, or refund an amount equal to the original purchase price. This limited warranty does not extend to any Product, which in the sole judgment of Metrologic, has been subjected to abuse, misuse, neglect, improper installation, or accident, nor any damage due to use or misuse produced from integration of the Product into any mechanical, electrical or computer system. The warranty is void if: (i) the case of the Product is opened by anyone other than Metrologic's repair department or authorized repair centers; or (ii) any software is installed on the Product other than a software program approved by Metrologic. THIS LIMITED WARRANTY, EXCEPT AS TO TITLE, IS IN LIEU OF ALL OTHER WARRANTIES OR GUARANTEES, EITHER EXPRESS OR IMPLIED, AND SPECIFICALLY EXCLUDES, WITHOUT LIMITATION, WARRANTIES OF MERCHANTABILITY AND FITNESS FOR A PARTICULAR PURPOSE UNDER THE UNIFORM COMMERCIAL CODE, OR ARISING OUT OF CUSTOM OR CONDUCT. THE RIGHTS AND REMEDIES PROVIDED HEREIN ARE EXCLUSIVE AND IN LIEU OF ANY OTHER RIGHTS OR REMEDIES. IN NO EVENT SHALL METROLOGIC BE LIABLE FOR ANY INDIRECT OR CONSEQUENTIAL DAMAGES, INCIDENTAL DAMAGES, DAMAGES TO PERSON OR PROPERTY, OR EFFECT ON BUSINESS OR PROPERTY, OR OTHER DAMAGES OR EXPENSES DUE DIRECTLY OR INDIRECTLY TO THE PRODUCT, EXCEPT AS STATED IN THIS WARRANTY. IN NO EVENT SHALL ANY LIABILITY OF METROLOGIC EXCEED THE ACTUAL AMOUNT PAID TO METROLOGIC FOR THE PRODUCT. METROLOGIC RESERVES THE RIGHT TO MAKE ANY CHANGES TO THE PRODUCT DESCRIBED HEREIN. NORTH AMERICA Metrologic Instruments, Inc. 90 Coles Rd. Blackwood, NJ 08012-4683 Customer Service Department Tel: 1-800-ID-METRO Fax: 856-228-6673 Email: [email protected] METROLOGIC EUROPEAN REPAIR CENTER (MERC) Metrologic Eria Ibérica, SL C/Alfonso Gomez, 38-40, 1D 28037 Madrid Tel: +34 913 751 249 Fax: +34 913 270 437 MTLG AUTO ID INSTRUMENTS (SHANGHAI) CO., LTD Suzhou Sales Office BLK A, Room# 03/03-04 No.5 Xinghan Street, Xinsu Industrial Square China-Singapore Suahou Industrial Park, Suzhou, PRC Tel: 86-512-67622550 Fax: 86-512-67622560 Email: [email protected] 25 INDEX Interface ..................................19 Keyboard Wedge.........1, 2, 6, 22 RS232 .........................1, 2, 5, 21 RS485 .........................1, 2, 6, 21 USB .................................1, 2, 21 A AC ..................................see power Accessories .................................. 2 Address Bar Code ........................ 2 B K Blue ............................see indicator Button ................................... 17, 18 Keyboard Wedge ....... see Interface C Cable AUX .......................................... 2 Keyboard Wedge .................. 2, 6 PowerLink ............................. 2, 5 RS232....................................... 5 RS485................................... 2, 6 USB ...................................... 2, 6 Caution compliance................................ 4 SELV......................................... 4 CE ................................................ 4 Compliance ............................ 4, 23 Configuration ........................ 17, 18 Customer Service................... 2, 25 D L Labels ...........................................4 LED............................ see indicator M Manual ..........................................2 Mounting hole ...............................2 P Page/Disconnect Button ...............2 Power........................................2, 5 R RMA............................................25 RS232 ........................see Interface RS485 ........................see Interface DC ..................................see power E EMC ........................................... 23 Emissions ................................... 23 F Firmware .............................. 17, 18 I Immunity..................................... 23 Indicator...................................... 19 Visual ........................................ 2 26 www.metrologic.com T terminations ..........................21–22 transformer..................... see power U UL .................................................4 Upgrade ................................17, 18 USB ...........................see Interface W Warranty .....................................25 70-79035A October 2008 Printed in China © 2008 Honeywell International Inc.