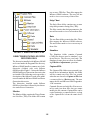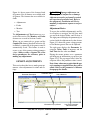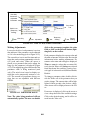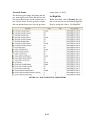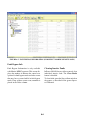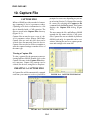
1
InPower ONAN
TM
User’s Guide
901−0112 September 2007
ABOUT THIS USER’S GUIDE
This User’s Guide covers procedures for using the InPowert ONAN service tool. This software is
subject to change and upgrades, which may not be reflected in this manual. In cases where this manual and the software conflict on features and/or operation methods, the software will take precedence.
No part of this document may be reproduced or transmitted in any form or by any means, electronic
or mechanical, for any purpose, without express written permission of Cummins Power Generation.
SERVICE AND SUPPORT
If you are having a problem with the software, write down what you can about the problem, determine whether the problem can be repeated, write down the software version available (this can be
found in the Help−About window), and then contact your distributor. Distributors should contact
the Cummins Help line.
E 2007 Cummins Power Generation, Inc. All rights reserved.
Onan is a registered trademark of Cummins Inc.
Cummins is a registered trademark of Cummins Inc.
InPower and “Performance you rely on” are trademarks of Cummins Inc.
Windows is a registered trademark of Microsoft.
i
INPOWER™ SOFTWARE LICENSE AGREEMENT
By breaking the seal on the InPower ONAN CD Package, you indicate your acceptance of this Agreement. If you do not
accept the terms of this Agreement, you may return within 5 Business days of your purchase the entire contents of this
kit to the Cummins Power Generation distributor from which it was purchased for a complete refund.
RECITALS:
WHEREAS, Cummins Power Generation and Licensee desire to establish a relationship pursuant to which Licensee
will obtain certain rights from Cummins Power Generation with respect to the Licensed Software, and Cummins Power
Generation will provide certain information and updates to Licensee, all for the mutual benefit of Cummins Power Generation and Licensee; THEREFORE, in consideration of the above premise and the mutual covenants contained herein,
Cummins Power Generation and Licensee agree as follows:
1)
License Grant and Restrictions
a)
Cummins Power Generation hereby grants to Licensee a non-exclusive, non-transferable and non-sublicensable license to use the Licensed Software to monitor and control power generation systems manufactured or
sold by Cummins Power Generation. Each copy of the Licensed Software is specifically licensed for use in a
single facility of Licensee for its intended purpose, and it may not be sublicensed, sold, or otherwise distributed. The license for Licensed Software is subject to the following terms and conditions.
b)
Licensee may load each copy of the Licensed Software files provided by Cummins Power Generation onto a
single computer as required to use the Licensed Software for its intended purpose. Licensee may make a
single backup or archival copy of the Licensed Software, provided that Licensee affixes to the backup or
archival copy any copyright and trademark notice, serial number and any other legend of ownership contained on the original disk from which the archival copy was made.
c)
Licensee agrees to use the licensed Software and any updates to the Licensed Software in strict accordance
with Cummins Power Generation’s published service practices and/or product warranty guidelines for the
sole purpose of setting up, servicing and maintaining power generation systems manufactured or sold by
Cummins Power Generation.
d)
Licensee acknowledges that Cummins Power Generation may, at its option and at no cost to the Licensee,
provide updates to the Licensed Software so that the most current version of the Licensed Software is used to
monitor and control power generation systems. Cummins Power Generation may also offer for sale upgrades
of the Licensed Software which the Licensee is under no obligation to purchase.
e)
All rights relating to the Licensed Software not specifically granted to Licensee pursuant to this Agreement
shall be retained by Cummins Power Generation.
f)
Licensee acknowledges that the Licensed Software may include software that Cummins Power Generation
has obtained or licensed from a third party, and Licensee agrees that the terms and conditions of this Agreement shall be applicable to any such third party software. Licensee agrees to abide by any additional or modified terms and conditions with respect to such third party software if reasonably requested in writing by
Cummins Power Generation and/or the third party.
ii
2)
Markings
Licensee shall use its best efforts to preserve all copyright, trademark, ownership or other notices, legends or markings
on the Licensed Software as originally provided by Cummins Power Generation. In the event the Licensed Software
contains any copyright or other message imbedded therein, Licensee shall not modify or remove such embedded message. All copyright, trademark, ownership or other notices, legends or markings on the Licensed Software as originally
provided by Cummins Power Generation also shall be clearly displayed on each backup or archival copy of the Licensed
Software.
3)
Materials
The InPower Installation CDs, User Manual, and any updates thereto, constitute the Licensed Software unless otherwise
agreed to by the parties.
4)
Title
Title and full ownership rights to the Licensed Software and any updates thereto, including all copyrights therein, shall
remain with Cummins Power Generation and/or its subsidiaries. Cummins Power Generation expressly retains all rights
that it may have under U.S. or foreign laws or international treaties relating to the Licensed Software, except for those
rights expressly granted to Licensee herein.
5)
Licensee Expenses
Costs and expenses incurred by Licensee relating to any use of the Licensed Software, or any other costs not specifically
agreed upon by the parties in writing, shall be responsibility of Licensee.
6)
Payment
The Sales Price does not include any federal, state, local or other governmental taxes, or other tariffs which may be imposed on the sale, transportation, production, storage, or export of the Licensed Software. Any and all such taxes and
costs shall be paid by Licensee and Cummins Power Generation shall have no liability therefor.
7)
Updates and Maintenance
a)
b)
8)
Cummins Power Generation agrees to provide reasonable free Help Desk support for the current version and
the latest prior version of the Licensed Software at hours, and or terms and conditions, determined solely by
Cummins Power Generation.
In the event of an error or defect in the Licensed Software or periodic update thereto, Cummins Power Generation agrees to repair or remedy such errors or effects which Cummins Power Generation deems necessary.
Licensee shall, promptly upon discovery thereof, notify Cummins Power Generation, in writing, of any errors
or defects in the Licensed Software and/or periodic update thereto. Cummins Power Generation shall use its
best efforts to remedy or repair such errors or defects, devoting reasonable resources to such task in view of
the particular business situation and customer need.
No Modification by Licensee
Licensee agrees not to translate, reverse assemble, reverse compile, adapt, translate, alter, modify or change in any way
the Licensed Software, or any update thereto, without the prior written authorization of Cummins Power Generation.
iii
9)
Warranties
Cummins Power Generation warrants that the CD containing the Licensed Software shall be free from defects in material or workmanship for a period of ninety (90) days from the date of delivery to Licensee. Cummins Power Generation
also warrants that the Licensed Software shall be delivered free of any rightful claim of infringement of any copyright,
trademark, trade secret or other proprietary right of any third party, provided that prompt notice of, and control over,
such claims is provided to Cummins Power Generation by Licensee. In the event of such claim, Cummins Power Generation may, at its sole option, defend the claim, procure for Licensee the continued rights as described herein, modify the
Licensed Software so the claim is avoided without reduced functionally, or refund Licensee’s sales price paid. Cummins
Power Generation’s option shall be its sole obligation and Licensee’s sole remedy in such event.
10)
Warranty Disclaimer
The Licensed Software and any and all updates thereto are licensed “As Is” with the exception of the warranties specifically provided herein. Cummins Power Generation does not claim and does not warrant that the Licensed Software will
run error free. WITH THE EXCEPTION OF THE WARRANTIES PROVIDED HEREIN, CUMMINS POWER GENERATION DISCLAIMS ALL WARRANTIES, EITHER EXPRESS OR IMPLIED, REGARDING THE LICENSED
SOFTWARE, ITS MERCHANTABILITY OR ITS FITNESS FOR ANY PARTICULAR PURPOSE, AND CUMMINS
POWER GENERATION WILL NOT OTHERWISE BE LIABLE FOR INDIRECT, INCIDENTAL OR CONSEQUENTIAL DAMAGES RESULTING FROM LICENSEE’S USE OF THE LICENSED SOFTWARE OR FOR ANY ERROR
OR DEFECT IN THE LICENSED SOFTWARE. CUMMINS POWER GENERATION’S NET LIABILITY TO LICENSEE SHALL NOT EXCEED THE TOTAL AGGREGATE PAYMENTS BY LICENSEE TO CUMMINS POWER
GENERATION WITH RESPECT TO THE LICENSED SOFTWARE.
11) Government Licensee
If Licensee is acquiring the Licensed Software as, or on behalf of, a unit of the United States Government, the following
provisions shall be applicable: The Government acknowledges and agrees that the Licensed Software and documentation
relating thereto were developed at private expense and no part of the Licensed Software or documentation relating thereto is in the public domain. The Government acknowledges Cummins Power Generation’s representation that the Licensed Software is “Restricted Computer Software” as that item is defined in Clause 52.227-19 of the Department of
Federal Acquisition Regulation Supplement (DFARS). The Government agrees that:
i)
ii)
If the Licensed Software is supplied to the Department of Defense (DOD), the Licensed Software is
classified as “Commercial Computer Software” and the Government is acquiring only “restricted
rights” in the Licensed Software and documentation relating thereto as that term is defined in Clause
252.227−7013(c)(1) of the DFARS, and
If the Licensed Software is supplied to any unit or agency of the United States Government other than
the Department of Defense, the Government’s rights in the Licensed Software and documentation relating thereto will be defined in Clause 52.227−19(c)(2) of the FAR.
12) Restricted Rights Legend
Use, duplication, or disclosure by the Government is subject to restrictions set forth in subparagraph (c) (1)
(ii) of the Rights in Technical Data and Computer Software clause at DFARS 252.227−7013.
iv
13) Confidentiality
a)
Licensee hereby acknowledges that the Licensed Software and periodic updates thereto contain valuable
information belonging to Cummins Power Generation that Cummins Power Generation considers “confidential”. Consistent with the purpose of this Agreement, Licensee agrees to use its best efforts not to release,
disclose or otherwise permit unauthorized access to such confidential information.
b)
Cummins Power Generation and Licensee agree to clearly mark written materials as ”confidential” if they are
to be treated as confidential. Verbal communications that are confidential in nature will be identified as so
before, during or immediately after the communication.
c)
Licensee will use its best efforts to ensure that all individuals who are provided access to the Licensed Software under this Agreement will observe and perform this nondisclosure covenant.
14) Termination of Agreement
a)
Cummins Power Generation may terminate this agreement for cause in the event that Licensee becomes or is
declared insolvent or bankrupt.
b)
In the event of termination of this Agreement, all rights granted by this Agreement shall revert to Cummins
Power Generation. Upon termination of this Agreement, Licensee will deliver to Cummins Power Generation
all material furnished by Cummins Power Generation pertaining to the Licensed Software and will also warrant that all copies thereof have been returned to Cummins Power Generation or destroyed.
c)
In the event of termination of this Agreement, Licensee and Cummins Power Generation shall remain obligated with respect to the provisions of this Agreement relating to confidentiality of information.
15) Completeness
Licensee and Cummins Power Generation agree that this Agreement constitutes the complete agreement and understanding between the parties relating to Licensed Software and updates thereto. This agreement supersedes all prior agreements, understandings, and negotiations whether written or verbal with respect to the subject matter thereof. This Agreement can only be modified by a written agreement signed by both parties.
16) Export Regulations
Licensee understands that the Export Administration Regulations of the Department of Commerce of the United States
may prohibit the export of the Licensed Software to certain countries and agrees to conform to those regulations. Licensee also agrees to conform to these regulations. Licensee shall indemnify Cummins Power Generation against any
loss related to Licensee’s failure to conform to those regulations.
17) Governing Law
This Agreement shall be governed by and construed in accordance with the laws of the State of Indiana, United States of
America and NOT the UNCISG. To the extent required in order to comply with the laws and regulations of any country
in which Licensed Software is distributed or used, the terms and conditions of this Agreement shall be construed to most
nearly effectuate the purposes of the Agreement as set forth herein. If any provision of this Agreement shall be held to
be unenforceable, such holding shall not affect the enforceability of any other provision hereof.
v
18) Attorney’s Fee’s
In the event of any legal action or other proceeding that is brought about to enforce this Agreement, the prevailing or
successful party shall be entitled to recover reasonable attorneys’ fees as well as other costs incurred in that action or
proceeding in addition to any compensation to which it may be entitled as a result.
19) Agreement Successors and Assigns
The terms and conditions of this Agreement shall inure to the benefit of and enforceable by Cummins Power Generation
and the successors and assigns of Cummins Power Generation’s interest in this agreement and/or Cummins Power Generation’s ownership of the Licensed Software.
©2007 Cummins Power Generation, Inc. All rights reserved.
vi
Table of Contents
About This User’s Guide . . . . . . . . . . . . . . . . . . . . . . . . . . . . . . . . . . . . . . . . . . . . . . . .
Service and Support . . . . . . . . . . . . . . . . . . . . . . . . . . . . . . . . . . . . . . . . . . . . . . . . . . . .
InPower Software License Agreement . . . . . . . . . . . . . . . . . . . . . . . . . . . . . . . . . . . . .
1. Introduction . . . . . . . . . . . . . . . . . . . . . . . . . . . . . . . . . . . . . . . . . . . . . .
System Overview . . . . . . . . . . . . . . . . . . . . . . . . . . . . . . . . . . . . . . . . . . . . . . . . . . . . . .
System Security . . . . . . . . . . . . . . . . . . . . . . . . . . . . . . . . . . . . . . . . . . . . . . . . . . . . . . .
User Interface . . . . . . . . . . . . . . . . . . . . . . . . . . . . . . . . . . . . . . . . . . . . . . . . . . . . . . . . .
About This User’s Guide . . . . . . . . . . . . . . . . . . . . . . . . . . . . . . . . . . . . . . . . . . . . . . . .
System Requirements . . . . . . . . . . . . . . . . . . . . . . . . . . . . . . . . . . . . . . . . . . . . . . . . . . .
Recommended PC . . . . . . . . . . . . . . . . . . . . . . . . . . . . . . . . . . . . . . . . . . . . . . . . . .
InPower ONAN Version 6.0 Updates . . . . . . . . . . . . . . . . . . . . . . . . . . . . . . . . . . . . . .
Start Menu Group Shortcuts . . . . . . . . . . . . . . . . . . . . . . . . . . . . . . . . . . . . . . . . . . . . .
Readme File . . . . . . . . . . . . . . . . . . . . . . . . . . . . . . . . . . . . . . . . . . . . . . . . . . . . . . .
Uninstall . . . . . . . . . . . . . . . . . . . . . . . . . . . . . . . . . . . . . . . . . . . . . . . . . . . . . . . . . .
Directories Installed with InPower ONAN . . . . . . . . . . . . . . . . . . . . . . . . . . . . . . . . . .
Monitor . . . . . . . . . . . . . . . . . . . . . . . . . . . . . . . . . . . . . . . . . . . . . . . . . . . . . . . . . . .
Strip Chart . . . . . . . . . . . . . . . . . . . . . . . . . . . . . . . . . . . . . . . . . . . . . . . . . . . . . . . .
Data . . . . . . . . . . . . . . . . . . . . . . . . . . . . . . . . . . . . . . . . . . . . . . . . . . . . . . . . . . . . .
Simulator . . . . . . . . . . . . . . . . . . . . . . . . . . . . . . . . . . . . . . . . . . . . . . . . . . . . . . . . .
Captured File . . . . . . . . . . . . . . . . . . . . . . . . . . . . . . . . . . . . . . . . . . . . . . . . . . . . . .
Calibration Directories Installed with InPower ONAN . . . . . . . . . . . . . . . . . . . . . . . .
2. Setup . . . . . . . . . . . . . . . . . . . . . . . . . . . . . . . . . . . . . . . . . . . . . . . . . . . .
Setup . . . . . . . . . . . . . . . . . . . . . . . . . . . . . . . . . . . . . . . . . . . . . . . . . . . . . . . . . . . . . . . .
General Setup . . . . . . . . . . . . . . . . . . . . . . . . . . . . . . . . . . . . . . . . . . . . . . . . . . . . . .
Unit of Measurement . . . . . . . . . . . . . . . . . . . . . . . . . . . . . . . . . . . . . . . . . . . . . . . .
User Setup − System Administration . . . . . . . . . . . . . . . . . . . . . . . . . . . . . . . . . . . .
Capture File Options . . . . . . . . . . . . . . . . . . . . . . . . . . . . . . . . . . . . . . . . . . . . . . . .
Site Setup . . . . . . . . . . . . . . . . . . . . . . . . . . . . . . . . . . . . . . . . . . . . . . . . . . . . . . . . .
Create Site . . . . . . . . . . . . . . . . . . . . . . . . . . . . . . . . . . . . . . . . . . . . . . . . . . . . . . . .
MONNet InPower ONAN Setup . . . . . . . . . . . . . . . . . . . . . . . . . . . . . . . . . . . . . . . . . .
vii
i
i
ii
1-1
1-1
1-2
1-2
1-2
1-3
1-3
1-3
1-4
1-4
1-4
1-5
1-5
1-5
1-5
1-5
1-5
1-6
2-1
2-1
2-1
2-1
2-2
2-2
2-3
2-5
2-6
Table of Contents (continued)
3. InPower ONAN Basics . . . . . . . . . . . . . . . . . . . . . . . . . . . . . . . . . . . . .
Starting InPower ONAN . . . . . . . . . . . . . . . . . . . . . . . . . . . . . . . . . . . . . . . . . . . . . . . .
The Main Window . . . . . . . . . . . . . . . . . . . . . . . . . . . . . . . . . . . . . . . . . . . . . . . . . . . . .
Menu Descriptions . . . . . . . . . . . . . . . . . . . . . . . . . . . . . . . . . . . . . . . . . . . . . . . . . . . . .
Port . . . . . . . . . . . . . . . . . . . . . . . . . . . . . . . . . . . . . . . . . . . . . . . . . . . . . . . . . . . . . .
Device . . . . . . . . . . . . . . . . . . . . . . . . . . . . . . . . . . . . . . . . . . . . . . . . . . . . . . . . . . . .
Edit . . . . . . . . . . . . . . . . . . . . . . . . . . . . . . . . . . . . . . . . . . . . . . . . . . . . . . . . . . . . . .
View . . . . . . . . . . . . . . . . . . . . . . . . . . . . . . . . . . . . . . . . . . . . . . . . . . . . . . . . . . . . .
Help . . . . . . . . . . . . . . . . . . . . . . . . . . . . . . . . . . . . . . . . . . . . . . . . . . . . . . . . . . . . .
User Interface . . . . . . . . . . . . . . . . . . . . . . . . . . . . . . . . . . . . . . . . . . . . . . . . . . . . . . . . .
Toolbar . . . . . . . . . . . . . . . . . . . . . . . . . . . . . . . . . . . . . . . . . . . . . . . . . . . . . . . . . . .
Dialog Boxes . . . . . . . . . . . . . . . . . . . . . . . . . . . . . . . . . . . . . . . . . . . . . . . . . . . . . .
4. Genset Service . . . . . . . . . . . . . . . . . . . . . . . . . . . . . . . . . . . . . . . . . . . .
3-1
3-1
3-1
3-3
3-3
3-3
3-3
3-3
3-3
3-4
3-4
3-5
4-1
Genset Service . . . . . . . . . . . . . . . . . . . . . . . . . . . . . . . . . . . . . . . . . . . . . . . . . . . . . . . .
4-1
Connecting to a Genset . . . . . . . . . . . . . . . . . . . . . . . . . . . . . . . . . . . . . . . . . . . . . .
4-1
Connecting to an HQD Inverter, Transfer Switch, or Display . . . . . . . . . . . . . . . .
4-3
Starting InPower ONAN . . . . . . . . . . . . . . . . . . . . . . . . . . . . . . . . . . . . . . . . . . . . .
4-5
Genset Adjustments . . . . . . . . . . . . . . . . . . . . . . . . . . . . . . . . . . . . . . . . . . . . . . . . . . . .
4-7
Adjustment Basics . . . . . . . . . . . . . . . . . . . . . . . . . . . . . . . . . . . . . . . . . . . . . . . . . .
4-7
Making Adjustments . . . . . . . . . . . . . . . . . . . . . . . . . . . . . . . . . . . . . . . . . . . . . . . .
4-8
Saving Adjustments . . . . . . . . . . . . . . . . . . . . . . . . . . . . . . . . . . . . . . . . . . . . . . . . .
4-9
Override Requests . . . . . . . . . . . . . . . . . . . . . . . . . . . . . . . . . . . . . . . . . . . . . . . . . . 4-10
Override Commands . . . . . . . . . . . . . . . . . . . . . . . . . . . . . . . . . . . . . . . . . . . . . . . . 4-10
Override Status . . . . . . . . . . . . . . . . . . . . . . . . . . . . . . . . . . . . . . . . . . . . . . . . . . . . . 4-11
Set High Idle . . . . . . . . . . . . . . . . . . . . . . . . . . . . . . . . . . . . . . . . . . . . . . . . . . . . . . . 4-11
5. Monitor . . . . . . . . . . . . . . . . . . . . . . . . . . . . . . . . . . . . . . . . . . . . . . . . . .
Monitor and Datalog . . . . . . . . . . . . . . . . . . . . . . . . . . . . . . . . . . . . . . . . . . . . . . . . . . .
Monitor Dialog . . . . . . . . . . . . . . . . . . . . . . . . . . . . . . . . . . . . . . . . . . . . . . . . . . . . . . . .
Monitor Dialog Features . . . . . . . . . . . . . . . . . . . . . . . . . . . . . . . . . . . . . . . . . . . . .
Adding Parameters . . . . . . . . . . . . . . . . . . . . . . . . . . . . . . . . . . . . . . . . . . . . . . . . . .
Using Monitor . . . . . . . . . . . . . . . . . . . . . . . . . . . . . . . . . . . . . . . . . . . . . . . . . . . . . . . .
Metering . . . . . . . . . . . . . . . . . . . . . . . . . . . . . . . . . . . . . . . . . . . . . . . . . . . . . . . . . . . . .
Product Info − Control . . . . . . . . . . . . . . . . . . . . . . . . . . . . . . . . . . . . . . . . . . . . . . . . . .
Product Info − Genset . . . . . . . . . . . . . . . . . . . . . . . . . . . . . . . . . . . . . . . . . . . . . . . . . .
Usage History . . . . . . . . . . . . . . . . . . . . . . . . . . . . . . . . . . . . . . . . . . . . . . . . . . . . . . . . .
viii
5-1
5-1
5-1
5-1
5-2
5-3
5-4
5-4
5-5
5-6
Table of Contents (continued)
6. Fault Information . . . . . . . . . . . . . . . . . . . . . . . . . . . . . . . . . . . . . . . . .
Fault Information . . . . . . . . . . . . . . . . . . . . . . . . . . . . . . . . . . . . . . . . . . . . . . . . . . . . . .
Advanced Fault Information . . . . . . . . . . . . . . . . . . . . . . . . . . . . . . . . . . . . . . . . . .
Fault History . . . . . . . . . . . . . . . . . . . . . . . . . . . . . . . . . . . . . . . . . . . . . . . . . . . . . . .
Fault Occurrences . . . . . . . . . . . . . . . . . . . . . . . . . . . . . . . . . . . . . . . . . . . . . . . . . . .
Fault Bypass Info . . . . . . . . . . . . . . . . . . . . . . . . . . . . . . . . . . . . . . . . . . . . . . . . . . .
Clearing Inactive Faults . . . . . . . . . . . . . . . . . . . . . . . . . . . . . . . . . . . . . . . . . . . . . .
Onan Fault Information . . . . . . . . . . . . . . . . . . . . . . . . . . . . . . . . . . . . . . . . . . . . . . . .
7. Initial Calibration . . . . . . . . . . . . . . . . . . . . . . . . . . . . . . . . . . . . . . . . .
6-1
6-1
6-2
6-2
6-3
6-4
6-4
6-5
7-1
About Initial Calibration . . . . . . . . . . . . . . . . . . . . . . . . . . . . . . . . . . . . . . . . . . . . . . . .
7-1
Initial Calibration Setup . . . . . . . . . . . . . . . . . . . . . . . . . . . . . . . . . . . . . . . . . . . . . . . . .
7-1
Initial Calibration Setup for Gensets . . . . . . . . . . . . . . . . . . . . . . . . . . . . . . . . . . . .
7-1
Initial Calibration Setup for HQD Inverters, Transfer Switches, and Monitors . . .
7-3
Initial Calibration . . . . . . . . . . . . . . . . . . . . . . . . . . . . . . . . . . . . . . . . . . . . . . . . . . . . . .
7-5
Selecting Calibration Part Number . . . . . . . . . . . . . . . . . . . . . . . . . . . . . . . . . . . . .
7-7
History . . . . . . . . . . . . . . . . . . . . . . . . . . . . . . . . . . . . . . . . . . . . . . . . . . . . . . . . . . .
7-8
Save and Restore Parameters . . . . . . . . . . . . . . . . . . . . . . . . . . . . . . . . . . . . . . . . . .
7-8
Use Capture File Feature . . . . . . . . . . . . . . . . . . . . . . . . . . . . . . . . . . . . . . . . . . . . .
7-9
Calibration Download . . . . . . . . . . . . . . . . . . . . . . . . . . . . . . . . . . . . . . . . . . . . . . . 7-10
Writing Adjustments From a Capture File . . . . . . . . . . . . . . . . . . . . . . . . . . . . . . . . . . 7-10
Final Adjustments . . . . . . . . . . . . . . . . . . . . . . . . . . . . . . . . . . . . . . . . . . . . . . . . . . . . . 7-10
8. Update Calibration . . . . . . . . . . . . . . . . . . . . . . . . . . . . . . . . . . . . . . . .
About Update Calibration . . . . . . . . . . . . . . . . . . . . . . . . . . . . . . . . . . . . . . . . . . . . . . .
Update Calibration Setup . . . . . . . . . . . . . . . . . . . . . . . . . . . . . . . . . . . . . . . . . . . . . . . .
Connecting to the Device . . . . . . . . . . . . . . . . . . . . . . . . . . . . . . . . . . . . . . . . . . . . .
Update Calibration . . . . . . . . . . . . . . . . . . . . . . . . . . . . . . . . . . . . . . . . . . . . . . . . . . . . .
History . . . . . . . . . . . . . . . . . . . . . . . . . . . . . . . . . . . . . . . . . . . . . . . . . . . . . . . . . . .
ix
8-1
8-1
8-1
8-2
8-2
8-3
Table of Contents (continued)
9. Strip Chart . . . . . . . . . . . . . . . . . . . . . . . . . . . . . . . . . . . . . . . . . . . . . . .
Strip Chart . . . . . . . . . . . . . . . . . . . . . . . . . . . . . . . . . . . . . . . . . . . . . . . . . . . . . . . . . . .
Starting the Strip Chart Feature . . . . . . . . . . . . . . . . . . . . . . . . . . . . . . . . . . . . . . . .
Creating a Custom Strip Chart . . . . . . . . . . . . . . . . . . . . . . . . . . . . . . . . . . . . . . . . . . . .
Adding Parameters . . . . . . . . . . . . . . . . . . . . . . . . . . . . . . . . . . . . . . . . . . . . . . . . . .
Parameter Properties Dialog . . . . . . . . . . . . . . . . . . . . . . . . . . . . . . . . . . . . . . . . . .
Sampling Rate Dialog . . . . . . . . . . . . . . . . . . . . . . . . . . . . . . . . . . . . . . . . . . . . . . .
Strip Chart Menu Bar Functions . . . . . . . . . . . . . . . . . . . . . . . . . . . . . . . . . . . . . . .
Context Menu Features . . . . . . . . . . . . . . . . . . . . . . . . . . . . . . . . . . . . . . . . . . . . . .
Chart Customization Dialog . . . . . . . . . . . . . . . . . . . . . . . . . . . . . . . . . . . . . . . . . . .
Printing a Strip Chart . . . . . . . . . . . . . . . . . . . . . . . . . . . . . . . . . . . . . . . . . . . . . . . .
Viewing Logged Data . . . . . . . . . . . . . . . . . . . . . . . . . . . . . . . . . . . . . . . . . . . . . . . .
9-1
9-1
9-1
9-2
9-2
9-2
9-3
9-3
9-5
9-6
9-6
9-6
10. Capture File . . . . . . . . . . . . . . . . . . . . . . . . . . . . . . . . . . . . . . . . . . . . . 10-1
Capture File . . . . . . . . . . . . . . . . . . . . . . . . . . . . . . . . . . . . . . . . . . . . . . . . . . . . . . . . . .
Viewing a Capture File . . . . . . . . . . . . . . . . . . . . . . . . . . . . . . . . . . . . . . . . . . . . . . .
Creating a Capture File . . . . . . . . . . . . . . . . . . . . . . . . . . . . . . . . . . . . . . . . . . . . . . . . .
Writing to a Device . . . . . . . . . . . . . . . . . . . . . . . . . . . . . . . . . . . . . . . . . . . . . . . . . . . .
10-1
10-1
10-1
10-2
11. Simulator . . . . . . . . . . . . . . . . . . . . . . . . . . . . . . . . . . . . . . . . . . . . . . . 11-1
Simulator . . . . . . . . . . . . . . . . . . . . . . . . . . . . . . . . . . . . . . . . . . . . . . . . . . . . . . . . . . . .
11-1
12. Reports . . . . . . . . . . . . . . . . . . . . . . . . . . . . . . . . . . . . . . . . . . . . . . . . . 12-1
Creating a Report . . . . . . . . . . . . . . . . . . . . . . . . . . . . . . . . . . . . . . . . . . . . . . . . . . . . . . 12-1
Printing a Report . . . . . . . . . . . . . . . . . . . . . . . . . . . . . . . . . . . . . . . . . . . . . . . . . . . . . . 12-2
Sending a Report to a File . . . . . . . . . . . . . . . . . . . . . . . . . . . . . . . . . . . . . . . . . . . . . . . 12-3
13. Help . . . . . . . . . . . . . . . . . . . . . . . . . . . . . . . . . . . . . . . . . . . . . . . . . . . . 13-1
Search for Help On... . . . . . . . . . . . . . . . . . . . . . . . . . . . . . . . . . . . . . . . . . . . . . . . . . . .
Contents . . . . . . . . . . . . . . . . . . . . . . . . . . . . . . . . . . . . . . . . . . . . . . . . . . . . . . . . . . . . .
How to Use Help . . . . . . . . . . . . . . . . . . . . . . . . . . . . . . . . . . . . . . . . . . . . . . . . . . . . . .
Service and Support . . . . . . . . . . . . . . . . . . . . . . . . . . . . . . . . . . . . . . . . . . . . . . . . . . . .
About Device Explorer . . . . . . . . . . . . . . . . . . . . . . . . . . . . . . . . . . . . . . . . . . . . . . . . .
A. Glossary . . . . . . . . . . . . . . . . . . . . . . . . . . . . . . . . . . . . . . . . . . . . . . . . .
x
13-1
13-1
13-1
13-1
13-1
A-1
1. Introduction
XP. Refer to the Installing InPower ONAN
section for recommended system hardware
and software. Installing and using InPower
ONAN requires experience using the Windows operating system.
SYSTEM OVERVIEW
InPower ONAN version 6.0 is a Windowsbased service, maintenance, and diagnostic
tool used with Recreational Vehicle (RV),
commercial mobile (CM), home standby, and
Marine Generator Sets (Gensets). This tool
provides electronic service functions including setting adjustments, monitoring, strip
chart, initial calibration, update calibration
data logging, viewing faults, and report capability.
The InPower ONAN tool also can be used to
save a device’s trims and settings to a file. The
stored settings can be viewed off-line and they
can be used to configure multiple installations
of the same application controller type.
Each copy of InPower ONAN is packaged and
installed separately. No more than one InPower ONAN product can be installed on the same
PC.
InPower ONAN requires one of the following
operating systems: Microsoft Windows 2000,
Windows Me, Windows NT 6.0, or Windows
The service PC, running InPower ONAN, is
connected to the genset control via an RS-232
serial communications harness. Figure 1-1 illustrates a method used to connect a service PC
to a RV genset.
The harness is connected to the (COM) port on
the PC with a DB9 connector. Diesel gensets
(HDKAx, starting with Spec K), Commercial
Mobile, and Marine gensets also require the
use of an RS-232 to RS-485 converter. For RV
installations, the other end of the serial cable is
connected with either an 8-pin connector (gas/
LP) or a 10-Pin connector (diesel). For Marine
installations, the other end of the serial cable is
connected with an 8-pin connector to the genset and an 8-pin connector to the remote connection. The interface harness kits required are
listed in Table 1-1.
P2 Connector
for Diesel
Gensets
P1 Connector
for Gasoline or
LPG Gensets
Interface Harness
J1 to P8 Connector
on the Genset
PC Running InPower ONAN
FIGURE 1-1.TYPICAL INPOWER ONAN SERIAL CONNECTION METHOD
1-1
Table 1-1. Interface Harness Kits
Fuel Type
Required Kit
RS-232 to RS-485
Converter
HDKAx (Starting with
Spec K)
Diesel
541−1374
Yes
810HQD, 1215HQD,
and 1218HQD
Diesel
541−1374
Yes
DKHA
Diesel
541−1374
Yes
HDKCx
Diesel
541−1287
No
HGJAA, HCJAD,
HGJAE, and HGJAF
(Units with controls built
in 2005 or later)
Gasoline/LPG
541−1287
No
MDKBH − MDKBS and
MDDCx
Diesel
541−1289
Yes
Gasoline
541−1289
Yes
Gasoline
or Diesel
541−1389
Yes
Model
MGKBx (Starting with
Spec C)
All
The tool’s main window displays a Menu Bar
and a Toolbar for access to the tool’s functions.
Only commands applicable to the current active window are enabled, all other commands
from the Menu Bar or Toolbar are grayed out.
SYSTEM SECURITY
InPower ONAN 6.0 does not require a hardware security device.
USER INTERFACE
Refer to the InPower ONAN Basics Section
for a detailed description of the user interface
features.
The InPower ONAN software operates in the
Windows graphical environment and is compatible with Windows. You can access the system like any other Windows application. If you
are unfamiliar with Windows, or have questions, refer to the Microsoft Windows User’s
Guide for your specific operating system, or
click on Help, from the Windows Start menu,
to view the Windows Help Topics.
All system commands are accessible by mouse
and keyboard. Frequently used commands
have keyboard shortcuts and tool bar access.
InPower ONAN uses the Windows Explorer
tree hierarchy for navigating a connected file
or device (referred to as Device Explorer, in InPower ONAN).
ABOUT THIS USER’S GUIDE
This User’s Guide covers installation and operation of the InPower ONAN service tool.
Specific subjects are covered in the following
sections:
Section 1 provides a general description of the
software tool and related components.
Section 2 describes InPower ONAN general,
user, and site setup procedures.
Section 3 provides an overview of the main
menu and toolbar functions. Each of Menu
items and Toolbar buttons are described. Some
1-2
− If using Windows XP Pro, NT
V6.0, the PC must be able to
operate at 500 MHz and greater
and have at least 256 MB RAM
and a 1.5 GB hard drive.
features are cross-referenced to their corresponding manual section.
Section 4 describes genset service, adjustment,
and test features available with InPower
ONAN. This section provides details about
each of the files that are displayed when you
are connected to a genset, and how these features are used.
Sections 5 through 13 describe individual service tool features.
Definitions for new terms that are used in this
user’s guide can be found in the Glossary, in
Appendix A.
Last minute software changes and corrections
may be found in the InPower ONAN ReadMe
file.
• Microsoft Internet Explorer version 5.5
or higher
• SVGA (1024x768) color display
• Windows compatible pointing device
and 101 key enhanced keyboard
• 16X CD-ROM
• One free serial communications
port
WARNING Electrical equipment and engines present hazards that can result in property damage, severe personal injury or death.
The InPower ONAN tool is for use by trained
and experienced technicians only. Refer to
important Safety Instructions in the equipment’s Operator and Maintenance manuals.
SYSTEM REQUIREMENTS
Recommended PC
The following section specifies the recommended laptop PC specifications.
Please note that InPower ONAN version 6.0
does not support the Windows 95 or Windows
98 operating systems.
• An IBM PC or 100% compatible PC
• Recommended Operating System:
INPOWER ONAN VERSION 6.0
UPDATES
The following new features were added with
the InPower ONAN version 6.0 release:
− If using Windows 2000, the PC
have a 300 MHz processor or
faster and have at least 128 MB
RAM.
• Support has been added for the DKHA
Auxilliary Power Unit (APU) diesel-powered generator.
1-3
FIGURE 1-2. START MENU GROUP SHORTCUTS
START MENU GROUP
SHORTCUTS
using InPower ONAN. Open and review these
instructions after the initial software installation.
InPower ONAN installs Start−Menu shortcuts for the InPower ONAN applications (refer
to Figure 1-2). The Setup feature is described
in Section 2. Each of the InPower ONAN
group programs are described in this User
Guides. The Monitor feature is described in
section 5. The Strip chart feature is described
in section 9. The ReadMe file and the Uninstall
feature are described in this section. Clicking
on any one of these shortcuts will launch the
selected application.
Uninstall
This program will uninstall InPower ONAN
from the Windows directory.
The uninstall program does not remove the directory “C:\Program Files\Power Generation”. This directory contains files including
the capture files that were saved to this directory (default location). Be aware that if you remove this directory manually these capture
files will be removed.
To remove InPower ONAN software, perform
the steps described in the installation instructions that are provided with the InPower
ONAN CD.
Readme File
When InPower ONAN is installed, a Readme
file is copied to the Power Generation group.
This file contains last minute instructions for
1-4
one or more .TPL files. These files support the
InPower ONAN software. The user will not
need to view or access any of these files.
Strip Chart
The Strip Chart folder contains one or more
strip chart parameter listing files (.TPL).
The files contain chart design parameters, the
user will not need to view or access these files.
Data
The two Data folders contain data files. These
files support the InPower ONAN software.
The user will not need to view or access any of
these files.
Simulator
FIGURE 1-3. DIRECTORY STRUCTURE
The Simulator folder contains Captured
(.CAP) files that are used to simulate a connected device. The files are read only. The
Simulator feature does not allow for simulating Edit-Save Adjustments operations.
DIRECTORIES INSTALLED WITH
INPOWER ONAN
The directories installed with InPower ONAN
are located under the Program Files directory.
InPower ONAN installs a common set of subdirectories (folders) with each InPower
ONAN product. Figure 1-3 shows the InPower
ONAN and Power Generation directories that
are installed. The following section provides a
description of the folders for each of the subdirectories under the InPower ONAN and Power
Generation directories.
The directories installed under InPower
ONAN are listed first, followed by the directories under Power Generation.
Captured File
The Captured File folder stores extracted (captured) device information. Initially, this folder
will not contain any files. Files are created
when the user chooses to Capture to File from
a connected device (Device menu). The user
names the file and InPower ONAN appends a
.CAP extension.
Captured files are read-only files. You can connect to and view these files, but you cannot
modify the file contents. Captured files can be
copied (written) to a connected device, as long
as the captured file is from the same device
type.
Monitor
The Monitor folder contains the Target Parameter List files (.TPL). This folder will contain
1-5
CALIBRATION DIRECTORIES
INSTALLED WITH INPOWER
ONAN
Starting with InPower ONAN version 6.0, a directory structure is downloaded in a PGA directory during installation (see Figure 1-4).
This file structure is to be used for downloading calibration files from the InCal website.
These directories will only be used by InPower
Pro users.
Service files and logical DFAs are also
part of the website InCal distribution and
are copied to their respective folders.
• Service Files: D:\Program
Files\Power Generation\InPower\Data
• Logical DFAs: D:\Program
Files\Power Generation\Shared\Data
FIGURE 1-4. PGA DIRECTORY STRUCTURE
1-6
2. Setup
SETUP
of the Setup features are described in this section.
If you need to set up another COM port, refer to
Create Site in this section for an example of
how to set up another COM port.
The Setup dialog allows the installer or System Administrator to set user preferences and
make changes to both Sites and Devices.
Unit of Measurement
General Setup
This feature allows selection of a list of pre-defined units of measure, based on a region or
country. InPower ONAN will convert and display values according to the units of measure
selected from the System Of Measurement
drop down list which includes two categories
(United States and Metric).
Users can create their own list by entering a
name in the System of Measurement dialog.
To customize a setup, select individual Unit
Descriptions, by Unit Type, from drop down
lists. Click on the Apply button to save the
changes.
The Setup feature can be accessed from the
Start menu. Figure 2-1 shows the Setup dialog
as it appears after the initial setup.
Three Setup tabs are displayed; the Unit of
Measurement tab is the default tab selection.
To select another tab, click on the desired tab.
When the Site Setup tab is selected, clicking
on a COM port or a Consumer Device in the
Site List allows for editing of the current sites.
The default sites, as set up, allow for connections to all consumer devices; changing the setup is not required to use the service tool. Each
FIGURE 2-1. SETUP DIALOG − UNIT OF MEASURE
2-1
FIGURE 2-2. USER SETUP
User Setup − System Administration
must exactly match the Windows user
name.
Three access levels are available as follows:
Read Only: User can connect to a device and
read all parameter settings, fault information
and history records.
Read/Write: User has full use of all InPower
ONAN features, including making adjustments.
Administrator: Administrator has full use all
InPower ONAN features and the ability to establish and maintain user privileges for all users on this PC.
The System Administration feature (User Setup) allows a person using the Windows log on
(with System Administrator privileges) to establish a user profile for each user on the system. After the initial setup, only the System
Administrator will have access to the User
Setup dialog.
Note: With InPower ONAN, using the System Administration feature requires the
user to have admin rights on the PC. The
first user of User Setup is automatically set
to have administrative privileges. This person should then assign privileges to other
personnel. Using this feature is not recommended for most users. If you do not have
admin rights, conflicts between Windows
User Administration and InPower ONAN
User Setup can occur, preventing user access to InPower ONAN. When this occurs, a
Windows Administrator may be required to
change the PC’s user access. The user name
Capture File Options
The User Setup dialog allows the user to set
their preference to either automatically create
a capture file each time they connect to a device (default setting) or to be prompted before
creating a capture file. Click inside the checkbox next to the desired setting then click on the
OK button. Figure 2-2.
2-2
FIGURE 2-3. SITE SETUP DIALOG
Site Setup
To add an item, click on the Add button. the
Create Site dialog is displayed. This feature is
described in the following section.
The Site Setup dialog allows the user to Add,
Remove, or edit a site or port (see Figure 2-3).
To remove an item from the Site List, select
the item and click on the Remove button. A
popup will be displayed to prompt you to continue (Yes) or cancel this operation (No) (see
Figure 2-4). Click on the Yes button to remove
the item, or click on the No button to cancel the
removal.
Selecting an item from the Site List enables
the edit feature. When a capture file or a simulator site file is selected, the file location (path)
is displayed and can be edited (see Figure 2-5).
When a port is selected, the COM port can be
edited (see Figure 2-6).
Use the Apply button to save the data in the
current dialog box to the InPower ONAN settings. Use the Cancel button to close the Setup
dialog without saving any changes made during this session. Use the OK button to accept
the existing settings.
FIGURE 2-4. REMOVING A DEVICE
PROMPT
2-3
FIGURE 2-5. SITE SETUP DIALOG − SIMULATOR
FIGURE 2-6. SITE SETUP DIALOG − COM1
2-4
FIGURE 2-7. CREATE SITE DIALOGS
Protocol − Automatically set to mon as the
protocol for all physical site types (the default,
Physical site w/MON protocol, connects to all
devices) or MONNet for network connection
site types (multiple devices).
Create Site
When the user selects the Add button, the
Create Site dialog appears (Figure 2-7). This
dialog allows the user to select a Site Type,
Site ID, and COM Port. Protocol, Location,
and Network Type are automatically selected.
Use each of the dialog fields as follows:
Site Type − Use Physical for direct device connections or Network for connection to multiple devices. Network sites are available only if
the RS-485 adapter is used to connect to the
genset. A Physical connection connects to all
devices and is the recommended site type for
basic tool operation.
Note: Initial and Update Calibration features are disabled when the Site Type = Network.
Network Type − If the Site Type is set to Network, the Network Type is automatically set to
MONNet.
Site ID − A description of the connection site
(for example, COM1, RV connection).
Location − Automatically set to Local.
COM Port: − Enter the COM port for devices.
Note: To use COM3 or COM4 with InPower
ONAN, use the following example to create
them and to add them to the Site List.
The following example describes how to add a
new COM port.
Example: To add a COM3 port, click on the
Add button in the Site Setup dialog. Select
Physical from the Site Type drop-down list.
Enter the Site ID.: COM3. Protocol: is automatically set to mon and the Location: is automatically set to Local. Set the COM Port: to 3.
When finished, click the OK button to save the
entries. The new port will be added to the Site
List.
2-5
MONNET INPOWER ONAN
SETUP
drop-down list. Select Network Type MONNet. Enter a Site ID. Enter 1 (or the desired
com port) for the COM Port. Click on the OK
button to create the new site (Figure 2-8).
Refer to information earlier in this section for a
general description of the Setup feature.
Launch the Setup program from the Start
menu − Power Generation program group.
In this example a new site will be created specifically for connecting to a MONNet
(PCCNet) network.
Select the MONNet site from the site list and
note that the Device Setup feature is disabled
(Figure 2-9). When InPower ONAN is connected to a MONNet site it automatically
checks the number of devices that are connected to the site and shows the active devices
under the site. Click on the the Setup Apply
button to save the device setup. Click on the
OK button to exit the Device Setup dialog.
FIGURE 2-8. MONNET SITE SETUP
Select the Site Setup tab and then click on the
Add button, located below the Site List.
Create a new site for connecting to the MONNet. Select the Site Type Network from the
FIGURE 2-9. MONNET DEVICE SETUP
A typical connection for a MONNet application is shown in Figure 2-10.
FIGURE 2-10. MONNET CONNECTION
2-6
3. InPower ONAN Basics
This section describes InPower ONAN’s user
interface features.
command will be displayed in black type—indicating that the feature is available.
STARTING INPOWER ONAN
• To display the list of options under a menu
entry, move the mouse pointer to the menu
name and click on the mouse button.
(Clicking refers to using the mouse select
button, typically the left button.)
Start InPower ONAN by selecting Programs
from the Start menu. Click on Power Generation and then click on InPower ONAN. The
programs in the InPower ONAN program
group will be displayed. Click on InPower
ONAN, from within the InPower ONAN
group, to launch the InPower ONAN service
tool application and display the InPower
ONAN Main Window (Figure 3-1).
• To select an option from a menu list, move
the mouse pointer to the option name and
click on it.
The Toolbar provides direct graphical interface shortcuts to some of the more frequently
used menu options. Buttons on the Toolbar
represent frequently used tool functions.
THE MAIN WINDOW
The main window, named Device Explorer,
includes the Menu Bar, the Toolbar, the Status Bar, and the left and right window panes.
The Menu Bar contains the groups of commands that are used to access tool functions
and features. A list of menu options is available
under each main menu entry (Figure 3-2).
The InPower ONAN Menu Bar expands to
display additional menu features when InPower ONAN is connected to a device or a file.
When a Menu Bar command is grayed
(dimmed), the command is not available. You
may need to select another action (such as connecting to a port or device) before the grayed
When a Toolbar button is grayed (dimmed),
the shortcut to that command is not available.
You may need to select another action (such as
connecting to a device or file) before the
grayed command will be displayed in color (or
black type)—indicating that it is available.
Placing the mouse pointer on a Toolbar button, the Status Bar describes the function of
the button. The Status Bar also shows a description of operations as they occur.
The left window pane works like Windows Explorer to navigate the directory tree. The right
window pane displays the contents (or screens)
for the item selected in the left window pane.
Menu Bar
Toolbar
Status Bar
Left Pane Used To Navigate
the Directory
Right Pane Displays Contents of the
Item Selected in the Left Pane
FIGURE 3-1. MAIN WINDOW
3-1
Add Site
Connect
Disconnect
Connect
Disconnect
Preview and Print Selected Features... Ctrl-P
Find INCAL
Save Adjustments
Capture to file...
Initial Calibration...
Update Calibration...
Exit
Copy
Ctrl-C
Find
Find Next
Find Previous
Ctrl-F
F3
Shift-F3
Toolbar
Status Bar
Split
Fault Trees
Snapshot...
Stripchart
Monitor
View Fault List
Refresh Parameters Ctrl-R
Search for Help On...
Help Contents
Shift-F1
F1
How to Use Help
Service and Support
About Device Explorer...
FIGURE 3-2. MENU SYSTEM CONTENTS
3-2
MENU DESCRIPTIONS
This section provides a brief description of the
functions performed by each of the InPower
ONAN menu commands. Some of the menus
are not displayed until the tool is connected to
a Port (COM port or .CAP file).
Several of the menu features have Toolbar
shortcuts (see Figure 3-3), and some features
can be enabled simply by double clicking on
the item from the directory tree in the left window.
when referring to a controller such as the Genset control.
Use InPower ONAN to change a device’s trims
and settings, then use the Device menu to Save
Adjustments. The Capture to a File menu is
used to save the device’s parameters (Refer to
the Capture File section for details on using
Capture files). The Initial Calibration and
Update Calibration menus are used to calibrate a device and, if necessary, update the calibration. For more information on Calibration,
see Sections 7 and 8.
Port
Edit
The Port menu allows the user to Connect to
and Disconnect from a port. InPower ONAN
uses the term Port to refer to either a COM
Port or a .CAP(ture) File, including Simulator
files. The Port menu also allows the user to
Add a local Site, Find InCAL calibrations,
and it has an Exit selection for exiting InPower
ONAN.
In order to connect to a COM port, the PC must
be physically connected to a device via the correct interface harness.
The Edit menu works within the directory of
the connected device to Find a specified string
of data. The Edit menu can also be used to
Copy and Paste selected data.
View
The View menu is used to view data from the
connected device in a Monitor display or
Strip Chart display.
Help
The Help menu commands are used to find online information about using InPower ONAN
and Windows. Help is also used to display Service and Support information and to obtain InPower ONAN product and version information.
Device
The Device menu is used to Connect to, and
Disconnect from, a device, and for performing
read and write functions with a connected device. InPower ONAN uses the term device
3-3
USER INTERFACE
Connect/Disconnect: Use to either connect to,
or disconnect from a site. If connecting to a
port (COM or file) and only one device exists,
then InPower ONAN connects to the device
automatically. This button toggles between the
Connect and Disconnect icon, depending on
whether the user is connected or disconnected.
In addition to the Menu commands, frequently
used commands have toolbar access. Only
commands applicable to the current active
window are enabled. All other commands are
grayed out. InPower ONAN also uses dialog
boxes whenever the user must enter information.
View Faults: Displays the Fault Information
Window for the selected device. (Refer to Section 5).
Toolbar
Some frequently used commands have toolbar
shortcut buttons. Figure 3-3 shows the Toolbar
and lists what each of the buttons represent.
Online Help
Exit InPower ONAN
Clear Faults
Save Trims
Monitor
Strip Chart
Refresh (Parameters)
Fault Information System
View Faults
Disconnect
Connect
FIGURE 3-3. TOOLBAR
3-4
Fault Information System: Not available with
InPower ONAN version 6.0.
Refresh: Provides an immediate update of all
the parameter values for a connected device.
Strip Chart: Launches the Strip Chart application and brings up the default charting
screen for the connected device. (Refer to Section 9.)
Monitor: Launches the Monitor application
and brings up the default Monitor screen for
the connected device. (Refer to Section 6.)
Save Trims: When connected to a device, the
Save command allows adjustment changes for
trims and settings to be written to the device.
Clear Faults: Not available with InPower
ONAN version 6.0.
Exit: Used to close the InPower ONAN program.
Help: Brings up the InPower ONAN online
help file.
A dialog box is a window that requires information from the user. Often, when you select a
function or menu option, the software will display a dialog box. You will then provide the required information by selecting an item from a
list, by clicking on an option button, or by entering text. Numerous different dialog boxes
are used with InPower ONAN. The dialog
boxes are described throughout this manual.
The following rules will apply to all the dialog
boxes and system messages unless specified
otherwise.
• • The Cancel button allows you to close
and exit a dialog box without saving any
modifications, and without executing any
commands.
• • The OK button allows you to save any
changes made and/or execute a command
and close the dialog or message box.
All lists that the dialog boxes display are sorted
alphabetically.
Dialog Boxes
3-5
NOTES
3-6
4. Genset Service
ator’s Manual for important safety precautions.
This section describes how to use InPower
ONAN for making adjustments and performing tests on a genset. When the user is connected to a genset, they can also access the
Monitor and Fault features. These features are
described in Sections 5 and 6.
You must be connected to the genset in order to
write adjustment trims and setting changes to
the controller, and to temporarily send test
commands to the genset controller. The features described may not apply to all control
types.
GENSET SERVICE
InPower ONAN performs several functions
including genset service and diagnostic functions. The Adjustment feature is used to perform service adjustments and trims.
Connecting to a Genset
Connection between the service PC and the
genset is made with a special RS-232 interface
harness.
The Test feature is used for diagnostics. Test is
used to temporarily override a variety of input
and output parameters, as described in the Test
section.
Figures 4-1 and 4-2 show two types of connections to a genset in a recreational vehicle. Figure 4-3 shows how to connect to a marine genset. The interface harness from the service PC
can be connected to the engine harness at the
remote connector. Disconnect remote connections and connect the tools. Interface harnesses
are available for all connection methods.
WARNING Electrical shock and moving
parts can cause severe personal injury or
death. Notify personnel before starting a
generator set. Refer to the equipment Oper-
P2 Connector
for Diesel
Gensets
P1 Connector
for Gasoline or
LPG Gensets
Interface Harness
J1 to P8 Connector
on the Genset
PC Running InPower ONAN
FIGURE 4-1. INPOWER ONAN SERIAL CONNECTION FOR HDKCx AND DKHA DIESEL
GENSETS AND HGJAA, HCJAD, HGJAE, AND HGJAF GASOLINE/LPG GENSETS
4-1
P3 Connector (Used
for connecting to an
inverter, transfer
switch, or display) P2 Connector
for Diesel
Gensets
P1 Connector
for Gasoline or
LPG Gensets
Interface Harness
J1 to P8 Connector
on the Genset
DB9
Connector
PC Running InPower ONAN
RS-232 to RS-485
Converter
FIGURE 4-2. INPOWER SERIAL CONNECTION FOR HDKAx (STARTING WITH SPEC K),
810HQD, 1215HQD, and 1218HQD DIESEL GENSETS
P4 Connector to J4
Connector (Remote
Connection)
P2 Connector to
Displays and/or
Network Module
PC Running InPower ONAN
RS-232 to RS-485
Converter
FIGURE 4-3. INPOWER ONAN SERIAL CONNECTION FOR MARINE GENSETS (MDKBH −
MDKBS, MDDCx, AND MGKBx [STARTING WITH SPEC C])
4-2
Connecting to an HQD Inverter,
Transfer Switch, or Display
from the service PC can be connected to the inverter or transfer switch. The interface harness
from the service PC must be connected to an
adapter harness that is connected to the display
and a power source. Connections to these devices require an RS-232 to RS-485 communications converter. Interface harnesses are
available for all connection methods.
InPower ONAN can also be used with recreational vehicles with an HQD generator to
communicate with the inverter, transfer
switch, or display.
Connection between the service PC and the device is made with a special RS-232 interface
harness.
Figure 4-4 shows how to connect to an inverter
or a transfer switch. Figure 4-5 shows how to
connect to a display. The interface harness
NOTE: When using InPower is connected to
the transfer switch to do an update or an intitial
calibration, the display must either be asleep or
disconnected.
P3 Connector
to Inverter
or Transfer
Switch
Interface Harness
PC Running InPower
DB9
Connector
RS-232 to
RS-485
Converter
FIGURE 4-4. INPOWER SERIAL CONNECTION FOR AN HQD INVERTER OR TRANSFER
SWITCH
4-3
Power Source
P6 Connector
P3
Connector
P4
Connector
Adapter Harness
Interface Harness
P5 Display
Connector
PC Running InPower
DB9
Connector
RS-232 to
RS-485
Converter
FIGURE 4-5. INPOWER SERIAL CONNECTION FOR AN HQD DISPLAY
4-4
Left Pane Used To
Navigate the Directory
Display Directory Folders
By Clicking On The + Sign
And Hide Folders By Clicking On The − Sign
Right Pane Displays Contents Of The
Item Selected In The Left Pane
FIGURE 4-6. DEVICE EXPLORER − TYPICAL GENSET DEVICE FEATURES
Starting InPower ONAN
make sure the genset is powered and the control is awake, check all connections, and repeat
the procedure for connecting to the COM port.
Start InPower ONAN and connect the device
to the port (COM1, COM2, etc.) that matches
the COM port on the service PC that is being
used for the genset connection. The available
COM port sites are displayed in the Device Explorer directory (left pane). Double click on
the COM port or designated site (or click on the
COM port and then click on the Connect button on the toolbar).
If InPower ONAN has problems connecting to
a site, the message shown in Figure 4-7 is displayed. If, after a few seconds, the program
still cannot connect to the site, the connection
failure message shown in Figure 4-8 is displayed. If you get this message, click on OK,
make sure the selected COM port is available,
make sure the COM port is being used, verify
that the RS-485 adapter is correctly installed,
Note: To wake up the genset control, press
and hold the Stop button on the genset until
the switch’s status light is enabled.
FIGURE 4-7. CONNECTION PROBLEM
MESSAGE
4-5
FIGURE 4-8. CONNECTION FAILURE
MESSAGE
The InPower ONAN Device Explorer displays
the features that are available for gensets in the
directory, listed under the device in the left
pane. To view the genset features, make sure
the genset is powered up and the genset control
is awake, double click on the site (COM1,
COM2, etc), and expand the genset directory.
When you double click on a site the first time
after InPower ONAN is started, the Progress
messages shown in Figure 4-9 are displayed to
show you that InPower ONAN is connecting to
the device and verifying parameters. When
completed, a message is displayed to inform
you of the location where capture files were
placed (Figure 4-10). Click on OK to acknowledge the message.
If a connection failure message is displayed
when attempting to connect to an available device, make sure the device is turned on and
check all connections.
FIGURE 4-9. CONSUMER DEVICE
PROGRESS MESSAGES
FIGURE 4-10. ANNOUNCEMENT OF CAPTURE FILE LOCATION
4-6
Figure 4-6 shows some of the features listed
for gensets. Not all features are available with
all gensets. The features that are available include:
• Faults
CAUTION Improper adjustment can
cause equipment malfunction or damage.
Adjustments must be performed by trained
and experienced personnel only. Refer to
the equipment’s Installation and Service
manuals for adjustment sequences and procedures.
• Monitor
Adjustment Basics
• Adjustments
• Test
The Adjustments and Test features are covered in this section. The Monitor and Faults
features are covered in Sections 5 and 6.
To access the available adjustment(s), use Device Explorer to navigate the left pane until
you reach the desired folder, and click on it.
The right pane will display the parameter(s) associated with the adjustments for that feature.
Figure 4-11 shows the genset voltage parameter for Marine gensets that can be adjusted.
The right pane displays the Parameter description, Value, Units of measure and the
Last Time that the value was Read.
Placing the mouse pointer over a parameter
will bring up an information pop-up box (see
Figure 4-11). The pop-up provides a brief description of how the parameter value is used.
Note: Some values may require that the genset is running or stopped before they can be
edited. Refer to the parameter’s information pop-up for details.
When you are connected to a genset and the
Capture File feature (described in Section 10)
is enabled, a capture file of the genset control is
automatically saved. This feature is used to
create a copy of the gensets existing parameter
values. Always create a Capture file of the
device parameters for reference, prior to
making any adjustments.
GENSET ADJUSTMENTS
This section describes how to make genset parameter value adjustments for trims and settings.
Parameter Description
Parameter Value
Parameter Value
Unit of Measure
Adjustments
Information Pop-up Boxes
Last Time Parameter
Value Was Read
FIGURE 4-11. ADJUST PARAMETER INFORMATION
4-7
View Only
Parameter
Adjustable
Parameter
Drop-Down
List
Switch Icon
(Temporary
Setting)
View Only
Adjustable
Temporary
Setting
Factory
Setting
FIGURE 4-12. TYPICAL ADJUSTMENT FEATURES
Making Adjustments
click on the parameter to update the value
field or click on the Refresh button (lightning bolt) on the toolbar.
Located to the left of each parameter is an icon
that indicates if the parameter can be adjusted
or if it is for monitoring (refer to Figure 4-12).
The screwdriver icon is used for trims and settings that can be written permanently to the device (read and write). When the cursor is
placed over a parameter that can be adjust, the
range for the parameter is displayed (Figure
4-13). The magnifying glass indicates that the
parameter value is being monitored (read
only). The switch icon is used to display settings that can be temporarily written to a device. The wrench icon represents factory settings that are not adjustable with InPower
ONAN.
Each parameter displays the current value and
the units of measure for that value. Review this
information before making adjustments. Parameter value trims and settings are displayed.
Trims are numeric values that are entered directly into the Value cell. Settings are selected
from drop-down lists, and they consist of several types of values such as On/Off and Enable/
Disable.
To change a parameter value, double click inside the Value cell of the parameter that you
wish to change. The current value will be highlighted, if there are only a few choices, a drop−
down arrow will be displayed next to the Value.
If an arrow is displayed, click on the arrow to
view a drop-down list of the available settings.
Click on the desired setting, and it will be entered into the Value cell.
FIGURE 4-13. PARAMETER RANGE
Note: The value being monitored will not
automatically update. The user can double
4-8
If you do not see an arrow, begin typing the
new value, the new value entry will overwrite
the current value. If the value entered is above
or below the range of acceptable values, an error message dialog box will be displayed (Figure 4-14). Review the information in the dialog
box to see the value limits, before clicking OK,
to close the error message dialog box.
key or click on another parameter value to exit
the edit mode.
Saving Adjustments: Adjustments are written
to the device as they are entered. To make these
changes permanent, click on the Save Adjustments button (floppy disc) on the toolbar or
click on the Device menu and select Save Adjustments. Changes in adjustments will immediately alter the device’s performance.
After the Save Adjustments button is selected, a Save Adjustments dialog is displayed.
This feature allows you to view and confirm
your changes by clicking on Save. You can
make final edits within this dialog by double
clicking inside the New Value box and entering
a new parameter value or you can reset all of
your changes by clicking on the Cancel button.
FIGURE 4-14. ADJUSTMENT ERROR
Saving Adjustments
Edit Mode: When selected, a parameter value
remains in the edit mode (to change a numeric
value or select from a drop-down list). When
finished making adjustments, press the enter
If the user loses connection with the device before saving an adjustment, the change will not
be saved.
4-9
TEST
•
•
•
•
•
•
•
Power Latch Override Command
Power Latch Override Status
Inverter Enable Override Request
Inverter Enable Override Command
Inverter Enable Output Status
Governor Output Override Request
Governor Output Override Command
(in percent)
• Governor Output Override Status
• Set High Idle
This section describes each group of tests
listed in the Test directory. The Self Test feature can be used as a quick check to determine
if the genset control is responding, by sending
control inputs that should activate the control
outputs. The other Tests are used for performing more specific test functions.
The Test parameter values are adjustable (see
Figure 4-15). Some parameters have a numeric
value that can be changed while others have
values that can be selected from a drop-down
list.
The Test feature is a diagnostic tool that is used
to perform internal self-checks on the device
(Self Test). Use InPower ONAN to verify inputs and outputs of the device, and test device
protection functions (like Overspeed).
After changing a Test parameter, the user can
observe or measure the results of the changes.
Note: There are two types of Test Commands: maintained inputs and momentary
inputs. When a maintained input is set to active, the input will remain active. The InPower ONAN user MUST set the input back
to inactive, when they are finished with the
test or before leaving the site, otherwise the
command will remain active.
Momentary inputs automatically change
state to inactive after one second.
Maintained inputs generally have the screwdriver icon next to the parameter name and momentary inputs have the switch icon next to the
parameter name.
The Test directory may contain the following
groups (folders) of Test options:
•
•
•
•
•
•
•
•
•
•
•
•
•
•
•
•
Override Requests
Starter Override Request
Starter Override Command
Starter Override Status
Glow Plugs Override Request
Glow Plugs Override Command
Glow Plugs Override Status
Fuel Pump Override Request
Fuel Pump Override Command
Fuel Pump Override Status
Run Output Override Request
Run Output Override Command
Run Override Status
Status Light Override Request
Status Light Override Command
Status Light Override Status
Power Latch Override Request
This test option allows you to enable or disable
an override for each of the eight devices.
Override Commands
For the starter, glow plugs, fuel pump, run output, status light, power latch, and inverter, this
test option allows you to set the override command to On or Off. For the governor output,
this test option allows you to set the range from
0 to 100%.
Pressing the Stop button disables any override.
Overrides are active for 60 seconds, and then
are disabled.
WARNING Overriding genset command may result in damage to the genset. Only trained and experienced personnel should override genset commands.
4-10
Override Status
output from 0 to 100%.
For the starter, glow plugs, fuel pump, run output, status light, power latch, and inverter, this
test option allows you to see the current state of
the override status. For the governor output,
this test option allows you to vary the governor
Set High Idle
While the default value is Normal, this variable can be used to set a mechanical High Idle
Stop by setting the value to “Set High Idle.”
FIGURE 4-15. ADJUSTABLE TEST PARAMETERS
4-11
NOTES
4-12
5. Monitor
This section describes how to use the Monitor
features. There are two methods of monitoring
parameters, the user can create a custom Monitor dialog for viewing selected parameters, or
the user can view pre-selected parameters,
based on the device type.
pling rate and enable the data logging feature.
Sampling allows real-time data viewing. Data
logging stores information in a file for later
use.
The Monitor Dialog is displayed when the
Monitor command is launched from either the
Start menu or the Monitor button, on the InPower ONAN toolbar.
MONITOR AND DATALOG
The Monitor feature is used to view and record
(datalog) parameters. The user can monitor
preselected parameters with Device Explorer,
or they can select the specific parameters they
want to monitor and record, using the Monitor
Dialog feature.
InPower ONAN’s Device Explorer allows the
user to navigate and view preselected parameters. Refer to the section named Using Monitor, for details.
Monitor Dialog Features
The Monitor Dialog is shown in Figure 5-1.
This section describes how to use the Monitor
Dialog features.
File Menu: Used to create a New Monitor file
or to Open an existing Monitor file. Also used
to Save changes to an opened file or Save As...,
to save changes to a new file. Recent allows
the user to view recently opened files and is
used as a shortcut to open a file.
MONITOR DIALOG
The Monitor Dialog allows the user to select
the parameters they want to view, set a samMenu
Bar
Toolbar
Parameter
Information
Sample Rate
List Box
Sample Enable Check
Box
Datalog
File Name
Dialog Box
Logging Enable and
Generate
Report
Check
Boxes
Browse
Button
FIGURE 5-1. MONITOR DIALOG FEATURES
5-1
FIGURE 5-2. TYPICAL MONITOR DIALOG
Edit Menu: Use the Edit menu commands to
Add, Delete, Edit, Cut, Copy, and Paste parameters into and out of the Monitor Dialog.
View Menu: Use the View command to hide or
display the Toolbar and Status Bar.
Help Menu: Provides InPower ONAN Help
Topics and About Monitor help.
Note: If the list of variables is long, the actual log rate (see Figure 5-1) may be longer
than the selected rate.
Adding Parameters
Parameters can be added to the Monitor Dialog
by selecting Edit − Add from the Menu bar or
by clicking on the Add button, on the toolbar.
The Add command launches InPower ONAN.
Use Device Explorer to locate, select and copy
the parameters that you want to add to the
Monitor dialog.
Sampling: The Monitor dialog will sample at
the selected setting. To select the sample rate,
click on the Sampling − Enabled check box
(enabled when checked). Enabling the Sampling feature activates the Sampling Rate list
box. Select the desired sampling rate from the
list box. Sample rates are available from 0.05
seconds to 60 seconds.
Logging: Logging allows the user to log parameter information to a .LOG file (at the selected Sampling Rate). Sampling must be enabled to use this feature. Before enabling data
logging, enter a name in the file dialog. The log
file uses the tab delimited file format. To select
the Logging feature, click on the Logging −
Enabled check box (enabled when checked).
Enabling the Logging feature starts datalogging. To stop data logging, disable the Logging check box. Data can be logged to the default (Monitor.LOG) file. The Browse button
allows the user to locate and overwrite a .LOG
file in another directory.
After selecting a parameter, use the drag-anddrop procedure to add the parameter to the
Monitor Dialog. (Or use the right menu button
to Copy it, then move the cursor to the Monitor
Dialog and use the right menu button again to
Paste the parameter into the Monitor Dialog.)
Monitor settings can be saved to a template
(.TPL file). These files are saved in the Monitor subdirectory of InPower ONAN. The template file stores the COM port information, this
prevents the file from working on another
COM port.
Each monitor screen provides the ability to log
sampled values into a tab delimited .LOG file.
This file format allows the data to be imported
into Microsoft Excel.
5-2
FIGURE 5-3. DEVICE EXPLORER − MONITOR DIRECTORY
USING MONITOR
When the user is connected to a device, the
monitor information displays current information (updated approximately every 0.05 seconds).
When the user starts InPower ONAN and connects to a Port and a Device (or .CAP file), the
Monitor directory will appear below the device (or file) in the Device Explorer menu (Figure 5-3). The Monitor directory contains the
following sub-directories.
If the user connects to a capture file, the information will represent the parameter values at
the time the capture file was created.
• Metering
• Product Info
The user can manually update a parameter value by double clicking on the parameter.
− Control
− Genset
Each group of Monitor features are described
in this section.
• Usage History
5-3
FIGURE 5-4. MONITOR − METERING (RV GENSET SHOWN)
METERING
− Control directory is used primarily to identify the control and the current version of the
software installed in the control.
The parameter displayed on the Metering directory varies from genset to genset.
The parameters displayed on the Product Info
− Control directory varies from genset to genset.
PRODUCT INFO − CONTROL
The information included in the Product Info
FIGURE 5-5. MONITOR − PRODUCT INFO − CONTROL (RV GENSET SHOWN)
5-4
GENSET
MODEL
GENSET
SERIAL
NUMBER
FIGURE 5-6. MONITOR − PRODUCT INFO − GENSET
PRODUCT INFO − GENSET
tional Minutes parameters. Only the Displayed
Operational Minutes parameter can be adjusted.
All Product Info − Genset information directories for newer model gensets (2005 or newer)
include the genset model and serial number
(see Figure 5-6). Some also include Control
Operational Minutes and Displayed Opera-
NOTE: With some generator models, the serial number is displayed in a text string and not
as shown in Figure 5-6.
5-5
FIGURE 5-7. MONITOR − USAGE HISTORY
USAGE HISTORY
• Load Period <50% − Displays the number
of minutes the unit was operated between
26 and 50% of load
• Load Period <75% − Displays the number
of minutes the unit was operated between
51 and 75% of load
• Load Period >75% − Displays the number
of minutes the unit was operated at greater
than 75% of load
• Session Period <30min − Displays the
number of times the unit was operated for
greater than 2 but less than 30 minutes
• Session Period <120min − Displays the
number of times the unit was operated between 31 and 120 minutes
• Session Period <240min − Displays the
number of times the unit was operated between 121 and 240 minutes
• Session Period >240min − Displays the
number of times the unit was operated for
longer than 240 minutes
Only the Displayed Operational Minutes parameter can be adjusted.
The Usage History information allows the
user to view records related to the devices run
time and events. Figure 5-7 is an example of a
list a parameters available on a typical genset.
The Usage History parameters can vary from
genset to genset. Parameters listed may include the following.
• Control Operational Minutes
• Displayed Operational Minutes
• Number of Start Attempts
• Number of Starts − Displays the number of
times the genset started and reached run
mode
• Number of Overcranks − Displays the
number of times the genset cranks but fails
to start
• Load Period <25% − Displays the number
of minutes the unit was operated at less
than or equal to 25% of load
5-6
6. Fault Information
view Faults for a connected device. Current
fault information for a device is only available
when you are connected to the device.
This section describes the fault information
features available for consumer products.
Three categories of fault information are available with RV gensets: Advanced Fault Info,
Fault History, and Fault Occurrences. Marine gensets include the same three categories
of fault information plus an additional category, Fault Bypass Info.
The Fault Information Window displays detailed information for each of the parameters
listed in each category.
To access the Fault Information Window,
start InPower ONAN and connect to a port,
then connect to a device. To view the fault categories, select the device name and either expand the device directory or else click on the
View Faults shortcut button (Figure 6-1).
Each fault is represented by a fault code indicating a particular malfunction or abnormal
condition within the device.
FAULT INFORMATION
Use the InPower ONAN Device Explorer to
FIGURE 6-1. FAULT INFORMATION WINDOW FOR RV GENSET
6-1
FIGURE 6-2. ADVANCED FAULT INFORMATION
Advanced Fault Information
active fault codes for a connected device and
the last recorded faults that occurred (some
display the last five faults).
The Advanced Fault Information window
(Figure 6-2) is for factory use only. This window shows the number of faults enabled in the
software. For some gensets, it also shows the
number of fuel faults enabled in the software.
NOTE: The time listed in the Time Last Read
column is the time that InPower last read the
fault; it is not the actual time of occurrence.
To find information about fault codes and how
to correct faults, refer to the Fault Help menu
(see page 6-5). Use this information to match
a specific fault to the symptoms observed by
the operator. This information can help you determine which fault to address first.
NOTE: The time listed in the Time Last Read
column is the time that InPower last read the
fault; it is not the actual time of occurrence.
Fault History
The Fault History window (Figure 6-3) lists all
FIGURE 6-3. FAULT HISTORY
6-2
FIGURE 6-4. FAULT OCCURRENCES
Fault Occurrences
occurred.
The Fault Occurrences window (Figure 6-4)
lists all possible faults that are available with
the device and the number of times each fault
NOTE: The time listed in the Time Last Read
column is the time that InPower last read the
fault; it is not the actual time of occurrence.
6-3
FIGURE 6-5. FAULT BYPASS INFORMATION (FOR SELECT MARINE GENSETS ONLY)
Fault Bypass Info
Clearing Inactive Faults
Fault Bypass Information is only available
with Marine MDDCx gensets. This screen displays the number of minutes the control was
operated in fault bypass mode and other events
that may have occurred while in fault bypass
mode. If any of these events occur, a number is
placed in the Value column.
InPower ONAN does not allow removal of an
individual inactive fault. The Clear Faults
button is disabled.
To clear faults, press the Stop or Start switch on
the genset, as described in the genset Operator’s Manual.
6-4
FIGURE 6-6. ONAN FAULT INFORMATION HELP FILES
ONAN FAULT INFORMATION
that can occur with each genset model. Each
individual fault includes a fault description, a
list of possible causes, and diagnosis and repair
procedures.
Onan Fault information is available from the
Help menu. It includes a list of possible faults
6-5
NOTES
6-6
7. Initial Calibration
ABOUT INITIAL CALIBRATION
INITIAL CALIBRATION SETUP
Initial Calibration Setup for Gensets
The Initial Calibration feature is used to download a calibration file into a corrupt device that
will not respond to an Update Calibration. An
Update Calibration should be used whenever
possible. Initial Calibration should be used as a
recovery method only. This section covers the
procedures for performing an Initial Calibration.
You must connect the service PC to the genset
in order to perform either an Initial Calibration
or an Update Calibration procedure.
Connection between the service PC and the
genset is made with a interface wiring harness
and, if needed, an RS-232 to RS-485 converter.
Connections are shown in Figures 7-1, 7-2, and
7-3. The appropriate interface harness kit is
listed in Section 1.
NOTE: InPower ONAN calibration fails
if the INCAL CD is being accessed from
a shared drive.
CAUTION Improper calibration can
cause equipment malfunction or damage.
Adjustments must be performed by trained
and experienced personnel only.
P2 Connector
for Diesel
Gensets
P1 Connector
for Gasoline or
LPG Gensets
Interface Harness
J1 to P8 Connector
on the Genset
PC Running InPower ONAN
FIGURE 7-1. INPOWER ONAN SERIAL CONNECTION FOR HDKCx AND DKHA DIESEL
GENSETS AND HGJAA, HCJAD, HGJAE, AND HGJAF GASOLINE/LPG GENSETS
7-1
P3 Connector (Used
for connecting to an
inverter, transfer
switch, or display)
P2 Connector
for Diesel
Gensets
P1 Connector
for Gasoline or
LPG Gensets
Interface Harness
J1 to P8 Connector
on the Genset
DB9
Connector
PC Running InPower ONAN
RS-232 to RS-485
Converter
FIGURE 7-2. INPOWER SERIAL CONNECTION FOR HDKAx (STARTING WITH SPEC K),
810HQD, 1215HQD, and 1218HQD DIESEL GENSETS
P4 Connector to J4
Connector (Remote
Connection)
P2 Connector to
Displays and/or
Network Module
PC Running InPower ONAN
RS-232 to RS-485
Converter
FIGURE 7-3. INPOWER ONAN SERIAL CONNECTION FOR MARINE GENSETS (MDKBH −
MDKBS, MDDCx, AND MGKBx [STARTING WITH SPEC C])
7-2
Initial Calibration Setup for HQD Inverters, Transfer Switches, and Monitors
Connection between the service PC and the device is made with a interface wiring harness
and, if needed, an RS-232 to RS-485 converter.
Connections are shown in Figures 7-4 and 7-5.
The appropriate interface harness kit is listed
in Section 1.
InPower ONAN can also be used with recreational vehicles with an HQD generator to
communicate with the inverter, transfer
switch, or display. You must connect the service PC to the device in order to perform either
an Initial Calibration or an Update Calibration
procedure.
CAUTION Improper calibration can
cause equipment malfunction or damage.
Adjustments must be performed by trained
and experienced personnel only.
P3 Connector
to Inverter
or Transfer
Switch
Interface Harness
PC Running InPower
DB9
Connector
RS-232 to
RS-485
Converter
FIGURE 7-4. INPOWER SERIAL CONNECTION FOR AN HQD INVERTER OR TRANSFER
SWITCH
7-3
P6 Power
Source
Connector
P3
Connector
P4
Connector
Adapter Harness
Interface Harness
P5 Display
Connector
PC Running InPower
DB9
Connector
RS-232 to
RS-485
Converter
FIGURE 7-5. INPOWER SERIAL CONNECTION FOR AN HQD DISPLAY
7-4
service PC to the device, as shown in Figure
7-1 thru 7-3.
Connect to the port by double clicking on the
port that matches the COM port on the service
PC being used for the genset connection
(COM1, COM2, etc.) or the Site setup (Section
2). The available COM ports are displayed in
the Device Explorer directory (left pane).
Note: Initial Calibration and Update Calibration are only available with a physical
connection type (MON protocol).
Select the device by clicking on it (Figure 7-6).
INITIAL CALIBRATION
Use of a Capture File can reduce the amount of
adjustment that may be required when replacing the base board. If the old base board is operational, and a capture file has not already
been created, correct any active faults (if possible). Create a Capture File following the procedure described in the Capture File section of
the InPower User’s Guide.
Connect the interface wiring harness from the
FIGURE 7-6 MAIN WINDOW
7-5
FIGURE 7-7. MAIN WINDOW
After connecting to the device, click on the Device menu and click on Initial Calibration
(Figure 7-7).
Refer to the genset engine label for the calibration part number (Figure 7-8). The model family is needed to select the correct calibration.
If a pop-up message is displayed, indicating
that there is an error loading INCAL, either the
CD drive letter was not correctly specified during InPower ONAN installation, the CD is not
installed, or it is defective. INCAL is included
on the installation CD. If the CD is in the CD
drive, click on Yes, and specify the correct CD
drive designation. If the CD is not in the drive,
insert the CD and click on No.
7HGJAD−1910A
D000012345
[The engine family designation, engine displacement, statement of compliance with the applicable EPA and / or California emissions regulations,
including the compliance period or category, appear
in this block on the actual nameplate on the genset.]
FIGURE 7-8. GENSET DATAPLATE AND
CALIBRATION LABEL
7-6
FIGURE 7-10. INCAL LOCATION FOUND
FIGURE 7-9. FIND INCAL
Selecting Calibration Part Number
The INCAL CD location can be verified by
clicking on the Port menu and clicking on
Find INCAL (Figure 7-9). Select INCAL CD
drive designation from the drop-down list,
then click on Verify INCAL Structure. A
pop-up message will verify the INCAL location (Figure 7-10).
The Select Calibration window (Figure 7-11).
lists all of the calibration files that are available
from the Power Generation INCAL CD.
Use the scroll bar to locate the Calibration
model that matches the model shown on the
genset engine label (Figure 7-8).
The data, displayed in each column, can be
sorted in ascending or descending order by
clicking on the column heading.
Click on the matching calibration part number
to select it. When the matching calibration part
number for the genset model is selected, click
on Next, to continue the Initial Calibration.
FIGURE 7-11. SELECT CALIBRATION
7-7
FIGURE 7-12. HISTORY
History
choose the correct calibration file.
If History displays the calibration file part
number that was previously selected, click on
the Next button to proceed to the Save and Restore Parameters feature.
The History window is displayed when the
NEXT button is selected (Figure 7-12). This
feature displays the calibration file Revision
History, Calibration File (part number) and
Revision Description.
Save and Restore Parameters
If this window displays a calibration file that
does not match the model listed on the genset
engine label, click on the Back button to
The Save and Restore Parameters window displays the Parameter Descriptions, Values, and
Units of measure information (Figure 7-13).
FIGURE 7-13. SAVE AND RESTORE PARAMETERS
7-8
Use Capture File Feature
(Figure 7-14). Using a capture file, during an
initial calibration, will only restore the dataplate information. To restore the remaining
capture file parameter settings, click on the
box next to the Overlay Capture File After
Calibration. If this feature is not used, the capture file can still be used after performing the
initial calibration to overwrite the parameter
settings. This is not recommended because
user data will be cleared during the download.
From the Save and Restore Parameters window, click on the Set Data Plate From Capture File button to select the capture file
created from the previous control (if available).
The Save and Restore window will display the
capture file name selected(Figure 7-15).
FIGURE 7-14. SELECTING A CAPTURE
FILE
Verify that the information displayed in the parameter list matches the information shown on
the genset, alternator and engine data tags. Use
the scroll bar to review all of the information. If
any information needs to be corrected, double
click on the data and enter the correct information.
If using the Set Data Plate From Capture File
button, browse to the Capture file location and
select the file, then click on the OK button
After confirming that the correct information
is displayed in the parameter list, click on the
Next button.
FIGURE 7-15. CAPTURE FILE SELECTED
7-9
Calibration Download
WRITING ADJUSTMENTS FROM
A CAPTURE FILE
The calibration file download may take a few
minutes or longer, depending on the service PC
and the communication port.
When the download is complete, a final popup message informs the user if the download
completed successfully. If the download completed successfully, click on the OK button to
close the pop-up message. (Figure 7-16).
If the pop-up message indicates that the download was not successful, repeat the Initial Calibration procedure. If the download is still not
successful, record the error message and contact the Service and Support number listed in
the front of this User’s Guide.
If a capture file was made prior to the control
being replaced, and the Overlay Capture File
After Calibration feature was not used, the
capture file can still used after performing the
initial calibration. The previous parameter adjustments and settings, stored in the capture
file, can be written to the new control (device).
Refer to Section 10 (Capture File). Follow the
procedures described under Writing to a Device.
Note: Read only information cannot be
written to when overlaying a capture file.
FINAL ADJUSTMENTS
Prepare to start the genset and test the operation of the entire system. Refer to the genset
service manual for adjustment procedures and
observe all safety precautions described in the
genset service manual.
After completing all necessary adjustments,
make a new capture file. Store a copy of the
capture file at the site and return a copy to Service for cataloging.
FIGURE 7-16. FEATURE LIST
7-10
8. Update Calibration
ABOUT UPDATE CALIBRATION
UPDATE CALIBRATION SETUP
The Update Calibration feature is used to replace a current calibration file with a newer
version from the Power Generation INCAL
CD. The new calibration file is written over the
current calibration file, in the genset baseboard.
Note: Initial Calibration and Update Calibration are only available with a physical
connection type (MON protocol).
Calibration updates are performed at the site,
using InPower ONAN. This section describes
the procedures for performing Update Calibration.
The service PC must be connected to the genset in order to perform the Update Calibration
procedure.
NOTE: InPower ONAN calibration fails
if the InCal CD is being accessed from a
shared drive.
Connect the serial communication cable from
the service PC to the device, as shown in Figure 7-1 thru 7-3.
Connection between the service PC and the
genset is made with a interface wiring harness
and, if needed, an RS-232 to RS-485 converter.
Figures 7-1 thru 7-3 (Section 7) show the
methods of connection.
CAUTION Improper calibration can
cause equipment malfunction or damage.
Adjustments must be performed by trained
and experienced personnel only.
8-1
FIGURE 8-1. MAIN WINDOW
Connecting to the Device
UPDATE CALIBRATION
After connecting to the device, click on the Device menu and click on Update Calibration
(Figure 8-2).
If prompted with the message, “Could not find
a matching Calibration Part Number ...,” click
on the OK button. Use the Initial Calibration
feature (Section 7) to update the calibration
file.
After selecting Update Calibration, the History window is displayed.
Connect to the port (COM1, COM2, etc.) that
matches the COM port on the service PC being
used for the genset connection. The available
COM ports are displayed in the Device Explorer directory (left pane). Double click on the
COM port (or click on the COM port and then
click on the Connect button, on the toolbar).
Select the device by clicking on it. Device Explorer displays the features that are available
for gensets (Figure 8-1).
FIGURE 8-2. UPDATE − DEVICE MENU
8-2
FIGURE 8-3. HISTORY
History
Note: Popup messages may be displayed behind an open window. To view all open windows, including popup messages, hold down
the Alt key and repeatedly press the Tab key
to view each open window.
The History window displays information
about the currently installed calibration part
number and calibration revision across the top
of the window (Figure 8-3).
The History window also displays information, from the Power Generation INCAL CD,
about the Revision History, Calibration File
part number and Revision Description.
The Save and Restore checkbox is used to
save the current adjustment trims and settings.
Make sure the checkbox is enabled (checked)
before proceeding.
Click on the Finish button to proceed with the
calibration update.
The message “Do you wish to calibrate the
controller now?” is displayed. (Figure 8-4).
Click on the Yes button to continue.
FIGURE 8-4. UPDATE NOW
When the download is complete, a popup message informs the user if the download completed successfully (Figure 8-5). Click on the
OK button to acknowledge.
FIGURE 8-5. COMPLETED
8-3
NOTES
8-4
9. Strip Chart
STRIP CHART
The Y-Axis displays the range of each parameter value. The Time that the sample was taken
for each interval is displayed at the bottom of
the chart.
The Strip Chart feature displays data in a
graphical form on a real-time strip chart. Up to
six parameters can be displayed in one chart.
Data is scrolled from right to left, so the most
recent data appears at the right.
Starting the Strip Chart Feature
The Strip Chart feature can be launched in two
ways:
1. Launch Strip Chart from the Windows
Start−Programs menu, under the Power Generation−InPower ONAN group
shortcuts.
2. Start InPower ONAN, connect to a device, then click on the Strip Chart button, on the InPower ONAN toolbar.
Starting a strip chart from InPower ONAN,
while connected to a device, allows InPower
ONAN to identify the device and display the
correct strip chart file type. This prevents accidentally opening a strip chart file for the wrong
device type.
If the chart file does not exist, Strip Chart will
display the File-Open screen, with a listing of
chart files in the Strip Charts directory.
Chart parameters can be saved to chart file
(.TPL file), allowing the user to save custom
parameter selections and settings. The chart
file will store the charts graph settings (Y-axis
limits, sampling rate, line styles, etc.) and port
identification. A chart file can be used with
other ports. Chart files are saved in the Strip
Charts directory.
Data is not logged using the Strip Chart feature, refer to the Monitor section if data logging is required.
Figure 9-1 shows a typical strip chart. Each of
the parameters contained in the chart are
named in the legend at the top of the chart.
Menu Bar
Parameter
Legend
Toolbar
Y-Axis
FIGURE 9-1. TYPICAL STRIP CHART
9-1
CREATING A CUSTOM
STRIP CHART
Immediately after the first parameter is added
to the Strip Chart graph, the applet automatically begins monitoring parameter values at
half-second intervals. The sampling rate may
be modified via the Options dialog, described
later in this section.
Strip charts can be customized by adding or deleting parameters, adjusting the sampling rate,
changing line styles, changing the Y-axis limits and making format changes.
The user can customize an existing strip chart,
or create a new strip chart and define each of its
properties. To create a new strip chart, launch
the Strip Chart feature from the Start-Programs menu, without specifying any chart file
to open.
Adding Parameters
Click on Add Parameters, from the Edit
menu, to launch InPower ONAN. To add parameters to the strip chart, drag individual parameters from InPower ONAN (right pane)
and drop the parameter on the strip chart. Multiple parameter selections may be dragged and
dropped on the Strip Chart, to add several parameters at once. Parameters can also be added
by selecting a parameter and using the Edit −
Copy command from InPower ONAN and the
Edit − Paste command from the Strip Chart
menu bar.
FIGURE 9-2. PARAMETER PROPERTIES
Parameter Properties Dialog
The Parameter Properties dialog, shown in
Figure 9-2, is accessible from the Edit−Properties menu.
The Name combo box, at the top of the dialog,
provides access to each of the parameters currently displayed on the Strip Chart. The user
may delete the selected parameter from the
strip chart by clicking on the Delete button.
Since parameters with different units of measure may be added to the graph, a separate Yaxis will be displayed for each graphed parameter.
The Data Ranges associated with the selected
parameter may be modified by entering new
values into the edit boxes. These new values
will control the minimum and maximum data
values displayed on the Y-axis of the graph.
As parameters are added to the graph, an additional Y-axis will appear, indicating the parameter’s description and unit of measure. A
new legend item will appear at the top of the
graph, indicating the point shape and color that
will be used when plotting the parameter’s values, and these values will automatically begin
to be displayed.
The Line Attributes may also be modified by
selecting a new line style from the Style combo
box. A new line color may be selected by
clicking on the Color button, which invokes
the Windows common Color dialog. Current
changes are applied after the user clicks on the
OK button, to close the dialog.
9-2
will be graphed, only the first six parameters
that have numeric values will be accepted.
File- Save: Allows saving the current selection of parameters to a chart file.
File - Save As: Allows saving the current set of
parameters to a new chart file name and/or
location.
File-Close: Closes the Strip Chart
Edit-Add Parameter: Allows adding parameters to the Strip Chart graph from InPower
ONAN. This command opens InPower
ONAN, allowing the user to select parameters
to be added to the Strip Chart. Drag individual
parameters from InPower ONAN and drop the
parameter on the Strip Chart graph.
Edit-Paste: Allows pasting the parameter(s)
from the Windows clipboard into the strip
chart. The Paste menu option will remain disabled until one or more parameters have been
cut or copied to the Windows Clipboard.
Edit-Properties: Opens the Element Properties dialog. (This feature can also be activated
by double clicking on the parameter names in
the strip chart’s legend.) The Element Properties dialog allows the user to perform a variety
of commands relating to the display properties
of the Strip Chart.
Options-Sampling: This option displays the
Sampling Rate dialog, which allows the user
to change the strip chart sampling rate. The
sample rate is adjustable from 0.05 seconds to
60 seconds.
Options-Sampling Enable: This option is
used to enable or disable the collection of sample data. A check mark is displayed next to
Sampling Enable on the Options drop down
menu to indicate that the feature is enabled.
Click once on Sampling Enable to stop collecting sample data. Click on it again to start
collecting sample data again.
FIGURE 9-3. SAMPLING RATE DIALOG
Sampling Rate Dialog
The Sampling rate feature is available from the
Strip Chart − Options menu. The Sampling
Rate dialog, shown in Figure 9-3, allows the
user to select the strip chart sampling rate.
Sampling can be enabled or disabled using the
Sampling Enable feature (see Strip Chart
Menu Bar Functions).
When finished customizing the strip chart,
choose the File−Save As... menu option.
Name the file and save in the Strip Charts directory.
Note: Saving a Custom Strip Chart saves
only the chart settings, it does not save (log)
data.
See Context Menu for additional commands
that are available for customizing strip charts.
Strip Chart Menu Bar Functions
This section describes each of the menu commands that are available from the Strip Chart
menu bar.
File-Open: Allows the user to specify a particular chart (.TPL) file to load from the list of
chart files, in the Strip Chart directory. Logged
data (.LOG file) can also be opened and
viewed with the Strip Chart feature.
After a .TPL file has been selected, the applet
will open the file and load the parameters and
settings from that file. Since parameter values
9-3
strip log files. The default file location is listed
on the menu (see Figure 9-4). If necessary, select the Browse button to select another location. Logging can be enabled from this menu.
When all adjustments are completed, click on
the OK button.
Options-Logging Enabled: This option is
used to enable the logging option to save a file
at the location set up with the Logging dialog.
If a strip chart log has already been created, the
message shown in Figure 9-5 is displayed.
FIGURE 9-4. LOGGING DIALOG
Options-Logging: This option provides you
with a means to assign a location for storing
FIGURE 9-5. LOGGING MESSAGE
9-4
point, area, two types of points with best fit
line, two types of points with best fit curve,
points with line, points with spline, spline, and
histogram chart types.
Data Shadows: This controls whether shadows will be placed behind plotting method
graphics. The shadows add depth to the images; however, they will slow image creation significantly when graphing many subsets and/or
points.
Grid Lines: This controls the horizontal and
vertical lines that make up the graphs grid. Possible values include horizontal and vertical
grid lines, horizontal grid lines only, vertical
grid lines only, or no grid lines.
Grid In Front: This controls whether the
graphs grid is placed behind or in front of the
plotting method graphics.
Graph and/or Table: This controls what is displayed in the graph’s area. Possible values include graph, table, or graph with table.
What to Table: This controls what information
is included in the objects table. Possible values
include tabling those subsets that are graphed
or tabling all subsets.
Point Label Orientation: This controls the orientation of the point labels. Possible values include automatic, horizontal, or vertical.
Mark Data Points: This controls whether
data-points are marked with a small circle.
Maximize: This function maximizes the graph
display. To return to the default display size,
click inside the solid bar at the top of the window or use the Esc key.
Customization Dialog: This function displays
the chart Customization dialog.
Export Dialog: Graphs can be exported in the
formats shown in Table 9-1, for the listed destinations. This dialog allows the user to print a
Strip Chart (see Printing a Strip Chart, Figure
9-8).
FIGURE 9-6. CONTEXT MENU FEATURES
(RIGHT MENU BUTTON)
Context Menu Features
The Context Menu, shown in Figure 9-6, may
be accessed by clicking on the right mouse button (or equivalent pointing device button)
while the cursor is inside the graph. This set of
menu items provides the users with additional
customization features.
Viewing Style: This controls the viewing style
of the object. Possible values include color,
monochrome, or monochrome with symbols.
Font Size: This controls the font size used in
the graph’s image creation process. The font
sizes available are large, medium, or small.
Note: It is recommended that the user
change the Font Size to the Medium setting,
or Large setting if only a few parameters are
being monitored. This selection will make it
easier to read the parameter legends.
Numeric Precision: This controls the number
of decimal places associated with the graph’s
data. Possible values include zero, one, two, or
three decimal places.
Plotting Method: This give you the option of
selecting the type of chart you wish to view.
Possible plotting methods include line, bar,
9-5
TABLE 9-1.
FORMAT
DESTINATIONS
Metafile
Clipboard, File, and Printer
Bitmap
Clipboard and File
OLE Object
Clipboard
Text / Data
Clipboard and File
Help: Displays graph−related help topics.
FIGURE 9-8. EXPORT − PRINT DIALOG
Printing a Strip Chart
A Strip Chart can be printed by using the Export dialog (Figure 9-8). Use the right menu
button to access the Export Dialog, then select
the Printer radio button and select the Print
button.
FIGURE 9-7. CHART CUSTOMIZATION
DIALOG
Viewing Logged Data
Logged data, created with the Monitor feature
(refer to Monitor Section 5) can be displayed
with the Strip Chart feature. Select Open from
the Strip Chart File menu. Select file type
.LOG and enter the file location and name.
Strip Chart will display logged data. Since the
data is not being displayed on a real-time basis,
the data is static. Use the left and right arrow
buttons, located on the keyboard, to navigate
the data within the .LOG file.
Chart Customization Dialog
An additional level of editing is available that
allows the user to customize the chart dialog.
To access this feature, double click within the
chart to display the Customization dialog.
This dialog has tabs for each of the editable
features.
Click on the desired tab to view the available
settings for that feature. These features can be
used to enhance the chart by changing border
colors, text size and colors, and many other
chart display features.
9-6
PRELIMINARY
10. Capture File
CAPTURE FILE
prompted to create one, depending on your setup selection (Section 2). Capture files can also
be created by selecting the Capture to file
command from the Device menu. This feature
displays the Capture File dialog (Figure
10-2).
InPower ONAN provides a method of extracting (capturing) a device’s parameter values.
Capturing saves device information in a file
that is identified with a .CAP extension. The
files are saved in the Capture Files directory
(Figure 10-1).
Capture files are used to store a copy of a device’s parameter values, History and Faults.
Capture files are read only files that can be
viewed after disconnecting from the device.
Capture files can also be used as a template to
write the captured settings to another device of
the same type.
The user names the file, and InPower ONAN
appends the file name with the .CAP extension. Capture files are not editable by InPower
ONAN (read-only). A capture file can be overwritten, allowing the user to re-capture parameters and settings to the same file.
Viewing a Capture File
To view a capture file, the user must connect to
it using InPower ONAN. Double click on the
Capture file name in the Capture Files directory structure. Capture file contents can be
viewed, like devices, using Device Explorer.
CREATING A CAPTURE FILE
A Capture files will be automatically captured
each time you connect to a site or you will be
FIGURE 10-1. CAPTURE FILE DIALOG
FIGURE 10-2. CAPTURE FILE DIRECTORY
10-1
PRELIMINARY
WRITING TO A DEVICE
The Edit − Copy and Edit − Paste features can
also be used to to write parameter settings from
a Capture file to a device. This feature can be
used to copy the entire Capture file, or individual folders or parameters.
Start by connecting to the Capture file, Use
Edit − Copy to copy the desired information
from the Capture file. When copying a folder
or individual parameters, use Device explorer
to display the desired folder or parameters in
the right pane. Hold down the Control key
while selecting the desired folder (s) or parameter(s) then use the Edit − Copy command.
Connect to the target device and use the Edit −
Paste feature to overwrite the target device’s
parameters with the parameter settings from
the Capture file.
Note: A capture file from a genset (for example) can be copied to another genset, but
it cannot be copied to any other device type.
Capture files can be used to overwrite the parameter values of a connected device (of the
same device type) with the parameter values
from a capture file. One capture file can be
used repeatedly (like a template) to configure
many devices of the same type.
To write to a device you must have registered
software of the correct device type.
To write from a Capture file, connect to the
Capture file first, then click on the target device, and connect to it. Next, select the Capture
file and drag-and-drop the Capture file onto the
target device. The message displayed in Figure
10-3 is displayed. To overwrite the device parameters, click on the OK button.
FIGURE 10-3. DEVICE MODIFICATION
MESSAGE
10-2
11. Simulator
SIMULATOR
If an arrow is displayed, click on the arrow to
view a drop-down list of the available settings.
Click on the desired setting, and it will be entered into the Value cell.
The simulator file(s) are stored in the Simulator directory. To run an InPower ONAN simulation, double click on the Simulator directory
and then double click on the desired simulator
file (*.CAP file).
Figure 11-1 shows the contents of a typical
genset Simulator file. The examples shown in
this section display files that are available with
an HDKAx genset.
InPower ONAN provides a means of demonstrating the service tool without connecting to
an actual device. A Capture file is used for simulation. This file contains most of the information that is normally displayed when you are
connected to a device.
Simulator files are read only, although during
simulation, the user may be allowed to make
editorial changes to help demonstrate the tool.
Any changes made during simulation will not
be saved.
FIGURE 11-1. TYPICAL SIMULATOR FILE
11-1
NOTES
11-2
12. Reports
This section describes how to create, save, and
print reports. Reports consist of parameter
groups and their values at the time the report
was created. Reports can be printed directly
from InPower ONAN, or they can be saved to a
file for use in a spreadsheet, database, or word
processing program.
CREATING A REPORT
additional folders, click on the + symbol next
to the folder or double click on the folder to expand it. Select the desired folder and use the
mouse or keyboard menu button to display the
pop-up menu (Figure 12-1). Select Preview
and Print Feature from the pop-up menu, to
create a report for the selected folder and display the Parameter List Report window
(Figure 12-2).
To create a report with more than one group
of parameters: Select each folder individually,
use the mouse or keyboard menu button to display the pop-up menu, click on Select Feature, in the pop-up menu. Each folder selected
will be marked with a check mark, to indicate
that it has been selected for use in the report
(Figure 12-1).
Start InPower ONAN and connect to a port,
then connect to a device (or file). Use the Device Explorer (tree view) to locate and select
the information you wish to include in the report.
Note: When selecting parameters for a report, be careful to avoid selecting too many
parameters. If a folder is selected that contains additional folders, the parameters of
all of the folders in the group will be selected.
After selecting the desired parameter groups,
use the Preview and Print Selected Features
menu pick from the InPower ONAN Device
menu to create a report and display the Parameter List Report window (Figure 12-2).
You can create a report from a single group of
parameters or from several groups of parameters. A few smaller reports are generally more
manageable than a very large report.
Selected folders can be deselected by clicking
on a folder with a check mark, then use the
mouse or keyboard menu button to display the
pop-up menu, click on Deselect Feature, in
the pop-up menu.
To create a report for a single group of parameters: Select the group folder, if it contains
Pop-up Menu
Check Mark
Indicates A
Selected
Feature
FIGURE 12-1. SELECTING FEATURES FOR A REPORT
12-1
Print Setup
Print
Send to File
View Options
FIGURE 12-2. PARAMETER LIST REPORT WINDOW
The Parameter List Report window allows
viewing the report contents. Each selected parameter group is shown. The window contains
a toolbar with a Print command button, a
Print Setup button, a Send to File button and a
drop-down list for selecting viewing magnification options. The window also has navigation arrows for moving between the pages of
the report.
Printed reports are organized according to the
InPower ONAN navigation directory. Each
group of parameters is printed in the same order that the information is displayed in the InPower ONAN directory structure.
PRINTING A REPORT
Each group of reports is titled with the directory location and name, the date the report was
printed, and the page number at the bottom of
each page. Reports are designed to print on either Letter (8 1/2 by 11 inch) or A4 size sheets.
Reports can be printed by clicking on the Print
button, on the toolbar. The standard Windows
print dialog is displayed.
InPower ONAN does not support narrow or
other non-standard printers, including 32-column printers.
12-2
SENDING A REPORT TO A
FILE
on the OK button and the Choose Export File
dialog is displayed (Figure 12-5).
Enter the file name and select the drive and directory location for the file, then click the OK
button to start the the export process.
Reports can be sent to a file by using the Send
to File button on the Parameter List window
toolbar. Click on the Send to File button, and
the Export Dialog will be displayed (Figure
12-3).
FIGURE 12-4. NUMBER AND DATE
FORMAT LOG
FIGURE 12-3. PRINT CAPTURE DIALOG
This window contains a Format dialog and a
Destination dialog. Use the Format dropdown list to select the desired file format.
VBE
In the Destination drop-down list, select Disk
File. Click on the OK button and a Pop-up
window confirming the Number Format and
Date Format is displayed (Figure 12-4). Click
FIGURE 12-5. CHOOSE EXPORT FILE
12-3
NOTES
12-4
13. Help
SERVICE AND SUPPORT
Use the Help menu to find information about
using InPower ONAN, to find Service and
Support information, and to find out about the
installed InPower ONAN product type and
software version.
The Help - ONAN Faults Information menu
lists information about how to troubleshoot
fault conditions for a given genset. To view this
information, click on the Help menu, then
click on Service and Support.
SEARCH FOR HELP ON...
ABOUT DEVICE EXPLORER
The Help - Search for Help On... feature allows searching for help on a specific topic or
keyword (standard Windows Help format).
Access this feature by clicking on the Help
menu, then click on Search for Help On... .
The Help - About... feature initiates the About
Device Explorer box (Figure 13-1). This box
displays the product type and software version.
The expiration date for the software is also
shown. To view this information, click on the
Help menu, then click on About....
CONTENTS
The Help - Contents feature provides access
to the list of subjects in the InPower ONAN
help file (standard Windows Help format). Access this information by clicking on the the
Help menu and then clicking on Contents.
HOW TO USE HELP
The Help - How to Use Help feature displays
the standard Windows Help Topics dialog.
Use this feature to find answers to basic Windows operation questions. Access this information by clicking on the the Help menu, and
then click on How to Use Help.
FIGURE 13-1. HELP − ABOUT
13-1
NOTES
13-2
A. Glossary
Calibrating − The process of reprogramming
a device. This requires the ESDN version of InPower ONAN.
out all the engine management functions (e.g.
timing, fueling).
Electronic Software Database & Network
(ESDN) − A worldwide Cummins corporate
database of released electronic software. It
provides calibration files reprogramming devices.
Calibration − Term used to describe the program and factory settings for a device.
Calibration Table − Name used to refer to a
Data Table, XY Table, or XYZ Table that contains one or more calibration variables.
Graphical User Interface (GUI) − A term
used to describe the way in which a user interacts with the software program.
Calibration Variable − Data that is stored in
the controller’s non-volatile memory, and
which may not be altered after sale by either a
customer or service technician.
Initial Calibration − Manually select software to download.
InPower ONAN − Name given to the Power
Generation Products based service tool.
Capture File − A capture (.cap) file contains
all of the trim values, monitor values, and table
values of a given device (e.g. Generator set).
This file can be thought of as a “template“ for
configuring other devices of the same type, or
it can be used as a backup file.
MON − A communications protocol for one
device connected to the service tool using
RS-485 and RS-232 serial communications.
All devices can communicate with the service
tool.
Channel − A channel is the physical communication media that connects the devices and
the properties of these media (such as transmission speed).
MONNet − A communications protocol for
more than one device connected to the service
tool using RS-485 communications only.
Network Connection − This term is used to
describe a connection using the MONNet protocol and an RS-485 adapter.
CSV File − Comma Separated Value file (same
as a comma delimited file). The file format
used by InPower ONAN to save datalog information. Allows the file to imported into Microsoft Excel.
Parameter − This term is used with InPower
ONAN to refer to properties whose values determine the behavior of a device. With InPower
ONAN there are two main types of properties;
trims that have a range of numeric values, and
settings that consist of a small number of predefined values such as On or Off.
Data Table − Data table is a structure containing a variable in each of the columns. The data
cells are viewed and edited in spreadsheet format.
Device − As used in InPower ONAN, refers to
any one of a series of application controllers
used in Power Generation applications. These
include: Generator-drive engine controllers,
Genset controllers and Automatic Transfer
Switch controllers.
Physical Connection − This term is used to
describe a connection using the MON protocol
and no RS-485 adapter.
Port − As used in InPower ONAN, it refers to
the channel by which a connection can occur.
Port connections can occur with COM ports, or
with Simulator or Capture files in the InPower
ONAN directory structure.
Electronic Control Module (ECM) − The
hardware residing on an engine which carries
A-1
PowerCommand® Control (PCC) − A microprocessor based genset monitoring, metering and control system with integrated AVR
and engine governing.
Protocol − Protocol is a language that each
node on a network knows how to speak and interpret. The protocol is what allows devices to
exchange messages with one another.
Save Trims − Term used with InPower ONAN
to indicate the process of permanently storing
parameter changes to a device.
Site − The name of a connection setup (COM1,
COM2, etc).
Template − 1. View template in InPower
ONAN describes how to display data table information. 2. Template can also describe the
Capture (.CAP) file that contains trim values
that can be used to configure multiple-devices
(e.g. genset controllers).
Tool − A set (or bundle) of software applets
that are targeted at a specific customer or end−
user function.
Trim − Data that is stored in the controller’s
non-volatile memory, but which may be altered after sale by either a customer or service
technician.
Update Calibration − Automatically updates
software, saves user information, and transfers
to a new control.
Volatile/Non−volatile Memory − The contents of volatile memory is lost following a loss
of power to the controller. Data stored in nonvolatile memory is retained.
A-2
Onan is a registered trademark of Onan Corporation.
Cummins is a registered trademark of Cummins Inc.
InPower is a trademark of Cummins Inc.
Windows is a registered trademark of Microsoft.
InPower ONAN Version 6.0