1
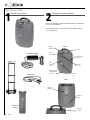
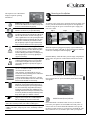
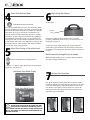
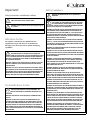
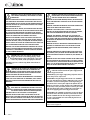
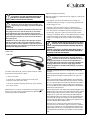
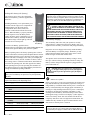
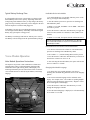
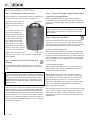
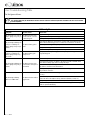
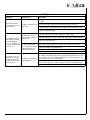
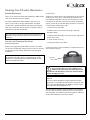
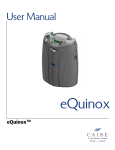
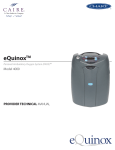
User Manual eQuinoxTM Model 4000 User Controls & System Status Indicators Symbol A 02 Definition FAA Approved Symbol: The U.S. Federal Aviation Administration (FAA) has approved this device for use on-board commercial aircraft. No Smoking Icon: Do not smoke near unit. Flow Setting Indicator Warnings / ALERT (Yellow) Indicator Pulse Mode Operation ALARM (Red) Indicator Device operating normally; power button External Power Indicator Increase Flow Setting Battery Pack (battery) Status Gauge Decrease Flow Setting Battery Pack Symbol Use no oil or grease. Amperes No open or naked flames. Alternating Current No serviceable parts inside. Do not open cover. IEC Icon for DC Power (Input) Warm Surface. Oxygen Output Do not get wet. Type BF Applied Part (degree of protection against electric shock) Drip Proof Equipment-IPX1: The eQuinox Battery Pack (Battery) and AC Power Supply provide protection against the harmful effects of the ingress of liquids. (IPX1, per IEC 60529) This symbol is to remind the equipment owners to return it to a recycling facility at the end of its life, per Waste Electrical and Electronic Equipment (WEEE) Directive. Drip and solid ingress proof: The eQuinox provides protection against the harmful effects of the ingress of liquids and solid foreign objects in accordance with IEC 60529 at the rating of IP22. Certified for both the U.S. and Canadian markets, to the applicable U.S. and Canadian standards. 2 — 4805 C Definition Read user manual before operation. See user manual for instructions. Recycle Symbol IP22 Symbol IPX1 Name and address of manufacturer Authorized representative in the European Community Class II equipment This device complies with the requirements of Directive 93/42/EEC concerning medical devices. It therefore bears the CE marking as shown. Contents User Controls & System Status Indicators...............................................................................................2 Quick Start Guide.......................................................................................................................................4 Indications for Use.....................................................................................................................................7 Contraindications for Use..........................................................................................................................7 Safety Guidelines.......................................................................................................................................7 Recommended Operating Environments.................................................................................................9 Operating Instructions.............................................................................................................................10 Voice Module Operation..........................................................................................................................13 First Time eQuinox Operation.................................................................................................................14 User Troubleshooting Table ....................................................................................................................16 Cleaning, Care & Routine Maintenance..................................................................................................19 EMC Tables................................................................................................................................................21 General Airline Travel Information.........................................................................................................25 Battery Pack & Airline Travel...................................................................................................................25 eQuinox (Model 4000) User Manual — 3 Quick Start Guide 1 2 Unpack Your eQuinox Getting to Know Your eQuinox Review all Warnings, Cautions and additional device information in the rest of this manual. Become familiar with the key features of the eQuinox and the User Control Panel. Oxygen Outlet Port AC Power Supply FRONT Handle Control Panel External Power Receptacle eQuinox Cart FAA Approval Icon 12VDC Cable Battery Pack Latch Rating Label & Serial Number Location Battery Pack BACK Service Cabinet Exhaust Vent Battery Pack (battery) 4 — 4805 C Air inlet Filter The eQuinox User Control Panel displays important operating information. ON/OFF Button (Green) Indicator: This button powers the device ON or OFF. The Green Indicator is lit up when the device is ON and functioning properly. Increase or Decrease Flow Setting Buttons: Use these buttons to set the flow to your prescribed setting. 3 Powering on the eQuinox To connect to AC power source: Insert the AC Power Supply cord securely into the External Power Receptacle on the right side of the device. Plug the AC power cord into the power supply and into an AC outlet. Step 1 Step 2 Step 3 Delivery Mode Button and Indicator: The button switches between Continuous Flow and Pulse Dose Mode. The Pulse Dose Mode activates autoSAT Technology. This allows a significant increase in the operating time while powered by the battery pack (battery). When the Pulse Dose Mode is activated, the green Pulse Dose Mode Indicator lights up. A pulse of oxygen is delivered and the green indicator blinks with each inspiratory effort. ALERT (Yellow) Indicator—When lit up, this indicates a low priority awareness condition or Caution. Continue to use your system. Refer to the Troubleshooting Table for the correct action, or contact your Home Care Provider. A flashing yellow indicates a medium priority alert. A prompt response is necessary. (Typically low oxygen or low battery.) ALARM (Red) Indicator—Indicates a high priority alarm condition. An immediate response is necessary. Refer to the Troubleshooting Table and contact your home care provider. (Typically loss of power, low oxygen, or malfunction.) Information Display. • C or P – “C” indicates Continuous Flow mode and “P” indicates Pulse Dose mode. • Time on battery – The display will cycle every 20 seconds when running on battery power to indicate the estimated time left on the battery • Setting (continuous flow or pulse dose) – each time you power the device ON, the last mode and/or setting has been saved and will be used at start-up. When the eQuinox is plugged in properly, a green indicator on the AC Power Supply will light up. The External Power Indicator on the user control panel will also light up. Install the Battery: Slide the battery into the empty compartment until it locks into position. It will be flush with the front of the device. When the battery is properly installed and the eQuinox is either ON or plugged into AC power, the Battery Pack Status Gauge will appear. Battery Pack (battery) Status Gauge: This indicator displays the charge remaining in the battery. Each of the five horizontal gray bars represents approximately 20% of the total battery charge. When the battery is charging, the charge indicator bars will blink in a waterfall-type fashion. If the battery is not installed, or if it is incorrectly installed, the Battery Pack (battery) Status Gauge will not light up or will flash on and off. External Power Indicator: When the eQuinox is properly plugged in and is using the AC or 12VDC Cable, this indicator will light up on the User Control Panel. Buzzer: An audible alarm alerts you to the operating condition of the device, either a warning or failure, and confirms a valid key press. Voice Module: If activated, a voice indicator will alert you of the operating condition of the device, changes in power source, and warning conditions or failures. ON/OFF Button (Green) Indicator Press and hold the “ON/OFF” button for two (2) seconds to power ON your eQuinox. A brief audible and visual power on self-test will occur. Check that all the indicators are lit up and the buzzer sounds for three (3) seconds. Press and hold the “ON/ OFF” button for two (2) seconds to power OFF your eQuinox. eQuinox (Model 4000) User Manual — 5 4 Select Flow Delivery Mode Flow Mode Button and Indicator Press the Flow Mode button to select your desired flow mode. Pressing this button repeatedly will switch you back and forth between continuous flow and pulse dose modes. In Continuous Flow Mode, the oxygen is provided at a constant flow rate between 0.5 and 3.0 LPM, indicated by the letter C. In Pulse Dose Mode, oxygen is supplied in a bolus at the beginning of each inhalation. Pulse mode settings 1–9 provide bolus sizes ranging from 16mL to 192mL and are designated by the letter P on the display. Pulse dose can be adjusted for sensitivity and breath bolus delivery. Flow settings in both modes should be prescribed for you by your physician. 5 Adjust Flow Setting to Prescribed Level 6 Begin Using the eQuinox Air Inlet Filter Air inlet Filter Your unit is equipped with an Air Inlet Filter (extra filter provided). Check daily and clean once a week. Instructions for cleaning are on page 19. Connect the oxygen supply tubing to the oxygen outlet and connect the oxygen cannula per the instructions provided with the cannula, or according to the instructions from your home care provider. Breathe normally through the nasal cannula. Increase or Decrease Flow Setting Button When operating on battery power, using the Pulse Dose Mode will result in longer duration-of-use. Using the + or - buttons, adjust the setting to the prescription supplied by your physician. Continuous Flow Mode Display Pulse Dose Mode Display WARNING: It is very important to select only the prescribed level of oxygen. Do not change the flow selection unless you have been directed to do so by a licensed clinician. The portable Oxygen Concentrator may be used during sleep under the recommendation of a qualified clinician. 6 — 4805 C 7 eQuinox Cart Operation Line up the eQuinox with the shaped floor of the cart so that it sits flat and upright. Line up the large threaded screw to the insert at the back of the eQuinox. Then hand-tighten the knob on the cart until the cart is tightly secured to the device. Depress the push-button on the telescoping cart handle and pull upward to adjust the height of the handle. Important! Safety Instructions are defined as follows: WARNING: IMPORTANT SAFETY INFORMATION FOR HAZARDS THAT MIGHT CAUSE SERIOUS INJURY. CAUTION: Important information for preventing damage to the eQuinox. Note: Information needing special attention. Indications for Use The eQuinox is intended for the administration of supplemental oxygen. The device is not intended for life support, nor does it provide any patient monitoring capabilities. WARNING: It is very important to select only the prescribed level of oxygen. Do not change the flow selection unless you have been directed to do so by a licensed clinician. The portable Oxygen Concentrator may be used during sleep under the recommendation of a qualified clinician. WARNING: Federal (USA) law restricts this device to sale or rental by order of a physician or other licensed health care provider. WARNING: This unit is not to be used for life support. Geriatric, pediatric, or any other patient unable to communicate discomfort while using this device may require additional monitoring. Patients with hearing and/or sight impairment(s) may need assistance with monitoring alarms. Contraindications for Use WARNING: IN CERTAIN CIRCUMSTANCES, THE USE OF NON-PRESCRIBED OXYGEN CAN BE HAZARDOUS. THIS DEVICE SHOULD ONLY BE USED WHEN PRESCRIBED BY A PHYSICIAN. WARNING: NOT FOR USE IN THE PRESENCE OF FLAMMABLE ANESTHETICS. WARNING: AS WITH ANY ELECTRICALLY POWERED DEVICE, THE USER MAY EXPERIENCE PERIODS OF NON-OPERATION AS A RESULT OF ELECTRICAL POWER INTERRUPTION, OR THE NEED TO HAVE THE eQuinox SERVICED BY A QUALIFIED TECHNICIAN. THE eQuinox IS NOT APPROPRIATE FOR ANY PATIENT WHO WOULD EXPERIENCE ADVERSE HEALTH CONSEQUENCES AS THE RESULT OF SUCH TEMPORARY INTERRUPTION. Safety Guidelines WARNING: No modification of this equipment is permitted WARNING: The Manufacturer recommends an alternate source of supplemental oxygen in the event of a power outage, alarm condition, or mechanical failure. Consult your physician or Equipment Provider for the type of reserve system required. WARNING: This device supplies high-concentration oxygen that promotes rapid burning. Do not allow smoking or open flames within the same room of (1) this device, or (2) any oxygen-carrying accessory. Failure to observe this warning can result in severe fire, property damage, and/or cause physical injury or death. WaRNING: Do not operate unit in a restricted or confined space (i.e., a small case or handbag) where ventilation can be limited. This can cause the Oxygen Concentrator to overheat and impair performance. WARNING: The concentrator should be located as to avoid smoke, pollutants or fumes. WARNING: The use of some oxygen administrating accessories not specified for this Oxygen concentrator may impair its performance. Recommended accessories are referenced within this manual. WARNING: If the oxygen concentrator has been dropped, damaged or exposed to water, please contact your home care provider for inspection or possible repair of the device. Do not use the oxygen concentrator if it has a damaged power cord or plug. WARNING: Properly secure, belt or otherwise restrain the oxygen concentrator when in a vehicle during transport to prevent damage or injury. WARNING: Do not allow either the air intake or the air outlet vents to become blocked. DO NOT drop or insert any objects into any openings on the device. This can cause the Oxygen Concentrator to overheat and impair performance. WARNING: DO NOT overfill the optional humidifier. Fill the optional humidifier with water only to the level shown by the manufacturer of the humidifier. WARNING: DO NOT operate the eQuinox and ambulate while a humidifier is attached. Remove the humidifier bottle before walking. DO NOT lay the eQuinox down while attached to a humidifier bottle. WARNING: The US Department of Transportation (DOT) and United Nations (UN) Regulations require the removal of the battery from the device for all international airline travel when the oxygen concentrator is checked as luggage. When shipping the oxygen concentrator, the battery must also be removed from the device and packaged properly. WARNING: DO NOT OPERATE THIS EQUIPMENT WITHOUT FIRST READING AND UNDERSTANDING THIS MANUAL. IF YOU ARE UNABLE TO UNDERSTAND THE WARNINGS AND INSTRUCTIONS, CONTACT YOUR EQUIPMENT PROVIDER BEFORE ATTEMPTING TO USE THIS EQUIPMENT; OTHERWISE, INJURY OR DAMAGE MAY RESULT. eQuinox (Model 4000) User Manual — 7 WARNING: If you feel discomfort or are experiencing a medical emergency, seek medical assistance immediately. WARNING: Smoking while using oxygen is the number one cause of fire injuries and related deaths. You must follow these safety warnings: WARNING: Operating the oxygen concentrator outside of the operational temperature specifications can limit the concentrator’s ability to meet Oxygen Concentration specification. Refer to the specification section of this manual for temperature limits. WARNING: Do not allow smoking, candles, or open flames in the same room with the device or the oxygen-carrying accessories. WARNING: Use no oil, grease, or petroleum-based or other flammable products with the oxygen-carrying accessories or the Oxygen Concentrator. Only water based, oxygen compatible lotions or salves should be used. Oxygen accelerates the combustion of flammable substances. WARNING: If you smoke, these 3 steps may save your life: turn off the oxygen concentrator, take off the cannula, and leave the room where this device is located. WARNING: The incorrect use of the battery can cause the battery to get hot, ignite, and may cause serious injury. Be sure not to pierce, strike, step on, drop the battery, or otherwise subject the battery to strong impacts or shocks. The use of a damaged battery may cause personal injury. WARNING: The Oxygen Concentrator should not be used adjacent to or stacked with other equipment. If adjacent or stacked use is unavoidable, the device should be observed to verify normal operation. CAUTION: In the event of an alarm or you observe the Oxygen Concentrator is not working properly; consult the Troubleshooting section in this manual. If you cannot resolve the problem, consult your Equipment Provider. CAUTION: To prevent a void warranty, follow all manufacturers’ instructions. WARNING: Do not attempt any maintenance other than the possible solutions listed within this manual. Do not remove covers, only your Equipment Provider or a qualified service technician should remove the covers or service this device. WARNING: Only accessories recommended by the manufacturer. Use of any other may be hazardous, cause serious damage to your oxygen concentrator and will void the warranty . WARNING: The Manufacturer recommends an alternate source of supplemental oxygen in the event of a power outage, alarm condition, or mechanical failure. Consult your physician or Equipment Provider for the type of reserve system required. WARNING: Do not allow either the air intake or the air outlet vents to become blocked. DO NOT drop or insert any objects into any openings on the device. This can cause the Oxygen Concentrator to overheat and impair performance. WARNING: Smoking while wearing an oxygen cannula may cause facial burns and possibly death. WARNING: “No Smoking – Oxygen in Use” signs must be prominently displayed in the home, or where oxygen is in use. Patients and their caregivers must be informed about the dangers of smoking in the presence of, or while using, medical oxygen. WARNING: Do not use your oxygen concentrator in the presence of flammable gases. This can result in rapid burning causing property damage, bodily injuries or death. WARNING: Removing the cannula and putting it on clothing, bedding, sofas, or other cushion material will cause a flash fire when exposed to a cigarette, heat source, or flame. WARNING: Do not leave a nasal cannula on or under clothing, bed coverings or chair cushions. If the unit is turned on but not in use, the oxygen will make the material flammable. Set the OXYGEN CONCENTRATOR to the 0 (Off) position when the Oxygen Concentrator is not in use. CAUTION: Always disconnect AC power supply from the wall before disconnection the AC power supply from the oxygen concentrator. CAUTION: Always place oxygen supply tubing and power cords in a manner that prevents a trip hazard. CAUTION: When using the Oxygen Concentrator in an automobile, boat, or on other DC sources with the 12VDC Cable, make sure that the vehicle is started and running before connecting the Oxygen Concentrator. If the external power light on the eQuinox does not illuminate and requires resetting, disconnect the 12VDC Cable from the DC outlet, restart your vehicle, and then reconnect your 12VDC Cable into the DC outlet. Failure to follow these instructions can result in not supplying power to the Oxygen Concentrator. CAUTION: When the automobile in which you are using the Oxygen Concentrator unit is turned off, disconnect and remove the device from the automobile. Do not store the Oxygen Concentrator in a very hot or cold automobile or in other similar, high-or low-temperature environments. Note: Portable and mobile RF communications equipment can effect medical electrical equipment. 8 — 4805 C Recommended Operating Environments For correct use of the device refer to the following chart. The chart provides important information about the recommended operating environments, or operating conditions. Specifications Operating 32º F to 104º F (0º C to 40º C) Temperature Operating Humidity 10% - 95% at an 82.4° F (28° C) dew point Transport/ -13°F to 158°F (-25°C to 70°C) Storage Humidity: Up to 95% Non-Condensing Temperature -4°F to 122°F (-20°C to 50°C) for battery packs Electrical Use no extension cords. Use no electrical outlets controlled by a switch. Altitude 0 – 13,123 feet (0 - 4,000 meters) Placement DO NOT block the air inlet (top back cover) or the exhaust vent (back bottom right). Place device a minimum of 3 inches (7.5 cm) away from walls, draperies, furniture, etc. Environment Must be smoke, pollutant, and fume free. Operating Time 24-hours a day when connected to an external AC or DC power source. Note: If the Oxygen Concentrator has been stored for an extended period of time outside its normal operating temperature range, the unit should be allowed to return to normal operating temperature before being turned on. (Refer to the Specifications section in this manual.) Proper Placement of the eQuinox Pick a location for the device that avoids the intake of smoke, fumes and pollutants. Correct positioning of the device should allow intake of air through the air inlet filter at the top rear of the cabinet. It should also allow exhaust air to freely leave the exhaust vent at the bottom right of the device. Place the device so that the alarms can be heard. Position the oxygen supply tubing in such a way that it does not kink or occlude. WARNING: Do not use your oxygen concentrator in the presence of flammable gases. This can result in rapid burning causing property damage, bodily injuries or death. Use no oil, grease, or petroleum-based or other flammable products with the oxygen-carrying accessories or the Oxygen Concentrator. Only water based, oxygen compatible lotions or salves should be used. Oxygen accelerates the combustion of flammable substances. WARNING: This device supplies high-concentration oxygen that promotes rapid burning. Do not allow smoking or open flames within the same room of (1) this device, or (2) any oxygen-carrying accessory. Failure to observe this warning can result in severe fire, property damage, and/ or cause physical injury or death. Note: When the automobile in which you are using the Oxygen Concentrator unit is turned off, disconnect and remove the device from the automobile. Do not store the Oxygen Concentrator in a very hot or cold automobile or in other similar, high-or low-temperature environments. DO NOT leave the Oxygen Concentrator or the Power Supply plugged into the vehicle if the ignition is in the off position. Doing so may drain the vehicle’s battery. CAUTION: Do not operate unit in a restricted or confined space (i.e., a small case or handbag) where ventilation can be limited. This can cause the Oxygen Concentrator to overheat and impair performance. Do not allow either the air intake or the air outlet vents to become blocked. This can cause the Oxygen Concentrator to overheat and impair performance. eQuinox (Model 4000) User Manual — 9 Operating Instructions Before Operating General Charging Information This user manual is your reference to help you use and maintain the device. If you have any questions or concerns please call your home care provider. The eQuinox runs on external AC power, DC power, or a rechargeable battery. The system includes a “smart battery charger.” This recharges the battery whenever the eQuinox is connected to an outside power source. The system monitors and controls the power source and the battery charger. Important! DO NOT try to use the eQuinox without first reading the Safety Guidelines section of this manual. Please follow all of the operating instructions. Please observe all Warnings on the device and in the User Manual. In order to decrease the risk of fire, personal injury and serious damage to the eQuinox, please follow all of the safety precautions. WARNING: Clean the cabinet, control panel, and power cord only with a mild household cleaner applied with a damp (not wet) cloth or sponge, and then wipe all surfaces dry. Do not allow any liquid to get inside the device. Pay special attention to the oxygen outlet for the cannula connection to make sure it remains free of dust, water, and particles. CAUTION: Do not allow either the air intake or the air outlet vents to become blocked. This can cause the Oxygen Concentrator to overheat and impair performance. Do not operate the Oxygen Concentrator without the air intake filter in place. If a second filter is provided, insert the “replacement” filter before you clean the dirty filter. Clean the dirty filter in a warm soap and water solution then dry thoroughly prior to use. The eQuinox charges the battery when using AC or DC power when the battery temperature is within safe charging temperature. When external power is removed, the device automatically switches over to the battery, as long as the battery is installed and charged. When connected to an AC or DC outlet again, the device runs on the external power source and recharges the battery. Line up the power plug with the recessed external connector to correctly plug in the AC Supply or 12VDC cable. The recessed power connector is on the right side of the device when facing the Control Panel. Push the power plug into the recessed connector. AC POWER SUPPLY Powering on your eQuinox The device can be operated from three (3) different power sources: • AC Power Supply • 12VDC Cable • Rechargeable Battery Pack (Battery) AC Power Supply The eQuinox includes a universal AC Power Supply for use at home or wherever standard AC power is available. To connect to an AC power source, plug the AC Power Supply cord securely into the recessed external connector. Also make sure that the cord from the AC Power Supply is plugged into an AC outlet. When the eQuinox is plugged in correctly, a green indicator on the AC Power Supply and the External Power Indicator will light up. The on the user control panel will also light up. The indicator CAIRE AC Power Supply PN 4836 is the main power source for the eQuinox portable oxygen concentrator. It is a very important part of the overall system. Note: Use only electrical voltage specified on the specification label affixed to the device. 10 — 4805 C Step 1 Step 2 Step 3 WARNING: Do Not touch the battery contacts and the patient at the same time when energizing the unit with the external power supply (AC Power Supply) and with no battery pack installed. CAUTION: Use only accessories recommended by the manufacturer. Use of any other may be hazardous, cause serious damage to your oxygen concentrator and will void the warranty. CAUTION: Do not use extension cords with this unit or connect too many plugs into the same electrical outlet. The use of extension cords could adversely affect the performance of the device. Too many plugs into one outlet can result in an overload to the electrical panel causing the breaker/fuse to activate or fire if the breaker or fuse fails to operate. CAUTION: Use of cables and adapters other than those specified, with the exception of cables and adapters sold by the manufacturer of the medical electrical equipment as replacement parts for internal components, may result in increased emissions of decreased immunity of the Oxygen Concentrator. 12VDC Cable 12VDC Cable A 12VDC Cable allows the system to operate from DC outlets, such as those found in motor vehicles. 1. Start your vehicle. 2. Insert the 12 Volt DC cord into the recessed power receptacle on the side of the device. 3. Insert the 12VDC Cable plug into the DC power outlet in your motor vehicle. When the device is properly connected and receiving power from the DC power source, the green External Power Indicator on the control panel will illuminate. eQuinox DC Supply Connection When the eQuinox is connected to the DC supply in a vehicle, the following applies: • The eQuinox will run at all continuous flow settings 0.5– 3.0LPM and all pulse settings 1–9 while being operated with the DC Supply in a car. • The battery will only charge if there is sufficient power remaining after the device is running at the prescribed flow rate. The eQuinox will dedicate the power supplied to run the unit first. Any power left over will be used as a trickle charge to re-charge the battery. If the eQuinox battery is being charged, the battery symbol will waterfall. If the eQuinox battery is not charging, the battery symbol will be displayed solid. WARNING: Do not allow either the air intake or the air outlet vents to become blocked. This can cause the Oxygen Concentrator to overheat and impair performance. WARNING: If the vehicle’s DC power source drops below 11.5 Volts, the eQuinox will revert to the Battery operation (if the battery is present AND CHARGED). CAUTION: When the automobile in which you are using the Oxygen Concentrator unit is turned off, disconnect and remove the device from the automobile. Do not store the Oxygen Concentrator in a very hot or cold automobile or in other similar, high-or low-temperature environments. DO NOT leave the Oxygen Concentrator or the Power Supply plugged into the vehicle if the ignition is in the OFF position. Doing so may drain the vehicle’s battery. Note: While operating the device from a 12VDC Cable, the Battery may not charge. Note: When operating the eQuinox from a 12VDC Cable, it is recommended that the Pulse Dose Mode be used if prescribed to use a pulse dose device. Note: To ensure that the device is utilizing the DC power, check that the External Power Indicator is illuminated. If a beep is heard, this could indicate a loss of external power. Check if the green External Power Indicator LED is on or off. If the battery is removed on DC power, it will ensure no loss of charge while the unit is running. If the indicator is not illuminated, the battery is powering the device. Note: Actual performance of the eQuinox may vary depending upon usage conditions of the motor vehicle. Some vehicles may not be able to support full functionality on DC power. In the event the vehicle cannot provide enough power to operate at the current setting, the eQuinox will first stop charging the battery and continue to run at the prescribed flow rate. If the vehicle still cannot provide enough power, the eQuinox will then lower the flow rate if the flow rate is 2.0LPM or greater. If the flow rate is less than 2.0LPM, the eQuinox will shut down. If low flow rates are experienced, remove all other electronic devices connected to the power circuit (GPS, cell phone charger, etc.). If sufficient power is restored, flow rates are not automatically increased back to the original setting; user will need to manually adjust. If the eQuinox is still not operating at the prescribed flow rate, attempt to remove the battery pack. eQuinox (Model 4000) User Manual — 11 Rechargeable Battery Pack (Battery) Note: Operating the Oxygen Concentrator outside of its normal operating temperature range can affect performance and decrease battery run time and/or increase battery charge time. (Refer to the Specifications section in this manual.) You will achieve longer operating time on the Battery if you operate your eQuinox in the Pulse Mode (Physician approved mode). The eQuinox can be run by the rechargeable Battery Pack (Battery), which is supplied with the device. Installing the Battery: Line up the Battery so it will slide into the empty Power Compartment. Push the Battery into the empty Power Compartment until it locks (clicks) into position. It will be flush with the front of the device. When the Battery is properly installed and the eQuinox is ON, the Battery Status Gauge will show on the Control Panel. (If you DO NOT have a Battery installed, the Battery Pack Status Gauge will not light up.) The unit Rechargeable Battery will still run on external power. Pack (Battery) To remove the Battery, push the release button on the top of the battery pack. While holding DOWN the release button, pull the Battery away from the eQuinox. Battery Operating Times: The battery operating time is shown on the Control Panel, in both symbol and alpha-numeric formats. When running on battery power, the battery status gauge will be shown at all times. The display screen will cycle to display the hours/minutes of battery life left. A number of factors, such as flow setting, Pulse or Continuous Flow Mode, and breath rate will affect the operating time. The table Typical New Battery Pack Operating Times provides operating time estimates for the eQuinox using a new, fully charged Battery based on flow settings and indicated operating conditions. Note: The eQuinox comes with a 12-cell battery when shipped from the factory. The 24-cell battery is an optional accessory for longer battery durations. Battery Type 12-cell 24-cell 1 LPM 2.16 hrs (2 hr, 9 min) 4.84 hrs (4 hrs, 50 min) 2 LPM 1.2 hours (1 hour, 12 min) 2.75 hrs (2 hrs, 45 min) 3 LPM 0.8 hrs (48 min) 1.83 hrs (1 hr, 49 min) 16 mL (1.0) 2.62 hrs (2 hrs, 37 min) 5.94 hrs (5 hrs, 56 min) 48 mL (3.0) 2.38 hrs (2 hrs, 22 min) 5.39 hrs (5 hrs, 23 min) 96 mL (6.0) 1.70 hrs (1 hr, 41 min) 3.85 hrs (3 hrs, 51 min) Continuous Mode Pulse Mode (12 BPM) 12 — 4805 C Initial Battery Charging The new Battery that comes with your eQuinox is not fully charged when it is shipped from the factory. Before using your eQuinox for the first time, you must first fully charge the Battery. Plug in the AC Power Supply and correctly install the Battery. Allow the Battery to completely charge. The Battery is fully charged when the Battery Pack Status Gauge on the Control Panel no longer cascades and remains solid. The eQuinox can be used while the Battery recharges. It may take up to 4 hours to charge, depending on the flow setting. The Battery will also charge when the eQuinox is plugged into AC power and turned off. CAUTION: Only use the Manufacturer’s provided batteries. For proper battery disposal, contact your Equipment Provider or your local government agency for disposal requirements. * Batteries are recyclable. * Typical New Battery Pack Operating Times Operating Type WARNING: For oxygen concentrators equipped with batteries: Store in a cool and dry location to help ensure the longevity of your battery. Storing your Oxygen Concentrator for extended periods of time at high temperatures or with a fully charged or completely discharged battery can degrade its overall battery life. Do not attempt to open the battery; there are no serviceable parts inside the battery. Keep batteries away from children. In the event of an AC or DC power interruption, the eQuinox will beep and automatically switch to Battery operation, as long as a charged Battery is installed. When external power is returned, the Battery will automatically start charging again. If the Battery is missing or is fully discharged when the AC power is interrupted, the eQuinox will shut down and alarm. The Battery is fully discharged when the Battery Pack Status Gauge on the control panel appears empty. The device will display a yellow light and sound a low battery alarm. This will continue until the device completely shuts down with a red light and constant alarm. The audible alert may continue for up to 5 minutes until the device shuts down or external power is restored. Note: Press and hold the eQuinox ON/OFF button for a minimum of 5 seconds, to silence the Loss of Power alarm. Connecting the eQuinox to an external AC power supply for 2 minutes will also eliminate this alarm. Typical Battery Recharge Time Enable/Disable the Voice Module It will normally take between 2 and 5 hours to recharge a fully drained Battery back to 80% capacity, depending on the flow setting being used. When the battery is fully charged, the battery gauge will stop cascading. The battery can be charged in the unit when the eQuinox is turned off and plugged in. If the Battery becomes too warm during discharging, recharging will not begin until the Battery sufficiently cools. Removing the Battery may speed up the cooling process. The Battery can recharge from both AC and DC power sources. The Battery will also charge from the optional Desktop Charger. 1. To enable/disable the voice module function, power on the unit by pressing the ON/Standby Key. 2. After the unit has powered on, press the No Smoking Icon and Hidden Key once. 3. Within 1–2 seconds, the SPKR = ON or SPKR = OFF menu item will be present. 4. Press the Increase or Decrease Flow Rate Key to toggle the selection to ON (enable voice module) or OFF (disable voice module). 5. Within 3–5 seconds, the option selected will become active. Note: This will only disable the voice module function once. When the device is turned off and device is reset, the voice module function will automatically be enabled. Increase/Decrease the Volume of Vocal Notifications 1. To increase or decrease the volume of vocal notifications, press the No Smoking Icon & Hidden Key twice. 2. The Volume = # - (Volume Setting Menu) will be present. Voice Module Operation 3. Press the Increase or Decrease Flow Rate Key to increase or decrease the volume level from 1 to 10. Voice Module Operational Instructions The eQuinox can provide verbal notifications or alarms and operating status. These verbal notifications supplement the information on the light emitting diode (LED) display. The following information provides instructions on how to turn the voice module function on and off, adjust loudness, and change language. ON/Standby Key ON/Standby Indicator (Green LED) Alert Indicator (Yellow LED) Alarm Indicator (Red LED) Increase Flow Rate Key 4. After selecting the desired loudness, the option will become active/set within 3–5 seconds. Changing Voice Module Language 1. To change the voice module language, press the No Smoking Icon & Hidden Key five times to access the language options. 2. The current activated language will be indicated on the display. For example, if the voice module is speaking English when accessing the language options menu, “English” will be the text that appears on the display. 3. Press the Increase or Decrease Flow Rate Key to scroll through the languages available. 4. Once the desired language is displayed, it will automatically be set within 3–5 seconds. External Power Present Indicator (Green LED) No Smoking Icon & Hidden Key Flow Mode Key Decrease Flow Rate Key Flow Mode Indicator (Green LED) LCD Display eQuinox (Model 4000) User Manual — 13 First Time eQuinox Operation Step 1: Positioning Your eQuinox for Use Place the eQuinox in a well-ventilated, well lit area. Be sure the air inlet and exhaust vents in the back are not blocked. Position the eQuinox so that all audible and visual indicators or alarms can be easily seen and heard. Air inlet Filter Be sure the air inlet filter is in place before operating your eQuinox. If the air inlet filter is missing, contact your home care provider. If the air inlet filter is dirty, wash with warm soapy water. Then rinse it with clear water and allow it to dry before placing the air inlet filter back in the device. If necessary, replace it with a new, clean air inlet filter. Exhaust Vent Plug the device into an AC Power outlet, a DC Power source, or be sure there is a fully charged Battery installed. Step 2: Power ON the Device and Allow it to Warm-Up Press and hold the “ON/OFF” Button for two (2) seconds to power ON your eQuinox. A brief visual power-on self-test will occur. Note: If there are three beeps when the device is first connected to power or powered on, this indicates a low battery condition for the 9-volt battery inside the cabinet of the eQuinox. Please contact your home care provider and request that the 9-volt battery be replaced. If three beeps continue intermittently after the unit has been power on and running for several minutes, this is not a low 9V battery condition. Contact your healthcare provider for service. The eQuinox has an oxygen concentration status indicator (OCSI) built in to the device. The OCSI continually monitors the oxygen output of the device. It uses a green light (normal), yellow light (alert), red light (alarm) and an audible alarm. These indicators will all illuminate during the power-on self-test at start-up. After first powering ON the device, please allow up to five (5) minutes for the device to reach its performance specifications. When only the green indicator light is illuminated, the device has reached its performance specifications. 14 — 4805 C Step 3: Connect the Oxygen Supply Tubing or Nasal Cannula to the Oxygen Outlet Replace the cannula and oxygen supply tubing regularly, as recommended by your home care provider. Ask your home care provider for cannula and supply tubing cleaning and replacement information. Note: Ensure the cannula is fully inserted and secure. This ensures that the Oxygen Concentrator can properly detect inspiration for oxygen delivery. During inhalation, you should hear or feel oxygen flow to the prongs of the nasal cannula. Step 4: Select the Flow Mode Press the Flow Mode button to choose the mode. Pressing this button more than once will switch you back and forth between Pulse Dose Mode and Continuous Flow Mode. The correct mode and setting should be prescribed for you by your physician. Continuous Flow Mode Operation: When running in the Continuous Flow Mode, a constant supply of oxygen will flow through your tubing and nasal cannula. The oxygen is measured in measured in liters per minute (LPM). You may use a humidifier when in Continuous Flow mode only. DO NOT tilt, transport, or lay the eQuinox down while a humidifier bottle is attached. Pulse Dose Mode Operation: When running in Pulse Mode, a bolus of oxygen, measured in milliliters (mL), is delivered upon inhalation. DO NOT use a humidifier in the Pulse Dose Mode. When operating in pulse dose mode, the eQuinox supplies a continuous flow of oxygen every 15 seconds if a breath is not detected. The device will stop continuous flow and repeatedly check for an inspiratory effort every 15 seconds. Once an inspiration is detected, the device will deliver a measured bolus again. To leave Pulse Dose Mode and start Continuous Flow Mode, push the flow mode button. Have your physician prescribe you the correct pulse dose to make sure you receive the proper oxygen saturation. Take into account your needs at rest, when you exercise, and when you travel at high elevation. Contact your care provider for prescription and boarding forms. Pulse Dose Mode and autoSat Features Your eQuinox has a feature called autoSAT . It delivers a consistent-sized bolus of oxygen up to 40 breaths per minute (see Max Breath Rate table below). As your breath rate increases, such as when you walk, the autoSAT feature servo-controls the device, delivering the set bolus size. autoSAT Technology is proprietary to CAIRE and is used during Pulse Mode only. ® Max Breath Rate Bolus Volume (+/- 15%) Pulse Dose Setting 1 2 3 4 5 6 7 8 9 Bolus Size (± 15%) mL Max Breath Rate 16 32 48 64 80 96 128 160 192 40 40 40 40 37 31 23 18 15 Note: Bolus volume decreases as breath rate exceeds published maximum breath rate Note: The pulse dose setting 1–9 is not equal to LPM. WARNING: Pulse dose Mode settings must be determined for each patient individually for their needs at rest, during exercise and when traveling. Step 5: Adjust the Flow Setting to the Prescribed Level Using the Flow Setting Buttons, adjust the flow setting to the prescribed setting supplied by your physician. WARNING: It is very important to select only the prescribed level of oxygen. Do not change the flow selection unless you have been directed to do so by a licensed clinician. Step 6: Begin Using Your eQuinox Breathe normally through the nasal cannula. Note: You will achieve longer operating time on the Battery if you operate your eQuinox in the Pulse Mode (Physician approved mode). Step 7: eQuinox Cart Operation The eQuinox Cart is designed for use on walking-type surfaces. Line up the eQuinox with the floor of the cart so it sits upright and level. Line up the large threaded screw to the insert at the back of the eQuinox. Then hand-tighten the knob on the cart until the eQuinox Cart is tightly secured to the device. Push down the push-button on the eQuinox Cart handle to adjust the height of the handle. WARNING: The eQuinox may not be able to detect all inspiratory efforts in Pulse Mode. if the eQuinox does not respond to your inspiration efforts, ask your home care provider to check the sensitivity setting. Note: To Equipment Provider: The following oxygen administration accessories are recommended for use with the Oxygen Concentrator: • Nasal Cannula with 7 feet (2.1 m) of tubing: PN 5408-SEQ • For any additional recommended accessories, please see the Accessories Catalog (PN ML-LOX0010) available on www.CAIREmedical.com. • CAIRE offers the OxySafe™ as an optional accessory. This is intended to be used in conjunction with the eQuinox concentrator. For customers in regions requiring compliance to EN ISO 8359:1996-Ammendment 1:2012, this accessory will meet this need. The OxySafe™ is a thermal fuse to stop the flow of gas in the event that the downstream cannula or oxygen tubing is ignited and burns to the OxySafe. It is placed in-line with the nasal cannula or oxygen tubing between the patient and the oxygen outlet of the Equniox. For proper use of the OxySafe, always refer to the manufacturer’s instructions (included with each OxySafe kit). CAIRE offers an OxySafe™ kits that includes a cannula headpiece, OxySafe™, and 7’ tubing: PN 20628667 Note: DO NOT operate the eQuinox and ambulate while a humidifier is attached. Remove the humidifier bottle before walking. DO NOT lay the eQuinox down while attached to a humidifier bottle. Step 8: Power Off the Device Press and hold the “ON/OFF” Button for two (2) seconds to power OFF your eQuinox. Store the eQuinox in a cool and dry location for a period no longer than 1 month. The eQuinox must run for at least 2 hours per month to ensure proper function of the unit. eQuinox (Model 4000) User Manual — 15 User Troubleshooting Table Do Not Ignore Alarms WARNING: The Manufacturer recommends an alternate source of supplemental oxygen in the event of a power outage, alarm condition, or mechanical failure. Consult your physician or Equipment Provider for the type of reserve system required. Yellow Light Symptom Possible Cause The yellow light is on solid. The The eQuinox has detected a alarm is giving 1 beep every 30 problem with the connection seconds. to the battery pack. The yellow light is flashing. The battery icon is flashing. The alarm is giving 1 beeps every 2 minutes. Your Action 1) Remove battery pack and re-install to ensure that it is secure in the concentrator. 2) If possible, install a separate battery pack in the eQuinox. 3) If this problem persists, contact healthcare provider. 1) Re-attach the eQuinox to external power or install a fully-charged battery pack in the eQuinox. Allow warm battery pack to cool outside the concentrator for 30 minutes. The eQuinox battery pack is warm. 2) Re-charge the battery pack using AC power 3) Replace the battery pack if another is available. 4) If the condition persists, contact your healthcare provider. The yellow light is flashing. The battery icon is flashing. The alarm is giving 2 beeps every 30 seconds. The eQuinox battery pack voltage is low. 1) Plug eQuinox into AC power supply and recharge or replace battery pack with fully charged battery pack. 1) Clean and replace cabinet inlet filter The yellow light is flashing. The alarm is giving 1 beep every 2 minutes. The eQuinox has detected a flow restriction causing low or blocked flow. 2) Ensure that the cannula is not kinked or blocked. If used with a humidifier bottle, ensure that it is filled properly and not creating a blockage. 3) Ensure that the eQuinox has proper ventilation. It needs to be at least 3 inches from any surface to ensure the vents aren’t blocked. 4) If the problem persists, switch to an alternate source of oxygen and contact healthcare provider for assistance. 1) Ensure the air intake filter is not clogged or restricted. Clean and replace the filter if necessary. The yellow light is flashing. There is no audible alarm. The eQuinox has detected low oxygen levels. 2) Ensure the eQuinox is in a well ventilated area. Make sure there are at least 3 inches between the back of the eQuinox and any obstructions (furniture, curtain, etc.) 3) If operating in the car, be sure the back of the eQuinox is facing outward in the seat. 4) If the condition persists, switch to an alternate source of oxygen and contact your healthcare provider immediately. 16 — 4805 C Red Light Symptom Possible Cause Your Action 1) Ensure the air intake filter is not clogged or restricted. Clean and replace the filter if necessary. The red light is flashing. The alarm is giving 3 beeps every 2 minutes. The eQuinox has detected low oxygen levels 2) Ensure the eQuinox is in a well ventilated area. Make sure there are at least 3 inches between the back of the eQuinox and any obstructions (furniture, curtain, etc.) 3) If operating in the car, be sure the back of the eQuinox is facing outward in the seat. 4) If the condition persists, switch to an alternate source of oxygen and contact your healthcare provider immediately. The red light is flashing. The alarm is giving a constant beep. The LCD displays ********. The eQuinox is not delivery oxygen and will not power on. The eQuinox has lost power temporarily while running on external power. The eQuinox has lost power due to a depleted battery pack (battery pack) charge or an overheated battery pack. 1) Inspect the external (AC or DC) power supply and ensure that its connections are secure at the eQuinox, the transformer, and the external power outlet. 2) If possible, attempt to use another electrical (AC or DC) outlet to power the eQuinox. 3) If the condition persists, switch to an alternate source of oxygen and contact your healthcare provider immediately. 1) Re-attach the eQuinox to external power or install a fully-charged battery pack in the eQuinox. Allow warm battery pack to cool outside the concentrator for 30 minutes. 2) Re-charge the battery pack using AC power 3) Replace the battery pack if another is available. 4) If the condition persists, contact your healthcare provider. The red light is solid. The display screen says “FAIL”. The eQuinox is not producing delivering oxygen and will not power on. The eQuinox has experienced a system malfunction. 1) Remove the battery pack and disconnect the AC or DC power supply from the eQuinox. The red light should disappear and the FAIL message will disappear from the screen when the power sources are removed. Wait approximately 20 seconds, reconnect power sources, and attempt to power on the eQuinox again. 2) If the eQuinox does power on, monitor it to determine if the FAIL message occurs again. If the FAIL message occurs again, contact your healthcare provider immediately. 3) If the eQuinox does not power back on, contact your healthcare provided immediately. eQuinox (Model 4000) User Manual — 17 Other Alarm Conditions Symptom While in pulse mode, the pulse mode LED flashes quickly for 15 seconds. Possible Cause The eQuinox is unable to detect the user’s breathing effort. See page 15 for pulse mode information. Your Action 1) Pulse mode may not work correctly if the user has any condition that causes blocked/restricted nasal passages. (Illness, deviated septum, etc.) 2) Ensure cannula is no longer than 7 feet in length. 3) Ensure that there are no kinks or blockage in cannula tubing. 4) If a humidifier bottle is connected, remove the humidifier bottle and connect cannula directly to outlet port. Pulse mode will not work with a humidifier bottle installed. 5) If the condition persists, contact your healthcare provider. 1) Verify that the outlet is providing power. Do not connect the power supply to a dimmer circuit or a power strip. The eQuinox is not Battery pack is drainreceiving power from ing while plugged in to the attached power AC/DC power supply supply. 2) Check that cable connections on power supplies are secure to the wall/vehicle and concentrator. If using the AC power supply, check the cable connection on the power supply transformer as well. 3) Ensure that the power verification lights are on. - There will be a green light on the power supply box. - There will be a green light on the eQuinox concentrator control panel in the shape of a power cord. 4) If power verification LEDs are not lit, remove all connections of the power supply for 20 seconds and reconnect. 5) If the condition persists, contact your healthcare provider. The battery pack was not fully charged The Battery pack (battery) charge is not lasting as long as it should. 1) Connect to AC power to recharge the battery. Verify that the battery charges for 2-5 hours and the battery icon is full and not flashing before use. 2) Refer to the actions for “Battery Pack is Not Charging” Symptom below. The eQuinox was not 1) Ensure that you are using the flow rate prescribed by your physician and that pulse or continuous flow operating at the antici- is being used as required. pated flow rate. The battery pack is not preforming to specifications. 1) Attempt to drain the battery pack completely. Do this by running the eQuinox on battery power until the machine shuts off completely. Then remove the battery and allow it to cool for approximately 30 minutes. After this time, re-insert the battery in the eQuinox and recharge it using AC power. 2) If the battery still does not last as long as it should after following step 1, contact your healthcare provider. 1) Verify that the outlet is providing power. Do not connect the power supply to a dimmer circuit or a power strip. The eQuinox is not receiving external AC power to charge the battery. The Battery Pack (battery) is not charging. 2) Check that cable connections on power supplies are secure to the wall/vehicle and concentrator. If using the AC power supply, check the cable connection on the power supply transformer as well. 3) Ensure that the power verification lights are on. - There will be a green light on the power supply box. - There will be a green light on the eQuinox concentrator control panel in the shape of a power cord. 4) If power verification LEDs are not lit, remove all connections of the power supply for 20 seconds and reconnect. 5) If the condition persists, contact your healthcare provider. 1) Remove battery pack and re-install to ensure that it is secure in the concentrator. The eQuinox is not properly communicating the battery pack to charge it. 2) Inspect the eQuinox for a solid yellow light when the battery is installed or a flashing battery icon when attempting to charge. If either of these symptoms is present, continue to step 3 3) If possible, install a separate battery pack in the eQuinox. If the replacement battery works properly, then the original battery needs to be replaced. 4) If this problem persists contact healthcare provider. The eQuinox beeps 3 times when it is first powered on. 18 — 4805 C The internal battery that powers the alarms is low 1) Contact your healthcare provider. Cleaning, Care & Routine Maintenance Routine Maintenance Air Inlet Filter Only a service technician trained and qualified by CAIRE should work on the internal parts of the eQuinox. Ambient air is drawn into the device through the air inlet located on the top rear of the device. Cleaning the air inlet filter is the most important maintenance activity you will perform as a user. Cleaning the air inlet filter will keep your eQuinox performing properly. Check this air inlet filter daily and clean it at least once a week using the following procedure: Preventative Maintenance (PM) should be done every year. Talk to your provider to arrange a PM schedule. Your home care provider or qualified technician will inspect the following parts only when needed: alarms, internal 9-volt battery, battery, internal filters and other internal parts. Note: If three beeps sound after the power ON self-test, this indicates the 9v battery is low in power. Contact your home care provider if you hear three beeps. User Care and Cleaning of the Device Cannula Replacement Replace your supply tubing and cannula as often as your home care provider recommends. Your physician or home care provider will provide you with cleaning, disinfection and replacement information. Note: Always follow the cannula manufacturer’s instructions for proper use. Replace the disposable cannula as recommended by the cannula manufacturer or your Equipment Provider. Additional supplies are available from your Equipment Provider. 1. Remove the air inlet filter 2. Wash the filter in warm tap water using a mild soap detergent solution 3. Rinse the filter thoroughly with clear tap water and squeeze out the excess water 4. Allow the filter to air dry 5. Reinsert the filter in the cabinet Cleaning tip: Keep a clean second filter as a replacement for use when one filter is drying. Air inlet Filter CAUTION: Do not operate the Oxygen Concentrator without the air intake filter in place. If a second filter is provided, insert the “replacement” filter before you clean the dirty filter. Clean the dirty filter in a warm soap and water solution then dry thoroughly prior to use. Note: The Manufacturer does not recommend the sterilization of this equipment. Note: Do not operate the Oxygen Concentrator without the air intake filter in place. If a second filter is provided, insert the “replacement” filter before you clean the dirty filter. Clean the dirty filter in a warm soap and water solution then dry thoroughly prior to use. The air inlet filter should be replaced annually. If the eQuinox is used in a dusty environment, the filter may need to be replaced more frequently. You should not operate the eQuinox without an air inlet filter installed for more than 5 minutes. eQuinox (Model 4000) User Manual — 19 AC Power Supply, 12VDC Cable, Power Cord and Outer Case: Optional Humidifier Turn OFF the eQuinox and disconnect from AC or DC power before you clean or disinfect. DO NOT spray right onto the outer case. Use a damp (not wet) cloth or sponge. Spray the cloth or sponge with a mild cleaning solution to clean the cabinet and power supply. To disinfect the eQuinox, use Lysol® Brand II disinfectant (or equivalent). Follow the directions of the cleaner manufacturer. If used, clean your humidifier every day to decrease the possibility of contamination. Follow the cleaning directions from the home care provider or the manufacturer of the humidifier. Replace the humidifier every month, or as directed by the manufacturer or your home care provider. (Do not overfill the humidifier.) WARNING: Electrical shock hazard. Turn OFF the unit and disconnect the power cord from the electrical outlet before you clean the unit to prevent accidental electrical shock and burn hazard. Only your Equipment Provider or a qualified service technician should remove the covers or service the unit. Do not use liquid directly on the unit. A list of undesirable chemical agents includes but is not limited to the following: alcohol and alcohol-based products, concentrated chlorine-based products (ethylene chloride), and oil- based products (Pine-Sol®, Lestoil®). These are NOT to be used to clean the plastic housing on Oxygen Concentrator, as they can damage the unit’s plastic. WARNING: Electrical shock hazard. Disconnect the power cord from the electrical outlet before you clean the unit to prevent accidental electrical shock and burn hazard. Only your Equipment Provider or a qualified service technician should remove the covers or service the unit. WARNING: Care should be taken to prevent the Oxygen Concentrator and the battery from getting wet or allowing fluids to enter the unit. This can cause a malfunction or shut down, and cause an increased risk for electrical shock or burns. WARNING: Clean the cabinet, control panel, and power cord only with a mild household cleaner applied with a damp (not wet) cloth or sponge, and then wipe all surfaces dry. Do not allow any liquid to get inside the device. Pay special attention to the oxygen outlet for the cannula connection to make sure it remains free of dust, water, and particles. WARNING: Do not use liquid directly on the unit. A list of undesirable chemical agents includes but is not limited to the following: alcohol and alcohol-based products, concentrated chlorine-based products (ethylene chloride), and oil- based products (Pine-Sol®, Lestoil®). These are NOT to be used to clean the plastic housing on Oxygen Concentrator, as they can damage the unit’s plastic. 20 — 4805 C CAUTION: DO NOT operate the eQuinox and ambulate while a humidifier is attached. Remove the humidifier bottle before walking. DO NOT lay the eQuinox down while attached to a humidifier bottle. eQuinox Cart Before cleaning the eQuinox Cart, remove it from the eQuinox. Use a damp (not wet) cloth or sponge and mild cleaning solution to clean the cart. Battery Pack (Battery) The Battery in the eQuinox needs special care to make sure it has a longer life and the highest level of performance. The CAIRE Battery is the only Battery recommended for use with the eQuinox. Use a damp (not wet) cloth or sponge to clean the Battery. First spray the cloth or sponge with a mild detergent, then clean the Battery case and the latch. CAIRE recommends replacing the battery pack after 2 years. Battery Disposal Your Battery is rechargeable and can be recycled. Always return it to your home care provider for proper disposal. You can also contact your local city or town offices for directions on proper disposal of the Battery. eQuinox Oxygen System Disposal Local environmental laws may not allow disposal of electrical and/or electronic equipment such as the eQuinox or AC Power Supply. Contact the local city or town offices for instructions on the correct way to dispose of electrical or electronic equipment. You may also contact CAIRE Inc. for disposal information. EMC Tables Guidance and Manufacturer’s Declaration—Electromagnetic Emissions The eQuinox is intended for use in the electromagnetic environment specified below. The customer or the user of the eQuinox should assure that it is used in such an environment. Emissions Test RF emissions CISPR 11 RF emissions CISPR 11 Compliance Electromagnetic Environment - Guidance Group 1 The eQuinox uses RF energy only for its internal function. Therefore, its RF emissions are very low and are not likely to cause any interference in nearby electronic equipment. Class B Harmonic emissions IEC 61000-3-2 Class A Voltage fluctuations/ flicker emissions IEC 61000-3-3 Complies The eQuinox is suitable for use in all establishments, including domestic establishments and those directly connected to the public low-voltage power supply network that supplies buildings used for domestic purposes. eQuinox (Model 4000) User Manual — 21 Guidance and Manufacturer’s Declaration—Electromagnetic Immunity The eQuinox is intended for use in the electromagnetic environment specified below. The customer or the user of the eQuinox should assure that it is used in such an environment. Immunity test IEC 60601 test level Electromagnetic envi±6 kV contact ronment – guidance ±8 kV air IEC 61000-4-2 Compliance level Electromagnetic environment – guidance ±6 kV contact Floors should be wood, concrete or ceramic tile. If floors are covered with synthetic material, the relative humidity should be at least 30 %. ±8 kV air Electrical fast transient/burst ±2 kV for power supply lines ±2 kV for power supply lines IEC 61000-4-4 ±1 kV for input/output lines N/A ±1 kV line(s) to line(s) ±1 kV line(s) to line(s) Surge IEC 61000-4-5 Voltage dips, short interruptions and voltage variations on power supply input lines IEC 61000-4-11 Power frequency (50/60 Hz) magnetic field IEC 61000-4-8 ±2 kV line(s) to earth <5 % UT <5 % UT (>95 % dip in UT ) (>95 % dip in UT ) for 0,5 cycle for 0,5 cycle 40 % UT 40 % UT (60 % dip in UT ) (60 % dip in UT ) for 5 cycles for 5 cycles 70 % UT 70 % UT (30 % dip in UT ) (30 % dip in UT ) for 25 cycles for 25 cycles <5 % UT <5 % UT (>95 % dip in UT ) (>95 % dip in UT ) for 5 sec for 5 sec 3A/m 3A/m NOTE UT is the A.C. mains voltage prior to application of the test level. 22 — 4805 C Mains power quality should be that of a typical commercial or hospital environment. Mains power quality should be that of a typical commercial or hospital environment. Mains power quality should be that of a typical commercial or hospital environment. If the user of the eQuinox requires continued operation during power mains interruptions, it is recommended that the eQuinox be powered from an uninterruptible power supply or a battery. Power frequency magnetic fields should be at levels characteristic of a typical location in a typical commercial or hospital environment. Guidance and Manufacturer’s Declaration–Electromagnetic Immunity The eQuinox is intended for use in the electromagnetic environment specified below. The customer or the user of the eQuinox should assure that it is used in such an environment. Immunity test IEC 60601 test level Compliance level Electromagnetic environment – guidance Conducted RF 3 Vrms 3 Vrms IEC 61000-4-6 150 kHz to 80 MHz Portable and mobile RF communications equipment should be used no closer to any part of the eQuinox, including cables, than the recommended separation distance calculated from the equation applicable to the frequency of the transmitter. Radiated RF 3 V/m IEC 61000-4-3 80 MHz to 2,5 GHz 3 V/m Recommended separation distance d 1.2 P d 1.2 P = 80 MHz to 800 MHz d 1.2 P = 800 MHz to 2,5 GHz where P is the maximum output power rating of the transmitter in watts (W) according to the transmitter manufacturer and d is the recommended separation distance in metres (m). Field strengths from fixed RF transmitters, as determined by an electromagnetic site survey,a should be less than the compliance level in each frequency range. b Interference may occur in the vicinity of equipment marked with the following symbol: NOTE 1 At 80 MHz and 800 MHz, the higher frequency range applies. NOTE 2 These guidelines may not apply in all situations. Electromagnetic propagation is affected by absorption and reflection from structures, objects and people. Field strengths from fixed transmitters, such as base stations for radio (cellular/cordless) telephones and land mobile radios, amateur radio, AM and FM radio broadcast and TV broadcast cannot be predicted theoretically with accuracy. To assess the electromagnetic environment due to fixed RF transmitters, an electromagnetic site survey should be considered. If the measured field strength in the location in which the eQuinox is used exceeds the applicable RF compliance level above, the eQuinox should be observed to verify normal operation. If abnormal performance is observed, additional measures may be necessary, such as re-orienting or relocating the eQuinox. a b Over the frequency range 150 kHz to 80 MHz, field strengths should be less than 3 V/m. eQuinox (Model 4000) User Manual — 23 Recommended separation distances between portable and mobile RF communications equipment and the eQuinox The eQuinox is intended for use in an electromagnetic environment in which radiated RF disturbances are controlled. The customer or the user of the eQuinox can help prevent electromagnetic interference by maintaining a minimum distance between portable and mobile RF communications equipment (transmitters) and the eQuinox as recommended below, according to the maximum output power of the communications equipment. Rated maximum output power of transmitter Separation distance according to frequency of transmitter m 150 kHz to 80 MHz 80 MHz to 800 MHz 800 MHz to 2,5 GHz W d 1.2 P d 1.2 P d 1.2 P 0,01 0.12 0.12 0.23 0,1 0.38 0.38 0.73 1 1.2 1.2 2.3 10 3.8 3.8 7.3 100 12 12 23 For transmitters rated at a maximum output power not listed above, the recommended separation distance d in metres (m) can be estimated using the equation applicable to the frequency of the transmitter, where P is the maximum output power rating of the transmitter in watts (W) according to the transmitter manufacturer. NOTE 1 At 80 MHz and 800 MHz, the separation distance for the higher frequency range applies. NOTE 2 These guidelines may not apply in all situations. Electromagnetic propagation is affected by absorption and reflection from structures, objects and people. 24 — 4805 C General Airline Travel Information During taxi, take-off, and landing, the eQuinox must be turned off and stowed under the seat or in another approved stowage location so as to not block the aisle way or the entry way into the row if the eQuinox will not be used. During taxi, take-off, and landing, the user must be in a seat location that does not restrict any other passenger’s access to, or use of, any required emergency or regular exit, or the aisle(s) in the passenger compartment of the aircraft if the eQuinox is used. User’s are not permitted to be seated in an exit row if using the eQuinox. If the eQuinox is used when decompression of the cabin occurs and the oxygen cabin oxygen system deploys, then the user is to discontinue use of the eQuinox and use the aircraft supplemental oxygen. The eQuinox unit is to be turned off after securing the aircraft supplemental oxygen. Prior to travel, the user needs to inspect the eQuinox to ensure it is in good operational condition. Battery Pack & Airline Travel Please allow for ground time (preflight check in, security check in, etc.) and layovers. Most airlines require that you have an adequate number of fully charged batteries to power the device for at least 150% of the expected maximum trip duration (flight times, all ground time; before and after flight, and during connections and for unexpected delays). It is suggested to always carry an extra battery with you on trips. Each airline has their own requirements for traveling with oxygen. Contact your airline at least 48 hours prior to departure to inform them you will be traveling with the eQuinox. CAUTION: The US Department of Transportation (DOT) and United Nations (UN) Regulations require the removal of the battery from the device for all international airline travel when the oxygen concentrator is checked as luggage. When shipping the oxygen concentrator, the battery must also be removed from the device and packaged properly. eQuinox (Model 4000) User Manual — 25 CAIRE Inc.® 2200 Airport Industrial Drive, Ste. 500 Ball Ground, GA 30107 USA 1-800-482-2473 Worldwide: www.CAIREmedical.com Medical Product Services GmbH Borngasse 20 35619 Braunfels, Germany Worldwide: www.CAIREmedical.com CAIRE Inc. reserves the right to discontinue its products, or change the prices, materials, equipment, quality, descriptions, specifications and/or processes to its products at any time without prior notice and with no further obligation or consequence. All rights not expressly stated herein are reserved by us, as applicable. As of the date of this publication, eQuinox, SeQual and autoSAT and their related logos (as applicable) are trademarks registered by CAIRE Inc. Lysol® is a registered trademark of Reckitt Benckiser, UK. ® OxySafe is a registered trademark of Applied Home Healthcare Equipment. Pine-Sol® and Lestoil® are registered trademarks of The Clorox Company. PN 4805 C