1
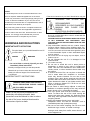
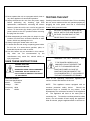
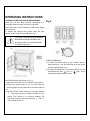
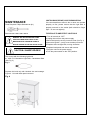
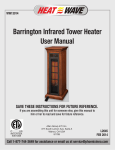
EA1105J
INFRARED
Electric Stove
User Manual
Save these instructions for future reference.
If you are assembling this unit for someone else, give this
manual to him or her to read and save for future reference
4001358
IMPORTANT SAFETY INSTRUCTIONS
CAUTION
CAUTION:BEFORE OPERATING
THIS EQUPMENT,PLEASE READ
THESE STRUCTIONS CAREFULLY
READ ALL INSSTRUCATIONS BEFORE
USINGTHIS APPLIANCE
RISK OF ELECTRICAL SHOCK DO NOT OPEN
NO USER-SERVICEABLE PARTS INSIDE
SA1965
HIGH TEMPERATURE
SA1965
KEEP DRAPERY AND OTHER FURNISHINGS AT LEAST 3.3
FEET/1 METER FROM THE FRONT AND SIDES OF THE
ELECTRICAL HEATER.
WARNING:
1.RISK OF FIRE – KEEP COMBUSTIBLE MATERIAL
AWAY FROM THE FRONT OF THE ELECTRICAL
HEATER.
2.SERVICING SHOULD BE DONE ONLY WHILE THE
ELECTRICAL HEATER IS DISCONNECTED FROM
THE POWER SUPPLY
1.Before permanently placing your stove, plug it into
a convenient outlet to verify that the circuit
breakers for the outlet are on.
2.The heater may emit a slight, harmless odor when
first used.This odor is normal and is caused by the
initial heating of internal heater parts and will not
occur again.
3.If your electrical heater does not emit heat, consult
your owner’smanual for further information.
SPECIAL CHARACTERISTICS:
A) The smoldering glow of the flames can hardly be
distinguished from that of a real fire. This heater is
ideal for use all year round, even when central
heating has been turned off.
B) This heater produces a hot current of air.
UNPACKING AND INSTALLING THE
ELECTRICAL HEATER.
1.Open the packaging carefully and remove the heater.
2.Remove and discard the plastic bag.
3.BE RESPONSIBLE HANDLING THE PACKING MATERIALS.
WARNING: KEEP PLASTIC WRAPPING AWAY FROM CHILDREN.
4.Keep the original packing for future transport and/or storage.
5.Keep the front of the unit, through which the heat is radiated, at
least 3 feet/0.9 meter away from furniture, curtains and other
flammable objects/materials at all times.
6.Ensure there is a grounded socket nearby (back of the
appliance).
7.The power cord must remain at the back of the appliance and
must not be in contact with any hot element.
REPLACEMENT LIGHT BULB CAUTION:
REPLACEMENT SHOULD ONLY BE DONE WITH E12 TYPE
CHANDELIER LIGHT BULB, CANDELABRA BASE, RATED
120V, 40W MAXIMUM.
NOTE:
A dedicated power circuit is recommended for the unit
but not required. Additional appliances on the same
circuit may exceed the current (amperage) rating for that
circuit. If after the installation of your unit, the circuit
breaker trips or the fuse fails on a repeated basis, then a
dedicated circuit will likely be required.
Any new wiring must be done in compliance with local
and national codes and other applicable regulations in
order to reduce the risk of fire, electrical shock or other
injuries. It is strongly recommended that you hire a
1. Read all the instructions in your User’s Manual before using this
unit.
WARNING: ANY OTHER USE
NOT
RECOMMENDED
OR
DESCRIBED IN YOUR OWNER’S
MANUAL MAY CAUSE FIRE
BURNS,
ELECTRICAL SHOCKS AND/OR
SERIOUS
OR
2. The unit canOTHER
become hot
when in use.INJURIES
To avoid accidental
DEATH
.
burns, do not
allow bare
skin to come in contact with the
licensed electrician to complete any such work.
hot surfaces of the unit.
WARNINGS AND RECAUTIONS
EXTREME CAUTION IS NECESSARY WHEN THE HEATER
IS LEFT OPERATING AND UNATTENDED. KEEP
CHILDREN, INVALIDS AND PETS AWAY FROM THE UNIT
WHEN IN USE.
IMPORTANT SAFETY NSTRUCTIONS
This symbol alerts you to potential hazards that can kill
you or hurt you and/or others.
DANGER
WARNING
You can be killed or seriously injured if you don’t
immediately follow instructions.
All safety messages will tell you what the potential
Hazard Is,tell you how to reduce the chances of injury,
andtell you what can happen if the instructionsare
not followed.
IMPORTANT SAFETY INSTRUCTIONS
WARNING: WHEN USING THIS PRODUCT,
BASIC PRECAUTIONS SHOULD ALWAYS
BE FOLLOWED, INCLUDING
THE FOLLOWING:
TM
Your Hearth Trends electric stove is classified as a
heater. As with any electrical appliance and
particularly with electrical heaters, basic
precautions must be followed in order to reduce
the risk of fire, burns, electrical shocks and/or
other serious injuries or death.
3. Keep combustible materials such as, curtains, drapes,
furniture, pillows, clothing, linens, bedding, paper, etc.,
at least 3.3 feet / 1 meter from the front and sides of the
unit. Do not use this unit in areas where gasoline, paint,
or other flammable liquids or their associated vapors
may be present.
4.Do not use this unit for drying any wet objects, such as
clothes, toys etc.
5. Do not operate the unit if it is damaged or has
malfunctioned.
6.For indoor use only.
7. Do not use or install this unit in areas prone to
dampness, or where it may come in contact with
water. This unit is not intended for use in bathrooms,
laundry areas, or other locations where water may
be present.
8. To reduce the risk of fire, do not place or install this
unit in areas where the ventilation or circulation
ducts may become blocked. Do not use on soft
surfaces, like a bed, where openings may become
blocked. Make sure there are at least 4”/10.15 cm of
space between the back of your heater and the wall.
Keep a minimum distance of 2”/5.08 cm on each
side of your heater free.
9.Do not insert or allow foreign objects to enter any
ventilation or exhaust opening as this may cause an
electric shock or fire, or damage the heater.
10.The unit’s power cord must be connected to 120V
outlet. To reduce the risk of fire, avoid running the
power cord under rugs, carpets, etc. Keep the power
cord away from high traffic areas where it may pose
a tripping hazard.
11.Alway plug heaters directly into a wall outlet/
receptacle. Never use with an extension cord or
relocatable power tap (outlet/power strip).
12.Do not run cord under carpeting. Do not cover cord
with throw rugs, runners, or similar coverings
Arrange cords away from traffic areas where it will
not be tripped over.
13.Never operate the unit on a program switch, timer or
any other appliance for automatic operation.
14.Always disconnect the unit from the power supply
before performing any cleaning, light bulb
replacement, maintenance, relocating the electric
heater or when the unit is not in use for long periods
of time. To disconnect the heater, push the master
power switch to the OFF position before removing
the plug from the outlet.
15.When transporting or storing the unit, keep it in a dry
location, free from dust, excessive vibration or other
factors, which may damage the unit.
16.Always unplug the heater when not in use.
17.A heater has hot and arcing or sparking parts inside.
Do not use it in areas where gasoline, paint, or
flammable liquids are used or stored.
18.Use this heater only as described in this manual.
Any other use not recommended by the
manufacturer may cause fire, electric shock, or
injury to persons.
SAVE THESE INSTRUCTIONS
DANGER: HIGH TEM
PERATURES MAY BE
GENERATED UNDER CERTAIN ABNORMAL
CONDITIONS. DO NOT PARTIALLY OR
FULLY COVER OR OBSTRUCT THE FRONT
OF THIS HEATER
SPECIFICATIONS
Technical Specifications
Model
EA1105J
Voltage
120V
Frequency 60Hz
Power
1400W
TESTING THE UNIT
Carefully remove the unit from the box. Prior to installing
the unit, test to make sure the unit operates properly by
plugging the unit’s power cord into a conveniently
located 120V grounded outlet.
CAUTION: TO PREVENT ELECTRICAL
SHOCK, MATCH THE WIDE BLADE OF
THE PLUG TO WIDE SLOT OF THE
RECEPTACLE,FULLY INSERT.
WARNING: DO NOT OPERATE THE
UNIT
IF THE POWER CORD/PLUG IS
DAMAGED. DO NOT OPERATE THE
UNIT IF IT IS DAMAGED OR HAS
MALFUNCTIONED. IN CASE OF
MALFUNCTION DISCONNECT THE
PLUG IMMEDIATELY. IF YOU SUSPECT
THE UNIT IS DAMAGED, ETURNING
THIS
UNIT TO THE
STORE.regarding the
Refer to the
Operating
Instructions
various controls and features of the unit.
NOTE:
This appliance comes equipped with an
overheat protection safety device.
Should the
appliance begin to overheat for any reason, it will
automatically turn all heater functions of the appliance
off. The appliance will have to be reset prior to
continuing use. To reset the overheat protection safety
device, turn all controls off and unplug the appliance.
Wait 10 minutes, plug the appliance back in and turn on.
OPERATING INSTRUCTIONS
CONTROL PANEL OPERATING PROCEDURES
Once the unit has been properly connected to a
grounded electrical outlet, it is ready to operate.
Note: Ensure the circuit breakers for the power supply
are turned on.
To access the control panel, slowly open the door
located on the front of the heater.(See Fig 1)
Fig 2
CAUTION: TO AVOID INJURY AND/OR
DAMAGE, ALWAYS OPERATE THE
DOOR SLOWLY TO THE OPEN AND
CLOSED POSITION.
FLAME OPERATION
1.To switch the flame effect of your heater, flip the
power switch on. You will know that you have power
when the flame effect is on.
2.To adjust the brightness of the flame effect, turn the
left-handed dial, from
“Low”, to
“High”, until it
reaches the brightness you desire.
HEATER OPERATION (Refer to Fig. 2)
1.Open the door of the unit to locate the control panel.
2.Ensure the power switch is on. You will know that
you have power to the heater when the flame effect is
on.
3.Flip the second rocker switch to the right, marked
“Ⅰ”. This switch gives you 900W of power to your
heater. This switch is for low-level heating. For
high-level heating, make sure that both “Ⅰ” and “Ⅱ”
rocker switches are on.
MAINTENANCE
Tools Required: Philips Screwdriver (#1)
REPLACING THE LIGHT BULB
WARNING: THE UNIT MUST BE UNPLUGGED
FROM THE POWER SUPPLY PRIOR TO ANY
MAINTENANCE OR CLEANING IN ORDER TO
REDUCE THE RISK OF ELECTRIC SHOCK OR FIRE.
.
CAUTION: SHARP EDGES!
This comes with the following light bulb:
2× 40W E12 Chandelier Light Bulb, Candelabra Base
(See Fig. 3)
Fig. 3
Replace this bulb only with identical size and wattage.
Figure 4 - Unit with back panel removed
Fig. 4
LIGHT BULB MAY BECOME LOOSE DURING SHIPPING.
If the simulated flame effect is dim or does not operate
properly at first, please ensure that the light bulb is
properly secured in the socket (bulb should be finger
tight – do not over tighten).
TO REPLACE FLAME EFFECT LIGHT BULB
1.Turn all controls to “OFF”
2.Unplug the unit from the power supply.
3.Remove back panel by removing 4 screws as shown. (See Fig. 4)
4.Unscrew the light bulb (turning counter-clockwise) and remove.
5.Replace with new light bulb, turning clockwise.
6.Replace back panel and secure with screws.
7.Plug the unit into the power supply.
8.Turn the power switch to the “ON” position.
CLEANING YOUR HEATER
TROUBLESHOOTING:
WARNING: BEFORE CLEANING THE EXTERIOR
WARNING:
OF THE APPLIANCE, DISCONNECT THE UNIT
cool for at least 10 minutes before attempting to
FROM THE POWER SUPPLY AND LEAVE UNTIL
service. Only a qualified professional should
COOL.
attempt to service or repair the appliance.
You can clean the exterior of the heater with a soft, damp,
lint-free cloth. Do not use cleaning or polishing products.
CLEANING THE FRONT GLASS PANEL
WARNING: BEFORE CLEANING THE EXTERIOR
Turn off the appliance, unplug and let
IF YOU EXPERIENCE DIFFICULTIES, PLEASE DO
NOT RETURN THIS PRODUCT TO STORE For
assistance with this appliance, please call our customer
service department
PROBLEM
POSSIBLE CAUSE
SOLUTION
No warm air is
Coming from the
heater
The overheat protection
device in the appliance
has been triggered
Turn all controls off, unplug
the appliance, allow to
cool for at least 10 min
plug back in and restart
The appliance
turns off and will
not turn back on.
1. The overheat protection
device in the appliance
has been triggered.
2. House circuit breaker
has been tripped.
1.Turn all controls off,
unplug the appliance, allow
to cool for at least 10 min.,
plug back in and restart.
2. Reset house circuit
breaker.
The appliance
does not turn on
when the button
is pushed to
“ON”
The overheat protection
device in the appliance
has been triggered
Turn all controls off,
unplug the appliance,
allow to cool for at least
10 min., plug back in
and restart
1. Dimmer control knob
is
set too low.
1. Turn knob clockwise
toincrease light.
2. Inspect light bulb and
replace if necessary.
(see
Maintenance
section of this manual)
3.
Remove
screws
holding back access
panel in place and
remove back acess
panel. Secure end of
“flame wand” back into
the support bracket.
OF THE APPLIANCE, DISCONNECT THE UNIT
FROM THE POWER SUPPLY AND LEAVE UNTIL
COOL.
Over time, the front glass panel may become dirty
or dusty. Dust can be removed by lightly rubbing
the glass surface with a clean lint-free cloth or
paper towel. To remove fingerprints or other marks,
use a soft, damp, lint-free cloth with a good quality
household glass cleaner. The front glass panel
should always be completely dried with a lint-free
cloth or paper towel.
Storage: When not in use, unplug the unit from the
power supply and store it in a dry, dust-free location.
.
CAUTION: DO NOT USE ABRASIVE
CLEANERS ! ON THE GLASS PANEL.
DO NOT SPRAY LIQUIDS DIRECTLY
ONTO ANY SURFACE OF THE UNIT.
2. Light bulb is burnt
out.
3. “Flame wand” has
come
loose from bracket.
Flame is dim or
not present
4. “Flame wand” motor
is
.
WARNING: AN AUTHORIZED SERVICE
REPRESENTATIVE SHOULD PERFORM
ANY OTHER SERVICING.
not functioning.
1 YEAR LIMITED WARRANTY:
Each and every product that we manufacture is tested prior to being shipped to retail stores. However,
certain damages can sometimes occur during transportation. The following non-transferable limited
warranty is extended only to the original consumer-purchaser of this Allen Group Int’l Inc. (A.G.I.) product.
This product is only warranted against defects in material and workmanship subject to the normal and
reasonable use and correct assembly (if assembled by the consumer-purchaser) of the product for a period
of one (1) year from the date of purchase.
This warranty does not apply to the normal wear and tear or to any failures or operating difficulties due to
accidental damage, abuse, misuse, alteration, misapplication, careless handling, improper installation,
improper maintenance or to products used commercially. This warranty does not cover light bulbs. The
duration of all implied warranties on this particular purpose are limited to the one (1) year duration of the
express warranty period specified above. In no event will A.G.I. be liable for any incidental or consequential
damages (including loss of profits) arising from the use of this product. Some jurisdictions do not allow
limitations on how long an implied warranty lasts / or do not allow the limitation or exclusion of incidental or
consequential damages, so these implied warranty limitations may not apply to you. This limited warranty
gives you specific legal rights. You may also have other rights which vary from jurisdiction to jurisdiction.
Repair or replacement, at A.G.I.’s option, of a defective product is your sole remedy under this limited
warranty. In no event will A.G.I.’s maximum liability exceed the purchase price of the product paid by the
consumer-purchaser.
Any legal action taken as a result of any alleged breach of this limited warranty or arising out of any use of
this product must be commenced in the State of California. A.G.I. makes no other additional warranties
express or implied with respect to this product or its component parts except those express limited warranties
described above. No dealer of this product nor any retail establishment selling this product has any
authority to make any warranties or to promise remedies in addition to or inconsistent with those stated
above. If replacement parts are needed or to obtain performance of any obligation under this limited warranty,
phone A.G.I.’s Customer Service Department prepared to provide evidence of purchase date and proof of
purchase, model number of your A.G.I. product, part number and defective part. You must pay all expenses
incurred in obtaining performance of any obligation under this limited warranty, including transportation,
postage, and other incidental service costs. If defective part or parts are requested by Customer Service
Department, you must make the product available to us free and clear of all liens and other encumbrances.
A.G.I. reserves the right to change prices, specifications and designs and to discontinue models without
notice and without incurring obligations
NOTES / NOTAS: