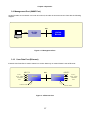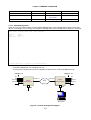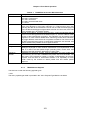
1
Loop-IP6700
TDMoEthernet
User’s Manual
LOOP TELECOMMUNICATION INTERNATIONAL, INC.
8F, NO. 8, HSIN ANN RD.
SCIENCE-BASED INDUSTRIAL PARK
HSINCHU, TAIWAN
Tel:
+886-3-578-7696
Fax:
+886-3-578-7695
© 2007 Loop Telecommunication International, Inc. All rights reserved.
Loop-IP is a trade mark of Loop Telecommunication International, Inc.
Version 8, 20 MAR 2007
ii
TABLE OF CONTENTS
1
1.1
1.3
1.4
PRODUCT DESCRIPTION................................................................................................1
Description.....................................................................................................................1
Applications ...................................................................................................................2
Specification ..................................................................................................................3
2
2.1
2.2
INSTALLATION .................................................................................................................4
Site Selection.................................................................................................................4
Mechanical Installation ..................................................................................................5
3
3.1
OPERATION....................................................................................................................23
Quick Start for Loop-IP6700 ........................................................................................23
3.1.1 Power On ............................................................................................................23
3.2
Self Test.......................................................................................................................23
3.3
Return to Default .........................................................................................................23
3.4
Using Terminal ............................................................................................................23
3.5
System Configuration ..................................................................................................24
3.5.1 Console Port .......................................................................................................24
3.6
Alarm ...........................................................................................................................24
3.7
Reports ........................................................................................................................25
3.8
LED… ..........................................................................................................................26
3.9
Management Port (SNMP Port)...................................................................................27
3.10
User Data Port (Ethernet)............................................................................................27
4
4.1
4.2
4.3
5
5.1
5.2
MAINTENANCE...............................................................................................................28
Self-Test ......................................................................................................................28
Near End Loopback.....................................................................................................28
4.2.1 E1/T1 Line Loopback ..........................................................................................28
4.2.2 E1/T1 Payload Loopback....................................................................................28
Far End Loopback .......................................................................................................29
FRONT PANEL OPERATION .........................................................................................30
Configuration ...............................................................................................................36
5.1.1 System ................................................................................................................36
5.1.1.1
Ethernet......................................................................................................36
5.1.1.2
Lan Port......................................................................................................36
5.1.1.3
Bun ACT Timer...........................................................................................37
5.1.1.4
LPT Timer...................................................................................................37
5.1.1.5
Lan Rate.....................................................................................................37
5.1.1.6
CAS Idle code ............................................................................................38
5.1.1.7
Remote loss ...............................................................................................38
5.1.1.8
IP ................................................................................................................38
5.1.1.9
Date............................................................................................................39
5.1.1.10 Time...........................................................................................................39
5.1.1.11 SNMP ........................................................................................................39
5.1.1.12 Device Name .............................................................................................40
Bundle Setup ...............................................................................................................41
5.2.1 Source IP ............................................................................................................41
5.2.2 Source subnet.....................................................................................................41
5.2.3 Gateway IP .........................................................................................................41
5.2.4 Port Select ..........................................................................................................42
5.2.5 Bundle ID ............................................................................................................42
5.2.6 Action ..................................................................................................................42
iii
5.3
5.4
5.5
5.6
5.7
5.8
5.2.7 UDP number .......................................................................................................43
5.2.8 Timeslot from ......................................................................................................43
5.2.9 Timeslot num ......................................................................................................44
5.2.10
Destination IP .................................................................................................44
5.2.11
Cell in bundle..................................................................................................44
5.2.12
Jitter delay ......................................................................................................44
5.2.13
Jitter size.........................................................................................................45
5.2.14
Vlan.................................................................................................................45
5.2.15
Vlan1 ID ..........................................................................................................45
5.2.16
Vlan1 priority...................................................................................................46
5.2.17
Vlan2 ID ..........................................................................................................46
5.2.18
Vlan2 priority...................................................................................................46
5.2.19
Bundle status..................................................................................................46
5.2.20
Confirm? .........................................................................................................47
Bundle Status ..............................................................................................................47
5.3.1 Classifi pack RX..................................................................................................47
5.3.2 Byte received ......................................................................................................48
5.3.3 Byte transmitted ..................................................................................................48
5.3.4 Packet received ..................................................................................................48
5.3.5 Packet transmitted ..............................................................................................48
5.3.6 LAN WAN SNMP ................................................................................................49
Alarm ...........................................................................................................................49
5.4.1 Alarm setup.........................................................................................................49
5.4.1.1
Alarm clock.................................................................................................49
5.4.1.2
Alarm link....................................................................................................50
5.4.2 Alarm status ........................................................................................................50
5.4.3 Alarm clear..........................................................................................................51
Information...................................................................................................................51
5.5.1 Software Version.................................................................................................51
5.5.2 Hardware Version ...............................................................................................51
5.5.3 Serial number......................................................................................................52
Miscellaneous ..............................................................................................................52
5.6.1 Store Config ........................................................................................................52
5.6.2 Retrieve Config ...................................................................................................52
5.6.3 Load Default........................................................................................................53
5.6.4 System reset .......................................................................................................53
E3/DS3 Menu ..............................................................................................................54
5.7.1 Config Setup .......................................................................................................54
5.7.1.1
Tx Length ...................................................................................................54
5.7.1.2
Xmt AIS ......................................................................................................54
5.7.2 Port Status ..........................................................................................................55
5.7.2.1
LOS XMT AIS.............................................................................................55
5.7.2.2
BPV ES ......................................................................................................55
5.7.3 Port Alarm ...........................................................................................................55
5.7.3.1
Alarm setup ................................................................................................55
5.7.3.2
Port History.................................................................................................57
5.7.3.3
Alarm clear .................................................................................................58
5.7.4 Port lookback ......................................................................................................58
5.7.4.1
Local Loopback ..........................................................................................58
5.7.5 Clock Source.......................................................................................................59
5.7.5.1
Master Clock ..............................................................................................59
5.7.5.2
Second Clock .............................................................................................60
5.7.5.3
Current Clock .............................................................................................61
5.7.5.4
Recover Clock ............................................................................................61
5.7.5.5
Clock Status ...............................................................................................62
E1-CARD Menu ...........................................................................................................63
5.8.1 Config Setup .......................................................................................................63
5.8.1.1
Frame .........................................................................................................63
iv
5.9
5.8.1.2
Code...........................................................................................................63
5.8.1.3
CRC............................................................................................................64
5.8.1.4
RAI .............................................................................................................64
5.8.1.5
AIS..............................................................................................................64
5.8.1.6
CAS ............................................................................................................65
5.8.1.7
OOS ...........................................................................................................65
5.8.1.8
FDL.............................................................................................................66
5.8.1.9
Sa_bit .........................................................................................................66
5.8.1.10
IDLE .......................................................................................................67
5.8.2 Port Status ..........................................................................................................67
5.8.2.1
LOF LOS ....................................................................................................67
5.8.2.2
RCV AIS RCV RAI .....................................................................................67
5.8.2.3
XMT AIS XMT RAI .....................................................................................68
5.8.2.4
BPV ES ......................................................................................................68
5.8.3 Port Alarm ...........................................................................................................68
5.8.3.1
Alarm Setup................................................................................................68
5.8.3.2
Port History.................................................................................................70
5.8.3.3
Alarm Clear ................................................................................................73
5.8.4 Port Loopback.....................................................................................................73
5.8.4.1
Local Loopback ..........................................................................................74
5.8.4.2
Remote Loopback ......................................................................................74
5.8.4.3
Send Bert ...................................................................................................75
5.8.5 Clock Source.......................................................................................................76
5.8.5.1
Master Clock ..............................................................................................76
5.8.5.2
Second Clock .............................................................................................77
5.8.5.3
Current Clock .............................................................................................78
5.8.5.4
Recover Clock ............................................................................................79
5.8.5.5
Clock status................................................................................................79
T1-CARD Menu ...........................................................................................................80
5.9.1 Config Setup .......................................................................................................80
5.9.1.1
Frame .........................................................................................................80
5.9.1.2
Code...........................................................................................................80
5.9.1.3
CRC............................................................................................................81
5.9.1.4
RAI .............................................................................................................81
5.9.1.5
AIS..............................................................................................................81
5.9.1.6
CAS ............................................................................................................82
5.9.1.7
OOS ...........................................................................................................82
5.9.1.8
FDL.............................................................................................................83
5.9.1.9
Sa_bit .........................................................................................................83
5.9.1.10 IDLE...........................................................................................................84
5.9.2 Port Status ..........................................................................................................84
5.9.2.1
LOF LOS ....................................................................................................84
5.9.2.2
RCV AIS RCV RAI .....................................................................................84
5.9.2.3
XMT AIS XMT RAI .....................................................................................85
5.9.2.4
BPV ES ......................................................................................................85
5.9.3 Port Alarm ...........................................................................................................85
5.9.3.1
Alarm Setup................................................................................................85
5.9.3.2
Port History.................................................................................................87
5.9.3.3
Alarm Clear ................................................................................................90
5.9.4 Port Loopback.....................................................................................................90
5.9.4.1
Local Loopback ..........................................................................................91
5.9.4.2
Remote Loopback ......................................................................................91
5.9.4.3
Send Bert ...................................................................................................92
5.9.5 Clock Source.......................................................................................................94
5.9.5.1
Master Clock ..............................................................................................94
5.9.5.2
Second Clock .............................................................................................95
5.9.5.3
Current Clock .............................................................................................96
5.9.5.4
Recover Clock ............................................................................................96
v
5.10
6
6.1
6.2
5.9.5.5
Clock status................................................................................................97
DTE Menu....................................................................................................................98
5.10.1
Config Setup ...................................................................................................98
5.10.1.1
Mode ......................................................................................................98
5.10.1.2
Rate .......................................................................................................98
5.10.1.3
Tx clock..................................................................................................99
5.10.1.4
Rx clock .................................................................................................99
5.10.1.5
DATA .....................................................................................................99
5.10.1.6
RTS......................................................................................................100
5.10.1.7
TTM......................................................................................................100
5.10.1.8
DCD .....................................................................................................100
5.10.2
Port Status ....................................................................................................101
5.10.2.1
Exit RTS LOS.......................................................................................101
5.10.2.2
CLK LOS DSR .....................................................................................101
5.10.2.3
CTS DCD .............................................................................................102
5.10.2.4
DSR RTS .............................................................................................102
5.10.3
Port Alarm.....................................................................................................102
5.10.3.1
Alarm Setup .........................................................................................102
5.10.3.2
Alarm History .......................................................................................103
5.10.3.3
Alarm Clear ..........................................................................................103
5.10.4
Port Loopback ..............................................................................................104
5.10.4.1
Local Loopback....................................................................................104
5.10.5
Clock Source ................................................................................................104
5.10.5.1
Master Clock ........................................................................................104
5.10.5.2
Second Clock.......................................................................................106
5.10.5.3
Current Clock .......................................................................................107
5.10.5.4
Recover Clock......................................................................................107
5.10.5.5
Clock status .........................................................................................107
TERMINAL OPERATION...............................................................................................109
Main Menu .................................................................................................................109
6.1.1 System Setup........................................................................................................110
6.1.1.1
System .....................................................................................................110
6.1.1.2
Inband Management ................................................................................111
6.1.1.3
Password..................................................................................................112
6.1.1.4
Port Speed Setup.....................................................................................112
6.1.1.5
Logoff .......................................................................................................113
6.1.1.6
Logon .......................................................................................................113
6.1.2 Time Slot IP Assignment ......................................................................................113
6.1.2.1
Bundle IP Setup .......................................................................................114
6.1.2.2
Time Slot IP Assignment..........................................................................114
6.1.3 Firmware Transfer.................................................................................................117
6.1.3.1
Download Mainboard Firmware ...............................................................118
6.1.3.2
Download Boot Strapper ..........................................................................118
6.1.3.3
Download Current Configuration..............................................................119
6.1.3.4
Upload Current Configuration from FLASH .............................................119
6.1.4 Store/Retrieve Configuration...............................................................................120
6.1.5 Clock Source Setup ............................................................................................121
6.1.6 System Alarm Setup ...........................................................................................122
6.1.7 System Configuration..........................................................................................122
6.1.8 Display MAP IP Assignment ...............................................................................123
6.1.9 Clock source Configuration .................................................................................123
6.1.10 Byte and Packet Counters ................................................................................124
6.1.11 Alarm Queue......................................................................................................124
6.1.12 Load Default Configuration .................................................................................125
6.1.13 Reset...................................................................................................................125
6.1.14 Clear Alarm Queue & History .............................................................................126
6.1.15 Alarm Cut Off ......................................................................................................126
E1 Sub-Menu.............................................................................................................127
vi
6.3
6.4
6.5
6.2.1 System Setup........................................................................................................127
6.2.2 Loopback Setup ....................................................................................................128
6.2.3 Alarm Setup ..........................................................................................................129
6.2.4 Chose Port ............................................................................................................130
6.2.5 Clear Performance Data .......................................................................................130
6.2.6 Clear Alarm History...............................................................................................130
6.2.7 1-Hour Performance Report .................................................................................131
6.2.8 24-Hour Performance Report ...............................................................................132
6.2.9 Line Availability .....................................................................................................133
6.2.10 Unit Configuration ...............................................................................................133
6.2.11 Unit Status ..........................................................................................................134
6.2.12 Unit Alarm History ...............................................................................................134
T1 Sub-Menu .............................................................................................................135
6.3.1 System Setup........................................................................................................135
6.3.2 Loopback Setup ....................................................................................................136
6.3.3 Alarm Setup ..........................................................................................................136
6.3.4 Bert Test ..............................................................................................................137
6.3.5 Clear Performance Data .......................................................................................137
6.3.6 Clear Alarm History...............................................................................................137
6.3.7 1-Hour Performance Report .................................................................................138
6.3.8 24-Hour Performance Report ...............................................................................138
6.3.9 Line Availability .....................................................................................................139
6.3.10 Unit Configuration ...............................................................................................139
6.3.11 Unit Status ..........................................................................................................140
6.3.12 Unit Alarm History ...............................................................................................140
DTE (V.35) Sub-Menu ...............................................................................................141
6.4.1 DTE Configuration ................................................................................................141
6.4.2 DTE Status............................................................................................................142
6.4.3 Alarm History ........................................................................................................142
6.4.4 System Setup........................................................................................................143
6.4.5 Loopback Tsst.......................................................................................................143
6.4.6 Alarm Setup ..........................................................................................................144
6.4.7 Clear Alarm History...............................................................................................144
DS3/E3 Sub-Menu.....................................................................................................145
6.5.1 DS3/E3 System Setup ......................................................................................145
6.5.2 DS3/E3 Loopback Test .....................................................................................146
6.5.3 Clear Performance Data ...................................................................................146
6.5.4 DS3/E3 Alarm Setup.........................................................................................147
6.5.5 Clear Alarm History...........................................................................................147
6.5.6 DS3/E3 1-Hour Performance Report ................................................................148
6.5.7 DS3/E3 24-Hour Performance Report ..............................................................149
6.5.8 DS3/E3 Line Availability....................................................................................150
6.5.9 DS3/E3 System Setup ......................................................................................151
6.5.10
DS3/E3 Status ..............................................................................................151
6.5.11
DS3/E3 Alarm History...................................................................................152
7
7.1
STEP BY STEP OPERATION .......................................................................................153
Time Slot IP Assignment ...........................................................................................153
7.1.1 Time Slot IP Assignment (Add bundle).............................................................153
7.1.2 Time Slot IP Assignment (Delete bundle).........................................................154
7.1.3 Time Slot IP Assignment (Delete all) ................................................................155
7.2 Password Setup ..............................................................................................................155
7.2.1 Enter old password ...............................................................................................155
7.2.2 Enter new password .............................................................................................156
7.2.3 Confirmation of new password .............................................................................156
7.3 Clock source setup ...........................................................................................................157
7.3.1 Application ........................................................................................................158
7.3.1.1
Example of clock source ..........................................................................158
For the clock source there are two examples to show as the table below................158
vii
8
8.1
8.2
FUNCTIONAL DESCRIPTION ......................................................................................159
TDMoEthernet Packet Format...................................................................................159
8.1.1 VLAN Option .....................................................................................................160
8.1.2 UDP/IP Header .................................................................................................161
8.1.3 TDMoEthernet Control Word ............................................................................162
8.1.4 TDMoEthernet Payload.....................................................................................163
AAL1 PAYLOAD TYPE MACHINE............................................................................164
LIST OF FIGURES
FIGURE 1- 1 APPLICATION DIAGRAM ..................................................................................................................... 2
FIGURE 2- 1 FRONT PANEL VIEW (WITH LCD)....................................................................................................... 5
FIGURE 2- 2 FRONT PANEL VIEW (WITHOUT LCD)................................................................................................. 5
FIGURE 2- 3 REAR PANEL VIEWS ......................................................................................................................... 6
FIGURE 2- 4 MAIN BOARD JUMPERS SETTING-E1, RJ (120 OHM).......................................................................... 8
FIGURE 2- 5 MAIN BOARD JUMPERS SETTING-E1, BNC (75 OHM)......................................................................... 9
FIGURE 2- 6 MAIN BOARD JUMPERS SETTING - T1 .............................................................................................. 10
FIGURE 2- 7 DAUGHTER BOARD JUMPERS SETTING - E1, RJ (120 OHM) ............................................................. 11
FIGURE 2- 8 DAUGHTER BOARD JUMPERS SETTING - E1, BNC (75 OHM)............................................................ 12
FIGURE 2- 9 DAUGHTER BOARD JUMPERS SETTING – T1 .................................................................................... 13
FIGURE 2- 10 INSTALLATION DIAGRAM (SINGLE) ................................................................................................. 14
FIGURE 2- 11 INSTALLATION DIAGRAM (DOUBLE) ................................................................................................ 14
FIGURE 2- 12 CHASSIS GROUNDING ................................................................................................................... 15
FIGURE 3- 1 MANAGEMENT PORT ....................................................................................................................... 27
FIGURE 3- 2 ETHERNET PORT ............................................................................................................................ 27
FIGURE 4- 1 LOOPBACK BLOCK DIAGRAM ........................................................................................................... 28
FIGURE 4- 2 FAR END DIAGRAM ......................................................................................................................... 29
FIGURE 8- 4
FIGURE 8- 5
FIGURE 8- 6
UDP/IP HEADER....................................................................................................................... 161
AAL1 PROCESSING................................................................................................................... 164
AAL1 PROCESSING FOR STRUCTURED WITHOUT CAS BUNDLES ................................................. 166
viii
LIST OF TABLES
TABLE 2- 1 JUMPER SETTING FOR MAIN BOARD .................................................................................................... 7
TABLE 2- 2 JUMPER SETTING FOR DAUGHTER BOARD ......................................................................................... 11
TABLE 2- 3 DB9S CONSOLE PORT PIN ASSIGNMENT .......................................................................................... 15
TABLE 2- 4 SNMP PORT ................................................................................................................................... 15
TABLE 2- 5 ALARM RELAY CONNECTOR .............................................................................................................. 16
TABLE 2- 6 POWER CONNECTOR ........................................................................................................................ 16
TABLE 2- 7 E1/ RJ48C LINE CONNECTOR .......................................................................................................... 16
TABLE 2- 8 RJ-45 FOR ETHERNET PORT ............................................................................................................ 16
TABLE 2- 9 V.35/DB25 DTE PORT PIN DEFINITION.......................................................................................... 17
TABLE 2- 10 EIA530/DB25 DTE PORT PIN DEFINITION...................................................................................... 18
TABLE 2- 11 X.21/DB15 DTE PORT PIN DEFINITION .......................................................................................... 18
TABLE 2- 12 RS449/DB37 DTE PORT PIN DEFINITION ...................................................................................... 19
TABLE 2- 13 RS422 DTE PORT PIN DEFINITION ................................................................................................ 20
TABLE 2- 14 DEFAULT SOFTWARE CONFIGURATION ............................................................................................ 21
TABLE 3- 1
TABLE 3- 2
TABLE 3- 3
TABLE 3- 4
TABLE 3- 5
CONSOLE PORT SETTING ................................................................................................................ 24
ALARM DEFAULT - FOR SYSTEM AND LINE ....................................................................................... 24
PERFORMANCE PARAMETER LIST - LINE......................................................................................... 25
PERFORMANCE REPORT OPTIONS ................................................................................................... 25
LED INDICATION FOR MAIN UNIT..................................................................................................... 26
TABLE 7- 1
TABLE 7- 2
TABLE 8- 3
TABLE 8- 4
TABLE 8- 5
TABLE 8- 6
TABLE 8- 7
TABLE 8- 8
EXAMPLE 1: UNIQUE CLOCK SOURCE (FROM IP6700-1 LINE CLOCK OF PORT A) .............................. 158
EXAMPLE 2: INDEPENDENT CLOCK SOURCE .................................................................................... 158
ETHERNET PACKET STRUCTURE ................................................................................................... 159
ETHERNET PACKET STRUCTURE (CONT.) ...................................................................................... 160
IP HEADER STRUCTURE ............................................................................................................... 161
UDP HEADER STRUCTURE ........................................................................................................... 162
TDMOETHERNET CONTROL WORD STRUCTURE ............................................................................ 163
AAL1 HEADER STRUCTURE .......................................................................................................... 165
ix
D
GB
F
ES
Bitte führen Sie das Gerät am Ende seinerLewbensdauer den zue Verfügung
stehended Rückgabeund Sammelsystemen zu.
At the end of the product's useful life, please dispose of it at appropriate collection
points provided in your country
Une fois le produit en fin devie, veuillez le déposer dans un point de recyclage
approprié.
Para preservar el medio ambiente, al final dela vida útil de su producto, depositelo
en los laguares destinado aello de acuerdo con la legislación vigente.
P
No final de vida útil do producto, por favor coloque no ponto de recolha
apropriado.
I
Onde tutelare l'ambiente, non buttate l'apparecchio trai i normali rifiuti al termine
della sua vita utile, ma portatelo presso i punti do taccolta specifici per questi rifiuti
previsti dalla normativa vigente.
NL
Wij raden u aan het apparant aan het einde van zijn nuttige levensduur, niet bij
hey gewone huisafval te deponeren, maar op de dearvoor bestemde adressen.
DK
Når produktet er udtjent, bor det børtskaffes via de sæ rlige indsamlingssteder i
landet.
N
Ved slutten av produktets levetid bør det avhendes på en kommunal miljøstasjon
eller leveres til en elektroforhandler.
S
Lämna vänligen in produkten på lämplig återvinningsstation när den är förbrukad.
FIN
Hävitä tuote käytöiän päättyessä viemällä se asianmukaiseen keräyspisteeseen.
PL
Gdy produkt nie nadaje sie juz do dalszego uzytku, nalezy zostawic go w jednym
ze specjalnych punktów zajmujacych sie zbiórka zuzytych producktów w
wybranych miejscach na terenie kraju.
CZ
Po skončení jeho životnosti odložte prosím výrobek na přislušném sbĕrném místé
zřízeném dle předpisů ve vaší zemi.
SK
Po skončení jeho životnosti odovzdajte prosím zariadenie na príslušnom zbernom
mieste podía platných miestnych predpisov a noriem.
SLO
Ko se izdelku izteče življenska doba, ga odnesite na ustrezno zbirno mesto
oziroma ga odvrzite v skladu z veljavnimi predpisi.
GR
Στο Тέλος тης λειτουργικής Ζωής του προϊόντος παρακαλώ
Πετξτε το στα ειōικά σημεία που Παρέχονται οτη χωρα σας.
PRC
當產品使用壽命結束,請在你的國家所提供的適當地點做好回收處理
Chapter 1 Product Description
1 PRODUCT DESCRIPTION
1.1 Description
Loop-IP6700 TDMoEthernet is designed to transport E1/T1/DTE/E3/DS3 signal with timing plus Ethernet
traffic over IP network, electrical or optical. This is a cost effective way of migrating to IP network from existing
voice and data network using existing TDM based equipment.
TDMoEthernet is a system that could be used to transport multiple E1, T1, DTE, E3, DS3, and 10/100BT
Ethernet traffic through 10/100BT Ethernet. The number of E1/T1/DTE/DS3 interfaces can be factory optioned
from 1 to 4 (4 T1/ 4 E1/ 2 DTEs / 1 E3 / 1 DS3 Max.). TDMoEthernet has built-in AC or DC power, console port,
Ethernet port, and SNMP port with inband management for remote.
.
1.2 Features
The features for Loop-IP6700:
Support- E1 / T1 on the main board
- E1 / T1 / V.35 / E3 / DS3 on the daughter board
E1/T1 interfaces: 1 to 4 framed or unframed with BNC/RJ connectors
LAN interface: one 10/100 BT Ethernet
WAN interface: 10/100 Base-Tx UTP or standard open Fiber slot for SFP Transceiver
Each port timing source can be chosen from:
(a) Internal
(b) External (for low speed card only)
(c) from its own or other's line/ WAN
Alarm relay
Console port, Ethernet, SNMP
Inband management: through any time slot of the transported E1
Support VLAN packet transparency i.e. up to Max 1536 bytes
Multi-color LED indicators
LCD/Keypad
1
Chapter 1 Product Description
1.3 Applications
For Low Speed
E1
E1
E1/V.35
E1/V.35
10/100 BaseT or 100 Base-FX
10/100 BaseT or 100 Base-FX
10/100
IP6700
TDMoEthernet
IP
NETWORK
IP6700
TDMoEthernet
10/100
Base T
LAN Base T
E1
E1
E1/V.35
E1/V.35
LAN
SNMP
SNMP
Management
For High Speed
E3/DS3
10/100
LAN Base T
10/100 BaseT or 100 Base-FX
IP6700
TDMoEthernet
10/100 BaseT or 100 Base-FX
IP
NETWORK
SNMP
IP6700
TDMoEthernet
SNMP
Management
Figure 1- 1 Application Diagram
2
E3/DS3
10/100
Base T
LAN
Chapter 2 Installation
1.4 Specification
Network Interface (E1):
Line rate
Input signal
ITU G.703
2.048 Mbps ± 50ppm
Framing
ITU G.704
Output signal
ITU G.703
Line code
AMI/HDB3
Jitter
ITU G.823
Connector
BNC and RJ48C
Electrical
75 ohm coax/120 ohm twisted pair
Network Line Interface (T1):
Line rate
Input signal
DS-1 from 0 dB to -26 dB w/ALBO
1.544 Mbps ± 32 ppm
Framing
D4/ ESF/ ESF&T1.403/ NONE (Clear
Output signal
DSX-1, DS-1
Channel)
Surge Protection FCC Part 68 Sub-Part D
Line code
AMI / B8ZS
Pulse Template
Per AT&T TR 62411
Connector
RJ48C
NOTE:
Large configurable jitter buffers, on a per bundle basis, that compensate for the delay variation introduced by the IP/MPLS
network, with the following maximal depths:
For E1:
up to 256 ms
For framed T1:
up to 256 ms
For unframed T1:
up to 340 ms
For framed T1 with CAS:
up to 192 ms
Ethernet (LAN)
Ethernet (WAN)
Connector
RJ45
Connector
RJ45
Speed
10/100 Base T
Speed
10/100 Base T
Optical (WAN)
Connector
SFP 3.3V
Speed
10/100 Base-FX
DTE Interface (V.35)
Alarm Relay
Data Rate
n x 56 (n= 1 to 31)
Alarm Relay
Fuse alarm, performance alarm
Data Rate
n x 64 Kbps (n= 1 to 32)
Connector
3 pin terminal block
Connector
DB25S for V.35
Standard
External Clock
Input signal
ITU G.703
Connector
BNC
Input signal
Network Management
Console Port
SNMP Port
Connector
DB9 at Front Panel
Connector
RJ45 at front panel
Electrical
RS232 interface
Protocol
Telnet (VT100) and Embedded SNMP
Protocol
Menu driven VT-100 terminal
Inband Management
Any 64 Kbps DS0 can be assigned for management
HDLC Management Protocol
Performance monitor(T1,E1)
Performance store
The last 24 hours performance in 15-minute intervals
Monitor registers
Line, user and remote site
Performance reports Date &Time, Error second, Degraded minutes, Unavailable second, Bursty error second, severe error
second, controlled slip second, and loss of frame count
Alarm history
Date & time, alarm type(i.e. master clock loss, RAI, AIS, LOS, BPV, ES, CSS)
Threshold
Second, degrade minutes
Diagnostics test(T1, E1)
Loopback
Line loopback, payload loopback and local loopback
Remote loopback
Line loopback and payload loopback
Front Panel
Keypad / LCD (future option)
LED
Physical
212.6 x 43.7 x 197 mm. (WxHxD)
Dimensions
Power
Single AC power or DC power.
Temperature
DC: 20 to 72 Vdc
0 -50°C
Humidity
0-95% RH (NON-CONDENSING)
AC: 100 to 240 Vac, 50/60Hz
Mounting
Desk-top stackable, wall mount
Power Consumption: 10W Max
Compliance Standard:
G.823/G.824, G.826, TDMoEthernet for structured traffic, SATOP for unstructured traffic
3
Chapter 2 Installation
2 INSTALLATION
2.1 Site Selection
The following list indicates a site selection guideline. Users need to follow this guideline to select a proper
installation site.
Location of the Loop-IP6700 unit should be part of the central office equipment layout design.
Considerations should be given to entrance cable routing.
The installation site should provide proper room for adequate ventilation and cable routing. Reserve at
least 0.5 m at the rear of the unit for human access, cables, and air flow.
The site should provide a stable environment. The operating area should be clean and free from extremes
of temperature, humidity, shock, and vibration.
Relative humidity should stay between 0 and 95%.
4
Chapter 2 Installation
2.2 Mechanical Installation
Loop-IP6700 is a desk top unit, which offers installation for power supply: on board fixed. The front panel is
shown in Figure 2-1, and the rear panel is shown in Figure 2-2.
Loop - IP
CONSOLE
TM
TDMoEthernet
ESC
D
C
10/100
LINK/ACT
LAN
WAN
LINK / ACT
B
ENTER
SNMP
POWER
A
ALM
10
/ 100
PORT
Figure 2- 1 Front Panel View (with LCD)
CONSOLE
D
LAN WAN
LINK/ACT
10/100
Loop-IP TM
LINK/ACT
ACO
TDMoEthernet
C
B
A
POWER
SNMP/ LAN2
ALM
10/100
Figure 2- 2 Front Panel View (without LCD)
5
Chapter 2 Installation
There are 4 models of Loop IP6700 available. The models are shown in the following figures.
Rear Panel
PORT D-V.35
ACLINE, 100-240VAC
50/60 HZ,0.3A MAX.
WAN
RELAY
PORT B
RX-IN
RX-IN
TX-OUT
EXT.CLK
TX-OUT
PORT C
PORT A
NC COM NO
LAN
IP6700 with PORT D-V.35 and PORT C
ACLINE, 100-240VAC
50/60 HZ,0.3A MAX.
PORT D-V.35
PORT D-V.35
WAN
EXT.CLK
EXT.CLK
RX-IN
TX-OUT
RELAY
PORT B
LAN
PORT A
2 PORT D-V.35
RELAY
RX-IN
TX-OUT
EXT.CLK
PORT B
NC COM NO
WAN
PORT C
TX-OUT
PORT D
RX-IN
ACLINE, 100-240VAC
50/60 HZ,0.3A MAX.
PORT A
LAN
PORT D and PORT C
ACLINE, 100-240VAC
50/60 HZ,0.3A MAX.
WAN
PORT A
RX-IN
TX-OUT
RELAY
LAN
NC COM NO
IP6700 with PORT A only (DS3/E3)
POWER (DC)
or
AC LINE, 100-240VAC,
50/60Hz, 0.4A MAX.
-V +V
AC power supply
DC power supply
Figure 2- 3 Rear Panel Views
6
Chapter 2 Installation
Table 2- 1 Jumper Setting for Main Board
PORT
A
PART
JP6, JP8,
JP10, JP11
E1 120
PIN (2,3) ON OFF
E1 75
B
JP5
JP22
JP14, JP16,
JP18, JP19
JP13
PIN (1,2) OFF PIN (2,3) ON OFF
PIN (5,6) OFF
PIN (3,4) OFF
PIN (7,8) OFF
PIN (1,2) ON PIN (2,3) ON PIN (1,2) OFF PIN (1,2) ON PIN (2,3) ON
PIN (5,6) OFF
PIN(3,4) ON
T1 100
No card
JP22
PIN (2,3) ON PIN (1,2) ON PIN (1,2) ON
PIN (7,8) ON
PIN (2,3) ON PIN (1,2) ON
PIN (5,6) ON
PIN (3,4) OFF
PIN (7,8) OFF
PIN (1,2) ON
PIN (1,2) ON
PIN (3,4) ON
PIN (3,4) ON
7
Chapter 2 Installation
1
3
5
7
Main Board
2
4
6
8
JP22
RJ (120 ohm) E1
JP13
1
2
3
1
2
3
JP5
JP14 JP16
1
2
3
ON
1
2
3
JP18 JP19
1
2
3
JP6 JP8
1
2
3
1
2
3
1
2
3
JP10 JP11
1
2
3
1
2
3
OFF
Figure 2- 4 Main Board Jumpers Setting-E1, RJ (120 ohm)
8
Chapter 2 Installation
1
3
5
7
Main Board
2
4
6
8
JP22
BNC (75 ohm) E1
JP13
1
2
3
1
2
3
JP5
JP14 JP16
1
2
3
ON
1
2
3
JP18 JP19
1
2
3
JP6 JP8
1
2
3
1
2
3
1
2
3
JP10 JP11
1
2
3
1
2
3
OFF
Figure 2- 5 Main Board Jumpers Setting-E1, BNC (75 ohm)
9
Chapter 2 Installation
1
3
5
7
Main Board
2
4
6
8
JP22
T1 (100 ohm)
JP13
1
2
3
1
2
3
JP5
JP14 JP16
1
2
3
ON
1
2
3
JP18 JP19
1
2
3
JP6 JP8
1
2
3
1
2
3
JP10 JP11
1
2
3
OFF
Figure 2- 6 Main Board Jumpers Setting - T1
10
1
2
3
1
2
3
Chapter 2 Installation
Table 2- 2 Jumper Setting for Daughter Board
PORT C OR D T1/E1 Daughter Card
PART
JP5, JP7, JP9, JP10
JP1
JP2
JP12
JP4
E1 120
PIN (2,3) ON
OFF
OFF
ON
OFF
E1 75
PIN (1,2) ON
OFF
ON
ON
PIN (2,3) ON
T1 100
PIN (2,3) ON
ON
OFF
ON
PIN (1,2) ON
JP1
JP2
JP 12
3 2 1
JP 4
Daughter Board
RJ (120 ohm) E1
1 2 3
1 2 3
JP7
JP10
1 2 3
1 2 3
JP9
JP5
ON
OFF
Figure 2- 7 Daughter Board Jumpers Setting - E1, RJ (120 ohm)
11
Chapter 2 Installation
JP1
JP2
JP 12
3 2 1
JP 4
Daughter Board
BNC (75 ohm) E1
1 2 3
1 2 3
JP7
JP10
1 2 3
1 2 3
JP9
JP5
ON
OFF
Figure 2- 8 Daughter Board Jumpers Setting - E1, BNC (75 ohm)
12
Chapter 2 Installation
JP1
JP2
JP 12
3 2 1
JP 4
Daughter Board
T1(100 ohm)
1 2 3
1 2 3
JP7
JP10
1 2 3
1 2 3
JP9
JP5
ON
OFF
Figure 2- 9 Daughter Board Jumpers Setting – T1
13
Chapter 2 Installation
C O N S O LE
D
LAN WAN
Loop -IP T M
10 / 10 0
L INK/ ACT
LINK /ACT
ACO
C
TDM oIP
B
A
POWER
SNM P/ LAN2
ALM
10/100
Figure 2- 10 Installation Diagram (Single)
C ON S OL E
C ON S OLE
Loop -IP TM
D
L AN W AN
TM
LI NK / A CT
ACO
10 / 10 0
C
TD M oIP
LINK /A CT
LINK/ ACT
10 / 10 0
Loop -IP
B
LAN WAN
LINK /ACT
ACO
TDM oIP
D
C
B
A
SNMP/ LAN2
A
S NM P/ L AN2
P OW ER
A LM
POWER
ALM
10/100
10/ 1 00
Figure 2- 11 Installation Diagram (Double)
14
Chapter 2 Installation
Chassis Grounding
The chassis is grounded when rack mounted. However, for stand alone units or extra grounding protection
for rack mounted units, a dedicated chassis ground screw and lock washer is provided. The chassis ground
screw is located on the right side of rear panel.
When attaching a ground wire to the chassis ground screw, please follow these instructions:
Use copper grounding conductors of 18 AWG
Conductors should not be of dissimilar metals.
The bare conductors should be coated with anti-oxidant before crimp connections are made.
Unplated connection surfaces, connectors, braided strap and bus bars must be bought to a bright finish
and coated with anti-oxidant before connections are made.
Listed connectors and fastening hardware must be used.
WAN
RX-IN
TX-OUT
PORT C
PORT A
LAN
Figure 2- 12 Chassis Grounding
Console port can be connected via RS232 interface to a configuration device a VT100 terminal or equivalent.
Pin definition and pin connection of the console port are listed in the following table.
Table 2- 3 DB9S Console Port Pin Assignment
Pin Number
1
2
3
4
5
6
7
8
9
Signal
Description
Data Carrier Detect
Receive Data
Transmit Data
Unassigned
Signal Ground
Data Set Ready
Unassigned
Clear to send
Unassigned
To DTE
To DTE
From DTE
To DTE
To DTE
Table 2- 4 SNMP Port
Pin Number
Signal
Description
1
2
3
6
7
8
TPTX+
TPTXTPRX+
TPRXChassis GND
Chassis GND
15
TP Driver Output
TP Receive Input
Chapter 2 Installation
Table 2- 5 Alarm Relay Connector
Pin Number
Signal
1
2
3
NC
COM
NO
Description
Normal Close
Common
Normal Open
Table 2- 6 Power Connector
Pin Number
1
2
3
Signal
-V
+V
Description
-DC 48 Volts
+DC Return
Chassis Ground
Table 2- 7 T1/ E1/ RJ48C Line Connector
Pin Number
1
2
4
5
7
8
Signal
Signal Direction
Receive Ring
Receive Tip
Transmit Ring
Transmit Tip
Unassignment
Unassignment
Input to IP6700
Input to IP6700
Output from IP6700
Output from IP6700
Table 2- 8 RJ-45 for Ethernet Port
Pin Number
1
2
3
4
5
6
7
8
Signal
Transmit Data +
Transmit Data Receive Data +
No Connection
No Connection
Receive Data No Connection
No Connection
Signal Direction
Output from IP6700
Output from IP6700
Input to IP6700
Input to IP6700
16
Chapter 2 Installation
The DTE port is configured as a DCE device. There are 5 different DTE boards: V.35/DB25, EIA530/DB25,
X.21/DB15, RS449/DB37 and RS422. Pin definitions are defined in Table 2-9 to 2-13.
Table 2- 9 V.35/DB25 DTE Port Pin Definition
Pin Number
1
2
3
4
5
6
7
8
9
10
11
12
13
14
15
16
17
18
19
20
21
22
23
24
25
Signal
Cable Shield
Transmit Data
Receive Data
Request To Send
Clear To Send
Data Set Ready
Signal Ground
Data Carrier Detect
Receive Clock Return
Unassigned
External Clock Return
Transmit Clock Return
Unassigned
Transmit Data Return
Transmit Clock
Receive Data Return
Receive Clock
Local Loopback
Unassigned
Data Terminal Ready
Remote Loopback
Unassigned
Unassigned
External Clock
Test Mode
Source
DTE
DCE
DTE
DCE
DCE
DCE
DCE
DTE
DCE
DTE
DCE
DCE
DCE
DTE
DTE
DTE
DTE
DCE
17
Chapter 2 Installation
Table 2- 10 EIA530/DB25 DTE Port Pin Definition
Pin Number
1
2
3
4
5
6
7
8
9
10
11
12
13
14
15
16
17
18
19
20
21
22
23
24
25
Signal
Cable Shield
Transmit Data
Receive Data
Request To Send
Clear To Send
Data Set Ready
Signal Ground
Data Carrier Detect
Receive Clock Return
Data Carrier Detect Return
External Clock Return
Transmit Clock Return
Clear To Send Return
Transmit Data Return
Transmit Clock
Receive Data Return
Receive Clock
Local Loopback
Request To Send Return
Data Terminal Ready
Remote Loopback
Data Set Ready Return
Data Terminal Ready Return
External Clock
Test Mode
Source
DTE
DCE
DTE
DCE
DCE
DCE
DCE
DCE
DTE
DCE
DCE
DTE
DCE
DCE
DCE
DTE
DTE
DTE
DTE
DCE
DTE
DTE
DCE
Table 2- 11 X.21/DB15 DTE Port Pin Definition
Pin Number
1
2
3
4
5
6
7
8
9
10
11
12
13
14
15
Signal
Cable Shield
Transmit Data
Control
Receive Data
Indication
Signal Timing
External Clock
Signal Ground
Transmit Data Return
Control Return
Receive Data Return
Indication Return
Signal Timing Return
External Clock Return
Unassigned
Source
DTE
DTE
DCE
DCE
DCE
DTE
DTE
DTE
DCE
DCE
DCE
DTE
18
Chapter 2 Installation
Table 2- 12 RS449/DB37 DTE Port Pin Definition
Pin Number
1
2
3
4
5
6
7
8
9
10
11
12
13
14
15
16
17
18
19
20
21
22
23
24
25
26
27
28
29
30
31
32
33
34
35
36
37
Signal
Cable Shield
Unassigned
Unassigned
Transmit Data
Transmit Clock
Receive Data
Request To Send
Receive Clock
Clear To Send
Local Loopback
Data Set Ready
Data Terminal Ready
Data Carrier Detect
Remote Loopback
Unassigned
Unassigned
External Clock
Test Mode
Signal Ground
Unassigned
Unassigned
Transmit Data Return
Transmit Clock Return
Receive Data Return
Request To Send Return
Receive Clock Return
Clear To Send Return
Unassigned
Data Set Ready Return
Data Terminal Ready Return
Data Carrier Detect Return
Unassigned
Unassigned
Unassigned
External Clock Return
Unassigned
Unassigned
19
Source
DTE
DCE
DCE
DTE
DCE
DCE
DTE
DCE
DTE
DCE
DTE
DTE
DCE
DTE
DCE
DCE
DTE
DCE
DCE
DCE
DTE
DCE
DTE
Chapter 2 Installation
Table 2- 13 RS422 DTE Port Pin Definition
Pin Number
1
2
3
4
5
6
7
8
9
10
11
12
13
14
15
16
17
18
19
20
21
22
23
24
25
Signal
Cable Shield
Transmit Data
Receive Data
Request To Send
Clear To Send
Data Set Ready
Signal Ground
Data Carrier Detect
Receive Clock Return
Data Carrier Detect Return
External Clock Return
Transmit Clock Return
Clear To Send Return
Transmit Data Return
Transmit Clock
Receive Data Return
Receive Clock
Unassigned
Request To Send Return
Data Terminal Ready
Unassigned
Data Set Ready Return
Data Terminal Ready Return
External Clock
Unassigned
20
Source
DTE
DCE
DTE
DCE
DCE
DCE
DCE
DCE
DTE
DCE
DCE
DTE
DCE
DCE
DCE
DTE
DTE
DCE
DTE
DTE
Chapter 2 Installation
Table 2- 14 Default Software Configuration
Configuration
E1 Line
Clock
Console port
Option
Default
Frame
ON:OFF
OFF
Code
HDB3, AMI
HDB3
CRC
ON, OFF
ON
RAI
ON:OFF
ON
FDL
OFF, FDL, HDLC
OFF
IDLE
0-ff
D5
S-Bit
Sa4, Sa5….Sa8, Sa4+5
Sa4
CAS
ON:OFF
OFF
I/ F
RJ, BNC
BNC
Master Clock
Line, Internal, External, Bundle 0
Internal
2nd Clock
Line, Internal, External, Bundle 0
Internal
Current Clock
nd
Master, 2 , Internal
Internal
Clock_Recover_Mode MANUAL, AUTO
AUTO
Baud rate
2400, 4800, 9600, 19200, 38400
9600
Data length
8-bits, 7-bits
8-bits
Stop bits
1-bit, 2-bits
1-bit
Parity
NONE, EVEN, ODD
NONE
SNMP
AUTO, FULL_100M, HALF_100M,
FULL_10M, HALF_10M
AUTO
WAN
AUTO, FULL_100M, HALF_100M,
FULL_10M, HALF_10M
AUTO
LAN
AUTO, FULL_100M, HALF_100M,
FULL_10M, HALF_10M
AUTO
Ethernet port
Speed/Duplex
Network
management
SNMP
IP address
0.0.0.0
Subnet mask
0.0.0.0
Gateway IP
0.0.0.0
Trap IP
0.0.0.0
Community Name
Public
Device name
IP6700
IP6700
Note:
1.Frame
For the E1 line interface, the frame format is ITU G.704. Either 2-frame, or 16-frame structure can be
selected. E1 supports clear channel mode, called E1 FRAME OFF mode, which can map to E1 same mode.
2.Code
For the E1 line interface, either AMI (Alternate Mark Inverting) or HDB3 (high density bipolar of length 3) line
code format can be chosen, be sure this setting matches that of the network.
21
Chapter 2 Installation
3. CRC
For the E1 line interface, the frame format is ITU G.704. Either 2-frame, or 16-frame structure can be selected.
Only the 16-frame provides CRC (Cycle Redundancy Check).
For two frame mode, set CRC to OFF. For multiframe mode, set CRC to ON.
E1 can be used in two frames or multiframe mode. If CRC is OFF, 2 frame format results. If CRC is ON, 16
frame format results. For E1, the cyclic redundancy check function can be turned ON or OFF. Unlike bipolar
violation, which can monitor only one span, CRC allows error monitoring through multiple spans of DS0 lines.
For E1, if CAS is ON, a 16-frame structure is used, which is independent of the 16-frame structure for CRC. A
proprietary facility data link is implemented in both modes to facilitate remote system control and performance
and statistics monitoring.
4. RAI
Remote Alarm Indication, transmits a return signal back out to indicate loss of signal and loss of frame sync at
the receiving side if the port. This action can be turned ON or OFF.
5. AIS
AIS, alarm indication signal, notify the far end that a loopback and diagnostic test are in progression. Thus
customer signals are blocked. The AIS can be sent two ways. In the framed mode, all time slots will have all
ones sent but the framing pattern will be preserved. In the unframed mode, all ones are sent for all time slots.
6. CAS
CAS (Channel-Associated Signaling) is a method for sending signaling information where time slot 16 of the
E1 format is shared for each of 30 other time slots within the same E1. Off designation is for CAS disabled. For
E1, when disabled, the 256N multiframe is used when time slot 16 is available to the user. The maximum
number of time slots available for payload is 31. ON designation is for CAS enabled. When enabled, the 256S
multiframe is used when time slot 16 is reserved for the transmission for end-to-end signaling using CAS. The
maximum number of time slots available for payload is then 30.
7.CGA
Carrier Group Alarm, CGA, is necessary for proper operation of the switched network in the face of possible
faults of the transport system. In the “normal” option, when a carrier facility fails, the switching system must be
notified so that it should cease to use that facility until repair is made. In the “transparent” option, the signaling
bits are left alone in fault conditions.
8.OOS
Out Of Service Signaling, for normal CGA option, when failure of the facility occurs, if there are calls in
progress, the billing system should be notified to stop charging the customer at the time of facility failure.
9.FDL
FDL for E1 is used to achieve remote system Loopback.
10.IDLE
Any DS0 time slot, which is not assigned is an idle time slot. An idle code is transmitted on idle DS0 time slots.
The idle time slot may be programmed to any bit pattern from 0x00 to 0Xff.
11.INTF
E1 interface only display 120 Ohm twisted pair / 75 Ohm BNC.
22
Chapter 3 Operation
3 OPERATION
This chapter describes the Loop-IP6700 configuration options and operational functions. User should refer to
CHAPTER 6: TERMINAL OPERATION for detailed operation.
3.1 Quick Start for Loop-IP6700
After installation, the user may want to familiarize with the equipment immediately. The following abbreviated
instructions will give the user a quick start.
3.1.1 Power On
Turn power on by attaching power cable at the rear of the unit.
Return to Default Setting.
The unit is shipped with factory default setting.
3.2 Self Test
If password is enabled, users must enter the password when logging in to gain the privilege to change system
configurations on the terminal. The default condition is password disabled. The default password is LOOP. To
change the password for the first time, enter the default password when prompted for the old password.
If the password is forgotten, the only recourse is to return to the factory setting of LOOP.
3.3 Return to Default
The unit is shipped with factory default setting.
To restore to factory setting in the future, immediately after power on, and during the display of “ESC” on the
LCD, press ESC key followed by pressing ENTER when “RET” is displayed. Unit will confirm with LOAD
DEFAULT CONFIGURATION.
3.4 Using Terminal
Management from a Telnet or Network Management System (NMS) can be effected through a LAN. Use the
DB9S console port of IP6700’s rear panel to connect a VT100 terminal to configure the unit. The VT100
terminal can be a PC running a VT100 emulator software.
Upon connection, press ENTER and ESC alternately to bring the main menu into view.
Under the "Main Menu", press "O" (Log On) to see the full menu.
Under the "Main Menu", press "S" to change the system configuration.
For more detail information, see also the chapter 6 in this menu.
23
Chapter 3 Operation
3.5 System Configuration
3.5.1 Console Port
The console port allows the user either to use a local VT-100 terminal or use a remote VT-100 terminal via
modem for system configuration, diagnostics, polling status reports, etc. The console port Baud rate, data bit
length, stop bit length, and parity bit length are defaulted, as shown below.
Table 3- 1 Console Port Setting
Item
Fixed Setting
9600
8-Bits
1-Bits
NONE
Baud
Data Length
Stop Bit
Parity
3.6 Alarm
When the Loop-IP6700 reports an alarm condition, such as loss of synchronization, the ALARM will cause the
LED on the front panel to light. Each alarm can be individually enabled or disabled. The alarm types are listed
in the table as below.
Table 3- 2 Alarm Default - for System and Line
Alarm
E1 Line
Default
RAI
DISABLE, ENABLE
MAJOR
AIS
DISABLE, ENABLE
MAJOR
LOS
DISABLE, ENABLE
MAJOR
LOF
DISABLE, ENABLE
MAJOR
Alarm
DISABLE, ENABLE
MAJOR
Threshold
10E- (5, 6, 7, 8, 9)
10E-5
Alarm
DISABLE, ENABLE
MAJOR
Threshold
1-900
1
Alarm
DISABLE, ENABLE
MAJOR
Threshold
1-900
1
Alarm
DISABLE, ENABLE
MAJOR
Threshold
1-900
Bundle
Status
DISABLE, ENABLE
MAJOR
Mac
Change
DISABLE, ENABLE
MAJOR
BPV
ES
UAS
E1
Option
CSS
T1 (future option)
DTE (future option) V.35
Ethernet
24
Chapter 3 Operation
3.7 Reports
For DS1 line receiver, Loop-IP6700 has three sets of performance registers. These are line, user, and far-end.
The line performance register tracks the DS1 line receiver performance status. The user performance register
tracks the DS1 line receiver as well, but user may clear at any time. The far-end performance register tracks
the far-end DS1 receiver status. The performance parameters are listed in the following tables.
Each performance parameter has ninety six sets of registers to record 24 hours history in 15 minute intervals.
Table 3- 3 Performance Parameter List - LINE
Performance
Parameter
Description
BPV
ES
UAS
Bipolar Violation
Error Second
Unavailable Second
Definition
2-Frame/Multiframe
Bipolar Error Count
BPV≥1, OOF≥1, or CS≥1.
≥ 10 consecutive SES
Definition
16-Frame/Multiframe
Bipolar Error Count
CRC ≥ 1, OOF ≥1, or CS ≥1.
≥ 10 consecutive SES
Below lists the types of reports available, performance parameters provided by each report, and the reset
commands for each report.
Table 3- 4 Performance Report Options
Report Type
Category
[Menu Command]
Report
ES
BES
SES
UAS
AS
EFS
USER [Network]
Y
Y
Y
Y
Y
Y
Menu Option [1]
LINE [Network]
N/C
N/C
N/C
N/C
N/C
N/C
24-Hour Terminal
USER [Network]
Y
Y
Y
Y
Y
Y
LINE [Network]
N/C
N/C
N/C
N/C
N/C
N/C
1-Hour Terminal
Reports
Reports
Menu Option [2]
Y = Report available and can be cleared by front panel “RESET” or admin terminal command “Y”.
X = Report available and can be cleared by front panel “RESET” or admin terminal command “X”.
N/C = No clear. Report available, but counts cannot be cleared by the user.
─ = Report not available.
25
Chapter 3 Operation
3.8 LED
The front panel of the Loop-IP6700 has mulit-color LEDs for operation and error indications. The indication is
either off, steady on, or flickering. The following table lists each LED and its color and the meaning it
represents. Note that when powering up and self test is in progress, the unit front panel LEDs are also used to
indicate fault conditions.
Table 3- 5 LED Indication for Main Unit
LED
POWER
Color
Off
Flashing Green
Red
Green
LINK/A
SNMP CT
Flashing Green
/WAN/
LAN
Off
10/100
Green
E1 V.35
(A, B, C, D)
Indication
Power off, self-test failure
Normal operation
Alarm occurs
Link.
A valid network connection on the RJ-45 SNMP port.
Activity.
Data is being transmitted or received through the RJ-45 SNMP port.
10Mbps
100Mbps
Green
Normal (Line in Sync)
Flashing Green
Testing
Red
Loss of Frame (LOF) or Loss of Signal (LOS)
Flashing Red
Alarm Indication Signal (AIS)
26
Chapter 3 Operation
3.9 Management Port (SNMP Port)
As two IP6700s are connected: one is set as local unit, the other is set as remote unit. See also the following
diagram.
WAN
SNMP
port
IP 6700
Local
IP 6700
Remote
PC 1
Figure 3- 1 Management Port
3.10
User Data Port (Ethernet)
IP6700's User Data Port is used to transmit or receive data only no matter IP6700 is set as Ethernet.
4 E1/T 1
4 E1/T 1
WAN
E1/T1 ,
Voice, Video
and TDM
data
IP 6700
E1/T1 ,
Voice, Video
and TDM
data
LA
LA
N
IP 6700
N
Ethernet Traffic
Ethernet Traffic
Figure 3- 2 Ethernet Port
27
Chapter 4 Maintenance
4 MAINTENANCE
4.1 Self-Test
When the Loop-IP6700 is powered up, a complete self-test routine is run to check all I/O ports, read/write
memory, and data paths to validate system integrity. During system self test, "TESTING" message and testing
code are shown on the VT100 terminal screen. If any error is found, a testing code is shown on the VT100
terminal display. Various system diagnostic methodology can be found in the following paragraphs.
4.2 Near End Loopback
The near end loopbacks such as digital local loopback, and line loopback are activated by the Loop-IP6700.
The loopbacks are at the near end facility. The following paragraph describes each loopback in detail.
4.2.1 E1/T1 Line Loopback
Line loopback is illustrated in Figure 4-1. The incoming optical line signal is loopback to the outgoing optical
signal before the optical mapper. This loopback is used to isolate the local equipment from a troubled optical
transmission line. Line loopback test can be activated from the terminal.
4.2.2 E1/T1 Payload Loopback
Payload loopback is illustrated in Figure 4-1. The incoming signal is loopback to the outgoing line signal after
the optical mapper. This loopback is used to isolate the TSI from the troubled transmission line. Payload
loopback test can be activated from the front panel and terminal.
LIU
Mux
2
1
1
PLB (Payload Loopback)
2
LLB (Line Local Loopback)
Figure 4- 1 Loopback Block Diagram
28
1
2
3
4
Chapter 5 Front Panel Operation
4.3 Far End Loopback
Far-end loopbacks (remote line loopback, remote payload loopback, remote channel loopback, U-PORT
loopback, and HDSL loopback) can be activated by the local IP6700 to cause a remote loopback commands to
the far-end facility. Inband code words are supported by FDL (facility data link) to initiate the loopback in the
case of the DS1 line, and either M channel in the case of the U-interface line. When using FDL messages, FDL
must be turned ON. All remote loopback can be activated from the terminal.
If the remote facility responds to a remote loopback activate command, a LOOPED message appears in the
lower left corner of the display. If the remote facility responds to a remote loopback deactivate command, a NO
LOOP message appears. If the remote activation/deactivation fails, an error message appears.
Either proprietary remote loopback commands can be used, or the industry standard V.54 loopback codes can
be used.
It is best to use remote loopbacks in conjunction with PRBS diagnostics testing to measure the DS1 network
line or U line integrity. The procedure is as follows:
1. Send a remote loopback command to cause the remote facility to perform a loopback.
2. Activate the PRBS or QRSS diagnostics test.
3. The far end loopback is illustrated in Figure 4-2.
E1
E1
IP6700
Line local loopback
Figure 4- 2 Far End Diagram
29
Payload loopback
Chapter 5 Front Panel Operation
5 FRONT PANEL OPERATION
The front panel LCD utilizes a 2-line by 16-character display and four keys labeled ESC, ENTER, left arrow '<',
and right arrow '>', as shown in Figure 5-1. The ENTER key is to enable a selection, while the left and right
arrow keys move the cursor to the left and right respectively. The ESC key returns to the next higher level of
selection or to the main menu without performing any operation. When the menu selected has no further
sub-menus, the current item selected is indicated by “*”.
NOTE: For each selection or change, ENTER key must be pressed to confirm.
Loop - IP
CONSOLE
TM
TDMoEthernet
ESC
D
C
10/100
LINK/ACT
LAN
WAN
LINK / ACT
B
ENTER
SNMP
POWER
A
ALM
10
/ 100
PORT
CONSOLE
D
LAN WAN
LINK/ACT
10/100
Loop-IP TM
LINK/ACT
ACO
TDMoEthernet
C
B
A
POWER
SNMP/ LAN2
ALM
10/100
Figure 5- 1 Front Panels
30
Chapter 6 TERMINAL OPERATION
The entire LCD menu tree is shown below. By successively selecting the menu item at each level, the desired
operation or display can be obtained. Use left or right key to select the desired main menu branch and press
ENTER.
Main
Menu
Configuration
Bundle status
Bundle setup
System
Alarm
Information
Software
Version
Store Config
Alarm clock
Hardware
Version
Retrieve
Config
Alarm link
Serial
Number
Load Default
Source IP
Classifi pack RX
Ethernet
Source subnet
Byte received
Lan port
Gateway IP
Byte transmitted
Bun ACT Timer
Port select
Packet received
LPT Timer
Bundle ID
Packet transmitted
Alarm clock
Lan Rate
Action
LAN WAN SNMP
Alarm link
CAS Idle code
UDP number
Remote loss
Timeslot form
IP
Timeslot num
IP address
Destination IP
Subnet Mask
Cell in bundle
Gatway IP
Jitter delay
Date
Jitter size
Time
Vlan
SNMP
Vlan1 ID
Trap IP1
Device Name
Trap IP2
Console Port
Trap IP3
Baud Rate
Trap IP4
Data Length
Trap IP5
Alarm setup
Alarm status
Alarm clear
Vlan1 priority
Vlan2 ID
Vlan2 priority
Bundle status
Confirm?
Stop Bit
Community get
Parity
Community set
Figure 5- 2 LCD Menu Tree
31
Miscellaneous
System reset
Chapter 6 TERMINAL OPERATION
E3/DS3
Conf setup
Port Status
Bundle status
Tx Length
LOS XMT
AIS
LOS XMT AIS
Xmt AIS
BPV ES
BPV ES
Port Alarm
Port lookback
Alarm setup
Master Clock
Alarm type
Second
Clock
Threshold
Current Clock
Port History
LOS
LCV
LES
SEFS
UAS
BUNDLE
MAC
Figure 5- 3 E3/DS3 LCD Menu Tree
32
Local
Loopback
Clock Source
Recover
Clock
Clock status
Chapter 6 TERMINAL OPERATION
E1
Conf setup
Port Status
Frame
LOF LOS
Code
RCV AIS
RCV RAI
CRC
XMT AIS
AMT RAI
RAI
BPV ES
Port Alarm
Port loopback
Clock Source
Local
Loopback
Master Clock
Alarm type
Remote
Loopback
Second
Clock
Threshold
Send Bert
Current Clock
Alarm setup
Port History
Bert Type
Recover
Clock
AIS
RAI
Bert Direct
Clock status
CAS
AIS
Timeslot from
OOS
LOS
Timeslot to
FDL
LOF
Sa-bit
BPV
IDLE
ES
UAS
CSS
BUNDLE
MAC
Alarm clear
Figure 5- 4 E1 LCD Menu Tree
33
Chapter 6 TERMINAL OPERATION
T1
Conf setup
Port Status
Frame
LOF LOS
Code
RCV AIS
RCV RAI
CRC
XMT AIS
XMT RAI
RAI
BPV ES
Port Alarm
Port loopback
Clock Source
Local
Loopback
Master Clock
Alarm type
Remote
Loopback
Second
Clock
Threshold
Send Bert
Current Clock
Alarm setup
Port History
Bert Type
Recover
Clock
AIS
RAI
Bert Direct
Clock status
CAS
AIS
Timeslot from
OOS
LOS
Timeslot to
FDL
LOF
Sa_bit
BPV
IDLEEE
ES
UAS
CSS
BUNDLE
MAC
Alarm clear
Figure 5- 5 T1 LCD Menu Tree
34
Chapter 6 TERMINAL OPERATION
DTE
Conf setup
Port Status
Port Alarm
Port loopback
Clock Source
Mode
Exist
RTS LOS
Rate
CLK LOS
DSR
Alarm type
Second
Clock
Tx clock
CTS
DCD
Threshold
Current Clock
Rx clock
DTR
RTS
Data
Alarm setup
Alarm History
Alarm clear
RTS
TTM
DCD
Figure 5- 6 DTE LCD Menu Tree
35
Local
Loopback
Master Clock
Recover
Clock
Clock status
Chapter 5 Front Panel Operation
5.1 Configuration
Configuration group includes System and Console Port menus.
IP-6700
System
5.1.1
System
Press ENTER from the above menu to enter into the System menu, which includes Ethernet, Lan port, Bun
ACT Timer, LPT Timer Lan Rate, CAS Idle code, Remote loss, IP, Date, Time, and SNMP submenus.
System
Configuration
5.1.1.1
Ethernet
Presses ENTER from the System menu. Use arrow keys to select ENABLE or DISABLE, then press ENTER.
Please refer to the 6.1.7 for detail information.
System
Ethernet
Ethernet
ENABLE
Ethernet
DISABLE
5.1.1.2
Lan Port
Press ENTER from the System menu. Use arrow keys to select Lan Port, then press ENTER. Please refer to
the 6.1.1.1 for detail information.
System
Lan Port
Lan Port
Data_only
Data_only
D+S S-on
36
Chapter 6 TERMINAL OPERATION
Data_only
D+S S-off
5.1.1.3
Bun ACT Timer
Press ENTER from the System menu. Use arrow keys to select Bun ACT Timer, then press ENTER. Bun ACT
Timer is used t setup the regular time to do activation. When the local side sets up a bundle, a signal is sent to
see if the remote side is online or not. When the local side and the Remote side are both on line, the activation
can be done.
System
Bun ACT Timer
Bun ACT Timer
1-9999(number)
5.1.1.4
LPT Timer
Press ENTER from the System menu. Use arrow keys to select LPT Timer, then press ENTER. When remote
side through FDL ask to do Loopback, Local side will do time setup. After time setup it will cancel Loopback
automatically.
System
LPT Timer
LPT Timer
1-9999(number)
5.1.1.5
Lan Rate
Press ENTER from the System menu. Use arrow keys to select Lan Rate, then press ENTER. The speed of
LAN+WAN is 100M. The user can setup the speed of LAN in order to keep the WAN rate.
System
Lan Rate
Lan Rate
1-9999(number)
37
Chapter 6 TERMINAL OPERATION
5.1.1.6
CAS Idle code
Press ENTER from the System menu. Use arrow keys to select CAS Idle code, then press ENTER. The code
of CAS Rate can choose the number form 1 to 15.
System
CAS Idle code
Lan Rate
1-15(number)
5.1.1.7
Remote loss
Press ENTER from the System menu. Use arrow keys to select Remote loss, then press ENTER. When the
user cannot receive bundle packet from others, it will still send user’s bundle packet. After the user presses the
stop, the user will not send any information to others. In addition, the user will stop send information to others.
System
Remote loss
Remote loss
continue
Remote loss
stop
5.1.1.8
IP
The IP menu allows modification of device IP address, IP address for Subnet Mask and Gateway, and IP
interface. Each IP address can be modified by moving the cursor to the desired position and selecting a
number. After making all changes, select YES to save the changes.
System
IP
IP Address
000.000.000.000
Subnet Mask
000.000.000.000
38
Chapter 6 TERMINAL OPERATION
Gateway IP
000.000.000.000
5.1.1.9
Date
Press ENTER from the System menu. Use arrow keys to select Date, then press ENTER. This is used to setup
the system data.
System
Date
Date
Month/day/year
5.1.1.10
Time
This menu is used to setup the system time.
System
Time
Time
Hour/min/sec
5.1.1.11
SNMP
This menu is used to select SNMP. Under Main menu, use left or right key to select SNMP menu. Under SNMP
sub-menu, use arrow keys to select a desired option
Its sub-menus include these options: Trap IP1, Trap IP2, TrapIP3, Trap IP4, Trap IP5, Community get and
Community set.
System
SNMP
SNMP
Trap IP1
Trap IP1
000.000.000.000
39
Chapter 6 TERMINAL OPERATION
Trap IP2
000.000.000.000
Trap IP3
000.000.000.000
Trap IP4
000.000.000.000
Trap IP5
000.000.000.000
Community get
XXXXX(test)
Community set
XXXXX(test)
5.1.1.12
Device Name
This menu is used to setup the Device Name.
System
Device Name
To rename the device name, use arrow keys to select a desired number or character, press ENTER. Then
move the cursor at OK, press ENTER to enable the device name.
Device Name
XXXXX(test)
40
Chapter 5 Front Panel Operation
5.2 Bundle Setup
The menus are used to configure console port to select Source IP, Source subnet, Gateway IP, Port select,
Bundle ID, Action, UDP number, Timeslot from, Timeslot num, Destination IP, Cell in bundle, Jitter delay, Jitter
size, Vlan, Vlan1 ID, Vlan1 priority, Vlan2 ID, Vlan2 priority, Bundle status, and Confirm. Under Bundle setup
menu, use left or right key to select Console Port menu. Press ENTER to enter into its submenus.
Configuration
Bundle Setup
5.2.1 Source IP
Under IP menu, move the cursor to the Source-IP option; the system will show Source IP Address as below.
Bundle Setup
Source IP
Source IP
000.000.000.000
5.2.2 Source subnet
Under IP menu, move the cursor to the Source-subnet option; the system will show Source Subnet Address as
below.
Bundle Setup
Source subnet
Source subnet
000.000.000.000
5.2.3 Gateway IP
If source IP and destination IP are not in a LAN the user must setup the LAN router address to the Getway IP.
Bundle Setup
Gateway IP
Gateway IP
000.000.000.000
41
Chapter 6 TERMINAL OPERATION
5.2.4 Port Select
Under Port Select menu, the user can select what port they want to setup.
Bundle Setup
Port select
Port select
PORT-A
Port select
PORT-B
Port select
PORT-C
Port select
PORT-D
5.2.5 Bundle ID
Move the cursor to select Bundle ID, press ENTER. Please refer to 6.1.2.2 (table of Maximum Bundle
Allocation) for detail information.
Bundle Setup
Bundle ID
Bundle ID
1-31(number)
5.2.6 Action
The Action has two options, “Add bundle” and “Delete bundle”. Move the cursor to select action, press ENTER.
Bundle Setup
Action
Action
Add bundle
42
Chapter 6 TERMINAL OPERATION
Action
Delete bundle
Action
Delete all
Action
Active all
Action
Change bundle
Action
Stop Tx bundle
5.2.7 UDP number
There are 4 ports to have UDP number from 1 to 8063. If one port gets UDP number such as 100, another port
cannot use same UDP number (refer to Figure 6-1 for detail). Move the cursor to select UDP number, press
ENTER.
Bundle Setup
UDP number
UDP number
1-8063(number)
5.2.8 Timeslot from
To modify the Timeslot from, first move the cursor to the digit to be modified. Press enter.
Bundle Setup
Timeslot from
Timeslot from
1-31(number)
43
Chapter 6 TERMINAL OPERATION
5.2.9 Timeslot num
To modify the Timeslot num, first move the cursor to the digit to be modified. Press enter.
Bundle Setup
Timeslot num
Timeslot num
1-31(number)
5.2.10 Destination IP
The Destination Address field identifies the station or stations that are to receive the packet. The Source
Address identifies the station that originated the packet. A Destination Address may specify either an
"individual address" destined for a single station, or a "multicast address" destined for a group of stations. A
Destination Address of all 1 bits refers to all stations on the LAN and is called a "broadcast address". Move the
cursor to select Destination IP, press ENTER.
Bundle Setup
Destination IP
Destination IP
000.000.000.000
5.2.11 Cell in bundle
In one bundle, how many cell will include (refer to Figure 8-5 for detail). Move the cursor to select Cell in
bundle, press ENTER.
Bundle Setup
Cell in bundle
Cell in bundle
1-31(number)
5.2.12 Jitter delay
Move the cursor to select Jitter delay, press ENTER. The number is from 1 to 512. Total delay buffer n × 0.5 ms
max.
Bundle Setup
Jitter delay
44
Chapter 6 TERMINAL OPERATION
Jitter delay
1-512(number)
5.2.13 Jitter size
Move the cursor to select Jitter size, the number is from 1-512, press ENTER. Packet delay cannot ≧n x 0.5
ms.
Bundle Setup
Jitter size
Jitter size
1-512(number)
5.2.14 Vlan
Move the cursor to select Current Vlan press ENTER. Under Vlan sub-menu, use arrow keys to select a
desired option.
Their submenu includes these options: OFF, 1-VLAN and 2-VLAN
Bundle Setup
Vlan
Vlan
OFF
Vlan
1-VLAN
Vlan
2-VLAN
5.2.15 Vlan1 ID
To modify the Vlan1 ID, first move the cursor to the digit to be modified. Press enter.
Bundle Setup
Vlan1 ID
45
Chapter 6 TERMINAL OPERATION
Vlan1 ID
1-4095(number)
5.2.16 Vlan1 priority
To modify the Vlan1 priority, first move the cursor to the digit to be modified. Press enter.
Bundle Setup
Vlan1 priority
Vlan1 priority
1-7(number)
5.2.17 Vlan2 ID
To modify the Vlan2 ID, first move the cursor to the digit to be modified. Press enter.
Bundle Setup
Vlan2 ID
Vlan2 ID
1-4095(number)
5.2.18 Vlan2 priority
To modify the Vlan2 priority, first move the cursor to the digit to be modified. Press enter.
Bundle Setup
Vlan2 priority
Vlan2 priority
1-7(number)
5.2.19 Bundle status
Bundle status menu shows the current parity selection of Deactive, NONE, or Active. To active or deactive
Bundle status, move cursor to a desired selection and press ENTER.
Bundle Setup
Bundle status
46
Chapter 6 TERMINAL OPERATION
Bundle status
Deactive
Bundle status
NONE
Bundle status
Active
5.2.20 Confirm?
Move the cursor to confirm, press ENTER. Move the cursor to NO or YES to confirm the Bundle setup.
Bundle Setup
Confirm?
Confirm?
No
Confirm?
YES
5.3 Bundle Status
The menus are used to configure Bundle status to select Classifi pack RX, Byte received, Byte transmitted,
Packet received, Packet transmitted and LAN WAN SNMP. Under Bundle status menu, use left or right key to
select Console Port menu. Press ENTER to enter into its submenus.
Configuration
Bundle Status
5.3.1 Classifi pack RX
To modify the Classifi pack RX, first move the cursor to the digit to be modified. Press enter.
Bundle Status
Classifi pack RX
47
Chapter 6 TERMINAL OPERATION
Classifi pack RX
0(number)
5.3.2 Byte received
To modify the Byte received, first move the cursor to the digit to be modified. Press enter.
Bundle Status
Byte received
Byte received
0(number)
5.3.3 Byte transmitted
To modify the Byte transmitted, first move the cursor to the digit to be modified. Press enter.
Bundle Status
Byte transmitted
Byte transmitted
0(number)
5.3.4 Packet received
To modify the Packet received, first move the cursor to the digit to be modified. Press enter.
Bundle Status
Packet received
Packet received
0(number)
5.3.5 Packet transmitted
To modify the Packet transmitted, first move the cursor to the digit to be modified. Press enter.
Bundle Status
Packet transmitted
48
Chapter 6 TERMINAL OPERATION
Packet transmitted
0(number)
5.3.6 LAN WAN SNMP
Move the cursor to select LAN WAN SNMP, press ENTER.
Bundle Status
LAN WAN SNMP
LAN WAN SNMP
Down Down UP
5.4 Alarm
The menus are used to select Alarm in order to setup alarm, clear alarm and to clear alarm. Under Alarm
menu, use left or right key to select Console Port menu. Press ENTER to enter into its submenus.
Configuration
Alarm
5.4.1 Alarm setup
Move the cursor to NEXT or PREV to view alarm, then go to EDIT option with pressing ENTER to do alarm
setup.
Alarm
Alarm setup
5.4.1.1 Alarm clock
The setup menu is used to setup clock alarm. The clock alarm occur when the clock source change.
Alarm setup
Alarm clock
Alarm clock
DISABLE
49
Chapter 6 TERMINAL OPERATION
Alarm clock
MAJOR
Alarm clock
CRITICAL
Alarm clock
MINOR
5.4.1.2 Alarm link
Press ENTER from the Alarm link menu. Use arrow keys to select alarm link, then press ENTER.
Their submenu includes these options: DISABLE, MAJOR< CRITICAL and MINOR.
Alarm setup
Alarm link
Alarm link
DISABLE
Alarm link
MAJOR
Alarm link
CRITICAL
Alarm link
MINOR
5.4.2 Alarm status
Move the cursor to select alarm status, press ENTER. Move the cursor to NO or YES to confirm the alarm
status.
Alarm
Alarm status
CLOCK LINK
NO
YES
50
Chapter 6 TERMINAL OPERATION
5.4.3 Alarm clear
Pressing enter when cursor is on NEXT will move to the next alarm item. To confirm the existing option, move
cursor to EDIT and press ENTER. Then move cursor to the desired option and press ENTER.
The alarm queue can be cleared.
Alarm
Alarm clear
Alarm clear
Confirm?
5.5 Information
The menus are used to select Software version, Hardware version and Serial number. Under Information
menu, use left or right key to select Console Port menu. Press ENTER to enter into its submenus.
Configuration
Information
5.5.1 Software Version
Move the cursor to select Software Version, press ENTER.
Information
Software Version
Software Version
xxxx(text)
5.5.2 Hardware Version
To modify the Hardware version, first move the cursor to the text to be modified. Press enter.
Information
Hardware Version
Hardware Version
xxxx(text)
51
Chapter 6 TERMINAL OPERATION
5.5.3 Serial number
To modify the Serial number, first move the cursor to the text to be modified. Press enter.
Information
Serial number
Serial number
xxxx(text)
5.6 Miscellaneous
The Miscellaneous group includes: Store Config, Retrieve Config, Load Default, and System reset.
Configuration
Miscellaneous
5.6.1 Store Config
Pressing enter when cursor is on NEXT will move to the next Store Config item. To confirm the existing option,
press ENTER.
Miscellaneous
Store Config
Store Config
Confirm?
5.6.2 Retrieve Config
Pressing enter when cursor is on NEXT will move to the next Retrieve Config item. To confirm the existing
option, press ENTER
Miscellaneous
Retrieve Config
Retrieve Config
Confirm?
52
Chapter 6 TERMINAL OPERATION
5.6.3 Load Default
Pressing enter when cursor is on NEXT will move to the next Load Default item. To confirm the existing option,
press ENTER. Note: Load Default will causes reboot.
Miscellaneous
Load Default
Load Default
Confirm?
5.6.4 System reset
Pressing enter when cursor is on NEXT will move to the next System reset item. To confirm the existing option,
press ENTER.
Miscellaneous
System reset
System reset
Confirm?
53
Chapter 5 Front Panel Operation
5.7 E3/DS3 Menu
Config setup includes Tx Length and Xmt AIS menus.
IP6700
DS3-CARD PORT A
5.7.1 Config Setup
Move the cursor to select Config Setup, press ENTER.
DS3-CARD PORT A
Config Setup
5.7.1.1 Tx Length
Move the cursor to select Tx Length, press ENTER. The Length of TX could be from 0-255 or 255 to 450.
Config Setup
Tx Length
Tx Length
0-255
Tx Length
255-450
5.7.1.2 Xmt AIS
Move the cursor to select Xmt AIS, press ENTER. This action can be turned ON or OFF. When los happened,
the Xmt AIS decide to transmitted AIS to line or not. When los sent AIS, use arrow keys to select ON. If the los
do not send AIS, use arrow keys to select OFF.
Config Setup
Xmt AIS
Xmt AIS
ON
Xmt AIS
OFF
54
Chapter 6 TERMINAL OPERATION
5.7.2 Port Status
Move the cursor to select Port Status, press ENTER.
Config Setup
Port Status
5.7.2.1 LOS XMT AIS
Under Port Status menu to select LOS XMT AIS, then Move the cursor to NO or YES to setup LOS XMT AIS,
press ENTER.
Port Status
LOS XMT AIS
LOS XMT AIS
No
YES
5.7.2.2 BPV ES
To setup the BPV ES, first move the cursor to the digit to be modified. Press enter.
Port Status
BPV ES
BPV ES
000 000
5.7.3 Port Alarm
Move the cursor to select Port Alarm, press ENTER.
Config Setup
Port Alarm
5.7.3.1 Alarm setup
Move the cursor to NEXT or PREV to view alarm, then go to EDIT option with pressing ENTER to do alarm
setup.
Port Alarm
Alarm setup
55
Chapter 6 TERMINAL OPERATION
5.7.3.1.1
Alarm Type
Move the cursor to select Alarm Type, press ENTER. The alarm types include LOS, LCV, LES, SEFS, UAS,
BUNDLE and MAC.
Alarm setup
Alarm Type
Alarm Type
LOS
LOS
MAJOR
LOS
CRITI
LOS
MINOR
LOS
DIS
5.7.3.1.2
Threshold
Move the cursor to select Current Threshold press ENTER. Under Threshold sub-menu, use arrow keys to
select a desired option.
Their submenu includes these options: DS3 LCV, DS3 LES, DS3 SEFS and ES3 UAS. Then move the cursor
to the digit to be modified. Press enter.
Alarm setup
Threshold
DS3 LCV
1-9(number)
DS3 LES
1-65535(number)
56
Chapter 6 TERMINAL OPERATION
DS3 SEFS
1-65535(number)
DS3 UAS
1-65535(number)
5.7.3.2 Port History
Move the cursor to select Current Port History, press ENTER. Under Port History sub-menu, use arrow keys to
select a desired option. The menu is used to show Alarm History.
Their submenu includes these options: PORT A LOS, PORT A LCV, PORT A LES, PORT A SEFS, PORT A
UAS, PORT A BUNDLE and PORT A MAC.
Config setup
Port History
PORT A LOS
OK MAJOR 0000
PORT A LCV
OK MAJOR 0000
PORT A LES
OK MAJOR 0000
PORT A SEFS
OK MAJOR 0000
PORT A UAS
OK MAJOR 0000
PORT A BUNDLE
OK MAJOR 0000
PORT A MAC
OK MAJOR 0000
57
Chapter 6 TERMINAL OPERATION
5.7.3.3 Alarm clear
Pressing enter when cursor is on NEXT will move to the next alarm item. To confirm the existing option, move
cursor to EDIT and press ENTER. Then move cursor to the desired option and press ENTER.
The alarm queue can be cleared.
Config setup
Alarm clear
Alarm clear
Confirm?
5.7.4 Port lookback
Move the cursor to select Port Loopback, press ENTER.
Config Setup
Port loopback
5.7.4.1 Local Loopback
Move the cursor to select Current Local Loopback press ENTER. Under Local Loopback sub-menu, use arrow
keys to select a desired option.
Their submenu includes these options: OFF, LOCAL, PLB and LLB.
Port Loopback
Local Loopback
Local Loopback
OFF
Local Loopback
LOCAL
Local Loopback
PLB
Local Loopback
LLB
58
Chapter 6 TERMINAL OPERATION
5.7.5 Clock Source
Move the cursor to select Clock Source, press ENTER.
Config Setup
Clock Source
5.7.5.1 Master Clock
The IP6700 provide operator to setup each port’s clock source from internal, external, line (from A/B/C/D), or
WAN (from A/B/C/D). Move the cursor to select Master Clock press ENTER.
Clock Source
Master Clock
Master Clock
INTERNAL
Master Clock
EXTERNAL
Master Clock
PORT A (LINE)
Master Clock
PORT B (LINE)
Master Clock
PORT C (LINE)
Master Clock
PORT D (LINE)
Master Clock
PORT A (BUNDLE 0)
Master Clock
PORT B (BUNDLE 0)
59
Chapter 6 TERMINAL OPERATION
Master Clock
PORT C (BUNDLE 0)
Master Clock
PORT D (BUNDLE 0)
5.7.5.2 Second Clock
The IP6700 provide operator to setup each port’s clock source from internal, external, line (from A/B/C/D), or
WAN (from A/B/C/D). Move the cursor to select Second Clock press ENTER.
Clock Source
Second Clock
Second Clock
INTERNAL
Second Clock
EXTERNAL
Second Clock
PORT A (LINE)
Second Clock
PORT B (LINE)
Second Clock
PORT C (LINE)
Second Clock
PORT D (LINE)
Second Clock
PORT A (BUNDLE 0)
Second Clock
PORT B (BUNDLE 0)
60
Chapter 6 TERMINAL OPERATION
Second Clock
PORT C (BUNDLE 0)
Second Clock
PORT D (BUNDLE 0)
5.7.5.3 Current Clock
Move the cursor to select Current Clock press ENTER. Its sub-menus include these options: Current Clock,
MASTER_CLK, SECOND_CLK and INTERNAL.
Clock Source
Current Clock
Current Clock
MASTER_CLK
Current Clock
SECOND_CLK
Current Clock
INTERNAL
5.7.5.4 Recover Clock
Move the cursor to select Current Clock press ENTER. Under Recover clock sub-menu, use arrow keys to
select a desired option.
Their submenu includes these options: MANUAL and AUTOMATIC
Clock Source
Recover Clock
Recover Clock
AUTOMATIC
Recover Clock
MANUAL
61
Chapter 6 TERMINAL OPERATION
5.7.5.5 Clock Status
Move the cursor to select Clock Status press ENTER. Moving the arrow keys to Normal and pressing ENTER
must conclude this operation.
Clock Source
Clock Status
Clock Status
NORMAL
62
Chapter 5 Front Panel Operation
5.8 E1-CARD Menu
Config setup includes Frame, Code, CRC, RAI, CIS, CAS, OOS, FDL, Sa_bit and IDLE menus.
IP6700
E1-CARD PORT B
5.8.1 Config Setup
Move the cursor to select Config Setup, press ENTER.
E1-CARD PORT B
Config Setup
5.8.1.1 Frame
Move the cursor to select Frame, press ENTER. To enable it, move the cursor to ON and press ENTER. To
disable it, move the cursor to OFF and press ENTER.
Config Setup
Frame
Frame
OFF
Frame
ON
5.8.1.2 Code
To select the coding scheme, use the arrow keys cycle through to a proper selection and press ENTER. The
choices for E1 are AMI and HDB3. Using the arrow keys to change the setting, and press ENTER. Be sure that
this setting matches that of the network.
Config Setup
Code
Code
AMI
Code
HDB3
63
Chapter 6 TERMINAL OPERATION
5.8.1.3 CRC
The cyclic redundancy check function can be turned on or off. Unlike bipolar violation, which can monitor only
one span, CRC menu allows error monitoring through multiple spans of E1 line. For two frame mode, set CRC
to OFF. For multi-frame mode, set CRC to ON.
Config Setup
CRC
CRC
ON
CRC
OFF
5.8.1.4 RAI
Remote Alarm Indication, transmits a return signal back out to indicate loss of signal and loss of frame sync at
the receiving side if the port. This action can be turned ON or OFF.
Use arrow keys to select ON or OFF, then press ENTER to enable or disable the option.
Config Setup
RAI
RAI
ON
RAI
OFF
5.8.1.5 AIS
Under CIS submenu, use arrow keys to select ON or OFF, then press ENTER to enable or disable the option.
Config Setup
AIS
AIS
ON
64
Chapter 6 TERMINAL OPERATION
AIS
OFF
5.8.1.6 CAS
Signaling is either CAS (channel associated signalling) or out-of-band such as CCIS (common channel
interoffice signalling). To change the signaling type, use the arrow keys to choose from CAS ON or CAS OFF
and press ENTER.
Config Setup
CAS
CAS
OFF
CAS
ON
5.8.1.7 OOS
To change the OOS protocol, use the arrow keys to cycle through to the proper selection and Press ENTER.
Config Setup
OOS
OOS
BUSY
OOS
IDLE
OOS
BUSY_IDLE
OOS
IDLE_BUSY
65
Chapter 6 TERMINAL OPERATION
5.8.1.8 FDL
FDL menu shows the facility data link. Move the cursor at a desired option, press ENTER to confirm it.
Config Setup
FDL
FDL
OFF
FDL
FDL
FDL
HDLC
5.8.1.9 Sa_bit
To change a channel for FDL, move cursor to Sabit, and use left or right arrow keys to select a channel, press
ENTER.
Config Setup
Sa_bit
Sa_bit
Sa4
Sa_bit
Sa5
Sa_bit
Sa6
Sa_bit
Sa7
Sa_bit
Sa8
66
Chapter 6 TERMINAL OPERATION
Sa_bit
Sa4+Sa5
5.8.1.10
IDLE
Press ENTER for the Line Idle Code menu. The user can enter number from 0-255 to the Idle menu.
Config Setup
IDLE
IDLE
0-255(number)
5.8.2 Port Status
Under the E1 card menu, move the cursor to Port Status option, then the system will show as below.
E1-CARD PORT B
Port Status
5.8.2.1 LOF LOS
Under Port Status menu to select LOF LOS, and move the cursor to NO to setup LOF LOS then press ENTER.
Port Status
LOF LOS
LOF LOS
NO No
5.8.2.2 RCV AIS RCV RAI
Under Port Status menu to select RCV AIS RCV RAI, press ENTER, move the cursor to NO to setup RCV AIS
RCV RAI, then press ENTER.
Port Status
RCV AIS RCV RAI
RCV AIS RCV RAI
NO NO
67
Chapter 6 TERMINAL OPERATION
5.8.2.3 XMT AIS XMT RAI
Under Port Status menu to select XMT AIS XMT RAI, press ENTER, move the cursor to NO to setup XMT AIS
XMT RAI, then press ENTER.
Port Status
XMT AIS XMT RAI
XMT AIS XMT RAI
NO No
5.8.2.4 BPV ES
To setup the BPV ES, first move the cursor to the digit to be modified. Press enter.
Port Status
BPV ES
BPV ES
000 000
5.8.3 Port Alarm
Move the cursor to select Port Alarm, press ENTER.
E1-CARD PORT B
Port Alarm
5.8.3.1 Alarm Setup
Move the cursor to NEXT or PREV to view alarm, then go to EDIT option with pressing ENTER to do alarm
setup.
Port Alarm
Alarm Setup
5.8.3.1.1
Alarm Type
Move the cursor to select Alarm Type, press ENTER. The alarm types include RAI, AIS, LOS, LOF, BPV, ES,
UAS, CSS, BUNDEL and MAC.
Port Alarm
Alarm setup
68
Chapter 6 TERMINAL OPERATION
Alarm setup
Alarm Type
E1 RAI
CRITI
E1 RAI
MINOR
E1 RAI
DIS
E1 RAI
MAJOR
5.8.3.1.2
Threshold
Move the cursor to select Current Threshold press ENTER. Under Threshold sub-menu, use arrow keys to
select a desired option.
Their submenu includes these options: E1 BPV, E1 ES, E1 UAS, and E1 CSS. Then move the cursor to the
digit to be modified.
Port Alarm
Alarm setup
Alarm setup
Threshold
E1 BPV
1-9
E1 ES
1-65535
E1 UAS
1-65535
69
Chapter 6 TERMINAL OPERATION
E1 CSS
1-65535
5.8.3.2 Port History
Move the cursor to select Current Port History, press ENTER. Under Port History sub-menu, use arrow keys to
select a desired option.
Their submenu includes these options: RAI, AIS, LOS, LOF, BPV, ES, UAS, CSS, BUNDLE and MAC.
Port Alarm
Port History
5.8.3.2.1
RAI
Move the cursor to select RAI, press ENTER.
Note: 1. CRITI is Critical
2. If the RAI alarm have ever happened, it will show alm. If it is not, will show OK.
3. 0000 shows how many times have it ever happened?
Port History
RAI
RAI
CRITI OK 0000
5.8.3.2.2
AIS
AIS menu shows the configuration set for the alarm indication signal. Move the cursor to select AIS, press
ENTER.
Note: 1. CRITI is Critical
2. If the AIS alarm has ever happened, it will show alm. If it is not, will show OK.
3. 0000 shows how many times have it ever happened?
Port History
AIS
AIS
CRITI OK 0000
70
Chapter 5 Front Panel Operation
5.8.3.2.3
LOS
Move the cursor to select LOS, press ENTER.
Note: 1. CRITI is Critical
2. If the LOS alarm has ever happened, it will show alm. If it is not, will show OK.
3. 0000 shows how many times have it ever happened?
Port History
LOS
LOS
CRITI OK 0000
5.8.3.2.4
LOF
Move the cursor to select LOF, press ENTER.
Note: 1. CRITI is Critical
2. If the LOF alarm has ever happened, it will show alm. If it is not, will show OK.
3. 0000 shows how many times have it ever happened?
Port History
LOF
LOF
CRITI OK 0000
5.8.3.2.5
BPV
Move the cursor to select BPV, press ENTER.
Note: 1. CRITI is Critical
2. If the BPV alarm has ever happened, it will show alm. If it is not, will show OK.
3. 0000 shows how many times have it ever happened?
Port History
BPV
BPV
CRITI OK 0000
71
Chapter 5 Front Panel Operation
5.8.3.2.6
ES
Move the cursor to select ES, press ENTER.
Note: 1. CRITI is Critical
2. If the ES alarm has ever happened, it will show alm. If it is not, will show OK.
3. 0000 shows how many times have it ever happened?
Port History
ES
ES
CRITI OK 0000
5.8.3.2.7
UAS
Move the cursor to select UAS, press ENTER.
Note: 1. CRITI is Critical
2. If the UAS alarm has ever happened, it will show alm. If it is not, will show OK.
3. 0000 shows how many times have it ever happened?
Port History
UAS
UAS
CRITI OK 0000
5.8.3.2.8
CSS
Move the cursor to select CSS, press ENTER.
Note: 1. CRITI is Critical
2. If the CSS alarm has ever happened, it will show alm. If it is not, will show OK.
3. 0000 shows how many times have it ever happened?
Port History
CSS
CSS
CRITI OK 0000
72
Chapter 5 Front Panel Operation
5.8.3.2.9
BUNDLE
Move the cursor to select BUNDLE, press ENTER.
Note: 1. CRITI is Critical
2. If the BUNDLE alarm has ever happened, it will show alm. If it is not, will show OK.
3. 0000 shows how many times have it ever happened?
Port History
BUNDLE
BUNDLE
CRITI OK 0000
5.8.3.2.10 MAC
Move the cursor to select MAC, press ENTER.
Note: 1. CRITI is Critical
2. If the MAC alarm has ever happened, it will show alm. If it is not, will show OK.
3. 0000 shows how many times have it ever happened?
Port History
MAC
MAC
CRITI OK 0000
5.8.3.3 Alarm Clear
Pressing enter when cursor is on NEXT will move to the next alarm item. To confirm the existing option, move
cursor to EDIT and press ENTER. Then move cursor to the desired option and press ENTER.
The alarm queue can be cleared.
Port Alarm
Alarm Clear
Alarm Clear
Confirm?
5.8.4 Port Loopback
Move the cursor to select Port Loopback, press ENTER.
E1-CARD PORT B
Port Loopback
73
Chapter 6 TERMINAL OPERATION
5.8.4.1 Local Loopback
Move the cursor to select Current Local Loopback press ENTER. Under Local Loopback sub-menu, use arrow
keys to select a desired option.
Their submenu includes these options: OFF, LOCAL, PLB and LLB.
Port Loopback
Local Loopback
Local Loopback
OFF
Local Loopback
LOCAL
Local Loopback
PLB
Local Loopback
LLB
5.8.4.2 Remote Loopback
E1 remote loopback is used to activate E1 line remote loopback test. To activate or deactivate E1 remote
loopback, use left or right arrow keys cycle through to a desired selection and press ENTER.
Port Loopback
Remote Loopback
Remote Loopback
Active
Remote Loopback
Deactive
74
Chapter 5 Front Panel Operation
5.8.4.3 Send Bert
Move the cursor to select Send Bert, press ENTER.
Port Loopback
Send Bert
5.8.4.3.1
Bert Type
Move the cursor to select Current Bert Type press ENTER. Under Bert Type sub-menu, use arrow keys to
select a desired option.
Their submenu includes these options: OFF, PRBS_FULL and N*64K.
Send Bert
Bert Type
Bert Type
OFF
Bert Type
PRBS_FULL
Bert Type
N*64K
5.8.4.3.2
Bert Direct
Move the cursor to select Bert Direct, press ENTER. Its sub-menus include these options: LINE and PCM. The
user can send their packet to LINE or to PCM side.
Send Bert
Bert Direct
Bert Direct
LINE
Bert Direct
PCM
75
Chapter 5 Front Panel Operation
5.8.4.3.3
Timeslot from
To modify the Timeslot from, first move the cursor to the digit to be modified. Press enter.
Send Bert
Timeslot from
Timeslot from
1-32
5.8.4.3.4
Timeslot to
To modify the Timeslot to, first move the cursor to the digit to be modified. Press enter.
Send Bert
Timeslot to
Timeslot to
1-32
5.8.5 Clock Source
Move the cursor to select Clock Source, press ENTER.
E1-CARD PORT B
Clock Source
5.8.5.1 Master Clock
The IP6700 provide operator to setup each port’s clock source from internal, external, line (from A/B/C/D), or
WAN (from A/B/C/D). Move the cursor to select Master Clock press ENTER. Please refer to 6.1.5 for detail
information.
Clock Source
Master Clock
Master Clock
INTERNAL
Master Clock
EXTERNAL
76
Chapter 6 TERMINAL OPERATION
Master Clock
PORT A (LINE)
Master Clock
PORT B (LINE)
Master Clock
PORT C (LINE)
Master Clock
PORT D (LINE)
Master Clock
PORT A (BUNDLE 0)
Master Clock
PORT B (BUNDLE 0)
Master Clock
PORT C (BUNDLE 0)
Master Clock
PORT D (BUNDLE 0)
5.8.5.2 Second Clock
The IP6700 provide operator to setup each port’s clock source from internal, external, line (from A/B/C/D), or
WAN (from A/B/C/D). Move the cursor to Second Clock, press ENTER. Please refer to 6.1.5 for detail
information.
Clock Source
Second Clock
Second Clock
INTERNAL
77
Chapter 6 TERMINAL OPERATION
Second Clock
EXTERNAL
Second Clock
PORT A (LINE)
Second Clock
PORT B (LINE)
Second Clock
PORT C (LINE)
Second Clock
PORT D (LINE)
Second Clock
PORT A (BUNDLE 0)
Second Clock
PORT B (BUNDLE 0)
Second Clock
PORT C (BUNDLE 0)
Second Clock
PORT D (BUNDLE 0)
5.8.5.3 Current Clock
Move the cursor to select Current Clock, press ENTER. Please refer to 6.1.5 for detail information.
Clock Source
Current Clock
Current Clock
MASTER_CLK
78
Chapter 6 TERMINAL OPERATION
Current Clock
SECOND_CLK
Current Clock
INTERNAL
5.8.5.4 Recover Clock
Move the cursor to select Recover Clock, press ENTER. Please refer to 6.1.5 for detail information.
Clock Source
Recover Clock
Recover Clock
AUTOMATIC
Recover Clock
MANUAL
5.8.5.5 Clock status
Move the cursor to select Clock status, press ENTER. Please refer to 6.1.5 for detail information.
Clock Source
Clock status
Clock status
NORMAL
79
Chapter 5 Front Panel Operation
5.9 T1-CARD Menu
Config setup includes Frame, Code, YEL, AIS, CAS, OOS, INBAND, IDLE, INTE, LBO and FDL menus.
IP6700
T1-CARD PORT C
5.9.1 Config Setup
Move the cursor to select Config Setup, press ENTER.
T1-CARD PORT C
Config Setup
5.9.1.1 Frame
Move the cursor to select Frame, press ENTER. The current selection is highlighted by an asterisk (*). To
enable it, move the cursor to ON and press ENTER. To disable it, move the cursor to OFF and press ENTER.
Config Setup
Frame
Frame
*OFF
Frame
ON
5.9.1.2 Code
To select the coding scheme, use the arrow keys cycle through to a proper selection and press ENTER. The
choices for T1 are AMI and HDB3. An asterisk (*) is placed by the currently selected item. Using the arrow keys
to change the setting, and press ENTER. Be sure that this setting matches that of the network.
Config Setup
Code
Code
*HDB3
Code
AMI
80
Chapter 6 TERMINAL OPERATION
5.9.1.3 CRC
For two frame mode, set CRC to OFF. For multiframe mode, set CRC to ON. Move the cursor to select CRC,
press ENTER. The current selection will be highlighted by an asterisk (*).
Config Setup
CRC
CRC
*ON
CRC
OFF
5.9.1.4 RAI
Use arrow keys to select ON or OFF, then press ENTER to enable or disable the option. The current selection
will be highlighted by an asterisk (*).
Config Setup
RAI
RAI
*ON
RAI
OFF
5.9.1.5 AIS
Move the cursor to select AIS, press ENTER. To enable it, move the cursor to ON and press ENTER. To
disable it, move the cursor to OFF and press ENTER.
Config Setup
AIS
AIS
*ON
81
Chapter 6 TERMINAL OPERATION
AIS
OFF
5.9.1.6 CAS
Signaling is either CAS (channel associated signalling) or out-of-band such as CCIS (common channel
interoffice signalling). To change the signaling type, use the arrow keys to choose from CAS ON or CAS OFF
and press ENTER.
Config Setup
CAS
CAS
*ON
CAS
OFF
5.9.1.7 OOS
To change the OOS protocol, use the arrow keys to cycle through to the proper selection and Press ENTER.
Config Setup
OOS
OOS
*BUSY
OOS
IDLE
OOS
BUSY_IDLE
OOS
IDLE_BUSY
82
Chapter 6 TERMINAL OPERATION
5.9.1.8 FDL
FDL menu shows the facility data link. To enable FDL by moving cursor to ON, while to disable it by moving
cursor to OFF, and press ENTER. The current selection is highlighted by an asterisk "*".
Config Setup
FDL
FDL
*ON
FDL
OFF
FDL
HDLC
5.9.1.9 Sa_bit
To change a channel for FDL, move cursor to Sa_bit, and use left or right arrow keys to select a channel, press
ENTER. The current selection is highlighted by an asterisk (*).
Config Setup
Sa_bit
Sa_bit
*Sa4
Sa_bit
Sa5
Sa_bit
Sa6
Sa_bit
Sa7
Sa_bit
Sa8
83
Chapter 6 TERMINAL OPERATION
Sa_bit
Sa4+Sa5
5.9.1.10
IDLE
Press ENTER for the Line Idle Code menu.
The Idle menu shows the transmission idle code when a DS0 time slot is in idle mode. To change the idle code,
press ENTER to cycle through the selections. This operation must be concluded by moving the arrow keys to
YES position and pressing ENTER to enable the changes.
Config Setup
IDLE
IDLE OK
*000 (0-255)
5.9.2 Port Status
Move the cursor to select Port Status, press ENTER.
T1-CARD PORT C
Port Status
5.9.2.1 LOF LOS
Under Port Status menu to select LOF LOS, and move the cursor to NO or YES to setup LOF LOS then press
ENTER.
Port Status
LOF LOS
LOF LOS
NO YES
5.9.2.2 RCV AIS RCV RAI
Under Port Status menu to select RCV AIS RCV RAI, and move the cursor to NO to setup RCV AIS RCV RAI
then press ENTER.
Port Status
RCV AIS RCV RAI
84
Chapter 6 TERMINAL OPERATION
RCV AIS RCV RAI
NO NO
5.9.2.3 XMT AIS XMT RAI
Under Port Status menu to select XMT AIS AMT RAI, and move the cursor to NO to setup XMT AIS AMT RAI
then press ENTER.
Port Status
XMT AIS XMT RAI
XMT AIS XMT RAI
NO No
5.9.2.4 BPV ES
To setup the BPV ES, first move the cursor to the digit to be modified. Press enter.
Port Status
BPV ES
BPV ES
000 000
5.9.3 Port Alarm
Move the cursor to select Port Alarm, press ENTER.
T1-CARD PORT C
Port Alarm
5.9.3.1 Alarm Setup
Move the cursor to select Alarm Setup, press ENTER.
Port Alarm
Alarm Setup
85
Chapter 6 TERMINAL OPERATION
5.9.3.1.1
Alarm Type
Move the cursor to select Alarm Type, press ENTER. The alarm types include YEL, AIS, LOS, LOF, BPV, ES,
UAS, CSS, BUNDLE and MAC. The current selection is highlighted by an asterisk (*).
Port Alarm
Alarm setup
Alarm setup
Alarm Type
T1 YEL
*MAJOR
T1 YEL
CRITI
T1 YEL
MINOR
T1 YEL
DIS
5.9.3.1.2
Threshold
Move the cursor to select Current Threshold press ENTER. Under Threshold sub-menu, use arrow keys to
select a desired option.
Their submenu includes these options: T1 BPV, T1 ES, T1 UAS, and T1 CSS. Then move the cursor to the
digit to be modified.
Port Alarm
Alarm setup
Alarm setup
Threshold
T1 BPV OK
*5 (1-9)
86
Chapter 6 TERMINAL OPERATION
T1 ES OK
*0001 (1-65535)
T1 UAS OK
*00001 (1-65535)
T1 CSS OK
*00001 (1-65535)
5.9.3.2 Port History
Move the cursor to select Current Port History, press ENTER. Under Port History sub-menu, use arrow keys to
select a desired option. The menu is used to show the Alarm History.
Their submenu includes these options: RAI, AIS, LOS, LOF, BPV, ES, UAS, CSS, BUNDLE and MAC.
Port Alarm
Port History
5.9.3.2.1
RAI
Move the cursor to select RAI, press ENTER. The menu shows the RAI alarm status.
Note: 1. MAJOR is Alarm Type
2. If the RAI alarm has ever happened, it will show alm. If it is not, will show OK.
3. 0000 shows how many times have it ever happened?
Port History
PORT B RAI
PORT B RAI
MAJOR OK 0000
5.9.3.2.2
AIS
AIS menu shows the configuration set for the alarm indication signal. Move the cursor to select AIS, press
ENTER.
Note: 1. MAJOR is Alarm Type
2. If the AIS alarm has ever happened, it will show alm. If it is not, will show OK.
3. 0000 shows how many times have it ever happened?
Port History
PORT B AIS
87
Chapter 6 TERMINAL OPERATION
PORT B AIS
MAJOR OK 0000
5.9.3.2.3
LOS
Move the cursor to select LOS, press ENTER. The menu shows the LOS alarm status.
Note: 1. MAJOR is Alarm Type
2. If the LOS alarm has ever happened, it will show alm. If it is not, will show OK.
3. 0000 shows how many times have it ever happened?
Port History
PORT B LOS
PORT B LOS
MAJOR OK 0000
5.9.3.2.4
LOF
Move the cursor to select LOF, press ENTER. The menu shows the LOF alarm status.
Note: 1. MAJOR is Alarm Type
2. If the LOF alarm has ever happened, it will show alm. If it is not, will show OK.
3. 0000 shows how many times have it ever happened?
Port History
PORT B LOF
PORT B LOF
MAJOR OK 0000
5.9.3.2.5
BPV
Move the cursor to select BPV, press ENTER. The menu shows the BPV alarm status.
Note: 1. MAJOR is Alarm Type
2. If the BPV alarm has ever happened, it will show alm. If it is not, will show OK.
3. 0000 shows how many times have it ever happened?
Port History
PORT B BPV
PORT B BPV
MAJOR OK 0000
88
Chapter 6 TERMINAL OPERATION
5.9.3.2.6
ES
Move the cursor to select ES, press ENTER. The menu shows the ES alarm status.
Note: 1. MAJOR is Alarm Type
2. If the ES alarm has ever happened, it will show alm. If it is not, will show OK.
3. 0000 shows how many times have it ever happened?
Port History
PORT B ES
PORT B ES
MAJOR OK 0000
5.9.3.2.7
UAS
Move the cursor to select UAS, press ENTER. The menu shows the UAS alarm status.
Note: 1. MAJOR is Alarm Type
2. If the UAS alarm has ever happened, it will show alm. If it is not, will show OK.
3. 0000 shows how many times have it ever happened?
Port History
PORT B UAS
PORT B UAS
MAJOR OK 0000
5.9.3.2.8
CSS
Move the cursor to select CSS, press ENTER. The menu shows the CSS alarm status.
Note: 1. MAJOR is Alarm Type
2. If the CSS alarm has ever happened, it will show alm. If it is not, will show OK.
3. 0000 shows how many times have it ever happened?
Port History
PORT B CSS
PORT B CSS
MAJOR OK 0000
89
Chapter 5 Front Panel Operation
5.9.3.2.9
BUNDLE
Move the cursor to select BUNDLE, press ENTER. The menu shows the BUNDLE alarm status.
Note: 1. MAJOR is Alarm Type
2. If the BUNDLE alarm has ever happened, it will show alm. If it is not, will show OK.
3. 0000 shows how many times have it ever happened?
Port History
PORT B BUNDLE
PORT B BUNDLE
MAJOR OK 0000
5.9.3.2.10 MAC
Move the cursor to select MAC, press ENTER. The menu shows the MAC alarm status.
Note: 1. MAJOR is Alarm Type
2. If the MAC alarm has ever happened, it will show alm. If it is not, will show OK.
3. 0000 shows how many times have it ever happened?
Port History
PORT B MAC
PORT B MAC
MAJOR OK 0000
5.9.3.3 Alarm Clear
Pressing enter when cursor is on NEXT will move to the next alarm item. To confirm the existing option, move
cursor to EDIT and press ENTER. Then move cursor to the desired option and press ENTER.
The alarm queue can be cleared.
Port Alarm
Alarm Clear
Alarm Clear
Confirm?
5.9.4 Port Loopback
Move the cursor to select Port Loopback, press ENTER.
T1-CARD PORT C
Port Loopback
90
Chapter 6 TERMINAL OPERATION
5.9.4.1 Local Loopback
Move the cursor to select Current Local Loopback press ENTER. Under Local Loopback sub-menu, use arrow
keys to select a desired option.
Their submenu includes these options: OFF, LOCAL, PLB and LLB. . The current selection is highlighted by an
asterisk (*).
Port Loopback
Local Loopback
Local Loopback
*OFF
Local Loopback
LOCAL
Local Loopback
PLB
Local Loopback
LLB
5.9.4.2 Remote Loopback
T1 remote loopback is used to activate T1 line remote loopback test. To activate or deactivate T1 remote
loopback, use left or right arrow keys cycle through to a desired selection and press ENTER. The current
selection is highlighted by an asterisk (*).
Port Loopback
Remote Loopback
Remote Loopback
*ACTIVE-IN-BAND
Remote Loopback
ACTIVE-AT&T-P
Remote Loopback
ACTIVE-ANSI-P
91
Chapter 6 TERMINAL OPERATION
Remote Loopback
ACTIVE-ANSI-L
Remote Loopback
DEACTIVE-IN-BAN
Remote Loopback
DEACTIVE-AT&T-P
Remote Loopback
DEACTIVE-ANSI-P
Remote Loopback
DEACTIVE-ANSI-L
5.9.4.3 Send Bert
Move the cursor to select Send Bert, press ENTER.
Port Loopback
Send Bert
5.9.4.3.1
Bert Type
Move the cursor to select Current Bert Type press ENTER. Under Bert Type sub-menu, use arrow keys to
select a desired option.
Their submenu includes these options: OFF, PRBS_FULL and N*64K. The current selection is highlighted by
an asterisk (*).
Send Bert
Bert Type
Bert Type
*OFF
Bert Type
PRBS_FULL
92
Chapter 6 TERMINAL OPERATION
Bert Type
N*64K
5.9.4.3.2
Bert Direct
Move the cursor to select Bert Direct, press ENTER. Its sub-menus include these options: LINE and PCM. The
current selection is highlighted by an asterisk (*).
Send Bert
Bert Direct
Bert Direct
*LINE
Bert Direct
PCM
5.9.4.3.3
Timeslot from
To modify the Timeslot from, first move the cursor to the digit to be modified. Press enter. The current selection
is highlighted by an asterisk (*).
Send Bert
Timeslot from OK
Timeslot from OK
*01 (1-24)
5.9.4.3.4
Timeslot to
To modify the Timeslot to, first move the cursor to the digit to be modified. Press enter.
Send Bert
Timeslot to OK
Timeslot to OK
*01 (1-24)
93
Chapter 6 TERMINAL OPERATION
5.9.5 Clock Source
Move the cursor to select Clock Source, press ENTER.
T1-CARD PORT C
Clock Source
5.9.5.1 Master Clock
The IP6700 provide operator to setup each port’s clock source from internal, external, line (from A/B/C/D), or
WAN (from A/B/C/D). Move the cursor to select Master Clock, press ENTER. The current selection is
highlighted by an asterisk (*).
Clock Source
Master Clock
Master Clock
*INTERNAL
Master Clock
EXTERNAL
Master Clock
PORT A (LINE)
Master Clock
PORT B (LINE)
Master Clock
PORT C (LINE)
Master Clock
PORT D (LINE)
Master Clock
PORT A (BUNDLE 0)
Master Clock
PORT B (BUNDLE 0)
94
Chapter 6 TERMINAL OPERATION
Master Clock
PORT C (BUNDLE 0)
Master Clock
PORT D (BUNDLE 0)
5.9.5.2 Second Clock
The IP6700 provide operator to setup each port’s clock source from internal, external, line (from A/B/C/D), or
WAN (from A/B/C/D). Move the cursor to Second Clock, press ENTER. The current selection is highlighted by
an asterisk (*).
Clock Source
Second Clock
Second Clock
*INTERNAL
Second Clock
EXTERNAL
Second Clock
PORT A (LINE)
Second Clock
PORT B (LINE)
Second Clock
PORT C (LINE)
Second Clock
PORT D (LINE)
Second Clock
PORT A (BUNDLE 0)
95
Chapter 6 TERMINAL OPERATION
Second Clock
PORT B (BUNDLE 0)
Second Clock
PORT C (BUNDLE 0)
Second Clock
PORT D (BUNDLE 0)
5.9.5.3 Current Clock
Move the cursor to select Current Clock, press ENTER. The current selection is highlighted by an asterisk (*).
Clock Source
Current Clock
Current Clock
*MASTER_CLK
Current Clock
SECOND_CLK
Current Clock
INTERNAL
5.9.5.4 Recover Clock
Move the cursor to select Current Clock press ENTER. Under Recover clock sub-menu, use arrow keys to
select a desired option.
Their submenu includes these options: MANUAL and AUTOMATIC
The current selection is highlighted by an asterisk (*).
Clock Source
Recover Clock
Recover Clock
*AUTOMATIC
96
Chapter 6 TERMINAL OPERATION
Recover Clock
MANUAL
5.9.5.5 Clock status
Move the cursor to select Clock status, press ENTER.
Clock Source
Clock status
Clock status
NORMAL
97
Chapter 5 Front Panel Operation
5.10 DTE Menu
Config setup includes Mode, Rate, Tx clock, Rx clock, Data, RTS, TTM and DCD menus.
IP6700
V35-CARD PORT D
5.10.1 Config Setup
Move the cursor to select Config Setup, press ENTER.
V35-CARD PORT D
Config Setup
5.10.1.1
Mode
The Mode menu shows the current Mode is either FULL or 64 Kbps. To change the Mode data rate, move
cursor to the desired selection and press ENTER. The current selection will be highlighted by an asterisk (*).
Config Setup
Mode
Mode
*FULL
Mode
N*64K
5.10.1.2
Rate
The Rate menu shows the current DTE data rate is either 64 or 56 Kbps. To change the DTE data rate, move
cursor to the desired selection and press ENTER. The current selection will be highlighted by an asterisk (*).
Config Setup
Rate
Rate
*56KBps
Rate
64KBps
98
Chapter 6 TERMINAL OPERATION
5.10.1.3
Tx clock
The Data menu shows the current DTE Tx clock polarity (either normal or inverted) by placing an asterisk (*) at
the appropriate selection. To change the DTE Tx clock polarity, move cursor to the desired selection and press
ENTER.
Config Setup
Tx clock
Tx clock
*Normal
Tx clock
Inverted
5.10.1.4
Rx clock
The Data menu shows the current DTE Rx clock polarity (either normal or inverted) by placing an asterisk (*) at
the appropriate selection. To change the DTE Rx clock polarity, move cursor to the desired selection and press
ENTER.
Config Setup
Rx clock
Rx clock
*Normal
Rx clock
Inverted
5.10.1.5
DATA
The Data menu shows the current DTE data polarity (either normal or inverted) by placing an asterisk (*) at the
appropriate selection. To change the DTE data polarity, move cursor to the desired selection and press
ENTER.
Config Setup
DATA
DATA
*Normal
99
Chapter 6 TERMINAL OPERATION
DATA
Inverted
5.10.1.6
RTS
The RTS menu shows the current DTE RTS operation mode (either activate or permanent) by placing an
asterisk (*) at the appropriate selection. To change the DTE RTS operation mode, move cursor to the desired
selection and press ENTER.
Config Setup
RTS
RTS
*Active
RTS
Permanent
5.10.1.7
TTM
TTM menu shows the current DTE terminal timing mode (either OFF or ON) by placing an asterisk (*) at the
appropriate selection. To change the DTE terminal timing mode, move cursor to the desired selection and
press ENTER.
Config Setup
TTM
TTM
*Off
TTM
On
5.10.1.8
DCD
DCD menu shows the current DTE DCD mode (either Normal or On) by placing an asterisk (*) at the
appropriate selection. To change the DTE DCD mode, move cursor to the desired selection and press ENTER.
Config Setup
DCD
100
Chapter 6 TERMINAL OPERATION
DCD
*Normal
DCD
On
5.10.2 Port Status
Move the cursor to select Config Setup, press ENTER.
V35-CARD PORT D
Port Status
5.10.2.1
Exit RTS LOS
Under Port Status menu to select Exit RTS LOS, and move the cursor to NO or YES to setup Exit RTS LOS
then press ENTER.
Port Status
Exit RTS LOS
Exit RTS LOS
YES NO
5.10.2.2
CLK LOS DSR
Under Port Status menu to select CLK LOS DSR, and move the cursor to NO to setup Exit CLK LOS DSR then
press ENTER.
Port Status
CLK LOS DSR
CLK LOS DSR
NO NO
101
Chapter 6 TERMINAL OPERATION
5.10.2.3
CTS DCD
Under Port Status menu to select CTS DCD, and move the cursor to NO to setup CTS DCD then press
ENTER.
Port Status
CTS DCD
CTS DCD
NO NO
5.10.2.4
DSR RTS
Under Port Status menu to select DSR RTS, and move the cursor to NO to setup DSR RTS then press
ENTER.
Port Status
DSR RTS
DSR RTS
NO NO
5.10.3 Port Alarm
Move the cursor to select Port Alarm, press ENTER.
V35-CARD PORT D
Port Alarm
5.10.3.1
Alarm Setup
Move the cursor to NEXT or PREV to view alarm, then go to EDIT option with pressing ENTER to do alarm
setup.
Port Alarm
Alarm Setup
Alarm Setup
Alarm Type
102
Chapter 6 TERMINAL OPERATION
5.10.3.1.1 Alarm Type
Move the cursor to select Alarm Setup, press ENTER.
Alarm Setup
Alarm Type
5.10.3.1.2 Threshold
Move the cursor to select Threshold, press ENTER.
Alarm Setup
Threshold
5.10.3.2
Alarm History
Move the cursor to select Alarm History, press ENTER.
Port Alarm
Alarm History
Alarm History
OK MAJOR 0001
5.10.3.3
Alarm Clear
Pressing enter when cursor is on NEXT will move to the next alarm item. To confirm the existing option, move
cursor to EDIT and press ENTER. Then move cursor to the desired option and press ENTER.
The alarm queue can be cleared.
Port Alarm
Alarm Setup
Alarm Setup
Alarm Clear
Alarm Clear
Confirm?
103
Chapter 6 TERMINAL OPERATION
5.10.4 Port Loopback
Move the cursor to select Port Loopback, press ENTER.
V35-CARD PORT D
Port Loopback
5.10.4.1
Local Loopback
Under Port Loopback menu, use left or right key to select Local Loopback menu. Under Local Loopback
sub-menu, use arrow keys to select a desired option.
Its sub-menus includes these options: OFF, TO_DTE and TO_WAN. The current selection is highlighted by an
asterisk (*).
Port Loopback
Local Loopback
Local Loopback
*OFF
Local Loopback
TO-DTE
Local Loopback
TO-WAN
5.10.5 Clock Source
Move the cursor to select Clock Source, press ENTER.
V35-CARD PORT D
Clock Source
5.10.5.1
Master Clock
The IP6700 provide operator to setup each port’s clock source from internal, external, line (from A/B/C/D), or
WAN (from A/B/C/D). Move the cursor to select Master Clock press ENTER. The current selection is
highlighted by an asterisk (*).
Clock Source
Master Clock
104
Chapter 6 TERMINAL OPERATION
Master Clock
*INTERNAL
Master Clock
EXTERNAL
Master Clock
PORT A (LINE)
Master Clock
PORT B (LINE)
Master Clock
PORT C (LINE)
Master Clock
PORT D (LINE)
Master Clock
PORT A (BUNDLE 0)
Master Clock
PORT B (BUNDLE 0)
Master Clock
PORT C (BUNDLE 0)
Master Clock
PORT D (BUNDLE 0)
105
Chapter 6 TERMINAL OPERATION
5.10.5.2
Second Clock
The IP6700 provide operator to setup each port’s clock source from internal, external, line (from A/B/C/D), or
WAN (from A/B/C/D). Move the cursor to select Second Clock press ENTER. The current selection is
highlighted by an asterisk (*).
Clock Source
Second Clock
Second Clock
*INTERNAL
Second Clock
EXTERNAL
Second Clock
PORT A (LINE)
Second Clock
PORT B (LINE)
Second Clock
PORT C (LINE)
Second Clock
PORT D (LINE)
Second Clock
PORT A (BUNDLE 0)
Second Clock
PORT B (BUNDLE 0)
Second Clock
PORT C (BUNDLE 0)
Second Clock
PORT D (BUNDLE 0)
106
Chapter 6 TERMINAL OPERATION
5.10.5.3
Current Clock
Move the cursor to select Current Clock, press ENTER. The current selection is highlighted by an asterisk (*).
Clock Source
Current Clock
Current Clock
*MASTER_CLK
Current Clock
SECOND_CLK
Current Clock
INTERNAL
5.10.5.4
Recover Clock
Move the cursor to select Current Clock press ENTER. Under Recover clock sub-menu, use arrow keys to
select a desired option.
Their submenu includes these options: MANUAL and AUTOMATIC. The current selection is highlighted by an
asterisk (*).
Clock Source
Recover Clock
Recover Clock
*AUTOMATIC
Recover Clock
MANUAL
5.10.5.5
Clock status
Move the cursor to select Clock status, press ENTER.
Clock Source
Clock status
107
Chapter 6 TERMINAL OPERATION
Clock status
NORMAL
108
Chapter 5 Front Panel Operation
6 TERMINAL OPERATION
Loop-IP6700 provides comprehensive and enhanced configuration and test capability through the console
port. A VT-100 type terminal or a modem can be connected to the console port on the front of the
Loop-IP6700. By use of single-character commands and arrow keys, the Loop-IP6700 can be configured and
tested. The single-character commands are not case sensitive. On each screen, the available commands and
the configurable fields are highlighted. When the Loop-IP6700 is powered on, user has not logged on yet a
main menu will show as below:
NOTE: On the upper right corner of the screen, a time-of day display indicates the time the current
screen is shown. User may hit any key other than ESC to update the screen.
6.1 Main Menu
If the terminal screen is illegible, press the “enter’” and “esc” key alternatively to bring up the main menu. This
is particularly needed if the terminal is connected to the controller while the power is already applied. If the
main menu still fails to appear, check to see that the terminal is configured as 9600,9, n, 1, and that a proper
null modem or a null modem cable is used.
LOOP IP 670 0
=== Mai n M enu ===
Seri al Num ber
:
- 1048 574 4
Hard war e V ersi on: Ve r.B
Soft war e V ersi on: V1 .01. 01 03/ 14/2 006
Star t T ime
1 8:12 :17 03 /14/ 200 0
: 15: 49: 05 0 3/1 4/2 000
[DIS PLA Y]
C -> Sy ste m Co nfi gur atio n
J -> Ti me Slot IP As sign men t
B -> Cl ock sou rce Co nfig ura tio n
D -> Li nk Stat us
Q -> Al arm Que ue
[S ETUP ]
S -> S yst em Setu p
P -> C hoo se Port
T -> T ime Sl ot I P A ssi gnme nt
W -> F irm war e Tr ans fer
V -> S tor e/R etri eve Co nfig ura tio n
K -> C loc k S ourc e S etu p
M -> S yst em Alar m S etu p
[LOG ]
F -> Lo g O ff [ SET UP] ,[MI SC] Me nu
O -> Lo g O n [ SET UP] ,[MI SC] Me nu
[M ISC]
Y -> R etu rn To D efa ult
Z -> R ese t
X -> C lea r A larm Qu eue & H ist ory
A -> A lar m C ut O ff
>>SP ACE ba r to re fre sh o r e nte r a com man d == =>
109
Chapter 6 TERMINAL OPERATION
6.1.1 System Setup
Press "S" from the “Main Menu” to view the system setup. The screen will show as below.
LOOP IP 670 0
=== Sy ste m Se tup == =
A
B
C
D
->
->
->
->
00: 00: 29# 01/0 1/U U93
Sys tem
Inb and Sy stem Se tup
Pas swo rd
Por t S pee d Se tup
<< P res s E SC k ey to retu rn to Main Me nu or e nte r a com man d > >
6.1.1.1 System
Press "A" from the "System Setup" to display the current status for system and console port. Refer to the table
below to see the differences when SNMP uses different ports.
LOOP IP 670 0
=== Sy stem Se tup (SY STE M) ===
1 5:07 :22 10 /03/ 200 6
ARRO W K EYS : CU RSO R M OVE, TA B: ROLL OP TIO NS
Time /Da te
:1 5:0 7:26 10 /03 /200 6
Eth erne t P ort :ENA BLE
L an P ort : D ata_ onl y
IP A ddr .:0 10.0 02. 003 .055 Su bne t Ma sk: 255 .255 .00 0.0 00 G ate way IP: 000 .00 0.00 0.0 00
Comm uni ty: (Get )pu bli c
Co mmu nit y(Se t)p ubl ic
W an P ort : W AN_o nly
Trap IP Ad dres s1: 000 .000 .00 0.0 00
Com mun ity1 :pu bli c
Trap IP Ad dres s2: 000 .000 .00 0.0 00
Com mun ity2 :pu bli c
Trap IP Ad dres s3: 000 .000 .00 0.0 00
Com mun ity3 :pu bli c
Trap IP Ad dres s4: 000 .000 .00 0.0 00
Com mun ity4 :pu bli c
Trap IP Ad dres s5: 000 .000 .00 0.0 00
Com mun ity5 :pu bli c
Devi ce Nam e
:L OOP IP6 700
Syst em Loc atio n:8 F, No.8 , H SIN ANN RO AD
S CIE NCE- BAS ED INDU STR IAL PAR K
H SIN CHU, 30 077 TAI WAN
Syst em Con tact :N ame : FA E
Te l:+8 86- 3-5 7876 96
E-m ail: FAE @lo op.c om. tw
Acti ve bun dle Tim er (s) : 0 000 0090
LAN Rat e S etup : 010 0 x3 2K
[CON SOL E p ort]
Baud Ra te :960 0
Da ta L eng th :8-B its
Fa x:+8 86- 3-5 7876 95
Loop bac k T imer (s ) : 000 000 60
CAS Idl e C ode : 0 1
Stop Bi t : 1-Bi t
Pa rity :N ONE
<< P res s E SC k ey to retu rn to prev iou s m enu >>
Note:
1.
2.
3.
4.
IP address: device IP address
Gateway IP: company’s DNS server value
Trap IP address: the user can setup no more than 5 Trap IP addresses.
In any situation, the user cannot connect any two ports in one LAN. When SNMP is setup at the
SNMP port, the WAN port and the LAN port act as switches. When SNMP is setup at the WAN port,
the SNMP port will shut down. No matter what the user does in any setup, the LAN port and the
WAN port act as switches.
110
Chapter 6 TERMINAL OPERATION
When SNMP uses SNMP port
When SNMP uses LAN port
SNMP Port
Enable
×
When SNMP uses WAN port
× (Shut down)
LAN Port
Data_only
D+S, S-on
D+S, S-off
× (Data_only)
WAN Port
WAN_only
WAN_only
WAN +S
6.1.1.2 Inband Management
Press "B" from the "System Setup" to setup Inband Management. It is to manage remote device from local
device. For example: one E1 assign one timeslot to manage other device. Please refer to Figure 6-1 for detail.
LOOP IP 670 0
== = In ban d M anag eme nt ===
ARRO W K EYS : CU RSO R M OVE, TA B: ROLL OP TIO NS
Inba nd
Port
Time Sl ot
13: 12: 52 12/0 6/2 005
:OF F
:PO RT_ A
:00
<< P res s E SC k ey to retu rn to prev iou s m enu >>
Note: 1. When Inband is on, the user needs to create a bundle.
2. Inband management can manage a pair only
3. Three ports in IP6700 cannot connect together in same switch. It will cause Ethernet Loop.
Inband = on
E1
E1
E1/V.35
E1/V.35
10/100
Base
T
LAN
Inband = on
10/100 BaseT
IP6700
TDMoEthernet
10/100 BaseT
WAN
IP6700
TDMoEthernet
SNMP
SNMP
Management
Figure 6- 1 Inband management Diagram
111
10/100
Base T
E1
E1
E1/V.35
E1/V.35
LAN
Chapter 6 TERMINAL OPERATION
6.1.1.3 Password
Press "B" from the "System Setup" to enter into the password setup screen. This menu is used to enable,
disable, and change password. Use TAB key to roll up the desired options, then press ENTER to confirm the
setting.
LOOP IP 670 0
=== Pas swo rd S etu p = ==
14: 08: 45 12/0 6/2 005
ARRO W K EYS : CU RSO R M OVE, BA CKS PACE to ed it, ESC to abo rt
Ena ble Pas swo rd : YE S
Cha nge Pas swo rd : YE S
Old
Pas swo rd : XX XX_ ____ __
New
Pas swo rd : XX XX_ ____ __
Con firm Pa ssw ord: __ ___ ____ __
>> Ple ase inp ut new pas swo rd agai n t o c onfi rm, th en p res s E NTER .
6.1.1.4 Port Speed Setup
Press "D" from the "System Setup" to setup port speed.
LOOP IP 670 0
=== Spe ed Man agem ent == =
ARRO W K EYS : CU RSO R M OVE, TA B: ROLL OP TIO NS
LAN
:A UTO
WAN
:A UTO
SNMP :A UTO
<< P res s E SC k ey to retu rn to prev iou s m enu >>
112
1 6:19 :27 04 /24/ 200 6
Chapter 5 Front Panel Operation
6.1.1.5 Logoff
After completing the system setup or clear history data, user should log off to prevent accidentally
changing the system configuration. Enters “F” to logoff.
6.1.1.6 Logon
To show a full menu, user has to logon. If the password option is turned on, a prompt asking for password is
shown.
==>> En ter pas swo rd :
Only after a valid password is entered, the full menu is shown, otherwise user is asked to enter the correct
password again.
>> I nva lid inp ut of pass wor d ! Try ag ain ?[Y /N]
6.1.2 Time Slot IP Assignment
Press "T" from the “Main Menu” to view the Time Slot IP Assignment. The screen will show as below.
LOOP IP 670 0
=== MAP Se tup ===
1 1:33 :38 11 /14/ 200 6
V -> Bun dle IP set up
W -> Tim e S lot IP Ass ign ment
<< P res s E SC k ey to retu rn to Main Me nu or e nte r a com man d > >
113
Chapter 5 Front Panel Operation
6.1.2.1 Bundle IP Setup
Press “V” to get the screen of Bundle IP Setup.
LOOP IP 670 0
=== Bun dle IP Set up ===
15 :54: 38 11/ 03/2 006
ARRO W K EYS : CU RSO R M OVE, Pl eas e In put : n nn.n nn. nnn .nnn , B ACK SPAC E t o e dit
Src. IP Ad dres s : 000 .000 .00 0.0 00
Subn et Mas k
: 000 .000 .00 0.0 00
Gatw ay IP
: 000 .000 .00 0.0 00
<< P res s E SC k ey to retu rn to prev iou s m enu >>
Note: The Src. IP Address should be IP 6700 WAN IP
6.1.2.2 Time Slot IP Assignment
Press “T” to get into the screen of Time Slot IP Assignment
LOOP IP 670 0
= == Syst em Set up(M AP) == =
ARRO W K EYS : CU RSO R M OVE, TA B: ROLL OP TIO NS
1 1:33 :53 11 /14/ 200 6
P O/TS TS PO /TS TS BND L ID /UD P N UM D est IP Add res s
Port
: PO RT_ A
= ==== == == === == === ==== === === == = === === ==== === =
Bund le ID : 0
Acti on
: Ad d b und le
UDP Num ber : 00 00
Cel l Nu m J itt er D ela y J itte r S ize
Time Sl ot : 00
=== ==== = = === ==== === == ==== === ===
Time Sl ot# : 00
Dest IP Ad dr: 000 .00 0.00 0.0 00
Cell in Bu ndle : 0 5
Jitt er Del ay:
0 20
Jitt er Siz e:
2 56
VLAN :
O FF
VLAN 1 I D:
0 000
VLAN 1 p rio rity : 0
VLAN 2 I D:
0 000
VLAN 2 p rio rity : 0
Conf irm ?
Ye s
<< P res s E SC k ey to retu rn to main me nu or s ave sy stem se tup >>
Note:
1. For SW Version 1.01.07 or over, User needs to setup Bundle from Bundle 0 because only
Bundle 0 can transfer clock.
114
Chapter 6 TERMINAL OPERATION
2. Bundle ID
UDP number
refer to table of Maximum Bundle Allocation below
There are 4 ports to have UDP number from 1 to 8063. If one port gets UDP
number such as 100, another port cannot use same UDP number (refer to
Figure 6-1 for detail).
In one bundle, how many cell will include (refer to Figure 8-5 for detail)
Total delay buffer n x 0.5 ms max.
Packet delay cannot ≧n x 0.5 ms
Cell in Bundle
Jitter Delay
Jitter Size
size
This area is empty and can
be used to store incoming
bursts
delay
This area is full and there
is still data to send on the
line if incoming data is
missing due to network
delays.
*Delay should be smaller than size. Also, the difference between size and delay should be larger
than the time that it takes to reconstruct a packet (otherwise an overrun may occur when the packet
arrives). Configuring the Jitter Buffer parameters correctly avoids under-run and overrun situation.
Under-run occurs when the Jitter Buffer is empty (the entering rate is lower than the exiting one). In
case of an under-run event, the chip transmits conditioning data instead of actual data towards the
TDM interface. Overrun occurs when the jitter buffer is full and there is no room for new data to
enter (the entering rate exceeds the exiting one). Under-run and overrun require special treatment
from the chip HW, depending on the bundle type.
Figure 6- 2 Jitter Buffer Diagram
After configured it. Press “Y” or “N” to confirm it.
Are you su re [ Y/N ] ?
After confirmed to save the configuration.
115
Chapter 6 TERMINAL OPERATION
LOOP IP 670 0
= == Syst em Set up(M AP) == =
ARRO W K EYS : CU RSO R M OVE, TA B: ROLL OP TIO NS
P O/TS
Port
: PO RT_ A
= ====
Bund le ID : 00
A 1
Acti on
: De let e b undl e
A 2
UDP N umb er : 000 1
A 3
Time Slo t : 01
A 4
Time Sl ot# : 31
A 5
Dest IP Ad dr: 010 .00 3.01 3.0 04 A 6
Cell in Bu ndle : 0 5
A 7
Jitt er Del ay:
0 20
A 8
Jitt er Siz e:
2 56
A 9
VLAN :
O FF
A 10
VLAN 1 I D:
0 000
A 11
VLAN 1 p rio rity : 0
A 12
VLAN 2 I D:
0 000
A 13
VLAN 2 p rio rity : 0
A 14
Conf irm ?
Ye s
A 15
A 16
1 1:39 :48 11 /14/ 200 6
TS PO /TS TS BND L ID /UD P N UM D est IP Add res s
== == === == === ==== === === == = === === ==== === =
1
A 17 17
0
1 0 10. 003 .013 .00 4
2
A 18 18
3 A 19 19 C ell Nu m Jit ter D elay Jit te r Siz e
4 A 20 20 = === == == == === == ==== === == ==== == =
5
A 21 21
5
20
25 6
6
A 22 22
7
A 23 23
8
A 24 24
9
A 25 25
10
A 26 26
11
A 27 27
12
A 28 28
13
A 29 29
14
A 30 30
15
A 31 31
16
<< P res s E SC k ey to retu rn to main me nu or s ave sy stem se tup >>
After configured it. Press “Y” or “N” to confirm it.
Are you su re [ Y/N ] ?
NOTE:
Configuration
E1 Line
Option
Default
Port
PORT_A, PORT_B, PORT_C, PORT_D PORT_A
Action
Add bundle, Delete bundle, Delete all,
Add bundle
Active all, change bundle, stop to bundle
Bundle ID
0-31
0
Time Slot
1-31
1
Time Slot#
1-31
1
Payload
AAL1
AAL1
UDP Number
1-8063
1
IP Address
Range of valid IP
000.000.000.000
Confirm?
NO, YES
NO
The Action has two options, “Add bundle” and “Delete bundle”. When user choose “Add bundle” option, the
bundle ID must be unique for the particular port. When user choose “Delete bundle” option, the particular
bundle must already been created. The UDP number need to unique for all the ports.
The chip supports up to 64 bundles. The maximum number of bundles that can be allocated per port is
configured as below
116
Chapter 6 TERMINAL OPERATION
Maximum Bundle Allocation
Allocation No
Port 1
Port 2
Port 3
Port 4
1.
32
Disabled
32
Disabled
2.
32
Disabled
16
16
3.
16
16
32
Disabled
4.
16
16
16
16
The highest priority of Allocation Number is descended from Allocation No 4 to Allocation No1.
6.1.3 Firmware Transfer
Under the Main Menu, press “W” to enter in the screen of File Transfer as below. Press “A” to download
mainboard firmware, “B” to upload mainboard firmware, and "R" to copy firmware to redundant.
LOOP IP 670 0
= ==Fi le Tra nsfe r== =
A
B
C
D
->
->
->
->
13: 38:1 3 1 2/0 6/20 0 5
D own load Ma inb oard Fi rmw are
D own load Bo ot Stra ppe r
D own load Cu rre nt C onf igu rati on
U plo ad C urr ent Con fig ura tion fr om FLAS H
<< P res s E SC k ey to retu rn to Main Me nu or e nte r a com man d > >
117
Chapter 5 Front Panel Operation
6.1.3.1 Download Mainboard Firmware
LOOP IP6 70 0
= == Down loa d F irmw are == =
13 :38: 34 1 2/ 06/2 00 5
ARRO W K EYS : CU RSO R M OVE, Pl eas e In put : n nn.n nn. nnn .nnn , B ACK SPAC E t o e dit
Firm war e 1 Ver sio n
:
Firm war e 2 Ver sio n
:
Curr ent Fi rmwa re Ban k:
Next Bo ot Firm war e
:
TFTP Se rve r IP
:
Firm war e F ile Nam e
:
E mpt y o r In val id ver
E mpt y o r In val id ver
1
1
0 00. 000 .000 .00 0
<< P res s E SC k ey to retu rn to prev iou s m enu >>
6.1.3.2 Download Boot Strapper
LOOP IP6 70 0
=== D ownl oad Bo otup Cod e ===
18 :11: 15 1 2/ 06/2 005
ARRO W K EYS : CU RSO R M OVE, Pl eas e In put : n nn.n nn. nnn .nnn , B ACK SPAC E t o e dit
TFTP Se rve r IP
Down loa d F ile Nam e
: 0 00. 000 .000 .00 0
:
<< P res s E SC k ey to retu rn to prev iou s m enu >>
118
Chapter 6 TERMINAL OPERATION
6.1.3.3 Download Current Configuration
LOOP IP 670 0
=== Do wnl o ad C urr ent Conf igu rat ion === 13 : 39:2 7 1 2/0 6/20 05
ARRO W K EYS : CU RSO R M OVE, Pl eas e In put : n nn.n nn. nnn .nnn , B ACK SPAC E t o e dit
TFTP Se rve r IP
Conf ig Fil e Na me
: 0 00. 000 .000 .00 0
:
<< P res s E SC k ey to retu rn to prev iou s m enu >>
6.1.3.4 Upload Current Configuration from FLASH
LOOP I P67 0 0
= == Up loa d C urr ent C onfi gur ati on === 13: 45:4 9 12/ 0 6/20 05
ARRO W K EYS : CU RSO R M OVE, Pl eas e In put : n nn.n nn. nnn .nnn , B ACK SPAC E t o e dit
TFTP Se rve r IP
Conf ig Fil e Na me
: 0 00. 000 .000 .00 0
:
<< P res s E SC k ey to retu rn to prev iou s m enu >>
119
Chapter 5 Front Panel Operation
6.1.4 Store/Retrieve Configuration
Under the Main Menu, press “V” to store or retrieve the current configuration as the following screen
shows. Use TAB key to select STORE or RETRIEVE, press ENTER. The current selection will be
highlighted by an asterisk (*).
Store Configuration:
LOOP IP 670 0
=== Sto re/ Retr iev e C onfi gur ati on== =
1 3:53 :07 12 /06/ 200 5
>> S ele ct ?
*ST ORE
R ETR IEVE
>> S tor e C urre nt Con figu rat ion ? [ Y/N ]
Retrieve Configuration:
LOOP IP 670 0
= ==S tor e/Re tri eve Con fig ura tion ===
>> S ele ct ?
ST ORE
*R ETR IEVE
>> R etr iev e La st Sto red Con fig urat ion ? [Y/N ]
120
13: 53: 57 12/0 6/2 005
Chapter 6 TERMINAL OPERATION
6.1.5 Clock Source Setup
Under the "MainMenu Setup" menu, press “K” to setup clock source as below.
==>> In put the E1 po rt n umb er (A~D ): A
The screen of clock will show as below after input E1 port number.
E1 P ort A
= == S yst em Setu p ( CLO CK-N orm al Mode ) = ==1 3:57 :00 12 /06/ 200 5
ARRO W K EYS : CU RSO R M OVE, TA B: ROLL OP TIO NS
Mast er_ Clk Sou rce
Seco nd_ Clk Sou rce
Curr ent Cl ock
Clk_ Rec ove r_Mo de
Cloc k S tat us
:
:
:
:
:
INTE RNA L
INTE RNA L
MAST ER_ CLK
MANU AL
NORM AL
<< P res s E SC k ey to retu rn to prev iou s m enu >>
NOTE:
Configuration
Option
Master_Clk Source
INTERNAL, EXTERNAL, PORT A(E1-LINE),
PORT B(E1-LINE), PORT C(E1-LINE),
PORT D(E1-LINE), PORT A(WAN),
PORT B(WAN), PORT C(WAN), PORT D(WAN)
Second_Clk Source
INTERNAL, EXTERNAL, PORT A(E1-LINE),
PORT B(E1-LINE), PORT C(E1-LINE),
PORT D(E1-LINE), PORT A(WAN),
PORT B(WAN), PORT C(WAN), PORT D(WAN)
Current Clock
MASTER_CLK,SECOND_CLK,INTERNAL
Clk_Recover_Mode MANUAL, AUTOMATIC
Clock Status
NORMAL
121
Default
INTERNAL
Add bundle
MASTER_CLK
AUTO
NORMAL
Chapter 6 TERMINAL OPERATION
6.1.6 System Alarm Setup
Press “M from the Main Menu, the screen of System Alarm Setup will show as below.
LOOP IP 670 0
=== Sys tem Al arm Set up ===
ARRO W K EYS : CU RSO R M OVE, TA B: ROLL OP TIO NS
[TYP E]
CLK Cha nge
14:5 8:1 4 1 2/06 /20 05
[A LAR M]
DI SAB LE
<< P res s E SC k ey to retu rn to prev iou s m enu >>
6.1.7 System Configuration
Press “C” from the Main Menu, the screen of System Configuration will show as below.
LOOP IP 670 0
= == Syst em Con figu rat ion ===
13:5 8:2 1 1 2/06 /20 05
[Sys tem ]
Ethe rne t P ort
IP A ddr ess
:0 00. 000. 000 .00 0
Subn et Mas k
Trap IP Ad dres s:0 00. 000. 000 .00 0
Gate way IP
Comm uni ty( Get) :p ubl ic
Comm uni ty( Set)
Devi ce Nam e
:L OOP IP6 700
Syst em Loc atio n:8 F, No.8 , H SIN ANN RO AD
S CIE NCE- BAS ED INDU STR IAL PAR K
H SIN CHU, 30 077 TAI WAN
Syst em Con tact :N ame : FA E
Te l:+8 86- 3-5 7876 96
E-m ail: FAE @lo op.c om. tw
IP I nte rfa ce
Lan Rat e S etup
[CON SOL E p ort]
Baud Ra te
Data Le ngt h
Stop Bi t
:D ISA BLE
:0 00. 000. 000 .00 0
:0 00. 000. 000 .00 0
:p riv ate
Fa x:+8 86- 3-5 7876 95
: ETH ERNE T_P ORT
: 100 x32 K
: 960 0
: 8-B its
: 1-B it
<< E SC key to ret urn to pre vio us m enu , S PACE ba r t o re fre sh >>
122
Chapter 6 TERMINAL OPERATION
6.1.8 Display MAP IP Assignment
Press “J” from the Main Menu Configuration Menu, the screen will show as below.
LOOP IP 670 0
=== Sys tem Se tup (MA P) ===
13:5 9:4 0 1 2/06 /20 05
Por t B und le U DP Cel ls J itt er
IP Ad dre ss
Ti me S lot
ID
N um
Nu m si ze/ Del ay
=== = = === == = === ==
== == === = == === === ==== === == ==== === === ==== === === ==== === =
A
0
1
5
20
25 6 00 0.0 00. 000. 000 0, 1,2, 3,4 ,5, 6,7, 8,9 ,10 ,11, 12,
13 ,14, 15, 16, 17,1 8,1 9,2 0,21 ,22 ,
23 ,24, 25, 26, 27,2 8,2 9,3 0,31
<< S PAC E b ar t o r efr esh or ESC key re tur n to ma in menu >>
The bundle entries are shown on the terminal as above. If the displaying entries are more than one page, hit
space key other view the next page. To return to main menu, hit “ESC” key.
6.1.9 Clock source Configuration
Press “B” from the Main Menu, the screen of Clock Source Configuration will show as below.
LOOP IP 670 0
Mast er_ Clk Sou rce
Seco nd_ Clk Sou rce
Curr ent Cl ock
Clk_ Rec ove r_Mo de
Cloc k S tat us
= == Cloc k S our ce S etu p = ==
:
:
:
:
:
1 4:00 :21 12 /06/ 200 5
INTE RNA L
INTE RNA L
MAST ER_ CLK
MANU AL
NORM AL
<< E SC key to ret urn to pre vio us m enu , S PACE ba r t o re fre sh >>
123
Chapter 5 Front Panel Operation
6.1.10 Byte and Packet Counters
Press “D” from the Main Menu, the screen of Byte and Packet Counters will show as below.
LOOP IP 670 0
= == Byt e an d P ack et C oun ter s == =
-- T ran swi tch Cou nte rs
T XC Cla ssif ied Pa cket s R ece ived
T XC Byt e Re cei ved
T XC Byt e Tr ans mit ted
T XC Pac kets Re cei ved
T XC Pac kets Tr ans mitt ed
L AN Por t Li nk Sta tus
W AN Por t Li nk Sta tus
S NMP Po rt L ink St atus
:
:
:
:
:
:
:
:
1 8:02 :03 05 /15/ 200 6
0
0
10 08
0
24
Li nk D own
Li nk D own
Li nk D own
<< E SC key to ret urn to pre vio us m enu , S PACE ba r t o re fre sh >>
6.1.11 Alarm Queue
Press “Q” from the Main Menu, the Alarm Queue Configuration will show as below.
LOOP IP 670 0
1
2
3
4
5
6
7
8
9
10
11
12
13
14
15
16
17
18
19
20
---------------------
Po rt
Po rt
Po rt
Po rt
Po rt
Po rt
Po rt
Po rt
Po rt
Po rt
Po rt
Po rt
Po rt
Po rt
Po rt
Po rt
Po rt
Po rt
Po rt
Po rt
=== Uni t A lar m Qu eue == =
D
C
A
D
C
A
A
A
A
A
A
A
D
C
D
C
D
C
D
C
E 1:
E 1:
E 1:
E 1:
E 1:
E 1:
E 1:
E 1:
E 1:
E 1:
E 1:
E 1:
E 1:
E 1:
E 1:
E 1:
E 1:
E 1:
E 1:
E 1:
MAJO R
MAJO R
MAJO R
MAJO R
MAJO R
MAJO R
MAJO R
MAJO R
MAJO R
MAJO R
MAJO R
MAJO R
MAJO R
MAJO R
MAJO R
MAJO R
MAJO R
MAJO R
MAJO R
MAJO R
U AS r emo ve- ---- --- --- -18: 49: 08
U AS r emo ve- ---- --- --- -18: 49: 08
U AS r emo ve- ---- --- --- -18: 49: 08
U AS-- --- --- ---- --- --- -18: 49: 07
U AS-- --- --- ---- --- --- -18: 49: 07
U AS-- --- --- ---- --- --- -18: 49: 07
U AS r emo ve- ---- --- --- -18: 40: 24
U AS-- --- --- ---- --- --- -18: 40: 23
L OF-- --- --- ---- --- --- -18: 40: 15
L OS-- --- --- ---- --- --- -18: 40: 15
E S r emo ve- ---- --- --- -18: 40: 15
E S -- --- --- ---- --- --- -18: 40: 14
U AS r emo ve- ---- --- --- -18: 34: 08
U AS r emo ve- ---- --- --- -18: 34: 08
U AS-- --- --- ---- --- --- -18: 34: 07
U AS-- --- --- ---- --- --- -18: 34: 07
U AS r emo ve- ---- --- --- -18: 19: 08
U AS r emo ve- ---- --- --- -18: 19: 08
U AS-- --- --- ---- --- --- -18: 19: 07
U AS-- --- --- ---- --- --- -18: 19: 07
1 8:56 :30 03 /14/ 200 0
03/1 4/0 0
03/1 4/0 0
03/1 4/0 0
03/1 4/0 0
03/1 4/0 0
03/1 4/0 0
03/1 4/0 0
03/1 4/0 0
03/1 4/0 0
03/1 4/0 0
03/1 4/0 0
03/1 4/0 0
03/1 4/0 0
03/1 4/0 0
03/1 4/0 0
03/1 4/0 0
03/1 4/0 0
03/1 4/0 0
03/1 4/0 0
03/1 4/0 0
<< E SC key ret urn to pre vio us menu or SP ACE bar to cha nge pa ge
NOTE:
The latest 40 alarm entries are shown on the terminal as above in two pages of 20 entries each.
If there are more than 20 entries, hit any key other than “ESC” to view the second page. To
return to main menu, hit “ESC” key.
124
Chapter 6 TERMINAL OPERATION
6.1.12 Load Default Configuration
Press “Y” to return to default, then confirm it by pressing “Y” or “N”.
LOOP IP 670 0
=== Mai n M enu ===
Seri al Num ber
:
- 1048 574 4
Hard war e V ersi on: Ve r.B
Soft war e V ersi on: V1 .01. 01 03/ 14/2 006
Star t T ime
1 8:56 :56 03 /14/ 200 0
: 15: 49: 05 0 3/1 4/2 000
[DIS PLA Y]
C -> Sy ste m Co nfi gur atio n
J -> Ti me Slot IP As sign men t
B -> Cl ock sou rce Co nfig ura tio n
D -> Li nk Stat us
Q -> Al arm Que ue
[S ETUP ]
S -> S yst em Setu p
P -> C hoo se E1 P ort
T -> T ime Sl ot I P A ssi gnme nt
W -> F irm war e Tr ans fer
V -> S tor e/R etri eve Co nfig ura tio n
K -> C loc k S ourc e S etu p
M -> S yst em Alar m S etu p
[LOG ]
F -> Lo g O ff [ SET UP] ,[MI SC] Me nu
O -> Lo g O n [ SET UP] ,[MI SC] Me nu
[M ISC]
Y -> R etu rn To D efa ult
Z -> R ese t
X -> C lea r A larm Qu eue & H ist ory
A -> A lar m C ut O ff
>> R etu rn to d efa ult - a re you sur e ? [Y /N]
6.1.13 Reset
Under Port Menu, press “Z” to reset unit. Press “Y” or “N” to confirm it.
LOOP IP 670 0
=== Mai n M enu ===
Seri al Num ber
:
- 1048 574 4
Hard war e V ersi on: Ve r.B
Soft war e V ersi on: V1 .00. 01 11/ 28/2 005
Star t T ime
1 3: 34:5 4 1 2/0 6/20 0 5
: 11: 09: 23 1 2/0 6/2 005
[DIS PLA Y]
C -> Sy ste m Co nfi gur atio n
J -> Ti me Slot IP As sign men t
B -> Cl ock sou rce Co nfig ura tio n
D -> Co unt ers Pag e
Q -> Al arm Que ue
[S ETUP ]
S -> S yst em Setu p
E -> E 1 S etu p
T -> T ime Sl ot I P A ssi gnme nt
W -> F irm war e Tr ans fer
V -> S tor e/R etri eve Co nfig ura tio n
K -> C loc k S ourc e S etu p
M -> S yst em Alar m S etu p
[LOG ]
F -> Lo g O ff [ SET UP] ,[MI SC] Me nu
O -> Lo g O n [ SET UP] ,[MI SC] Me nu
[M ISC]
Y -> R etu rn To D efa ult
Z -> R ese t
X -> C lea r A larm Qu eue & H ist ory
A -> A lar m C ut O ff
Rese t – ar e yo u s ure ? [ Y/N ]
125
Chapter 6 TERMINAL OPERATION
6.1.14 Clear Alarm Queue & History
Under Port Menu, press “X” to clear alarm queue and history. Press “Y” or “N” to confirm it.
LOOP IP 670 0
=== Mai n M enu ===
Seri al Num ber
:
- 1048 574 4
Hard war e V ersi on: Ve r.B
Soft war e V ersi on: V1 .00. 01 11/ 28/2 005
Star t T ime
1 4: 58:5 9 1 2/0 6/20 0 5
: 11: 09: 23 1 2/0 6/2 005
[DIS PLA Y]
C -> Sy ste m Co nfi gur atio n
J -> Ti me Slot IP As sign men t
B -> Cl ock sou rce Co nfig ura tio n
D -> Co unt ers Pag e
Q -> Al arm Que ue
[S ETUP ]
S -> S yst em Setu p
E -> E 1 S etu p
T -> T ime Sl ot I P A ssi gnme nt
W -> F irm war e Tr ans fer
V -> S tor e/R etri eve Co nfig ura tio n
K -> C loc k S ourc e S etu p
M -> S yst em Alar m S etu p
[LOG ]
F -> Lo g O ff [ SET UP] ,[MI SC] Me nu
O -> Lo g O n [ SET UP] ,[MI SC] Me nu
[M ISC]
Y -> R etu rn To D efa ult
Z -> R ese t
X -> C lea r A larm Qu eue & H ist ory
A -> A lar m C ut O ff
>> C lea r a larm qu eue - a re you sur e ? [Y /N]
6.1.15 Alarm Cut Off
Press “A” to show alarm cut off screen.
LOOP IP 670 0
=== Mai n M enu ===
Seri al Num ber
:
- 1048 574 4
Hard war e V ersi on: Ve r.B
Soft war e V ersi on: V1 .01. 01 03/ 29/2 006
Star t T ime
1 6:15 :49 04 /24/ 200 6
: 15: 37: 33 0 4/2 4/2 006
[DIS PLA Y]
C -> Sy ste m Co nfi gur atio n
J -> Ti me Slot IP As sign men t
B -> Cl ock sou rce Co nfig ura tio n
D -> Li nk Stat us
Q -> Al arm Que ue
[S ETUP ]
S -> S yst em Setu p
P -> C hoo se E1 P ort
T -> T ime Sl ot I P A ssi gnme nt
W -> F irm war e Tr ans fer
V -> S tor e/R etri eve Co nfig ura tio n
K -> C loc k S ourc e S etu p
M -> S yst em Alar m S etu p
[LOG ]
F -> Lo g O ff [ SET UP] ,[MI SC] Me nu
O -> Lo g O n [ SET UP] ,[MI SC] Me nu
[M ISC]
Y -> R etu rn To D efa ult
Z -> R ese t
X -> C lea r A larm Qu eue & H ist ory
A -> A lar m C ut O ff
>> C ut off ala rm - a re y ou sur e (Y /N) ?
126
Chapter 6 TERMINAL OPERATION
6.2 E1 Sub-Menu
When P is selected and E1 port number is entered, the following Port Menu will show up.
==>> In put the E1 po rt n umb er (A~D ): A
E1 P ort A
=== Por t M enu ===
[DIS PLA Y]
1 -> 1- Hou r Pe rf. Re port
2 -> 24 -Ho ur P erf . R epor t
A -> Li ne Avai lab ili ty
C -> Co nfi gura tio n
I -> St atu s
H -> Al arm His tor y
1 3:22 :34 12 /06/ 200 5
[S ETUP ]
L -> L oop bac k Se tup
S -> S yst em Setu p
K -> C lea r P erfo rma nce Dat a
M -> A lar m S etup
X -> C lea r A larm Hi sto ry
[LOG ]
P -> Ch oos e Po rt
F -> Lo g O ff [ SET UP] ,[MI SC] Me nu
O -> Lo g O n [ SET UP] ,[MI SC] Me nu
E -> Re tur n to Ma in Menu
>>SP ACE ba r to re fre sh o r e nte r a com man d == =>
6.2.1 System Setup
To view the unit configuration, press “C” from Port Menu, then the screen will show as below.
E1 P ort A
FR AME
=
CO DE
=
CR C
=
RA I
=
AI S
=
CA S
=
SI GNA LLIN G=
CG A
=
OO S
=
FD L
=
Sa _bi t
=
ID LE
=
IN TF
=
= == Port Sy ste m Se tup == =
1 3:29 :13 12 /06/ 200 5
OFF
HDB 3
ON
ON
FRA MED
OFF
TRA NS
NOR M
BUS Y
OFF
Sa4
0
120 Ohm
<< E SC key to ret urn to pre vio us m enu , S PACE ba r t o re fre sh >
127
Chapter 5 Front Panel Operation
6.2.2 Loopback Setup
Under Port Menu, press “L” to do Loopback Test, then the screen will show as below. Use arrow
keys to move the cursor, press ENTER key to select items.
E1 P ort A
= == Port Lo opb ack Tes t = ==
ARRO W K EYS : C URS OR MOVE , ENT ER K EY : I TEM SEL ECT
- NE AR- END LOO PBA CK
: *OF F
LOCA L
PLB
1 5:49 :31 #01 /01/ UU9 3
LL B
- SE ND LOO PBAC K A CTI VATE CO DE TO F AR- END :
*P AYLO AD
LI NE
- SE ND LOO PBAC K D EAC TIVA TE COD E TO FA R-E ND:
*P AYLO AD
LI NE
- SE ND TES T PA TTE RN:
*O FF
PRB S-F ULL
- ST ATU S:
<< P res s E SC k ey to retu rn to prev iou s m enu >>
NOTE:
a. Near end loop-backs
1. Local loop-back: the out-going signal is looped back to the device to verify the device integrity.
2. Line loop-back: the entire incoming signal is looped back towards the line to isolate the device from the line
3. Payload loop-back: the payload of the incoming signal is looped back towards the line. This is done after
the framer framed on the incoming signal.
b. Far end loop-backs
1. Remote line loop-back: the signal received by the remote unit is looped back towards the local device to
verify line integrity.
2. Remote payload loop-back: the payload of the signal received by the remote unit is looped back towards
the local device to verify the payload integrity.
c. Loop-back timer
The period of time from the activation of a loop-back to its de-activation is controlled by a
timer. The default value of this timer is 60 seconds.
d. Diagnostics
Pseudo-random patterns are commonly used for diagnostic tests of digital systems. For E1, a 15-bit register
PRBS (pseudo-random binary sequence) pattern is standard practice. This pattern is available for testing
local system integrity by local loopback test, and for measuring the line quality. The diagnostics scenario is
as follows:
1. First, send a remote loopback command to cause the remote facility to loopback DS0 time slots.
2. Then, activate the local PRBS diagnostics operation by using the Test command to enable the pattern
and choose for test all time slots, or only idle time slots.
3. The FULL diagnostic uses a framed pattern. This is useful for testing full E1 loopback at the far-end.
128
Chapter 6 TERMINAL OPERATION
When the PRBS pattern sync is found, a bit error counter tracks total bit errors. It is advised to send the
pattern for more than 15-minute interval to evaluate the quality of loop condition and facility reliability.
User may utilize the ‘>’ key to inject a single error, the ‘<’ key to reset error counter, and ‘ESC’ to terminate
the test. Read the performance report to understand the type of errors that occur.
6.2.3 Alarm Setup
To do alarm setup, press “M” from Port Menu, then the following screen will show up.
E1 P ort A
=== Por t A lar m Se tup == =
ARRO W K EYS : CU RSO R M OVE, TA B: ROLL OP TIO NS
[TYP E]
[THR ESH OLD ]
RAI
AIS
LOS
LOF
BPV
1 0E- 5
ES
00 1
UAS
00 1
CSS
00 1
BUND LE STA TUS
MAC CHA NGE
1 3:33 :25 12 /06/ 200 5
[A LAR M]
MA JOR
MA JOR
MA JOR
MA JOR
MA JOR
MA JOR
MA JOR
MA JOR
MA JOR
MA JOR
<< P res s E SC k ey to retu rn to prev iou s m enu >>
NOTE:
Configuration
Default
RAI
DISABLE, MAJOR, CRITICAL, MINOR
MAJOR
AIS
DISABLE, MAJOR, CRITICAL, MINOR
MAJOR
LOS
DISABLE, MAJOR, CRITICAL, MINOR
MAJOR
LOF
DISABLE, MAJOR, CRITICAL, MINOR
MAJOR
Alarm
DISABLE, MAJOR, CRITICAL, MINOR
MAJOR
Threshold
10E- (5, 6, 7, 8, 9)
10E-5
Alarm
DISABLE, MAJOR, CRITICAL, MINOR
MAJOR
Threshold
1-900
1
Alarm
DISABLE, MAJOR, CRITICAL, MINOR
MAJOR
Threshold
1-900
1
Alarm
DISABLE, MAJOR, CRITICAL, MINOR
MAJOR
Threshold
1-900
1
DISABLE, MAJOR, CRITICAL, MINOR
MAJOR
DISABLE, MAJOR, CRITICAL, MINOR
MAJOR
BPV
E1 Line
Options
ES
UAS
CSS
Bundle Status
Mac
Change
For description of acronym, please refer to Glossary
129
Chapter 6 TERMINAL OPERATION
6.2.4 Chose Port
Under Port Menu, press “P” to choose port, press ENTER to get into port menu.
E1 P ort B
=== Por t M enu ===
0 0:4 0:11 #01 /01 /UU9 3
[DIS PLA Y]
1 -> 1- Hou r Pe rf. Re port
2 -> 24 -Ho ur P erf . R epor t
A -> Li ne Avai lab ili ty
C -> Co nfi gura tio n
I -> St atu s
H -> Al arm His tor y
Q -> Al arm Que ue
[S ETUP ]
L -> L oop bac k Se tup
S -> S yst em Setu p
K -> C lea r P erfo rma nce Dat a
M -> A lar m S etup
X -> C lea r A larm Qu eue & H ist ory
D -> U pgr ade Fir mwa re
[LOG ]
P -> Ch oos e Po rt
F -> Lo g O ff [ SET UP] ,[MI SC] Me nu
O -> Lo g O n [ SET UP] ,[MI SC] Me nu
E -> Re tur n to Ma in Menu
[M ISC]
Y -> L oad De faul t C onf ig
Z -> R ese t
Port : A
6.2.5 Clear Performance Data
Press “K” from Port Menu to clear performance data, the screen will show as below. Press “Y”
or “N” to confirm the command.
=>> Cle ar Perf orm anc e Da ta (Y/ N)?
6.2.6 Clear Alarm History
Under Port Menu, press “X” to clear alarm queue and history, then press “Y” or ”N” to confirm
it.
>> C lea r a larm hi sto ry - ar e y ou s ure ? [ Y/N]
130
Chapter 5 Front Panel Operation
6.2.7 1-Hour Performance Report
Press “1” from E1 Port Menu to view the 1-hour performance report. Use TAB key to select
register type, USER or LINE. The current selection will be highlighted by an asterisk (*).
>> S ele ct Regi ste r T ype ? * USE R
L INE
After pressing ENTER from the above screen, the following screen will show up
E1 P ort A
= == Por t 1- Hou r S tat. Re por t == =
13:2 6:5 7 1 2/06 /20 05
Star t T ime = 1 1:0 9:2 3 12 /06 /20 05
USER
-- V ali d S econ ds in Curr ent 15 -Min In ter val : 2 93 seco nds
( ES)
(UAS )
(BE S)
(SE S)
(DM )
(C SS)
C urr ent 15- Min In terv al
: 0
293
0
0
0
0
1 st Nea rest 15 -Mi n In ter val : 0
900
0
0
0
1
2 nd Nea rest 15 -Mi n In ter val : 0
900
0
0
0
0
3 rd Nea rest 15 -Mi n In ter val : 0
900
0
0
0
0
4 th Nea rest 15 -Mi n In ter val : 0
900
0
0
0
0
-- V ali d 1 5-Mi n I nte rval s i n C urre nt 24- Hour In ter val: 14
( ES)
(UAS )
(BE S)
(SE S)
C urr ent 24- Hou r I nter val
: 0
1260 0
0
0
1 2/0 5/2 005
: - --- ---- --- ---- -1 2/0 4/2 005
: - --- ---- --- ---- -1 2/0 3/2 005
: - --- ---- --- ---- -1 2/0 2/2 005
: - --- ---- --- ---- -1 2/0 1/2 005
: - --- ---- --- ---- -1 1/3 0/2 005
: - --- ---- --- ---- -1 1/2 9/2 005
: - --- ---- --- ---- --
(DM )
0
--- ---- ---- ---- ---- ---- ---- --
(C SS)
1
-- ---- ---- ---- ---- ---- ---- ---
<< T AB key to sho w S tati sti cs Repo rt >>
<< E SC key to ret urn to pre vio us m enu , S PACE ba r t o re fre sh >>
NOTE:
Performance
Parameter
Description
ES
UAS
BES
SES
DM
CSS
Error Second
Unavailable Second
Bursty Error Second
Severe Error Second
Degraded Minute
Controlled Slip Second
Definition
2-Frame/Multiframe
BPV≥1, OOF≥1, or CS≥1.
≥ 10 consecutive SES
1 < BPV < 2048
BPV ≥ 2048, or OOF ≥1
BPV ≥ 123
Frame slip ≥1
131
Definition
16-Frame/Multiframe
CRC ≥ 1, OOF ≥1, or CS ≥1.
≥ 10 consecutive SEC
1 < CRC < 805
CRC ≥ 805, or OOF ≥1.
CRC ≥ 47
Frame slip ≥1
Chapter 5 Front Panel Operation
6.2.8 24-Hour Performance Report
Press “2” from E1 Port Menu to view the 24-hour performance report, use TAB key to select
register type, USER or LINE, press ENTER.
>> S ele ct Regi ste r T ype ? * USE R L INE
>> S ele ct Para met er ? *E S
UAS
BE S
SES
CS S
DM
AS
EF S
BPV
Use the cursor to select the desired parameter. The current selection will be highlighted by an
asterisk (*) and press ENTER key to view the report as follows.
E1 P ort A
== = P ort 24- Hou r P erf. Re por t == =
1 3:27 :55
Star t T ime = 1 1:0 9:2 3 12 /06 /20 05
USER ES
-- V ali d S econ ds in Curr ent 15 -Min In ter val : 3 84 seco nds
-- V ali d 1 5-Mi n I nte rval s i n C urre nt 24- Hour In ter val: 14
( ES)
(UAS )
(BE S)
(SE S)
(DM )
C urr ent 15- Min In terv al
: 0
384
0
0
0
C urr ent 24- Hou r I nter val
: 0
1260 0
0
0
0
12 /06/ 200 5
(C SS)
0
1
-- U SER , E S, L ast 96 15- Min In terv al :
0 1-0 8 > 0
0
0
0
0
0
0
0
0 9-1 6 > 0
0
0
0
0
0
--- -- - --- 1 7-2 4 > --- -- --- -- - --- - - ---- -- --- --- -- --- -- - --- 2 5-3 2 > --- -- --- -- - --- - - ---- -- --- --- -- --- -- - --- 3 3-4 0 > --- -- --- -- - --- - - ---- -- --- --- -- --- -- - --- 4 1-4 8 > --- -- --- -- - --- - - ---- -- --- --- -- --- -- - --- 4 9-5 6 > --- -- --- -- - --- - - ---- -- --- --- -- --- -- - --- 5 7-6 4 > --- -- --- -- - --- - - ---- -- --- --- -- --- -- - --- 6 5-7 2 > --- -- --- -- - --- - - ---- -- --- --- -- --- -- - --- 7 3-8 0 > --- -- --- -- - --- - - ---- -- --- --- -- --- -- - --- 8 1-8 8 > --- -- --- -- - --- - - ---- -- --- --- -- --- -- - --- 8 9-9 6 > --- -- --- -- - --- - - ---- -- --- --- -- --- -- - --- << T AB key to sho w S tati sti cs Repo rt >>
<< E SC key to ret urn to pre vio us m enu , S PACE ba r t o re fre sh
NOTE
Performance
Parameter
Description
ES
UAS
BES
SES
CSS
DM
AS
EFS
BPV
Error Second
Unavailable Second
Bursty Error Second
Severe Error Second
Controlled Slip Second
Degraded Minute
Available Second
Error Free Second
Bipolar Violation
Definition
2-Frame/Multiframe
BPV≥1, OOF≥1, or CS≥1.
≥10 consecutive SES
1 < BPV < 2048
BPV ≥ 2048, or OOF ≥1
Frame slip ≥1
BPV ≥ 123
Frame slip ≥1
Error Free Second
Bipolar Error Count
132
Definition
16-Frame/Multiframe
CRC ≥ 1, OOF ≥1, or CS ≥1.
≥10 consecutive SES
1 < CRC < 805
CRC ≥ 805, or OOF ≥1.
Frame slip ≥1
CRC ≥ 47
Frame slip ≥1
Error Free Second
Bipolar Error Count
Chapter 6 TERMINAL OPERATION
6.2.9 Line Availability
Under Port Menu, press “A” to view the line availability as the following screen shows,
The information, based on user performance register set, includes the valid seconds, available
seconds, unavailable seconds and the line availability.
E1 P ort A
S tar t T ime
=== Po rt L ine Av aila bil ity ===
1 3:28 :51 12 /06/ 200 5
: 11: 09: 23 1 2/0 6/2 005
-- L ine Av aila bil ity dur ing La st 2 4-H our :
V ali d S econ ds
: 130 71 seco nds
A vai lab le S eco nds
: 0 s eco nds
U nav ail able Se con ds: 130 71 seco nds
L ine Av alia bil ity
: 0.0 %
<< E SC key to ret urn to pre vio us m enu , S PACE ba r t o re fre sh >>
6.2.10 Unit Configuration
To view the unit configuration, press “C” from Port Menu, then the screen will show as below.
E1 P ort A
FR AME
=
CO DE
=
CR C
=
RA I
=
AI S
=
CA S
=
SI GNA LLIN G=
CG A
=
OO S
=
FD L
=
Sa _bi t
=
ID LE
=
IN TF
=
= == Port Sy ste m Se tup == =
1 3:29 :13 12 /06/ 200 5
OFF
HDB 3
ON
ON
FRA MED
OFF
TRA NS
NOR M
BUS Y
OFF
Sa4
0
120 Ohm
<< E SC key to ret urn to pre vio us m enu , S PACE ba r t o re fre sh >
133
Chapter 6 TERMINAL OPERATION
6.2.11 Unit Status
Press “I” from Port Menu, to show the screen of Status as below.
E1 P ort A
-- L INE -L OS
:
L OF
:
R CV AIS :
R CV RAI :
X MT AIS :
X MT RAI :
B PV ERR OR
ES
ERR OR
= == P ort St atus == =
1 3:31 :14 12 /06/ 200 5
Y ES
NO
NO
NO
NO
NO
C OUN T : 0
C OUN T : 0
-- T EST -P ATT ERN TRA NSM ITT ED : OF F
N EAR -EN D LO OPB ACK
: OF F
<< E SC key to ret urn to pre vio us m enu , S PACE ba r t o re fre sh >>
6.2.12 Unit Alarm History
To view the unit alarm history, press “H” from Port Menu.
E1 P ort A
LOCA L
[ALA RM- TYP E]
RAI
AIS
LOS
LOF
BPV
ES
UAS
CSS
BUND LE STA TUS
MAC CHA NGE
= == Port Al arm His tor y = ==
[T HRE SHOL D]
10 E-5
1
1
1
[ CURR -ST ATE ]
OK
OK
AL M
OK
OK
OK
OK
OK
OK
OK
[CO UNT ]
0
0
1
0
0
1
15
1
0
0
1 3:31 :31 12 /06/ 200 5
[AL ARM ]
MAJ OR
MAJ OR
MAJ OR
MAJ OR
MAJ OR
MAJ OR
MAJ OR
MAJ OR
MAJ OR
MAJ OR
<< E SC key to ret urn to pre vio us m enu , S PACE ba r t o re fre sh >>
134
Chapter 6 TERMINAL OPERATION
6.3 T1 Sub-Menu
Under the Controller Menu, press “P” to choose port. The user can choose port B to do setup.
Then the following Port Menu of T1 will show.
T1 P ort B
=== Por t M enu ===
[DIS PLA Y]
1 -> 1- Hou r Pe rf. Re port
2 -> 24 -Ho ur P erf . R epor t
A -> Li ne Avai lab ili ty
C -> Co nfi gura tio n
I -> St atu s
H -> Al arm His tor y
1 5:09 :53 10 /03/ 200 6
[S ETUP ]
S -> S yst em Setu p
L -> L oop bac k Se tup
K -> C lea r P erfo rma nce Dat a
M -> A lar m S etup
X -> C lea r A larm Hi sto ry
B -> S end Be rt
[LOG ]
P -> Ch oos e Po rt
F -> Lo g O ff [ SET UP] ,[MI SC] Me nu
O -> Lo g O n [ SET UP] ,[MI SC] Me nu
E -> Re tur n to Ma in Menu
>>SP ACE ba r to re fre sh o r e nte r a com man d == =>
6.3.1 System Setup
By Pressing “S”, the system setup menu is displayed as follows.
1 Po rt B
== = P ort Sys tem Set up ===
ARRO W K EYS : CU RSO R M OVE, TA B: ROLL OP TIO NS
FR AME
=
CO DE
=
YE L
=
AI S
=
CA S
=
SI GNA LLIN G=
CG A
=
OO S
=
IN BAN D
=
ID LE
=
IN TF
=
LB O
=
FD L
=
NON E
B8Z S
ON
OFF
OFF
TRA NS
NOR M
BUS Y
ON
0
LON G HA UL
0 dB
OFF
<< P res s E SC k ey to retu rn to prev iou s m enu >>
135
15 :10: 21 10/ 03/2 006
Chapter 6 TERMINAL OPERATION
6.3.2 Loopback Setup
To enter the T1 status menu, press “L”. The following screen appears.
T1 P ort B
= == Port Lo opb ack Tes t = ==
ARRO W K EYS : C URS OR MOVE , ENT ER K EY : I TEM SEL ECT
- NE AR- END LOO PBA CK
: *OF F
LOCA L
PLB
1 5:11 :15 10 /03/ 200 6
LL B
- SE ND LOO PBAC K A CTI VATE CO DE TO F AR- END :
*I N-BA ND
AT &T-P
A NSI -P
ANS I-L
- SE ND LOO PBAC K D EAC TIVA TE COD E TO FA R-E ND:
*I N-BA ND
AT &T-P
A NSI -P
ANS I-L
- ST ATU S:
<< P res s E SC k ey to retu rn to prev iou s m enu >>
6.3.3 Alarm Setup
Press “M” to view the alarm history.
T1 P ort B
=== Por t A lar m Se tup == =
ARRO W K EYS : CU RSO R M OVE, TA B: ROLL OP TIO NS
[TYP E]
[THR ESH OLD ]
YEL
AIS
LOS
LOF
BPV
1 0E- 5
ES
00 1
UAS
00 1
CSS
00 1
BUND LE STA TUS
MAC CHA NGE
[A LAR M]
MA JOR
MA JOR
MA JOR
MA JOR
MA JOR
MA JOR
MA JOR
MA JOR
MA JOR
MA JOR
<< P res s E SC k ey to retu rn to prev iou s m enu >>
136
1 5:12 :00 10 /03/ 200 6
Chapter 6 TERMINAL OPERATION
6.3.4 Bert Test
Press “B” to test the system.
T1 P ort B
===
Ber t t est
ARRO W K EYS : CU RSO R M OVE, TA B: ROLL OP TIO NS
Typ e
=
D ire ct
=
Tim eSl ot From =
Tim eSl ot Num
=
OFF
LIN E
1
1
<< P res s E SC k ey to retu rn to prev iou s m enu >>
6.3.5 Clear Performance Data
Press K to show Clear Performance Data screen.
=>> Cle ar Perf orm anc e Da ta (Y/ N)?
6.3.6 Clear Alarm History
Press X to show Clear Alarm History screen.
>> C lea r a larm hi sto ry - ar e y ou s ure ? [Y/N ]
137
===
1 5:12 :19 10 /03/ 200 6
Chapter 6 TERMINAL OPERATION
6.3.7 1-Hour Performance Report
Under Port Menu, press “1” to view the 1-hour performance report.
T1 P ort B
== = P ort 1-H our St at. Rep ort ===
1 5:15 :29 10 /03/ 200 6
Star t T ime = 1 5:0 7:1 4 10 /03 /20 06
USER
-- V ali d S econ ds in Curr ent 15 -Min In ter val : 0 se cond s
( ES)
(UAS )
(BE S)
(SE S)
(CS S)
C urr ent 15- Min In terv al
: 0
0
0
0
0
1 st Nea rest 15 -Mi n In ter val : - --- ---- --- ---- ---- -2 nd Nea rest 15 -Mi n In ter val : - --- ---- --- ---- ---- -3 rd Nea rest 15 -Mi n In ter val : - --- ---- --- ---- ---- -4 th Nea rest 15 -Mi n In ter val : - --- ---- --- ---- ---- --- V ali d 1 5-Mi n I nte rval s i n C urre nt 24- Hour In ter val: 0
( ES)
(UAS )
(BE S)
(SE S)
C urr ent 24- Hou r I nter val
: - --- ---- --- ---- -1 0/0 2/2 006
: - --- ---- --- ---- -1 0/0 1/2 006
: - --- ---- --- ---- -0 9/3 0/2 006
: - --- ---- --- ---- -0 9/2 9/2 006
: - --- ---- --- ---- -0 9/2 8/2 006
: - --- ---- --- ---- -0 9/2 7/2 006
: - --- ---- --- ---- -0 9/2 6/2 006
: - --- ---- --- ---- --
(CS S)
--- ---- ---- ---- ---- ---- ---- ---- --
<< T AB key to sho w S tati sti cs Repo rt >>
<< E SC key to ret urn to pre vio us m enu , S PACE ba r t o re fre sh >>
6.3.8 24-Hour Performance Report
Under Port Menu, press “2” to view the 24-hour performance report.
T1 P ort B
== = P ort 24- Hou r P erf. Re por t == =
1 5:29 :02 10 /03/ 200 6
Star t T ime = 1 5:2 0:1 6 10 /03 /20 06
USER ES
-- V ali d S econ ds in Curr ent 15 -Min In ter val : 0 se cond s
-- V ali d 1 5-Mi n I nte rval s i n C urre nt 24- Hour In ter val: 0
( ES)
(UAS )
(BE S)
(SE S)
(CS S)
C urr ent 15- Min In terv al
: 0
0
0
0
0
C urr ent 24- Hou r I nter val
: - --- ---- --- ---- ---- --- U SER , E S, L ast 96 15- Min In terv al :
0 1-0 8 > --- -- --- -- - --- - - ---- -- --- --- -- --- -- - --- 0 9-1 6 > --- -- --- -- - --- - - ---- -- --- --- -- --- -- - --- 1 7-2 4 > --- -- --- -- - --- - - ---- -- --- --- -- --- -- - --- 2 5-3 2 > --- -- --- -- - --- - - ---- -- --- --- -- --- -- - --- 3 3-4 0 > --- -- --- -- - --- - - ---- -- --- --- -- --- -- - --- 4 1-4 8 > --- -- --- -- - --- - - ---- -- --- --- -- --- -- - --- 4 9-5 6 > --- -- --- -- - --- - - ---- -- --- --- -- --- -- - --- 5 7-6 4 > --- -- --- -- - --- - - ---- -- --- --- -- --- -- - --- 6 5-7 2 > --- -- --- -- - --- - - ---- -- --- --- -- --- -- - --- 7 3-8 0 > --- -- --- -- - --- - - ---- -- --- --- -- --- -- - --- 8 1-8 8 > --- -- --- -- - --- - - ---- -- --- --- -- --- -- - --- 8 9-9 6 > --- -- --- -- - --- - - ---- -- --- --- -- --- -- - --- << T AB key to sho w S tati sti cs Repo rt >>
<< E SC key to ret urn to pre vio us m enu , S PACE ba r t o re fre sh >>
138
Chapter 6 TERMINAL OPERATION
6.3.9 Line Availability
Under Port Menu, press “A” to view line availability as the following screen shows.
T1 P ort B
S tar t T ime
=== Po rt L ine Av aila bil ity ===
1 5:29 :18 10 /03/ 200 6
: 15: 20: 16 1 0/0 3/2 006
-- L ine Av aila bil ity dur ing La st 2 4-H our :
V ali d S econ ds
: 0 s eco nds
A vai lab le S eco nds
: 0 s eco nds
U nav ail able Se con ds: 0 s eco nds
L ine Av alia bil ity
: 214 748 36.4 8 %
<< E SC key to ret urn to pre vio us m enu , S PACE ba r t o re fre sh >>
6.3.10 Unit Configuration
To view the unit configuration, press “C” from Port menu, then the screen will show as below.
T1 P ort B
== = P ort 1-H our St at. Rep ort ===
1 5:15 :29 10 /03/ 200 6
Star t T ime = 1 5:0 7:1 4 10 /03 /20 06
USER
-- V ali d S econ ds in Curr ent 15 -Min In ter val : 0 se cond s
( ES)
(UAS )
(BE S)
(SE S)
(CS S)
C urr ent 15- Min In terv al
: 0
0
0
0
0
1 st Nea rest 15 -Mi n In ter val : - --- ---- --- ---- ---- -2 nd Nea rest 15 -Mi n In ter val : - --- ---- --- ---- ---- -3 rd Nea rest 15 -Mi n In ter val : - --- ---- --- ---- ---- -4 th Nea rest 15 -Mi n In ter val : - --- ---- --- ---- ---- --- V ali d 1 5-Mi n I nte rval s i n C urre nt 24- Hour In ter val: 0
( ES)
(UAS )
(BE S)
(SE S)
C urr ent 24- Hou r I nter val
: - --- ---- --- ---- -1 0/0 2/2 006
: - --- ---- --- ---- -1 0/0 1/2 006
: - --- ---- --- ---- -0 9/3 0/2 006
: - --- ---- --- ---- -0 9/2 9/2 006
: - --- ---- --- ---- -0 9/2 8/2 006
: - --- ---- --- ---- -0 9/2 7/2 006
: - --- ---- --- ---- -0 9/2 6/2 006
: - --- ---- --- ---- --
(CS S)
--- ---- ---- ---- ---- ---- ---- ---- --
<< T AB key to sho w S tati sti cs Repo rt >>
<< E SC key to ret urn to pre vio us m enu , S PACE ba r t o re fre sh >>
139
Chapter 6 TERMINAL OPERATION
6.3.11 Unit Status
Press I from the port menu, to show the screen of Unit Status as below.
T1 P ort B
-- L INE -L OS
:
L OF
:
R CV AIS :
R CV YEL :
X MT AIS :
X MT YEL :
B PV ERR OR
ES
ERR OR
= == P ort St atus == =
1 6:06 :08 10 /03/ 200 6
L OS
NO
NO
NO
NO
NO
C OUN T : 0
C OUN T : 0
-- T EST -P ATT ERN TRA NSM ITT ED : OF F
N EAR -EN D LO OPB ACK
: OF F
<< E SC key to ret urn to pre vio us m enu , S PACE ba r t o re fre sh >>
6.3.12 Unit Alarm History
To view the unit alarm history, press “H” from the Port Menu.
T1 P ort B
LOCA L
[ALA RM- TYP E]
RAI
AIS
LOS
LOF
BPV
ES
UAS
CSS
BUND LE STA TUS
MAC CHA NGE
= == Port Al arm His tor y = ==
[T HRE SHOL D]
10 E-5
1
1
1
[ CURR -ST ATE ]
OK
OK
AL M
OK
OK
OK
OK
OK
OK
OK
[CO UNT ]
0
0
1
0
0
0
0
0
0
0
1 6:06 :27 10 /03/ 200 6
[AL ARM ]
MAJ OR
MAJ OR
MAJ OR
MAJ OR
MAJ OR
MAJ OR
MAJ OR
MAJ OR
MAJ OR
MAJ OR
<< E SC key to ret urn to pre vio us m enu , S PACE ba r t o re fre sh >>
140
Chapter 6 TERMINAL OPERATION
6.4 DTE (V.35) Sub-Menu
Under the Controller Menu, press “P” to choose port. The user can choose either port C or port
D to do setup. Then the following Port Menu of DTE (V.35) port will show.
DTE Por t C
=== Por t M enu ===
[DIS PLA Y]
C -> DT E C onfi gur ati on
I -> DT E S tatu s
H -> Al arm His tor y
1 5:32 :48 06 /15/ 200 6
[SET UP]
S -> Sy ste m Se tup
L -> Lo opb ack Tes t
M -> Al arm Set up
X -> Cl ear Ala rm His tory
[LOG ]
P -> Ch oos e Po rt
F -> Lo g O ff
O -> Lo g O n
E -> Re tur n to Ma in Menu
>>SP ACE ba r to re fre sh o r e nte r a com man d == =>
6.4.1 DTE Configuration
By Pressing “C”, the unit setup menu is displayed as follows.
DTE Por t C
= == P ort St atus == =
0 9:23 :36 07 /17/ 200 6
DTE Por t C
[--- --- -Chan nel
mode
Rate
TX_C loc k
RX_C loc k
Data
RTS
TTM
DCD
intf
LOCA L - --- ---- ]
: 31
: N* 64K
: 64 KBp s
: No rma l
: No rma l
: No rma l
: Ac tiv e
: Of f
: No rma l
: V3 5
<< E SC key to ret urn to pre vio us m enu , S PACE ba r t o re fre sh >>
141
Chapter 6 TERMINAL OPERATION
6.4.2 DTE Status
To enter the DTE status menu, press “I”. The following screen appears.
DTE Por t C
== = Po rt Sta tus ===
11 :44: 12 07/ 07/2 006
[--- --- LO CAL --- --- ]
DTE- 3 e xis ted : Y ES
RTS LOS S
: YES
EXT_ CLK LO SS
: NO
DSR : N O
CTS : N O
DCD : N O
DTR : N O
RTS : N O
[Loo pba ck Stat us]
DTE Loo pba ck
: OFF
BERT
: OFF
<< E SC key to ret urn to pre vio us m enu , S PACE ba r t o re fre sh >>
6.4.3 Alarm History
Press “H” to view the alarm history.
LOOP IP 670 0
[Por t]
C :
[S tate ]
A LARM
== = Al arm Hi stor y = ==
[Co unt]
1
1 1:45 :24 07 /07/ 200 6
[ Ala rm]
M AJO R
<< E SC to retu rn to prev iou s m enu, SP ACE to ref res h, U ke y t o ch ang e u nit >>
142
Chapter 6 TERMINAL OPERATION
6.4.4 System Setup
Press “S” to setup the system.
LOOP IP 670 0
[Por t]
C :
[S tate ]
A LARM
== = Al arm Hi stor y = ==
[Co unt]
1
1 1:45 :24 07 /07/ 200 6
[ Ala rm]
M AJO R
<< E SC to retu rn to prev iou s m enu, SP ACE to ref res h, U ke y t o ch ang e u nit >>
6.4.5 Loopback Tsst
To enter the Loopback and Test screen, press “L”. The following screen appears.
LOOP IP 670 0
=== Un it L oop bac k an d T est ===
ARRO W K EYS : CU RSO R M OVE; EN TER KEY : I TEM SEL ECT ;
DTE Por t C
[TES T M ENU ]
DTE Loo pba ck
: * OFF
TO -DT E
<< P res s E SC k ey to retu rn to prev iou s m enu >>
143
T O-W AN
1 0:28 :46 07 /07/ 200 6
Chapter 6 TERMINAL OPERATION
6.4.6 Alarm Setup
To set up the alarm configuration, press “M”. The following screen is displayed.
LOOP IP 670 0
= == A lar m S etup == =
ARRO W K EYS : CU RSO R M OVE, TA B: ROLL OP TIO NS
[Por t]
C :
1 0:29 :36 07 /07/ 200 6
[ Alar m]
M AJOR
<< P res s E SC k ey to retu rn to prev iou s m enu >>
6.4.7 Clear Alarm History
Under Port Menu, press “X” to clear alarm history, then press “Y” or “N” to confirm it.
>> C lea r a larm hi sto ry - ar e y ou s ure ? [Y/N ]
144
Chapter 6 TERMINAL OPERATION
6.5 DS3/E3 Sub-Menu
The user can choose either DS3 or E3 to do setup. When the user plug in the DS3 card, all
machine is for port A only. In addition, DS3 Card needs to plug in Port C.
DS3 /E3 me nu
[DIS PLA Y]
1 -> 1- Hou r Pe rf. Re port
2 -> 24 -Ho ur P erf . R epor t
A -> Li ne Avai lab ili ty
C -> Co nfi gura tio n
I -> St atu s
H -> Al arm His tor y
14: 08:3 8 0 2/0 7/20 07
[S ETUP ]
S -> S yst em Setu p
L -> L oop bac k Se tup
K -> C lea r P erfo rma nce Dat a
M -> A lar m S etup
X -> C lea r A larm Hi sto ry
[LOG ]
F -> Lo g O ff [ SET UP] ,[MI SC] Me nu
O -> Lo g O n [ SET UP] ,[MI SC] Me nu
E -> Re tur n to Ma in Menu
>>SP ACE ba r to re fre sh o r e nte r a com man d == =>
6.5.1 DS3/E3 System Setup
By Pressing “S”, the system setup menu is displayed as follows.
= == DS3 /E3 Sys tem Set up ===
ARRO W K EYS : CU RSO R M OVE, TA B: ROLL OP TIO NS
CA RD TYPE = DS3
TX -LE NGTH = 0-2 25
XM T-A IS
= ON
<< P res s E SC k ey to retu rn to prev iou s m enu >>
145
14: 10:0 3 0 2/0 7/20 07
Chapter 6 TERMINAL OPERATION
6.5.2 DS3/E3 Loopback Test
To enter the Loopback and Test screen, press “L”. The following screen appears.
== = D S3/E 3 L oop back Te st ===
ARRO W K EYS : C URS OR MOVE , ENT ER K EY : I TEM SEL ECT
- NE AR- END LOO PBA CK
: *OF F
LLB
LO CAL -A
1 4:10 :41 02 /07/ 200 7
LOC AL- D
<< P res s E SC k ey to retu rn to prev iou s m enu >>
6.5.3 Clear Performance Data
Under DS3/E3 Menu, press “K” to clear performance data, then press “Y” or “N” to confirm it.
=>> Cle ar Perf orm anc e Da ta (Y/ N)?
146
Chapter 5 Front Panel Operation
6.5.4 DS3/E3 Alarm Setup
To set up the alarm configuration, press “M”. The following screen is displayed.
= == D S3/ E3 Alar m S etu p == =
ARRO W K EYS : CU RSO R M OVE, TA B: ROLL OP TIO NS
[TYP E]
[THR ESH OLD ]
LOS
LCV
1 0E- 5
LES
00 1
SEFS
00 1
UAS
00 1
BUND LE STA TUS
MAC CHA NGE
14 :11 :16 02/ 07/ 200 7
[A LAR M]
MA JOR
MA JOR
MA JOR
MA JOR
MA JOR
MA JOR
CR ITI CAL
<< P res s E SC k ey to retu rn to prev iou s m enu >>
6.5.5 Clear Alarm History
Under DS3/E3 Menu, press “X” to clear alarm history, then press “Y” or “N” to confirm it.
>> C lea r a larm hi sto ry - ar e y ou s ure ? [Y/N ]
147
Chapter 5 Front Panel Operation
6.5.6 DS3/E3 1-Hour Performance Report
Press “1” from the DS3/E3 menu, the following screen is displayed. To view 1-hour
performance repot by selecting register type, USER or LINE. The current selection will be
highlighted by an asterisk ( *).
=== DS3 /E3 1-H our Pe rf. Rep ort ===
>> S ele ct Regi ste r T ype ? * USE R
14 :14: 38 02/ 07/2 007
L INE
== = D S3/ E3 1 -Ho ur Stat . R epo rt = ==
14:1 1:4 5 0 2/07 /20 07
Star t T ime = 1 4:0 4:5 5 02 /07 /20 07
USER
-- V ali d S econ ds in Curr ent 15 -Min In ter val : 4 07 seco nds
( LES )
(UAS )
(SE FS) (LC V)
C urr ent 15- Min In terv al
: 0
0
0
0
1 st Nea rest 15 -Mi n In ter val : - --- ---- --- ---- -2 nd Nea rest 15 -Mi n In ter val : - --- ---- --- ---- -3 rd Nea rest 15 -Mi n In ter val : - --- ---- --- ---- -4 th Nea rest 15 -Mi n In ter val : - --- ---- --- ---- --- V ali d 1 5-Mi n I nte rval s i n C urre nt 24- Hour In ter val: 0
( LES )
(UAS )
(SE FS) (LC V)
C urr ent 24- Hou r I nter val
: - --- ---- --- ---- -0 2/0 6/2 007
: - --- ---- --- ---- -0 2/0 5/2 007
: - --- ---- --- ---- -0 2/0 4/2 007
: - --- ---- --- ---- -0 2/0 3/2 007
: - --- ---- --- ---- -0 2/0 2/2 007
: - --- ---- --- ---- -0 2/0 1/2 007
: - --- ---- --- ---- -0 1/3 1/2 007
: - --- ---- --- ---- -<< T AB key to sho w S tati sti cs Repo rt >>
<< E SC key to ret urn to pre vio us m enu , S PACE ba r t o re fre sh >>
148
Chapter 5 Front Panel Operation
6.5.7 DS3/E3 24-Hour Performance Report
Press “2” from the DS3/E3 menu, the following screen is displayed. To view 24-hour
performance repot by selecting register type, USER or LINE. The current selection will be
highlighted by an asterisk ( *).
=== DS3 /E3 24- Hou r P erf. Re por t == =
>> S ele ct Regi ste r T ype ? * USE R
L INE
=== DS3 /E3 24- Hou r P erf. Re por t == =
>> S ele ct Regi ste r T ype ? * USE R
>> S ele ct Para met er ? *L ES
UA S
14 :15: 08 02/ 07/2 007
L INE
SEF S
14 :12: 36 02/ 07/2 007
LCV
149
Chapter 6 TERMINAL OPERATION
=== DS3 /E3 24- Hou r P erf. Re por t == =
14 :15: 51 02/ 07/2 007
Star t T ime = 1 4:0 4:5 5 02 /07 /20 07
USER LE S
-- V ali d S econ ds in Curr ent 15 -Min In ter val : 6 53 seco nds
-- V ali d 1 5-Mi n I nte rval s i n C urre nt 24- Hour In ter val: 0
( LES )
(UAS )
(SE FS) (LC V)
C urr ent 15- Min In terv al
: 0
0
0
0
C urr ent 24- Hou r I nter val
: - --- ---- --- ---- --- U SER , L ES, Las t 9 6 15 -Mi n I nter val :
0 1-0 8 > --- -- --- -- - --- - - ---- -- --- --- -- --- -- - --- 0 9-1 6 > --- -- --- -- - --- - - ---- -- --- --- -- --- -- - --- 1 7-2 4 > --- -- --- -- - --- - - ---- -- --- --- -- --- -- - --- 2 5-3 2 > --- -- --- -- - --- - - ---- -- --- --- -- --- -- - --- 3 3-4 0 > --- -- --- -- - --- - - ---- -- --- --- -- --- -- - --- 4 1-4 8 > --- -- --- -- - --- - - ---- -- --- --- -- --- -- - --- 4 9-5 6 > --- -- --- -- - --- - - ---- -- --- --- -- --- -- - --- 5 7-6 4 > --- -- --- -- - --- - - ---- -- --- --- -- --- -- - --- 6 5-7 2 > --- -- --- -- - --- - - ---- -- --- --- -- --- -- - --- 7 3-8 0 > --- -- --- -- - --- - - ---- -- --- --- -- --- -- - --- 8 1-8 8 > --- -- --- -- - --- - - ---- -- --- --- -- --- -- - --- 8 9-9 6 > --- -- --- -- - --- - - ---- -- --- --- -- --- -- - --- << T AB key to sho w S tati sti cs Repo rt >>
<< E SC key to ret urn to pre vio us m enu , S PACE ba r t o re fre sh >>
6.5.8 DS3/E3 Line Availability
Under DS3/E3 Menu, press “A” to view the line abailability as the following screen shows.
=== DS3 /E3 Lin e A vai labi lit y = ==
S tar t T ime
1 4:1 6:36 02 /07 /200 7
: 14: 04: 55 0 2/0 7/2 007
-- L ine Av aila bil ity dur ing La st 2 4-H our :
V ali d S econ ds
: 698 se cond s
A vai lab le S eco nds
: 698 se cond s
U nav ail able Se con ds: 0 s eco nds
L ine Av alia bil ity
: 100 .0 %
<< E SC key to ret urn to pre vio us m enu , S PACE ba r t o re fre sh >>
150
Chapter 5 Front Panel Operation
6.5.9 DS3/E3 System Setup
To setup DS3/E3 system, press “S” from DS3/E3 Menu, then the following screen will show up.
Use arrow keys to move the cursor, TAB key to roll up options.
== = D S3/E 3 S yst em S etu p = ==
1 4:16 :59 02 /07/ 200 7
CA RD TYPE = DS3
TX -LE NGTH = 0-2 25
XM T-A IS
= ON
<< E SC key to ret urn to pre vio us m enu , S PACE ba r t o re fre sh >>
6.5.10 DS3/E3 Status
Press “I” from DS3/E3 Menu, to show the screen of DS3//E3 Status as below.
=== DS 3/E3 St atu s == =
-- L INE -L OS
:
X MT AIS :
B PV ERR OR
ES
ERR OR
14 :17 :17 02/ 07/ 2007
NO
NO
C OUN T : 0
C OUN T : 0
<< E SC key to ret urn to pre vio us m enu , S PACE ba r t o re fre sh >>
151
Chapter 5 Front Panel Operation
6.5.11 DS3/E3 Alarm History
To view alarm history, press “H” from the DS3/E3 menu, then the following screen will show as below.
== = D S3/E 3 A lar m Hi sto ry ===
LOCA L
[ALA RM- TYP E]
LOS
LCV
LES
SEFS
UAS
BUND LE STA TUS
MAC CHA NGE
[T HRE SHOL D]
10 E-5
1
1
1
[ CURR -ST ATE ]
OK
OK
OK
OK
OK
AL M
OK
[CO UNT ]
0
0
0
0
0
0
0
1 4:17 :42 02 /07/ 200 7
[AL ARM ]
MAJ OR
MAJ OR
MAJ OR
MAJ OR
MAJ OR
MAJ OR
CRI TIC AL
<< E SC key to ret urn to pre vio us m enu , S PACE ba r t o re fre sh >>
152
Chapter 5 Front Panel Operation
7 STEP BY STEP OPERATION
7.1 Time Slot IP Assignment
7.1.1
Time Slot IP Assignment (Add bundle)
Under the Main Menu, press “T” to get into the screen of Time Slot IP Assignment, then choose “Add bundle”
from the Action menu to create a new bundle.
LOOP IP 670 0
= == Syst em Set up(M AP) == =
ARRO W K EYS : CU RSO R M OVE, TA B: ROLL OP TIO NS
1 5:09 :10 10 /03/ 200 6
P O/TS TS PO /TS TS BND L ID /UD P N UM D est IP Add res s
Port
: PO RT_ A
= ==== == == === == === ==== === === == = === === ==== === =
Bund le ID : 00
Acti on
: Ad d b und le
UDP Num ber : 00 01
Ce ll Nu m Ji tte r D elay Ji tte r Si z e
Time Sl ot : 00
== === == = == === === === === === ==== = =
Time Sl ot# : 32
Dest IP Ad dr: 010 .00 2.00 3.0 04
Cell in Bu ndle : 0 5
Jitt er Del ay:
0 20
Jitt er Siz e:
2 56
VLAN :
O FF
VLAN 1 I D:
0 000
VLAN 1 p rio rity : 0
VLAN 2 I D:
0 000
VLAN 2 p rio rity : 0
Conf irm ?
No
<< P res s E SC k ey to retu rn to main me nu or s ave sy stem se tup >>
Note: if it is unframe allocation, the bundle ID must be 0 and the Time Slot, Time Slot# will be skipped to
disallow user set up.
If the IP Address is invalid. The error message will display.
Can not ge t ta rge t m ac a ddr ess
After confirm the configuration. Press “Y” or “N” to re-confirm it.
Are you su re [ Y/N ] ?
After save the configuration, the screen will refresh and display as follow
LOOP IP 670 0
= == Syst em Set up ( MAP ) = ==
ARRO W K EYS : CU RSO R M OVE, TA B: ROLL OP TIO NS
Port
: PO RT_ A
Acti on
: Ad d b und le
Bund le ID : 0
UDP Num ber : 1
Time Slo t : 01
Time Sl ot# : 01
IP A ddr ess : 00 0.0 00. 000. 000
Cell in Bu ndle : 5
Jitt er Del ay:
20
Jitt er Siz e:
2 56
Conf irm ?
Ye s
P O/TS
= ====
A 1
A 2
A 3
A 4
A 5
A 6
A 7
A 8
A 9
A 10
A 11
A 12
A 13
A 14
A 15
A 16
1 3:35 :55 12 /06/ 200 5
TS PO /TS TS BND L ID /UD P N UM
IP Ad dres s
== == === == === ==== === === == = === === ==== === =
1
A 17 17
0
1 0 00. 000 .000 .00 0
2
A 18 18
3 A 19 19 C ell Nu m Ji tte r S ize Jit ter Del a y
4 A 20 20 = === == == == === == ==== === == ==== == =
5
A 21 21
5
20
25 6
6
A 22 22
7
A 23 23
8
A 24 24
9
A 25 25
10
A 26 26
11
A 27 27
12
A 28 28
13
A 29 29
14
A 30 30
15
A 31 31
16
<< P res s E SC k ey to retu rn to main me nu or s ave sy stem se tup >>
153
Chapter 6 TERMINAL OPERATION
To show all the information of time slot assignment which user has configured, Press “J” from the Main Menu
Configuration Menu.
LOOP IP 670 0
= == Syst em Set up ( MAP ) = ==
1 3:59 :40 12 /06/ 200 5
Por t B und le U DP Cel ls J itt er
IP Ad dre ss
Ti me S lot
ID
N um
Nu m si ze/ Del ay
=== = = === == = === ==
== == === = == === === ==== === == ==== === === ==== === === ==== === =
A
0
1
5
20
25 6 19 2.1 68. 0.1
0, 1,2, 3,4 ,5, 6,7, 8,9 ,10 ,11, 12,
13 ,14, 15, 16, 17,1 8,1 9,2 0,21 ,22 ,
23 ,24, 25, 26, 27,2 8,2 9,3 0,31
B
0
2
5
20
25 6 19 2.1 68. 0.2
0, 1,2, 3,4 ,5, 6,7, 8,9 ,10 ,11, 12,
13 ,14, 15, 16, 17,1 8,1 9,2 0,21 ,22 ,
23 ,24, 25, 26, 27,2 8,2 9,3 0,31
<< S PAC E b ar t o r efr esh or ESC key re tur n to ma in menu >>
7.1.2 Time Slot IP Assignment (Delete bundle)
Choose the “Delete bundle” option from the Action menu. Then enter the valid bundle ID at the Bundle ID field.
LOOP IP 670 0
= == Syst em Set up ( MAP ) = ==
Plea se Inp ut d eci mal num ber (0 -31) , B ACK SPAC E t o e dit
Port
: PO RT_ A
Acti on
: De let e b undl e
Bund le ID : 0_
UDP Num ber : 1
Time Sl ot : 01
Time Sl ot# : 01
IP A ddr ess : 19 2.1 68. 0.1
Cell in Bu ndle : 5
Jitt er Del ay:
20
Jitt er Siz e:
2 56
Conf irm ?
Ye s
1 5:44 :10 12 /19/ 200 5
P O/TS TS PO /TS TS BND L ID /UD P N UM
IP Ad dres s
= ==== == == === == === ==== === === == = === === ==== === =
1
17
2
18
3
19
Cel l Nu m J itt er S ize Ji tter De lay
4
20
=== ==== = = === ==== === == ==== === ===
5
21
6
22
7
23
8
24
9
25
10
26
11
27
12
28
13
29
14
30
15
31
16
<< P res s E SC k ey to retu rn to main me nu or s ave sy stem se tup >>
If the value which user has entered is invalid, the error message will display.
Bund le ID not exi ste d!
After confirm the configuration. Press “Y” or “N” to re-confirm it.
Are you su re [ Y/N ] ?
154
Chapter 6 TERMINAL OPERATION
7.1.3 Time Slot IP Assignment (Delete all)
Choose the “Delete all” option from the Action menu. This option is used to clear all the bundles setup which
has been created.
LOOP IP 670 0
= == Syst em Set up ( MAP ) = ==
ARRO W K EYS : CU RSO R M OVE, TA B: ROLL OP TIO NS
Port
: PO RT_ A
Acti on
: De let e a ll
Bund le ID : 00
UDP Num ber : 00 01
Time Sl ot : 01
Time Sl ot# : 01
IP A ddr ess : 00 0.0 00. 000. 000
Cell in Bu ndle : 0 5
Jitt er Del ay:
0 20
Jitt er Siz e:
2 56
Conf irm ?
Ye s
1 7:28 :14 12 /19/ 200 5
P O/TS TS PO /TS TS BND L ID /UD P N UM
IP Ad dres s
= ==== == == === == === ==== === === == = === === ==== === =
Cel l Nu m J itt er S ize Ji tter De lay
=== ==== = = === ==== === == ==== === ===
<< P res s E SC k ey to retu rn to main me nu or s ave sy stem se tup >>
After confirm the configuration. Press “Y” or “N” to re-confirm it.
Are you su re [ Y/N ]?
7.2 Password Setup
Press “S” from the main menu to get into System Setup. Then press “C” to get into password setup.
7.2.1 Enter old password
Before making change of new password, user need to fill in the old password, the default password is “LOOP”.
LOOP IP 670 0
== = Pa ssw ord Set up ===
ARRO W K EYS : CU RSO R M OVE, BA CKS PACE to ed it, ESC to abo rt
Ena ble Pas swo rd : YE S
Cha nge Pas swo rd : YE S
Old
Pas swo rd : __ ___ ____ __
>> Ple ase inp ut old pas swo rd, the n p res s EN TER .
155
1 8:17 :53 12 /19/ 200 5
Chapter 5 Front Panel Operation
7.2.2 Enter new password
Enter the valid old password, then press ENTER, the new password will be required to enter.
LOOP IP 670 0
== = Pa ssw ord Set up ===
ARRO W K EYS : CU RSO R M OVE, BA CKS PACE to ed it, ESC to abo rt
Ena ble
Cha nge
Old
New
Pas swo rd
Pas swo rd
Pas swo rd
Pas swo rd
:
:
:
:
1 8:17 :53 12 /19/ 200 5
YE S
YE S
XX XX_ ____ __
XX XX_ ____ __
>> Ple ase inp ut new pas swo rd, the n p res s EN TER .
7.2.3 Confirmation of new password
After confirm new password. Press “Y”, or “N” to save new password.
LOOP IP 670 0
== = Pa ssw ord Set up ===
ARRO W K EYS : CU RSO R M OVE, BA CKS PACE to ed it, ESC to abo rt
Ena ble Pas swo rd :
Cha nge Pas swo rd :
Old
Pas swo rd :
New
Pas swo rd :
Con firm Pa ssw ord:
YE S
YE S
XX XX_ ____ __
XX XX_ ____ __
XX XX_ ____ __
>> Sav e n ew p ass wor d (Y /N) ?
156
1 8:37 :32 12 /19/ 200 5
Chapter 5 Front Panel Operation
7.3 Clock source setup
The IP6700 provide operator to setup each port’s clock source from internal, external, line (from A/B/C/D), or
WAN (from A/B/C/D).
The basic application show as below
Figure 7- 1 Clock Source
157
Chapter 5 Front Panel Operation
7.3.1
Application
The application diagram of IP6700 clock source shows below.
Figure 7- 2 Application Diagram of clock source
7.3.1.1
Example of clock source
For the clock source there are two examples to show as the table below.
Table 7- 1 Example 1: unique clock source (from IP6700-1 line clock of Port A)
Port A
Port B
Port C
IP6700-1
Line clock A
Line clock A
Line clock A
IP6700-2
WAN clock A
IP6700-3
WAN clock A
IP6700-4
WAN clock A
Table 7- 2 Example 2: independent clock source
Port A
Port B
Port C
IP6700-1
Line clock A
Line clock B
Line clock C
IP6700-2
WAN clock A
IP6700-3
WAN clock A
IP6700-4
WAN clock A
158
Chapter 5 Front Panel Operation
8
Functional Description
8.1
TDMoEthernet Packet Format
To transport TDM data through packet switched networks, the PacketTrunk-4 encapsulates it into Ethernet
packets, as depicted in Figure 8-1. TDMoEthernet Encapsulation in an Ethernet Packet.
OPTIONAL
PREAMBLE
START FRAME
DELIMITER
DESTINATIO
N ADDRESS
SOURCE
ADDRESS
VLAN
TAG
7 BYTES
1 BYTES
6 BYTES
6 BYTES
2 BYTES
VLAN TAG
CONTROL
2 BYTES
TYPE
DATA AND
PADDING
2 BYTES
46-1500
BYTES
FRAME CHECK
SEQUENCE
4 BYTES
OPTIONAL
UDP/IP
HEADER
28 BYTES
TDMoIP
CONTROL WORD
TDMoIP
PAYLOAD
4 BYTES
Figure 8- 3 TDMoEthernet Encapsulation in an Ethernet Packet
Table 8- 3 Ethernet Packet Structure
Field
Description
A sequences of 56 bits (alternating 1 and 0 values) used for synchronization.
Preamble
Start frame
Gives components in the network time to detect the presence of a signal.
A sequence of 8 bits (10101011) that indicates the start of the packet.
delimiter
Destination and The Destination Address field identifies the station or stations that are to receive the packet.
The Source Address identifies the station that originated the packet. A Destination Address
source
may specify either an "individual address" destined for a single station, or a "multicast
address" destined for a group of stations. A Destination Address of all 1 bits refers to all
addresses
stations on the LAN and is called a "broadcast address".
159
Chapter 5 Front Panel Operation
Table 8- 4 Ethernet Packet Structure (Cont.)
Field
Description
Type
Protocol type
Data and
This field contains the data transferred from the source station to the destination station or
stations. The maximum size of this field is 1500 bytes. If the size of this field is less than 46
bytes, then padding is used to bring the packet size up to the minimum length. A minimum
Ethernet packet size is 64 bytes from the Destination Address field through the Frame Check
Sequence.
padding
Frame check
sequence
This field contains a 4-byte cyclical redundancy check (CRC) value used for error checking.
When a source station assembles a packet, it performs a CRC calculation on all the bits in
the packet from the Destination Address through the Pad fields (that is, all fields except the
preamble, start frame delimiter, and frame check sequence).
The source station stores the value in this field and transmits it as part of the packet. When
the packet is received by the destination station, it performs an identical check. If the
calculated value does not match the value in this field, the destination station assumes an
error has occurred during transmission and discards the packet.
8.1.1
VLAN Option
The original Ethernet standards defined the minimum packet size as 64 bytes and the maximum as 1518
bytes. These numbers include all bytes from the Destination Address field through the Frame Check Sequence
field. The Preamble and Start Frame Delimiter fields are not included when quoting the size of a packet. The
IEEE 802.3ac standard released in 1998 extended the maximum allowable packet size to 1522 bytes to allow
a VLAN tag to be inserted into the Ethernet packet format. If present, the 2-byte VLAN tag is set to 0x8100, a
reserved Type field assignment indicating the presence of the VLAN tag and a ‘traditional’ Type field 4 bytes
further into the packet.
The 2-byte VLAN Tag Control field consists of:
First 3 bits User Priority field, used to assign a priority level to the Ethernet packet
Next 1 bit Canonical Format Indicator indicating the presence of a Router Information Field
Last 12 bits VLAN Identifier, uniquely identifying the VLAN to which the Ethernet packet belongs.
The packet may contain two VLAN tags to support VLAN stacking.
160
Chapter 6 TERMINAL OPERATION
8.1.2
UDP/IP Header
Figure 8- 4 UDP/IP Header
Table 8- 5 IP Header Structure
Field
Description
IPVER
IHL
IP TOS
Total length
Identification
Flags
Fragment offset
IP version number, e.g. for IPv4 IPVER=4
Length in 32-bit words of the IP header, IHL=5
IP type of service
Length in octets of header and data
IP fragmentation identification
IP control flags; must be set to 010 to avoid fragmentation
Indicates where in the datagram the fragment belongs; not used for
TDMoEthernet
IP time to live field; datagrams with zero in this field are to be discarded
Must be set to 0x11 to signify UDP
Checksum for the IP header
IP address of the source
IP address of the destination
Time to live
Protocol
IP Header checksum
Source IP address
Destination IP address
161
Chapter 5 Front Panel Operation
Table 8- 6 UDP Header Structure
Field
VER
Bundle number
Destination port
number
UDP length
UDP checksum
Description
TDMoEthernet version number. Presently VER=001
This field is usually dedicated to the Source Port Number, but here identifies the unique
data stream emanating from a given trunk and sharing a common destination. This
nonstandard use of a UDP port number is similar to
RTP/RTCP's use of port numbers to uniquely identify sessions, and the common
practice (sanctioned in H.225) of randomly allocating port numbers for VoIP sessions.
Here placing the bundle identifier in the UDP header rather than the application area
enables fast switching.
Possible values are:
1-8063: valid bundle numbers
0: reserved
8191 (1FFF): used for OAM control messages
the 127 ports 8064-8190: reserved.
Set to 0x085E (2142), the user port number which has been assigned to
TDMoEthernet by the Internet Assigned Numbers Authority (IANA)
Length in octets of UDP header and data
Checksum of UDP/IP header and data. If not computed it must be set to zero.
8.1.3
TDMoEthernet Control Word
162
Chapter 5 Front Panel Operation
Table 8- 7 TDMoEthernet Control Word Structure
Field
FORMID
L
R
RES
Length
Sequence
number
Description
Format Identifier:
1100 AAL1 unstructured
1101 AAL1 structured
1110 AAL1 structured with CAS
1111 HDLC
Local loss of sync failure. This bit is set by the CPU. A set L bit indicates that the
source has detected or has been informed of a TDM physical layer fault
impacting the data to be transmitted. This bit can be used to indicate physical
layer LOS that should trigger AIS generation at the far end. Once set, if the TDM
fault is rectified, the L bit must be cleared.
Remote receive failure. This bit is set by the CPU. A set R bit indicates that the
source is not receiving packets at the Ethernet port, i.e., there is a failure of that
direction of the bi-directional connection. This indication can be used to signal
congestion or other network related faults. Receiving remote failure indication
may trigger fall-back mechanisms for congestion avoidance. The R bit must be
set after a preconfigured number of consecutive packets are not received, and
must be cleared once packets are once again received.
Reserved bits. Must be set to zero.
The length of the TDMoEthernet packet (control word and payload), in case
padding is employed to meet minimum transmission unit requirements of the
PSN. It is used if the total packet length (including PSN, control word, and
payload) is less than 64 bytes. Otherwise, it is set to zero.
TDMoEthernet sequence number, defined separately for each bundle and
incremented by one for each TDMoEthernet packet sent for that bundle. The
initial value of the sequence number is random (unpredictable) for security
purposes, and the value is incremented modulo 2 16 separately for each
bundle. Used by the receiver to detect packet loss and restore packet
sequence.
8.1.4
TDMoEthernet Payload
This field can contain the following payload types:
• AAL1
The AAL1 payload type detail is provided in the ”AAL1 Payload Type Machine as below.
163
Chapter 5 Front Panel Operation
8.2
AAL1 PAYLOAD TYPE MACHINE
For the prevalent case for which the timeslot allocation is static and no activity detection is performed, the
payload can be efficiently encoded using constant bit rate AAL1 adaptation.
In the TDM to Ethernet direction, the AAL1 Payload Type machine concatenates the bundle’s timeslots
payload into structures and then slices it into 48-octet AAL1 cells. After adding the AAL1 header, the cells are
concatenated into the Ethernet packet payload.
Figure 8- 5 AAL1 Processing
164
Chapter 5 Front Panel Operation
Table 8- 8 AAL1 Header Structure
Field
C
Length
[bits]
1
Description
Indicates if there is a pointer in the 2nd octet of the cell. When set, a pointer exists.
SN
3
Cell sequence number
CRC
P
3
1
E
Pointer
1
7
Error cyclic redundancy code on C and SN
Even parity bit on C, SN and CRC or the even byte parity LSB for the sequence number
octet (P format cells only)
(P format cells only) Even byte parity MSB for pointer octet
(P format cells only) Indicates the next structure boundary. It is always located at the
first possible position in the sequence number cycle, in which a structure
boundary occurs. The pointer indicates one of 93 octets (46 octets of the current cell +
47 octets of the next cell). P=0 indicates that the first octet of the current cell’s payload
is the first octet of the structure. P=93 indicates that the last octet of the next cell is the
final octet of the structure.
The AAL1 block supports the following bundle types:
• Unstructured
• Structured without CAS
• Structured with CAS.
Unstructured bundles, as part of the E1/T1 interface, support rates of N × 64 kbps, where N is the number of
timeslots configured to be assigned to a bundle. Unstructured bundles may also carry traffic of the whole
low-speed interface (up to 4.6 Mbps), T1 interface (1.544 Mbps) and high-speed interface (up to 51.84 Mbps).
The 47-octet AAL1 type cell’s payload contains 376 bits of pure TDM bit stream, without synchronization. Each
cell has a one-byte header containing sequence number and protection fields.
Structured without CAS bundles, as part of the E1/T1 interface, support rates of
N × 64 kbps, where N is the number of timeslots configured to be assigned to a bundle. For this format, the
timeslots belonging to the bundle are sequentially placed in a structure, one octet per timeslot, until all 47
octets are filled. The 47th octet may contain a timeslot other than the last one in the bundle. Therefore the 1st
octet of the next cell will contain the next timeslot of the same bundle.
165
Chapter 5 Front Panel Operation
Figure 8- 6 AAL1 Processing for Structured without CAS Bundles
This means that each cell can start with a different timeslot. In order for the far end to recognize the first
timeslot in the bundle, a pointer to it is sent periodically in one of the 8 cells of every SN cycle. When this
pointer is sent, a P-format cell is used.
Structured with CAS bundles as part of the E1/T1 interface, support rates of N × 64 kbps, where N is the
number of timeslots configured to be assigned to a bundle. For this format, the AAL1 header is identical with
the previously explained one. The addition of CAS only affects the structure contents. CAS data of one timeslot
is 4 bits long, meaning one octet can contain CAS data of 2 timeslots. Bundles containing an odd number of
timeslots need a padding of 4 zeroes in the last CAS octet. For example, a 3-timeslot bundle of an E1 frame
with CAS will yield the following structure octet sequence: TS1, TS2, TS3 repeated 16 times and then
CAS1+CAS2, CAS3+padding.
In the Ethernet to TDM direction, cells/packets of a bundle are being received only after the synchronization
process. The synchronization process includes cell SN synchronization, packet SN synchronization and
pointer synchronization. Cells with CRC or parity errors in their header are discarded. Pointer mismatch
imposes jitter buffer under-run and bundle resynchronization. Cell header errors or pointer errors may be
ignored depending on per-bundle configuration. Missing cells or packets are detected and restored in the jitter
buffer.
166
Chapter 5 Front Panel Operation
Glossary
AIS
AS
BES
BPV
CRC
CSS
DM
DS1
DS3
DTE
EFS
ES
FDL
IP
LCD
LAN
LED
LIU
LOF
LOS
NMS
PRBS
QRSS
RAI
SAToP
SES
SNMP
TDM
UAS
VLAN
WAN
Alarm Indication Signal
Available Second
Bursty Error Second
Bipolar Violation
Cyclical Redundancy Check
Controlled Slip Second
Degraded Minute
Digital Signal, Level One - E1 or T1
Digital Signal, Level Three – E3 or T3
Data Terminal Equipment-an end-user machine. Eg. PC or workstation
Error Free Second
Error Second
Facility Data Link
Internet Protocol
Liquid Crystal Display
Local Area Network
Light Emitting Diode
Line Interface Unit
Loss of Frame
Loss of Signal
Network Management System
Pseudo Random Binary Sequence
Quasi Random Signal Sequence
Remote Alarm Indication
Structure Agnostic TDM over Packet
Severe Error Second
Simple Network Management Protocol
Time Division Multiplexing
Unavailable Second
Virtual LAN Area Network
WAN wide Area Network
167