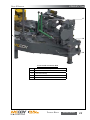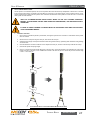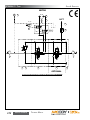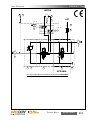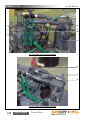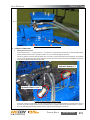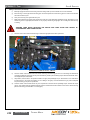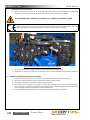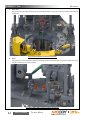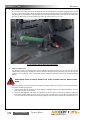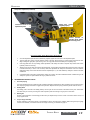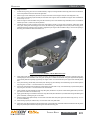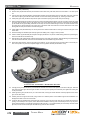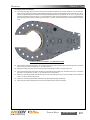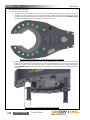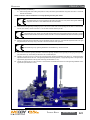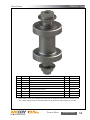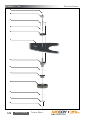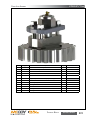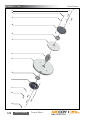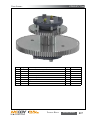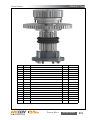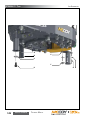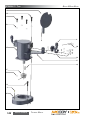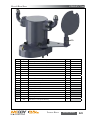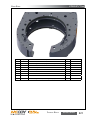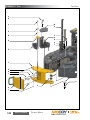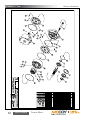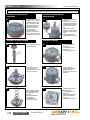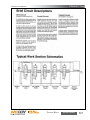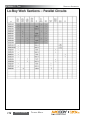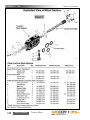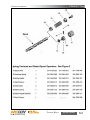
1
TECHNICAL MANUAL
KT8625
8-5/8” (21.9cm) 25K
Hydraulic Power Tong
•
•
•
•
Specifications
Operation
Maintenance
Assembly
Copyright © 2005 - 2012 McCoy Corporation. All rights reserved.
Published by McCoy Corporation, Technical Publications Department
14755 - 121A Avenue • Edmonton, AB, Canada, T5L 2T2
mccoyglobal.com
KT8625 8-5/8” Tong
This manual covers the following models:
TONG MODEL REV
80-0609-4
80-0609-5
80-0609-7
80-0609-8
DESCRIPTION
2
Tong with motor valve, rigid sling, and safety door.
2
Tong with motor valve, rigid sling, safety door, and Wincatt dump valve.
2
Tong with motor valve, lift valve, rigid sling, and safety door.
0
Tong with motor valve, rigid sling, and safety door. Closed-centre system.
This technical manual applies to all CE-marked versions of the models listed in the
table above.
PATENTED & PATENTS PENDING
NOTE: Some illustrations used in this manual may not exactly match your model of tong.
ORIGINAL INSTRUCTIONS
Technical Manual
Section Contents
iii
This page intentionally
left blank
KT8625 8-5/8” Tong
WARNINGS
a “load-bearing device” is a chain sling, rigid sling, spreader bar assembly, frame, or
any other device that bears the partial or total weight of the equipment FOR WHICH
this manual HAS BEEN PRODUCED
The load-bearing device supplied by McCoy Drilling & Completions IS designed to support the equipment described in this manual. McCoy Drilling & Completions will not
guarantee the ability of the load-bearing device to support any other part, assembly or combination of parts and assemblies. McCoy Drilling & Completions will not
guarantee the ability of the load-bearing device to lift OR SUPPORT the equipment
described in this manual if there are any modifications to the load-bearing device,
or any additions to the equipment described in this manual that add weight to the
equipment, unless supplied by McCoy Drilling & Completions.
WHEN RE-ASSEMBLING LOAD-BEARING devices (CHAIN SLINGS, RIGID SLINGS, BACKUP LEGS,
ETC.) NOTE THAT THE ASSOCIATED FASTENERS MUST BE TIGHTENED TO THE CORRECT TORQUE
SPECIFIED FOR THAT SIZE OF FASTENER (See section 3 - overhaul). Any threaded fastener
in a load-bearing device must be secured with red or blue loctite™.
ANY REPLACEMENT FASTENER (BOLTS, NUTS, CAP SCREWS, MACHINE SCREWS, ETC.) USED
DURING MAINTENANCE OR OVERHAUL MUST BE GRADE 8 OR EQUIVALENT unless otherwise
specified.
Technical Manual
Section Contents
v
This page intentionally
left blank
KT8625 8-5/8” Tong
Copyright © 2007 - 2012 McCoy Corporation, including its wholly owned subsidiaries, (“McCoy”), all rights reserved. This document is the
property of McCoy and is supplied as reference information for users of our products. This document and the contents within are considered confidential information, not to be disclosed, copied, transmitted, transcribed in any form, or stored on any type of data storage media
without the express written consent of McCoy.
McCoy has made every effort to ensure the information contained in this document is accurate and current. This manual is intended to
provide equipment operation and safety instructions for your equipment. However, McCoy does not warrant or guarantee that the information is either complete or accurate in every respect and the user of the manual should consult with its McCoy sales representative for any
clarifications and updates.
The user of the manual shall protect, indemnify, and hold harmless McCoy and its directors, officers, employees, and agents from and
against all liability for personal injury, death, or property damage resulting directly or indirectly from the use of the information contained in
this manual.
Observance of all descriptions, information and instructions set out in this manual is the full responsibility of the user. This manual is
intended for guidance and informational purposes and must be used in association with adequate training and on-the-job supervision to
provide safe and effective equipment use.
It is the responsibility of the user to conform to all regulations and requirements issued by an authority or agency which may affect the
operation, safety or equipment integrity, that may overrule the content of this documentation.
The user will acknowledge and obey any general legal or other mandatory regulation in force relating to accident prevention, safety, and
equipment integrity.
Summary Of Revisions
Date
Section
Page
Sep 2007
N/A
N/A
Intro
3
JUNE 2009
6
Initial Release
KI
iii
Added closed-centre model to table.
v
Inserted load-bearing and assembly warnings.
3.1
Added load bearing device / sling safety section
3.7
Added closed-centre outlet to parts list
3.9
Added closed-centre hydraulic schematic
6.31
Approved
Added closed-centre outlet to parts list
Appendix 1
Added power tong daily maintenance checklist
DB
Appendix 2
Added power tong monthly maintenance checklist
Appendix 3
Added backup daily maintenance checklist
Appendix 4
Added power unit daily maintenance checklist
Appendix 5
Added power tong decommissioning checklist
Appendix 6
Added power tong recommissioning checklist
6
6.30, 6.31
Added additional working section to hydraulic valve assembly illustration to
cover model 80-0609CM
3
3.10, 3.20
Added optional schematic to show CHROMEMASTER™ valve section,
updated operation illustration
N/A
N/A
Revised manual to reflect support roller and cage plate design changes
All
All
Updated manual to current branding standards
iii
Removed unsupported & “backup ready” tong models from list
x
Inserted list of illustrations
Appendices
DEC 2009
NOV 2010
Description Of Revision
Intro
1.3
1
MAY 2012
2
KD
DB
Inserted illustration of additional hazard areas
1.4
Inserted illustration & identification of FARR CE Nameplate
1.5
Corrected specifications page
All
Moved “Tong Assembly” to “Maintenance” section. “Setup & Operation”
re-numbered as Section 2.
2.1
Inserted new section “Initial Receipt & Inspection of Equipment”
2.1
Renumbered section 2.B, “Major Component Identification”
2.4
Renumbered section 2.C, “Sling & Load-Bearing Device Safety”
2.7
Inserted new section 2.D, “Lift Cylinder Installation”
SH
Continued on next page
Technical Manual
Section Contents
vii
KT8625 8-5/8” Tong
Summary Of Revisions (Continued):
Date
Section
Page
2.8
2
2.12
Inserted CE-applicable hydraulic schematic (Open Centre)
2.13
Inserted CE-applicable hydraulic schematic (Closed Centre)
2.17
Revised section 2.G, “Tong Jaw Availability & Installation”
2.19
Inserted new section 2.H, “Tong Rig-up & Leveling”
2.22
Inserted new subsection 2.I.1, “Operator Training”
2.22
Inserted new subsection 2.I.2, “Operator Safety”
2.23
Revised subsection 2.I.3, “Valve Operation”
2.24
Inserted new subsection 2.I.4, “Shifting Gears”
2.25
Inserted new subsection 2.I.5, “Pre-operational Checks”
2.27
Inserted new section 2.J, “Making & Breaking Connections”
3.1
Inserted new section 3.A, “General Maintenance Safety Practices”
3.1
Inserted new section 3.C, “Preventive Maintenance Practices”
3.2
3.2
MAY 2012
Inserted new section 3.D, “Hydraulic System De-Pressurizing”
Replaced illustrations Section 3.E, “Lubrication Instructions”
3.7
Inserted lubrication instruction 3.E.10, “Door Stop Cylinder”
3.6
Renumbered section 3.F, “Adjustments”
3.8
Revised subsection 3.F.1, “Brake Band Adjustment”
3.9
Replaced illustration, subsection 3.F.2, “Door Latch Cam Adjustment”
3.10
Inserted new subsection 3.F.3, “Shifter Detent Force Adjustment”
3.10
Inserted new subsection 3.F.4, “Safety Door Adjustment”
3.11
Renumbered section 3.G, “Recommended Periodic Checks”
3.12-3.13
Renumbered & revised section 3.H, Overhaul Procedures - Disassembly.
Corrected disassembly procedures and added CE-specific information and
warnings.
3.14-3.25
Inserted new section 3.I, “Assembly Procedures” including CE-specific information and warnings.
3.26
Inserted new section 3.J, “Power Tong Daily Inspection & Maintenance”,
removed from appendices. Added CE-Specific information.
3.28
Inserted new section 3.K, “Power Tong Monthly Inspection & Maintenance”,
removed from appendices
3.31
Inserted new section 3.L, “Tubular Connection Equipment De-Commissioning”, removed from appendices. Revised section to add packaging and
shipping instructions and retitled “Tubular Connection Equipment DeCommissioning & Shipping”.
3.35
Inserted new section 3.M, “Tubular Connection Equipment Re-Commissioning”, removed from appendices
4.1
Revised section 4.A, Troubleshooting - Tong Will Not Develop Sufficient
Torque
4.2
Inserted new section 4.B, Troubleshooting - Relief Valve
4.4
Inserted new section 4.C, Troubleshooting - Safety Door
4.5
Renumbered section 4.D, Troubleshooting - Tong Running Too Slowly
4.6
Renumbered section 4.E, Troubleshooting - Failure of Jaws to Grip Pipe
4.7
Renumbered section 4.F, Troubleshooting - Shifting
Continued on next page
viii
Section Contents
Approved
Renumbered section 3.E, “Lubrication Instructions”
3.2-3.7
3
4
Description Of Revision
Removed obsolete hydraulic schematics from section 2.E, “Hydraulic
Schematics and Component Identification
Technical Manual
SH
KT8625 8-5/8” Tong
Summary Of Revisions (Continued):
Date
MAY 2012
Section
5
Page
Description Of Revision
5.2
Inserted list of critical spare parts
5.3
Inserted list of recommended spare parts
5.4
Inserted list of parts needed for complete overhaul
Approved
5.10-5.11
Replaced illustrations & corrected B.O.M., Support Roller - Door Pivot
5.12-5.13
Replaced illustrations, Rotary Idler
5.14-5.15
Replaced illustrations & revised B.O.M., Pinion Idler
5.16-5.17
Replaced illustrations, Pinion
5.18-5.19
Replaced illustrations & revised B.O.M., Clutch
5.20-5.21
Replaced illustrations & revised B.O.M., Shifter
5.22-5.23
Replaced illustrations & revised B.O.M. to reflect changes to backing pin,
Rotary Assembly
SH
Removed illustration & B.O.M., Hydraulic Assembly
5.24-5.25
Replaced illustrations, Tong Leg Assemblies
5.26-5.27
Inserted new illustration & B.O.M., “Hydraulic Supports”
5.28-5.29
Replaced illustrations & revised B.O.M., Motor & Motor Mount Assembly
5.30-5.31
Replaced illustrations & revised B.O.M., Brake Bands
Removed illustration & B.O.M., Hydraulic Assembly
5.32-5.33
6
Revised illustrations & B.O.M., “Tong Door Assembly”
5.34-5.35
Replaced illustrations & revised B.O.M., Safety Door Components. Added
addition B.O.M. for CE-specific components.
5.36-5.37
Replaced illustrations & revised B.O.M., Rigid Sling. Added addition illustration and B.O.M. for CE-specific components.
All
Complete revision of Torque Measurement section
Technical Manual
Section Contents
ix
KT8625 8-5/8” Tong
Table of Contents
SECTION ONE: INTRODUCTION
Introduction & Contact Information....................................................................................................................................
Equipment Specifications..................................................................................................................................................
Lubricant Specifications....................................................................................................................................................
SECTION TWO: SETUP & OPERATION
A. INITIAL EQUIPMENT RECEIPT & INSPECTION........................................................................................................
B. MAJOR COMPONENT IDENTIFICATION....................................................................................................................
C. SLING / LOAD BEARING DEVICE SAFETY................................................................................................................
1. Inspection Of Slings..................................................................................................................................................
2. Proper Use Of Load-Bearing Devices...................................................................................................................... 3. Storage Of Load-Bearing Devices............................................................................................................................
D. LIFT CYLINDER & SPRING HANGER INSTALLATION
1. Installation Procedure...............................................................................................................................................
2. Lift Cylinder Connection............................................................................................................................................
3. Lift Cylinder Safety....................................................................................................................................................
E. HYDRAULIC SCHEMATIC / COMPONENT IDENTIFICATION...................................................................................
F. HYDRAULIC CONNECTIONS......................................................................................................................................
G. TONG JAW AVAILABILITY & INSTALLATION
1. Jaw Availability..........................................................................................................................................................
2. Jaw / Jaw Die Removal............................................................................................................................................
H. TONG RIG-UP & LEVELING
1. Suspension & Restraint............................................................................................................................................
2. Tong Leveling............................................................................................................................................................
I. TONG OPERATION
1. Operator Training......................................................................................................................................................
2. Operator Safety.........................................................................................................................................................
3. Valve Operation........................................................................................................................................................
4. Shifting Gears...........................................................................................................................................................
5. Pre-Operational Checks............................................................................................................................................
6. General Comments...................................................................................................................................................
J. MAKING AND BREAKING CONNECTIONS
1. Making A Connection................................................................................................................................................
2. Breaking A Connection.............................................................................................................................................
K. EXTREME COLD WEATHER OPERATION PROCEDURES......................................................................................
SECTION THREE: MAINTENANCE
A. GENERAL MAINTENANCE SAFETY PRACTICES.....................................................................................................
B. CLEANING....................................................................................................................................................................
C. PREVENTIVE MAINTENANCE PRACTICES...............................................................................................................
D. HYDRAULIC SYSTEM DE-PRESSURIZATION...........................................................................................................
E. LUBRICATION..............................................................................................................................................................
F. ADJUSTMENTS
1. Brake Band Adjustment:...........................................................................................................................................
2. Door Latch Adjustment.............................................................................................................................................
3. Shifter Detent Force Adjustment:..............................................................................................................................
4. Safety Door Switch Adjustment:...............................................................................................................................
G. RECOMMENDED PERIODIC CHECKS
1. Door Stop Spring......................................................................................................................................................
2. Shifting Shaft.............................................................................................................................................................
3. Backing Pin...............................................................................................................................................................
4. Torque Gauge Assembly..........................................................................................................................................
H. OVERHAUL PROCEDURES - DISASSEMBLY............................................................................................................
I. ASSEMBLY PROCEDURES.........................................................................................................................................
J. Daily Inspection & Maintenance Checklist (power tong).....................................................................
K. MONTHLY MAINTENANCE Checklist - power tong........................................................................................
l. TUBULAR CONNECTION EQUIPMENT De-commissioning & SHIPPING procedure...................................
m. TUBULAR CONNECTION EQUIPMENT Re-commissioning procedure........................................................
SECTION fOUR: TROUBLESHOOTING
A. TONG WILL NOT DEVELOP SUFFICIENT TORQUE.................................................................................................
B. RELIEF VALVE IS INCORRECTLY SET OR MALFUNCTIONING..............................................................................
C. SAFETY DOOR IS MALFUNCTIONING.......................................................................................................................
D. TONG RUNNING TOO SLOWLY..................................................................................................................................
E. FAILURE OF JAWS TO GRIP PIPE.............................................................................................................................
F. FAILURE OR DIFFICULTY OF TONG TO SHIFT........................................................................................................
G. GENERAL COMMENTS...............................................................................................................................................
Continued on next page...
x
Section Contents
Technical Manual
1.1
1.2
1.6
2.1
2.1
2.4
2.5
2.6
2.6
2.7
2.8
2.8
2.10
2.15
2.17
2.18
2.19
2.20
2.22
2.22
2.23
2.24
2.25
2.26
2.27
2.32
2.34
3.1
3.1
3.1
3.2
3.2
3.8
3.9
3.10
3.10
3.11
3.11
3.11
3.11
3.12
3.14
3.26
3.28
3.31
3.35
4.1
4.3
4.5
4.6
4.7
4.8
4.9
KT8625 8-5/8” Tong
Table of Contents (continued):
SECTION FIVE: PARTS AND ASSEMBLIES
Critical Spare Parts List.................................................................................................................................................
Recommended Spare Parts List...................................................................................................................................
Parts List - Complete Overhaul.....................................................................................................................................
Gear Train Layout.........................................................................................................................................................
Support Roller...............................................................................................................................................................
Support Roller - Door Pivot...........................................................................................................................................
Rotary Idler....................................................................................................................................................................
Pinion Idler ...................................................................................................................................................................
Pinion Assembly............................................................................................................................................................
Clutch Assembly............................................................................................................................................................
Shifting Assembly..........................................................................................................................................................
Rotary (Cage Plate) Assembly......................................................................................................................................
Leg Assemblies.............................................................................................................................................................
Hydraulic Supports........................................................................................................................................................
Motor & Motor Mount Assembly....................................................................................................................................
Brake Band Assembly...................................................................................................................................................
Tong Door Assembly.....................................................................................................................................................
Safety Door Components..............................................................................................................................................
Rigid Sling Assembly.....................................................................................................................................................
SECTION SIX: TORQUE MEASUREMENT
a. Basic Torque Measurement .............................................................................................................................
B. TROUBLESHOOTING..................................................................................................................................................
C. PERIODIC INSPECTION AND MAINTENANCE
1. Inspection..................................................................................................................................................................
2. Fluid Recharge..........................................................................................................................................................
3. Reference Checking The Torque Measurement System..........................................................................................
4. Repair And Calibration..............................................................................................................................................
SECTION SEVEN: HYDRAULIC COMPONENT INFORMATION
5.2
5.3
5.4
5.6
5.8
5.10
5.12
5.14
5.16
5.18
5.20
5.22
5.24
5.26
5.28
5.30
5.32
5.34
5.36
6.1
6.5
6.6
6.6
6.6
6.7
List of Illustrations
Illustration 1.A.1: KT8625 Tong.................................................................................................................................................
Illustration 1.A.2: KT8625 Tong Dimensions.............................................................................................................................
Illustration 1.A.3: KT8625 Additional Hazard Areas...................................................................................................................
Illustration 1.A.4: FARR® CE Nameplate..................................................................................................................................
Illustration 2.B.1: Component ID 01..........................................................................................................................................
Illustration 2.B.2: Component ID 02..........................................................................................................................................
Illustration 2.B.3: Component ID 03..........................................................................................................................................
Illustration 2.C.1: Sling Angle....................................................................................................................................................
Illustration 2.D.1: Lift Cylinder & Spring Hanger Installation......................................................................................................
Illustration 2.D.2: Lift Cylinder Hydraulic Connection................................................................................................................
Illustration 2.E.1: Hydraulic Schematic (Open Centre)..............................................................................................................
Illustration 2.E.2: Hydraulic Schematic (Closed Centre)...........................................................................................................
Illustration 2.E.3: Hydraulic Schematic (Open Centre) CE MARKED.......................................................................................
Illustration 2.E.4: Hydraulic Schematic (Closed Centre) CE MARKED.....................................................................................
Illustration 2.E.5: Hydraulic Component ID 01..........................................................................................................................
Illustration 2.E.6: Hydraulic Component ID 02..........................................................................................................................
Illustration 2.E.7: Hydraulic Component ID 03..........................................................................................................................
Illustration 2.F.1: Hydraulic Connections 01..............................................................................................................................
Illustration 2.F.2: Hydraulic Connections 02..............................................................................................................................
Illustration 2.G.1: Jaw Removal.................................................................................................................................................
Illustration 2.H.1: Tong Suspension Relative To Axial Centre...................................................................................................
Illustration 2.H.2: Tong Suspension Relative To Vertical Centre...............................................................................................
Illustration 2.H.3: Tong Leveling (Side-To-Side)........................................................................................................................
Illustration 2.H.4: Tong Leveling (Front-To-Rear)......................................................................................................................
Illustration 2.I.1: Tong Motor Control Valve................................................................................................................................
Illustration 2.I.2: Tong Lift Cylinder Control Valves....................................................................................................................
Illustration 2.I.3: Tong Manual Shifter........................................................................................................................................
Illustration 2.J.1: Master Lifting Link..........................................................................................................................................
Illustration 2.J.2: Backing Pin Set To “Make-up” Position..........................................................................................................
Illustration 2.J.3: Lift Cylinder Control - Raise...........................................................................................................................
Illustration 2.J.4: Opening Tong Door........................................................................................................................................
Illustration 2.J.5: Motor Control - Make-up................................................................................................................................
1.1
1.2
1.3
1.4
2.1
2.2
2.3
2.4
2.7
2.8
2.10
2.11
2.12
2.13
2.14
2.14
2.15
2.15
2.16
2.18
2.20
2.20
2.21
2.21
2.23
2.24
2.25
2.27
2.28
2.29
2.29
2.30
Continued on next page...
Technical Manual
Section Contents
xi
KT8625 8-5/8” Tong
List of Illustrations (continued):
Illustration 2.J.6: Motor Control - Releasing Jaws.....................................................................................................................
Illustration 2.J.7: Lift Cylinder Control - Lower...........................................................................................................................
Illustration 2.J.8: Setting Backing Pin To “Break-Out” Position..................................................................................................
Illustration 2.J.9: Rotation Control - Break-out..........................................................................................................................
Illustration 2.J10: Using Motor Control To Release Tong Jaws Following Break-out & Un-threading.......................................
Illustration 2.J.11: Lowering Tong Using Lift Cylinder Control...................................................................................................
Illustration 3.E.1: Cam Follower Lubrication..............................................................................................................................
Illustration 3.E.2: Support Roller Lubrication.............................................................................................................................
Illustration 3.E.3: Rotary Idler Lubrication.................................................................................................................................
Illustration 3.E.4: Pinion Idler Lubrication Point.........................................................................................................................
Illustration 3.E.5: Pinion Lubrication Points (Top Plate).............................................................................................................
Illustration 3.E.6: Pinion Lubrication Points (Bottom Plate).......................................................................................................
Illustration 3.E.7: Clutch Lubrication Points...............................................................................................................................
Illustration 3.E.8: Motor Mount Lubrication Point.......................................................................................................................
Illustration 3.E.9: Shifter Shaft Lubrication................................................................................................................................
Illustration 3.E.10: Tong Door Lubrication Points......................................................................................................................
Illustration 3.E.11: Door Cylinder...............................................................................................................................................
Illustration 3.F.1: Brake Band Adjustment..................................................................................................................................
Illustration 3.F.2: Door Latch Cam Adjustment..........................................................................................................................
Illustration 3.F.3: Shifter Detent Force Adjustment....................................................................................................................
Illustration 3.F.4: Safety Door Switch Adjustment 01.................................................................................................................
Illustration 3.I.1: Tong Assembly - Rotary Gear Installation.......................................................................................................
Illustration 3.I.2: Tong Assembly - Gear Assembly Positioning.................................................................................................
Illustration 3.I.3: Tong Assembly - Top Fastener Locations.......................................................................................................
Illustration 3.I.4: Tong Assembly - Support Rollers (Securing Leg Mounts)..............................................................................
Illustration 3.I.5: Tong Assembly - Front Leg Installation...........................................................................................................
Illustration 3.I.6: Tong Assembly - Support Rollers (Brake band Weldments)...........................................................................
Illustration 3.I.7: Tong Assembly - Top Shifter Bushing Assembly.............................................................................................
Illustration 3.I.8: Tong Assembly - Front Cage Plate Spacers...................................................................................................
Illustration 3.I.9: Tong Assembly - Safety Door Valve Installation.............................................................................................
Illustration 3.I.10: Tong Assembly - Rigid Sling Adjustment Bolt Installation.............................................................................
Illustration 3.I.11: Tong Assembly - Valve Handle Guard Installation - CE MARKED................................................................
Illustration 3.L.1: Shipping Instructions - Pallet Construction....................................................................................................
Illustration 3.L.2: Shipping Instructions - Wrapping Chain Sling & Strapping to Pallet..............................................................
Illustration 4.B.1: Relief Valve Troubleshooting - Installing Temporary Pressure Gauge..........................................................
Illustration 6.A.1: Torque Gauge 6.1..........................................................................................................................................
Illustration 6.A.2: Tension Load Cell..........................................................................................................................................
Illustration 6.A.3: Compression Load Cell.................................................................................................................................
Illustration 6.A.4: Tension Load Cell..........................................................................................................................................
Illustration 6.A.5: Turn Counter Encoder Mount........................................................................................................................
xii
Section Contents
Technical Manual
2.31
2.31
2.32
2.33
2.33
2.34
3.2
3.3
3.3
3.4
3.4
3.5
3.5
3.6
3.6
3.7
3.7
3.8
3.9
3.10
3.11
3.15
3.16
3.17
3.18
3.18
3.19
3.20
3.21
3.22
3.23
3.25
3.33
3.34
4.3
6.1
6.1
6.1
6.3
6.4
KT8625 8-5/8” Tong
The information presented in this document will provide setup, operating, and maintenance instructions for your
KT8625 tong. Due to the wide variety of operating conditions, these instructions must be considered guidelines
rather than absolute operating procedures. It is the responsibility of the user to use these guidelines together
with an experienced manager to develop operating procedures that conform to all policies set forth by the operating authority (ies).
IDENTIFICATION OF OF WARNINGS AND OTHER NOMENCLATURE OF
IMPORTANCE USED IN THIS INSTALLATION GUIDE
McCoy Drilling & Completions | FARR. uses these indicators to describe items of three degrees of importance.
A HAZARD to operators or equipment is represented by an exclamation point within a red triangle and identifies items
of the highest importance. Failure to heed information identified by a HAZARD symbol may result in bodily injury, death,
catastrophic equipment damage, or any combination of these. A HAZARD may also indicate the potential for dangerous
environmental contamination.
This identifies a HAZARD to operators or equipment
A WARNING is represented by an exclamation point within an orange triangle, and contains information that will alert personnel to a potential safety hazard that is not life-threatening. A WARNING may also serve to alert the user to information
critical to the correct assembly or operation of the equipment in use.
This identifies a WARNING to users
A CAUTION is represented by an exclamation point within a yellow triangle and highlights information that may aid the user
during assembly or operation of your equipment. CAUTIONs are also used to ensure common errors are not made during
assembly or operation of your equipment.
This identifies a CAUTION to users
Some sections of this technical manual apply only to “CE Marked” equipment. These sections will be clearly identified by
the use of the phrase “applies to CE-marked tongs only”, or by use of the CE logo within an enclosed border.
This identifies a section that only applies to CE-Marked equipment
Observance of the following is the full responsibility of the user:
●●all descriptions, information and instructions set out in this manual
●●any regulation or requirement issued by an authority or agency which may influence operation,
safety or integrity of the equipment that overrules the content of this document.
●●any legal or other mandatory regulation in force governing accident prevention or environmental
protection.
Technical Manual
Section Contents
xiii
This page intentionally
left blank
KT8625 8-5/8” Tong
Introduction
Congratulations on the purchase of your FARR® KT8625 8-5/8” tong. This unit will provide you with years of outstanding
performance. Simple maintenance and care will extend its life and ensure years of excellent performance and reliability. The
setup, operating, and maintenance instructions in this manual will assist you in giving your equipment the care it requires.
Please carefully read the manual before installing and using your equipment. Replacement parts are readily available from
McCoy Drilling & Completions | FARR in Edmonton Alberta. Note that many parts are transferable between FARR® tongs
and backups. Should you need replacement parts, or should you experience any difficulty not covered in this manual, please
contact:
McCoy Drilling & Completions | FARR
14755 121A Avenue
Edmonton, Alberta
Canada T5L 2T2
Phone: 780.453.3277
Fax: 780.455.2432
Sales Fax: 780.481.9246
Email Engineering: [email protected]
Email Sales: [email protected]
Website: http://www.mccoyglobal.com/drilling-completions
MODEL 80-0609-7 SHOWN
Illustration 1.A.1: KT8625 Tong
Technical Manual
Section Contents
1.1
KT8625 8-5/8” Tong
Specifications
Color Coding:
Green = Handle or control, safe to grasp or manipulate
Yellow = Active or potential hazard. Use caution not to contact area especially when tong is rotating.
30”
49”
26-1/8”
54”
Illustration 1.A.2: KT8625 Tong Dimensions
1.2
Section Contents
Technical Manual
KT8625 8-5/8” Tong
Specifications
In addition to the HAZARD areas of this equipment that are coated YELLOW, the
rotating cage plate assembly poses a significant hazard when the equipment is
active. Keep hands clear of the cage plate when equipment is energized. SAFE
areas to handle while the equipment is energized are indicated by GREEN coating
Keep hands clear of cage
plate when equipment is
energized
TORQUE GAUGE
MOUNTS IN THIS
LOCATION
SYSTEM
PRESSURE
GAUGE
Technical Manual
Section Contents
1.3
KT8625 8-5/8” Tong
Specifications
II 2 G c T6
Illustration 1.A.5: FARR® CE Nameplate
CE compliant. Conforms with the essential requirements of the applicable Conformité Européenne directives.
EU Explosive Atmosphere certified
II
2
Gc
T6
1.4
Equipment Group (surface, non-mining)
Equipment Category - high level of protection
Gas Group (Acetylene & Hydrogen) - Certified for use in an acetylene / hydrogen environment
Maximum surface temperature of 85 oC.
Section Contents
Technical Manual
KT8625 8-5/8” Tong
Specifications
Torque Table **
Pressure
High Gear
PSI / MPa
Lbs.-ft.
Nm
Low Gear
Lbs.-ft.
Nm
1000 / 6.89
1800
2440
8900
12067
1500 / 10.34
3100
4203
15300
20744
2000 / 13.79
4400
5966
21600
29286
2300 / 15.17
5100
6915
25400
34438
MAXIMUM RATED TORQUE: 25000 LBS.-FT. (25354 Nm)
MAXIMUM SYSTEM PRESSURE: 2285 PSI (15.7545 MPa)
Speed Table
Flow (US GPM / LPM)
Low Gear (RPM)
High Gear (RPM)
10 / 37.9
2.0
10.0
20 / 75.71
4.0
19.0
40 / 151.4
8.0
39.0
60 / 227.1
12.0
58.0
** These are ideal values. Actual achieved torque is highly dependant upon tong efficiency,
final position of rotary gear when full torque load is reached, and the motor with which the
tong is equipped.
Maximum Hydraulic Requirements
60 GPM (227.1 LPM)
2500 PSI (17.237 MPa)
Maximum Dimensions
Length (Doors Closed)
54” / 137.2 cm
Height
49” / 124.5 cm
Width
30” / 76.2 cm
Maximum Elevator Diameter
Torque Arm Length (Pipe center to anchor center)
Dead Weight (Approximate)
Max. Working Weight (inc. Spring Hanger)
Sound Level (dBa)
Jaws available (inches)
Recommended Spring Hanger
Unlimited (tong comes off pipe)
36” / 91.4 cm
1550 lbs / 705 kg
2300 lbs / 1045 kg
97 dB A @ 1m / 96 dB C @ 1m
All standard sizes from 2.062” to 8-5/8” (See Pg. 2.14)
85-0106X (Capacity = 1800 lbs / 818 kg)
only use spring hanger supplied by mccoy. if using spring hanger refer to section 2.H for proper rigging instructions.
ALL REPLACEMENT FASTENER (BOLTS, NUTS, CAP SCREWS, MACHINE SCREWS, ETC.) USED
DURING MAINTENANCE OR OVERHAUL MUST BE GRADE 8 OR EQUIVALENT unless otherwise specified.
Technical Manual
Section Contents
1.5
KT8625 8-5/8” Tong
Specifications
Use an EP synthetic grease that meets or exceeds the following specifications:
Thickener NLGI consistency grade NLGI performance grade Penetration - ASTM D 217 (25°C [77°F] 0.1 mm) worked 60 strokes Dropping point, °F[°C] - ASTM D2265 High temperature life, hours - ASTM D 3527 Oxidation stability, psi - ASTM D 942 Water washout, percent - ASTM D 1264 Rust and corrosion - ASTM D 1743 Oil separation, percent loss - ASTM D 1742
(24 hours, 25°C [77°F]
Leakage, g lost - ASTM D 4290 Four ball wear test, mm scar - ASTM D 2266 Fretting wear, mg - ASTM D 4170 Four ball EP, kgf - ASTM D 2596
Weld point
Load wear index Timken OK load test, lbs - ASTM D 2509 Low temperature torque, N*m - ASTM D 4693
(-40°C [-40°F])
LT-37 pumpability, g/min (60°F/0°F [16°C/-18°C])
Copper corrosion - ASTM D 4048 Disc brake wheel bearing specifications
Ford ESA-M1C 198A
Chrysler MS-3701 Oil viscosity: 40°C [104°F], cSt
100°C [212°F], cSt Flash point, °F[°C] - ASTM 92 Lithium Complex
2
GC-LB
265-295 minimum
550 [288] minimum
160 minimum
(100 hr/300 hr) 0/3
1.8 max
pass
1.1 max
1.0 max
0.40 max
3.4 max
400 minimum
50 minimum
50
1.3 max
360/7
1B
Yes
Yes
151
19.2
450[232]
Use a premium quality hydraulic fluid that meets or exceeds the following specifications:
1.6
Typical Density (kg/m3) Viscosity - cSt @ 40 °C - cSt @ 100 °C Viscosity Index Pour Point °F [°C] Flash Point °F [°C] Colour, ASTM Neutralization Number Rust Protection - Distilled Water - Sea Water
Hydrolytic Stability - Cu Mass Loss, mg/cm2 Copper Corrosion Test Filterability: Denison - Wet & Dry Afnor - Wet & Dry Cincinatti Milacron Spec Approved Denison HF-0: Denison P-46 Piston Pump:
Denison T6C Vane Pump:
Vickers 35VQ25 Vane Pump Test:
104/105C Vane Pump Test:
Vane pump test total ring and vane wear, mg. Oxidation Stability
Turbine Oil Stability Test Life, hours
Rotary Bomb Oxidation Test, minutes
FZG Spur Gear Test, Failure Load Stage (FLS) Section Contents
Technical Manual
878
68.8
8.7
97
-22 [-30]
432 [222]
1.5
0.40
No Rust
No Rust
0.04
1A
Pass
Pass
P69
Approved
Pass
Pass
Pass
No Data Available
<10
2500+
325
12
KT8625 8-5/8” Tong
Setup & Operation
Adequate setup and proper hydraulic connections are essential in ensuring reliable operation of your tong. For best results and long term
reliability, read and obey the start-up instructions in this section.
A.initial receipt and inspection of equipment
YOUR EQUIPMENT HAS BEEN THOROUGHLY TESTED AND INSPECTED AT THE FACTORY.
HOWEVER, mccoy ADVISEs inspecting your equipment for shipping damage upon
receipt and TESTING YOUR TONG before releasing to an operational environment.
Perform a visual inspection following removal of all packaging material. Immediately identify any shipping damage to the shipping
company, and correct all damage before connecting equipment to a hydraulic power source.
B. MAJOR COMPONENT IDENTIFICATION
1
2
7
3
8
4
5
6
Illustration 2.B.1: Component ID 01
Item
Description
1
Master Lifting Link
2
Rigid Sling
3
Rigid Sling Leveling Device
4
Safety Door Switch Assembly
5
Tong Door Latch
6
Tong Door
7
Hydraulic Motor
8
Torque Gauge Mounting Plate
Technical Manual
Section Contents
2.1
KT8625 8-5/8” Tong
Setup & Operation
9
10
13
11
14
12
15
Illustration 2.B.2: Component ID 02
Item
2.2
Description
9
Backing Pin Assembly
10
Cage Plate Assembly
11
Tong Jaws with Die Inserts
12
Door Latch Adjustment Cam
13
Brake Band
14
Brake Band Adjustment
15
Tong Door Spring Cylinder
Section Contents
Technical Manual
KT8625 8-5/8” Tong
Setup & Operation
17
16
18
19
Illustration 2.B.3: Component ID 03
Item
Description
16
Manual Shift Assembly
17
Valve Bank Assembly
18
Motor Mount
19
Access Panel
Technical Manual
Section Contents
2.3
KT8625 8-5/8” Tong
Setup & Operation
C. SLING / LOAD BEARING DEVICE SAFETY
The supplied Load-Bearing device (chain sling, rigid sling, spreader bar assembly, frame, or any other device that bears the partial or total weight of the
equipment described in this manual) has been specified or designed to support
the equipment described in this DOCUMENT. Farr will not guarantee the ability
of the load-bearing device to support any other part, assembly or combination of parts and assemblies, or any additions to the equipment described
in this manual that add weight to the equipment, unless supplied by McCoy
Drilling & Completions.
McCoy Drilling & Completions DOES not guarantee the INTEGRITY of MODIFIED OR
DAMAGED load-bearing deviceS, UNLESS THOSE MODIFICATIONS ARE PERFORMED BY
McCoy Drilling & Completions.
McCoy Drilling & Completions recommends following an industry-accepted standard such as OSHA, ASME B30.9-2006, or manufacturer’s guidelines when performing any rigging and overhead lifting. Use by untrained persons is hazardous. Improper use will
result in serious injury or death. Do not exceed rated capacity. Slings will fail if damaged, abused, misused, overused, or improperly
maintained.
●● Only grade 80 or grade 100 alloy chain should be used for overhead lifting applications.
●● Working Load Limit (WLL) is the maximum allowable load in pounds which may be applied to the load-bearing device, when the
device is new or in “as new” condition, and when the load is uniformly and directly applied. The WLL must never be exceeded.
●● Working Load Limit (WLL) is the maximum working load for a specific minimum sling angle, measured from the horizontal plane.
The Working Load Limit is identified on the sling.
●● The Working Load Limit or Design factor may be affected by wear, misuse, overloading, corrosion, deformation, intentional alterations, sharp corner cutting action and other use conditions.
●● Shock loading and extraordinary conditions must be taken into account when selecting alloy chain slings.
●● See OSHA Regulation for Slings 1910.184, ANSI/ASME B30.9-”SLINGS”, ANSI/ASME B30.10-”HOOKS” and ANSI/AMSE
B30.26 “RIGGING HARDWARE” for additional information.
THE MINIMUM SLING ANGLE (THE ANGLE OF THE LEG OF THE SLING MEASURED
FROM THE HORIZONTAL) MUST NEVER FALL LOWER THAN THE ANGLE SPECIFIED
FOR THE SLING IN USE
Sling Angle
Illustration 2.C.1: Sling Angle
2.4
Section Contents
Technical Manual
KT8625 8-5/8” Tong
Setup & Operation
1. Inspection Of Slings
Farr strongly recommends the following practices:
A complete inspection of new load-bearing devices and attachments shall be performed by a qualified, designated person prior
to initial use. Each link and component shall be examined individually, taking care to expose and examine all surfaces including
the inner link surface. The sling shall be examined for conditions such as those listed in the removal criteria below. In addition,
daily inspection of slings, fastenings and attachments shall be performed by a designated person. If damage or defects are found
at either inspection, the damaged or defective component shall be quarantined from service until it can be properly repaired or
replaced.
Removal Criteria:
A load-bearing device shall be removed from service if conditions such as the following are present:
•
•
•
•
Missing or illegible sling identification.
Cracks or breaks
Evidence of tampering is seen - sling tag has been modified or obscured, or tamper-proof nuts are missing.
Signs of impact on load-bearing components, including spreader bars, lifting lugs, rigid slings & rigid sling weldments, and
legs & leg mounts.
• Broken or damaged welds.
• Excessive wear, nicks, or gouges. Refer to the chart below to ensure minimum thickness on chain links supplied is not
be below the values listed:
Minimum Allowable Chain Link Thickness at Any Point
Nominal Chain Size
Minimum Thickness
Inches
MM
Inches
MM
7/32
5.5
0.189
4.80
9/32
7
0.239
6.07
5/16
8
0.273
6.93
3/8
10
0.342
8.69
1/2
13
0.443
11.26
5/8
16
0.546
13.87
3/4
20
0.687
17.45
7/8
22
0.750
19.05
1
26
0.887
22.53
32
1.091
27.71
1-1/4
Refer To ASME B30.9
• Stretched, bent, twisted, or deformed chain links or components.
• Evidence of heat damage.
• Excessive pitting or corrosion.
• Lack of ability of chain or components to hinge (articulate) freely.
• Weld splatter.
• For hooks, removal criteria as stated in ASME B30.10
• Other conditions, including visible damage, that cause doubt as to the continued use of the sling.
Inspect all lugs and fixing points for signs of elongation and/or bending, or for material build-up around the hole. Repair or
replace components that appear distorted. Ensure all hardware is tight and in good condition. Replace missing hardware if
necessary. All hardware must be free of rust and corrosion.
Additional inspections shall be performed during sling use where service conditions warrant. Periodic inspection intervals shall
not exceed one year. The frequency of periodic inspections should be based on:
•
•
•
•
Frequency of use of the load-bearing device.
Severity of service conditions
Nature of lifts being made
Experience gained on the service life of load-bearing devices used in similar circumstances.
Guidelines for the interval are:
• Normal Service - yearly
• Severe Service - monthly to quarterly
• Special Service - as recommended by a qualified person
Technical Manual
Section Contents
2.5
KT8625 8-5/8” Tong
Setup & Operation
Units designed and manufactured in accordance with EN 12079 and DNV 2.7-1 should be tested and examined in accordance
with the following schedule of examination and test. The user of the load-bearing device shall place a permanent placard or plate
upon which the type and date of the last test shall be recorded. To avoid confusion, the plate shall not carry the date of the next
test or examination, only the most recent.
Test / Examination
Time / Interval
Lifting Tests1
Non-Destructive
Examination (NDE) of
Lifting Points
Thorough
Visual
Examination
Suffix To Be Marked
On Plate Attached
To Unit
Initial Certification By
Farr / Superior
YES
YES
YES
T
Interval Not Exceeding
12 Months
At the discretion of
inspection body
At the discretion of
inspection body
YES
T or VN3
Interval Not Exceeding
60 Months
At the discretion of
inspection body
YES
YES
T or VN
Following Substantial
Repair or Alteration4
YES
YES
YES
T
1. Lifting test as per S 7.3 BS EN 12079 or DNV 2.7-1 May 1995
2. T = Proof Test, non-destructive examination; VN = non destructive examination and visual examination;
V = visual examination.
3. Dependant upon whether non-destructive examination has been carried out.
4. For the purposes of this standard, a substantial repair or modification is defined as any repair and/or
modification that has been carried out which may, in the opinion of the inspection body, affect the load bearing elements of the container or lifting device, or elements that contribute directly to its structural
integrity.
IF MECHANICAL DAMAGE IS SEEN OR SUSPECTED ON A LOAD-BEARING DEVICE, OR IF THE
LOAD-BEARING DEVICE HAS BEEN OVERLOADED, IT MUST BE REMOVED FROM SERVICE AND
QUARANTINED UNTIL RECERTIFIED
Written records of the most recent periodic inspection shall be maintained, and shall include the condition of the sling.
2.
Proper Use Of Load-Bearing Devices
Whenever any load-bearing device is used, the following practices shall be observed.
•
•
•
•
•
•
•
•
•
•
•
3.
Load-bearing devices that are damaged or defective shall not be used.
Slings shall not be shortened with knots or bolts or other makeshift devices.
Sling legs shall not be kinked.
Load-bearing devices shall not be loaded in excess of their rated capacities.
Slings shall be securely attached to their load.
Load-bearing devices shall be protected from snagging, and shall not be further obstructed by any object.
Suspended loads shall be kept clear of all obstruction.
All employees shall be kept clear of loads about to be lifted and of suspended loads.
Hands or fingers shall not be placed between the sling and its load while the sling is being tightened around the load.
Shock loading is prohibited.
Do not stand directly under a load during lifting.
Storage Of Load-Bearing Devices
Proper storage of out-of-service load bearing devices is important to ensure full integrity of the device once it is returned to
service. Farr recommends observing the following practices.
• Wipe off all excess grease. Use a solvent-based cleaner on rags to wipe all external surfaces to remove residual grease
or hydraulic fluid. Once the outside surfaces have been de-greased, wipe all external surfaces with clean water to remove
residual solvent.
• Farr recommends that an anti-corrosive agent such as Tectyl® 506 be applied to all external surfaces. Refer to manufacturer data sheets for proper application and safety information. Allow the anti-corrosive coating ample time to dry - refer to
manufacturer data sheets for drying times at room temperature.
• Store in a clean, dry location. When returning to service, note that a full inspection of the device must be performed.
2.6
Section Contents
Technical Manual
KT8625 8-5/8” Tong
Setup & Operation
D. Lift cylinder installation
The lift cylinder is not orientation-specific; that is, the lift cylinder will function the same way independent of which end is connected
to the crane and which end is connected to the main lifting lug of the tong (or the spring hanger, if used). However, McCoy recommends orienting the lift cylinder with the hydraulic hose connection at the bottom of the cylinder to ensure the hose is not stressed
when cylinder is at full extension.
Test lift cylinder before installation. Refer to the Lift Cylinder Technical
Manual for detailed testing and operating procedures, and detailed safety
guidelines.
if using a spring hanger its weight must be accounted for when calculating
total suspended weight.
1.
Installation Procedure
i.
Use a crane to hoist the lift cylinder by the shackle, ensuring the hydraulic hose connection is at the bottom of the cylinder
when it is hoisted.
ii.
Remove the two R-clips securing the clevis pin, and remove the clevis pin.
iii.
Orient the spring hanger so the piston will extend down during thread make-up, preventing water and debris from gathering
around the seal.
iv. Place the welded U-connection inside the clevis. Replace the clevis pin, and secure the clevis pin with the two R-clips.
v.
Hoist the lift cylinder and spring hanger.
vi. Place a 1” shackle around the master lifting link on the tong sling. Secure the shackle to the extending end of the spring
hanger using the 1-1/8” UNC x 4-3/4” modified hex bolt and 1-1/8” UNC hex jam nut. Secure the jam nut to the bolt using
a 3/16” x 1-1/4” cotter pin.
Illustration 2.D.1: Lift Cylinder & Spring Hanger Installation
Technical Manual
Section Contents
2.7
KT8625 8-5/8” Tong
2.
Setup & Operation
Lift Cylinder Connection
Inspect the hydraulic hose before connection, ensuring the line is free of ruptures, cracks, cuts, or other damage. Inspect the
female quick-connect fitting to ensure it is free from damage. Connect the female quick-connect on the lift cylinder hydraulic
hose to the male quick-connect fitting attached to the needle valve on the tong valve bank. Once the fitting has snapped into
place give the hydraulic line a light tug upwards to ensure the fitting is securely seated.
If not already done, connect the main hydraulic supply to the power tong (see section 2.F for proper hydraulic connection procedure). Energize the hydraulic supply to the power tong.
Lift the power tong approximately three inches off the work surface, and suspend the tong for approximately thirty seconds.
Following the suspension alternately lift and lower the tong slightly to confirm that lift and lower functions each operate correctly.
Illustration 2.D.2: Lift Cylinder Hydraulic Connection
3.
Lift Cylinder Safety
A CLEARLY IDENTIFIED REMOTE POWER PACK EMERGENCY STOP MUST BE INSTALLED IN THE
IMMEDIATE VICINITY OF THE TONG OPERATOR.
McCoy Drilling & Completions recommends following an industry-accepted standard such as OSHA, ASME B30.9-2006, or
manufacturer’s guidelines when performing any rigging and overhead lifting. Use by untrained persons is hazardous. Improper
use will result in serious injury or death. Do not exceed rated capacity.
Working Load Limit (WLL) is the maximum allowable load in pounds which may be applied to the load-bearing device, when the
device is new or in “as new” condition, and when the load is uniformly and directly applied. The WLL must never be exceeded.
The Working Load Limit or Design factor may be affected by wear, misuse, overloading, corrosion, deformation, intentional
alterations, sharp corner cutting action and other use conditions.
See OSHA Regulation for Slings 1910.184, ANSI/ASME B30.9-”SLINGS”, ANSI/ASME B30.10-”HOOKS” and ANSI/AMSE
B30.26 “RIGGING HARDWARE” for additional information.
2.8
Section Contents
Technical Manual
KT8625 8-5/8” Tong
Setup & Operation
Lift Cylinder Safety (continued):
The flexible line providing hydraulic power to the lift cylinder has been equipped with abrasion-resistant, high visibility protective
wrap. The high visibility wrap allows operators to easily see monitor the position of the hydraulic line at all times, and can easily
see if the line appears to become entangled or snagged.
immediately cease lift cylinder operation in the event of entanglement of the
hydraulic line with fixed rig components or tong superstructure.
The protective wrap also prevents wear of the hydraulic line though abrasion. Do not remove the protective wrap from the lift
cylinder line, and replace protective wrap if it is missing, torn, or split. Regardless of use or condition, the hydraulic line supplying
the lift cylinder must be replaced every two years.
replace lift cylinder hydraulic line every two years
The control valve section on the power tong is equipped with an internal check valve, preventing sudden drop of the tong in the
event of hydraulic power failure. A speed-limiting orifice is installed in the breather port of the lift cylinder. The orifice prevents
sudden drop of the lift cylinder in the event of a ruptured hydraulic line, limiting the speed at which the cylinder extends and the
tong drops to a safe rate. Do not remove the speed-limiting orifice, and only replace with an identical orifice supplied by McCoy.
do not remove the speed-limiting orifice from the lift cylinder breather port
The working load limit (WLL) is clearly stenciled on to the side of the lift cylinder. Do not use lift cylinder if the WLL stencil has
been rubbed off or intentionally removed. Locate the test certificate that accompanied the cylinder to the job site or, if necessary,
obtain a copy of the test certificate from the location at which the original certificate has been stored. The lift cylinder must be
clearly re-marked with the WLL before it is released to an operating environment.
do not use a lift cylinder with a missing or defaced wll stencil.
Technical Manual
Section Contents
2.9
KT8625 8-5/8” Tong
Setup & Operation
E. HYDRAULIC SCHEMATIC / COMPONENT IDENTIFICATION
Your tong may not be equipped with a lift valve, and may be configured to be open-centre or closed centre, depending upon the
specific model.
MOTOR
12
11
P
10
T
LIFT
G
9
8
6
7
T
P
1
2
3
4
5
OPTIONAL
Illustration 2.E.1: Hydraulic Schematic (Open Centre)
Item
Part Number
Inlet Valve DVA35
10-9016
2
Relief Valve, DVA35
10-0010R
3
Motor Section
10-9014
4
Lift Section (Optional)
10-9015
5
Outlet Section
10-0086
Outlet Section - Closed Centre (Optional)
08-1825
6
Lift Cylinder Flow Control Valve
08-9062
7
Safety Door Valve Block
101-0727
8
Pilot-To-Operate Cartridge Valve (For safety door system)
08-1625
9
Safety Door Switch
08-0337
87-0112
5A
2.10
Description
1
10
Hydraulic Motor
11
Check Valve
02-9022
12
Pressure Gauge, 0 - 3000 PSI
02-0245
13
Lift Cylinder Orifice
Section Contents
Technical Manual
KT8625 8-5/8” Tong
Setup & Operation
MOTOR
12
11
P
10
T
LIFT
G
9
8
6
7
T
X
P
1
2
3
4
5A
OPTIONAL
Illustration 2.E.2: Hydraulic Schematic (Closed Centre)
the relief pressure valve is factory-set to optimize the performance of your
equipment. do not adjust the relief valve without first consulting mccoy drilling & completions | farr.
Technical Manual
Section Contents
2.11
KT8625 8-5/8” Tong
Setup & Operation
MOTOR
12
11
P
LIFT
10
T
13
G
9
8
6
7
T
P
1
2
3
4
OPTIONAL
Illustration 2.E.3: Hydraulic Schematic (Open Centre) CE MARKED
2.12
Section Contents
Technical Manual
5
KT8625 8-5/8” Tong
Setup & Operation
MOTOR
12
11
P
LIFT
10
T
13
G
9
8
6
7
T
X
P
1
2
3
4
5A
OPTIONAL
Illustration 2.E.4: Hydraulic Schematic (Closed Centre) CE MARKED
Technical Manual
Section Contents
2.13
KT8625 8-5/8” Tong
Setup & Operation
3
4
1
5
5A
2
11
Illustration 2.E.5: Hydraulic Component ID 01
6
7
8
Illustration 2.E.6: Hydraulic Component ID 02
2.14
Section Contents
Technical Manual
KT8625 8-5/8” Tong
Setup & Operation
9
Illustration 2.E.7: Hydraulic Component ID 03
F.
HYDRAULIC CONNECTIONS
1.
Main Hydraulic Connections
A pair of hydraulic lines - a 1” supply line and a 1-1/4” return line - connect the tong to the power unit (see illustration below).
Ancillary devices (hydraulic motors, hydraulic cylinders, etc.) are connected through the valve block.
Perform any hydraulic connection when the power unit is not running, or when the hydraulic pump is disengaged. The possibility
of error in inter-changing the high pressure supply hose and the low pressure return hose has been eliminated, because the
supply side coupling is smaller than the return side.
Hydraulic Supply (1”)
Hydraulic Return (1-1/4”)
Illustration 2.F.1: Hydraulic Connections 01
These hose couplings are self-sealing, and care should be taken to ensure complete engagement to prevent partial closure of
the check valve in the coupling. Ensure that the nut (female) side is completely made up onto the male connector - there is a
line on the male fitting that indicates complete make-up. Snug the female fitting right up to the line.
Technical Manual
Section Contents
2.15
KT8625 8-5/8” Tong
Setup & Operation
Hydraulic Connections (continued):
Make up female fitting to
Marked point on male fitting
Illustration 2.F.2: Hydraulic Connections 02
A CLEARLY IDENTIFIED REMOTE POWER PACK EMERGENCY STOP MUST BE INSTALLED IN THE
IMMEDIATE VICINITY OF THE TONG OPERATOR.
Inspect these connections upon activation of the power unit. Leaking components must be repaired before releasing the tong to the
operational environment. Deactivate the power unit and de-pressurize the hydraulic system according to the procedure in Section
3.D. Disconnect the main hydraulic connections and inspect all four connectors (two male, two female) for damage or debris. If the
connectors cannot be cleaned or easily repaired, McCoy recommends replacement of the leaking connector. Note that damage to
one of the connectors may have caused damage to its mate.
Turn off power unit and depressurize hydraulic system before disconnecting the main hydraulic lines under normal working conditions.
See Section 3.D for hydraulic system depressurization. McCoy recommends placing protective caps over the exposed connectors to
protect them from water and impact damage.
always turn off hydraulic power and depressurize hydraulic system before
disconnecting main hydraulic lines.
2.16
Section Contents
Technical Manual
KT8625 8-5/8” Tong
Setup & Operation
G. TONG JAW AVAILABILITY & INSTALLATION
1.
Jaw Availability
The following table lists all jaw die kits that are available as standard stocked sizes for this model of tong. McCoy Drilling &
Completions | Farr offers a good selection of standard jaw sizes. However, please note that McCoy can custom-engineer and
manufacture any size of jaw within the range of the tong. Jaw systems are available to allow use of die inserts intended for
specialized applications. Call our sales office for information on jaw and die systems designed for higher or lower grip, or nonmarking applications.
The table lists standard contoured, flat and wraparound die inserts that are available as spare parts. However, a wide variety
of diamond-tooth, GRITFACE®, and wrap-around fine-tooth dies are available for specialized applications. Please refer to our
website for complete information:
http://www.mccoyglobal.com/dies-inserts
use of aluminum dies is forbidden
on ce-marked equipment
STANDARD JAW DIE KITS
Description
Part Number
Weight (Per Single Jaw)
2.062” Jaw Die Kit
1050-JDK-100
A
18 lbs / 8.2 kg
2-3/8” Jaw Die Kit
1050-JDK-105
B
18 lbs / 8.2 kg
2-7/8” Jaw Die Kit
1050-JDK-110
C
18 lbs / 8.2 kg
3-1/8” Jaw Die Kit
1050-JDK-112
D
18 lbs / 8.2 kg
18 lbs / 8.2 kg
18 lbs / 8.2 kg
1050-JDK-114
D
3-1/2” Jaw Die Kit
1050-JDK-115
D
4” Jaw Die Kit
1050-JDK-120
18 lbs / 8.2 kg
4-1/2” Jaw Die Kit
1050-JDK-130
19 lbs / 8.6 kg
4-3/4” Jaw Die Kit
1050-JDK-132
18 lbs / 8.2 kg
5” Jaw Die Kit
1050-JDK-135
17 lbs / 7.7 kg
5-1/2” Jaw Die Kit
1050-JDK-140
18 lbs / 8.2 kg
5-3/4” Jaw Die Kit
1050-JDK-142
17 lbs / 7.7 kg
6” Jaw Die Kit
1050-JDK-143
16 lbs / 7.2 kg
6-1/2” Jaw Die Kit
1050-JDK-144
15 lbs / 6.8 kg
6-5/8” Jaw Die Kit
1050-JDK-145
15 lbs / 6.8 kg
7” Jaw Die Kit
1050-JDK-150
14 lbs / 6.4 kg
7-5/8” Jaw Die Kit
1050-JDK-155
13.5 lbs / 6.1 kg
7-3/4” Jaw Die Kit
1050-JDK-160
12.5 lbs / 5.7 kg
8-5/8” Jaw Die Kit
1050-JDK-165
13 lbs / 5.9 kg
3-3/8” Jaw Die Kit
A - Uses contoured insert PN 12-0002
B - Uses contoured insert PN 12-0004
C - Uses contoured insert PN 12-0007
D - Uses contoured insert PN 12-0011
All other jaw die kits use flat die PN 13-0008-314-0
Technical Manual
Section Contents
2.17
KT8625 8-5/8” Tong
2.
Setup & Operation
Jaw / Jaw Die Removal
jaws may produce metal slivers. wear sturdy gloves when removing and
installing jaw die kits.
The tong jaws will often require removal to change jaw size or replace worn jaw die inserts. Open the tong door to disable tong
rotation (rotation is inhibited by safety door systems). Support the jaw being removed from the bottom, and use a wrench to
loosen and remove the jaw pivot bolt. Slide the jaw away from the rotary gear towards the centre of the cage plate assembly,
and lift clear of the tong (see Illustration 2.G.1 next page). Repeat for the other jaw.
DO NOT ACCESS ROTATING COMPONENTS UNLESS HYDRAULIC POWER SUPPLY HAS BEEN
DEACTIVATED OR ISOLATED.
Illustration 2.G.1: Jaw Removal
Once the jaw has been removed, extract the die keeper screws and remove the dies by tapping dies lightly with a hammer.
Replace the dies, tapping them into place if necessary, and replace the keeper screws.
Tong jaws are clearly marked with the size. Ensure the jaw to be installed is the proper size for the pipe to be run. Over-sized
or under-sized jaws may result in jaw slippage, or cause the jaws to leave the end of the cam surface on the inside of the rotary
gear. Additionally, incorrectly sized jaws will cause the pipe to be off-centre relative to the backup, resulting in eccentric rotation
and potential pipe thread damage.
Use of jaws not manufactured by McCoy is not recommended, and may result in jaw slippage jaw failure, or damage to the
camming surfaces of the rotary gear.
ensure jaws to be installed are the correct size. use of jaws not supplied by
mccoy may cause jaw slippage or failure, and may result in damage to the tong.
The use of reducer dies is not recommended.
2.18
Section Contents
Technical Manual
KT8625 8-5/8” Tong
Setup & Operation
H. TONG RIG-UP & LEVELING
1. Suspension & Restraint
Suspend the tong from a location as near to the centre of the drill rotary as possible, and from a location high enough on the
mast to ensure easy handling. The lower the point from which the tong is suspended, the more effort will be required to move
the tong to and from the connection point.
The suspension line may be extended over a pulley and balanced by a counterweight equal to the weight of the tong, or simply
tied off in the derrick to form a dead line. When using a dead line arrangement it is necessary to use a FARR® spring hanger
assembly (see specification page for recommended spring hanger). This spring hanger compensates for the downward movement of the casing as the thread is made-up, and imparts additional force to the suspension cable:
•
•
a “single spring” hanger typically applies 420 lbs. (191 kg.) to the suspension line for every inch of thread made up
a “double spring” hanger typically applies 840 lbs. (382 kg.) to the suspension line for every inch of thread made up
If you do not know which specific spring hanger is in use, check the specification page in this manual for information on the
recommended spring hanger for this application. McCoy Drilling & Completions will not guarantee or specify spring hangers
other than what has been supplied by McCoy.
Many applications use a lift cylinder for adjusting the height of the tong. Ensure the weight of the lift cylinder is known if it has
not been included in the total weight of the tong.
All forces upon the suspension line must be considered when calculating necessary strength of the suspension line. The weight
of the tong, the weight of the lift cylinder, the weight of the spring hanger, and the force imparted on the suspension line by
the spring hanger must all be added together in order to arrive at the total force supported by the suspension line. Select your
suspension line based upon the total force and the margins of safety dictated by the policies of your company and by established engineering practices. Ultimately, calculating the force on the suspension line and selection of the suspension line is the complete responsibility of the customer.
Use of dual backup (snub) lines of strength sufficient to withstand the linear force imparted by the maximum rated torque of the
tong is integral to ensuring safety on the drill floor. Use of snub lines of less than sufficient strength poses a significant risk of
injury to personnel. Calculate the force on the snub lines by dividing the maximum torque of the tong by the tong’s torque arm
(expressed in feet). For example, a 25,000 lbs.-ft. tong with a 36 inch (3 ft.) torque arm will generate 8333‑ lbs. of force against
the snub line. Select your snub lines and attachment points based upon the total force and the margins of safety dictated by
the policies of your company and by established engineering practices. Ultimately, calculating the force on the snub line and
selection of the snub line is the complete responsibility of the customer.
Snub lines must be securely connected to the rear of the tong, and tied off to a suitable anchor. One snub line must be secured
to the load cell, which is then secured to the rear of the tong. The side of the tong the load cell connects to is dependant upon
whether make-up or break-out activities are underway. To ensure accurate torque measurement, the torque measurement line
must be connected perpendicular to the lengthwise axis of the tong, and perpendicular to the hang line (see illustrations 2.F.1
and 2.F.2). Connect the second snub line on the opposite side of the load cell, perpendicular to the lengthwise axis of the tong
and perpendicular to the vertical. Installed snub lines should have as little slack as possible when not under load.
When placing tong on the drill floor ensure the surface is level and sturdy enough to support the tong without the risk of toppling.
MCCOY DRILLING & COMPLETIONS ACCEPTS NO RESPONSIBILITY FOR DESIGNING AND
SELECTING AN ADEQUATE SUSPENSION and restraint SYSTEM FOR YOUR DRILLING
EQUIPMENT. failure to follow the instructions provided in this section may
result in serious injury to the operator.
all selected fasteners, shackles, clamps, etc. used for constructing the suspension and snub lines must be rated for the calculated forces.
Technical Manual
Section Contents
2.19
KT8625 8-5/8” Tong
Setup & Operation
Suspension & Restraint (continued):
90o
Illustration 2.H.1: Tong Suspension Relative To Axial Centre
90o
Illustration 2.H.2: Tong Suspension Relative To Vertical Centre
2. Tong Leveling
The tong must be leveled side-to-side and front-to-rear before placing into service. We have provided the following guidelines
for assisting you when leveling your tong.
i.
2.20
Place a level axially (side to side) across the tong, ensuring that it is parallel with the surface of the tong. Use a thin wrench
on the flat of the adjusting helix to rotate the helix, forcing the lift link to move towards the outer supports of the sling. The
3/4” nylock nut on the pin may have to be slightly loosened to allow the helix to rotate. Adjust the helix until the level shows
that the tong is level side-to-side.
Section Contents
Technical Manual
KT8625 8-5/8” Tong
Setup & Operation
Tong Leveling (continued):
failure to properly level tong may result in jaw slippage or failure of jaw
components
Rotate helix
using flat
3/4” Nylock nut may
have to be loosened
Illustration 2.H.3: Tong Leveling (Side-To-Side)
only use The master link to suspend the tong assembly. the rigid sling is
designed to be used for vertical lifting only.
ii.
Place a level lengthwise (front to back) along the tong, ensuring that it is parallel with the surface of the tong. Loosen the
1/2” jam nuts on the adjusting bolts on rigid sling brackets. Completely loosen the adjusting bolts. Turn each adjusting bolt
equally until tong hangs level front-to-back. Lock adjusting bolts in place with the jam nuts.
Loosen 1/2” hex jam nut before rotating adjustment bolt
Illustration 2.H.4: Tong Leveling (Front-To-Rear)
Technical Manual
Section Contents
2.21
KT8625 8-5/8” Tong
I.
Setup & Operation
TONG OPERATION
1.
Operator Training
Many companies set qualification standards that must be met before equipment may be operated without supervision. McCoy
Drilling & Completions recommends operator training, which typically consists of operation of the equipment under the supervision of a trained equipment operator until a satisfactory level of competence is achieved. Typical operator training should include:
•
•
•
•
•
•
2.
Introduction to and general description of equipment
Technical specifications and performance data
Operating instructions
Control systems and interlocks
Operating hazards
Checks and inspections
Operator Safety
McCoy recommends that a hazard assessment of the work area be performed by a designated safety representative before
commencing operations. A designated safety representative is responsible for verifying that all operators have adequate equipment and safety training.
The safety door system is the primary device protecting the tong operator and nearby personnel from the rotary gear. Confirm
the correct operation of the safety door before every job. Never disable the safety door device.
Inspect anti-tamper devices on safety door components before beginning job. Equipment showing signs of tampering
on any safety system must be immediately removed from service and tested. Anti-tamper devices must be restored
before allowing equipment to be released to an operating environment.
The area surrounding the tong operating area must be clutter-free and free from tripping hazards, or protruding objects that may
snag hydraulic hoses on the tong, backup, lift cylinder, or torque measurement system. Operating surface or drill floor must be
kept free of slipping hazards like grease, oil, water, etc.
Adequate lighting of the work area is required. All warnings, labels, gauges, and signs must be clearly visible
The components of the tong commonly manipulated or requiring control input are painted green, and are safe for continuous handling. Areas painted yellow are designated as hazardous areas, and contact with those areas must be avoided during
operation. Always wear all personal protective equipment (PPE) specified by your company’s HSE policy, and follow all of your
company’s safety guidelines.
always wear approved personal protective equipment (ppe) when operating
hydraulically-powered equipment.
Ensure hydraulic power is deactivated and tong hydraulics are de-pressurized before disconnecting the main hydraulic lines.
McCoy recommends depressurizing the tong hydraulic system before connecting or disconnecting quick-connect fittings.
depressurize equipment before disconnecting main hydraulic lines.
2.22
Section Contents
Technical Manual
KT8625 8-5/8” Tong
Setup & Operation
3.
Valve Operation
4-way proportional valves control operation of hydraulic devices on the tong assembly such as hydraulic motors and cylinders.
When any one valve is “centered” or in the detent position, there is no hydraulic output from the valve. When the valve is pushed
forward there is an effect, and when the valve is pulled back, there is an opposite effect. These valves feature proportional control, which means that further extension of the valve handle (thereby further opening the valve orifice) results in proportionally
higher hydraulic output to the controlled device.
The following illustrations demonstrate the type and effect of the hydraulic valves with which this tong is may be equipped.
TONG MOTOR
This is a proportional valve. Pushing the valve handle forward will cause the tong motor to rotate in a clockwise direction (as seen
from the top of the tong). This is the desired direction of rotation for making up a joint. Pulling the valve handle in the opposite
direction results in counter-clockwise rotation, which is the desired direction of rotation for breaking out a joint. Releasing the
valve handle will cause the tong to immediately stop rotation.
Illustration 2.I.1: Tong Motor Control Valve
Technical Manual
Section Contents
2.23
KT8625 8-5/8” Tong
Setup & Operation
LIFT CYLINDER CONTROL VALVE
This is a direct-acting valve. Pulling out on the valve handle will cause the lift cylinder to lift the tong vertically. Pushing in on the
valve handle will cause the lift cylinder to lower the tong. Releasing the valve handle will immediately stop the lifting or lowering
action.
Pushing on the lift cylinder control valve handle (toward the center of the tong) will cause the equipment to lift, while
pulling on the lift cylinder control valve handle (toward the operator) will cause the equipment to lower. This valve
handle action applies to all CE-marked tongs and is irregardless of control valve bank orientation.
LIFT CYLINDER NEEDLE VALVE (See illustration 2.I.2)
This needle valve regulates hydraulic fluid flow to the lift cylinder. Closing the needle valve (rotating the knob clockwise) will
increasingly restrict the flow rate of the fluid, resulting in slower actuation of the cylinder in both directions (lifting & lowering).
Lift Cylinder Needle Valve
Illustration 2.I.2: Tong Lift Cylinder Control Valves
4.
Shifting Gears
The shifting shaft has three “detent” positions identifying the low speed/high torque position, the “neutral” or free-spinning position, and the high speed/low torque position. The detent strength may be adjusted by releasing the locknut on the detent tube
and increasing or relaxing pressure on the detent spring. Ensure the locknut is tightened once the desired detent pressure has
been set.
To shift to the high-speed gear, move the shifting handle DOWN from neutral position. To shift to the low-speed gear, move the
shifting handle UP through the neutral detent to its HIGHEST position. Note that the high clutch gear or the low clutch gear may
not be exactly aligned when shifting, so the operator may need to “bump” the motor control handle slightly to turn the main clutch
gear shaft and shifting collar into alignment. The most effective way of achieving this is to apply a small amount of pressure on
to the gear shift lever in the direction you want to shift the tong, ensuring the shifting collar will “catch” when the main clutch gear
aligns with either the high or low clutch gear (see Illustration 2.I.3 next page)
DO NOT SHIFT TONG WHILE ROTATING THE MOTOR AND Cage plate. CATASTROPHIC GEAR
TRAIN FAILURE MAY RESULT.
2.24
Section Contents
Technical Manual
KT8625 8-5/8” Tong
Setup & Operation
Shifting Gears (continued):
Illustration 2.I.3: Tong Manual Shifter
5.
Pre-Operational Checks
McCoy recommends that the following pre-operating tests be performed prior to releasing the tong assembly to a operational
environment:
a.
Connect the tong to a hydraulic power source in a controlled environment. Ensure the power unit’s operating parameters
are within the specifications as identified on Pg. 1.3. Ensure the hydraulic connections from the power unit are properly and
securely made up (see Section 2.E). Do not neglect to connect the motor drain line.
b.
Start the power unit as specified by the power unit operator’s manual. Open the Bypass Valve on the hydraulic system, and
inspect all pressure and return line hose connections to ensure correct and secure installation. A restriction in the pressure
supply hose will result in high pressure within the power unit hydraulic system, which will activate the hydraulic governor
and increase the engine speed to as high as maximum RPM. A restriction in the return line will result in high pressure within
the power unit and the tong hydraulic system, causing engine speeds as high as maximum RPM, and possible failure of
the motor seal.
A CLEARLY IDENTIFIED REMOTE POWER PACK EMERGENCY STOP MUST BE INSTALLED IN THE
IMMEDIATE VICINITY OF THE TONG OPERATOR.
c.
Allow hydraulic system to warm by circulating fluid for about 10 minutes, then slowly close the bypass valve to allow hydraulic fluid to circulate through the hoses and tong. Ensure circulating pressure does not exceed 200 psi.
d.
Inspect all hydraulic hoses and connections on the tong. Immediately correct any hydraulic fluid leaks.
e.
Inspect all gauges. Replace leaking or cracked gauges, or any gauge not registering a reading.
f.
Confirm that all load-bearing pins and R-clip retainers are installed and in good condition (rigid sling pins, lift cylinder pins).
g.
Confirm all hydraulic hoses (with the exception of the supply & return to the backup) are securely fastened to the tong, and
are not in contact with the cage plate or creating a snagging hazard.
h.
Ensure the tong door is securely closed before rotating tong.
DOOR MUST BE CLOSED AND SECURELY LATCHED BEFORE tong rotation IN ORDER TO
ASSURE THE SAFETY OF OPERATING PERSONNEL.
Technical Manual
Section Contents
2.25
KT8625 8-5/8” Tong
Setup & Operation
Pre-Operational Checks (continued):
i.
Shift the tong to low gear (see Section 2.I.3) and rotate the tong slowly forward for approximately a minute. Stop the tong
and then reverse the rotation direction for approximately another minute. Stop the tong, shift to high gear, and operate in
high gear for approximately another minute. Stop the tong and rotate in the opposite direction in high gear for approximately
another minute. If at any time abnormal operation is suspected (surging, grinding, squealing, or other noises deemed to be
unusual, or failure to operate) discontinue operation of the tong and contact McCoy Drilling & Completions immediately.
j.
Re-inspect all hydraulic lines and connections on the tong, and correct all leaks.
k.
The safety door system is the prime protective measure separating the operator from the rotary gear, and must be in working condition when operating tong. Carefully inspect the safety door components, and test the operation of the safety door
using the following procedure:
i.
Keep non-essential personnel clear of the unit under test. This test procedure will only include two people: one to run
the control valve and one to operate the door.
ii.
Ensure the tong door is securely closed.
iii.
Shift to LOW gear.
iv. Begin rotating the tong (direction of rotation is not important).
v.
Open the tong door while the rotating the tong. The tong must immediately and completely stop rotating as soon as
the door is opened.
vi. Continue to apply rotation control, and open & close the door throughout its complete range. Slowly close the door
until it latches. Rotation must not begin until the door is completely closed and securely latched.
If the safety door does not operate as designed, the safety door switch may require adjustment, or further troubleshooting
of the safety door system may be required. See Section 3.F.4 for safety door switch adjustment procedures, and Section
4.D for safety door troubleshooting instructions.
The safety door switch is protected from impact by a sturdy metal guard, painted yellow. This guard must be inspected
before each use of the tong. All components of the guard must be in place, and all fasteners securing the guard must be
intact and tight. Ensure wire ties (where applicable) on safety door components are present and secure, and do not show
signs of tampering.
do not operate tong with a malfunctioning or non-operating safety door system.
6.
General Comments
a)
Position rotary gear in contact with both idler gears when making up or breaking out joints or collars when torque in excess
of 50% of the rated torque is required.
b)
When making-up integral (shouldered) joints, it is essential to make up the last turn of the threads in low gear. This reduces
the tendency of an instant stop or a sudden increase in torque, which induces extremely high stress upon the gear train.
c)
DO NOT employ the “snap break” method of breaking-out joints when pulling a string. By definition, the “snap break”
method is a procedure used by some operators to break out connections, accomplished by leaving slack in the “jaw-pipe”
engagement, and then quickly pulling the throttle valve control lever allowing the tong to snap into its loaded or high torque
condition. The extremely high stress placed on the gear train frequently causes gear breakage.
DO not use the “snap break” method to break out joints
2.26
Section Contents
Technical Manual
KT8625 8-5/8” Tong
Setup & Operation
J.
MAKING AND BREAKING CONNECTIONS
ThESE OPERATING procedureS assume the user has properly set up and prepared
the equipment for operation as per Sections 2D, 2E, and 2F of this manual.
Set up and prepare your equipment for operation as per Section 2 of this manual Refer to the following sections:
●● 2.D - Lift Cylinder Installation
●● 2.F - Hydraulic Connections
●● 2.G - Tong Jaw Installation
●● 2.H.1 - Tong Rig-up and Leveling (Suspension)
●● 2.H.2 - Tong Rig-up and Leveling (Leveling)
Your tong and backup assembly should be properly suspended, connected to a hydraulic power source, and ready to make or break
connections at this point.
1.
Making A Connection
a)
Ensure hydraulic power supply to the tong is energized. The master link on the rigid sling must be used to suspend the
tong. Do not suspend the tong directly from the rigid sling.
Illustration 2.J.1: Master Lifting Link
The master link must always be used to suspend the tong assembly
b)
Ensure the backing pin is in the “make-up” position. From the front of the tong, the backing pin correctly configured for
makeup will be in the 10 o’clock position (see Illustration 2.J.2 next page). If it is not, simply lift up and place in the correct
position (see Illustration 2 next page). The cage plate opening must be aligned with the door opening when setting the
backing pin position.
Technical Manual
Section Contents
2.27
KT8625 8-5/8” Tong
Setup & Operation
Making A Connection (Continued)
Illustration 2.J.2: Backing Pin Set To “Make-up” Position
c)
Ensure the load cell and snub line(s) are properly configured for making up connections. A “snub line” is a length of wire
rope that connects the rear of the tong body to a sturdy anchor on the drill floor (see Section 2.F.1). The snub line prevents the tong body from spinning in the opposite direction of the cage plate when torque begins to build in the joint. Farr
Canada Corp. recommends using two snub lines when running the equipment to eliminate uncontrolled movement in either
rotational direction. The snub line(s) must be rated for the applied torque plus whatever safety margins stated by your own
operating policies. The snub line connection point on the drill floor must be sturdy enough to absorb all applied forces when
making up the joints. When making up joints the load cell must be connected to the driller’s side of the tong, which is the
left side of the tong as seen from the rear. For accurate torque measurement the snub line between the tong body and the
anchor must be perpendicular to the vertical, and perpendicular to the centre-line of the tong.
d)
Actuate the lift cylinder control valve to lift the assembly from the drill floor. Pulling on the valve handle toward the operator
will retract the lift cylinder to lift the assembly (see Illustration 2.J.4 below). Note that rig personnel are required to stabilize
the tong and backup as it is being lifted so it does not swing and collide with other rig equipment.
Pushing on the lift cylinder control valve handle (toward the center of the tong) will cause the equipment to lift. This
valve handle action applies to all CE-marked tongs and is irregardless of control valve bank orientation.
Rig personnel must stabilize the tong as it is lifted from the drill floor
2.28
Section Contents
Technical Manual
KT8625 8-5/8” Tong
Setup & Operation
Making A Connection (Continued):
Illustration 2.J.3: Lift Cylinder Control - Raise
e)
Grasp the tong door handle and pull the door to release the latch and open the door. (See Illustration 2.J.4). Opening the
tong door will activate the safety door system and prevent rotation of the cage plate.
Illustration 2.J.4: Opening Tong Door
Technical Manual
Section Contents
2.29
KT8625 8-5/8” Tong
Setup & Operation
Making A Connection (Continued):
f)
Manually engage the threads of the tubing connection being made up. Ensure threads are not cross-threaded.
g)
Move the tong on to the pipe above the tubing joint. Use the lift cylinder to ensure the tong jaws are at the correct location
above the connection joint.
h) Firmly close the tong door against the latch post.
i)
Begin rotation with the tong in high gear and the tong motor set to high speed (high speed/low torque). See Section 2.I.2 to
set the tong motor to high speed, and Section 2.I.3 to properly set the tong to high gear. Do not shift gears while the tong
is rotating.
SHIFTING TONG WHILE ROTATING THE MOTOR AND CAGE PLATE MAY RESULT IN
CATASTROPHIC GEAR TRAIN FAILURE
j)
Push the motor control valve toward the tong to rotate the cage plate in the make-up direction.
Illustration 2.J.5: Motor Control - Make-up
k)
Push the rotation control handle toward the centre of the tong once the tong jaws cam on to the tubing This threads the
connection together at high speed. As the joint becomes fully made up the increasing torque demand will stall the motor,
and displayed torque will increase.
l)
Stop rotation, and set motor to low speed and shift to low gear (low speed/high torque - See Section 2.I.2 for instructions
for setting motor to low speed, and Section 2.I.3 for shifting to low gear). This will enable the tong to produce adequate
torque for making up the joint to specification.
m) Push the rotation control handle all the way in to complete the connection at low speed/high torque. Observe the torque
gauge - stop rotation when the specified make-up torque is reached. Reverse the rotation control valve to release the tong
jaws from the tubing (see Illustration 2.J.6 next page).
2.30
Section Contents
Technical Manual
KT8625 8-5/8” Tong
Setup & Operation
Making A Connection (Continued):
Illustration 2.J.6: Motor Control - Releasing Jaws
p)
Align the opening in the rotary gear with the mouth of the tong once the jaws are free. Open the tong door. Note that rig
personnel may be required to stabilize the tong as it completely releases from the drill string. Guide the tong away from the
string. Push the lift cylinder control valve toward the centre of the tong to lower the equipment to the drill floor if desired.
Pulling on the lift cylinder control valve handle (toward the operator) will cause the equipment to lower. This valve
handle action applies to all CE-marked tongs and is irregardless of control valve bank orientation.
Illustration 2.J.7: Lift Cylinder Control - Lower
p)
Repeat steps “e” through “p” until the desired number of connections are made up.
Technical Manual
Section Contents
2.31
KT8625 8-5/8” Tong
2.
Setup & Operation
Breaking A Connection
YOUR TONG SHOULD BE PROPERLY SUSPENDED, CONNECTED TO A HYDRAULIC POWER
SOURCE, AND READY TO BREAK CONNECTIONS.
a)
Ensure hydraulic power supply to the tong is energized. The master link on the rigid sling must be used to suspend the
tong. Do not suspend the tong directly from the rigid sling. See Illustration 2.J.1.
b)
Set the backing pin on the tong “breakout” operation. Lift up on the backing pin and rotate it to the “breakout” position, which
is 2 o’clock as seen from the front of the tong. The opening in the rotary gear must be aligned with the tong door opening
in order to properly set the backing pin (see Illustration 2.J.8).
Illustration 2.J.8: Setting Backing Pin To “Break-Out” Position
c) Ensure the load cell is configured for break-out operation. If torque measurement for break-out is required, connect the load
cell to the off-driller’s side (the right-hand side as seen from the rear of the tong).
d) Connect snub lines to the rear of the tong to arrest uncontrolled rotation of the assembly. The snub lines must be rated for
the applied torque plus whatever safety margins stated by your own operating policies. The snub line connection points on
the drill floor must be sturdy enough to absorb all applied and potential forces.
e)
Open the tong door (see Illustration 2.J.4).
f)
Actuate the lift cylinder control valve to lift the assembly from the drill floor. Pull the valve toward the operator to retract the
lift cylinder to lift the assembly (see illustration 2.J.4). Note that rig personnel are required to stabilize the tong and backup
as it is being lifted so it does not swing and collide with other rig equipment.
Pushing on the lift cylinder control valve handle (toward the center of the tong) will cause the equipment to lift. This
valve handle action applies to all CE-marked tongs and is irregardless of control valve bank orientation.
Rig personnel must stabilize the tong as it is lifted from the drill floor
2.32
g)
Firmly close the tong door against the latch post.
h)
Rig personnel may be required to stabilize the tong above the connection until the jaws have been clamped shut.
Section Contents
Technical Manual
KT8625 8-5/8” Tong
Setup & Operation
Breaking A Connection (Continued)
i)
Break-out torque is only available when tong motor speed is set to low speed and tong is in low gear. See Section 2.I.2 to
set tong to low speed and Section 2.I.3 to shift to low gear. Do not shift gears while the tong is rotating.
SHIFTING TONG WHILE ROTATING THE MOTOR AND CAGE PLATE MAY RESULT IN CATASTROPHIC
GEAR TRAIN FAILURE
j)
Gently pull the motor control valve toward the operator to cam the tong jaws on to the pipe.
Illustration 2.J.9: Rotation Control - Break-out
k)
Break the connection by pulling the rotation control handle all the way out once the tong jaws cam on to the tubing.
l)
Un-thread the connection at high speed by setting the tong motor to high speed and shifting to high gear (see Section 2.I.2
to set motor speed and 2.I.3 to shift to high gear) once the connection is broken.
m) Pull the rotation control handle all the way out to completely un-thread the connection. Reverse the rotation control handle
(push toward tong) to release the tong jaws from the tubing.
Illustration 2.J.10: Using Motor Control To Release Tong Jaws Following Break-out & Un-threading
Technical Manual
Section Contents
2.33
KT8625 8-5/8” Tong
Setup & Operation
Breaking A Connection (Continued)
n)
Align the opening in the rotary gear with the mouth of the tong once the jaws are free. Open the tong door and guide the
tong away from the string, and push the lift cylinder control handle to lower it to the drill floor if desired.
Rig personnel must stabilize the tong as it is lowered to the drill floor
Pulling on the lift cylinder control valve handle (toward the operator) will cause the equipment to lower. This valve
handle action applies to all CE-marked tongs and is irregardless of control valve bank orientation.
Illustration 2.J.11: Lowering Tong Using Lift Cylinder Control
o)
Use your rig’s standard pipe handling procedures to remove and rack the freed tubing strand.
p)
Repeat steps “e” through “p” as many times as necessary to break out and un-thread the desired number of connections.
K. EXTREME COLD WEATHER OPERATION PROCEDURES
2.34
1)
Consult the power unit engine operator’s manual for all cold weather operating procedures and precautions.
2)
Select gear and bearing lubricants that are compatible with expected climatic conditions.
3)
Select hydraulic fluid that is compatible with expected climatic conditions.
4)
Allow hydraulic fluid to circulate for approximately 20 minutes after starting the power unit, prior to activating the bypass
valve to allow fluid to circulate to tong. If the power unit is equipped with an oil temperature gauge, ensure that the fluid has
reached operating temperature as specified by hydraulic fluid data sheet.
5)
Allow for adequate drying of moisture (prior to lubricating) when cleaning tong parts in cold weather.
Section Contents
Technical Manual
KT8625 8-5/8” Tong
Maintenance
McCoy Completions & Drilling recognizes that minor on-site repairs and modifications are required to maintain peak operating condition of
your equipment, or to match your equipment with the operating environment. Examples of minor repairs are
●● replacement of damaged hydraulic hoses and fittings.
●● replacement of malfunctioning pressure gauges and valves.
●● replacement of door spring stop cylinders
●● replacement of fasteners
Any replaced component must be an identical component supplied by McCoy Completions & Drilling. Replaced fasteners must be Grade
8 or equivalent, or whatever fastener is specified by McCoy.
A. GENERAL MAINTENANCE SAFETY PRACTICES
The practices identified here are intended as a guideline. All personnel are responsible for performing their tasks in a manner that
ensures worker, equipment, and environmental safety, and may require taking additional steps that are not identified in this section.
Equipment maintenance shall be performed only by designated qualified maintenance personnel. Wear all personal protective equipment (PPE) specified by your company’s HSE policy, and follow all of your company’s safety guidelines. Do not begin a maintenance
task without the proper tools or materials on hand, or the proper drawings and documentation necessary.
Schedule planned maintenance with operators to avoid conflicts, unnecessary downtime, and the danger of accidental equipment
activation. Notify operations when maintenance procedures are complete and equipment functionality is restored and tested.
If on-site maintenance must be performed (in other words, if equipment cannot be transported to a controlled maintenance facility)
isolate the location of the maintenance to prevent unaware personnel from inadvertently exposing themselves to a hazard. Use tape,
rope, or signage to clearly indicate “off-limits” area.
Replacement of large, heavy individual parts and/or heavy structural components must be performed using an approved lifting
device of sufficient lifting capacity. Use care when attaching the lifting device, and safeguard area to avoid endangering personnel
or equipment.
All spare parts must meet or exceed OEM specifications in order to maintain equipment integrity, especially protective equipment.
do not perform maintenance until tubular connection equipment has been completely isolated from hydraulic power
Your equipment uses materials that may be harmful to the environment if improperly disposed of (hydraulic fluid, grease, etc.).
Dispose of all materials according to your company’s proscribed environmental protection regulations.
B.CLEANING
Clean tong thoroughly cleaned with a good petroleum-based cleaning agent after each job, prior to storage. Farr® recommends
that the motor and valve assembly be periodically removed, along with the top tong plate, so that guides, rollers and gears can be
properly cleaned (see Section 3.H, Overhaul). Ensure that cleaning solvents and chemicals are captured to prevent environmental
contamination, and dispose of all materials according to your company’s proscribed environmental protection regulations.
C. PREVENTIVE MAINTENANCE PRACTICES
Regular maintenance programs are necessary, and must be established to assure safe, dependable operation of your Hydraulic
Tubular Connection System and to avoid costly breakdown maintenance. The following maintenance procedures provides information required to properly maintain your equipment. Your equipment may require more, or less maintenance depending upon the
frequency of use and the field conditions under which your equipment operates. These maintenance procedures are designed for
equipment operating at 10°C to 35°C ambient temperature for 10 hours per day. McCoy recommends that the inspection and maintenance procedures in this section be performed as recommended in the maintenance checklists (see Appendices), or in conjunction
with your maintenance foreman’s experience and best estimate of when your equipment is due for this maintenance.
Manufacturers of purchased components included with your hydraulic tubular connection equipment (for example: motors, valves,
etc.) may specify maintenance tasks and intervals over and above what McCoy recommends as part of their recommended procedures. Users of this equipment may choose to perform or ignore these additional tasks at their discretion.
Filtration of the hydraulic fluid must be 10 microns or better. Premature fouling of particulate filters within your prime mover or ancillary hydraulic power unit requires immediate hydraulic fluid laboratory analysis to prevent premature wear of hydraulic system due
to high levels of wear metals in the fluid.
McCoy Drilling & Completions recommends tracking all maintenance activity including the lubrication schedule and replacement of
hydraulic hoses. This may be a simple as keeping a paper log, or using a software-based maintenance tracking utility. A maintenance
log is a valuable tool that can be used for easily retrieving maintenance history or identifying trends that require correction.
Technical Manual
Section Contents
3.1
KT8625 8-5/8” Tong
Maintenance
D. hydraulic system de-pressurization
McCoy Drilling & Completions recommends that the hydraulic system be de-pressurized prior to maintenance on any hydraulic component. Perform the following steps to ensure the dangers posed by hydraulic fluid under pressure are minimized.
Ensure adequate containment is in place to prevent environmental contamination from residual hydraulic fluid
1)
Rotate the tong to the “open throat” position. Ensure tong and backup doors (if equipped) are closed. Fully extend the lift cylinder
2)
De-energize the power unit.
3)
Repeatedly actuate the tong motor control valve lever IN BOTH DIRECTIONS to dissipate any residual pressure in the valve
and motor.
4)
Remove the hydraulic SUPPLY line from the equipment.
5)
Repeatedly actuate the remaining control valve levers IN BOTH DIRECTIONS to dissipate any residual pressure in the remainder of the hydraulic control system.
7) Disconnect the hydraulic RETURN line from the equipment.
8)
Disconnect remaining hoses such as case drains, or lines connected to the turns counter.
Hydraulic pressures as high as operating pressure may remain trapped in small
areas of the equipment. Ensure all maintenance is carried out by a qualified
service technician, and that adequate personal protective equipment is used to
guard against pressure injuries
E. LUBRICATION instructions
Use a quality multipurpose bearing lubricant that will remain within its viscosity range at expected operating temperatures. In addition,
Farr recommends the following lubrication procedure at the completion of each job prior to storage.
McCoy recommends that a liberal coating of grease be applied to the cam surface of the rotary drive gear prior to jaw installation.
Also, the clutch inspection plate should periodically be removed, and a liberal coating of grease applied to the clutch, drive gears
and shifting shaft.
Coat the jaw pins and rollers with a liberal amount of anti-seize compound when installing new jaw die kits.
1.
Cage Plate Cam Followers
Apply grease to the cam followers through the grease fittings recessed into the top and bottom cage plates (thirteen locations
top, thirteen locations bottom).
Illustration 3.E.1: Cam Follower Lubrication
3.2
Section Contents
Technical Manual
KT8625 8-5/8” Tong
Maintenance
2.
Support Rollers
Apply grease to the support roller bearings through the grease fittings recessed into the top and bottom of each support roller
shaft (12 locations total).
Illustration 3.E.2: Support Roller Lubrication
3.
Rotary Idlers
Apply grease to the rotary idler bearings through the grease fittings recessed into the top of each shaft on the top of the tong
(two locations total).
Illustration 3.E.3: Rotary Idler Lubrication
Technical Manual
Section Contents
3.3
KT8625 8-5/8” Tong
4.
Maintenance
Pinion Idler
Apply grease to the pinion idler bearing through the grease fitting located on the top face of the tong under the valve bank (one
location only).
Illustration 3.E.4: Pinion Idler Lubrication Point
5.Pinion
Apply grease to the pinion bearings through the grease fittings located on the bearing caps on the top and bottom faces of the
tong (two locations top, two locations bottom).
Illustration 3.E.5: Pinion Lubrication Points (Top Plate)
3.4
Section Contents
Technical Manual
KT8625 8-5/8” Tong
Maintenance
Pinion Lubrication (Continued):
Illustration 3.E.6: Pinion Lubrication Points (Bottom Plate)
6.Clutch
Apply grease to the clutch bearings through the two grease fittings located on the clutch bearing cap on the bottom face of the
tong, and the single grease fitting recessed into the end of the clutch shaft. (three locations total).
Illustration 3.E.7: Clutch Lubrication Points
Technical Manual
Section Contents
3.5
KT8625 8-5/8” Tong
7.
Maintenance
Motor Mount
Apply grease to the motor gear/clutch drive gear through the grease fitting located on the top of the motor mount (one location
only).
Illustration 3.E.8: Motor Mount Lubrication Point
8.
Shifting Shaft
Apply grease to the shifting shaft and top shifting shaft bushing. The shaft and shifting yoke can be accessed through the cover
plate on the side of the tong.
Access shifter components
through this panel
Illustration 3.E.9: Shifter Shaft Lubrication
3.6
Section Contents
Technical Manual
KT8625 8-5/8” Tong
Maintenance
9.
Door Lubrication
Apply grease to the door latch adjustment cam through the grease fitting located in the top of the adjustment cam shaft. Apply
grease to the contact surfaces of the safety door switch plunger.
Lubricate safety door switch
plunger contact area.
Lubricate door latch cam
through grease fitting.
Illustration 3.E.10: Tong Door Lubrication Points
10. DOOR STOP CYLINDER
Periodically disassemble the door stop cylinders and coat the spring and cylinder with a general purpose lubricating oil.
Illustration 3.E.11: Door Cylinder
the door stop cylinder spring may retain energy from being compressed. use a
clamp to contain the ends of the cylinder when it is removed, and relieve the
spring tension gradually.
Technical Manual
Section Contents
3.7
KT8625 8-5/8” Tong
Maintenance
F. ADJUSTMENTS
1.
Brake Band Adjustment:
The top and bottom brake bands must be periodically adjusted to continue to provide smooth and efficient jaw cam action. If
the cage plate turns with the rotary gear, the jaws will not cam properly and, therefore, will not bite on the tubing or casing.
Tightening the brake band against the cage plates will increase frictional resistance, allowing jaws to cam properly and grip the
casing. Adjust the brake band using the adjustment nut and bolt set as shown in the illustration below. Use caution, as overtightening will cause excessive wear to the brake bands.
BRAKE BAND
BRAKE BAND ADJUSTMENT
BOLT AND NYLOCK NUT
Illustration 3.F.1: Brake Band Adjustment
top and bottom brake bands must be adjusted simultaneously and equally
3.8
Section Contents
Technical Manual
KT8625 8-5/8” Tong
Maintenance
2.
Door Latch Adjustment
Normal operation of the tong may cause wear of the door latch, which will cause the door to develop a loose fit at the latch. A
latch cam plate is located at the top face of the door. The cam plate has eight positioning holes located on a 360 degree bolt
circle. The latch cam shaft extends down through the door and is secured at the top by a 3/8” hex head bolt. To make adjustments in door alignment, remove the 3/8” bolt and turn the cam with a wrench. When the door has been adequately aligned,
replace the 3/8” bolt.
THE DOOR IS AN IMPORTANT PART OF THE STRUCTURAL INTEGRITY OF THE TONG. IT
IS IMPERATIVE TO KEEP A SECURE FIT AT THE DOOR IN ORDER TO MAINTAIN PROPER
GEAR ALIGNMENT, AND TO MINIMIZE THE POSSIBILITY OF DAMAGE TO THE GEAR TRAIN
WHEN OPERATING THE TONG AT SPECIFIED TORQUE. A CLOSED DOOR ALSO ENSURES
SAFETY OF OPERATING PERSONNEL.
DOOR LATCH
ADJUSTMENT CAM
Illustration 3.F.2: Door Latch Cam Adjustment
Technical Manual
Section Contents
3.9
KT8625 8-5/8” Tong
3.
Maintenance
Shifter Detent Force Adjustment:
Over time wear to the shifting shaft, wear to the detent ball, and loss of spring tension in the detent spring may result in a loose
or “sloppy” fit within the top shifter bushing. The detent pressure may be increased or otherwise adjusted by loosening the 7/16”
UNF locking jam nut, and turning the 7/16” UNF detent bolt. Should adequate detent action not be achieved, the shifting shaft,
detent ball, or detent spring (or possibly all three) may need to be replaced (see Pp. 5.16 - 5.17).
Illustration 3.F.3: Shifter Detent Force Adjustment
4.
Safety Door Adjustment:
The safety door system is the prime protective measure separating the operator from the rotary gear, and must be in working
condition when operating tong. The safety door switch is designed to interrupt hydraulic power to the motor when the tong door
is opened, or even slightly ajar. This is a critical safety system, and proper adjustment is necessary to maintain the intended
function.
keep hands clear of safety door latch claws (painted yellow) when closing
door.
If the rotary gear does not stop immediately and completely stop rotating when the door is opened, remove the tong from service
and perform the following adjustments:
3.10
a.
Remove the top plate from the safety door guard. Wire ties (if applicable) require removal before the fasteners on the top
plate of the door guide can be replaces.
b.
Perform an initial alignment of the safety door mechanism. Close the tong door. Ensure the two safety door “claws” are
seated firmly together. Slightly loosen the hex bolts securing the adjustment plate - tap the bottom adjustment plate one
way or the other until the shoulder bolts on the floating plate are in the centre of the traveling slots (see Illustration 3.F.4).
Section Contents
Technical Manual
KT8625 8-5/8” Tong
Maintenance
Safety Door Adjustment (continued):
Safety door “claws”
aligned properly
Loosen 3/8” bolts on the
adjustment plate.
Correct position of
shoulder bolts within
the traveling slots.
Illustration 3.F.4: Safety Door Switch Adjustment 01
c.
Once the adjustment plate has been satisfactorily adjusted, tighten the 3/8” bolts on the adjustment plate.
d. Test the safety door system. Connect hydraulic power to the tong. Ensure the door is closed and all personnel are clear.
Begin rotating the cage plate. Open the tong door - the cage plate should immediately and completely stop.
e.
If the cage plate does not stop rotating, further adjustment of the safety door switch is required. Stop rotation and remove
hydraulic power from the tong.
f.
Slightly loosen the hex bolts securing the adjustment plate - tap the bottom adjustment plate toward the centre of the tong
in small increments (i.e. about 1 mm at a time). After each adjustment the safety door mechanism must be re-tested to
determine if safety door function has been restored. Repeat steps d, e, & f until satisfactory safety door function has been
established.
g.
If adjustment limits have been reached before safety door function has been established further troubleshooting of the
safety door system is required before the tong is placed into service.
G. RECOMMENDED PERIODIC CHECKS
1.
Door Stop Spring
The spring inside the actuator cylinder must be of sufficient strength to enable the door latch mechanism to snap closed properly.
Door stop spring fatigue will result in sluggish latch operation. Replace the latch spring inside the cylinder when this occurs.
2.
Shifting Shaft
The shifting yoke is secured to the shifting shaft by one hex jam nut and one locknut on the bottom of the yoke. Check these
nuts after each job. Do this by removing the clutch inspection plate and ensuring a snug fit prior to lubrication.
3.
Backing Pin
Perform a visual inspection of the backing pin after each job. Replace the pin if stress cracks or excessive wear is found, or if
the pin appears bent.
4.
Torque Gauge Assembly
Periodic calibration of the torque gauge is recommended to assure accurate torque readings. When having the torque gauge
serviced and calibrated, it is critical to note the arm length of the tong, as indicated on page 1.3.
Technical Manual
Section Contents
3.11
KT8625 8-5/8” Tong
H. OVERHAUL PROCEDURES - DISASSEMBLY
Once the tong has been removed from the backup it may be overhauled using the disassembly instructions specified in the following
procedure. Access to the gear train is possible by removal of the top plate of the tong.
ALL MAINTENANCE AND OVERHAUL SHOULD BE PERFORMED FROM THE TOP. THE BOTTOM
PLATE OF THE TONG IS TYPICALLY WELDED TO THE SIDE BODY AND CANNOT BE REMOVED.
REPLACEMENT FASTENERs (BOLTS, NUTS, CAP SCREWS, MACHINE SCREWS, ETC.) USED
DURING MAINTENANCE OR OVERHAUL MUST BE GRADE 8 OR EQUIVALENT.
FASTENERs USED for MAINTENANCE OR OVERHAUL of load-bearing components
(chain slings, rigid slings, legs) MUST BE tightened to the proper torque
1.
Use a crane to lift the tong on to a sturdy support structure that is capable of safely supporting the entire weight of the tong
while still allowing access to the bottom cage plate. Metal horses work well for this application.
2.
If not already done, remove the two jaws.
3.
Support the rigid sling with a crane. Remove the two hitch pins from each rigid sling pin, and remove the rid sling pins. The rigid
sling may now be lifted away from the tong and stored in a secure location. Remove both rigid sling hanger bracket weldments.
The heads of the fasteners securing the rigid sling hanger brackets are drilled, and are constrained to the brackets
using wire ties. Wire ties must be removed before extracting the fasteners and removing the rigid sling hanger
bracket.
4.
Disconnect all flexible hydraulic lines running from the safety door switch and motor at the motor side i.e. leave the lines connected to the safety door switch. Disconnect both 1” hydraulic lines at the motor.
5.
Support the hydraulic valve assembly with a temporary lifting sling and a crane. Remove the 1/2” x 4-1/2” bolts securing the
hydraulic valve assembly to the valve support posts. Lift the hydraulic valve section up and away from the top plate of the tong.
If the hydraulic valve assembly does not require service ensure it is stored in a clean, secure location. Cover all exposed connections. DISASSEMBLY NOTE (CE MARKED TONGS ONLY): The valve handle guard does not need to be removed from
the valve bank. Do not lift the valve assembly using the protective handle.
6.
Remove the inlet and outlet support pieces.
7.
Remove the top and bottom brake band weldments, leaving the adjustment lug weldments in place for now.
8.
Remove the tong door stop cylinder. The door stop cylinder spring may retain energy from being compressed. Use a clamp to
contain the ends of the cylinder when it is removed, and relieve the spring tension gradually.
the door stop cylinder spring may retain energy from being compressed. use a
clamp to contain the ends of the cylinder when it is removed, and relieve the
spring tension gradually.
9.
Remove the tong door assembly:
i.
Remove the nylock nut and flat washer securing the door pivot roller shaft.
ii
Use a soft alloy material (e.g. brass rod) to lightly tap the shaft up through the support roller assembly until it comes free
at the top. Use caution that the threads on the ends of the support roller shafts are not damaged.
iii.
The door assembly is relatively light weight and may be moved using man power. However, a temporary lifting sling and
crane may also be used. DISASSEMBLY NOTE: the shoulder bushings for the door may become dislodged. If the bushing
are to be re-used rather than replaced use caution not to lose them.
10. Disconnect the three hydraulic connections from the motor. Undo the restraints securing the inlet and outlet lines connections
to their supports, and lift the hydraulic valve section away from the tong. Remove the inlet and outlet support pieces.
11. Remove top brake band assembly (leave adjustment lug weldments in place for now).
12. Remove the tong door stop cylinder. The door stop cylinder spring may retain energy from being compressed. Use a clamp to
contain the ends of the cylinder when it is removed, and relieve the spring tension gradually.
13. Remove door assembly by removing the door roller shaft. Support door assembly as the roller shaft is removed. Remove the
nut from the top of the roller shaft, and use a soft alloy material (e.g. brass rod, etc.) to lightly tap the shaft down through the
support roller assembly until it comes free at the bottom. Use caution that the threads on the ends of the support roller shafts
are not damaged. Do not lose the door shoulder bushings.
3.12
Section Contents
Technical Manual
KT8625 8-5/8” Tong
Maintenance
REMOVAL OF TOP PLATE (Continued):
14. Remove the hitch pin securing the torque gauge holder to the torque gauge mount weldment, and remove the mount.
15. Remove the four hex socket head cap screws securing the motor and the torque gauge mount weldment. Remove the torque
gauge mount weldment, then lift the motor up and away from the motor mount. Inspect the motor gear, located at the bottom of
the motor shaft, for gear clashing or tooth damage. Also, ensure that the motor gear is securely attached to the motor shaft.
16. Remove the cotter pin and clevis pin connecting the shifter handle to the shifter shaft (it is not necessary to disconnect the handle
from the pivot lug weldment).
17. Unbolt the pivot lug weldment from the top plate, and remove the pivot lug and handle assembly.
18. Remove the four hex socket head cap screws securing the motor mount to the top plate. Use care not to dislodge and lose the
two positioning dowels.
19. Remove the snap ring securing the drive gear to the top of the clutch shaft. Carefully remove the drive gear from the clutch
shaft.
20. Remove the two 10-24 x 3/4” hex socket head cap screws securing the top clutch bearing retainer to the top plate.
21. Remove the top clutch bearing retainer, and bearing retainer spacer. The top clutch bearing and clutch bearing bushing may
come off with the bearing retainer.
22. Remove the 1-1/4” nylock nut and the three 5/8” bolts securing the pinion idler half-moon pad.
23. Pull the top pinion gear bearing cap by removing the four 1/2” bolts which secure the bearing cap. Thread two of the removed
bolts into the extra holes on top of the bearing cap, and use them as lifting lugs to lift the bearing cap out of place.
IF THE BEARING REMAINS ATTACHED TO THE GEAR SHAFT AFTER THE BEARING CAP IS
PULLED, MCCOY SERVICE PERSONNEL RECOMMENDS LEAVING IT IN PLACE UNTIL THE TOP
TONG PLATE IS REMOVED.
24. Ensure the bottom cage plate is supported before beginning this step (weight - 80 lbs / 36.4 kg). Remove the two front cage
plate bolt and nut sets. Remove the backing pin assembly and the rear cage plate bolt, and the cage plate spacers. The top
and bottom cage plates may now be removed - Note that the cam followers are fastened to the top and bottom cage plates, so
use caution not to damage them.
THE CAGE PLATE BOLTS ARE THE ONLY ITEMS FASTENING THE BOTTOM CAGE PLATE TO THE
TONG. SUPPORT THE BOTTOM CAGE PLATE FROM BELOW PRIOR TO REMOVING CAGE PLATE
BOLTS IN ORDER TO PREVENT DAMAGE TO THE BOTTOM CAGE PLATE OR PERSONAL INJURY
TO THE MECHANIC
25. Remove the top nuts and pads for the rotary idler gears.
26. Remove the remaining support roller shafts. Note that the top brake band adjustment lug weldments are removed at this point.
27. Loosen, but do not remove the detent bolt on the top shifter lug weldment. Once the force from the detent ball has been removed from the shifter shaft, the top shifter bushing can be un-threaded from the top plate. Take care not to lose the detent
ball when the bushing comes free of the shaft.
28. Remove the hex head bolts and hex flat head cap screws around the perimeter of the tong that secure the top plate.
29. With all the above steps taken, the top tong plate can be lifted off providing access to the inside of the gear case.
Technical Manual
Section Contents
3.13
KT8625 8-5/8” Tong
I.
Maintenance
ASSEMBLY PROCEDURES
Assembly of Farr Hydraulic Power Tongs is simple, and can be accomplished without the use of special tools. The instructions on
this page are presented as a guide only, and are similar to the assembly sequence our technician would use while assembling the
tong in our plant.
NOTE ON INSTALLATION PRACTICES: Ensure all bearings are liberally greased before installing over a shaft or into gears
or bearing caps. When inserting a shaft through a support roller assembly ensure shaft is greased. Also ensure all metalto-metal contact in the gear train is adequately greased. When graphics are not used in the assembly process, please refer
to the relevant exploded diagrams in Section 5.
ALL FASTENERS USED DURING REASSEMBLY OF LOAD-BEARING COMPONENTS (CHAIN
SLINGS, RIGID SLINGS, BACKUP LEGS) MUST BE TIGHTENED TO THE CORRECT TORQUE.
Threaded fasteners used in load-bearing devices must be secured with red loctite™.
TIGHTENING TORQUE GUIDE
SAE GRADE 8 - FINE THREAD
SIZE
CLAMP LOAD
PLAIN
PLATED
1/4 - 28 (.250)
3,263
14 ft. lbs.
10 ft. lbs.
5/16- 24 (.3125)
5,113
27 ft. lbs.
20 ft. lbs.
3/8 - 24 (.375)
7,875
49 ft. lbs.
37 ft. lbs.
7/16 - 20 (.4375)
10,650
78 ft. lbs.
58 ft. lbs.
1/2 - 20 (.500)
14,400
120 ft. lbs.
90 ft. lbs.
9/16 - 18 (.5625)
18,300
172 ft. lbs.
129 ft. lbs.
5/8” - 18 (.625)
23,025
240 ft. lbs.
180 ft. lbs.
3/4 - 16 (.750)
33,600
420 ft. lbs.
315 ft. lbs.
7/8” - 14 (.875)
45,825
668 ft. lbs.
501 ft. lbs.
1 - 12 (1.000)
59,700
995 ft. lbs.
746 ft. lbs.
1 - 14 (1.000)
61,125
1019 ft. lbs.
764 ft. lbs.
1 1/8 - 12 (1.125)
77,025
1444 ft. lbs.
1083 ft. lbs.
1 1/4 - 12 (1.125)
96,600
2012 ft. lbs.
1509 ft. lbs.
1 3/8 - 12 (1.375)
118,350
2712 ft. lbs.
2034 ft. lbs.
1 1/2 - 12 (1.500)
142,275
3557 ft. lbs.
2668 ft. lbs.
SAE GRADE 8 - COARSE THREAD
SIZE
CLAMP LOAD
PLAIN
PLATED
1/4 - 20 (.250)
2,850
12 ft. lbs.
9 ft. lbs.
5/16- 18 (.3125)
4,725
25 ft. lbs.
18 ft. lbs.
3/8 - 16 (.375)
6,975
44 ft. lbs.
33 ft. lbs.
7/16 - 14 (.4375)
9,600
70 ft. lbs.
52 ft. lbs.
1/2 - 13 (.500)
12,750
106 ft. lbs.
80 ft. lbs.
9/16 - 12 (.5625)
16,350
153 ft. lbs.
115 ft. lbs.
5/8” - 11 (.625)
20,325
212 ft. lbs.
159 ft. lbs.
3/4 - 10 (.750)
30,075
376 ft. lbs.
282 ft. lbs.
7/8” - 9 (.875)
41,550
606 ft. lbs.
454 ft. lbs.
1 - 8 (1.000)
54,525
909 ft. lbs.
682 ft. lbs.
1 1/8 - 7 (1.125)
68,700
1288 ft. lbs.
966 ft. lbs.
1 1/4 - 7 (1.125)
87,225
1817 ft. lbs.
1363 ft. lbs.
1 3/8 - 6 (1.375)
103,950
2382 ft. lbs.
1787 ft. lbs.
1 1/2 - 6 (1.500)
126,450
3161 ft. lbs.
2371 ft. lbs.
REPLACEMENT FASTENER (BOLTS, NUTS, CAP SCREWS, MACHINE SCREWS, ETC.) USED
DURING MAINTENANCE OR OVERHAUL MUST BE GRADE 8 OR EQUIVALENT unless otherwise specified.
3.14
Section Contents
Technical Manual
KT8625 8-5/8” Tong
Maintenance
Assembly Procedure:
1.
Position the tong body gear case on a suitable stationary support, ensuring that the bottom body plate remains accessible. A
set of sturdy metal horses works well in this application.
2.
Slide a support roller shaft spacer (PN 1037-C-134) into the centre of each support roller (PN 1037-135) (total of 12).
3.
Press support roller bearings (PN 02-0094) into each side of the support rollers. Assemble five support roller assemblies as
shown on Pp. 5.4 - 5.5.
4.
Install five support roller assemblies along one side of the body case. Insert shafts through assemblies, but do not install the
bottom nylock nuts or, where used, the top washers.
5.
Thread two rated 1/2” UNC eye bolts in to the rotary gear (weight = 200 lbs / 91 kg) to serve as temporary lifting points. Install
rotary gear, making sure the backing pin slots are on the side facing up. Keep fingers clear of pinch points as rotary gear is
positioned in the tong opening. Ensure one side is supported by the support rollers installed in Step 4, and have the opening in
the rotary gear oriented as shown in illustration 3.I.1.
Illustration 3.I.1: Tong Assembly - Rotary Gear Installation
6.
Install support roller assemblies in the locations exposed by the opening in the rotary gear. Continue to rotate the rotary gear,
installing support roller assemblies in the rotary gear opening as it is rotated. Finish with the rotary gear aligned with the opening
in the bottom plate and completely supported by the support rollers. Do not install the door pivot support roller assembly at this
time.
7.
Press pinion bearing (PN 02-0007) into bottom pinion bearing cap (PN 1050-89), and install bearing cap into bottom plate of
tong using four 1/2” UNC x 1-1/2” hex bolts and 1/2” lock washers.
8.
Press lower clutch bearing (PN 02-0004) into clutch bearing cap (PN 1050-C1-54), and install bearing cap into bottom plate of
tong using four 3/8” UNC x 1-1/2” hex bolts and 3/8” lock washers.
9.
Install a retainer clip (PN 02-0009) into both rotary idler gears (PN 997-A2-119). Press an idler bearing (PN 02-0011) into each
gear and secure with a second retainer clip.
10. Lightly grease the larger circumference of the two rotary idler shafts (PN 1050-D5-117) and slide them through the bearing and
gears assemblies, centering the gear on the shaft.
11. Slide two bearing seals (PN 02-0010) over each end of the idler shafts and press against the retainer clips (see Pp. 5.6 - 5.7
for correct orientation).
12. Slide a bearing spacer (PN 1050-D5-121) over each end of the rotary idler shafts.
13. Place each rotary idler assembly through the bottom plate, ensuring the ends of the shafts with the threaded hole for the grease
fitting are pointed upward and the rotary idler gears mesh with the rotary gear.
Technical Manual
Section Contents
3.15
KT8625 8-5/8” Tong
Maintenance
Assembly Procedure (continued...):
14. Place an idler pad (PN 997-D20-125) over the bottom side of each rotary idler shaft, and secure each with a 1-1/2” UNF nylock
nut.
15. The low pinion gear (PN 997-A5-88) is machined with shoulders around the centre spline on both sides of the gear. Place the
side of the low pinion gear with the smaller shoulder over the lower bearing and bearing cap, centering as best as able.
16. Install pinion gear shaft (PN 997-A7-86) into the spline of the bottom pinion gear and the lower pinion bearing.
17. Slide 2 needle bearings (PN 02-0003) over each end of the clutch shaft (PN 997-A8-50), and press up against centre gear. Slide
low clutch gear (PN 997-A1-52) over the bottom end of the clutch shaft (the bottom end of the clutch shaft can be identified
by the threads for the grease fitting machined into the end) onto the two needle bearings. Ensure the smaller diameter of the
low clutch gear is directly adjacent to the centre gear on the clutch shaft. Place lower end of clutch shaft into the lower clutch
bearing that has been pre-mounted in the lower body plate.
18. Install shifting collar (PN 997-A9-62) over the top of the clutch shaft and mesh with low clutch gear and the centre gear on the
clutch shaft.
19. Place the shifting fork weldment (PN 1050-72) against the shifting collar, roughly in its final position.
20. Install a retainer clip (PN 02-0009) into the pinion idler gear (PN 997-A2-119). Press an idler bearing (PN 02-0011) into the gear,
and secure with the second retainer clip.
21. Slide the pinion idler half-shaft (PN 1050-D5-105) through the pinion idler gear assembly. Slide the bearing seal (PN 02-0010)
over the end of the half-shaft, and secure to the half-shaft with a shaft retainer clip (PN 02-0008).
22. Place pinion idler assembly, less the idler pad and top fastener, on top of the lower pinion gear and position it as best as possible - their position may have to be adjusted slightly as the top plate is attached (see illustration 3.H.2).
Illustration 3.I.2: Tong Assembly - Gear Assembly Positioning
23. The high pinion gear (PN 997-A4-87) is machined with shoulders around the centre spline on both sides of the gear. Place the
side of the high pinion gear with the larger shoulder over the top of the splined pinion shaft and press against the centre gear
on the pinion shaft.
24. Install high clutch gear (PN 997-A1-51) on to the clutch shaft, ensuring the smaller diameter is directly adjacent to the centre
gear on the clutch shaft.
25. Carefully remove all support roller shafts, using caution not to shift the position of the installed support roller assemblies or to
damage the threads on the end of the shafts.
26. Locate the three un-threaded holes in the side body of the tong, one in the rear centre and one just to either side of the front
opening. If old dowel pins are in place, remove them before installation of the top plate. If the dowel pins are in any way damaged or deformed McCoy recommends replacing them with new 3/8” x 1-1/2” hardened dowel pins. If necessary clean the dowel
pin holes, and do not insert dowel pins until after the top plate has been installed.
3.16
Section Contents
Technical Manual
KT8625 8-5/8” Tong
Maintenance
Assembly Procedure (continued...):
27. Use a temporary lifting sling and crane to maneuver the top plate (PN 1050-7T) into position, and place on to the side body.
Insert the three positioning dowel pins (PN 09-0092) through the top plate into their respective holes in the side body. Use a
hammer to tap the dowel pins until they are flush with the top plate. Secure the top plate with 14 3/8” UNC x 1-1/2” hex bolts
and 3/8” lock washers, and ten 3/8” UNC x 1” hex socket head cap screws as shown in illustration 3.H.3. Do not install fasteners
at the rigid sling hanger locations, indicated by the red circles, or the door cylinder mounting lug location indicated by the green
circle.
Illustration 3.I.3: Tong Assembly - Top Fastener Locations
28. Install half-moon idler pad (PN 997-D17-109) over the end of the pinion idler shaft and secure with three 5/8” UNC x 2-3/4” hex
bolts and 5/8” lock washers, followed by a 1-1/2” UNF nylock nut.
29. Slide the remaining rotary idler pads over the rotary idler shafts and secure with 1-1/2” UNF nylock nuts.
30. Press the remaining pinion bearing (PN 02-0007) into the remaining pinion bearing cap and install over the top of the pinion
gear shaft - secure with four 1/2” UNC x 1-1/2” hex bolts and 1/2” lock washers.
31. Install top clutch bearing retainer (PN 997-D11-59) over the clutch shaft into the cutout in the top plate and secure with two
10-24 x 3/4” hex socket head cap screws.
32. Insert top clutch bearing (PN 02-0002), followed by the clutch bearing bushing (PN 997-60).
33. Install clutch drive gear (PN 997-A3-61) and secure with retaining snap ring (PN 1234-00-04).
Technical Manual
Section Contents
3.17
KT8625 8-5/8” Tong
Maintenance
Assembly Procedure (continued...):
34. Re-install support roller shafts:
i)
Install all support roller shafts (PN 101-3939) that are NOT coincidental with the brake band lug weldments as shown in
illustration 3.H.5 (seven total). Ensure a 1-1/8” narrow flat washer is installed on the support roller shaft before inserting
through the top body plate and support roller assemblies. Do not install the door pivot roller at this time. ASSEMBLY NOTE:
The shafts coincidental with the front leg weldments are shown circled in red.
Illustration 3.I.4: Tong Assembly - Support Rollers (Securing Leg Mounts)
ii)
Secure the bottoms of the support roller shafts with 1” narrow flat washers and 1” UNS thin nylock nuts. Install the RH
front leg mount weldment (PN 101-0163) and the LH front leg mount weldment (PN 101-0162) on the to the support roller
shafts using 1” UNS thin nylock nuts and two 3/8” UNC x 1-3/4” hex bolts and lock washers per weldment (see Illustration
3.H.6). ASSEMBLY NOTE: Do not use flat washers when installing the 1” UNS nut on the shaft coincidental with the leg
weldments.
Illustration 3.I.5: Tong Assembly - Front Leg Installation
3.18
Section Contents
Technical Manual
KT8625 8-5/8” Tong
Maintenance
Assembly Procedure (continued...):
34. Re-install support roller shafts continued:
iii) Install support roller shafts (PN 101-3939) in four locations where they are coincidental with the top and bottom brake band
lug weldments (top left & bottom right weldment PN = 101-0083, top right & bottom left weldment PN = 101-0096) as shown
in illustration 3.H.7. These support rollers do not use top or bottom washers.
Illustration 3.I.6: Tong Assembly - Support Rollers (Brake band Weldments)
35. Coat the threads of the top shifter bushing (PN 101-0020) with red Loctite™. Thread the top shifter bushing into the top plate
until snug. Thread the detent tube (PN 101-0019) into the top shifter bushing as shown in illustration 3.I.7.
36. Insert the shifting shaft (PN 1116-71) through the top shifter bushing in to the shifting fork installed in Step 19. Secure the shaft
to the shifting fork with a 5/8” UNF hex nut and 5/8” UNF hex jam nut. Place the end of the shifting shaft in the lower shifting
bushing (welded to the bottom plate) and ensure the shifting fork is meshed with the shifting collar.
37. Thread three 5/8” UNC x 5/8” hex socket set screws into the remaining three ports in the bushing - these set screws are
intended to be used as contamination barriers only. Do not bottom out the set screws on the shifting shaft, or the shaft will not
move.
Technical Manual
Section Contents
3.19
KT8625 8-5/8” Tong
Maintenance
Assembly Procedure (continued...):
38. Insert the shifter detent ball (PN 02-0018) into the detent tube, followed by the detent spring (PN 01-0040). Thread a 7/16” UNF
hex jam nut onto a 7/16” UNF x 1-1/4” hex nut, then thread the 7/16” bolt into the detent tube. This is the detent force adjustment bolt and lock nut.
Illustration 3.I.7: Tong Assembly - Top Shifter Bushing Assembly
39. Insert two 5/16” x 1-1/4” dowel pins (PN 09-0033) into the un-threaded holes in the rear of the tong, behind the clutch drive gear
on either side of the cutout in the top plate. Pre-clean the dowel pin holes if necessary.
40. Place motor mount (PN 1050-150) on to top plate over the dowel pins installed in the previous step, and secure with four 1/2”
UNC x 1-1/2” hex socket head cap screws.
41. Bolt the shifter lug weldment (PN 101-0016) onto the top plate with four 3/8” UNC x 1-1/4” hex bolts and 3/8” lock washers.
42. Press the 5/16” square x 1-1/2” gear key in to the key slot in the hydraulic motor (PN 87-0112) shaft. Slide the motor gear (PN
997-A10-149) on to the motor shaft, securing with two 3/8” UNC x 3/8” flat point hex socket set screws.
43. Install the motor on to the motor mount. Secure the RH side of the motor to the motor mount with two 1/2” UNC x 1” hex socket
head cap screws and 1/2” lock washers.
44. The LH side of the motor is secured with two 1/2” UNC x 1-1/4” hex socket head cap screws and 1/2” lock washers, which also
secures the torque gauge holder weldment (PN 1500-09-04A).
45. Install shifting handle weldment (PN 1037-D-20B). Secure the handle to the shifter shaft and shifter pivot lug weldment with
5/16” x 1-1/2 clevis pins. Use a hitch pin on each clevis pin to ensure they do not become dislodged.
46. Install thirteen cam followers (PN 02-0015) in the top cage plate (PN 1050-21), and secure each a with 5/8” UNF hex jam nut
and 5/8” lock washer. Once installed the cam followers will ride in the top groove in the rotary gear.
47. Install thirteen cam followers (PN 02-0015) in the bottom cage plate (PN 1050-22), and secure each a with 5/8” UNF hex jam
nut and 5/8” lock washer. Once installed the cam followers will ride in the bottom groove in the rotary gear.
48. Support the bottom cage plate assembly (weight - 80 lbs / 36.4 kg) against the bottom of the rotary gear, with the cam followers
in the groove in the bottom of the rotary gear and the opening of the cage plate aligned with the opening in the tong body.
49. Place the top cage plate assembly (weight - 80 lbs / 36.4 kg) on the top of the rotary gear, with the cam followers in the groove
in the top of the rotary gear and the opening of the cage plate aligned with the opening in the tong body.
3.20
Section Contents
Technical Manual
KT8625 8-5/8” Tong
Maintenance
Assembly Procedure (continued...):
50. Insert two cage plate spacers (PN 1050-C3-38) between the cage plates at the front of the cage plates next to the rotary gear.
Secure the cage plates through the spacers using 1/2” UNC x 7-1/2” hex bolts, 1/2” narrow flat washers (on the bottom) and
1/2” UNC nylock nuts.
Cage plate spacers & 1/2” NC x
7-1/2” bolt and nut sets
Illustration 3.I.8: Tong Assembly - Front Cage Plate Spacers
51. Coat half of the threaded connecting stud (PN 101-4097) with blue Loctite and screw in to the backing pin (PN 101-4188).
52. Insert the exposed half of the threaded dowel pin through the smaller diameter hole of the backing pin retainer link (PN 1014187). Slide the small backing pin spacer (PN 101-4096) over the threaded dowel against the backing pin retainer link. Thread
the backing pin knob (PN 02-0017) on to the remaining threads of the exposed stud until tight.
53. Slide a 1/2” flat washer on to a 1/2” UNC x 9-1/2” hex bolt, followed by the backing pin spacer (PN 101-4186). Slide the larger
diameter hole in the backing pin retainer link (PN 101-4187) over the end of the 9-1/2” hex bolt on to the backing pin spacer.
54. Position the remaining cage plate spacer (PN 1050-C3-38) between the cage plates at the rear of the opening. Insert the long
bolt of the backing pin assembly through the cage plates and cage plate spacer, and the backing pin in to one of the backing
pin holes at the rear of the top cage plate. Thread the bolt in to the bottom cage plate.
55. Thread the rear door cylinder mounting lug (PN 1050-12-001) into the top plate next to the LH top brake band lug weldment
(see illustration 3.H.3).
56. Install the door pivot shoulder bushings (PN 101-0110) in the door weldment assembly (PN 1050-C4-10) (see Pp. 5.28- 5.29
for correct bushing orientation).
57. If not already done, install the remaining support roller assembly less the shaft and fasteners between the body plates in the
door pivot location.
58. Align the pivot holes in the door weldment with the pivot holes in the top and bottom plates. Slide a 1-1/8” narrow flat washer
on to the door pivot roller shaft (PN 101-3940) and insert the shaft through the door bushings, support roller components, and
body plates. Once the shaft is fully inserted (it may need to be lightly tapped) secure with a 1” narrow flat washer and 1” UNS
thin nylock nut.
59. Thread a 1/2” UNC hex nut on to a 1/2” UNC x 1-3/4” hex bolt. Thread the hex bolt in to the threaded hole on the front of the
door weldment.
60. Refer to Pp. 5.32 - 5.33 for a door assembly illustration. Lightly grease the door latch adjustment cam (PN 1037-A-14). Position
the door latch weldment (PN 1050-15) at the front of the door weldment, and insert the two latch springs (PN 997-16) between
the latch weldment and the door weldment. Press the latch weldment against the door weldment until the latch pivot holes align,
and insert the door latch cam shaft. Secure the latch adjustment cam to the top plate of the door weldment with a 3/8” UNC x
3/4” hex bolt and 3/8” lock washer.
Technical Manual
Section Contents
3.21
KT8625 8-5/8” Tong
Maintenance
Assembly Procedure (continued...):
61. Install mechanical door stop (PN 101-1833) to the bottom plate of the tong next to the LH brake band retainer weldment. Secure
with two 3/8” UNC x 2” bolts and 3/8” lock washers.
62. Install the door spring cylinder (PN 101-0069) using two 1/2” x 1/2” hex socket shoulder bolts (UNC).
63. Install upper and lower lined brake band weldments (PN 1050-D4-29). Secure each brake band to the top or bottom plate with
a brake band retainer (PN 101-0140),and 3/8” NC x 1” hex bolts and 3/8” lock washers. Attach the fronts of each brake band
weldment to the brake band lug weldments with 3/8” UNC x 1-1/2” hex bolts, 3/8” narrow flat washers, and 3/8” UNC hex nylock
nuts. These nut and bolt sets are used for adjusting the brake band tension.
64. Install the safety door switch assembly using the following procedure (see Pp. 5.30 - 5.31):
i.
Attach safety door latch spacer (PN 101-1411) to the top of the door weldment using two 3/8” UNC x 1” hex socket head
cap screws and 3/8” lock washers.
ii.
Attach safety door latch block (PN 101-1104) to the latch spacer using four 3/8” x 1/2” UNC shoulder bolts.
CE-marked tongs only: attach safety door latch block (PN 101-1104) to the latch spacer using four 3/8” x 1/2”
UNC wire-drilled shoulder bolts
iii.
Attach safety door latch block (PN 101-1103) to safety door latch plate (PN 101-1410) using three 3/8” NF x 1” flat head
countersunk cap screws.
iv. Place the safety door latch plate (PN 101-1410) onto the bottom plate of the safety switch base and guard weldment (PN
101-1475) and align the bolt holes. Secure to the top plate using two 3/8” UNC x 3” hex bolts and lock washers, and one
3/8” UNC x 1-1/4” hex bolt and lock washer. Note that the two longer cap screws in this step replace two of the tong’s
perimeter fasteners.
CE-marked tongs only: secure safety door latch plate (PN 101-1410) and guard weldment (PN 101-1475)
to the top plate using two 3/8” UNC x 3” wire-drilled hex bolts and lock washers, and one 3/8” UNC x 1-1/4”
wire-drilled hex bolt and lock washer.
v.
Insert load plunger (PN AE12-306) into LH safety door latch block (PN 101-1103).
vi. Attach three 1/4” NPT x 1/4”JIC elbows (PN 08-0284) to the Deltrol safety door valve (PN 08-0337M). Position a 15/16”
valve lock nut (PN 09-0278) as shown in illustration 3.H.9, and secure the safety door valve to the safety door latch block
using the valve lock nut.
Illustration 3.I.9: Tong Assembly - Safety Door Valve Installation
3.22
Section Contents
Technical Manual
KT8625 8-5/8” Tong
Maintenance
Assembly Procedure (continued...):
vii. Attach the top plate of the switch guard (PN 101-1474) to the switch guard weldment using three 3/8” UNC x 1” hex bolts
and 3/8” lock washers.
NOTE: See Section 3.F.4 for information on correctly adjusting the safety door switch.
CE-marked tongs only: secure top plate of the switch guard (PN 101-1474) to the switch guard weldment
using three 3/8” UNC x 1” wire-drilled hex bolts and lock washers.
65. Install the LH & RH rigid sling mounting lugs (LH = PN 101-0113, RH = PN 101-0115) using two 3/8” UNC x 1-3/4” hex bolts
and 3/8” lock washers, and two 1/2” UNC x 1-1/4” hex bolts and lock washers per side.
CE-marked tongs only: secure LH & RH rigid sling mounting lugs to the top plate using two 3/8” UNC x 2” wiredrilled hex bolts and 3/8” lock washers, and two 1/2” UNC x 1-1/4” wire-drilled hex bolts and lock washers per side.
66. Slide the master lifing link (PN 02-0516) over the adjustment helix (PN 1053-1-H), and install the adjustment helix in the rigid
sling weldment (PN 101-0112) using a 3/4” UNC x 8” hex bolt and 3/4” UNC nylock nut.
CE-marked tongs only: rigid sling weldment for CE-marked tong = PN 101-0112-CE
67. Use a crane to hoist the rigid sling weldment. Connect the rigid sling weldment to the rigid sling mounting lugs with rigid sling
pins (PN 1053-C-1C). Secure each pin with two 0.148” x 2.938” hitch pins.
68. Thread a 3/4” UNC hex nut on to each of two rigid sling leveling adjustment weldments (PN 1053-C-1L). Thread the leveling
adjustment weldments into the front of the rigid sling weldment mounting brackets, roughly adjusting them so the rigid sling is
approximately perpendicular to the top plate of the tong (see illustration 3.H.10).
69. Thread 1/2” UNC hex nuts on to two 1/2” UNC x 1-3/4” hex bolts. Thread the bolts into the rear of the rigid sling weldment mounting brackets. (see illustration 3.H.10).
Illustration 3.I.10: Tong Assembly - Rigid Sling Adjustment Bolt Installation
Technical Manual
Section Contents
3.23
KT8625 8-5/8” Tong
Maintenance
Assembly Procedure (continued...):
70. Attach the rear leg weldment (PN 997-D8-160A) to the bottom plate of the tong using a 7/8” UNC x 1” hex socket head cap
screw and a regular 7/8” flat washer.
71. Install grease fittings:
a)
b)
c)
d)
Install one 1/4” straight thread grease fitting (PN 02-0097) into the top side of each support roller shaft, including the door
pivot rollers (12 locations total).
Install one 1/4” straight thread grease fitting (PN 02-0097) into the top side of the latch adjustment cam.
Install one 1/8” NPT grease fitting (PN 02-0005) into the top of each rotary idler shaft (two locations total).
Install two 1/8” NPT 90o grease fittings (PN 02-0093) into the top of the pinion idler half-shaft.
e)
Install one 1/8” NPT grease fitting (PN02-0005) into the end of the clutch shaft, in the centre of the clutch bearing cap.
r)
g)
h)
Install two 1/8” NPT 90o grease fittings (PN 02-0093) in each pinion bearing cap (four locations total).
Install two 1/8” NPT 90o grease fittings (PN 02-0093) in clutch bearing cap (two locations total).
Install one 1/8” NPT 90o grease fitting (PN 02-0093) or one 1/8” NPT 45o grease fitting (PN 02-0006) in the top of the motor
mount.
Install drive-in grease fittings (PN 02-0012) into the ends of each cage plate cam follower (26 locations total).
i)
72. Install hydraulic inlet support base (PN 101-1138) to the top plate directly adjacent to the RH rotary idler, using two 3/8” UNC
x 1” hex bolts and 3/8” lock washers. Attach the adjustment plate (PN 101-0022) to the support base using two 3/8” UNC x 1”
hex bolts, 3/8” narrow flat washers, and 3/8” UNC hex nylock nuts.
73. Attach the outlet coupling support mounting base (PN 101-0021) to the top plate on the RH side of the motor mount using four
3/8” UNC x 2” hex socket head cap screws.
74. Attach the outlet coupling support weldment (PN 101-0023) to the weldment mount using two 3/8” UNC x 1” hex bolts and 3/8”
lock washers. Attach the adjustment plate (PN 101-0277) to the outlet support weldment using four 3/8” UNC x 1” hex bolts,
3/8” narrow flat washers, and 3/8” UNC hex nylock nuts.
75. Coat the threads of the hydraulic valve mounting posts (PN 101-0116) with Loctite™ and thread into the top plate just behind
the brake band on either side of the brake band retainer.
76. Mount the DVA35 hydraulic valve assembly on the mounting posts using two 1/2” UNC x 4-1/2” hex bolts and 1/2” narrow flat
washers.
CE-marked tongs only: Install the valve handle guard weldment (PN CE-HANDLE-2) over the valve handles while
securing the valve bank to the supports (see illustration 3.I.11 next page).
3.24
Section Contents
Technical Manual
KT8625 8-5/8” Tong
Assembly Procedure (continued...):
Illustration 3.I.11: Tong Assembly - Valve Handle Guard Installation (CE Marked Tongs)
78. Attach two #20 (1-1/4”) / 1” JIC flange elbows (PN 02-9216) to the motor using #20 split flange kits (PN 02-9217).
79. Connect the safety door valve block (PN 101-0727) directly to the flange elbows on the hydraulic motor (the block will sit on top
of the motor following installation). Connect the rotation control valve on the DVA35 valve assembly to the safety door block.
80. Connect the safety door switch to the safety door block and hydraulic valve assembly. Refer to hydraulic schematic, or call
McCoy Drilling & Completions | Farr engineering department for assistance.
81. Install desired jaw die kit in the tong using the jaw pivot bolts (PN 1050-C5-28).
Technical Manual
Section Contents
3.25
KT8625 8-5/8” Tong
J.
Maintenance
Daily Inspection & Maintenance Checklist (power tong)
Farr recommends that the following inspection and maintenance procedures be performed before each use, and at least once per
day when the tong is in steady use, in the order in which they are listed.
1.
Rotate cage plate/rotary gear until the opening in the rotary gear faces towards the rear of the tong.
Do not perform any further actions or maintenance while the tong is connected to any hydraulic power supply. Farr recommends that all hydraulic
lines are fully disconnected, and residual hydraulic pressure is bled off.
Ensure adequate containment is in place to prevent environmental contamination from residual hydraulic fluid.
Depressurize Hydraulic System In Preparation For Maintenance:
1) Rotate the tong to the “open throat” position. Ensure tong and backup doors (if equipped) are closed. Fully extend
the lift cylinder
2) De-energize the power unit.
2.
3) Repeatedly actuate the tong motor control valve lever IN BOTH DIRECTIONS to dissipate any residual pressure in
the valve and motor.
4) Remove the hydraulic SUPPLY line from the equipment.
5) Repeatedly actuate the remaining control valve levers IN BOTH DIRECTIONS to dissipate any residual pressure in
the remainder of the hydraulic control system.
7) Disconnect the hydraulic RETURN line from the equipment.
8) Disconnect remaining hoses such as case drains.
Hydraulic pressures as high as operating pressure may remain trapped in
small areas of the equipment. Ensure all maintenance is carried out by a
qualified service technician, and that adequate personal protective equipment is used to guard against pressure injuries
3.
Perform an initial wash of the tong in order to remove the majority of dirt and grease build-up. Ensure adequate containment is in place to prevent environmental contamination from residual hydraulic fluid and dirty grease.
4.
Remove the access panel on the side of the tong directly adjacent to the shifter mechanism.
5.
Use a flashlight to perform a visual inspection of the gear train through the access panel and the opening of the rotary
gear. If gear damage or chips of metal are seen, the tong should be removed from service and overhauled to avoid further
damage. Replace access panel when inspection is complete.
6.
Perform a visual inspection of all fasteners and protruding body pieces (example: hydraulic valve mounts, inlet & outlet
line supports, tong legs, shifter handle pivot lugs). Tighten or replace loose or missing fasteners. Farr recommends that
damaged or missing body parts be repaired or replaced.
7.
Inspect the jaws and dies. Inspect the jaw roller pins for signs of damage - replace pins if necessary. If the pins are welded
in place, replace the entire jaw assembly. Ensure dies are secure in the jaw - replace worn dies if necessary. Ensure that
the jaw rollers rotate freely. Check to ensure the size of the loaded jaws match the size of casing or pipe you are running.
8.
Perform a visual inspection of all lifting points - if visible damage is seen, including cracks, broken lugs, distorted metal,
etc. replace damaged part(s) before placing tong in service. Also inspect all chains, master links, and turnbuckles - again,
if any damage is noted replace the damaged part(s) before placing the tong in service.
9.
Inspect tong for signs of premature wear, or moving parts that are rubbing (bare metal where there used to be paint is a
good indication of wear.
10.
Inspect backing pin(s). If cracked, broken, or bent it (they) must be replaced.
11.
Inspect top and bottom brake band linings - replace if necessary. Unequal wear of the brake bands indicates that the
brake band tension is not evenly adjusted. Refer to the maintenance section of the manual for instructions on properly
adjusting brake bands.
12.
Perform a visual inspection of all hydraulic lines. Replace flexible lines if they appear to be cracked, fatigued, or have
visible signs of wear from contact with a rigid object.
3.26
Section Contents
Technical Manual
KT8625 8-5/8” Tong
Maintenance
13.
Perform a complete greasing of the tong - refer to Maintenance section of the technical manual
14.
Ensure main supply and return connections to the tong are fully made up. Re-connect the remainder of the hydraulic
lines, and, if applicable, the electrical line to the turns counter.
Failure to ensure that the self-sealing supply and return lines are fully
made up may result in catastrophic equipment failure.
15.
Perform a visual inspection of the load cell. If using a tension load cell, replace any cracked, broken, or distorted components including links and chains. If using a compression load cell, replace any component that has been crushed or
otherwise distorted through compression. Inspect hydraulic line, fittings, and diaphragm seals for fluid leaks.
16.
If applicable, inspect the load cell anchor pins (tension load cell only). Replace the anchor pins if cracking or metal
distortion is seen.
If using a stand-alone power unit, start it now - refer to the power unit technical manual for startup procedures. Listen to power unit for
a moment to see if there are any unusual mechanical sounds (rubbing, grinding, excessive pump noise). If using a diesel unit, allow
sufficient time for the engine to reach operating temperature before increasing engine RPM. Once engine is warm, gradually increase
engine RPM until operating speed is reached.
17.
Ensure that supply pressure is at or above the tong’s specified operating pressure, and that the return pressure is less
than 350 psi.
18.
Perform a visual inspection of pressurized hydraulic lines. Document and correct any hydraulic fluid leaks.
19.
Perform a full functional test of the tong (refer to section 2.I.4).
20.
Test safety door feature (if equipped). Open the tong door(s), and attempt to rotate the cage plate at low speed (low
gear) in both directions (makeup and breakout). If cage plate begins rotating, the safety door mechanism is not functional, and the tong must be removed from service until the safety door mechanism can be repaired. If the safety door
is operating correctly, cage plate rotation will not be inhibited once the door is closed and latched.
Never operate your equipment with a bypassed or malfunctioning safety
door
21.
While rotating the cage plate, ensure that the jaws properly cam. If the jaws do not cam properly, the brake bands
need to be tightened. Incrementally adjust both the top and bottom brake bands EQUALLY until proper cam action is
achieved.
CE-marked tongs only: Inspect all wire-ties on drilled bolts on critical safety systems. All wiring must be intact and
appear tamper-free. Check the integrity of all guards, including the rubber protective washers over the backup leg
openings.
Technical Manual
Section Contents
3.27
KT8625 8-5/8” Tong
Maintenance
K. MONTHLY MAINTENANCE Checklist - power tong
The following maintenance checklist is intended as a guideline rather than a definitive maintenance schedule. Your equipment may
require more, or less, maintenance depending upon the frequency of use, the percentage of maximum torque that your equipment is
routinely subjected to, and the field conditions under which your equipment operates. Farr recommends that the following inspection
and maintenance procedures be performed monthly, or in conjunction with your maintenance foreman’s experience and best estimate
of when your equipment is due for this maintenance.
1.
Rotate cage plate/rotary gear until the opening in the rotary gear faces towards the rear of the tong.
Do not perform any further actions or maintenance while the tong is connected to any hydraulic power supply. Farr recommends that all hydraulic
lines are fully disconnected, and residual hydraulic pressure is bled off.
Ensure adequate containment is in place to prevent environmental contamination from residual hydraulic fluid.
Depressurize Hydraulic System In Preparation For Maintenance:
1) De-energize the power unit.
2.
2) Repeatedly actuate the tong motor control valve lever IN BOTH DIRECTIONS to dissipate any residual pressure in
the valve and motor.
3) Remove the hydraulic SUPPLY line from the equipment.
4) Repeatedly actuate the remaining control valve levers IN BOTH DIRECTIONS to dissipate any residual pressure in
the remainder of the hydraulic control system.
5) Disconnect the hydraulic RETURN line from the equipment.
6) Disconnect remaining hoses such as case drains, or lines connected to the turns counter.
Hydraulic pressures as high as operating pressure may remain trapped in
small areas of the equipment. Ensure all maintenance is carried out by a
qualified service technician, and that adequate personal protective equipment is used to guard against pressure injuries
3.
Clean the exterior of the tool thoroughly, using either water (if using a pressure washer ensure a low-pressure wash wand
is used), or an appropriate solvent-based grease-cutting cleaner such as Varsol. Ensure adequate containment is in place
to prevent environmental contamination from residual hydraulic fluid, dirty grease, and cleaning agents.
4.
Remove the access panel on the side of the tong directly adjacent to the shifter mechanism.
5.
Clean the interior of the tong thoroughly, using either water (do not use a pressure washer), or an appropriate solventbased grease-cutting cleaner such as Varsol. Ensure adequate containment is in place to prevent environmental contamination from residual hydraulic fluid, dirty grease, and cleaning agents. Make a note if any metal shavings or metal
pieces are flushed out of the gear train cavity - if shavings or metal pieces are seen the tong must be overhauled before
it is returned to service.
6.
Inspect all fasteners and fastener safety wires (if equipped). Replace any missing fasteners - use Grade 8 bolts only unless otherwise specified. Re-torque all external fasteners to SAE specifications.
7.
Repair or replace any damaged or missing external body parts, such as torque gauge mounts, hydraulic supports, safety
door protectors, etc.
8.
Perform a visual inspection of all fasteners and protruding body pieces (example: hydraulic valve mounts, inlet & outlet
line supports, tong legs, shifter handle pivot lugs). Tighten or replace loose or missing fasteners.
9.
Inspect tong for signs of premature wear, or moving parts that are rubbing (bare metal where there used to be paint is a
good indication of wear.
10.
Inspect all paint - locations in which the paint has been damaged must be repaired prior to the tong being returned to
service. Prepare areas to be painted to ensure they are free of grease, dirt, or solvent. Touch up using a solvent-based
acrylic paint - “McCoy Grey” is paint color number RAL7015, “McCoy Yellow” (hazard areas) is RAL1007, and McCoy
Green is RAL6029 (contact Farr sales for paint number for custom paint applications). Allow sufficient time for paint to
dry before proceeding.
11.
Visually inspect all load-bearing welds. Any weld that is cracked or separating must be repaired and repainted before
returning the tong to service.
3.28
Section Contents
Technical Manual
KT8625 8-5/8” Tong
Maintenance
12.
Perform a visual inspection of all lifting points - if visible damage is seen, including cracks, broken lugs, distorted metal,
etc. replace damaged part(s) before placing tong in service. Also inspect all chains, master links, and turnbuckles again, if any damage is noted replace the damaged part(s) before placing the tong in service. Refer to Section 2A of
the technical manual (Sling/Load Bearing Device Safety) for information on recommended testing and recertification.
Please note that turnbuckles with part number 101-3086 (short turnbuckles) use a high-strength pin which must be
supplied by Farr.
“Short” turnbuckles having part number 101-3086 employ high-strength pins
which must be supplied by Farr.
13.
Remove hydraulic motor and rotate the gear train by hand, and use a flashlight to perform a visual inspection of the
gear train through the access panel and the opening of the rotary gear while the gear train is being rotated. If gear
damage or chips of metal are seen, the tong should be removed from service and overhauled to avoid further damage.
Replace access panel when inspection is complete.
14.
Inspect all jaws and dies in use for the maintenance interval. Remove pin & roller, and inspect for signs of damage
- replace pins if necessary. If the pins are welded in place & the welds are found to be damaged, remove and quarantine the jaw until the weld is repaired. Clean the pins and rollers, and reassemble using a liberal coating of anti-seize
compound. Ensure dies are secure in the jaw & die retainers are present. Replace worn dies if necessary. Ensure that
the jaw rollers rotate freely.
15.
Inspect backing pin(s). If cracked, broken, or bent it (they) must be replaced.
16.
Inspect top and bottom brake band linings - replace if lining is found to be flaking or is missing pieces of material. Unequal wear of the brake bands indicates that the brake band tension is not evenly adjusted. Refer to the maintenance
section of the manual for instructions on properly adjusting brake bands.
17.
Inspect door springs. Ensure the springs retain sufficient strength to be able to assist the opening of the door, and to
keep the door open. The springs should also help to “snap” the door shut.
18.
Inspect backup springs (if applicable). The rear extension springs (where used) should be equally extended, and
the front leg springs should be equally compressed. Ensure that neither of the rear backup springs have been overextended and lack sufficient tension to adequately support the backup. Ensure that neither of the front leg springs (or,
when installed, the single rear backup leg spring) have been over-compressed, and still retain enough spring strength
to support the front of the backup.
19.
Extend all hydraulic cylinders, and inspect cylinder rods for signs of mechanical damage, flaking, or rust. Farr recommends that damaged cylinders be replaced prior to storage.
20.
Perform a visual inspection of all hydraulic lines. Replace flexible lines if they appear to be cracked, fatigued, or have
visible signs of wear from contact with a rigid object. If your tong is equipped with rigid hydraulic lines, replace any line
that is dented or appears to be stressed or cracked.
21.
Generously fill the gear train housing with grease through the access panel, and also through the opening in the rotary
gear. Perform a full lubrication - refer to Maintenance section of manual to determine lubrication points.
22.
Ensure main supply and return connections to the tong are fully made up. Re-connect the remainder of the hydraulic
lines.
Failure to ensure that the self-sealing supply and return lines are fully
made up may result in catastrophic equipment failure.
If using a stand-alone power unit, start it now - refer to the power unit technical manual for startup procedures. Listen to power unit for
a moment to see if there are any unusual mechanical sounds (rubbing, grinding, excessive pump noise). If using a diesel unit, allow
sufficient time for the engine to reach operating temperature before increasing engine RPM. Once engine is warm, gradually increase
engine RPM until operating speed is reached.
23.
Ensure that supply pressure is at or above the tong’s specified operating pressure, and that the return pressure is less
than 350 psi.
24.
Perform a visual inspection of pressurized hydraulic lines. If any hydraulic fittings or hoses are leaking they must be
repaired or replaced before proceeding.
25.
Rotate tong for one minute in both high and low gear. Stop the tong and reverse the direction of rotation for another
minute in both high and low gear, ending with the opening of the rotary gear facing the gear train. De-energize the
power unit, and perform another generous lubrication of the gear train, including the gear housing.
Technical Manual
Section Contents
3.29
KT8625 8-5/8” Tong
Maintenance
26.
Energize power unit. Rotate tong for one minute in both high and low gear. Stop the tong and reverse the direction of
rotation for another minute in both high and low gear, ending with the opening of the rotary gear facing the gear train.
27.
De-energize the power unit, and perform a third generous lubrication of the gear train, including the gear housing.
28.
Rotate tong in low gear for 5 minutes while monitoring pressurized seals and hydraulic lines. If a seal, line, or fitting
begins to leak while tong is rotating, it must be replaced before the equipment is returned to service.
29.
Rotate tong in high gear for 5 minutes while monitoring temperature of top and bottom bearing caps. If the bearing caps
are hot to the touch (higher than approximately 50oC) replace the applicable bearings. Likewise if the tong is making
unusual noises check for damaged bearings (see Maintenance Manual for all bearing locations).
30.
Install load cell. If using a tension load cell, perform a visual inspection and replace any cracked, broken, or distorted
components including links and chains. If using a compression load cell, replace any component that has been crushed
or otherwise distorted through compression. Inspect load cell for damage or signs of stress. Check oil level in load cell
and fill if necessary (refer to technical manual Section 7 or Section 8).
31.
If applicable, inspect the load cell anchor pins (tension load cell only). Replace the anchor pins if cracking or metal
distortion is seen.
32.
If applicable, the weld securing the single load cell anchor to the bridge bar main plate must be inspected (compression
load cell only). If the integrity of the weld has been compromised, the tong must be removed from service until the weld
is repaired. The load cell beam will need to be disconnected and removed so the weld is visible. Before re-installing the
beam, liberally grease the anchor pin before reinserting into the load cell beam.
33.
While rotating the cage plate, ensure that the jaws properly cam. If the jaws do not cam properly, the brake bands
need to be tightened. Incrementally adjust both the top and bottom brake bands EQUALLY until proper cam action is
achieved. Refer to the maintenance section of the manual for instructions on properly adjusting brake bands.
34.
Perform a full functional test of the tong including, if applicable, backup components, lift cylinder, and float frame
components (refer to Section 2.I.4). Report and correct any hydraulic leaks from the hydraulic valve bank, or from any
hydraulic cylinders that are used.
35.
Test safety door feature (if equipped). Begin rotating the tong at low speed, and open the tong door(s). If rotation does
not immediately stop, this is an indication that the safety door mechanism is not operating correctly and the tong must
be removed from service until the mechanism is repaired. Repeat the test while operating the tong in the opposite direction. If the safety door is operating correctly, cage plate rotation will not be inhibited once the door is closed and latched.
Never operate your equipment with a bypassed or malfunctioning safety
door
36.
Farr recommends that an anti-corrosive agent such as Tectyl® 506 be applied to all external unpainted surfaces (and
chain slings) EXCEPT cylinder rods, jaw rollers, and rotary gear camming surfaces. Refer to manufacturer data sheets
for proper application and safety information.
Once all of the above maintenance checklist items have been satisfactorily completed the tool may
be returned to service.
3.30
Section Contents
Technical Manual
KT8625 8-5/8” Tong
Maintenance
L.
TUBULAR CONNECTION EQUIPMENT De-commissioning & SHIPPING procedure
Perform the following decommissioning procedures when removing tubular connection equipment from service, with the intent of
short to long-term storage. These procedures are essential for ensuring proper protection of the equipment from environmental attack,
and to aid in the quick turnaround when returning the equipment to service.
Store all o-rings, seals, packings, gaskets, etc. in strong moisture proof, airtight containers. Ensure that these items are not crushed,
nicked, or otherwise damaged.
Do not perform any further actions or maintenance while the tong is connected to any hydraulic power supply. Farr recommends
that all hydraulic lines are fully disconnected, and residual hydraulic pressure is bled off. Ensure adequate containment is in place to
prevent environmental contamination from residual hydraulic fluid.
in order to maintain the integrity of installed seals, mccoy recommends that
the maximum storage interval not exceed one year. at least once per year all
tubular connection in long-term storage should be recommissioned as per
section 3.M. If further storage is required, the equipment should then be put
through another de-commissioning procedure.
Depressurization Procedure In Preparation For Storage:
1) Rotate the tong so that the opening in the rotary gear faces the gear train (towards the rear of the tong). Ensure tong and backup
doors (if equipped) are closed. Fully extend the lift cylinder (if equipped). If mounted in a frame, retract the float cylinders (if
equipped).
2) De-energize the power unit.
3) Repeatedly actuate the tong motor control valve lever IN BOTH DIRECTIONS to dissipate any residual pressure in the valve
and motor.
4) Remove the hydraulic SUPPLY line from the equipment.
5) Repeatedly actuate the remaining control valve levers IN BOTH DIRECTIONS to dissipate any residual pressure in the remainder of the hydraulic control system.
7) Disconnect the hydraulic RETURN line from the equipment.
8) Disconnect remaining hoses such as case drains, or lines connected to the turns counter.
Hydraulic pressures as high as operating pressure may remain trapped in
small areas of the equipment. Ensure all maintenance is carried out by a
qualified service technician, and that adequate personal protective equipment is used to guard against pressure-induced injuries
1.
Perform an initial wash of the tool in order to remove the majority of dirt and grease build-up. Ensure adequate containment is in place to prevent environmental contamination from residual hydraulic fluid and dirty grease.
2.
Remove the access panel on the side of the tong directly adjacent to the shifter mechanism.
3.
Clean the interior of the tong thoroughly, using either water (do not use a pressure washer), or an appropriate solventbased grease-cutting cleaner such as Varsol. Ensure adequate containment is in place to prevent environmental contamination from residual hydraulic fluid, dirty grease, and cleaning agents. Make a note if any metal shavings or metal
pieces are flushed out of the gear train cavity - if shavings or metal pieces are seen the tong must be overhauled before
it is returned to service.
4.
Clean the exterior of the tool thoroughly, using either water (do not use a pressure washer), or an appropriate solventbased grease-cutting cleaner such as Varsol. Ensure adequate containment is in place to prevent environmental contamination from residual hydraulic fluid, dirty grease, and cleaning agents.
5.
Inspect all fasteners and fastener safety wires. Replace any missing fasteners - use Grade 8 bolts only. Re-torque all
external fasteners to SAE specifications.
6.
Inspect backing pin(s). If cracked, broken, or bent it (they) must be replaced.
7.
Repair or replace any damaged or missing external body parts, such as torque gauge mounts, hydraulic supports, safety
door protectors, etc.
8.
Inspect all paint - locations in which the paint has been damaged must be repaired prior to storage. Prepare areas to be
painted to ensure they are free of grease, dirt, or solvent. Touch up using a solvent-based acrylic paint - “McCoy Grey” is
paint number RAL7015. Allow sufficient time for paint to dry before proceeding.
9.
Perform a liberal lubrication of the equipment - refer to Maintenance section of manual to determine lubrication points.
Generously fill the gear train housing with grease through the access panel, and also through the opening in the rotary
gear.
10.
Connect the equipment to a hydraulic power unit. Ensure all lines are fully made up to prevent equipment damage from
excessive back pressure. Do not neglect to connect the motor drain.
Technical Manual
Section Contents
3.31
KT8625 8-5/8” Tong
Maintenance
11.
Energize power unit.
12.
Rotate tong for one minute, stop, and reverse the direction of rotation for another minute, ending with the opening of the
rotary gear facing the gear train. De-energize the power unit, and perform another generous lubrication of the gear train,
including the gear housing.
13.
Energize power unit. Rotate tong for one minute, stop, and reverse the direction of rotation for another minute, ending with
the opening of the rotary gear facing the gear train.
14.
De-energize the power unit, and perform a third generous lubrication of the gear train, including the gear housing.
15.
Energize power unit, and rotate the tong for a final time, one minute in one direction, stop, and reverse the direction of
rotation for another minute, this time ending with the rotary gear in the “open throat” position.
16.
Extend all hydraulic cylinders, and inspect cylinder rods for signs of mechanical damage, flaking, or rust. Farr recommends that damaged cylinders be replaced prior to storage.
17.
If you are using a frame-mounted tool, the tong must be lowered onto the backup in order to remove the risk of sudden
and catastrophic movement when pressure is removed from the float cylinders. Cover the top of the backup with protective cloth to protect the paint on the backup. Place two wooden beams across the top of the tong, ensuring that the beams
have a minimum size of 4” x 4” x the width of the tong. Cover the tops of the wooden beams with more protective cloth to
prevent paint damage to the tong. When lowering the tong onto the beams, ensure that the beams come into flat contact
with the bottom of the tong, away from bearing caps, brake bands, or other protrusions on the bottom of the tong. Ensure
that the tong hanger chains are loose, but not dangling into contact with the hangers or top plate of the tong.
Depressurization Procedure For Storage:
1)
Rotate the tong to the “open throat” position.
2)
Exercise each hydraulic cylinder several times - open the tong and backup doors (if equipped), retract and extend the
remote backing pin ramp (if equipped), retract and extend the float cylinders. Leave all cylinders except for the door
cylinders in their fully retracted position. The general idea is to have as little of the chrome cylinder rods exposed as
possible.
3)
De-energize the power unit.
4)
Repeatedly actuate the tong motor control valve lever IN BOTH DIRECTIONS to dissipate any residual pressure in the
valve and motor.
5)
Remove the hydraulic SUPPLY line from the equipment.
6)
Repeatedly actuate the remaining control valve levers IN BOTH DIRECTIONS to dissipate any residual pressure in the
remainder of the hydraulic control system.
7)
Connect a low-pressure air supply line (10 PSI or less) to the hydraulic supply line, and force a small amount of the
remaining hydraulic fluid from the valve assembly - this will allow for thermal expansion of the hydraulic fluid if the equipment is stored or transported in high ambient temperatures. Failure to do this may result in damaged or destroyed seals
in the equipment.
8) Disconnect the hydraulic RETURN line from the equipment.
9)
Disconnect remaining hoses such as case drains, or lines connected to the turns counter.
18.
If any hydraulic fittings or hoses are leaking they must be repaired or replaced before proceeding.
19.
Wipe all excess grease from outside of equipment. Replace the access door panel. Use a solvent-based cleaner on
rags to wipe all external surfaces to remove residual grease or hydraulic fluid. Once the outside surfaces have been degreased, wipe all external surfaces with clean water to remove residual solvent.
20.
Farr recommends that chain slings be removed and stored separately. Rigid slings and other rigid suspension devices
may remain in place.
21.
Apply grease or heavy oil to all exposed cylinder rods.
22.
Farr recommends that an anti-corrosive agent such as Tectyl® 506 be applied to all external surfaces EXCEPT cylinder
rods (including chain slings). Refer to manufacturer data sheets for proper application and safety information.
Do not allow anti-corrosive agents to contact cylinder rods. Cylinder rod
damage will occur.
3.32
Section Contents
Technical Manual
KT8625 8-5/8” Tong
Maintenance
23.
Allow the anti-corrosive coating ample time to dry - refer to manufacturer data sheets for drying times at room temperature.
24.
Wrap entire assembly in 100 gauge (1 mil) corrosion-inhibiting wrap, at least 3 layers thick. Attempt to ensure that the tool
is well-sealed within the wrapping, including the bottom.
If possible, store in a sealed, climate controlled environment. If isolated storage is not available, Farr recommends storing your wrapped
equipment in a secure, out-of-the-way location, using silica gel desiccant to reduce the humidity within the wrapping. As a guideline, use
125 g. of desiccant for each cubic metre of space, or 3.5 g. per cubic foot.
Calculation Of Required Desiccant
1)
Calculate the trapped air volume by measuring the outside dimensions of the tool to be stored, and treat that as the volume
to be stored. For example, the external dimensions of a KT20000 20” power tong are 80.25” x 50.5” x 28”, which calculates
to an approximate volume of 113500 in3, or 66 ft3 (1.87 m3).
2)
Multiply the calculated air volume, in cubic feet, by the recommended amount of desiccant per cubic foot. Carrying forth the
example used in the previous step, the required desiccant charge would be 3.5 g. x 66 ft3, equaling 231 g. Several manufacturers offer silica gel desiccant in packaged quantities of 125 grams per bag, so two packages of desiccant would be required.
Please keep in mind that this is a guideline only - more or less desiccant may be required in extreme environmental conditions.
For best corrosion resistance the equipment should be removed from storage and exercised on a regular basis, depending on the storage environment. Farr recommends that for equipment stored in a salt-water maritime or exposed dusty environment, repeat steps 9
through 24 monthly. For equipment stored in isolated storage in a non-maritime environment, repeat steps 9 through 24 quarterly. Replace desiccant packs at this time - depleted desiccant packs may be treated as regular dunnage.
Shipping Instructions
The following procedure lists the steps to be followed to prepare your tong for shipping.
1.
If not already done remove accessories (tong jaws, load cell, torque gauge, etc.) McCoy recommends wrapping these items
in protective wrap and placing in a separate wooden crate.
2.
Place the equipment on a sturdy pallet constructed of 4” x 4” cross-members and 2” x 4” flooring. McCoy recommends placing a 2” x 6” board across the width of the tong under the legs (see Illustration 3.M.1). Ensure the pallet is large enough to
accommodate the wooden crate containing the tong accessories.
Illustration 3.L.1: Shipping Instructions - Pallet
Technical Manual
Section Contents
3.33
KT8625 8-5/8” Tong
Maintenance
Shipping Instructions (Continued):
3.
Use a crane to support the chain sling (if equipped). Wrap the chain sling with bubble wrap or another similar protective wrapping, and secure the wrapping with tape. Lower the wrapped chain sling so it sits inside the opening of the tong.
Illustration 3.M.2: Shipping Instructions - Wrapping Chain Sling & Strapping To Pallet
4.
Securely strap the equipment in place using metal strapping (see Illustration 3.L.2). Place strapping as close to the crossmembers under the equipment legs as possible, and use caution not to entrap any flexible hydraulic hoses beneath the
strapping (guide strapping through beneath the hydraulic hoses). Use the following guidelines to determine the strapping
requirements:
Assemblies weighing 1000 lbs. (454 kg.) or less:
Assemblies weighing more than 1000 lbs. (454 kg.) or less:
3/4” x 0.029” metal strapping, 3320 lbs. (1509 kg.) tensile strength
Minimum two straps
1-1/4” x 0.031” metal strapping, 5500 lbs. (2500 kg.) tensile strength
Minimum two straps for assemblies weighing less than 5000 lbs. (2273 kg.)
Minimum three straps for assemblies weighing more than 5000 lbs. (2273 kg.)
Before tightening strapping, place strapping protectors wherever the metal strapping comes into contact with the equipment.
Place the wooden crate containing the tong accessories on the crate next to the equipment. Strap the crate to the pallet using
3/4” x 0.029” metal strapping. If it is not practical to place larger loose items in a wooden crate, ensure they are also securely
strapped to the pallet using 3/4” x 0.029” metal strapping.
5.
Use a large polyethylene shipping bag (sometimes called a pallet cover) to completely enclose the equipment. Seal polyethylene bag to the pallet using 1 mil polyethylene wrap. Use the wrap to conform the plastic cover to the general shape of the
equipment, but do not wrap so tight that sharp edges on the equipment perforate the cover.
6.
McCoy recommends enclosing the equipment in a sturdy shipping crate which is securely fastened to the pallet.
3.34
Section Contents
Technical Manual
KT8625 8-5/8” Tong
Maintenance
M. TUBULAR CONNECTION EQUIPMENT Re-commissioning procedure
Perform the following recommissioning procedures when removing tubular connection equipment from short or long-term storage
back into regular service. These procedures are essential for ensuring proper equipment preparation and operation. The following
procedures also assume that the decommissioning and storage procedures recommended by Farr have been strictly observed.
1.
Remove all protective plastic wrapping. If there are desiccant packs with the assembly, they may be disposed of with the
regular garbage.
2.
Remove the access panel on the side of the tong directly adjacent to the shifter mechanism.
3.
Wipe excess grease or heavy oil from exposed cylinder rods.
4.
If applicable, re-connect chain sling to lifting lugs. Perform a visual inspection of all lifting points - if visible damage is seen,
including cracks, broken lugs, distorted metal, etc. replace damaged part(s) before placing tong in service. Also inspect
all chains, master links, and turnbuckles - again, if any damage is noted replace the damaged part(s) before placing the
tong in service. If your company requires yearly certification of lifting equipment, ensure that the most recent test date falls
within the past year. Perform recertification if necessary.
5.
Perform a liberal lubrication of the equipment - refer to Maintenance section of manual to determine lubrication points.
Generously fill the gear train housing with grease through the access panel, and also through the opening in the rotary
gear.
6.
Connect the equipment to a hydraulic power unit. Ensure all lines are fully made up to prevent equipment damage from
excessive back pressure. Do not neglect to connect the motor drain.
Failure to ensure that the self-sealing supply and return lines are fully
made up may result in catastrophic equipment failure.
7.
Energize power unit.
8.
Ensure that supply pressure is at or above the tong’s specified operating pressure, and that the return pressure is less
than 350 psi.
9.
Perform a thorough inspection of pressurized hydraulic lines and fittings. Any leaking hydraulic fluid lines or fittings must
be replaced before the equipment is returned to service.
10.
Perform a thorough inspection of all seals. Any seal that is leaking or “weeping” must be replaced before the equipment
is returned to service.
11.
Rotate tong in low gear for 5 minutes while monitoring pressurized seals and hydraulic lines. If a seal, line, or fitting begins
to leak while tong is rotating, it must be replaced before the equipment is returned to service. Finish this step with the
rotary gear opening facing the gear train. De-energize the power unit.
12.
Inspect all flexible hydraulic lines for signs of wear, blistering, or any other signs of potential failure - replace if signs of
potential failure are identified.
13.
Inspect the gear train housing. If the amount of grease is inadequate, liberally grease the gear train through the access
panel, and through the opening in the rotary gear.
14.
Inspect top and bottom brake band linings - replace if necessary. Unequal wear of the brake bands indicates that the
brake band tension is not evenly adjusted. Refer to the maintenance section of the manual for instructions on properly
adjusting brake bands. Ensure that all grease is wiped from brake band linings and the parts of the cage plates that come
into contact with the brake band linings
15.
Re-install access panel. Install a set of pre-inspected jaws that are the correct size for the pipe or casing being run.
16.
Install load cell. If using a tension load cell, perform a visual inspection and replace any cracked, broken, or distorted
components including links and chains. If using a compression load cell, replace any component that has been crushed
or otherwise distorted through compression.
17.
If applicable, inspect the load cell anchor pins (tension load cell only). Replace the anchor pins if cracking or metal distortion is seen.
18.
If applicable, the weld securing the single load cell anchor to the bridge bar main plate must be inspected (compression
load cell only). If the integrity of the weld has been compromised, the tong must be removed from service until the weld
is repaired. The load cell beam will need to be disconnected and removed so the weld is visible. Before re-installing the
beam, liberally grease the anchor pin before reinserting into the load cell beam.
19.
Re-energize power unit.
Technical Manual
Section Contents
3.35
KT8625 8-5/8” Tong
Maintenance
20.
Perform a full functional test of the equipment including, if applicable, backup components and float frame components.
Report and correct any hydraulic leaks from the hydraulic valve bank, or from any hydraulic cylinders that are used.
21.
If using a frame-mounted tong and backup system, raise the tong off the beams that it is resting upon. Remove the beams
and protective cloths - inspect the paint on top of the backup and the bottom of the tong to ensure it has not been damaged by the beam.
22.
Test safety door feature (if equipped). Open the tong door(s), and attempt to rotate the cage plate at low speed (low gear)
in both directions (makeup and breakout). If cage plate begins rotating, the safety door mechanism is not functional, and
the tong must be removed from service until the safety door mechanism can be repaired. If the safety door is operating
correctly, cage plate rotation will not be inhibited once the door is closed and latched.
Never operate your equipment with a bypassed or malfunctioning safety door
23.
While rotating the cage plate, ensure that the jaws properly cam. If the jaws do not cam properly, the brake bands
need to be tightened. Incrementally adjust both the top and bottom brake bands EQUALLY until proper cam action is
achieved.
24.
When all of the previous steps are completed, you may return your re-commissioned equipment to service.
3.36
Section Contents
Technical Manual
KT8625 8-5/8” Tong
Troubleshooting
Adequate maintenance and proper fluid selection is essential for minimizing hydraulic-related failures. All troubleshooting must be performed by a technician trained in hydraulic systems, and familiar with the equipment design, assembly and operation.
The following troubleshooting instructions are intended to be guidelines only. Any faults not solved through the use of this guide should be
referred to our engineering department for their evaluation and recommendations.
A. TONG WILL NOT DEVELOP SUFFICIENT TORQUE
1.
Malfunctioning relief valve on tong hydraulic circuit.
See Section 4.B, Relief Valve Troubleshooting
2.
POSSIBLE PROBLEM: Directional valve is leaking.
SOLUTION: Check directional valve. Neutral position should return fluid directly to the reservoir. Replace or repair valve to
ensure correct operation.
3.
POSSIBLE PROBLEM: Power unit is not producing adequate pressure.
SOLUTION: Troubleshoot power unit (see user’s manual for your particular unit).
4.
POSSIBLE PROBLEM: Poor hydraulic pressure at the tong despite adequate pressure at the power unit, or excessive back
pressure in the return line.
SOLUTION: Restrictions exist in line between power unit and tong. Inspect integrity of self-sealing couplings to ensure they
are allowing full fluid flow. Check to ensure no other restrictions exist (contaminated catch screens or filters, for example).
5.
POSSIBLE PROBLEM: Fluid viscosity is not appropriate (too high or too low).
SOLUTION: Ensure hydraulic fluid being used is the viscosity recommended by McCoy Drilling & Completions. Power unit pump
may not prime if fluid is too heavy, and the hydraulic system will overheat if fluid is too light. Replace with proper viscosity fluid.
SOLUTION: Hydraulic fluid viscosity is affected by environmental conditions. Ensure the fluid being used is suitable for high or
low temperatures. Replace with proper viscosity fluid for the operating conditions if necessary.
6.
POSSIBLE PROBLEM: Worn or damaged tong motor causing slippage.
SOLUTION: Replace or repair worn or damaged motor.
7.
POSSIBLE PROBLEM: Damaged bearings or gears causing excessive drag.
SOLUTION: Replace or repair worn or damaged gears or bearings.
8.
POSSIBLE PROBLEM: Jaws slipping on pipe.
SOLUTION: Ensure jaw dies are not worn to the point that they cannot grip. Ensure the correct sized jaws are in use.
9.
POSSIBLE PROBLEM: Torque gauge is indicating incorrectly
SOLUTION: Incorrect gauge is being used. Ensure gauge is the proper range, and has been properly calibrated for the arm
length of the equipment in use.
SOLUTION: Gauge has been damaged. Check gauge operation and calibration on independent system.
Technical Manual
Section Contents
4.1
KT8625 8-5/8” Tong
Troubleshooting
TONG WILL NOT DEVELOP SUFFICIENT TORQUE Cont’d:
10. POSSIBLE PROBLEM: Load cell is measuring incorrectly.
SOLUTION: Incorrect load cell is being used.
SOLUTION: Air is trapped in torque measuring circuit (load cell, hydraulic line, or gauge. Refer to torque measurement troubleshooting in Section 6 of this manual.
SOLUTION: Load cell has been damaged. Replace load cell, or return to McCoy for repair and re-calibration.
farr canada corp. GUARANTEES CALIBRATION OF A LOAD CELL/TORQUE GAUGE
ASSEMBLY FOR A PERIOD OF ONE YEAR. farr canada corp. SUGGESTS THAT THE LOAD
CELL/TORQUE GAUGE ASSEMBLY BE RETURNED TO THE FACTORY FOR RE-CALIBRATION ON
A YEARLY BASIS.
4.2
Section Contents
Technical Manual
KT8625 8-5/8” Tong
Troubleshooting
B. Relief valve is incorrectly set or not functioning
1.
POSSIBLE PROBLEM: Relief pressure set too low, resulting in insufficient tong torque.
POSSIBLE PROBLEM: Relief pressure set too high, resulting in crushed pipe or gear train failure.
SOLUTION: Adjust setting:
a.
If your tong is equipped with a system pressure indicator proceed to step “f”. If your tong does not have a system
pressure indicator, a temporary 0 - 3000 PSI indicator must be installed on the hydraulic inlet.
b.
Isolate your tong from hydraulic power, and depressurize following the procedure in section 3.D.
c.
Tee in a temporary indicator at the safety door supply pressure port. Ensure all hydraulic connections are performed by a qualified hydraulic technician.
Connect a temporary 0 - 3000
PSI pressure indicator at this
location
Illustration 4.B.1: Relief Valve Troubleshooting - Installing Temporary Pressure Gauge
e.
Re-establish hydraulic power to your tong.
f.
Loosen the locking nut on the pressure relief valve.
g.
Open the tong door to activate the safety door system and inhibit tong rotation.
h.
Activate motor control valve. Observe the pressure displayed on the pressure indicator. Adjust the relief valve
until the pressure indicated is at the maximum system pressure specified on the specifications page (maximum
system pressure is the pressure at which your tong achieves its specified torque).
do not adjust pressure relief to a setting that allows higher than maximum
system pressure. doing so creates a potential for serious injury or death, and
may cause catastrophic equipment failure.
i.
Release the motor control valve and tighten the locking nut on the pressure relief valve.
j.
Isolate your tong from hydraulic power, and depressurize following the procedure in section 3.D.
k.
Close the tong door, and remove the temporary pressure indicator. Restore the safety door pressure supply line
to factory specifications.
2.
POSSIBLE PROBLEM: Relief cannot be adjusted to maximum system pressure (high fluid bypass results in low system pres-
sure).
SOLUTION: Debris on valve seat, spring is broken, spring has lost spring force due to continuous tension
a.
Isolate your tong from hydraulic power, and depressurize following the procedure in section 3.D.
b.
Loosen the locking nut on the pressure relief valve.
Continued on next page
Technical Manual
Section Contents
4.3
KT8625 8-5/8” Tong
Troubleshooting
Relief valve is incorrectly set or not functioning Cont’d:
4.4
c.
Use a large flat-head screwdriver to completely unthread the poppet and spring from the relief assembly.
d.
Inspect the relief valve spring, poppet, and valve seat.
e.
If no debris is found in relief valve and if seat and poppet are undamaged, replace relief valve spring.
f.
Reassemble relief valve.
g.
Relief valve must be re-set to allow maximum system pressure. Follow the procedure in Step 1 of this section to
properly adjust relief valve.
h.
If maximum system pressure still cannot be reached, replace the entire relief valve assembly.
Section Contents
Technical Manual
KT8625 8-5/8” Tong
Troubleshooting
C.safety door does not operate or is malfunctioning
1.
POSSIBLE PROBLEM: Safety door switch requires adjustment.
SOLUTION: Adjust switch as per section 3.F.4.
2.
POSSIBLE PROBLEM: Safety door switch has failed.
SOLUTION: Test safety door switch for proper function and replace if necessary.
3.
POSSIBLE PROBLEM: Contamination in hydraulic lines.
SOLUTION: Ensure all three flexible hydraulic lines to safety door switch are free-flowing.
4.
POSSIBLE PROBLEM: Pilot-to-open valve in safety door valve block is malfunctioning.
SOLUTION: Remove each valve. Inspect seats and springs. Replace valve(s) if damage is seen on valve seats, or if spring
appears to be damaged or broken.
Technical Manual
Section Contents
4.5
KT8625 8-5/8” Tong
Troubleshooting
D. TONG RUNNING TOO SLOWLY
1.
POSSIBLE PROBLEM: Obstruction in tong hydraulic circuit preventing adequate flow.
SOLUTION: Inspect self-sealing couplings to ensure they are properly engaged.
SOLUTION: The main hydraulic lines (supply and discharge) to the tong are obstructed. Remove and clean if required.
2.
POSSIBLE PROBLEM: Power unit is not producing adequate flow or pressure.
SOLUTION: Troubleshoot power unit (see user’s manual for your particular unit).
3.
POSSIBLE PROBLEM: Tong motor is excessively worn and is leaking hydraulic fluid past the vanes.
SOLUTION: Replace motor, or rebuild as per Section 7 of this manual.
4.
POSSIBLE PROBLEM: Bearings in gear train and rotary section are excessively worn.
SOLUTION: Overhaul tong. See Section 3 of this manual for tong overhaul procedures.
5.
POSSIBLE PROBLEM: Shifter has malfunctioned and the tong is not shifting to high gear.
SOLUTION: Inspect and repair shift mechanism as necessary.
6.
POSSIBLE PROBLEM: Two-speed hydraulic motor (if equipped) is not set to correct speed.
SOLUTION: Check motor, and set to the correct speed if required.
7.
POSSIBLE PROBLEM: Safety door system is not properly adjusted - hydraulic fluid leak past Deltrol valve.
SOLUTION: Check and adjust safety door system.
8.
POSSIBLE PROBLEM: Hydraulic fluid viscosity too high.
SOLUTION: Ensure hydraulic fluid meets McCoy Drilling & Completions specifications.
SOLUTION: Ensure hydraulic fluid is appropriate for climatic conditions, especially during cold-weather operation..
9.
POSSIBLE PROBLEM: By-pass valve not functioning.
SOLUTION: Check and repair.
4.6
Section Contents
Technical Manual
KT8625 8-5/8” Tong
Troubleshooting
E. FAILURE OF JAWS TO GRIP PIPE
1.
POSSIBLE PROBLEM: Dies have become too dull to provide adequate grip.
SOLUTION: Replace dies.
2.
POSSIBLE PROBLEM: Incorrect jaws are being used.
SOLUTION: Double-check jaw size to ensure they are rated for the diameter of pipe or casing being run.
3.
POSSIBLE PROBLEM: Incorrect dies are being used
SOLUTION: Ensure dies loaded in the jaws are appropriate for the type of pipe or casing being run.
4.
POSSIBLE PROBLEM: Brake band(s) is (are) insufficiently adjusted, not allowing jaws to cam properly.
SOLUTION: Adjust brake bands to give proper resistance to cage plates.
5.
POSSIBLE PROBLEM: Jaw roller broken or worn.
SOLUTION: Remove jaw assembly and inspect. Replace rollers that are visibly “flat-spotted” or otherwise damaged.
Technical Manual
Section Contents
4.7
KT8625 8-5/8” Tong
F.
Troubleshooting
FAILURE OR DIFFICULTY OF TONG TO SHIFT
1.
POSSIBLE PROBLEM: Bent or broken shifter handle.
SOLUTION: Replace shifter handle.
2. POSSIBLE PROBLEM: Bent or broken shifter yoke.
SOLUTION: Inspect and replace shifter yoke.
3.
POSSIBLE PROBLEM: “Frozen” or hard-to-move shifter handle.
SOLUTION: Grease shifter shaft.
4.
POSSIBLE PROBLEM: Bent or broken shifter shaft.
SOLUTION: Replace.
5.
POSSIBLE PROBLEM: Locking nuts on shifting shaft have loosened and position of yoke has changed.
SOLUTION: Reposition yoke and re-tighten locking nuts.
6.
POSSIBLE PROBLEM: Shifting yoke has come loose from shifting shaft
SOLUTION: Inspect yoke and inspect for damage. If free of damage, replace on shaft and tighten locking nuts.
7.
POSSIBLE PROBLEM: Tong pops out of gear
SOLUTION: Ensure that detent ball & spring assembly has been correctly set.
4.8
Section Contents
Technical Manual
KT8625 8-5/8” Tong
Troubleshooting
G. GENERAL COMMENTS
The following factors generally contribute to poor hydraulic operation and premature wear of equipment:
1.
Contaminated hydraulic fluid due to overuse, overheating, or inadequate fluid filtration.
2.
Unsuitable hydraulic fluid, especially in extreme climatic conditions.
3.
Defective packing or seals in components of the hydraulic system.
4.
Poor or incomplete hydraulic system training. Users must be fully qualified to operate the equipment, and have complete understanding of the hydraulic system.
If your hydraulic troubleshooting procedures involve flow and pressure tests at the power unit, Farr Canada Corp. recommends construction of a test rig that can easily be connected to the main suction and discharge ports of the power unit.
Technical Manual
Section Contents
4.9
This page intentionally
left blank
KT8625 8-5/8” Tong
PARTS AND ASSEMBLIES
MODEL 80-0609-7 SHOWN
MODEL 80-0609-7-CE SHOWN
Technical Manual
Section Contents
5.1
KT8625 8-5/8” Tong
Spare Parts
The following table lists parts that McCoy Drilling & Completions | FARR has identified as critical spare parts for this model of tong. McCoy
recommends that the specified quantity of each part be on hand at all times.
MISC TONG & BACKUP PARTS
Description
Part Number
Qty. Required
Dumbbell Roller
1037-135
2
Motor Gear
997-A10-149
1
Door Latch Spring
997-16
2
Jaw Pivot Bolt
1050-C5-28
2
Shifting Collar
997-A9-62
1
Cage Plate Spacer
1050-C3-38
3
1053-C-1C
2
Rigid Sling Pins
BEARINGS & BUSHINGS
Description
Part Number
Dumbbell Roller Bearing
02-0094
Qty. Required
10
Rotary Idler Bearing
02-0011
2
Pinion Bearing
02-0007
2
Ball Bearing (Bottom Clutch Bearing)
02-0004
1
Needle Bearing (Clutch Shaft)
02-0003
4
Ball Bearing (Top Clutch Bearing)
02-0002
1
Cam Follower
02-0015
5
FASTENERS & FITTINGS
Description
Part Number
Qty. Required
Idler Bearing Seal
02-0010
4
Idler Gear Retainer
02-0009
4
External Snap Ring Clutch
02-0001
2
Motor Gear Set Screw
09-0106
1
Motor Gear Key
01-0317
1
Hex Bolt 1/2" UNC X 7" (Cage Plate Bolt)
09-1194
2
Hex Bolt 1/2” UNC X 9” (Backing Pin Bolt)
09-1202
1
5/8" Lock Washer (Cam Follower Fastener)
09-5114
5
5/8" UNF Jam Nut (Cam Follower Fastener)
09-5514
5
HYDRAULIC COMPONENTS
Description
Qty. Required
Relief Valve (Backup)
08-1180
1
Check Valve (Backup)
08-0481
1
Relief Cartridge (DVA35)
10-0010R
1
Relief Cartridge (Safety Door)
08-1625
1
1
Seal Kit - Rineer GA15
87-7110
DVA35 Seal Kit
07-0004
1
Safety Door Switch
08-0337M
1
Hydraulic Hose - Lift Cylinder Supply
02-0934H
1
High-Visibility Protective Wrap, Lift Cylinder Hydraulic Hose
02-E0203
1
Continued on next page...
5.2
Part Number
Section Contents
Technical Manual
KT8625 8-5/8” Tong
Spare Parts
Critical Spare Parts List (Continued)
JAW COMPONENTS
Description
Part Number
Qty. Required
Jaw Roller
1050-JR-2125
2
Jaw Pin
1050-JP
2
3.875" Flat Die Insert
13-0008-314-0
48
Contoured Insert (2-3/8” jaw die kits only)
12-0004
8
Contoured Insert (2-7/8” jaw die kits only)
12-0007
8
Contoured Insert (3-1/8” to 3-1/2” jaw die kits only)
12-0011
16
ITEMS ON THE CRITICAL SPARE PARTS LIST MARKED IN RED INDICATE ESSENTIAL HEALTH & SAFETY ITEMS.
FAILURE TO REPLACE DAMAGED ESSENTIAL HEALTH & SAFETY ITEMS WILL PRESENT IMMEDIATE DANGER
TO PERSONNEL OR EQUIPMENT. HAVE THESE ITEMS ON HAND AT ALL TIMES. STOP WORK AND QUARANTINE
TONG UPON DISCOVERY OF DAMAGED OR DEFECTIVE HEALTH AND SAFETY COMPONENTS UNTIL PARTS CAN
BE REPLACED.
In addition to the critical spare parts identified in the previous table, McCoy suggests stocking the following spare parts. Even though these
are not critical spares, stocking these components may significantly decrease repair time in the event of long lead times from the factory.
MISC TONG PARTS
Description
Part Number
Qty. Recommended
Backing Pin
101-4188
1
Backing Pin Spacer
101-4096
1
Backing Pin Stud
101-4097
1
Backing Pin Knob
02-0017
1
Shifting Yoke Weldment
1050-72-1
1
Shifting Shaft
1116-71
1
Door Spring Cylinder
101-0069
1
Brake Band Retainer
101-0140
2
Lined Brake Band Weldment
1050-D4-29
2
AE12-306
1
Safety Door Load Plunger
BEARINGS & BUSHINGS
Description
Part Number
Door Bushing
101-0110
Qty. Recommended
2
FASTENERS & FITTINGS
Description
Part Number
Qty. Recommended
Shifter Detent Force Spring
997-0-64
1
Shifter Detent Force Ball
02-0018
1
1/8” NPT Grease Fitting
02-0005
2
1/8” NPT 90o Grease Fitting
02-0093
2
1/8” NPT 45 Grease Fittings
02-0006
2
1/4” Straight Thread Grease Fitting
02-0097
5
3/8 UNC X .5" Flange Bolt (Jaw Retainer)
09-0229
10
5/16 UNC X .5" Countersunk (Jaw Retainer)
09-1338
10
o
Technical Manual
Section Contents
5.3
KT8625 8-5/8” Tong
Parts List - Complete Overhaul
MISC TONG PARTS
Description
Part Number
Qty. Required
Jaw Pivot Bolt
1050-C5-28
2
Backing Pin
101-4188
1
Backing Pin Spacer
101-4096
1
Backing Pin Stud
101-4097
1
Backing Pin Knob
02-0017
1
Backing Pin Retainer
101-4186
1
Backing Pin Spacer
101-4187
1
Cage Plate Spacer
1050-C3-38
3
Lined Brake Band Weldment
1050-D4-29
2
Brake Band Retainers
101-0140
2
Door Cylinder
101-0069
1
Door Cylinder Post
1050-12-001
1
Latch Springs
997-16
2
Safety Door Interlock
101-1103
1
Safety Door Interlock
101-1104
1
Safety Door Load Plunger
AE12-306
1
Shifting Shaft
1116-71
1
Shifting Yoke
1050-72-1
1
Top Shifter Bushing
101-0020
1
Dumbbell Roller
1037-135
12
Roller Spacer
101-3871
24
Roller Spacer
1037-C-134
12
Door Pivot Roller Shaft
101-3940
1
Roller Shaft
101-3939
11
Drive Gear (Clutch)
997-A3-61
1
Shifting Collar
997-A9-62
1
High Clutch Gear
997-A1-51
1
Splined Clutch Shaft
997-A8-50
1
Low Clutch Gear
997-A1-52
1
Motor Gear
997-A10-149
1
BEARINGS & BUSHINGS
Description
5.4
Part Number
Qty. Required
Dumbbell Roller Bearings
02-0094
24
Idler Bearing
02-0011
3
Pinion Bearing
02-0007
2
Ball Bearing (Bottom Clutch Bearing)
02-0004
1
Needle Bearing (Clutch Shaft)
02-0003
4
Ball Bearing (Top Clutch Bearing)
02-0002
1
Cam Follower
02-0015
26
Door Bushing
101-0110
2
Section Contents
Technical Manual
KT8625 8-5/8” Tong
Parts List - Complete Overhaul
FASTENERS & FITTINGS
Description
Part Number
Rotary Idler Seal
02-0010
Qty. Required
5
Rotary Idler Retainer
02-0009
6
1/4” Straight Thread Grease Fitting
02-0097
12
1/8” NPT Grease Fitting
02-0005
4
1/8” NPT 90o Grease Fitting
02-0093
7
1/8” NPT 45o Grease Fittings
02-0006
1
Snap Ring (Clutch Shaft)
02-0001
1
Motor Gear Set Screw
09-0106
2
Motor Key
01-0317
1
1-1/8” Narrow Flat Washer (Support Roller Top Washer)
02-0471
8
1” Narrow Flat Washer (Support Roller Bottom Washer)
09-5120
6
1" UNS Thin Nylock Nut
09-9167
12
Hex Bolt 1/2" UNC X 7" (Cage Plate Bolt)
09-1194
2
Hex Bolt 1/2” UNC X 9” (Backing Pin Bolt)
09-1202
1
5/8" Lock Washer (Cam Follower Fastener)
09-5114
26
5/8" UNF Jam Nut (Cam Follower Fastener)
09-5514
26
Shifter Detent Force Spring
997-0-64
1
Shifter Detent Force Ball
02-0018
1
HYDRAULIC COMPONENTS
Description
Part Number
Qty. Required
Safety Door Switch
08-0337M
1
Rineer GA15 Seal Kit
87-7110
1
DVA35 Seal Kit
07-0004
1
Relief Cartridge (DVA35)
10-0010R
1
Relief Cartridge (Safety Door)
08-1625
2
Hydraulic Hose - Lift Cylinder Supply
02-0934H
1
High-Visibility Protective Wrap, Lift Cylinder Hydraulic Hose
02-E0203
1
ITEMS ON THE CRITICAL SPARE PARTS LIST MARKED IN RED INDICATE ESSENTIAL HEALTH & SAFETY ITEMS.
FAILURE TO REPLACE DAMAGED ESSENTIAL HEALTH & SAFETY ITEMS WILL PRESENT IMMEDIATE DANGER
TO PERSONNEL OR EQUIPMENT. HAVE THESE ITEMS ON HAND AT ALL TIMES. STOP WORK AND QUARANTINE
TONG UPON DISCOVERY OF DAMAGED OR DEFECTIVE HEALTH AND SAFETY COMPONENTS UNTIL PARTS CAN
BE REPLACED.
Technical Manual
Section Contents
5.5
KT8625 8-5/8” Tong
Gear Train Layout
A
B
C
D
E
J
K
F
G
H
5.6
Section Contents
Technical Manual
KT8625 8-5/8” Tong
Gear Train Layout
ITEM
TYPE
A
Part
DESCRIPTION
QTY
Hydraulic Motor
1
B
Assembly
Clutch Assembly (See Pp. 5.14 - 5.15)
1
C
Assembly
Pinion Assembly (See Pp. 5.12 - 5.13)
1
D
Assembly
Rotary Idler Assembly (See Pp. 5.8 - 5.9)
2
E
Assembly
Support Roller Assembly (See Pp. 5.4 - 5.5)
11
F
Part
Rotary Gear
1
G
Assembly
Cam Follower Assembly (See Pp. 5.18 - 5.19)
24
H
Assembly
Door Pivot Roller Assembly (See Pp. 5.6 - 5.7)
1
J
Assembly
Shifter Assembly (See Pp. 5.16 - 5.17)
1
K
Assembly
Pinion Idler Assembly (See Pp. 5.10 - 5.11)
1
L
Part
Motor Gear
1
PART NUMBER
87-0112
1172-D1
997-A10-149
L
Technical Manual
Section Contents
5.7
KT8625 8-5/8” Tong
Support Roller
A
B
C
D
E
F
G
E
D
H
J
5.8
Section Contents
Technical Manual
KT8625 8-5/8” Tong
Support Roller
Item
(1)
Type
Description
Qty
Part Number
A
Part
1/4” Straight Thread Grease Fitting
1
02-0097
B
Part
Support Roller Shaft
1
101-3939
C
Part
1-1/8” Narrow Flat Washer (1)
1
02-0471
D
Part
Support Roller Spacer
2
101-3871
E
Part
Bearing
2
02-0094
F
Part
Support Roller Internal Spacer
1
1037-C-134
G
Part
Support Roller
1
1037-135
H
Part
1” Narrow Washer
1
09-5120
J
Part
1” UNS Thin Nylock Nut
1
09-9167
(1)
Where support rollers are coincidental with brake band lug weldments upper and lower washers are not
used. Where support rollers are coincidental with front leg weldments lower washers are not used.
Technical Manual
Section Contents
5.9
KT8625 8-5/8” Tong
Support Roller - Door Pivot
A
B
C
D
E
F
G
E
D
H
J
5.10
Section Contents
Technical Manual
KT8625 8-5/8” Tong
Support Roller - Door Pivot
Item
Type
Description
Qty
Part Number
A
Part
1/4” Straight Thread Grease Fitting
1
02-0097
B
Part
Door Pivot Roller Shaft
1
101-3940
C
Part
1-1/8” Narrow Flat Washer
1
02-0471
D
Part
Support Roller Spacer
2
101-3871
E
Part
Bearing
2
02-0094
F
Part
Support Roller Internal Spacer
1
1037-C-134
G
Part
Support Roller
1
1037-135
H
Part
1” Narrow Washer
1
09-5120
J
Part
1” UNS Thin Nylock Nut
1
09-9167
Technical Manual
Section Contents
5.11
KT8625 8-5/8” Tong
Rotary Idler Assembly
A
B
C
D
E
F
G
H
J
G
F
D
C
B
5.12
Section Contents
Technical Manual
KT8625 8-5/8” Tong
Rotary Idler Assembly
Item
Type
A
Part
Description
Qty
Part Number
1/8” NPT Grease Fitting
1
02-0005
B
Part
1-1/4” UNF Hex Nylock Nut
2
09-5740
C
Part
Idler Pad
2
997-D20-125
D
Part
Rotary Idler Spacer
2
1050-D5-121
E
Part
Rotary Idler Shaft
1
1050-D5-117
F
Part
Bearing Seal
2
02-0010
G
Part
Retaining Ring
2
02-0009
H
Part
Bearing
1
02-0011
J
Part
Rotary Idler Gear
1
997-A2-119
Technical Manual
Section Contents
5.13
KT8625 8-5/8” Tong
Pinion Idler Assembly
A
B
C
D
E
F
G
H
J
K
H
L
M
5.14
Section Contents
Technical Manual
KT8625 8-5/8” Tong
Pinion Idler Assembly
Item
Type
Description
A
Part
90 1/8” NPT Grease Fitting
1
02-0093
B
Part
1-1/2” UNF Hex Nylock Nut
1
09-5740
o
Qty
Part Number
C
Part
5/8” UNC x 2-1/2” Hex Bolt
3
09-0081
D
Part
5/8” Lock Washer
3
09-5114
E
Part
Idler Pad
1
997-D17-109
F
Part
Top Plate (Shown for illustration purposes only)
1
G
Part
Pinion Idler Half Shaft
1
1050-D5-105
H
Part
Retaining Ring
2
02-0009
J
Part
Bearing
1
02-0011
K
Part
Pinion Idler Gear
1
997-A2-119
L
Part
Bearing Seal
1
02-0010
M
Part
Bearing Retainer
1
02-0008
Technical Manual
Section Contents
5.15
KT8625 8-5/8” Tong
Pinion Assembly
A
B
C
D
E
F
G
H
E
D
C
B
A
5.16
Section Contents
Technical Manual
KT8625 8-5/8” Tong
Pinion Assembly
Item
Type
A
Part
Description
1/8” NPT 90o Grease Fitting
Qty
4
Part Number
02-0093
B
Part
1/2” UNC x 1-1/2” Hex Bolts
8
09-1170
C
Part
1/2” Lock Washers
8
09-5110
D
Part
Pinion Bearing Cap
2
1050-89
E
Part
Pinion Bearing
2
02-0007
997-A4-87
F
Part
High Pinion Gear
1
G
Part
Pinion Gear Shaft
1
997-A7-86
H
Part
Low Pinion Gear
1
997-A5-88
Technical Manual
Section Contents
5.17
KT8625 8-5/8” Tong
Clutch Assembly
A
B
C
D
E
F
G
H
J
K
H
L
M
N
P
Q
R
S
5.18
Section Contents
Technical Manual
KT8625 8-5/8” Tong
Clutch Assembly
Item
Type
A
Part
Description
Outside Snap Ring
Qty
1
Part Number
1234-00-04
B
Part
Drive Gear
1
997-A3-61
C
Part
Top Clutch Bearing Spacer
1
997-60
D
Part
#10-24 x 3/4” Hex SHCS
2
09-0001
E
Part
Top Clutch Bearing
1
02-0002
F
Part
Top Bearing Retainer
1
997-D11-59
G
Part
High Clutch Gear
1
997-A1-51
H
Part
Needle Roller Bearing
4
02-0003
J
Part
Splined Clutch Shaft
1
997-A8-50
K
Part
Shifting Collar
1
997-A9-62
L
Part
Low Clutch Gear
1
997-A1-52
M
Part
Bottom Clutch Bearing
1
02-0004
N
Part
Clutch Bearing Cap
1
1050-C1-54
P
Part
3/8” Lock Washer
4
09-5106
Q
Part
3/8” UNC x 1-1/4” Hex Bolt
4
09-1048
R
Part
1/8” NPT Grease Fitting
1
02-0005
S
Part
1/8” NPT 90 Deg. Grease Fitting
2
02-0093
Technical Manual
Section Contents
5.19
KT8625 8-5/8” Tong
Shifter Assembly
A
N
B
C
P
D
E
F
Q
R
S
G
H
J
K
L
M
5.20
Section Contents
Technical Manual
KT8625 8-5/8” Tong
Shifter Assembly
Item
Type
A
Weldment
Description
Shifting Handle Weldment
Qty
1
Part Number
1037-D-20B
B
Part
HITCH PIN .0930 X 1.125
2
02-0274
C
Part
Detent Ball
1
02-0018
D
Part
7/16” UNF x 1-1/4” Hex Bolt
1
09-1608
E
Part
7/16” UNF Hex Jam Nut
1
09-5508
997-0-64
F
Part
Detent Spring
1
G
Part
5/8” UNC x 5/8” Hex Socket Set Screw
3
09-2011
H
Part
Shifting Shaft
1
1116-71
J
Weldment
K
Part
Shifting Fork Weldment
1
1050-72
5/8” UNF Hex Nut
1
09-5914
L
Part
5/8” UNF Hex Jam Nut
1
09-5915
M
Part
Lower Shifter Bushing (typically welded to bottom plate)
1
1064-B1-95
N
Part
3/8” UNC x 1” Hex Bolt
4
09-1046
P
Part
3/8” Lock Washer
4
09-5106
Q
Part
5/16” x 1-1/2” Clevis Pin
2
09-0256
R
Part
Shifter Lug Weldment (Bolted)
1
101-0016
S
Part
Top Shifter Bushing (threaded)
1
101-0020
Technical Manual
Section Contents
5.21
KT8625 8-5/8” Tong
Rotary Assembly
A
B
C
M
D
N
E
P
F
G
Q
H
R
J
K
S
T
U
L
5.22
Section Contents
Technical Manual
KT8625 8-5/8” Tong
Rotary Assembly
Item
Type
A
Part
1/2” UNC x 9” Hex Bolt
Description
Qty
1
09-1202
Part Number
B
Part
Backing Pin Knob
1
02-0017
C
Part
3/8” UNF x 2” Threaded Stud
1
101-4097
D
Part
Backing Pin Spacer
1
101-4096
E
Part
Backing Pin Spacer
1
101-4186
F
Part
Backing Pin Retainer
1
101-4187
G
Part
Backing Pin
1
101-4188
09-5514
H
Part
5/8” UNF Hex Jam Nut
26
J
Part
5/8” Lock Washer
26
09-5114
K
Part
Cam Follower
26
02-0015
L
Part
Cage Plate - BOTTOM
1
1050-22
M
Part
1/2” Regular Flat Washer
1
09-5010
N
Part
Jaw Pivot Bolt
2
1050-C5-28
P
Part
1/2” UNC x 7” Hex Bolt
2
09-1194
Q
Part
1/2” Narrow Flat Washer
1
09-5119
R
Part
Cage Plate - TOP
1
1050-21
S
Assembly
Jaw Die Kit (5-1/2” shown - see Pp. 2.10 - 2.11)
2
T
Part
Cage Plate Spacer
3
1050-C3-38
U
Part
Rotary Gear
1
1172-D1
Technical Manual
Section Contents
5.23
KT8625 8-5/8” Tong
Leg Assemblies
A
B
E
C
F
D
5.24
Section Contents
Technical Manual
G H
KT8625 8-5/8” Tong
Leg Assemblies
Item
Type
A
Weldment
Rear Leg Weldment
Description
Qty
B
Weldment
LH Leg Weldment
1
101-0162
C
Part
Regular 7/8” Flat Washer
1
09-5022
D
Part
7/8” UNC x 1-1/4” Hex Socket Head Cap Screw
E
Weldment
1
101-0163
1
RH Leg Weldment
Part Number
997-D8-160A
F
Part
1” UNS Thin Nylock Nut
1
09-9167
G
Part
3/8” NC x 2” Hex Bolt
4
09-1054
H
Part
3/8” Carbon Steel Lock Washer
4
09-5106
Technical Manual
Section Contents
5.25
KT8625 8-5/8” Tong
Hydraulic Supports
A
H
B
J
C
K
D
L
M
E
C
N
F
F
G
5.26
Section Contents
Technical Manual
KT8625 8-5/8” Tong
Hydraulic Supports
A
The illustration on this page
applies to CE-Marked versions
only
H
A
P
Q
R
Item
Type
A
Part
1/2” UNC x 4-1/2” Hex Bolt
Description
Qty
3
09-1184
Part Number
B
Part
Hydraulic Valve Mount Post
2
101-0116
C
Part
3/8” UNC x 1” Hex Bolt
6
09-1046
D
Part
3/8” UNC x 2” Hex Bolt
2
09-1054
E
Part
Adjustable Plate - Discharge Line Support
1
101-0277
F
Part
3/8” Lock Washer
4
09-5106
G
Part
Discharge Line Support Mounting Plate
1
101-0023
H
Part
1/2” Lock Washer
2
09-5110
J
Part
Adjustable Plate - Inlet Line Support
1
101-0022
K
Weldment
Inlet Line Support Mounting Base
1
101-1138
L
Part
3/8” UNC Thin Nylock Nut
6
09-
M
Part
3/8” Narrow Flat Washer
6
09-5124
N
Part
3/8” UNC x 1-1/4” Hex Bolt
2
09-1048
P
Weldment
Valve Handle Guard
1
CE-HANDLE-2
Q
Part
1/2” Flat Washer
1
09-5010
R
Part
1/2” UNC Thin Nylock Nut
1
09-5610S
Technical Manual
Section Contents
5.27
KT8625 8-5/8” Tong
Motor & Motor Mount
A
B
C
D
L
M
E
N
P
Q
F
G
H
J
K
5.28
Section Contents
Technical Manual
KT8625 8-5/8” Tong
Motor & Motor Mount
Item
Type
A
Weldment
Description
Qty
Part Number
Torque Gauge Mount Weldment
1
1500-09-03A
B
Part
1/2” UNC x 1-1/4” Hex Socket Head Cap Screw
2
09-2168
C
Part
1/2” UNC x 1” Hex Socket Head Cap Screw
2
09-2166
D
Part
1/2” Lock Washer
4
09-5110
E
Part
Hydraulic Motor
1
87-0112
F
Part
Motor Gear
1
997-A10-149
G
Part
3/8” UNC x 3/8” Hex Socket Set Screw
2
09-0106
H
Part
1/2” UNC x 1-1/2” Hex Socket Head Cap Screw
4
09-2170
J
Part
1/8” NPT 90o Grease Fitting
1
02-0093
K
Part
Motor Mount
1
1050-150
L
Part
#20 (1-1/4”)/JIC 1” Flange Elbow
2
02-9216
M
Part
0.148” x 2.938” Hitch Pin
1
N
Part
#20 (1-1/4”) Split Flange Kit
2
Part
O-Ring
1
Part
#20 (1-1/4”) Split Flange
2
Part
7/16” Lock Washer
4
Part
7/16” UNC x 1-1/2” Hex Bolt
4
Torque Gauge Holder Weldment
1
5/16” x 5/16” x 1-1/2” Square Gear Key
1
P
Weldment
Q
Part
Technical Manual
02-9217
1500-09-04A
Section Contents
5.29
KT8625 8-5/8” Tong
Brake Bands
E
F
G
A
B
H
C
J
D
5.30
Section Contents
Technical Manual
KT8625 8-5/8” Tong
Brake Bands
Item
Type
A
Weldment
Lined Brake Band Weldment
Description
Qty
2
1050-D4-29
Part Number
B
Weldment
Brake Band Lug Weldment (Top Right, Bottom Left)
2
101-0096
C
Part
3/8” Narrow Flat Washer
4
09-5124
D
Part
3/8” UNC Thin Nylock Nut
4
E
Part
3/8” x 1” Hex Cap Screw
4
09-1046
F
Part
3/8” Lock Washer
4
09-5106
G
Part
Brake Band Retainer
2
101-0140
3/8” UNC x 1-1/4” Hex Bolt
4
09-1048
Brake Band Lug Weldment (Bottom Right, Top Left)
2
101-0083
H
Part
J
Weldment
Technical Manual
Section Contents
5.31
KT8625 8-5/8” Tong
Tong Door
A
B
C
M
N
A
P
Q
R
B
D
S
T
E
F
G
H
J
V
W
X
U
K
L
5.32
Section Contents
Technical Manual
KT8625 8-5/8” Tong
Tong Door
Item
Type
A
Part
3/8” UNC x 3/4” Hex Bolt
4
09-1044
Part
CE-MARKED: 3/8” UNC x 3/4” Hex Bolt, SSD
3
09-1044SSD
Part
3/8” Carbon Steel Lock Washer
4
09-5106
B
Description
Qty
Part Number
C
Part
1/8” NPT Grease Fitting
1
02-0005
D
Part
Adjustment Cam
1
1037-A-14
E
Assembly
Safety Door Latch Block Assembly (Pp. 5.30 - 5.31)
1
F
Weldment
Door Weldment
1
1050-C4-10
G
Part
1/2” Lock Washer
1
09-5110
H
Part
1/2” UNC Hex Nut
1
09-9124
J
Part
1/2” x 1-3/4” Hex Bolt
1
09-2172
K
Weldment
Door Latch Weldment
1
1050-15
L
Part
Latch Spring
2
997-16
M
Part
Switch Guard Top Plate
1
101-1474
N
Part
Door Pivot Support Roller Shaft
1
101-3940
P
Part
1/2” x 1/2” Hex Socket Shoulder Bolt UNC
2
02-0973
Q
Assembly
R
Part
S
Assembly
Safety Door Latch Switch Assembly (Pp. 5.30 - 5.31)
1
1/2” Narrow Flat Washer
2
09-5119
Door Cylinder
1
101-0069
T
Part
1 1/8” Narrow Washer (Door Pivot Roller)
1
02-0471
U
Part
Shoulder Bushing
2
101-0110
V
Part
Door Cylinder Mounting Lug
1
1050-12-001
W
Part
1” Narrow Washer (Door Pivot Roller)
1
09-5120
X
Part
1” UNS Thin Nylock Nut (Door Pivot Roller)
1
09-9167
Technical Manual
Section Contents
5.33
KT8625 8-5/8” Tong
Safety Door Components
A
L
H
M
B
C
N
D
P
E
Q
R
F
H
G
H
J
S
K
5.34
Section Contents
Technical Manual
KT8625 8-5/8” Tong
Safety Door Components
Item
Type
Description
Qty
Part Number
A
Part
3/8” x 1/2” Shoulder Bolt, UNC
4
09-0125
B
Part
Safety Door Latch Block
1
101-1104
C
Part
15/16” Valve Lock Nut
1
09-0278
D
Part
Safety Door Latch Block
1
101-1103
E
Part
3/8” UNC x 1” Hex Socket Head Cap Screw
2
09-1738
F
Part
Safety Door Latch Spacer
1
101-1411
G
Part
3/8” UNC x 1-1/2” Hex Bolt
1
09-1553
H
Part
3/8” Carbon Steel Lock Washer
6
09-5106
J
Part
Safety Door Latch Plate
1
101-1410
K
Part
3/8” UNC x 1” Hex Socket Flat Countersunk Cap Screw
3
09-4046
L
Part
3/8” UNC x 3/4” Hex Bolt
4
09-1044
M
Part
Switch Guard Top Plate
1
101-1474
N
Part
1/4” NPT - JIC 90 degree elbow 2024-4-4
3
08-0284
P
Part
Safety Door Switch
1
08-0337M
Q
Part
Load Plunger
1
AE12-306
R
Part
3/8” UNC x 3” Hex Bolt
2
09-1058
S
Weldment
Safety Door Switch Guard Weldment
1
101-1475
CE-Marked tongs use the following parts in place of those in the previous table:
Item
Type
Description
Qty
Part Number
A
Part
3/8” x 1/2” Shoulder Bolt, UNC, SS Drilled
4
09-0125SSD
G
Part
3/8” UNC x 1-1/4” Hex Bolt, SS Drilled
1
09-1048SSD
L
Part
3/8” UNC x 3/4” Hex Bolt, SS Drilled
4
09-1044SSD
R
Part
3/8” UNC x 3” Hex Bolt, SS Drilled
2
09-1058SSD
Technical Manual
Section Contents
5.35
KT8625 8-5/8” Tong
Rigid Sling
A
B
N
C
D
K
L
E
M
F
G
H
P
Q
R
J
5.36
Section Contents
Technical Manual
KT8625 8-5/8” Tong
Rigid Sling
ALL FASTENERS USED TO ASSEMBLE LOAD-BEARING COMPONENTS (CHAIN SLINGS, RIGID
SLINGS, BACKUP LEGS) MUST BE TIGHTENED TO THE CORRECT TORQUE.
See Page 3.12
Item
Type
A
Part
Rigid Sling Weldment
- CE Marked Tong
Description
Qty
Part Number
Lifting Link
1
02-0516
B
Part
Rigid Sling Adjustment Helix
1
1053-1-H
C
Part
3/4” NC x 9” Hex Bolt
1
09-1322
D
Weldment
Rigid Sling Weldment
1
101-0112
E
Part
1/2” NC Hex Jam Nut
2
09-5810
F
Part
1/2” NC x 1-3/4” Hex Bolt
2
09-1172
G
Part
3/8” NC x 2” Hex Bolt
4
09-1046
H
Part
3/8” Helical Lock Washer
4
09-5106
J
Weldment
LH Rigid Sling Bracket
1
101-0113
Weldment
RH Rigid Sling Bracket
1
101-0115
K
Weldment
Level Adjustment Bolt
2
1053-C-1L
L
Part
3/4” UNC Hex Nut
2
09-5818
M
Part
Rigid Sling Pin
2
1053-C-1C
N
Part
3/4” NC Nylock Nut
1
1429-39-02
P
Part
3/16” Hitch Pin
4
02-0028
Q
Part
1/2” UNC x 1-1/2” Hex Bolt
4
09-1170
R
Part
1/2” Lock Washer
4
09-5110
CE-Marked tongs use the following parts in place of those in the previous table:
Item
Type
D
Weldment
G
Part
Q
Part
Description
Rigid Sling Weldment
Qty
Part Number
1
101-0112-CE
3/8” UNC x 2” Hex Bolt, SS Drilled
4
09-1054SSD
1/2” UNC x 1-1/4” Hex Bolt, SS Drilled
4
09-1168SSD
Technical Manual
Section Contents
5.37
This page intentionally
left blank
KT8625 8-5/8” Tong
Torque Measurement
a. Basic Torque Measurement
Basic torque measurements are performed using a simple hydraulic measurement system. A hydraulic load cell connects to a calibrated torque gauge through a reinforced flexible hydraulic hose. The torque gauge is factory-calibrated to display accurate torque
measurements for a tong or tong and backup assembly with a particular arm length. The arm length is a measurement from the centre
of the pipe or casing to the centre of the force being applied to the load cell.
Two load cell options are available. A tension load cell is typically used with a suspended stand-alone tong. This application requires
that the load cell be attached to the rear of the tong as part of the restraint line that opposes the force generated when the tong
makes up or breaks out a joint. A compression load cell is used in a tong and backup assembly, and is typically located on the rear of
the backup between the backup and a stationary frame. The load cell must be located in the centre of the compression force vector
generated between the backup and the frame.
Hydraulic force generated by a load cell is transmitted to the torque gauge via a reinforced flexible hydraulic line. The hydraulic force
is displayed as torque in units of Ft.-Lbs. The torque gauge has a red “peak torque” indicator that tracks with the torque gauge needle
to the point of highest torque, and remains at the point of highest torque until manually reset. Note that every model of tong and
tong and backup assembly has a unique arm length, and the torque gauge must be calibrated for that arm length. Torque gauges
that are not calibrated for the arm length of the tool in service will not display correct torque. To ensure correct torque measurement,
ensure the arm length or “handle” as displayed on your torque gauge matches the arm length of the tool in service as listed on the
specifications page of the technical manual.
The images on this page are for illustration purposes only and may not accurately represent the torque gauge and load cell that have
been supplied with your equipment.
THE IMAGES DISPLAYED ARE SUPPLIED FOR ILLUSTRATION PURPOSES ONLY
Illustration 6.A.2: Tension Load Cell
Illustration 6.A.1: Torque Gauge (For
Illustration Purposes Only)
Illustration 6.A.3: Compression Load Cell
Torque gauges and load cells are supplied as a matched calibrated pair. Substituting one or the other will render the calibration
inaccurate even if the actual model numbers appear to be identical. The serial numbers of matching load cell and torque gauges
are clearly identified on the calibration certificate. Should you suspect the accuracy of your torque measurements, or wish to replace
either component the pair should be returned to the factory for re-calibration before placing into service.
torque gauges and load cells are factory-supplied as matched calibrated
pairs. if replacing either component the load cell and torque gauge must be
returned to the factory for re-calibration before placed into service.
Technical Manual
Section Contents
6.1
KT8625 8-5/8” Tong
Torque Measurement
Basic Torque Measurement (Continued:)
The images on the preceding page are for illustration purposes only and may not accurately represent the torque gauge and load cell
that have been supplied with your equipment. Please note that the parts listed in the following table are correct for accurate torque
measurement while using the equipment for which this manual is supplied.
THE TORQUE GAUGE USED IS FULLY DEPENDANT UPON THE ARM LENGTH AND TORQUE
RANGE OF THE EQUIPMENT IN USE. THE PART NUMBERS LISTED IN THE FOLLOWING TABLE
ARE CORRECT FOR ACCURATELY MEASURING TORQUE USING THE EQUIPMENT FOR WHICH
THIS MANUAL IS SUPPLIED.
Item
Type
Description
Qty
Part Number
Assembly
36” Arm-30K Tension Load Cell and Gauge
1
10-0017T
10-0008T
2
A
Part
4.08 in Tension Load Cell
1
B
Part
Torque Gauge, 30,000 Ft.-Lbs. 36” Arm
1
10-0017G
C
Part
Hydraulic Hose
1
02-0069
load cells are not user serviceable. illustration 6.A.4 IS provided for information purposes only. damaged load cells must be returned to the factory for
repair and re-calibration.
electronic load cells are not permitted for use
with ce marked equipment
6.2
Section Contents
Technical Manual
KT8625 8-5/8” Tong
Torque Measurement
Item
Type
Assembly
Description
Tension Load Cell, 4.08 in2
A
Part
1/4” NC x 1/2” Binding Head Machine Screw
B
Part
Stat-O-Seal
C
Part
O-Ring
D
Part
O-Ring
E
Part
Load Cell Piston
F
Part
Flange Gasket
G
Part
Load Cell End
H
Part
Load Cell Rod
J
Part
Wiper
K
Part
O-Ring
L
Part
Load Cell Body
M
Part
3/8” NC x 3/8” Cup Point Hex Set Screw
Seal Kit
This is the standard tension load cell supplied by McCoy
Drilling & Completions | Farr. Contact our sales department for information about optional applicationspecific tension load cells.
H
Replacement Seal Kit 4.08 in Tension Load Cell
2
J
K
A
B
C
L
D
E
M
F
G
Illustration 6.A.4: Tension Load Cell
Technical Manual
Section Contents
6.3
KT8625 8-5/8” Tong
Torque Measurement
A
2.75”
B
C
D
E
2.74”
D
Item
Type
Description
Qty
Assembly
Standard Turn Counter Encoder Mount
1
A
Part
6-32 x 3/8” Hex Socket Head Set Screw
4
Part Number
60-0001
C
F
B
Part
Helical Flexible Encoder Shaft Coupling
1
60-0130N
C
Part
Internal Retainer Ring
2
1376-13
D
Part
Bearing
2
1376-05
E
Part
Encoder Housing
1
1392-104A
F
Part
Internal Retainer Ring
1
02-0436
G
Part
Encoder Shaft
1
1392-103A-01
H
Part
Encoder Gear
1
01-0320A-M
J
Part
10-24 x 1-1/4” Hex Socket Head Set Screw
1
G
H
J
Illustration 6.A.5: Turn Counter Encoder Mount
6.4
Section Contents
Technical Manual
KT8625 8-5/8” Tong
Torque Measurement
B.TROUBLESHOOTING
Under normal operating conditions, and with proper maintenance, the torque gauge and load cell system are designed to give lasting
trouble-free performance. Faulty indication on the gauge will very often define a fault within the gauge.
IF TROUBLESHOOTING REVEALS THAT THERE IS INSUFFICIENT FLUID IN THE SYSTEM, BEFORE
RECHARGING, CHECK THAT ALL SYSTEM COMPONENTS ARE FREE FROM DAMAGE. THIS WILL
ENSURE THAT FLUID LOSS WILL NOT CONTINUE AFTER RELOADING
1. 2. 3.
Symptom: No indication on gauge.
Possible Problem: Obstruction in hydraulic hose.
Solutions: Check hydraulic hose for kinks.
Replace hydraulic hose.
Possible Problem: Loss of hydraulic fluid.
Solution: Recharge hydraulic fluid (see Section 6.C). NOTE: Ensure any breaches in the hydraulic system
between the load cell and torque gauge are repaired to prevent further fluid loss.
Possible Problem: Internal mechanism of torque gauge is damaged.
Solution: Replace gauge.
Symptom: Gauge indication unexpectedly high.
Possible Problem: Excessive hydraulic fluid.
Solutions: Completely drain hydraulic fluid from torque gauge/load cell system. Recharge following the procedure in Section 6.C.
Possible Problem: Internal mechanism of gauge is damaged.
Solution: Replace gauge.
Possible Problem: Incorrect torque gauge in use (not part of the original torque gauge/load cell pair).
Solution: Replace gauge with gauge properly calibrated for the load cell in service.
Symptom: Gauge indication unexpectedly low
Possible Problem: Insufficient hydraulic fluid.
Solution: Recharge hydraulic fluid (see Section 6.C). NOTE: Ensure any breaches in the hydraulic system
between the load cell and torque gauge are repaired to prevent further fluid loss.
Possible Problem: Obstruction in hydraulic hose.
Solutions: Check hydraulic hose for kinks.
Replace hydraulic hose.
Possible Problem: Snub line not at right-angle to tong handle.
4.
Solution: Check angle of snub line and correct if necessary.
Possible Problem: Internal mechanism of gauge is damaged.
Solution: Replace gauge.
Possible Problem: Incorrect torque gauge in use (not part of the original torque gauge/load cell pair).
Solution: Replace gauge with gauge properly calibrated for the load cell in service.
Symptom: Gauge indication is erratic or sluggish
Possible Problem: Insufficient hydraulic fluid in torque measurement section.
Solution: Recharge hydraulic fluid (see Section 6.C). NOTE: Ensure any breaches in the hydraulic system
between the load cell and torque gauge are repaired to prevent further fluid loss.
Possible Problem: Loss of damping fluid in torque gauge.
Solution: Top up or refill damping fluid (NOTE: Ensure leakage points in gauge are identified and repaired
to prevent further loss of damping fluid).
Possible Problem: Air bubbles in hydraulic fluid in the torque measurement system.
Solution: Bleed air from load cell and torque gauge and top up fluid (if necessary) as per Section 6.C.
Possible Problem: Internal mechanism of gauge is damaged.
Solution: Replace gauge.
Technical Manual
Section Contents
6.5
KT8625 8-5/8” Tong
Torque Measurement
C. PERIODIC INSPECTION AND MAINTENANCE
only qualified, designated personnel are permitted to perform maintenance on
the torque measurement system.
1.Inspection
The torque measurement system supplied with your equipment is designed and built to provide years of trouble-free service
with minimum maintenance. Periodic inspections of the load cell, hydraulic lines and fittings are recommended in order to keep
the system in top operating condition. A thorough inspection should be made at each rig-up.
2.
Fluid Recharge
Recharge hydraulic system with W15/16 fluid through the check valve on the torque indicating gauge. Recharging must only be
performed when there is no load on the load cell. Refer to the illustrations on pages 6.3 & 6.4 for guidance if required.
a.
Place the torque indicating gauge higher than the load cell. Remove the brass 1/4” cap from the fitting on the check valve
on the top of the gauge.
b.
Connect the hand pump to the check valve fitting.
c.
Elevate the load cell so it is higher than the torque gauge and hand pump.
Un-contained spillage of the hydraulic fluid in this system may contravene
governmental environmental regulations, or the environmental regulations
and policies of your company. Farr Canada Corp. highly recommends placing
your load cell in a containment basin before proceeding with the bleeding &
refilling process.
d. Fill hand pump bowl with W15/16 hydraulic fluid.
MAINTAIN GREATER-THAN HALF FULL FLUID LEVEL IN THE HAND PUMP BOWL TO AVOID
PUMPING AIR INTO THE SYSTEM. DO NOT ALLOW THE LEVEL TO FALL BELOW ONE-HALF FULL
e.
Remove the vent plug screw and Stat-O-Seal (Items C and D on Illustration 6.A.4, or item H on Illustration 6.A.5) to allow
trapped air to escape.
f. Pump fluid into the system until no more air is seen escaping from the vent port.
3.
g.
Replace the vent plug screw and Stat-O-Seal and tighten securely.
h.
Remove load cell from containment vessel and wipe clean. Reclaim the hydraulic fluid (if it is clean) or dispose of all waste
materials according to governmental or your company’s proscribed environmental protection regulations.
i.
Disconnect the hand pump from the torque gauge.
j.
Replace the brass cap on the torque gauge check valve fitting.
Reference Checking Your Torque Measurement System
The following steps define a process for determining if your torque measurement system is correctly measuring and indicating
within an expected range. This procedure is best suited for performing in a shop or location removed from the drill floor, within
range of a crane. This is a reference check and not a calibration. Calibrations must be performed at an authorized calibration
facility.
Tension Load Cell
a.
Locate a known weight in the range of approximately 500 to 1000 lbs (227 to 455 kg), and move the weight next to the
tong and backup assembly.
b.
Remove the tension load cell from the tong, but do not disconnect from the torque gauge.
c.
Suspend the load cell, piston side up, from a crane capable of supporting the known weight in Step 3a.
d.
Connect the rod side of the load cell to the known weight, and use the crane to hoist the weight from the surface to be
suspended freely.
Continued on next page...
6.6
Section Contents
Technical Manual
KT8625 8-5/8” Tong
Torque Measurement
Reference Checking Your Torque Measurement System (continued):
Tension Load Cell (continued):
e.
Perform a simple calculation to determine the expected indication on the torque gauge based on the known hoisted weight.
This is a calculation that must be performed using imperial units (eg., pounds and feet). The calculation is: [KNOWN
WEIGHT] x [ARM LENGTH (in feet)]. For example, if the arm length is 36 inches and the hoisted weight is 1000 lbs the
calculation is:
Therefore, the expected indication on the torque gauge should be 3000 lbs-ft.
1000 x (36/12) = 3000
4. Repair And Calibration
Return the load cell and indicator gauge to the authorized repair facility for repairs and calibration.
Technical Manual
Section Contents
6.7
This page intentionally
left blank
KT8625 8-5/8” Tong
Section 7: Hydraulic Component Information
The manufacturer information contained in this section has been obtained from publicly available web sites and has been provided for
information purposes only. McCoy Drilling & Completions does not guarantee the accuracy of the information contained in this section.
All original copyrights claimed by the manufacturer(s) apply.
Technical Manual
Section Contents
7.1
R
E
R
OF HYDR
Hydraulic Information
A
U
L
U
KT8625 8-5/8” Tong
CT
IC
MA
TORS
N U FA
MO
R
POWER to be the Best!
HYDRAULICS, INC.
MOTOR SELECTION GUIDE
Features of the 15 Series Standard Motor:
Standard Motor - 3000 PSI (Code 61)
Eight fixed displacement motors
ranging from 6 in 3 to 15 in 3.
Starting and stall torques equal
to 90-94% of theoretical torque.
Speed to 2,000 RPM continuous.
Up to 75 HP continuous.
Conforms to SAE 'C' mounting
specification.
Weighs 43 lbs.
CROSS SECTION
Made in USA
7.2
Section Contents
PUBLICATION DS151005 8/03
Technical Manual
KT8625 8-5/8” Tong
Hydraulic Information
15 Series Standard Motor Envelope
7.17
2.18
5.87
.24
.51
6.81
CENTER
LINE
CASE
DRAIN
1.62
EFF.
KEY
3.41
5.000
4.998
5.69
4.51 17°
1.250
1.248
5.70
5.91
17°
.314
.316
1/213UNC
3/8" O-RING BOSS
CASE DRAIN
(2) PLACES
1.0
SAE STD. 1.25
4-BOLT FLANGE
NEAR AND FAR
CENTER
LINE
CASE
DRAIN
9/16" DIA., 4 HOLES
1.38
SAE 14T 12/24 PITCH
FLAT ROOT SIDE FIT
INVOLUTE SPLINE
OPTIONAL SHAFT
15 Series Two Speed Envelope
9.0
7.80
1/4 O-RING
BOSS
2.18
.24
5.80
.50
1.62
EFF.
KEY
5.000
4.998
5.40
1.250
1.248
5.91
SAE 1/4 O-RING
BOSS
1.8
ALTERNATE
PORT "B"
1-1/4 O-RING
BOSS
PORT
"B"
17°
PORT
"A"
3/8" O-RING
BOSS
CASE DRAIN
(2) PLACES
1.0
SAE STD. 1.25
4-BOLT FLANGE
NEAR AND FAR
3.41
4.50
SQR. 17°
5.70
.313
.315
1/2-13UNC
x 1/2 DP.
PORT 'A'
6.82
CENTER
LINE
CASE
DRAIN
2.2
9/16" DIA., 4 HOLES
CENTER LINE
CASE DRAIN
ALTERNATE
PORT "A"
1-1/4 O-RING
BOSS
1.3
B
A
OPTIONAL SHAFT
SAE 14T 12/24
PITCH
FLAT ROOT SIDE FIT
INVOLUTE SPLINE
REAR VIEW
Technical Manual
Section Contents
7.3
KT8625 8-5/8” Tong
Hydraulic Information
Technical Information - All Styles
VANE CROSSING VANE
The Rineer patented vane crossing vane design produces
much higher volumetric and mechanical efficiencies than is
possible with a standard vane type design. This design
provides a sealing vane between cavities to improve
mechanical and volumetric efficiencies.
STARTING AND STALL TORQUE
The Rineer motor produces torque curves which are virtually
flat, with starting and stall torque equal to approximately 9094% of theoretical torque.
MORE POWER STROKES PER REVOLUTION
The 15 Series has four stator cavities and 10 rotor vanes.
Each rotor vane works in each stator cavity once per
revolution, which results in 40 power strokes per revolution.
This helps produce higher mechanical efficiency and flatter
torque curves.
BEARING LOADING
The bearings in the 15 Series can accept radial load per the
radial capacity chart. Thrust load is not recommended under
most conditions. Consult with a Rineer Application Engineer
for optional bearing configurations to match your application.
SEALS
Buna N seals are supplied as standard on the Rineer 15
series motors. Viton seals may be ordered as an option.
ROTATING GROUP - 1S or 1H
FILTRATION
25 micron minimum.
FLUID
We suggest premium grade fluids containing high quality rust,
oxidation and foam inhibitors, along with anti-wear additives.
For best performance, minimum viscosity should be
maintained at 100 SSU or higher. Fluid temperature should not
exceed 180O F. Elevated fluid temperature will adversely affect
seal life while accelerating oxidation and fluid breakdown. Fire
resistant fluids may be used with certain limitations. Contact
Rineer for additional information.
CASE DRAIN
The 15 Series Motor is designed for either internal or external
case drain. Two case drain ports are supplied. When using
internal case drain, simply plug the two ports. When using
external case drain, use the port at the highest elevation. We
recommend case drain pressure of 35 PSI or less when using
the standard seals.
CASE DRAIN CIRCULATION
Fluid should be circulated through the case when a
temperature differential exists between the motor and the
system in excess of 50O F. Should this occur, contact a
Rineer Application Engineer.
MOUNTING
The mounting position is unrestricted. The shafts, pilots, and
mounting faces should be within .002 TIR.
Under most operating conditions, 1S (standard rotating
group parts) should be used. Under some high speed
conditons 1H can be specified.
INTERMITTENT CONDITIONS
ROTATION
OTHER AVAILABLE MOTORS
HORSEPOWER LIMITATION
37 Series ..............................................Publication DS371003
57 Series ..............................................Publication DS571003
125 Series ............................................Publication DS1251003
The 15 Series Motor rotates equally well in either direction
and smoothly throughout its entire pressure and speed
range. Looking into the end of the shaft, rotation is clockwise
when oil is supplied to port "A".
Intermittent conditions are to be less than 10% of every minute.
For information on additional Rineer Motors, request one of the
following publications:
Maximum horsepower limitations may vary with different
applications. When using the 15 Series Motor above 75
HP, consult a Rineer Application Engineer.
Technical Information - Retractable Shaft Motor
RETRACTING THE SHAFT
RE-ENGAGING THE SHAFT
RETAINING SHAFT IN RETRACTED POSITION
BEARING LOADING
The shaft is spring loaded into the engaged position. Pulling
on the knob attached to the shaft at the rear of the motor will
move the shaft 1.25 inches into the motor.
CAUTION: Retracting the shaft must be done when the
motor and driven mechanism are not in operation and
are unloaded.
The shaft is retained in the retracted position by inserting a
Section
Contents
Technical
anual
7.4
2.0 inch wide
spacer between
the rear housing
and theM
knob
attached to the shaft. Depending on the application and
mounting position of the motor, the spacer design may vary.
Spacers are not supplied with the motor.
This is accomplished by releasing the shaft, then rotating it
clockwise until the splines of the shaft line up and engage the
splines of the driven mechanism.
CAUTION: Re-engaging the shaft must be done when the
motor and driven mechanism are not in operation and are
unloaded.
The 15 series Retractable is not suitable for applications which
require radial or axial loading of the shaft.
MOUNTING
The mounting position is unrestricted. CAUTION: The shaft
KT8625 8-5/8” Tong
Hydraulic Information
Performance Data - Selected Displacements
9.5 C.I.D.
ACTUAL TORQUE AND POWER 6-CID
340
320
100 RPM
300
1700 RPM
100 RPM
280
50
1200 RPM
40
30
800 RPM
1000
1500
2000
PRESSURE (psid)
2500
200
100
1700 RPM
180
80
1300 RPM
140
60
900 RPM
100
10
40
60
500 RPM
30
40
300 RPM
20
20
0
3000
0
500
100 RPM
1000
60
75
55
1800
70
50
1600
45
1400
55
40
1200
50
2500
10
0
3000
1700
1500
1400
65
60
1000
800
1500
2000
PRESSURE (psid)
ACTUAL FLOW - 9.5 CID
80
25
50
80
2000
30
70
120
ACTUAL FLOW - 6 CID
35
90
160
20
400 RPM
100 RPM
220
POWER (HP)
1600 RPM
POWER (HP)
60
240
1200
1000
45
40
800
35
30
600
RPM
2000 RPM
TORQUE (ft-lbf)
70
FLOW (gpm)
600
25
20
400
15
200
100
10
400
20
15
200
100
10
5
5
0
500
0
0
500
1000
11.5 C.I.D.
450
1500
2000
PRESSURE (psid)
2500
3000
15 C.I.D.
ACTUAL TORQUE AND POWER - 11.5 CID
425
400
1600 RPM
375
100 RPM
350
325
275
250
130
120
110
100
1200 RPM 90
80
70
60
800 RPM
50
40
400 RPM 30
20
200 RPM
10
100 RPM
0
2500
3000
1600 RPM
200
POWER (HP)
175
TORQUE (ft-lbf)
300
225
150
125
100
75
50
25
0
500
1000
1500
2000
PRESSURE (psid)
ACTUAL FLOW - 11.5 CID
100
1000
600
575
550
525
500
475
450
425
400
375
350
325
300
275
250
225
200
175
150
125
100
75
50
25
0
500
1500
2000
PRESSURE (psid)
2500
3000
ACTUAL TORQUE AND POWER - 15 CID
1500 RPM
100 RPM
150
1500 RPM
125
1100 RPM
100
75
700 RPM
500 RPM
50
300 RPM
100 RPM
1000
1500
2000
PRESSURE (psid)
2500
25
POWER (HP)
FLOW (gpm)
2000 RPM
260
65
TORQUE (ft-lbf)
ACTUAL TORQUE AND POWER 9.5-CID
360
RPM
TORQUE (ft-lbf)
6 C.I.D.
200
190
180
170
160
150
140
130
120
110
100
90
80
70
60
50
40
30
20
10
0
500
0
3000
ACTUAL FLOW - 15 CID
110
1500
90
1600
80
1400
100
1300
90
80
1100
1200
70
800
40
600
30
400
900
60
50
700
40
500
RPM
1000
50
FLOW (gpm)
60
RPM
FLOW (gpm)
70
30
300
20
20
200
10
100
0
0
500
1000
1500
2000
PRESSURE (psid)
2500
3000
10
0
500
100
1000
1500
2000
PRESSURE (psid)
2500
3000
The above performance data was obtained at 140OF with ISO 46(DTE 25). These values must be maintained to
obtain the performance indicated. Contact Rineer Hydraulics, Inc. for additional displacements.
Technical Manual
Section Contents
7.5
KT8625 8-5/8” Tong
Hydraulic Information
Model Code
M015 - 61/62
-1S
-015
-31
-B1
-TV
-000
Special Code Designator
M015 - 61 = 015 Single Speed
M015 - 62 = 015 Two Speed
Options:
62 = Two Speed Single Pilot
Open During Crossover
63 = Two Speed Single Pilot
Closed During Crossover
65 = Two Speed Double Pilot
Open During Crossover
67 = Two Speed Double Pilot
Closed During Crossover
Seal - Package Selection
Bearing Package Selection
1S = Std.
1H = High Speed
010 = 10.5 in3 (172cc)/rev.
006 = 6 in3 (98cc)/rev.
007 = 7 in3 (115cc)/rev. 011 = 11.5 in3 (189cc)/rev.
008 = 8 in3 (131cc)/rev. 013 = 13 in3 (213cc)/rev.
009 = 9.5 in3 (156cc)/rev. 015 = 15 in3 (246cc)/rev.
30 = Keyed Shaft
31 = Splined Shaft
32 = Wheel Motor
34 = Double Key
50 = Retractable
53 = API Thread
Applications
For durable hydraulic motors that meet your demands, specify Rineer.
For over 35 years, we have specialized in only one thing - engineering the right motor for your needs.
Rineer delivers the performance you can count on.
Limited Warranty Policy
Rineer Hydraulics, Inc. warrants that, at the time of shipment to
Purchaser, our product will be free of defects in the material and
workmanship. The above warranty is LIMITED to defective
products returned by Purchaser to Rineer Hydraulics, Inc., freight
prepaid within four hundred and fifty-five (455) days from date of
shipment, or one (1) year from date of first use, whichever expires
first. We will repair or replace any product or part thereof which is
proved to be defective in workmanship or material. There is no
other warranty, expressed or implied, and in no event shall Rineer
Hydraulics, Inc. be liable for consequential or special damages.
Dismantling the product, operation of the product beyond the
published capabilities or for purposes other than that for which the
product was designed, shall void this warranty.
331 Breesport San Antonio, Texas 78216
7.6
Section Contents
210-341-6333 Fax: 210-341-1231 e-mail: [email protected]
Technical Manual
KT8625 8-5/8” Tong
R
E
R
OF HYDR
A
U
L
U
Hydraulic Information
CT
IC
Repair Manual
MA
R
TORS
N U FA
MO
15 Series
HYDRAULICS, INC.
Standard Motor
Two Speed Motor
331 BREESPORT * SAN ANTONIO, TX 78216 * (210) 341-6333 FAX (210) 341-1231
Technical Manual
Section Contents
7.7
KT8625 8-5/8” Tong
7.8
Section Contents
Hydraulic Information
Technical Manual
KT8625 8-5/8” Tong
Hydraulic Information
WARNING: RINEER RECOMMENDS FOLLOWING ALL STANDARD SHOP SAFETY PRACTICES SPECIFICALLY INCLUDING WEARING OF EYE PROTECTION.
REMOVAL OF SHAFT SEAL
1
5
1) Two of the 3/8" bolt
holes are provided with
jack screw threads.
2) Insert a piece of 1/4"
round stock by 2-1/2" long
into each jack screw hole
3) Screw two 7/16-14 bolts
into the jack screw threads
until the bearing box is free
of the motor.
6
Lift up on the bearing box
to remove from motor.
1) Remove snap ring
WARNING: Use caution
when removing snap ring.
If released accidentally it
can become an airborne
hazard.
2
1) Pry out shaft seal plate
with two screw drivers.
2) Remove seal plate oring from groove in bearing
bore.
REMOVAL OF WHEEL MOTOR SEAL
PLATE AND BEARING BOX
DISASSEMBLY OF WHEEL MOTOR
BEARING BOX
3
1) Loosen and remove 8
each 10-32 bolts.
2) Pry off seal plate with
screw driver.
7
1) Loosen clamp screw in
lock nut.
2) Unscrew lock nut and
remove.
4
Loosen and remove 8
each 3/8" bolts with 5/16"
socket head wrench.
8
1) Press shaft out of
bearing box.
2) Proceed to step 9,
disregarding steps 11 & 12
5
Technical Manual
Section Contents
7.9
KT8625 8-5/8” Tong
Hydraulic Information
WARNING: RINEER RECOMMENDS FOLLOWING ALL STANDARD SHOP SAFETY PRACTICES SPECIFICALLY INCLUDING WEARING OF EYE PROTECTION.
DISASSEMBLY OF FRONT
HOUSING AND SHAFT
DISASSEMBLY OF ROTOR/STATOR
CARTRIDGE
9
1) Mark one side of the
motor for proper assembly,
paying careful attention
that the cartridge will not
be installed upside down.
2) Secure the motor prior
to loosening the 5/8-11
bolts.
13
Lift up rotor/stator cartridge
and remove from the rear
housing.
10
1) Remove front housing
2) Note: Two 5/16" ball
checks and one main body
o-ring may be dislodged
and fall free.
14
1) Place cartridge on any
object which will hold it off
the table.
2) Remove two each 10-32
place screws.
3) Remove timing plate.
11
With the seal plate removed,
press shaft and ball bearing
out of front housing.
15
1) Remove o-ring and
springs with a small
screwdriver.
2) Remove dowels pins.
12
1) Remove snap ring from
shaft.
2) Press shaft out of
bearing.
16
1) Replace plate on
rotor/stator cartridge.
2) Turn rotor/stator
cartridge over.
3) Repeat steps 14 & 15.
7.10
Section Contents
6
Technical Manual
KT8625 8-5/8” Tong
Hydraulic Information
WARNING: RINEER RECOMMENDS FOLLOWING ALL STANDARD SHOP SAFETY PRACTICES SPECIFICALLY INCLUDING WEARING OF EYE PROTECTION.
17
1) Remove the rotor.
2) Remove both the rotor
and stator vanes.
3) Note: On motors
manufactured prior to
1987, rotor vane slots and
rotor vanes should be
numbered so that vanes
can be reassembled in the
same vane slot.
INSPECTION AND REPLACEMENT
OF PARTS
21
PLATES: Normal wear
results in marking of timing
plates which does not
impair motor performance.
Replacement of the timing
plate is required if any
smearing, galling, or heat
cracks are present.
22
ROTOR: Normal wear
results in polishing of rotor
faces which does not impair
motor performance.
Examine the rotor vane
slots closely. Polishing
down in the slots is normal,
but if there is any indication
of a "pocket" forming in the
wall of the slot, the rotor
should be replaced.
18
Inspect all springs and
seals. We recommend
replacement of all seals
and springs whenever the
motor has been
disassembled.
19
Inspect all parts and
replace any parts which
obviously show excessive
wear or damage.
23
STATOR: Normal wear results
in polishing of cam form which
does not impair motor
performances.
Noticeable wear may be
apparent along the corner of
one side of the staor vane
slot. This does not necessarily
require replacement of the
stator, but may slightly affect
volumetric efficiency.
20
VANES: Normal wear results
in slight flattening of vane tips
which does not impair motor
performance. Replace vane if
radius is reduced by 50%.
Clearance between the rotor
vane and rotor vane slot
varies with the vane
selection. The design allows
the vane to "lean" slightly in
the slot, providing the
required mechanical seal.
24
Note: Measure the rotor
and stator length to the
fourth decimal point and
supply measurement when
ordering rotor, stator, or
vanes.
7
Technical Manual
Section Contents
7.11
KT8625 8-5/8” Tong
Hydraulic Information
WARNING: RINEER RECOMMENDS FOLLOWING ALL STANDARD SHOP SAFETY PRACTICES SPECIFICALLY INCLUDING WEARING OF EYE PROTECTION.
ASSEMBLY OF ROTOR/STATOR
CARTRIDGE
25
ASSEMBLY OF WHEEL MOTOR
FRONT HOUSING
1) Reverse the procedures
in steps 17, 16, 15, and 14
2) NOTE: Make sure that
the radiused edge of each
stator vane points to the
rotor and the radiused
edge of each rotor vane
points to the stator.
3) NOTE: Make sure
springs are seated in the
bottom of the spring pocket
in both the rotor and stator.
ASSEMBLY OF FRONT HOUSING
29
1) Reverse the procedures in
steps 8 thru 3.
2) Screw lock nut onto shaft
until all threads are engaged.
3) Tighten clamp screw until
lock nut turns with a slight
drag.
4) Tighten lock nut until
desired rolling drag of bearing
is obtained - see procedure
Page 9.
5) Tighten clamp screw
6) Tighten all seal plate bolts.
ASSEMBLY OF MOTOR
26
1) Press bearing onto shaft.
2) Install snap ring.
30
1) Install dowel pins into
rear housing.
2) Install ballchecks into
rear housings.
3) Install main body o-ring.
27
Press shaft and bearing
assembly into front
housing by pressing on the
outer race of bearing.
31
1) Place rotor/stator
cartridge onto rear housing.
2) NOTE: Make sure
assembly marks from step 3
are lined up.
32
1) Install main body o-ring
into front housing.
2) Install ball checks into
front housing.
3) Place a small amount of
grease over ball checks
and o-ring.
4) Wipe off excess grease.
28
7.12
1) Place seal in seal plate.
2) Place seal plate o-ring
into groove in the front
housing.
3) Press seal plate into
front housing.
4) Install snap ring.
5) Proceed to step 30.
Section Contents
8
Technical Manual
KT8625 8-5/8” Tong
Hydraulic Information
WARNING: RINEER RECOMMENDS FOLLOWING ALL STANDARD SHOP SAFETY PRACTICES SPECIFICALLY INCLUDING WEARING OF EYE PROTECTION.
33
1) Install dowel pins into
rotor/stator cartridge.
2) Pour a small amount of
clean oil into the cartridge.
3) Install front housing onto
rotor/stator cartridge.
4) Make sure alignment
marks are lined up.
34
1) Install 5/8-11 bolts.
2) Torque bolts to 50 ft./lbs.
35
1) Rotate shaft in both
directions to assure that the
shaft turns smoothly.
2) Torque motor to 190 ft./lbs.
3) Rotate shaft again in both
directions to assure that the
shaft turns smoothly.
SPOOL ASSEMBLY FOR THE
TWO SPEED MOTOR
36
B
A
NOTE: Spool should be
oriented as shown for two
speed motors with model
codes 62, 63, 68, & 69.
NOTE: Slight design
variations may exist in
motors manufactured
either before or after the
printing of this manual.
WHEEL MOTOR SHAFT AND BEARING ASSEMBLY PROCEDURE
1)�
2)�
�
3)�
4)�
5)�
6)�
7)�
8)�
�
9)�
10)�
Clean ALL assembly parts w/ lacquer thinner.
Dip clampnut and clamping bolt separately in lacquer thinner.
(Steps 3 thru 10 must be conducted to completion ONE assembly at a time.)
Press bearing cups into bearing housing. Make sure they are pressed completely against bearing shoulders.
Coat inner race of large cone with #609 (green) Loctite and press cone onto the shaft. Make sure the cone is completely against the shoulder of the shaft.
Insert shaft and large cone into bearing housing.
Coat inner race of small cone with #609 (green) Loctite and press small cone onto shaft.
Apply #272 (red) Loctite to the clampnut threads of the shaft. Apply #242 (blue) Loctite to the threads of the clamping bolt and install in the clampnut.
Spin clampnut onto shaft with the "B" face towards bearings. After the nut threads are fully engaged, but prior to the nut contacting the bearings, �
tighten the clamping bolt until there is drag on the clamping nut (see note Fig. 1). Tighten the nut until a 20 to 30 inch pound rolling torque is achieved.
Tighten clamping bolt on clampnut to 70 inch pounds and recheck rolling torque. Apply inspectors lacquer to head of the bolt.
Allow a minimum of 24 hrs. to dry.
CUTAWAY
FACE
"A"
Note:
The slit in the clampnut
allows for loose
assembly on the shaft.
Once in position, the
clampnut clamping bolt
MUST be tightened to
a slight drag in order to
correctly engage the
threads on the shaft to
achieve the clamp
force required.
FACE
"B"
CLAMPING BOLT
FACE
"A"
Figure 1
9
Technical Manual
Section Contents
7.13
KT8625 8-5/8” Tong
Hydraulic Information
Information:
Bolt Torque Main Bolts (5/8-11): 190 ft. lbs.
Seal Plate (3/8-16)
(Wheel Motor only): 45 ft. lbs.
Grease used for bolt threads
and o-ring retention:
Pennzoil 707L RED
Shaft seal assembly lube:
Mobilgrease special
with Moly
D
AN
ST
AR
Seal Kits:
Standard 15 series seal kit
#0150940
Standard 15 two speed seal kit
#0150940
Standard 15 wheel motor seal kit
#0150936
OR
OT
M
D
EE
T
O
LM
WO
SP
OR
OT
M
D
R
TO
EE
WH
331 Breesport San Antonio, Texas 78216
210-341-6333 Fax: 210-341-1231 e-mail: [email protected]
7.14
Section Contents
Technical Manual
KT8625 8-5/8” Tong
Hydraulic Information
Technical Manual
Section Contents
7.15
KT8625 8-5/8” Tong
7.16
Section Contents
Hydraulic Information
Technical Manual
KT8625 8-5/8” Tong
Hydraulic Information
Technical Manual
Section Contents
7.17
KT8625 8-5/8” Tong
7.18
Section Contents
Hydraulic Information
Technical Manual
KT8625 8-5/8” Tong
Hydraulic Information
Technical Manual
Section Contents
7.19
KT8625 8-5/8” Tong
7.20
Section Contents
Hydraulic Information
Technical Manual
KT8625 8-5/8” Tong
Hydraulic Information
Technical Manual
Section Contents
7.21
KT8625 8-5/8” Tong
7.22
Section Contents
Hydraulic Information
Technical Manual
KT8625 8-5/8” Tong
Hydraulic Information
Technical Manual
Section Contents
7.23
KT8625 8-5/8” Tong
7.24
Section Contents
Hydraulic Information
Technical Manual
KT8625 8-5/8” Tong
Hydraulic Information
Technical Manual
Section Contents
7.25
KT8625 8-5/8” Tong
7.26
Section Contents
Hydraulic Information
Technical Manual
KT8625 8-5/8” Tong
Hydraulic Information
Technical Manual
Section Contents
7.27
KT8625 8-5/8” Tong
7.28
Section Contents
Hydraulic Information
Technical Manual
KT8625 8-5/8” Tong
Hydraulic Information
Technical Manual
Section Contents
7.29
KT8625 8-5/8” Tong
Hydraulic Information
Capacity:
15 gpm (60
L/min.)
Pilot-to-open, spring biased closed, unbalanced
poppet logic element
Functional Group:
Products : Cartridges : Logic Element : Unbalanced Poppet : Pilot-to-open,
spring biased closed
Model:
LKDC-XDN
Product Description
These unbalanced poppet, logic valves are 2-way switching elements that are
spring-biased closed. Pressure at either work port 1 or 2 will further bias the
valve to the closed position while pressure at port 3 will tend to open it. The
force generated at port 3 must be greater than the sum of the forces acting
at port 1 and port 2 plus the spring force for the valve to open. NOTE: The
pilot area (port 3) is 1.8 times the area at port 1 and 2.25 times the area at
port 2.
Download
Technical Features
Because these valves are unbalanced, operation is
pressure dependent. Opening and closing of the
poppet are functions of the force balances on
three areas: Port 1 = 100%, Port 2 = 80%, and
Port 3 = 180%.
These valves have positive seals between port 3
and port 2.
Stainless steel cartridge options P or W are
intended for use within corrosive environments
with all external components manufactured in
stainless steel or titanium. Internal working
components remain the same as the standard
valves.
These valves are pressure responsive at all three
ports, therefore it is essential to consider all
aspects of system operation through a complete
cycle. Pressure changes at any one port may
cause a valve to switch from a closed to an open
position, or vice versa. All possible pressure
changes in the complete circuit must be
considered to assure a safe, functional system
design.
All ports will accept 5000 psi (350 bar).
Incorporates the Sun floating style construction to
minimize the possibility of internal parts binding
due to excessive installation torque and/or
cavity/cartridge machining variations.
Technical Data
U.S. Units
Model Weight
Cavity
Capacity
7.30
Section Contents
Metric Units
0.28 lb.
0.13 kg.
T-11A
15 gpm
Technical Manual
60 L/min.
KT8625 8-5/8” Tong
Hydraulic Information
Area Ratio, A3 to A1
1.8:1
Area Ratio, A3 to A2
2.25:1
Maximum Operating Pressure
Maximum Valve Leakage at 110 SUS (24 cSt)
Pilot Passage into Valve
5000 psi
350 bar
10 drops/min.@1000
psi
.031 in.
10 drops/min.@70
bar
0,8 mm
.02 in³
0,33 cc
Pilot Volume Displacement
Series (from Cavity)
Series 1
U.S. Patent #
4,795,129
Valve Hex Size
Valve Installation Torque
7/8 in.
22,2 mm
30 - 35 lbf ft
45 - 50 Nm
Seal Kits
Buna: 990-011-007
Seal Kits
Viton: 990-011-006
LKDC-XDN
Control
X Not Adjustable +0.00
Minimum Pilot Pressure
D 50 psi (3,5 bar) +0.00
External Material/Seal
Material
N Buna-N +0.00
If the material/seal is P, the control must be X
If the material/seal is W, the control must be X
Explanation of Sun cartridge control options - US units.
Explanation of Sun cartridge control options - metric units.
Copyright © 2007-2008 Sun Hydraulics Corporation. All rights reserved.
Terms and Conditions - ISO Certification - Statement of Privacy
Technical Manual
Section Contents
7.31