1
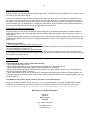
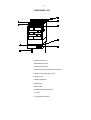
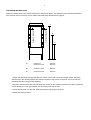
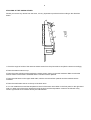
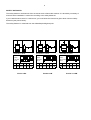
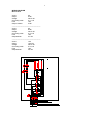
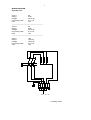
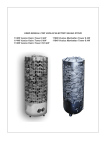
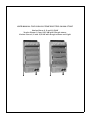
USER MANUAL FOR VUOLUX STONE ELECTRIC SAUNA STOVE
Vuolux Stone 6, 8 and 10,5 kW
Vuolux Stone 6, 8 and 10,5 kW with Rough stones
Vuolux Stone 6, 8 and 10,5 kW with Rough stones and Light
___________________________________________________________________________
CONTENTS
3
Introduction and installation of electric sauna stove
4
General installation instructions and directions for use
5
The sauna room and ventilation
5
Instructions for electrical installation
5
Troubleshooting
5
Warranty and contact information
6-11
Installation and wiring diagrams
The owner of the sauna stove or the person responsible for the sauna should keep this user
manual!
__________________________________________________________
3
Thank you for choosing Vuolux sauna stove! You will soon be able to enjoy your new Vuolux sauna stove,
the heart of your sauna, developed respecting the old sauna traditions and utilising the latest
manufacturing methods. We wish you many relaxing moments in your new Vuolux sauna!
Introduction and installation of electric sauna stove
Vuolux sauna stove is suitable for family saunas, not public saunas. Please install only one (1) sauna stove in
each sauna room. Using an electric sauna stove and a wood burning sauna stove in the sauna
room at the same time is strictly prohibited!
Start the installation by removing the packaging from around the sauna stove and carefully cut off the supporting
strap. You will find the moisture-retaining stones, small steam stones and mounting screws in a separate package.
If your sauna stove has a built-in timer, we recommend that an electrician installs the connections before you
mount the sauna stove on the wall.
Mount the sauna stove on the wall according to the instructions on pages 7 and 9 with the screws provided. The
stove is locked into place with so-called locking screws. Check the minimum safety distances! If the sauna stove
is mounted in a wall recess or if you are going to build a safety rail around it, you must follow the instructions
given regarding minimum safety distances on page 9. The safety distances are distances to an inflammable
structural element and you can halve the distances when necessary by using incombustible protective plates. For
further information, please contact the manufacturer.
Be careful not to place the rocks between the heating elements as this would prevent air circulation through the
sauna stove!
You should preheat the sauna stove twice (for around 45 minutes each time) before you start using it. Ventilate
the sauna room between the pre-heating and allow the stove to cool thoroughly. Do not use water when
preheating the sauna stove. We recommend using room temperature water on the stones. Always preheat the
sauna under supervision! The stones may get stained depending on the quality of the sauna water.
When mounting the sauna stove, make sure that controlling and using the sauna stove is as easy as
possible.
Please read through the general installation instructions and directions for use!
4
General installation instructions and directions for use
Timer
Vuolux sauna stoves are delivered with a built-in timer in the lower part of the stove.
The timer works as the main switch (8+4 hours). The power is automatically switched off after the regulated time.
You can switch the sauna stove on at a pre-selected time of one (1) to eight (8) hours. The sauna stove stays
switched on for a maximum of four (4) hours.
Example 1: When you want to switch the stove on immediately, simply turn the timer knob to the desired position
between 1 and 4.
Example 2: When you wish to have a sauna after a certain time (e.g. after a jog), you can estimate when you wish
the sauna to be ready. If you want to have a sauna in two hours’ time, turn the timer knob past the scale of 1-4 to
the pre-selected time position 1. The timer is switched on and the power will be switched on after one hour and the
sauna will start heating up. The sauna will be ready in about two hours.
When the stove has been switched on, it will stay on for a maximum of four (4) hours. You can switch the power off
earlier by turning the time knob to position zero (0).
Please make sure that the timer has switched the power off after the selected time! You should also check
the timer after thunderstorms.
___________________________________________________________________________________________
Adjusting the temperature
The sauna stove preheats in about 45 minutes. The size, structure and thermal insulation of the sauna room all
affect the preheating time significantly. An uninsulated 1 m² surface increases the required output of the sauna
stove as much as an additional 1.5 m³ would. The effect of the sauna stove must however always correspond to
the recommended cubic volume of the sauna room, the above-mentioned additions included.
The desired temperature can be selected with the thermostat dial and the thermostat keeps it at the desired level.
The temperature limit control switches the stove off should there be any risk of overheating. You can switch the
stove back on by pressing the reset button of the temperature limit control (located next to the thermostat knob).
Always examine the reason for the overheating before you turn the stove back on!
Adjust the hot steam by splashing water onto the stones. We recommend using room temperature water.
Always check the sauna room before you switch the stove on!
5
The sauna room and ventilation
Correct ventilation is very important for pleasant sauna baths. The following recommendations are currently in force
for sauna rooms with electric stoves:
The fresh air ventilator should be placed at least 50 cm above the sauna stove. The exhaust air ventilator should
be placed as far from the stove as possible and close to the edge of the floor. You can also lead the exhaust air to
the shower room from under the door to the sauna room (as long as the gap is at least 5 cm high). This alternative
works well when you use mechanical air conditioning. The diameter of the ventilation pipes should be between 50
and 100 mm and the exhaust vent should be bigger than the fresh air vent.
Instructions for electrical installations
The sauna stove can only be connected to the power supply by an authorised electrician in accordance with the
applicable regulations. The connecting cable must be a rubber cable type H07RN-F. Never use a PVC cable in a
sauna stove!
Connect the stove semi-permanently to the junction box. The junction box must be splash-proof and it must not be
installed higher than 50 cm from the floor. The thermostat knob is located in the lower part of the stove. Please see
pages 10-11.
Additional connections:
1. Connecting the signal light outside the sauna room
The connecting cable must be of type H07RN-F, with the same circumference as the connecting cable of the stove
(see wiring diagrams on pages 10-11).
2.Connecting electrical heating with the sauna stove
Run the control cable for electrical heating directly into the junction box of the sauna stove, and from there to the
terminal blocks of the sauna stove along a rubber cable with the same thickness as that of the connection wire (see
wiring diagrams on pages 10-11).
Troubleshooting
If the sauna stove does not heat, check the following:
- Has the power been switched on?
- Has the timer been switched on to a section where the sauna stove should be heated?
- Does the thermostat show a higher figure than the temperature of the sauna?
- Has the timer stopped/got stuck? The timer knob can only move freely if there is a gap of 1-2 mm between the
timer knob and the front panel of the timer.
- Has the temperature limit control cut the power off? Reset the temperature limit control by pressing the hole next
to the thermostat knob until you hear a clicking sound. Always check the reason for the overheating before you turn
the stove back on!
For additional information, please contact your dealer or the manufacturer!
Vuolux Oy warrants its electric sauna stoves for one (1) year from the date of purchase. Please retain the sales
receipt as you will need it for any warranty service. The warranty is valid only for sauna stoves in private use.
_____________________________________________________________________________________
Manufacturer’s contact information:
Vuolux Oy
Pajatie 5
85500 NIVALA
FINLAND
Tel. +358-44-3243100
[email protected]
www.vuolux.fi
6
COMPONENT LIST
1 Rear steam stone
2 Small steam stones
3 Rear steam stones
4 Reset button of temperature limit control
5 Support legs with plastic cover
6 Steam cups
7 Steam distributor
8 Shelf stone
9 Side stone
10 Moisture-retaining stones
11 Timer
12 Temperature control
7
FASTENING INSTRUCTIONS
Fasten the sauna stove to the wall according to the instructions below. The distances given indicate the distance
from the floor to the hole for the screw. Please check the safety distances from page 9.
A
38 cm
LOCKING SCREWS
LOCKING SCREWS
B
C
A=
Vuolux 6.0
Vuolux 8.0-10.5
780 mm
904 mm
B=
Vuolux 6.0-10.5
600 mm
C=
Vuolux 6.0-10.5
350 mm
1 Fasten the sauna stove to the wall with four screws. Two of the screws are locking screws. Place the
sauna stove in the desired position and mark the position of the screws on the wall. You do not have to
dismantle the sauna stove before fastening.
2 Move the sauna stove to the side and fasten the screws on the marked positions on the wall. Tighten the
screws leaving a 2-3 mm gap between the top of the screw and the wall.
3 Lift the sauna stove onto the wall. Make sure that the legs support the stove.
4 Fasten the locking screws.
8
STACKING OF THE SAUNA STONES
Should you remove any stones from the stove, it is very important to put them back according to the directions
below:
1 Check the angle of incline of the rearmost sauna stoves from the picture above and pile the stones accordingly.
2 Place the steamer stone on top.
3 Place the water-collecting stones against the sauna stones, resting on the steel retainers. Make sure that the
smooth surface of the stone is outwards and the rounded corners upwards.
4 Place the shelf stone on the upper steel retain, with the smooth surface upwards and the rounded corners
outwards.
5 Place the small steam stones on the top of the shelf stone.
5 You can install the timer and the temperature control of the sauna stove either in the front panel on the right-hand
side or in either end of the stove. Note that moving the timer and the temperature control to the left end of any
Vuolux Light sauna stove must be done by the manufacturer.
9
SAFETY DISTANCES
The safety distances are distances from the sauna stove to flammable surfaces. It is absolutely necessary to
ensure that the installation is carried out according to the safety distances.
If you install the sauna stove in a wall recess, you must follow the instructions given about minimum safety
distances (see picture below).
The safety distance is measured from the widest/deepest/highest point.
SAUNA 8-12m 3
MAX
SAUNA 5-8m3
400V
3N~6kW
IP X4
A
100
B
MIN.mm
C
D
E
950 1900 300 170
Vuolux 6 Kw
MIN.mm
MIN.mm
F
760
400V
3N~8kW
IP X4
A
B
SAUNA 9-15m 3
MIN.mm
C
D
100 1070 2100 350
MIN.mm
E
F
170
760
Vuolux 8 kW
MAX
MIN.mm
MIN.mm
MAX
MIN.mm
400V
3N~10.5kW
IP X4
A
B
MIN.mm
C
D
E
100 1070 2100 400 170
F
760
Vuolux 10.5 kW
1
WIRING DIAGRAM
Built-in timer
Vuolux
6.0
Output
6 kW
Voltage
400 V 3N
Connecting cable
5 x 1.5 S
Fuse
10A
Output / resistor
2 kW
__________________________________
Vuolux
8.0
Output
8 kW
Voltage
400 V 3N
Connecting cable
5 x 2.5 S
Fuse
16A
Output/resistor
2.7 kW
__________________________________
Vuolux
Output
Voltage
Connecting cable
Fuse
Output/resistor
10.5
10,5 kW
400 V 3N
5 x 2,5 S
16A
3,5 kW
1
WIRING DIAGRAM
Separate timer
Vuolux
6.0
Output
6 kW
Voltage
400 V 3N
Connecting cable
5 x 1.5 S
Fuse
10A
_____________________________________
Vuolux
8.0
Output
8 kW
Voltage
400 V 3N
Connecting cable
5 x 2.5 S
Fuse
16A
_____________________________________
Vuolux
Output
Voltage
Connecting cable
Fuse
10.5
10,5 kW
400 V 3N
5 x 2,5 S
16A
T
T
L1
L2
L3
N
P
1
400 V 3N ~AC
1= heating control