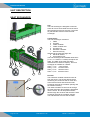
1
USER MANUAL CLIMA MANAGER FOR CLIMA+ 200 SYSTEM UM-ACM-1.3-GB / 02-2013 TABLE OF CONTENTS TABLE OF CONTENTS CHAPTER BOOK INTRODUCTION I 1 SAFETY I 2 MACHINE DESCRIPTION I 3 OPERATION I 4 MAINTENANCE I 5 SPARE PARTS I 6 TROUBLE SHOOTING I 7 COMMISSIONING I UM-ACM-1.3-GB/02-2013 USER MANUAL CM Page 3 of 76 TABLE OF CONTENTS INDEX INTRODUCTION ................................................................................................................................................7 LIABILITY ............................................................................................................................................... 9 GENERAL............................................................................................................................................... 9 COPYRIGHT ........................................................................................................................................... 9 GENERAL............................................................................................................................................. 10 SAFETY REGULATIONS.......................................................................................................................... 10 LEGAL REGULATIONS............................................................................................................................ 10 HOW TO USE THIS MANUAL.................................................................................................................... 11 WHO SHOULD USE THIS MANUAL ........................................................................................................... 11 MANUAL INFORMATION ......................................................................................................................... 11 SERIAL NUMBER ................................................................................................................................... 11 SYMBOLS ............................................................................................................................................ 12 1. SAFETY..................................................................................................................................................13 GENERAL............................................................................................................................................. 14 SAFETY REGULATIONS.......................................................................................................................... 15 SAFETY PROVISIONS ............................................................................................................................ 16 DEFINITION OF SAFETY DEVICES............................................................................................................ 16 WARNING LABELS ................................................................................................................................. 17 2. MACHINE DESCRIPTION .....................................................................................................................19 SAFETY REGULATIONS.......................................................................................................................... 20 SYSTEM DESCRIPTION .......................................................................................................................... 21 + CLIMA UNIT ......................................................................................................................................................................................... 21 UNIT DESCRIPTION ............................................................................................................................... 22 HEAT EXCHANGER ................................................................................................................................................................................ 22 CIRCULATION FANS .............................................................................................................................................................................. 24 AIR MEASURING UNIT ........................................................................................................................................................................... 25 3. OPERATION ..........................................................................................................................................27 SAFETY REGULATIONS.......................................................................................................................... 28 VENTILATION ....................................................................................................................................... 29 A VENTILATION CURVE ......................................................................................................................................................................... 29 EXPLANATION OF THE SCREENS ................................................................................................................................................. 31 CLIMA MANAGER ............................................................................................................................................................................... 31 OFF- AUTO SELECTION KNOB ............................................................................................................................................................... 56 STARTING THE SYSTEM ......................................................................................................................................................................... 57 MANUAL CONTROL CIRCULATION FANS ................................................................................................................................................ 58 ALARM ON / OFF.................................................................................................................................................................................... 59 STOPPING THE CLIMA+ UNIT ................................................................................................................................................................. 60 4. MAINTENANCE .....................................................................................................................................61 GENERAL............................................................................................................................................. 62 SAFETY REGULATIONS.......................................................................................................................... 62 GENERAL MAINTENANCE PROCEDURE ................................................................................................... 63 AFTER MAINTENANCE ........................................................................................................................... 63 PREVENTIVE MAINTENANCE INSTRUCTIONS ............................................................................................ 64 FILTERS ................................................................................................................................................................................................ 64 FILTERS REPLACEMENT ........................................................................................................................................................................ 64 AIR TUBES ............................................................................................................................................................................................. 65 AIR TUBES CLEANING............................................................................................................................................................................ 65 PROTECTIVE GRIDS FANS ...................................................................................................................................................................... 66 FILTER ELECTRICAL CABINET ............................................................................................................................................................... 66 FILTER ELECTRICAL CABINET REPLACEMENT ....................................................................................................................................... 66 CHANNELS ............................................................................................................................................................................................ 67 UM-ACM-1.3-GB/02-2013 USER MANUAL CM Page 5 of 76 TABLE OF CONTENTS EXHAUST CHIMNEY .............................................................................................................................................................................. 67 GAS SPRINGS ......................................................................................................................................................................................... 67 WATER DRAINAGE ................................................................................................................................................................................ 67 5. SPARE PARTS ......................................................................................................................................69 SPARE PARTS LIST .............................................................................................................................. 71 6. TROUBLE SHOOTING ..........................................................................................................................73 TROUBLE SHOOTING LIST...................................................................................................................... 75 Page 6 of 76 USER MANUAL CM UM-AM-1.3-GB/02-2013 INTRODUCTION INTRODUCTION UM-ACM-1.3-GB/02-2013 USER MANUAL CM Page 7 of 76 INTRODUCTION CAUTION: This manual must be read by or to each person, before that person operates, cleans, repairs, supervises the operation of, or uses this system in any way. CAUCION: Este manual debe ser leido por a cada persona antes de comenzar a operar, limpiar, reparar, supervisar la operación de, o utilizar esta sistema de cualquier manera. ATTENTION: Ce manuel doit être lu par, ou a, toute personne avant qu’elle ne mette en route, nettoie, répare, supervise le fonctionnement ou utilise cet système, de quelque manière que ce soit. VORSICHT: Jeder, der dieses System bedienen, reinigen, reparieren, überwachen oder auf irgendeine Weise benutzen soll, muß vorher diese Hinweise lesen oder vorgelesen bekommen. ATTENTIE: Een ieder, die dit systeem bedient, reinigt, repareert, controleert of op enige andere wijze gebruiken zal, dient vooraf deze bedieningsvoorschriften te lezen. Page 8 of 76 USER MANUAL CM UM-AM-1.3-GB/02-2013 INTRODUCTION LIABILITY Agro Supply BV cannot be held responsible for any costs, damage or personal injury if it’s system is not used in accordance with the instructions as described in this manual. The information provided in this manual is valid for the standard design of the system. Parts of your system may differ from this standard design. Since Agro Supply BV is constantly improving its systems it may be possible that there are small differences between your system and this manual. Though this manual has been put together with the utmost care, Agro Supply BV cannot accept any responsibility for costs, damage or personal injury arising from any fault and/or incompleteness in the content of this document. GENERAL This manual contains important information concerning safety, operation, adjustment, maintenance, cleaning and repair of the Agro Supply BV system. For uncomplicated functioning of the system, read this manual carefully and work according to the directions in this manual. Besides the design and the used materials, also the operation and maintenance have great impact on the functioning, the life span and the operational costs of our system. You, as the owner of the system, are responsible for the execution of maintenance according to the directions and the intervals in this manual. This manual will help you to gain knowledge to use the system as it should be used: correct operated and excellent maintained. An Agro Supply BV system meets the demands, mentioned in the European machine guideline (CE). COPYRIGHT Agro Supply BV © This document contains confidential information and information protected by copyright of Agro Supply BV. Reproduction or transmission of any part of this document to third parties, or the use thereof is only permitted after express written permission of Agro Supply BV. All rights rest with Agro Supply BV, Eersel, The Netherlands. Written by Visser Machine Services. UM-ACM-1.3-GB/02-2013 USER MANUAL CM Page 9 of 76 INTRODUCTION GENERAL This manual contains important information concerning safety, operation, cleaning, maintenance and breakdown remedies. At all time this manual must be accessible for all personnel working with the system. Keep it in a permanent place, close to the system. When the manual is lost or damaged, order a new copy as soon as possible. The user of the system should read and understand the total user manual before operating, cleaning, maintaining and repairing the system. Never change the sequence of procedures as described in this manual. Besides this manual also knowledge about the installation and adjustments of the system may be helpful for communication with the Agro Supply dealer. This information is described in the Englishlanguage installation manual, which is also delivered with this system. SAFETY REGULATIONS Before starting operation, cleaning, maintaining the system or before remedying breakdowns, first read this chapter and chapter Safety. LEGAL REGULATIONS - - - All safety directions stated in this manual must be observed. Along with the safety regulations in this chapter, the instructions of the qualified trade organization of your country must be observed to avoid accidents. Before starting to repair or maintain the system, always consult your safety manager to discuss if a work permit is required for this job. All safety devices in the system and the safety indications mentioned in this manual are conditions to control the system safely. The owner and his qualified personnel are in the end the ones responsible for the safe use of the system. The owner is responsible for the ability of the qualified personnel to perform its duties according to the safety measures. Technical changes, which influence the safety working of the system, may only be executed after the approval of the service department of Agro Supply. Only use genuine Agro Supply parts or CE-certified parts for replacement. Agro Supply cannot be held responsible for any consequential damages to the system or other installations that were caused by technical changes, unprofessional maintenance and repairs on our system, which were executed by the customer. Warranty becomes invalid when consequential damages to the system, caused by technical changes, unprofessional maintenance and repairs, were executed by the customer. DANGER! Failure to obey legal regulations may result in permanent personal injury or death. ATTENTION! Failure to obey legal regulations may result in damage to the system. Page 10 of 76 USER MANUAL CM UM-AM-1.3-GB/02-2013 INTRODUCTION HOW TO USE THIS MANUAL The manual is constructed to provide a maximum amount of information with a minimum amount of searching. The key to easy reference is the Table of contents. Familiarize yourself with it and you won’t have any trouble locating information from any area of system. WHO SHOULD USE THIS MANUAL Owner: The owner (contractor, concern) is the person that owns or hires the system and puts this system into production. The owner must take care that the users of the system will read the manual. Operator: The operator is the person who operates the system as ordered by the owner. The operator must read the chapters Introduction, Safety, Machine description, Operation. Professional: A professional is someone who can assess the duties appointed to him on account of his education, knowledge and experience and who can assess the dangers attached, thereby avoiding these dangers. Maintenance engineer: The maintenance engineer is the professional who is deemed qualified by the owner to perform certain duties. The qualification only applies to those assigned duties. The maintenance engineer must read the total manual. MANUAL INFORMATION System type: Manual revision: + Clima 200 Unit for Broilers 1.3 (February 2013) SERIAL NUMBER Each system has a unique project- and type number printed on the nameplate, which can be found on the door of the intake ventilator box. Note down this project- and type number to have it available when contacting the Agro Supply service department. 9006000079 UM-ACM-1.3-GB/02-2013 9007000118 USER MANUAL CM Page 11 of 76 INTRODUCTION SYMBOLS Symbols are used in the manual when special attention/caution is required while working on the system. The special symbols and their meaning are depicted in the below table. Symbol: Meaning: DANGER! This symbol is used when instructions should be followed to the letter. If not they may result in permanent personal injury or death. CAUTION! This symbol is used when instructions should be followed to the letter. If not they may result in permanent personal injury. ATTENTION! This symbol is used when instructions should be followed to the letter. If not they may cause damage to the system. LIVE STOCK! This symbol is used to advise for the well being of the livestock. Disregarding the advice may cause illness or death of the livestock. TIP! This symbol is used as a helpful hint to simplify the execution of certain tasks. Page 12 of 76 USER MANUAL CM UM-AM-1.3-GB/02-2013 SAFETY 1. SAFETY UM-ACM-1.3-GB/02-2013 USER MANUAL CM Page 13 of 76 SAFETY GENERAL Only persons meeting the following requirements are authorized to work with the system. These persons should be: - Skilled and specifically trained for their duties. - Familiar with the contents of this manual. - Familiar with the locations of the safety devices. - 18 years old or above. - Familiar with the national and regional regulations regarding safety. These persons should have reached the minimum legal age required to perform this work. These persons are NOT under influence of any drug, medicine or alcoholic drink. DANGER! Keep children and incompetent persons away from the system! The system is only to be used for the purpose it was designed for. See the chapter Machine description for details. Page 14 of 76 USER MANUAL CM UM-AM-1.3-GB/02-2013 SAFETY SAFETY REGULATIONS - Do not use the system when safety devices have been removed. This system may contain sharp edged parts, moving parts and rotating parts. When protective covers are removed, sharp edges and pinch points may be exposed. Use extreme caution and avoid touching or striking these areas with your hands or body because they may cause injuries. - Do not enter parts of your body or objects into openings in the system. This may lead to serious physical injury or damage to the system. It can be dangerous to be in, on or under the system while it is operational. - Do not touch or come near moving or rotating parts. Physical contact with these parts is dangerous. - Do not work alone on the system. At least one other person should be present. - Before starting to clean, maintain or inspect the system or before remedying breakdowns, follow the steps mentioned below: Switch off the system and secure it against accidental switching on. Post “Do not switch on” warning sign on the main switch. Make sure that no components are moving. - Before switching on the machine, you must check the following: All safety devices are in place and are functioning. No other persons are in the system. No tools or objects are in the system. No other persons are at risk. - Do not use water to clean electricity cabinets. - Manual activation of safety switches is forbidden. - When the safety devices are put out of operation, the system must first be switched off and secured against accidental switching on. - Work inside the electrical cabinet may only be undertaken by skilled personnel like Agro Supply service engineers or its dealers service engineers. - Always switch off the main switch before opening electrical cabinets. - After switching off the main switch, parts inside the electrical cabinet remain live for approximately one minute. The frequency inverters may hold a high voltage charge during this time. Do not touch parts inside the electrical cabinet as long as displays of frequency inverters are on. - Several parts inside the electrical cabinet maintain voltage even when the main switch is turned off (main switch, main power supply, terminals for communication with other systems, etcetera). DANGER! Failure to obey safety regulations may result in permanent personal injury or death. ATTENTION! Failure to obey safety regulations may result in damage to the system. UM-ACM-1.3-GB/02-2013 USER MANUAL CM Page 15 of 76 SAFETY SAFETY PROVISIONS Before operating the system, the safety devices must be checked for correct functioning. Also the protective covers must be mounted before starting to use the system. Repair or replace safety devices before using the system if they do not work properly. Never rely solely on safety devices. Always switch off the system and lock up the power source (1) before working on the machine. 1 2 DANGER! Protective covers safeguard dangerous system areas. These covers are of utmost importance to operate the system safely. Never operate the system when protective covers are removed because serious injury or death may occur! DEFINITION OF SAFETY DEVICES Safety devices are: lockable doors (2), safety switches (3) and protective grids (4). 2 4 3 Page 16 of 76 USER MANUAL CM The safety switch stops (a part of) the system immediately when the door is opened. Protective grids shield off dangerous (moving) parts. These covers cannot be removed without tools. Lockable doors are doors that can only be opened with a key. The key should only be in possession of a supervisor. DANGER! Lockable doors safeguard dangerous system areas. These doors are of utmost importance to operate the system safely. Never operate the system when doors are open or not locked because serious injury or death may occur! UM-AM-1.3-GB/02-2013 SAFETY WARNING LABELS The Agro Supply system contains dangerous parts when they contact the body. The following labels are posted as a warning. Understand and remember the meaning of the warning labels. DANGER! Keep the warning labels clean. When labels become unclear, replace them. The flashlight label is used to warn for dangerous voltage inside a cabinet. Contacting parts inside this cabinet may result in permanent personal injury or death. UM-ACM-1.3-GB/02-2013 USER MANUAL CM Page 17 of 76 MACHINE DESCRIPTION 2. MACHINE DESCRIPTION UM-ACM-1.3-GB/02-2013 USER MANUAL CM Page 19 of 76 MACHINE DESCRIPTION SAFETY REGULATIONS Before starting operation, cleaning, maintaining the system or before remedying breakdowns first read the chapters Introduction and Safety. Page 20 of 76 USER MANUAL CM UM-AM-1.3-GB/02-2013 MACHINE DESCRIPTION SYSTEM DESCRIPTION The system description gives information about the complete system. For detailed information of this system see the Unit description in this chapter. Use: + The Clima Unit is designed to improve the climate for birds and at the same time reduce the heating costs of the house. + CLIMA UNIT Construction: + A standard Clima system consists of: 1 Heat exchanger 2 Channels 3 Circulation fans 4 Air measuring unit 5 Clima Manager 6 Electrical cabinet 5 3 2 4 1 Process: The heat exchanger exhausts warm air from the house while, at the same time, blowing fresh air through channels into the top of the house. The warm air preheats the fresh air before it leaves the heat exchanger. The circulation fans distribute the fresh preheated air evenly throughout the house. 6 CAUTION! Do not enter objects through the protective covers into the ventilators, circulation fans or air-measuring unit. ATTENTION! Do not enter objects through the protective covers into the ventilators, circulation fans or Air-measuring unit. Chapters and Manuals: See below mentioned chapters or manuals for detailed information: This chapter for unit information. Chapter operation for operation details. Chapter maintenance for cleaning and maintenance information. Installation manual for information about + installing and adjusting the Clima unit. Safety: Both ventilators are positioned inside the heat exchanger. The intake ventilator and air measuring unit are protected with a protective grid. The circulation fans are positioned in the top of the house and therefore normally not reachable. In case those fans are placed on a reachable level they should be protected with protective grids. Read the safety instruction of the units in the chapter unit descriptions. No emergency stop is present. The power switch is positioned on the electrical cabinet. UM-ACM-1.3-GB/02-2013 USER MANUAL CM Page 21 of 76 MACHINE DESCRIPTION UNIT DESCRIPTION HEAT EXCHANGER Use: The heat exchanger is designed to exhaust warm air from a house while and at the same time blowing fresh air into a house. The warm air preheats the fresh air inside the heat exchanger. 5 7 6 4 3 8 9 2 1 Process: The extraction ventilator exhausts warm air from the house. The air first passes the air measuring unit, flows into the air return box, around the air tubes and leaves the heat exchanger through the ventilator opening and the exhaust chimney. The intake ventilator sucks fresh air through the heat exchanger and supplies it preheated into the house. The air first passes a filter, flows through the air tubes and leaves the heat exchanger through the ventilator opening. The heat transfer occurs at the air tubes. 8 9 Page 22 of 76 Construction: The heat exchanger consists of: 1 Filters 2 Air tubes 3 Intake ventilator 4 Intake ventilator box 5 Air return box 6 Extraction ventilator 7 Exhaust chimney Attached to the heat exchanger are: 8 Electrical cabinet 9 Air measuring unit The heat exchanger has standard dimensions (l x h = 10.1 meter x 2.3 meter) except for the width. The width of the heat exchanger determines its maximum capacity. The heat exchanger is available in 4 widths: + Clima 1,0 m 9.400 m³/hour + Clima 1,5 m 13.700 m³/hour + Clima 2,0 m 18.400 m³/hour + Clima 2,5 m 22.300 m³/hour USER MANUAL CM UM-AM-1.3-GB/02-2013 MACHINE DESCRIPTION Both the extraction ventilator and the intake ventilator run with the same speed. This speed determines the capacity of the ventilation. On the Clima Manager it is possible to adjust this speed, but it is also possible to program a ventilation curve that automatically adjusts the necessary ventilation to the need of the growing birds. CAUTION! Keep all doors of the heat exchanger closed and locked when it is running. CAUTION! Do not sit or crawl into the heat exchanger when it is running. Do not use a ladder or other platform to get above the exhaust chimney when the heat exchanger is running. CAUTION! Keep distant to the ventilators when they are running. CAUTION! Do not enter objects or body parts into the heat exchanger when it is running. ATTENTION! Do not enter objects or body parts into the heat exchanger when it is running. Safety: The heat exchanger is completely secured with protective covers and lockable doors. When the heat exchanger is running, keep all doors locked with padlocks. Do not open or close any door when the heat exchanger is running. When you close a door while a ventilator is running, an under pressure may close the door with a strong force! The electrical cabinet may be positioned inside the intake ventilator box. This box is accessible by a door, which is equipped with a safety switch. Do not open or close this door when the heat exchanger is running. Although the safety switch switches off the power supply to the intake ventilator, it takes some time before the ventilator is actually stopped. Make sure the door remains open when you are inside the intake ventilator box and make sure the ventilator cannot start. The exhaust chimney is not secured. Because of this, do not use a ladder or other platform to get above the chimney when the system is running. At all time keep distance to the ventilators when you have access to them (for whatever reason). Be careful with loosely hanging clothes and long hair, do not come to close to the ventilators and do not touch them when the heat exchanger is running. UM-ACM-1.3-GB/02-2013 USER MANUAL CM Page 23 of 76 MACHINE DESCRIPTION CIRCULATION FANS Use: The circulation fans distribute the fresh preheated air evenly throughout the house. Construction: Several circulation fans are placed in the + house. During installation of the Clima unit, the positions of these circulation fans is determined in such a way that the air delivered + by the Clima unit is able to flow through the house without creating draughts, hot spots or cold spots. Process: One (1) or two (2) channel openings near the roof of the house supply the preheated fresh air. One or two circulation fans, positioned underneath the channels create an airflow that moves this fresh air through the house. Other circulation fans, positioned further away from the channel openings, take care of the further flow of fresh air through the house. 1 2 CAUTION! Do not use a ladder or other platform to get near the circulation fans when they are running. CAUTION! Keep distant to the circulation fans when they are running. CAUTION! Do not enter objects or body parts into the circulation fans when they are running. ATTENTION! Do not enter objects or body parts into the circulation fans when they are running. Page 24 of 76 USER MANUAL CM All circulation fans run with the same speed. On the Clima Manager it is possible to adjust this speed, but it is also possible to program a circulation fan curve. The circulation fans are used to circulate the air inside the house all the time. When this is achieved, the speed of the circulation fans can be kept constant. It is not possible to give a standard advice for this speed setting. It depends on the size of the house, obstacles in the airflow and the normal house ventilation. Too much circulation causes draught on the birds; too little circulation causes temperature differences in the house, both resulting in an irregular distribution of the flock in the house. Safety: Normally the circulation fans are positioned in the roof of the house, and are not secured with protective grids. Because of this do not use a ladder or other platform to get near the circulation fans when they are running. When the circulation fans are placed lower than 2,7 meters from the floor they should be equipped with protective grids. At all time keep distance to the circulation fans when they are running. Be careful with loosely hanging clothes and long hair, do not come to close to the circulation fans and do not touch them. UM-AM-1.3-GB/02-2013 MACHINE DESCRIPTION AIR MEASURING UNIT Use: The air measuring unit measures the amount of ventilation and sends this information to the Clima Manager. Construction: The air measuring unit is installed in the exhaust opening of the house (1). Process: The extraction ventilator exhausts warm air from the house. This air passes the air measuring unit and drives the three bladed propeller. The rotation speed value of this propeller is sent to the Clima Manager that uses it to adjust the speed of the ventilators to meet the programmed capacity. When the Clima Manager does not receive the programmed amount of ventilation (within a certain amount of time), it will report an alarm. 1 CAUTION! Keep distant to the air-measuring unit when it is running. CAUTION! Do not enter objects or body parts into the airmeasuring unit when it is running. ATTENTION! Do not enter objects or body parts into the airmeasuring unit when it is running. UM-ACM-1.3-GB/02-2013 USER MANUAL CM Safety: The air measuring unit is protected with a protective grid. At all time keep distance to the air measuring unit when it is running. Be careful with loosely hanging clothes and long hair, do not come to close to the air measuring unit and do not touch it. Page 25 of 76 OPERATION 3. OPERATION UM-ACM-1.3-GB/02-2013 USER MANUAL CM Page 27 of 76 OPERATION SAFETY REGULATIONS Before starting operation, cleaning, maintaining the heat exchanger or before remedying breakdowns first read the chapters Introduction and Safety. Page 28 of 76 USER MANUAL CM UM-AM-1.3-GB/02-2013 OPERATION VENTILATION This chapter describes how to use the Clima + Manager to control the Clima unit according a minimum ventilation curve. Before starting to + control the Clima unit it is important to have basic knowledge about the climate inside a birds house. The minimum necessary ventilation in a birds house is approximately 1 m³/hour/kilo unless otherwise stated. By estimating the weight of a bird on a certain day during the cycle and multiplying this with the number of birds in the house, you know the minimum ventilation needed in your house on that day. EXAMPLE See alongside table and the graphic as a typical example. The table shows the increasing weight of the birds and thus the increasing need of ventilation. The need of ventilation is visualized in the graphic (minimum ventilation, brown dashed line). In the alongside table you can see that during + the first 2 weeks of the cycle, the Clima unit supplies all the ventilation, but then it reaches its maximum capacity. This is visualized in the + graphic (Clima 1.5 m, green line). After this first 2 weeks another ventilation system (the so called normal house ventilation) is necessary to supply the extra ventilation. See the graphic (house ventilation, blue dotted line). A VENTILATION CURVE As you can see in the graphic the needed ventilation is a curved line, the so called ventilation curve. With the Clima Manager it is possible to program this ventilation curve that takes care of (part of) the heating of the house and the correct minimum ventilation during the first days of a new flock. Before starting to program this ventilation curve, first you need to know the maximum capacity of your heat exchanger: + Clima 1,0 m 9.400 m³/hour + Clima 1,5 m 13.700 m³/hour + Clima 2,0 m 18.400 m³/hour + Clima 2,5 m 22.300 m³/hour UM-ACM-1.3-GB/02-2013 USER MANUAL CM Page 29 of 76 OPERATION In the alongside graphic, you can see the + necessary ventilation curve for a Clima 1,5 m (with a maximum capacity of 13.700 m³/hour) using the example table of the previous page. + The Clima unit is able to follow this necessary ventilation curve when 4 breakpoints are programmed. With the below explanation it is possible to find the 4 breakpoints. (In the Clima Manager, more breakpoints can be programmed if needed). st 1 breakpoint: On the first day of the cycle, you calculate the necessary minimum ventilation and the corresponding fan speed (in % of its maximum). nd 2 breakpoint: On the seventh day of the cycle, you calculate the necessary minimum ventilation and the corresponding fan speed (in % of its maximum). rd 3 breakpoint: With the capacity of your heat exchanger, you can estimate on which day the heat exchanger has to run with a fan speed of 100% to give its maximum ventilation. th 4 breakpoint: th The speed setting of the 4 breakpoint is the constant speed setting used from this + breakpoint day until the Clima unit is stopped. This breakpoint is a few days after reaching the maximum capacity and its fan speed is approximately 75%. This reduces energy costs. LIVE STOCK! When the Clima+ unit reaches its maximum capacity the normal house ventilation must gradually start to supply fresh air. You may program the minimum setting of the house ventilation to coincide with the capacity of the Clima+ unit. Other settings of the normal house ventilation (temperature, maximum ventilation) remain the same as running without the Clima+ unit. LIVE STOCK! During days with warm weather, the house temperature may become too high and the normal house ventilation needs to cool the house while the Clima+ unit keeps supplying the minimum ventilation. Therefore it’s very important that the normal house ventilation is NOT switched off, but only the minimum ventilation setting is set to 0. TIP! When the Clima+ unit supplies enough heat and a lot of house heaters are switched off, it may be allowed to reduce the minimum allowed ventilation below 1 m³/hour/kilo, because less CO2 is produced. Page 30 of 76 USER MANUAL CM UM-AM-1.3-GB/02-2013 OPERATION EXPLANATION OF THE SCREENS CLIMA MANAGER The large graphic display on the Clima Manager can show several screens of information about the status of the heat exchanger. Since the information visible institutions determined by the installer settings, it may be that the scenes shown in the examples do not correspond with those in your own computer. Items that are not installed therefore are not shown. There are three speed dial keys F1, F2 and F3, and an alarm button. The most common screens or selections are thus easily accessible. F1: Manual Controls F2: House status F3: Graphs button to quickly switch between data and a graph display in some scenes. Overview screen: If the Clima Manager is not touched for a few minutes, the display light will go out and jump back to the overview screen. Here one can also come from any screen by repeatedly pressing the [C] key. The [C] key is always a screen jumped back. As the name suggests, here are the latest things in one glance. (Data in this screen cannot be changed!) Below the two horizontal bars, the setpoints are displayed, while in front of them the actual measured value is displayed. Left is the house temperature and on the right is the ventilation. (extracted air) In the upper right corner the actual air quantity 3 is displayed in m /h. In the lower left the present time and date is displayed; on the right the present (curve) day number. UM-ACM-1.3-GB/02-2013 USER MANUAL CM Page 31 of 76 OPERATION Main menu: From the overview screen by pressing the "enter" button you get to the main menu. There are two possibilities to move around the menus: - With the up and down arrow keys, it’s possible to move through the menu and then select the desired choice with the "enter" button. - One can also go directly to a menu by the number that stands before the choice by using the numeric keypad. The final line [Access code] is intended only for the installer and is protected by a code. Here, once all the allocations for the entire installation will be done. In case there are some changes done in here by unauthorized people, this may result in wrong functioning of + the Clima unit. Main menu: 1 Manual control Main menu => [1] - [1] Manual control The manual control menu is also directly accessible by pressing the F1 key. Here, all visible arrangements can be operated manually, if that would be necessary. Normally, all will be set to AUTO and the Clima Manager does its job. Should a situation occur for a particular item and so should be set to manual, you can simply select the relevant scheme and change the field [auto] after pressing the "enter" button. Then the choice [man.] is selected and confirmed by "enter". At the time the option "MANUAL" is confirmed, there will also be the symbol of a hand to clearly indicate that a value can be entered manually. From that moment onward, the control will stay at this set value. Even though the house status is set to "not in use", the manual control has priority over that. In this example, the setting for the extraction fan manually is set at 55%. If there are one or more manual controls active, this is demonstrated by a flashing red LED in the [F1] button. This serves to remind you that there is a manual operation is active. Page 32 of 76 USER MANUAL CM UM-AM-1.3-GB/02-2013 OPERATION Main menu: 2 Climate controls Main menu => [21] - [2] Climate Controls [1] House status The House status menu is also directly accessible by pressing the F2 key. Here, the most important items quickly can be checked and changed when needed. If in a screen the text is underlined, such as “Growth curve temperature” in above example, this text can be selected as well. By pressing the enter button on this text, there will be a direct jump to the belonging curve settings. “7 ------------“ Hyphens in a menu, indicate that the choice is not available. The installer has during the setup / assignments of the house this item disabled, because it will not be present. UM-ACM-1.3-GB/02-2013 USER MANUAL CM House status - "in use": This means that the CM runs in + automatic mode. The Clima unit is used! - "not in use": This means that the CM is not running, all automated controls are stopped. (Controls set on manual, however, will continue to work!) - “cleaning”: Before switching the CM to “not in use”. This function can be activated to start an extra intensive cleaning process. This process can be programmed in advance at the time clocks. Growth curve temperature - If a curve is activated, here through an offset to the target for the house (far right value) can be changed. - If no curve has been activated for the house temperature, immediately the target for the house is entered. House temperature - Measured house temperature. (If several temperature sensors are assigned, the average temperature will be displayed! Also the temperature will be underlined, to being able to read each sensor individually) Growth Curves - Here all curves immediately can be switched on or off. (If off, the computer will work with the last settings) Day - Here the age of the animals should be set. Far right is the day number where the curve data is collected from. (+ or – correction) Corr. - It is possible to shift the curve day, if the desired conditions are in the house are not as expected. However, this correction by plus or minus offset, one can easily come back to the original curve by making this correction zero again.. Page 33 of 76 OPERATION Main menu: 2 Climate controls Main menu => [22] - [2] Climate Controls [2] Extraction fan This is the overview screen for the extraction fan, which is leading. The intake fan will follow the extraction fan. Here can be read out, but also set, how the heat exchanger should work. In this example on the left, the maximum value is set higher, to make it possible to ventilate extra in case needed. In case this is not desired, this can be altered at the maximum ventilation curve. In subsequent scenes, the Clima Manager works more intelligent and can be applied first to increase ventilation and if the house temperature gets too warm, the ventilation will be decreased to an absolute minimum. Wherever the F3 symbol apears in the upper right corner on the screen, the F3 key can toggle between display in tabular or graphical format. At curve settings, this can provide a much better overview. Page 34 of 76 USER MANUAL CM Extraction fan - Like in the manual menu, also here the control for extraction fan can be swapped between auto and manual. Temperature setting - Here the target temperature for the extraction fan (main control) can be changed from the curve. (To the right is the calculated value.) Bandwidth - If the ventilation can increase, here can be filled in how many degrees the ACM should go from minimum to maximum ventilation. Growth curve minimum - This value is extracted from the curve and can be adjusted through an offset here. (To the right is the calculated value) Growth curve maximum - This value is extracted from the curve and can be adjusted through an offset here. (To the right is the calculated value) House temperature - Measured house temperature. (If several temperature sensors are assigned, this value is the average temperature!) Calculated ventilation - Based on the measured temperature and temperature setting, the actual ventilation value is determined. UM-AM-1.3-GB/02-2013 OPERATION Current ventilation - Reading of the measuring fan. (If the alarm for this is off, this is illustrated with a symbol of a measuring fan with a cross through it, right along the measured value.) The computer operates on the value calculated without measuring fan. During rinse cycle - Here the desired position for the extraction fan during “rinsing” can be set. (In case this value is set to 0%, the extraction fan will stop during rinsing. It then might be possible that some water will enter the house by the negative pressure inside the house.) 1 Reduction - This menu is only visible if it is activated in the installation menu. UM-ACM-1.3-GB/02-2013 USER MANUAL CM Page 35 of 76 OPERATION Main menu => [221] - [2] Climate Controls [2] Extraction fan [1] Reduction extr. fan Temperature setting - Here you set after how many degrees, the Clima Manager has to decrease the ventilation again. Left is the offset (the horizontal part) Right is the calculated temperature. Bandwidth - This is how fast (in how many degrees) the ventilation is reduced to the absolute minimum value entered below. Reduce until + - Theoretically, the Clima unit might decrease to 0% ventilation, but this could cause drafts created by the opening of the + Clima unit. Therefore it might be better to + leave the Clima unit running for example on 10% continue, to prevent air coming back into the house via the extraction trajectory. House temperature - Measured house temperature. (If several temperature sensors are assigned, this value is the average temperature!) Calculated ventilation - Based on the measured temperature and temperature setting, the actual ventilation value is determined. Current ventilation - Reading of the measuring fan. (If the alarm for this is off, this is illustrated with a symbol of a measuring fan with a cross through it, right along the measured value.) The computer operates on the value calculated without measuring fan. Page 36 of 76 USER MANUAL CM UM-AM-1.3-GB/02-2013 OPERATION Main menu: 2 Climate controls Main menu => [23] - [2] Climate Controls [3] Intake fan Usually there is no separate air measuring unit provided for the air intake fan. The control of the inlet fan follows the exhaust fan, which is leading. Intake fan - Like in the manual menu [F1], also here the control for the intake fan can be changed from AUTO to HAND and back. Current temperature - This is the measured air intake + temperature, fresh air through the Clima unit which goes into the house. Extraction temperature - This is the measured air temperature below the extraction fan. (optional) Calculated ventilation - Based on the measured temperature and temperature setting, the actual ventilation value is determined. (This follows the extraction control.) Frost protection In case a temperature sensor is installed below the extraction fan, this can work as a frost protection and take care that the heat exchanger will not freeze completely. When that happens the extraction trajectory will be blocked with ice and no air can go out any more. In this example the speed of the intake fan will be reduced when the temperature below the extraction fan reaches 10,0 °C or less. The fan will be reduced with 33% per degrees of Celsius; which is equal to a bandwidth of 3,0 degrees. By taking less cold air through the + Clima unit then warm air leaves through the unit, the heat exchanger will not freeze. UM-ACM-1.3-GB/02-2013 USER MANUAL CM Page 37 of 76 OPERATION Main menu: 2 Climate controls Main menu => [24] - [2] Climate Controls [4] Valves ACU In case there are valves installed inside the + Clima unit, they will be assigned in the installer settings and here visible. [1] ACU-valve => The ACU-valve is a valve that can close the fresh incoming air off through the heat exchanger. This will be the case if there is also + a heater inside the Clima unit. [2] Bypass ACU => The Bypass ACU valve, can be used in warm days, to bypass the incoming fresh air from the heat exchanger, to prevent it from extra heating, before entering the house. [3] Air inlet valve => The Air inlet valve is a valve after the intake fan and will push the fresh intake air into the ridge of the house. This valve is part of the louvrebox. Page 38 of 76 USER MANUAL CM UM-AM-1.3-GB/02-2013 OPERATION Main menu: 2 Climate controls Main menu => [241] - [2] Climate Controls [4] Valves ACU [1] ACU-valve ACU-valve - Also here the ACU valve can be set to HAND or AUTO. Extraction ventilation - This is the calculated value for the extraction ventilation. Current position - Read out of the position of the ACU-valve.. Main menu => [242] - [2] Climate Controls [4] Valves ACU [2] Bypass ACU Bypass ACU - Also here the bypass ACU valve can be set to HAND or AUTO. Growth curve temperature - Start value according to its own curve. Bandwidth - Control Band in how many degrees the valve position goes from minimum to maximum position. Growth curve minimum - Minimum opening according the curve. Growth curve maximum - Maximum opening according the curve. House temperature - Measured house temperature. (If several temperature sensors are assigned, this value is the average temperature!) Current cooling - Percentage how far the bypass ACU valve is open. Current position (only visible when assigned as a frost protection) - In case the frost protection is active, this will show the actual position according the frost protection control. UM-ACM-1.3-GB/02-2013 USER MANUAL CM Page 39 of 76 OPERATION Main menu => [2421] - [2] Climate Controls [4] Valves ACU [2] Bypass ACU [1] Frost guard Frost guard - If the temperature measured below the extraction fan reaches this value, the Bypass ACU valve will start to open. Bandwidth - Control Band in how many degrees the valve position goes from minimum to maximum position. Minimum position - Minimum position of the Bypass valve. Maximum position - Maximum position of the Bypass valve. Extraction temperature - Measured temperature below the extraction fan. (optional) Current heating - Actual position of the heating control. Current position - Actual position of the Bypass valve. Main menu => [243] - [2] Climate Controls [4] Valves ACU [3] Air inlet valve Air inlet valve - Also here the bypass ACU valve can be set to HAND or AUTO. Intake ventilation - Calculated value of the intake fan. Calculated flap opening - Actual position of the intake flap of the louvrebox. Page 40 of 76 USER MANUAL CM UM-AM-1.3-GB/02-2013 OPERATION Main menu: 2 Climate controls Main menu => [25] - [2] Climate Controls [5] Circulation fans Circulation fans - Like in the manual menu, also here the control for circulation fans can be swapped between auto and manual. Ventilation - On the left is the set value or the value calculated from its own curve. On the right is the calculated value. Control ventilation - Actual control of the circulation fans. UM-ACM-1.3-GB/02-2013 USER MANUAL CM Page 41 of 76 OPERATION Main menu: 2 Climate controls Main Menu => [26] - [2] Climate Controls [6] Heating [1] Heater block => Settings for the heater. [2] Bypass heater => The bypass heater is a valve that can bridge the heater when not in use. [3] Recirculation heater => The recirculation heater valve is a valve that recirculates house air back to the intake fan. This control can be used with an extra air measuring unit. In this way the house air can be reheated. Main menu => [261] - [2] Climate Controls [6] Heating [1] Heater block Heater block - If needed, here the heater can be switched off. Temperature setting - The heating works in its own curve, which is linked to the house curve. If needed, an offset can be entered here. On the right, the calculated value is displayed. Current temperature - Current house temperature. Current heating - Status of the heater. (On or off) Intake ventilation - Percentage of air through the intake fan. Main control => [262] - [2] Climate Controls [6] Heating [2] Bypass heater Bypass heater - The bypass valve can be set to HAND. Temperature setting - At this setpoint, the bypass should open. Bandwidth - Temperature band to open the bypass. Current temperature 1 & 2 - Temperature BEFORE and AFTER the heater block. Temperature difference - Temperature difference between the two sensors. Current position - Current opening of the bypass heater valve. Current heating - Current status of the heater. Page 42 of 76 USER MANUAL CM UM-AM-1.3-GB/02-2013 OPERATION Main menu => [263] - [2] Climate Controls [6] Heating [3] Recirculation heater Recirculation heater - The recirculation valve can be set to HAND. Intake fan - Percentage of the air through the intake fan. Extraction fan - Percentage of air through the extraction fan. Calculated ventilation - Calculated control of the recirculation valve. Main menu: 2 Climate controls Main menu => [27] - [2] Climate Controls [7] Miscellaneous controls Current RH - Measurement of the actual Relative Humidity (RH) RH-compensation - From this percentage onwards, the ventilation will be increased. Factor - RH compensation factor. In the installation settings it can be set to be absolute or relative. It’s also possible only to measure RH, without any compensations to be activated. UM-ACM-1.3-GB/02-2013 USER MANUAL CM Page 43 of 76 OPERATION Main menu: 2 Climate controls Main menu => [28] - [2] Climate Controls [8] Growth curves clim. controls As in screen [21] House status (= F2), also here all the curves can be switched ON or OFF. Also the current day number can be changed from here. If the growth curves are switched off, the CM works with default settings. At the sub menus 1 through 6, each curve can be set individually. Main menu => [281] - [2] Climate Controls [8] Growth curves climate controls. [1] Growth curve house temp. This curve is the main curve of the Clima Manager. This must be copied from the existing house climate computer. This allows the Clima Manager to work together with the house climate computer. Growth curve temperature - Here each curve can be individually switched ON or OFF. Number of points - Here the required number of break points can be entered. (Max. 15 break points) Subsequently, behind each breakpoint number, the curve day and corresponding house temperature can be entered. By pressing F3, the entered curve can be displayed in a graph. By the means of this it’s easier to spot any typing errors. Page 44 of 76 USER MANUAL CM UM-AM-1.3-GB/02-2013 OPERATION Main menu => [282] - [2] Climate Controls [8] Growth curves climate controls [2] Growth curves extract. fan Main menu => [2821] - [2] Climate Controls [8] Growth curves climate controls [2] Growth curves extraction fan [1] Temperature Growth curve temperature - Here each curve can be individually switched ON or OFF. Number of points - Here the required number of break points can be entered. (Max. 15 break points) Subsequently, behind each breakpoint number, the curve day and corresponding offsets relative to the house temperature can be entered. UM-ACM-1.3-GB/02-2013 USER MANUAL CM Page 45 of 76 OPERATION Main menu => [2822] - [2] Climate Controls [8] Growth curves climate controls [2] Growth curves extraction fan [2] Minimum ventilation Growth curve minimum - Here each curve can be individually switched ON or OFF. Number of points - Here the required number of break points can be entered. Subsequently, behind each breakpoint number, the curve day and corresponding minimum ventilation settings can be entered. By pressing F3, the entered curve can be displayed in a graph. By the means of this it’s easier to spot any typing errors. Main menu => [2823] - [2] Climate Controls [8] Growth curves climate controls [2] Growth curves extraction fan [2] Maximum ventilation Growth curve maximum - Here each curve can be individually switched ON or OFF. In case the Clima Manager only needs to work according a minimum curve, then the setting “min” should be selected and the maximum curve will follow the minimum curve settings. Number of points - Here the required number of break points can be entered. (Max. 15 break points) Subsequently, behind each breakpoint number, the curve day and corresponding maximum ventilation settings can be entered. Page 46 of 76 USER MANUAL CM UM-AM-1.3-GB/02-2013 OPERATION Main menu: 2 Climate controls Main menu => [29] - [2] Climate Controls [9] Alarm climate controls In this menu system alarm conditions can be set for each control separately. Main menu => [291] - [2] Climate Controls [9] Alarm climate controls [1] Alarm house temperature When the outside temperature gets higher than the set point house, the maximum alarm limit will also move up. UM-ACM-1.3-GB/02-2013 USER MANUAL CM Alarm temperature - Here the alarm for the house temperature can be switched on or off. (In case the house curve is not set, this should be switched off to prevent any false alarm.) Minimum alarm limit - Lowest alarm limit is -20°C below the set point of the house temperature. Maximum alarm limit - Highest alarm limit is +20°C above the calculated set point for the house temperature. Absolute alarm limit - Absolute maximum alarm limit. House temperature - (Average) house set point.. Temperature setting - Set point house temperature. Outside temperature - Measured outside temperature. Alarm status - Actual status of this alarm control. In this example an alarm is active for this control! Page 47 of 76 OPERATION Main menu => [292] - [2] Climate Controls [9] Alarm climate controls [2] Alarm extract. temperature Alarm temperature - Here the alarm for the temperature below the extraction fan can be switched on or off. Minimum alarm limit - Absolute minimum value for the temperature to reach below the extraction fan. Maximum alarm limit - Absolute maximum value for the temperature to reach below the extraction fan. Absolute alarm limit - Absolute maximum alarm limit. Current temperature - Actual measurement of the temperature sensor below the extraction fan. Outside temperature - Measured outside temperature. Alarm status - Actual status of this alarm control. Main menu => [293] - [2] Climate Controls [9] Alarm climate controls [3] Alarm intake temperature Alarm temperature - Here the alarm for the intake temperature sensor can be switched on or off. Minimum alarm limit - Absolute minimum value for the intake temperature. Maximum alarm limit - Absolute maximum value for the intake temperature. Absolute alarm limit - Absolute maximum alarm limit. Current temperature - Actual measurement of the intake temperature sensor. Outside temperature - Measured outside temperature. Alarm status - Actual status of this alarm control. Page 48 of 76 USER MANUAL CM UM-AM-1.3-GB/02-2013 OPERATION Main menu => [294] - [2] Climate Controls [9] Alarm climate controls [4] Alarm extract. ventilation Measuring fan - Here the alarm for the measuring fan can be switched on or off. (This can be done when the measuring fan becomes faulty.) Current ventilation - The actual measurement of the measuring fan. Calculated ventilation - The calculated ventilation at this moment. Minimum alarm limit - When the actual measurement becomes below this limit, there will be alarm. Maximum alarm limit - When the actual measurement becomes above this limit, there will be alarm. Alarm status - Actual status of this alarm control. (In this example this control gives an alarm; the calculated value is 18%, while the measured value equals 0%!) In case the alarm for the measuring fan is switched off, a cross will be displayed through the fan symbol, to indicate that the alarm is switched off and the control will be done without measuring fan UM-ACM-1.3-GB/02-2013 USER MANUAL CM Page 49 of 76 OPERATION Main menu => [298] - [2] Climate Controls [9] Alarm climate controls [8] Alarm miscel. controls In case CO2 or RH is measured, here the alarm settings can be altered. Main menu => [2982] - [2] Climate Controls [9] Alarm climate controls [8] Alarm miscel. controls [2] Alarm RH Alarm RH - Here the alarm for the house RH can be switched on or off. Minimum alarm limit - At this value there will be an alarm. Maximum alarm limit - At this value there will be an alarm. Current RH - Actual RH measurement. Alarm status - Actual status of this alarm control. Main menu => [299] - [2] Climate Controls [9] Alarm climate controls [9] Alarm outside temperature Alarm outside temperature - Here the alarm for the outside temperature alarm can be switched on or off. Outside temperature - Measured outside temperature. Alarm status - Actual status of this alarm control. Page 50 of 76 USER MANUAL CM UM-AM-1.3-GB/02-2013 OPERATION Main menu: 4 Timers The rinse timers should be used if the Clima unit has a rinsing system. The moment a rinse timer is running, the extraction fan will start to run on a preset speed throughout the rinsing period. This setting can be done at [22] Extraction fan. The inlet fan percentage is then calculated according to value, unless it has its own air measuring unit. Main menu => [41] - [4] Timers [1] Rinse timer 1 It’s also possible to work with a “skip-a-day” program. This needs to be activated in the installer settings. Rinse timer 1 - Like in the manual menu, also here the status for the rinse valve can be swapped between auto and manual. Current status - Readout if the timer is active. Active from day - The timer will start to work from this day onwards. This choice can be enabled or disabled from the installer menu. Start time - Start time when this rinse valve should start. Period time - Duration of rinse timer 1 when started. The same applies for rinse timer 2, only the start time needs to be set exactly to the start time + duration of rinse timer 1 Main menu => [411] - [4] Timers [1] Rinse timer 1 [1] Soaking rinse timer 1 Soaking - Possibility to activate the soaking. Here this can be switched on or off. Begin / End - Beginning and end time of the cleaning process. Cycle time on / off - Rinse time and pause time during the cleaning process. UM-ACM-1.3-GB/02-2013 USER MANUAL CM Page 51 of 76 OPERATION Main menu => [41] - [4] Timers [3] Timer 1 Timer 1 - Here the timer can be set to HAND or AUTO. (This is not possible in the manual control menu F1) Current status - Readout if the timer is active. Number of periods - Here you can indicate how many starting times / periods need to be entered. By pressing the F3 button, the entered time periods can be displayed in a graph. In case a new timer period needs to been entered in between two periods, this can be done easily without first manually moving the times. - Go to the line where the new time period needs to be inserted and press the `enter` button. - When the box is open as in this example, press (and hold) the F1 button. Then also press the + button (= arrow up) at the same moment. After doing that, an extra line will be inserted and can be set with the correct times. To remove a line works the same, except by using the F1 and the – button. - - Page 52 of 76 USER MANUAL CM UM-AM-1.3-GB/02-2013 + + OPERATION Main menu: 5 Info This menu contains all the histories. The stored data from the last period can be examined here. Main menu => [51] - [5] Info o [1] Log Here the status of the Clima+ Unit can be viewed back for the past 60 days. Main menu => [52] - [5] Info o [2] Overview growth curves Here an overview of the set curves can be seen. UM-ACM-1.3-GB/02-2013 USER MANUAL CM Page 53 of 76 OPERATION Main menu: 6 Alarm This alarm menu can also directly been approached through the red alarm button. Main Alarm - The complete alarm of the Agro Clima Manager can here be switched ON or OFF. Test - The alarm can easily being tested by choosing “yes”. During 10 seconds the alarm contact will be switched and should give an alarm to the alarm system. If there is an actual alarm, this can be temporarily switched off. After 30 minutes the alarm will be activated again if still not solved. Alarm Code - When an alarm occurs, here it will tell which alarm has been occurred. Control When an alarm occurs, here it will tell which control has the alarm. - [1] Latest alarms - In this sub-menu the last five occurred alarms will be stored. In case the time at Alarm 0 is equal the actual time, the alarm is still active. In case the time at Alarm 0 is not equal the time, then this is the time the last alarm (= Alarm 1) has been solved. [21] External alarm - In this sub-menu settings can be made for external alarms, like in this example the electrical switchbox. - In total 4 external alarms can be activated. (If there are enough digital inputs available in the switchbox) The name of every external alarm is free to change. Control cabinet - Here it can be selected how an alarm should be given: LOUD: Alarm message in display and alarm contact switched SILENT: Alarm message only in display OFF: External alarm switched off. Page 54 of 76 USER MANUAL CM UM-AM-1.3-GB/02-2013 OPERATION Main menu: 7 System This menu contains general information about the Clima Manager. Software version - The version of this computer program. Software date - Release date of this computer program version. Language - Here the language of the Clima Manager can be changed. (Dutch, German, French, Danish, Polish and English) The language can be changed in any given menu, with the following key combination: [►] + F1 Main menu => [71] - [7] System [1] Date / Time First day of the week - Enter what day a new week starts. Beginning new day - Enter what time of the day, the history data of "today" to "yesterday" shoud be passed. Main menu => [72] - [7] System [2] Display Contrast - Setting for the readability of the display. brightness - Setting for the brightness of the display. On- time - If after this set time, no buttons are pressed, the display view will switch to the overview screen. Cursor left - This choice will determine where the cursor is normally. (Left or right) UM-ACM-1.3-GB/02-2013 USER MANUAL CM Page 55 of 76 OPERATION OFF- AUTO SELECTION KNOB A fan OFF / AUTO knob is attached to the electrical box. When set to AUTO, the intake and extraction fan both are controlled by the Clima Manager, according to the programmed ventilation curve. When the knob is set to OFF, the intake and extraction fan both will be stopped. A red lamp in the button lights up when the electrical box has a fault. LIVE STOCK! After turning off the fans, cover the openings of the air measuring unit and the inlet fan off. This prevents air leakage that causes draft on the animals. LIVE STOCK! After turning off the fans, make sure that the normal house ventilation is set to the necessary amount of ventilation to be provided. Page 56 of 76 USER MANUAL CM UM-AM-1.3-GB/02-2013 OPERATION STARTING THE SYSTEM Follow the below procedure to start up the Clima+ unit. This is a general description for the most common use of the Clima+ unit: 1. Remove the cover from the air measuring unit. 2. Remove the cover from the intake fan. 3. Set the selection knob on the switchbox to AUTO. 4. Enable the alarm, see on/off alarm further on in this chapter. 5. When no ventilation curve is present, or a new ventilation curve is necessary, program a ventilation curve. 6. Put the Clima manager “in use” at button F2. 7. Now the Clima+ unit is running. 8. Check the normal house ventilation for correct functioning. 1 2 DANGER! Although a lot of safety measures are built into the system, Agro Supply cannot guarantee that no dangerous situations will occur. Before you start the system, make sure no persons are in danger. LIVE STOCK! Make sure the normal house ventilation switches on when the Clima+ unit has reached its maximum capacity. Make sure an alarm goes off when the Clima+ unit has a failure. 3 UM-ACM-1.3-GB/02-2013 USER MANUAL CM Page 57 of 76 OPERATION MANUAL CONTROL CIRCULATION FANS The circulation fans are used to circulate the air inside the house. Since there is a constant amount of air inside the house, normally the speed of the circulation fans can be kept constant. Too much circulation causes draught on the birds; too little circulation causes temperature differences in the house, both resulting in an irregular distribution of the flock in the house. Normally it is not necessary to change the speed of the circulation fans during the cycle, so it is not necessary to program a circulation fans curve. Just set the circulation fans into the manual mode, enter a circulation fan speed and adjust this until the climate inside the house is constant over the complete surface of the house. TIP! Using smoke can help to visualize the distribution of fresh air through the house. TIP! A regular distribution of the flock over the complete surface of the house is an indication for the correct distribution of fresh air through the house. Page 58 of 76 USER MANUAL CM UM-AM-1.3-GB/02-2013 OPERATION ALARM ON / OFF Both the Clima Manager and the electrical cabinet are able to generate an alarm. The air measuring unit installed in the exhaust opening of the house measures the amount of ventilation and sends a signal to the Clima Manager. When the difference in measured value and calculated value is too big, the computer will generate an alarm. The alarm LED on the Clima Manager switches ON. After pressing the alarm button, on the display, an alarm code appears. See the trouble-shooting chapter further on in this manual for the possible alarms. The electrical cabinet generates an alarm when one of the ventilators is stopped. The light inside the selection knob switches ON. Since the heat exchanger provides the minimum amount of ventilation (at the first days of a cycle it provides all ventilation) it is very important that an alarm goes off when the heat exchanger has a failure (for whatever reason). Because of this normally the alarm signals of the Clima Manager and electrical cabinet are connected to an external alarm device, like for example a beeper or the normal house ventilation controller. To enable this connection (sending a signal to an external alarm device) follow below steps: 1. Press alarm button. 2. The main alarm should be set to ”ÖN”. UM-ACM-1.3-GB/02-2013 USER MANUAL CM Page 59 of 76 OPERATION STOPPING THE CLIMA+ UNIT 4 When for example in the summer, the temperature inside the house raises, it may be necessary to stop the heat exchanger. It’s not recommended to switch the Clima manager and switchbox OFF. Follow below steps to stop the heat exchanger: 1. Press alarm button. 2. Switch off the main alarm. 3. Push the “F2” button and set the house status to: “not in use” 4. Stop the heat exchanger by switching OFF the fans with the selection knob on the electrical cabinet. LIVE STOCK! When the birds are heavier during the last days of a cycle, or during very warm weather, the Clima+ may be stopped. Raise the minimum ventilation setting of the house ventilation to compensate the ventilation loss because of the stopped Clima+ unit. When the heat exchanger is stopped, but birds are still present in the house, it is recommended to cover the openings of the air measuring unit (5, exhaust opening) and the intake fan (6). The covers prevent air leaks causing draught on the birds. There are 3 types of covers available: Brown covers for the round 710 mm. Blue covers for the round 820 mm. White covers for the round 920 mm. 4 5 After stopping the Clima+ unit immediately start with the cleaning of the outside of the air tubes! In case a rinse installation is installed, the “cleaning” status could be activated. See chapter maintenance for details. 5 6 Page 60 of 76 USER MANUAL CM UM-AM-1.3-GB/02-2013 MAINTENANCE 4. MAINTENANCE UM-ACM-1.3-GB/02-2013 USER MANUAL CM Page 61 of 76 MAINTENANCE GENERAL Only professionals who are familiar with the installation and its operation may perform maintenance, cleaning, repairs and replacement of defective or worn out parts. When during maintenance questions arise regarding the condition of the system, consult your Agro Supply dealer. In case of difficult or special repairs consult your Agro Supply dealer. Inspections must be carried out before, during and after operation of the machine. Mechanical flaws must be repaired upon discovery. The operator is responsible for noticing and locating abnormal noises and other unusual signs indicating flaws. If the operator cannot locate the flaw, he must stop the installation and inform his superior. Take preventive actions against vermin as they may cause failures to the electrical cables and such. SAFETY REGULATIONS Before starting operation, cleaning, maintaining the system or before remedying breakdowns first read the chapters Introduction and Safety. Page 62 of 76 USER MANUAL CM UM-AM-1.3-GB/02-2013 MAINTENANCE GENERAL MAINTENANCE PROCEDURE Before actually starting to maintain the system, first follow below steps: - Switch off the system and secure it against accidental switching on. Check the condition of the system during cleaning. CAUTION! When using warm water to moisten a cloth, make sure the temperature of the water is below 45°C. Above this temperature it is possible to incinerate body parts. When hosing down don’t aim water jet towards other persons. ATTENTION! Do not use abrasive cleaning detergents or utensils on non-longwearing parts. ATTENTION! Do not use aggressive cleaning products. Use cleaning product with a PH value between 6 and 8. LIVE STOCK! We recommend to use a mild disinfectant such as Macrodes during cleaning. ATTENTION! Hose down only those systems that are designed for hosing down. Use a jet of water from a distance of at least 1 meter, with a maximum water pressure of 25 bars and a maximum water temperature of 60°C. Do not hose down bearings and electrical parts. ATTENTION! Do NOT clean the electrical cabinet with water. Perform the maintenance according the advices and intervals as described in the Preventive maintenance instructions further on in this chapter. TIP! The maintenance advices and intervals described in this manual are general. For your specific situation the maintenance schedule may need alteration. During the first months observe the performance of the system and the influence of contamination on the system and (if necessary) change the maintenance methods and schedules. AFTER MAINTENANCE When the maintenance duties are finished, ensure the following: - All fasteners are secure. All safety covers are in place and safety doors are closed. All tools and cleaning utensils are removed from the system. UM-ACM-1.3-GB/02-2013 USER MANUAL CM Page 63 of 76 MAINTENANCE PREVENTIVE MAINTENANCE INSTRUCTIONS FILTERS Check the filters daily for contamination. In case of contaminated filters replace them with a spare set of clean filters. Contaminated filters can be washed and reused. LIVE STOCK! Clogged filters may result in intake ventilator overload, which stops the ventilation. FILTERS REPLACEMENT Follow below procedure to replace the filters: 1. Loosen the filter(s) from the filter frame. 2. Remove the filter(s) from the filter frame. 3. Replace the clean filter(s) in the reverse order of the removal. Page 64 of 76 USER MANUAL CM UM-AM-1.3-GB/02-2013 MAINTENANCE AIR TUBES As soon as the Clima+ unit is switched off, dust sticking to the outside of the air tubes starts to dry out. Because of this, the outside of the air tubes must be cleaned immediately after switching off the Clima+ unit. LIVE STOCK! A lot of dust sticking to the outside of the air tubes results in less heat transfer, higher energy consumption and may result in intake ventilator overload which stops the ventilation. AIR TUBES CLEANING 1 1 2 Follow below procedure to clean the outside of the air tubes: 1. Open all 6 doors above the air tubes. (The 1 meter Clima+ unit only has 3 doors) 2. Hose down all air tubes using volume water. 3. After cleaning check the status of the rubber seals of the doors. 4. Leave the doors ajar to allow the tubes to dry. Do not expose the tubes continuously to direct sunlight. 5. Close all doors when the tubes are completely dry. 6. It’s recommended when finished cleaning, to leave the fans in the heat exchanger running for about 20 minutes. This way there will be no condensation and drying is speeded up. Make sure that only the lower doors are opened near the extraction box, to prevent dirty house air going through the clean unit again. ATTENTION! Do not stand or walk on the air tubes. This damages the tubes. ATTENTION! After cleaning the Clima+ unit, prevent the air tubes against direct sunlight. Make sure that the doors and covers are closed far enough. Direct sunlight damages these air tubes since they are UV sensitive. UM-ACM-1.3-GB/02-2013 USER MANUAL CM Page 65 of 76 MAINTENANCE PROTECTIVE GRIDS FANS At the end of each cycle, clean the protective grids of the air measuring unit and the intake fan. FILTER ELECTRICAL CABINET At the end of each cycle, check the filter of the electrical cabinet for contamination. In case of contaminated filter, wash or replace it with a clean filter. 2 FILTER ELECTRICAL CABINET REPLACEMENT 3 4 Follow below procedure to replace the filter of the electrical cabinet: 1. Stop the Clima+ unit. 2. Switch OFF the main switch on the electrical cabinet. 3. Press on the side of the filter holder and pull slightly. 4. The filter holder now falls forward and could also be taken out for washing. 5. Take out the filter to wash, or replace the contaminated filter in the filter holder by a clean filter. 6. Place the filter holder back in the gap of the door and click the holder back. 5 Page 66 of 76 USER MANUAL CM UM-AM-1.3-GB/02-2013 MAINTENANCE CHANNELS At the end of the first cycle retighten all clamping- and coupling lines of the channels. For later cycles always check the clamping and coupling lines of the channels for correct attachment. EXHAUST CHIMNEY Check regularly the presence and the tension of the 4 tension wires. GAS SPRINGS After cleaning the air tubes, check the functionality of the gas springs (dampers) and replace them if necessary. WATER DRAINAGE Whenever a long period of hard frost is forecasted, remove the siphon. Place the siphon back as soon as the temperature rises above freezing point. (Optional a frost protection set is available) UM-ACM-1.3-GB/02-2013 USER MANUAL CM Page 67 of 76 SPARE PARTS 5. SPARE PARTS UM-ACM-1.3-GB/02-2013 USER MANUAL CM Page 69 of 76 SPARE PARTS SPARE PARTS LIST Article nr. Description 5702300090 5702300091 5702300311 5702300310 Ventilator SGS-82-C4E complete Vent. Motor for SGS 1,5 kW Fanblade complete for SGS-82-C4E Ventilator SGS-92-D4S complete Vent. Motor for SGS 2,2 kW Fanblade complete for SGS-92-D4S Air measuring unit Sensor for air measuring unit Yellow Measuring fan Yellow Sensor for air measuring unit Green Measuring fan Green 5702300062 5702300079 5702300101 5702300094 5702300063 5702300097 Temperaturesensor Clima Computer Clima Manager Clima Controller MB Remote Control RC-10 Static Pressure switch 30-500Pa 5702300084 5702300086 5702300085 5702300087 Electrical switchbox 8001100104 Freq. drive ATV12 1.5kW Schneider 8001100008 Freq. drive V1000 2.2kW Omron 5702100036 Circulation ventilator 1 phase 230VAC Ø50 5702100078 Circulation ventilator 3 phase 380VAC Ø50 Various 4300400002 Closing sheet for LMU 710 Brown 4300400003 Closing sheet for LMU 820 Blue 4300400004 Closing sheet for LMU 920 White 4100500072 5009900052 9307700008 5702400223 Epdm rubber strip 15x8 Black Slide lock 100x75mm Ladder Lance for cleaning 7100700006 7100700007 7100700008 7100700009 Gas springs Gas spring D14 500N Gas spring D14 700N Gas spring D14 1000N Gas spring D14 1500N UM-ACM-1.3-GB/02-2013 USER MANUAL CM Page 71 of 76 SPARE PARTS Filter sets 5702400226 Filter cloth (H= 1600) per meter. 4000300052 Terminal profile White L=2700mm Page 72 of 76 USER MANUAL CM UM-AM-1.3-GB/02-2013 TROUBLE SHOOTING 6. TROUBLE SHOOTING UM-ACM-1.3-GB/02-2013 USER MANUAL CM Page 73 of 76 TROUBLE SHOOTING TROUBLE SHOOTING LIST Alarm Description code: Standby (No failure) Temperature sensor outside limits. Measuring fan is not turning. Measuring fan is turning too slowly (less than 2%) Measuring fan is turning with more than 40% variation to calculate setting. One of the ventilators is stopped and the frequency inverter displays “OLF”. UM-ACM-1.3-GB/02-2013 Cause Sensor malfunctions Exhaust ventilator is not running. Contamination around the air tubes Thermal protection switch in electrical cabinet is switched off. USER MANUAL CM Action Check thermal protection switch in electrical cabinet Check for contaminated air tubes and clean them if necessary Check for clogged filter or contaminated air tubes. Setting ITH not correct in frequency inverter. Too high static pressure inside the house. Switch off the switchbox and switch it on again. Page 75 of 76