1
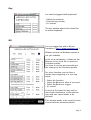
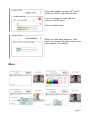
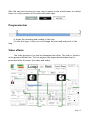
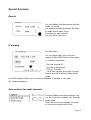
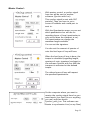
User manual
Page 1
Table of contents
Overview.................................................................................................................... 3
Installation..................................................................................................................3
On windows XP or Vista......................................................................................... 3
On Mac OSX (3.9 or later)..................................................................................... 4
The principle...............................................................................................................4
Quick start................................................................................................................. 5
Using Lax 2.1............................................................................................................. 7
Preferences............................................................................................................ 7
Loop preset............................................................................................................7
Sound..................................................................................................................... 8
Midi......................................................................................................................... 8
Key......................................................................................................................... 9
Wii.......................................................................................................................... 9
Arduino.................................................................................................................10
Video input.............................................................................................................. 11
Audio input.............................................................................................................. 12
Mixer.........................................................................................................................13
Loop controls...........................................................................................................14
Progression bar........................................................................................................ 15
Video effects........................................................................................................... 15
Input effects........................................................................................................ 16
Output effects..................................................................................................... 16
Display......................................................................................................................17
Sequencer................................................................................................................ 18
Special functions......................................................................................................19
Record.................................................................................................................. 19
IP sending.............................................................................................................19
Auto switcher for audio channels........................................................................ 19
Bypass Input........................................................................................................ 20
Variable speed of the loop...................................................................................20
Timing controls........................................................................................................ 21
Without control :..................................................................................................21
Master Control :................................................................................................... 22
Slave control : ..................................................................................................... 23
Page 2
Overview
Lax 2.1 is a real time software for looping audio and video.
It is a tool for manipulating audio and video contents in in a unique way. It
have special functions for original use of audio/ video loop. The developement of
this tool is a work in progress. Lax 2.1 is a state at a day. Every idea of
improvements and other practices will be welcome.
The main features are :
–
–
–
–
–
–
–
–
–
–
–
–
–
–
–
Lax is working upon layers of audio/video. You can play with the two last.
Three kind of video input : Live camera, video fle, video on a network,
Three kind of audio input : Microphone, audio fle, audio from video fle,
Many kinds of video mixing : crossfade, chroma-keing, alpha blending, …
10 originals video effects (multiscreen, …),
10 « graphical » effects (distort, ghost effect, …),
a sequencer of portion of the loop,
variable speed control of the loop,
Undo / Redo,
Pause / Resume and Stop / Play of the loop,
A timing control for master or slave synchro with any daw (mainly tested
with Live) or any device that provides a midi synchro clock.
a audio and video recorder,
a video network sender,
Lax can be triggered with a keyboard, any midi device, a arduino board, a
wiimote,
Every parameters are saved in a preset.
Installation
On windows XP or Vista
You need QuickTime installed (7.0 or later)
Uncompress the Lax 2.1.zip fle.
Copy the folder « Lax softwares » in your program fles directory
Page 3
That's done !
On Mac OSX (3.9 or later)
Uncompress the Lax 2.1.zip fle.
Copy the folder « Lax softwares » in your Applications directory
That's done !
The principle
Lax is looping using an overdub process without accumulation.
You can loop audio or video or audio and video by switching on or off the
buttons show below.
The frst layer of loop make the maximum length of your loop. You can
resize the loop (only at this state) with the inlet and outlet of the progression bar.
The over layers of loop will be of this length or less, and this will be the last
period of loop length that will be looped. It means that if your frst layer of loop is
12 sec long and you loop an hour for the second, that will be the last 12 sec. of
this hour that will be looped (non cumulative).
It also use Ram for storing audio and video data in real time. The amount of
Ram needed is related to the video defnition of the loop, its length, its frame rate
(of audio and also video).
Keep in mind that a 10 sec loop at 720 x 576 with 25 fps and an audio
sampling rate at 44.1 kHz needs 410 Mo. Lax needs 250 Mo itself.
Depending on your hardware and the settings of the loop preset the startup
of Lax takes one's time. On a macbook pro 2.4 Ghz with a loop preset of 20 sec
at 640 x 480 with 30 fps, Lax needs 17 sec to start
Page 4
Quick start
In the folder « Lax softwares » you'll fnd :
for Windows XP or Vista :
four folders : Lax 2.1, Lax Remote, Remote Live with Lax, Developpers
run the Lax 2.1.exe
for Mac OSX :
three applications : Lax 2.1, Lax Remote, Synchro with Lax, and a folder
Developers
run the Lax 2.1 application.
Lax use Ram for storing audio and video data, so, depending on your hardware
loading Lax will take time.
The interface of Lax can be divided in 12 areas
Preferences :
This is were you defned the settings of the loop (defnition, length max, …),
the settings for hardware control (mappings of keyboard, midi device, arduino
Page 5
board, wiimote), the settings of your sound card.
Video input :
Set the video input you want to use
Audio input :
Set the audio input. The level input and output
Loop controls :
There are buttons to control recording and playing of the loop.
Mixer :
For mixing the loop playing with any input video. The mix mode available
are : - Crossfade,
- Cromakeying (keying with a color that can be set by choosing a key color
or by cliking an area in the window input),
- Math. Operations : many compositing mode (additive, multiplication,
average, equal, …),
- Alphablend : alphablending. This mode is also used with multi-screen
effects.
The freeze toggle allow to freeze the mixing set. Instead, each end of a loop
recording the set-up is initialize to crossfade with a mixing value of 0.
Progression bar :
The progression bar displays the portion of the loop played in real time. It
also display the in and out of the loop.
Sequencer :
Allows to make a sequence of portions of the loop.
Video effects :
Originals video effects.
Timing control :
Lax can be used free of any time control, or with a human-friendly timing
control with tempo relative units. Lax can be the master or the slave of any daw
using tempo timing control.
Display control:
Controls the settings of the display.
Recorder :
Can record the audio and video output of Lax.
Page 6
Network sender :
Video output can be sent on a network (for Max users)
Using Lax 2.1
Preferences
The menu of Preferences is the access
for the settings of the loop engine, the
sound card and the control with midi,
keyboard, wii and arduino.
Loop preset
You can set :
Maximum length : It can be anything
from 5s to 90 sec.
The defnitions of loop available are 320
x 240, 360 x 288, 480 x 360, 640 x
480, and 720 x 576.
Sampling rate of loop can be set.
Keep in mind that this three parameters
change the amount of Ram used.
If you have a camera with latency (mostly the case), you can set it. Lax will adapt
its audio / video synchro to make it disappears in loop output. Keep in mind that
Latency is active for any video input you use.
Page 7
Sound
Lax needs a sound card active to run, even if you only loop video contents. If the
audio is Off in the Sound setup window, Lax can't loop.
Lax loop stereo or mono audio channels.
Use mainly the asio and core audio
drivers. Drivers like none, NonRealtime,
ad_rewire are not supported.
The parameters are the classical ones.
You can set which channel of your
sound card you use for audio input or
output. The menu is always populated
with the ins and outs available on your
sound card.
There is a special function for auto
swith of the input used.
Midi
Lax can be triggered by any midi device
on any channel.
Note, program change, controler,
pitchbend can be used.
- Select the function,
- Press the note or move your controler,
- It's stored.
Variable speed loop is available with
pitchbend (min and max have to be
defned).
This midi window need to be closed for an active midi.
Page 8
Key
Lax can be triggered with keyboard.
- Select the function,
- Push the key chosen,
- It's stored.
The key window need to be closed for
an active keyboard.
Wii
You can trigger Lax with a Wii via
Osculator ( http://www.osculator.net )
Wiimote control on Windows system is
not yet available.
In the « Lax softwares » folder run the
Wiimote to Lax.oscd fle. It opens an
Osculator patche.
You have to set the port according to
the settings of the Osculator patche.
For every function you can have a
double step triggering or a one step
mode.
-
Select the function,
Select the Button to allow if you need,
Select the Button to trigger,
It's stored.
Control of the speed of loop can be
done with orientations of the wiimote
(min and max speed needs to be
defned).
This window needs to be closed to have
control with the wiimote enabled.
Page 9
Arduino
You can trigger Lax with a Arduino
board ( http://www.arduino.org )
You need to switch On the On/Off
toggle at the top left of the window to
activate your board.
- Select the function,
- Select the analog or digital input,
- It's stored.
Control of the speed of loop can be
done with any analog input of the board
(min and max speed needs to be
defned).
This window needs to be closed to have
control with Arduino board enabled.
In this window settings you can set
which input you want to use.
Every parameters of any preferences is automatically saved in preset.
Each time you change something Lax remembers it and save it. All the settings
(including preferences, effects setings, display settings, …) are saved when you
exit Lax in a fle named Lax_preset.xml. If you want to restart from blank settings
just trash this fle.
Page 10
Video input
There is three kinds of video input :
Live from any camera or any digitizer.
- Activate
The settings allow to set up your driver
options in your system interface.
From any video sample that can be read
by Quicktime.
- Click on the folder icon and select a
directory.
- Click in a line of the playlist,
- Select a video fle,
You can change the rate,
you can jump to a specifc frame with a
click in the progresion bar where a red
spot travels.
The playlist is automatically saved in the
fle video.
Page 11
For max users
You can receive video from jit.net.send
object of Max/MSP/Jitter on the same
or a distant computer.
- Set the port to receive,
- You'll see a green spot right to word
connected.
You can set the defnition of the input.
In the Developers folder you can fnd an
example of patche to use with
(IP_sender.maxpat)
Audio input
The levels and monitoring satus are
stored with preset.
There is three kinds of audio input :
From any input of your sound card.
The input can be mono or stereo.
The button Sound Settings opens the
Sound Setup window.
With Mono enabled you got the channel
1 of Lax (see Sound Setup).
Page 12
The audio sampler can play AIFF, NeXT/
SUN(.au), WAVE, and Raw Data fles.
You can change the start and end
points of the fle read.
Files are read in loop.
When you read video sample in video
input, you can get the audio track of the
video sample (if available).
Mixer
Page 13
There are 4 mix mode.
Crossfade
Crossfade
Chroma-keying
Click on the input's preview to select a color in the image or defne it with
color panel.
You can set the saturation of the color and the softness of the chromakeying.
Math. Operation
Many mode for mixing and compositing
Alpha blend
Usefull only with alpha content.
The Direct/Indirect button allow to have in the main output, the output of
the mixer or only the loop when Lax is not recording a layer of loop. With any
state of this button the main output is the output of the mixer when recording a
layer of loop.
Each time you make a layer of loop, the settings of the mixer is re-initialize
to Crossfade with a mixing value of 0. The freeze function allow to keep the
settings you make for all the future layers of loop.
Loop controls
7 buttons controls the playing and recording of loops made with Lax.
This functions are also available with midi, keyboard, Wii or Arduino board.
Loop :
- Click, it will start the recording of a new layer of audio/video loop.
- Click to stop, even it stops at the max length.
- The button is red whenrecording, white when not recording.
Undo/Redo
- One level on Undo/Redo
Reset :
- Clear all the layers of loop
Pause/Resume
- Pause and resume the reading of loop
Stop/Play : - Stop and play the loop
Page 14
With this two last functions you can stop or pause on the actual frame, on a black
frame or on the preview of the video and audio input.
Progression bar
It shows the recording and reading of the loop.
For the frst layer of loop you can change the start and end point of the
loop.
Video effects
The video process in Lax can be shematized as follow. The video « travels »
in the green and black line. The Lax engine (the engine whick makes loop) is
processed after the mixer (for video and audio).
Page 15
There is two kinds of video effects :
The Input Effects are applied to the input before the mixer.
The Output Effects are applied after the Lax engine (they are not looped).
Input effects
Pix. Fb :
A instable feedback of part of the image.
Glop :
Feedback with for each red, green, blue channels.
Multi II :
Multi screen effect with variable dimensions of window and variable positions
Tiff :
Variable pixellisation.
Slide :
Slide in time. Kind of ghost effect
Expo :
Automatic exposure.
Cont. :
Brigthness, contrast and saturation.
Conv. :
Increase the ligth with a good resolution.
Multi :
Multi screen in grid with variable size.
Blur :
blur.
Output effects
XY :
a displacement of the image at x and y speeds.
Page 16
Delay :
A delay with a ghost and saturation effect.
Wob. :
Wobble with parameters.
Dist. :
a set of distortions.
Luma :
Displacement regards to lumination.
C.B.S. :
Contrast, brigthness and saturation.
Dist. II :
an other random set of distortions.
Squint :
horyzontal and vertical squint.
Del.C :
A delay ,with loop mode, and many others.
Blur :
blur
Display
You can display the output of Lax in a window of any dimensions in any
position of your screen.
There is a menu with popular defnition, and you can customize.
Page 17
Sequencer
You can compose sequence with portions of the actual loop.
You defne 12 « portions » of the loop, from the entire length to a tiny part.
Portions are defned in proportion of each active loop and stored with preset.
On the image below the portion defned will started any loop made with Lax at
1/3 of his length and end at 2/3 of his length.
At the end of the reading of this portion, it will stop and the main output will
display a black frame. The button Stop/Play will then be red and on the stop
postion.
Then you can re-start the reading of the loop by pushing the Play button or with
the read of an other portion in the sequencer.
The follow actions available are :
Stop on last frame,
Stop and black on last frame,
Play again,
Play any,
Play next,
Play previous,
Play from the beginning,
With Play from the beginning it will re-start the reading of the actual loop.
The magnetism option is available only when Timing control is on Master or Slave
mode.
You can trigger each portions defned in the sequencer with midi, key, and the
Arduino board.
Page 18
Special functions
Record
You can defne the dimensions and the
codec of record.
Lax always records Quicktime fle with
an audio and a video track.
This fles are auto-named
AV_Lax_Date_Hour.mov
IP sending
For Max users.
You can send video to jit.net.recv
object of Max/MSP/Jitter on the same
or a distant computer.
- Set the receiver IP,
- Set the receiver port,
- Click on Connect,
- You'll see a green spot right to word
Connected and a latency value will be
given.
In the Developers folder you can fnd an example of patche to use with
(IP_receiver.maxpat)
Auto switcher for audio channels
On both Arduino and midi settings you
can fn a function named Cycle through
Audio input.
This function let you change the input
of your sound card used in Lax.
Page 19
It cycles from the actual to the last
input, and returns to the frst, ….
Bypass Input
If there is at least a frst loop running in
Lax, you can bypass audio and video
input with a switch of a midi device, the
keyboard or the Arduino board.
This function works while recording
layers of loop.
Variable speed of the loop
Speed can be changed in two ways :
- With direct change to a speed value.
Midi
Arduino
Wii
Key
With a midi note (or any program
change) a digital input of the Arduino
board, a button of the Wii, a key of a
keyboard, you can trigger a speed
value.
With a Wii, you have three choices.
Increase by two, decrease by half or a
direct set to 1.
With any midi device, the Arduino board
or a key you have many choices of
values to set in real time.
- With smooth change
Page 20
Midi
Arduino
Wii
With a pitch bend in midi, an analog
input of the Arduino board, an
orientation of the Wii, you can set a
free variable speed.
The limits of the speed have to be
defned.
Timing controls
Lax can run free of any timing control
or as master or slave of other software.
Without control :
You are free to play and record
whenever you want in the limits of the
maximum length.
Page 21
Master Control :
With master control, a synchro signal
from Lax will be sent to another
software (Synchro with Lax).
This synchro signal is sent with OSC
protocol. Then you have to set a
correct IP address and a valid port to
sent to.
With the Quantization menu you can set
which quantization Lax will use for
recording layers of loop (quantization is
only active when the transport is on).
The quantization can change the
maximum length available.
You can set the signature.
You also set the amount of quarter of
note the frst layer of loop will have.
When the frst layer of loop is done, the
tempo is calculated (regarding length,
quarters of note, signature) and sent to
the software Synchro with Lax AND the
transport is activated at the defned
tempo.
The others layers of loop will respect
the specifed quantization.
On the computer where you want to
receive the synchro signal from Lax you
must launch your Daw (Live or anything
you use) and then launch
Synchro_with_Lax. This software use
Rewire to synchronize Live (or any Daw)
Page 22
to the tempo and the start and stop
sent by Lax. So the order (frst your
daw, then Lax) must be respected.
Set the same Port as the one set in Lax.
In live (or any daw you use) you need to
set at least one input of an audio track
to Synchro with Lax.
Because this list is populated with
shorcuts fnd in the directory
Users/you/Application
Support/Propellerhead Software/Rewire
for mac and .../..../... for Windows you
probably need to run Synchro with Lax
alone one time.
Slave control :
With slave control, a synchro signal can
be sent to Lax from any daw via an
other software (Lax Remote).
This synchro signal is sent from your
daw to Lax Remote with Rewire, and
with OSC protocol to Lax. Then you
have to set a correct IP address and a
valid port to sent to in Lax Remote and
the same port in Lax.
With the Quantization menu you can set
which quantization Lax will use for
recording layers of loop (quantization is
only active when the transport is on).
The quantization can change the
maximum length available.
You can set the signature.
A change of the tempo of your daw is
ignored if a frst layer of loop is running.
Page 23
Lax Remote is built upon the midi
preferences of Lax. You can with Lax
Remote remote Lax from a distant
computer connected to midi devices.
This remote is also switchable with a
midi input (note or program change).
In live (or any daw you use) you need to
set at least one input of an audio track
to Lax Remote.
Because this list is populated with
shorcuts fnd in the directory
Users/you/Application
Support/Propellerhead Software/Rewire
for mac and .../..../... for Windows you
probably need to run Lax remote alone
one time.
Page 24
tralala
Page 25