1
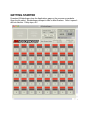
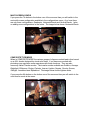
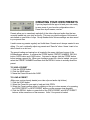
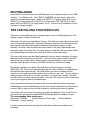
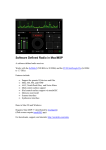
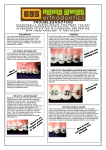
64Videofingers is a live performance application designed for making music out of video
clips. I hope you enjoy playing with it.
YOU ARE GOING TO NEED LOTS OF VIDEOS
Before you begin, you are going to need some video and audio clips. It can take quite a
while collecting and gathering and exporting and converting all the video clips you want
to use for your live performance. Itʼs a big hindrance when you just want to play with
the app and get to know how it works. That is why I have done some of the collecting
for you. Be sure to check the 64Videofingers application page on the monome.org
website for a link to a few of my downloadable video collections to play with instantly. I
will be adding new collections to download every so often so be sure to check back.
If you want to begin creating your own clips check the end of this manual for some
advise and instructions regarding good methods for pulling clips and recommended
video codec settings.
GETTING STARTED
Download 64Videofingers from the Applications page on the monome.org website.
Open the file called _64videofingers.maxpat in Max or Max Runtime. Once it opens It
will look like this. Pretty dope, eh?
Download one of my video collection links and unzip the file. It will create two folders.
One folder contains all the video clips and the other folder contains all the audio clips.
Examine the two folders closely and you will notice that the video clips are named
exactly the same as the audio clips. This is an important thing to note for when you
want to create your own video collection.
Drag and drop the folder of video clips onto the area of 64Videofingers that says “drop
your video folder HERE”. Now the application may take a bit of time processing as it
loads every video clip into the application. The first two seconds of every clip is also
loaded into RAM. When the program finishes processing you will see the titles of the
video clips appear in all of the 48 ORANGE BOXES in 64Videofingers.
Now drag the folder of audio clips onto the area labeled “drop your audio folder HERE”.
Once it finishes processing you will see the titles of all the audio clips appear in the
BROWN BOXES just below the orange ones.
Now click on the SETTINGS button in 64Videofingers. Set the PREFIX by clicking the
box labeled “Set prefix to /64”. Connect your monome to the computer and click the
CONNECT button. You should now be connected and you can close the Settings
window.
Finally, the last step is to activate the DAC. To do this simply click the DAC button
located at the top of 64Videofingers.
Now you should be able to trigger the video clips with the monome.
There is one last setting that you may want to adjust, the FRAMES PER SECOND
setting. Depending at what frame rate your video clips are running at you will want to
set the “fps” setting to match. With my video collections it will either be “30fps” or
“23.98fps”. You will be able verify the correct setting by checking how well the video
appears to sync with the audio.
THE SLOT
There are 48 slots in 64Videofingers. Each slot contains a menu of
available VIDEO CLIPS, a VOLUME SLIDER and a GROUP
NUMBER. In order to change the video clip associated with a
particular button you click on the orange box for that slot and a
menu of selectable video clips will pop up.
You can have the same video clip in multiple slots BUT if you associate a different
GROUP NUMBER to the same clip in multiple slots then each time the video is
triggered by alternating groups the video will freeze in the previous window. I
recommend experimenting.
GROUP NUMBERS
Each button or video clip has a group number. 64Videofingers defaults with the first two
rows of video clips set to Group 1 and then each row after being Groups 2-5. The group
numbers dictate a couple of things. First, it says which clips will play together and
which clips will cut each other off. Second, it associates the video clip to a particular
window in the VIDEO PREVIEW WINDOW. It becomes pretty obvious once you start
playing with it.
MONOME LAYOUT
Now lets take a look at how the buttons on the monome are broken up.
THE TOP ROW
GROUP STOPS
The first five buttons in the top row are the GROUP STOPS. If you have experience
playing with MLR then you will already know how this works. Basically, if you press a
video in Group 1 than the GROUP 1 STOP button will light up. If you then press the
GROUP 1 STOP button then the clip will stop playing and the light will turn back off.
ALL (non-pattern) CLIPS STOP
The sixth button over on the top row is the “ALL (non-pattern) CLIPS STOP” button. It
begins flashing whenever any clip is playing. It acts like an all-stop button unless you
have some clips being triggered by the pattern recorders, then it only stops the clips
NOT associated to a pattern. So, if you are soloing with clips in multiple groups over a
bed of clips created with the pattern recorders and you canʼt remember which groups
you have triggered.
PREV PRESET, NEXT PRESET & INITIALIZE PRESET
The last two buttons in the top row are for switching your PRESET BANK of video clips.
You increase or decrease the PRESET NUMBER by pressing either the PREV
PRESET or NEXT PRESET buttons. Once you have the correct preset number
selected, you press both buttons at the same time to RECALL the new preset. Presets
save which video clip, volume setting and group number is associated to a particular
button.
THE BOTTOM ROW
PATTERNS
The first four buttons on the bottom row are the pattern recorders. 64Videofingers is a
clock-free application so it does not sync to a midi signal. It works much closer to the
way a looper pedal works where you dictate the beginning and end of a pattern by your
button presses. PATTERN_1 is the master pattern so you always want to record your
first loop with the PATTERN_1 button. PATTERNS 2, 3 and 4 will slave and sync to the
master pattern.
Hereʼs how it works. Press the PATTERN_1 button. The led will light up telling you that
itʼs ready to record. Begin recording your pattern by playing the clips to a rhythm. At
the end of your pattern you press the PATTERN_1 button again “IN TIME” and your
pattern will instantly begin playing back. If you want to record more layers with Patterns
2, 3 and 4 then you repeat the steps above with each of those buttons.
A note on sync: In order for the slave pattern recorders to sync perfectly to the master
pattern you must record them in square multiples. I just made up that term. Iʼm not so
great at math so Iʼll describe it this way. If your master pattern is 4 bars long and you
record your second pattern thats 2 bars long it will remain in sync. If your third pattern
is 1 bar long then it will remain in sync. If your fourth pattern is 3 bars long then the
pattern will offset each time it loops. This can be used to your advantage by creating
melodies and rhythms that are surprising and interesting.
Finally, to CLEAR a pattern, double tap the pattern button quickly and the led will begin
flashing very quickly. This is telling you that its now ready to clear. Now you have two
options. You can press the pattern button once again to clear the pattern or you could
press another video clip on the monome to seamlessly clear the pattern and continue
playing.
One more little detail: There is one extra nuance/possible future development/small
annoyance in regards to the pattern buttons. When a pattern is playing back the led for
that pattern button will begin flashing with long “ons” and quick “offs”. If you press the
pattern button once again then the led will switch to long “offs” and quick “ons”. In the
old 64Videofingers this was where you could turn off the video for this pattern while
keeping the audio playing. Right now it does nothing. ALTHOUGH, you might be trying
to clear a pattern and your quick double taps seem to be doing nothing. Itʼs probably
because your pattern button is showing long “offs”/quick “ons”. In order for the double
tap to register you need to make sure your led is showing long “ons” and quick “offs”.
My apologies but I have come to appreciate this nuance because Iʼm less apt to mess
up a pattern because of a sloppy button press.
The pattern recorders take practice. With experience you can discover new and
interesting ways to use them. For example, you can simultaneously set one pattern to
clear while enabling another to begin recording.
Also, I should mention that PATTERN_1 is a master AND a slave. If you start a pattern
with pattern 1 and then layer in patterns 2 and 3, and then you clear pattern 1, then
pattern 1 will now act as a slave and sync up like all the other ones. Only when ALL
PATTERNS ARE CLEARED will pattern 1 switch back to master.
MULTI-SCREEN MODE / COMPOSITE MODE
If you press the last or 8th button on the bottom row of the monome then you will switch
the app between MULTI-SCREEN MODE and COMPOSITE MODE. Multi-Screen
mode will play all of the videos in boxes as dictated by the MULTI-SCREEN CONFIG
setting (Quadrants, Vertical Bands, Horizontal Bands). COMPOSITE MODE will overlay
the videos to create a single composite image as dictated by the COMPOSITE
TRANSFER MODE setting.
MULTI-SCREEN CONFIG
If you press the 7th button in the bottom row of the monome then you will switch to the
next multi-screen configuration available in the configurations menu. As of now there
are only three configurations, Quadrants, Horizontal Bands and Vertical Bands. I plan
on adding more configurations in the future. The image below shows Horizontal Bands
COMPOSITE TYPE/MODE
When in COMPOSITE MODE the various groups of clips are overlaid each other based
on a v001 shader designed by visual artist vade. If you have ever worked with
photoshop you may have some experience with these functions. They are also
commonly called Transfer modes. The transfer modes available are Additive, Average,
Brightlight, Difference, Dodge, Exclude, Inverse, Lighten, Negate, Overlay, Screen,
Softlight, Lumablend and Alphablend. The image below shows Lighten mode.
If you press the 6th button on the bottom row of the monome then you will switch to the
next transfer mode in the menu.
SHIFT
The 5th button on the bottom row is the SHIFT button. I designed this shift function
mainly for the purposes of creating good presets. Basically, if you hold down the SHIFT
button and then press one of the video clip buttons then rather than trigger that clip it
will instead change the video clip associated to that button to then next available from
within the menu.
This can be useful for finding good clip combos by recording a pattern and then shifting
the clips to hear how it changes.
Most of these functions can also be accessed via the graphical user interface on
64Videofingers
CREATING YOUR OWN PRESETS
If youʼve played with the app a bit and your now ready
to save some of your favorite configurations into a
Preset then by all means, read on.
Presets allow you to seamlessly switch all of the video clips and audio clips that are
currently loaded into your slots on the fly. This way you could configure a full musical
sets based on one folder of clips. Group Numbers and Volume settings are also saved
in your preset files.
I tend to save my presets regularly as I build them. Presets arenʼt always created in one
sitting. For me I continually adjust my presets and “Save As” when I know I want to be
able to back to an old one.
The preset loading and saving box is located in the upper right hand corner of the
64Videofingers window. It contains the STORE button, PRESET NUMBER, RECALL
button, SAVE button and LOAD button. You need to always click the STORE button
before saving a preset file. When your loading a preset file, after its loaded, you must
select the PRESET NUMBER and then click the RECALL button to actually recall the
preset.
TO SAVE A PRESET
1. Click the STORE button
2. Click the SAVE button
3. Name the Preset file and click SAVE.
TO LOAD A PRESET
(Make sure youʼve already loaded your video clip and audio clip folders)
1. Click the LOAD button
2. Select the Preset file you want to load and click OPEN
3. Select the Preset number either by clicking on the up or down arrows or by pressing
the PREV PRESET or NEXT PRESET buttons on the monome (see diagram)
4. Click the RECALL button or press both of the PREV PRESET and NEXT PRESET
buttons at the same time on the monome. Voila! Your preset is loaded.
ROUTING AUDIO
It is possible to route the audio from 64Videofingers onto separate tracks in your DAW
software. I use Ableton Live. The GROUP NUMBERS are also used to define the
audio into separate audio tracks. Audio from GROUP 1 is output tracks 3&4 of max.
GROUP 2 is output tracks 5&6, GROUP 3 is output tracks 7&8, GROUP 4 is output
tracks 9&10 and GROUP 5 is output tracks 11&12. You can use Soundflower to route
the audio or simply use Max.
TIPS FOR PULLING YOUR OWN CLIPS
There are so many different ways to prepare clips for use in 64VIdeofingers but I will
explain a couple of ways I like doing it.
Ultimately, you want to end up with two folders. One with your video clips and one with
your corresponding audio clips. The audio and video clips need to be labeled with the
same names and each folder needs to have exactly the same number of clips.
Basically, the audio folder should be an exact match of the video folder except with
audio files rather than video files. This way when you load the audio and video folders
into 64Videofingers the videos will match up to their corresponding audio.
The reason the audio must be loaded separately from the video is because of the way
Max treats audio contained in a video file. It just sends the audio straight to the DAC
without the use of patch cables. Keeping them separate allows you to route the
separate audio groups to tracks in your DAW software for effects and mixing.
My favorite software to use when exporting clips for 64Videofingers is actually
ABLETON LIVE. Ableton will automatically save the video and audio as separate files
and with the same name as well. Also with Ableton you can zoom deep into the
waveform of the audio and find the perfect start position for your clip. If youʼre using an
editing program like Final Cut Pro then you have to do each pass yourself. Set the in
and out, export the video, export the audio. It can get a bit monotonous but itʼs all worth
it once your triggering them in 64Videofingers.
I also recommend removing the audio tracks from the video files before using them.
64Videofinger should automatically mute the sound tracks contained in a video clip but
it doesnʼt hurt to lower the load on the software by removing the audio all together.
If you donʼt want to lay down the cash for programs like Ableton Live or Final Cut Pro
you could also use a program called MPEG Streamclip which is available for free.
The recommended video settings are:
Resolution: 720X486
Codec: MJpeg or Photo-Jpeg Quality: Medium
Framerate: Current (usually)
It is also recommended that you keep all of the clips at the same resolution and
framerate.