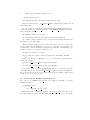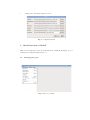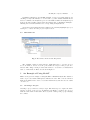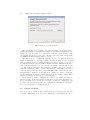
1
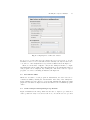
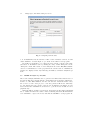
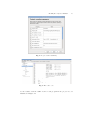
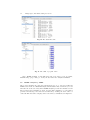
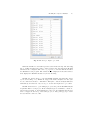
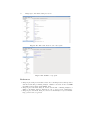
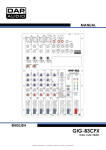
McAiT (Rev 1.0) User Manual
Mingsong Lv1 , Nan Guan1,2 , Wang Yi1,2 , and Ge Yu1
1
Northeastern University, Shenyang, China
2
Uppsala University, Uppsala, Sweden
Abstract. This manual gives information on how to install and use the
McAiT (Rev1.0) WCET analysis tool.
1
Overview
McAiT is a tool for WCET estimation of parallel programs running on multicore
processors. McAit uses Abstract Interpretation to analyze the local cache behavior of each program on a dedicated core. Based on the cache analysis, McAiT
offers the user with two alternatives to find safe estimations of the WCETs of
all the programs. First, the user may chose to use the classical Implicit Path
Enumeration technique combined with the worst-case memory bus access delays provided by the user for the given micro-architecture, which may result in
pessimistic bounds. To tighten the bounds, the user may model the arbitration
protocol of the bus using timed automata (TA) and let McAiT generate automatically a Timed Automaton to model the precise timing information of each
program on when to access the memory bus (i.e. when a cache miss occurs).
McAiT explores the TA models for the shared bus and the programs running on
separated cores using the UPPAAL model checker to find the WCETs for the
programs.
This manual mainly contains information on how to install the McAiT tool
and use the tool for WCET analysis of multicores. Section 2 lists all the packages/software needed for installation of McAiT, and how users can obtain them.
The installation process is detailed in Section 3. Section 4 gives the main functions of McAiT according to its menu organization. Section 5 uses a complete
example to demonstrate how to use McAiT.
Documents related to McAiT are listed as follows (which are available at the
McAiT website: http://www.neu-rtes.org/mcait)
– Document [1] gives the internal techniques of McAiT.
– Document [2] gives an description of the McAiT tool.
– This document [3] mainly serves as a user manual to show how to use McAiT.
2
Download List
To use McAiT, one should download the following packages/software:
2
Mingsong Lv, Nan Guan, Wang Yi, Ge Yu
1. McAiT.tar.gz: This is the package for the McAiT tool, which is precompiled for the 32-bit Linux platform.
2. gcc-2.7.2.3.tgz: This is the SimpleScalar distribution of GCC compiler,
which is modified by the CHRONOS team. The objective of this tool is to
compile benchmark source codes into the binaries of SimpleScalar ISA.
3. simpleutils-990811.tar.gz and simpletools-2v0.tgz: The packages contain GNU binutils source retargeted to the SimpleScalar architecture. The
utilities help the GCC in the compilation.
4. uppaal-4.1.3.zip (Academic version): This is the latest academic version
of UPPAAL, which is invoked by McAiT to find the WCET of each program
when the Timed Automata model of the system is automatically generated.
5. lp solve 5.5.tgz: This is a free linear programming solver, which is used
to obtain the WCET of the programs if the user adopts the Implicit Path
Enumeration technique.
6. The Qt SDK: The GUI of McAiT is developed using the Qt library, so a
Qt environment should be established to make the tool run.
Item 1 - Item 5 are available at:
http://www.neu-rtes.org/mcait
Item 6, the free version of Qt SDK is available at:
http://qt.nokia.com/downloads
where the direct link of the distribution of Qt SDK for 32-bit Linux is:
http://get.qt.nokia.com/qtsdk/qt-sdk-linux-x86-opensource-2010.05.1.bin
3
Installation
In this section, let’s assume that all the above packages are put in a source
directory $DIR, which can be freely determined by the end user. This directory
is the default working directory. The installation contains the following steps.
3.1
Setting up the Cross-Compiler Environment
Before installation, make sure that you have a 32-bit Linux operating system
installed. Currently, the tool has been tested to work on the Fedora 11 (and up)
Linux distribution, which is recommended for end users.
The first step of the installation is to set up the environment to compile
source codes into SimpleScalar binaries. In $DIR,
1. Build the SimpleScalar binary utilities
Unpack the binary utility package:
tar -xzvf simpleutils-990811.tar.gz
tar -xzvf simpletools-2v0.tgz
McAiT (Rev 1.0) User Manual
3
Then go to the sub-directory “simpleutils-990811”:
cd simpleutils-990811
Configure the tool to the correct platform:
./configure --host=i386-*-linux --target=sslittle-na-sstrix
--with-gnu-as --with-gnu-ld --prefix=$DIR
Where “*” should be replaced with the correct linux version the user is using.
For example, if you are using Fedora Linux, just replace “*” with “fedora”.
Build and install the binary utilities:
make all install
If the above process is successful, the utilities should be available in $DIR/sslittlena-sstrix/bin.
2. Build the SimpleScalar GCC
In the first step, remember to set the system path environment so that when
building the cross-platform GCC, the utilities are correctly found. This can be
done by executing the command below in the command line (or by editing the
.bash profile under the user’s home directory). If you try to edit the profile,
remember to re-login to make the change take effect. This is a mandatory step!
export PATH=$PATH:$DIR/sslittle-na-sstrix/bin
Unpack the GCC package and go into its sub-directory:
tar -xzvf gcc-2.7.2.3.tgz
cd $DIR/gcc-2.7.2.3
Configuration before make the tool:
./configure --host=i386-*-linux --target=sslittle-na-sstrix
--with-gnu-as --with-gnu-ld --prefix=$DIR --enable-languages=c
Make the tool:
make
make install
Now, if the make is successful, the GCC executables are installed in the directory $DIR/bin. If the user wants to install the executables in other directories,
please change the parameter for “--prefix=...” in the configuration step.
4
Mingsong Lv, Nan Guan, Wang Yi, Ge Yu
3. Possible build errors
In building simpleutils, one might encounter an error like:
ldlex.l:589:7 error: ’yy current buffer’ undeclared (first use in
this function)
To correct this error, edit the file “$DIR/simpleutils-990811/ld/ldlex.l”,
at line 588, change “yy current buffer” to “YY CURRENT BUFFER”, save the file
and re-build the package.
In making the GCC, an error like:
cp patched/sys/cdefs.h /sslittle-na-sstrix/include/sys
cp: cannot create regular file ’/sslittle-na-sstrix/include/sys’:
no such file or directory
This is mainly because you are not logged in as the “root” user. Please edit
the file “Makefile” in “$DIR/gcc-2.7.2.3”, go to line 459, there should be the
command cp, comment this line by adding # before this line, and manually copy
the file; or switch to root user to make the tools.
In making the GCC, an error like:
decl.c:3605:27: error: lvalue required as increment operand
Please go to directory ”“$DIR/gcc-2.7.2.3” and edit the “obstack.h” file,
at line 341: change
*((void **) o->next free)++=((void *)datum);
to
*((void **) o->next free++)=((void *)datum);
If you have other problems in building the GCC tool, please refer to the
“FixedErrors.pdf” and “simplescalar install notes.pdf” given at the McAiT website to find solutions. If the cross-compiler has been successfully compiled and
installed, let’s go to the next step.
3.2
Setting up the WCET Calculation Tools
Two other tools, UPPAAL and lp solve, are required by McAiT to perform
WCET calculation.
To install lp solve:
tar -xzvf lp solve 5.5.tgz
This will produce 3 packages. package “lp solve 5.5 exe.tar.gz” is the
pre-built binary for 32-bit systems. Basically, one do not need to recompile
McAiT (Rev 1.0) User Manual
5
lp solve, and can just use this pre-compiled binary. Then unpack this package:
tar -xzvf lp solve 5.5 exe.tar.gz
To install UPPAAL:
unzip uppaal-4.1.3
Note that the latest academic version of UPPAAL requires the user to obtain
a free license from the Internet; otherwise, the tool will not be activated. Please
connect to the Internet, and run the UPPAAL tool independently to see if the
license has been obtained. McAiT will not work if UPPAAL is not activated.
3.3
Install the Qt GUI SDK
If you have downloaded the Qt SDK for 32-bit Linux for the Qt website, put it in
the $DIR directory, execute the bin file in command line. The SDK itself provide
with a GUI-based installation interface, which greatly simplifies the installation
process.
3.4
Install McAiT and Configure the Tool
Up till now, all the supporting tools for McAiT to work are installed. Unpack
the “McAiT.tar.gz” file:
tar -xzvf McAiT.tar.gz
Now in directory “$DIR/McAiT” exists a pre-compiled executable for 32-bit
linux, execute the “McAiT” file to run the tool. Before any analysis, the tool
should be correctly configured; otherwise, the tool will not function. If you have
started McAiT, open the “Project” menu, click the “Preferences” item to
open the tool configuration interface as illustrated in Figure ??.
Given the above installation configurations, the components working with
McAiT should be as follows:
–
–
–
–
–
–
–
Compiler: $DIR/bin/sslittle-na-sstrix-gcc
Disassembler: $DIR/McAiT/Components/dis
AS: $DIR/bin/sslittle-na-sstrix-as
OBJDUMP: $DIR/bin/sslittle-na-sstrix-objdump
Analyzer: $DIR/McAiT/Components/analyzer
UPPAAL: $DIR/uppaal-4.1.3/bin-Linux/verifyta
ILP Solver: $DIR/lp solve/lp solve
Once the tool has been correctly configured, one need not re-configure it in
successive runs, as long as the locations of the supporting tools are not changed.
6
Mingsong Lv, Nan Guan, Wang Yi, Ge Yu
Fig. 1. Configuring McAiT
4
Main Functions of McAiT
This section briefly introduces the main functions of McAiT, including: project
management, analysis management, etc.
4.1
Managing Projects
Fig. 2. The Project Menu
McAiT (Rev 1.0) User Manual
7
Each WCET analysis task is treated as a project in McAiT. Project management functionalities are organized in the “Project” menu of the tool, as illustrated in Figure 2. The functions of each menu item is as follows:
New Project: creating a new WCET analysis project. A project wizard will
lead the user to make a project, of which the detailed steps will be shown in the
next section.
Open Project: opening an existing project. The tool will pop up a dialog to
let the user locate an existing McAiT project in the file system.
Recent Projects: This menu item has a sub menu, which shows the last 10
projects that has been opened by McAiT. One can directly open a recent project
by clicking the corresponding item (as long as the project files are not moved or
deleted).
Close Project: closing the currently high-lighted project, if any.
Close All: closing all opened projects. Note that McAiT allows users to
open multiple projects at the same time.
Save Project: saving the status of the current high-lighted project.
Save Project As: saving the currently high-lighted project as another one.
Save All: saving all the opened projects.
Preferences: setting up the environment for McAiT, basically locating all
the supporting tools.
Exit: exit the tool.
4.2
WCET Analysis by McAiT
The main objective of McAiT is WCET analysis. The tool currently supports two
ways of progressing the analysis: the user can conduct analysis STEP-BY-STEP,
or let the tool perform WCET analysis automatically. Once a step is finished,
the result of this step can be viewed by clicking the corresponding entry (for
each project or each task) in the project list. The analysis functionalities are as
follows and shown in Figure 3:
Compile Programs: invoke the GCC compiler to compile all the programs/tasks
of the currently highlighted project, and the compiled binary is disassembled immediately. This can be done once a project has been created. The result is the
disassembled file for each program/task.
Reconstruct CFG: invoke the analyzer to reconstruct the Control Flow Graph
(CFG) of each program from the disassembled file. The result is the CFG for
8
Mingsong Lv, Nan Guan, Wang Yi, Ge Yu
Fig. 3. The Analysis Menu
each program. This step is enabled only if the programs have been compiled and
disassembled.
Input Flow Information: pop up a dialog to let the user input loop bounds
for all programs. This step is enabled only if the CFG of all programs are reconstructed.
Cache Analysis: Perform private instruction cache analysis based on Abstract Interpretation. This step is possible only if the CFG of all programs are
reconstructed.
TA Generation: Generate the Timed Automata model for the system. This
step is enabled only if the loop bounds have been set and cache analysis is
finished.
ILP Formulation: Generate the ILP formulation for each program if the user
choose to use the traditional Implicit Path Enumeration technique for WCET
analysis. This step is enabled under the same condition to TA Generation.
WCET Calculation: Calculate the WCET of each program by either letting
UPPAAL to run the TA models for the system or letting an ILP solver to run
the ILP formulations. This depends on the analysis technique the user chooses
to use.
Automatic Analysis: Besides the above step-by-step analysis method, McAiT
allows users to perform automatic WCET analysis by either model checking and
IPET. The analysis steps will run one after another, only interrupted in the
middle to let the user input the loop bounds.
McAiT (Rev 1.0) User Manual
9
Terminate Analysis: For WCET analysis of bigger programs with model
checking, it may take minutes or even hours to get the results. McAiT allows
users to terminate an analysis step before it is finished. When an analysis step is
started, the thread will be listed in the sub-menu items of “Terminate Analysis”.
Clicking the item will terminate the corresponding analysis thread.
Clear All: Clear all intermediate results for the currently highlighted project,
leaving it to a state as if the project is just created.
4.3
Miscellaneous
Fig. 4. The Window Menu and the Help Menu
The “Window” menu provides with two main functions: to open the project
tree dock window, and to close all opened windows except for the project tree
window. The “Help” menu provides with entries to access the tool manual and
basic tool information. These are shown in Figure 4.
5
An Example of Using McAiT
This section gives an example of using McAiT for WCET analysis. We assume a
dual core processor with a 8KB private instruction cache. The cores use a shared
First-Come-First-Service bus to access the main memory. We allocate two tasks
on each core.
5.1
Creating a Project
Creating a project involves 3 major steps. The first step is to input the name
and the location of the project, as illustrated in Figure 5. If there is a project
with the same name in the same directory, then a dialog will pop up notifying
the conflict.
10
Mingsong Lv, Nan Guan, Wang Yi, Ge Yu
Fig. 5. Input project name and path
The second step is to configure the target hardware by inputting microarchitectural features, as illustrated in Figure 6. Information required are: the
number of cores, the number of cache levels, cache size, cache line size, cache
associativity, hit latency of the cache, bus type, bus service time and slot size
for TDMA bus. Invalid inputs will be rejected.
The third step is to configure the schedule on each core, which is shown in
Figure 7. Currently, we only support static schedules in which a series of tasks
runs one after another. For example, if in the previous step, a dual core processor
is configured, then two tab pages will be displayed in this configuration interface,
each of which stands for a core. One can select how many tasks will run on each
core. The tasks are then statically scheduled according to the given order. For
each task, clicking the “Add...” item on the left most column will open a dialog
to let the user select source files of this task. The paths of the selected source
files will then be displayed on the right most column. Note that for each task,
the user must give it a name, which is input from the middle column. When
tasks are scheduled for all cores, go to the next step.
In the last step, all the configurations for the project made previously are
listed in a table, as shown in Figure 8. The user can check the information to
see if everything is set correctly. If one needs to modify the configuration, just
go back to the previous steps. Once the configuration is submitted, it is fixed to
the project and cannot be changed later on.
5.2
Compile the Tasks
Once a project is created, it will be listed in the project list window. One can
view the configuration of the project by clicking the “Configuration” sub to
McAiT (Rev 1.0) User Manual
11
Fig. 6. Configuring micro-architecture features
the project root item. The user can collapse the tree level by level to see the
schedules on each core. For each task, the user currently can only view the source
code, since no other analysis has been performed. This is shown in Figure 9.
Then, we can click the “Compile” entry in the “Analysis menu” to compile
and disassemble all the tasks. After this analysis step, the disassembled file for
each program can be displayed. By clicking the “Dis File” item for a given
program, one can see something as illustrated in Figure 10.
5.3
Reconstruct CFG
When the executable of each program is disassembled, the user can now reconstruct its CFG by clicking the “Reconstruct CFG” entry of the “Analysis”
menu. Clicking the item “CFG” for a given task, McAiT will display the CFG
graph in a new window. Figure 11 shows the CFG for the benchmark program
“fdct”.
5.4
Cache Analysis and Inputting Loop Bounds
Figure 12 illustrates the dialog which lets the user to input loop bounds. For
each loop with an “entry” node and a “tail” node, one can allocate a loop bound
12
Mingsong Lv, Nan Guan, Wang Yi, Ge Yu
Fig. 7. Configuring task schedules
to it. In McAiT Rev1.0, the interface is like a table. In future versions, we will
enable McAiT to let users input loop bounds on the CFG of each program.
In parallel to inputting loop bounds, the user can also perform cache analysis based on AI. This is done by clicking the entry “Cache Analysis” in the
“Analysis” menu. The result of cache analysis is the Cache Hit/Miss Classification for each instruction of the program. In the current version of McAiT, the
result is not displayed. But only if this step is finished, can future analysis steps
start.
5.5
WCET Analysis by AI+MC
After cache analysis, McAiT is able to generate the Timed Automata model for
the system. The user can just click the “TA Generation” item in the “Analysis”
menu to do this. When finished, the user can click the “FCFS TA Model” entry
sub to the root item of the project to view the generated TA model. Currently,
we only display the raw content of the model, as illustrated in Figure 13; but
users can user the UPPAAL model checker to open the model and show it in a
graphical way.
When the TA model has been generated, the menu item “By Model Checking”
sub to “WCET Calculation” will be enabled. Clicking this item, McAiT will invoke UPPAAL to explore the model and find the WCET for each program. To
McAiT (Rev 1.0) User Manual
13
Fig. 8. Project creation summary
Fig. 9. The source code
see the results, click the “WCET” item for each program in the project tree, as
illustrated in Figure 14.
14
Mingsong Lv, Nan Guan, Wang Yi, Ge Yu
Fig. 10. The disassembled file
Fig. 11. The CFG of program “fdct”
Since WCET analysis by AI+MC may take some time for big programs,
McAiT will pop up a dialog to notify the user when the analysis is finished.
5.6
WCET analysis by IPET
After cache analysis, the user may alternatively choose to use the traditional
IPET based method for WCET analysis, which assume that each memory access
will take the worst-case delay. The WCET analysis problem is formulated as an
Integer Linear Programming problem, and the ILP formulation of each task is
generated in this step. One can view the ILP file by clicking the item “ILP” for
each task. The file will be displayed in a new window, as illustrated in Figure 15.
McAiT (Rev 1.0) User Manual
15
Fig. 12. The dialog to input loop bounds
When the ILP file for each task is generated, the menu item “By ILP Solving”
sub to “WCET Calculation” will be enabled. If the user click this item, McAiT
will invoke the configured ILP solver, e.g., lp solve, to run the ILP file and find
the WCET for each program. The results are also displayed in the same window
that displays the WCET calculated by model checking.
McAiT also allows users to perform WCET analysis automatically, either
by model checking or by IPET. To trigger automatic analysis, the user just
need to click the item sub to “Automatic Analysis”, and the analysis will start
immediately, and involves only one stop to let the user input the loop bounds.
McAiT allows users to open multiple projects and perform WCET analysis
in parallel. But for each project, all the analysis steps are serialized to ensure no
data racing problems. So if an analysis step of Project A is running and the user
tries to trigger another step of the same project, a dialog will pop up to warn
the user that he cannot do this.
16
Mingsong Lv, Nan Guan, Wang Yi, Ge Yu
Fig. 13. The Timed Automata model for the system
Fig. 14. The WCET for a program
References
1. Mingsong Lv, Wang Yi, Nan Guan, and Ge Yu. Combining Abstract Interpretation
with Model Checking for Timing Analysis of Multicore Software. In the 31st IEEE
Real-Time Systems Symposium (RTSS), 2010.
2. Mingsong Lv, Nan Guan, Wang Yi, and Ge Yu. McAiT – A Timing Analyzer for
Multicore Real-Time Software. Submitted to the tool paper track of ATVA 2011.
3. Mingsong Lv, Nan Guan, Wang Yi, and Ge Yu. McAiT (Rev 1.0) User Manual.
http://www.neu-rtes.org/mcait
McAiT (Rev 1.0) User Manual
Fig. 15. The ILP formulation for a program
17