1
EcoMata User Manual
EcoMata User Manual
Version 1.0 – June 2010
Page 1
EcoMata User Manual
Table of content
1 Introduction
2 Representation of trophic network
3 Installation and Starting Program
3.1 Installation
3.2 Starting Program
4 Menu
4.1 File Menu
4.2 Tool Menu
4.3 Option Menu
5 Editor
5.1 Graphic View
5.1.1 Tool Bar
5.1.2 Property Panel
5.2 Synthetic View
5.3 Automaton Editor
5.3.1 Schematized
5.3.2 Auto Adaptative
5.3.3 Custom
6 Generate Automaton
7 Query
7.1 About verifyta
7.2 Launch Queries
7.3 Use Batch
7.4 Text Query Result Format
Page 2
EcoMata User Manual
1 Introduction
EcoMata is designed for generate, manipulate and verify qualitative models of marine trophic
networks in order to provide information for fishing administration.
2 Representation of trophic network
In this application, we use ecopath model to represent an ecosystem.
Species in the system has the following attributes:
Biomass – Initial biomass of a species which will be considered as normal level.
P/B – Production/Biomass ratio.
Q/B - Consumption/Biomass ratio.
Qualitative states – Represented by q* = B* / B
Fishing pressures in the system has the following attributes:
F – Basic capture rate. Percentage of biomass captured
Type – Fishing schedule type. Schematized, Auto Adaptative or Customized.
Qualitative states – Fishing force represented by q* = F* / F
Disturbance in the system has the following attributes:
Mortality – Similar to F of fishing pressure. Percentage of biomass's reduction
Type – How the disturbance happens. Event to simulate a random event like volcanic eruption and
programmed to simulate a periodic influence like global warming.
3 Installation and Starting Program
3.1 Installation
The software installer is usually a zip package. No special install procedure is needed. You can
unzip the package and store anywhere you want.
Since the program is purely in Java, the only difference between install packages is the JREs
included in the package. Make sure that you have downloaded the right version according to your
system type. (Attention: 32bits version does not work on 64bits system)
If you have already JDK or JRE installed on your system, you can download the stand alone
version. But make sure that environment variable is correctly set (JAVA_HOME for Microsoft
Windows and JAVAHOME for Linux based system).
3.2 Starting Program
Once you unzip the package, find run_xx script in program folder. Double click it (and click launch
on the pop up window for Linux). If the system type is right, an application window will appear.
4 Menu
Page 3
EcoMata User Manual
4.1 File Menu
New:
Create an empty ecosystem model
Load:
Load an existing ecosystem from disk
Save:
Save current ecosystem, customized icons (if any), automaton (if generated), query batch (if
any), query history (if any) to disk.
Save As:
Save current ecosystem in another file name
Import Species:
Export Species:
To share same species among ecosystems and to avoid input the same data, we can use these
two menus to import/export species models into/from local library. See chapter 5 for more detail.
Export Query XML:
Save current query history in a structured XML file. This is useful before regenerate
automaton since the regeneration clears query history.
Export Query Text:
Save current query history in plain text file. The export text format will be explained in
Query section.
Exit:
Exit program.
4.2 Tool Menu
Generate:
Order manually a regeneration of automaton. We do not quite need this command since
every time we toggle to query panel we will be asked to confirm a regeneration if there is any
change made in ecosystem.
Report:
Display automaton generation report. A new window will pop up. Basic characteristics and
detail information will be displayed separately in two area. Use Detail button to show/hide detail
information area.
Open Automaton:
Open last generated automaton in UPPAAL if UPPAAL's path is currently set. Note that the
opened automaton in UPPAAL is a copy of automaton file. That's to say any change made in
UPPAAL will be ignored. If you would like to modify or create manually a fishing automaton,
please go to automaton editor.
Page 4
EcoMata User Manual
Export Image:
Take a graphic snap shot of current ecosystem and save it in a png picture file.
4.3 Option Menu
A pop up window appears when you click on Parameters menu.
Language:
Language setting. Selecting Auto option leaves the program to detect the best language to
use. Three languages are actuelly supported, English, French and Simplified Chinese.
UPPAAL path:
This path indicates uppaal's launcher script file but not uppaal.jar itself. For Microsoft
Windows users, it is highly recommended to write a batch file. You do not have to set this path if
you do not wish to view automaton file in UPPAAL.
Verifyta path:
This path is very important for query since the model-checking procedure depends entirely
on it. Attention: UPPAAL provides executable files both for Windows and Linux. Make sure that
you have picked the right one.
Display Names:
Check this option to have species and external forces' names displayed in graphic editor.
Display DC:
Check this option to have dc value on dc arrow displayed in graphic editor.
EcoSystem Background:
Species Background:
Pressure Background:
Disturbance Background:
Change background color of these elements.
Note:
1. These settings are saved once you close the application.
2. Color settings are local. You will see different background color if you open your saved file
on others' computer.
5 Editor
We have two principal parts on the Network Editor tab, one floatable tool bar on top of the
panel and an editor area. The editor area has three view tabs in which we can edit the ecosystem in
different way.
5.1 Graphic View
Here we edit the trophic network in graphic mode. And only in this mode the buttons on the
tool bar are activated.
Page 5
EcoMata User Manual
5.1.1 Tool Bar
The selected button indicates current mouse action.
Hand button :
Click this button switches to move mode. We can select, drag, delete element in the working
area and edit elements' properties on the right side panel.
Click on any icon or arrow to select it. Drag a rectangular area to select multiple elements.
Drag the selected icons to move them to a new place, and all arrows leaving from or
pointing to these icons will be automatically adjusted.
To delete one or more element, click to select them, and press “Delete” key on keyboard.
When you select one and only one element in the system, its properties are displayed at the
right side panel.
When you click in the empty area in the working area, ecosystem's properties will be
displayed. These properties are mainly relative to automaton generation. Please refer to chapter 6
for more explanation.
Fish button:
In this mode, click on any empty space in the working area to add a species into current
ecosystem model.
The right side panel shows archived species models. Drag one of them in the graphic panel
to create an instance. Click on cross button to remove it from the library. In Move Mode, click a
species icon in graphic panel and click Save button in the property panel to add one save this
species in the model library.
Fishing button:
In this mode, click on any empty space in the working area to add a fishing pressure into
current ecosystem model.
Disturbance button:
In this mode, click on any empty space in the working area to add a natural disturbance into
current ecosystem model.
Arrow button:
In this mode, drag from any species icon and drop on another species icon or fishing icon or
disturbance icon to create a consumption relation. If the relation is valid and has been successfully
added into ecosystem, it will remain on the working area. Note that the arrow points to biomass
transformation direction.
Zoom buttons:
Click on these three buttons change zoom scale of graphic view. The first button restore
zoom to 1:1, the “+” button zoom in by adding 0.1x until 2.0x and the “-” button zoom out by
subtracting 0.1x until 0.5x.
Page 6
EcoMata User Manual
5.1.2 Right Side Panel
This panel shows Properties Panel in Move Mode (hand button) and shows local species
model library in Add Species Mode (fish button).
5.1.2.1 Properties Panel
In Move Mode, click on any icon or arrow to show this panel. We can edit any string,
numerical and enumerative property such as biomass, P/B, Q/B directly.
To edit the qualitative states, click on the Edit... button. A dialog window will appear. We
can add up to 5 states by clicking on a “+” button, delete a state by clicking on the “-” button
(except the state whose q value is 1.0), and modify state's name or q value. Once the q value is
modified, all the states are resorted immediately. Attention: add/delete state or change state q value
will affect: fishing pressure's schema, auto adaptive constraints and customized automaton, queries
batch in query panel. It is strongly recommended to determine these qualitative states before edit the
rest ecosystem.
To customize icon on the working panel, click on Browse button, choose a picture file. If the
file is a valid picture file, it will be resized to 48x48 and displayed on the working panel. Once you
save current ecosystem model, all the customized icons will also be saved. To restore the default
icon, click on Default button.
5.1.2.2 Species Model Library
In Add Species Mode, this panel shows all the species model in local library. A species
model has all the basic information such as biomass, P/B, Q/B and the qualitative states. Click on
Add button to add a species in the top-left corner of the graphic editor. Click “X” button to remove
permanently a model from the library which can not be undone.
Use Import Species and Export Species in File menu to import/export species models
into/from this local library.
To save one species in current ecosystem as a species model into the library, switch to Move
Mode, click on a species icon and then click on Save button on the properties panel.
Attention: all the species model must have different names. Any import action, import menu
or save button, will fail if any existing model in the library has the same name as the model to be
added.
5.2 Synthetic View
Here we have a global synthetic view of every element in the ecosystem. The entire panel is
vertically divided into 5 zone. Ecosystem's properties, species, fishing pressures, disturbances and
DC value table.
We can add, delete species, fishing pressure or disturbance in this panel except that
everything added will be found at top left corner of the graphic view panel. We can modify directly
the properties even modify states.
In the DC table, change one value from zero to non zero adds a relation between two
element with specified DC value, while change one value from non zero to zero deletes this
relation. The disabled box means a opposite relation exists already and it is impossible to add this
relation.
Page 7
EcoMata User Manual
5.3 Automaton Editor
In this panel, we can edit fishing pressure's automaton type (and also disturbance whose type
is programmed). Choose firstly the fishing pressure in the left combo box, and then choose
automaton type in the right combo box. Different editor will appear according to the automaton type
that you have chosen.
Attention: when you change fishing pressure's state q value, or carry out any change on
fished species' state, it is strongly recommended to verify these automatons.
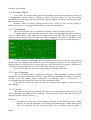
5.3.1 Schematized
This is a chronogram editor. It simulate the changes of state according to time point.
To change state at a specified time point, click on the corresponding black point. Attention:
This is a linked action, which means if you change state at one time point, all the states of the
following time point who have the same state will be changed to new state. For example, in the
figure below, any change at the time point 3 will change the following time point until time point 7.
To make a periodic chronogram, draw chronogram in the first period at the start position,
indicate the first period's start (inclusive) and end (inclusive) positions in two spinner, click
Duplicate button, the period will be copies on the rest of the time points. For example, adjust start to
4 and end to 9 means duplicate a period of 6 time units from the 10th time unit.
Click on Reset button to restore the chronogram in its default initial state.
5.3.2 Auto Adaptative
This is a constraints editor. It simulate the changes of state according to changes of other
automatons. This kind of automaton is passive. If the depending automaton stay stable, it will never
evaluate. Since the fishing pressure automatons are normally source of evaluation, it is
recommended that the Startup State should be other state than Normal.
In the table below, pick the state you want the fishing pressure toggle to when the species
state changes.
5.3.3 Custom
This section is designed for advanced users who know well timed automatons. Here you can
edit the automaton just (almost) like in UPPAAL. Except that right click on the edge to add a nail,
and right click on a nail to remove it.
Attention:
1. We memories always the last automaton generated for the fishing pressures. That's
means if you edit the automaton, then change the automaton type to others than custom,
once you regenerate the hole ecosystem model, all the changes you have made to
Page 8
EcoMata User Manual
automaton will be lost.
2. Every time you delete a species or edit any state information, including add a state,
delete a state, or modify state order, of any species or fishing pressure in the ecosystem,
it is strongly recommended to verify all the strings, such as invariant on the states, select,
guard, sync and update on the transitions.
6 Generate Automaton
We have some more explanation for the properties of ecosystem which will make different
effect to automaton generation.
Time limit:
This option means that the simulation is limited in how may time units. Note that longer
time limit will bring more states in automaton since some slow evaluation are ignored when the
time limit is shorter than evaluation time. In the time relative queries such as Reachable and Which
State, time point can be chosen only between 0 and time limit.
Synt Step:
This option will not change automaton generation but synthesis query.
Regroup:
Since there are too many transit state between main state in automaton, we regroup these
states according to their similarity on invariant and guard value. This value is limited between 6 and
24. Normally 12 is a good choice. A larger value makes more precise query result but a slower
query speed because of a larger amount of states. A smaller value leads to loss of precise and either
a faster speed or a slower speed due to the amount of regrouped transitions on one state.
After each generation, the program evaluates the generated automaton. According to its
complexity, a message will displayed to inform that the query process may be slow.
7 Query
On the query panel, we can launch queries on current ecosystem.
7.1 About verifyta
Before launch any query, make sure that you have downloaded UPPAAL and have verifyta
program in its package. This file is essential for query processing.
7.2 Launch queries
To launch a query, select query type in the combo box, compose one situation, and/or select
the time point, and click the Launch button next to the combo box. A pop up progress indicator
dialog will appear to show current progress of the query. If you would like to abandon a query, click
Cancel button on the dialog. When the query is correctly finished, another pop up window will
appear to display the query result. And the query's information including selected states, time point
and the result will be appended in the result text panel on the bottom of the application window.
7.2.1 Compose a situation
To launch the queries which need a specified situation like always, never, reachable and
Page 9
EcoMata User Manual
which date query, the situation composer is enabled. Check the boxes to select states.
Select no state for one species means this species is not concerned in this query.
Select more than one state for one species means an “OR” relation between the selected
states.
7.2.2 Queries
Always (Vileness):
To test a situation is always verified during simulation time.
Never (Security):
To test a situation will never happen during simulation time.
Reachable:
To test if a situation will happen at a specified time point.
WhichDate:
To test if a situation will happen. If yes, the first occurrence time point.
WhichStates:
Enumerate all possible situations at a specified time point.
Synthesis:
Carry out a synthesis analysis within simulation time. The interval of time point is specified
in ecosystem's properties.
7.2.3 Use batch
If you wish to launch several time consuming queries like which date query, batch is a better
choice.
To add a query to batch list, select query type, compose query states and select time point if
necessary, instead of click on Launch button, click Add Batch button in the middle panel of the
query window. You will find a brief description of the query in the left bath list panel.
To change the queries' order, click the query which you would like move in the list window,
click Move Up or Move Down button to adjust its position in the list.
To remove a query from the list, select it in the list window, click on Remove button.
To clear the query list, click Clear button. That will remove every query from the list after
your confirmation.
Finally, click Launch button on the batch editor panel to launch the batch.
During the batch, the pop up progress indicator is different from the one when you launch
one query at a time. Firstly, a batch progress will indicate which query is in progress. Secondly, an
extra Pass button is added. Click on Pass button will abandon the current query and start the next
one while click on Cancel button will stop entirely the batch process.
In batch mode, neither pop up result dialog nor pop up error message dialog will be shown
during the whole query processing. All output will be appended in the result text panel. The text
output format will be explained in the next chapter.
Attention:
Page 10
EcoMata User Manual
1. No semantic verification is performed when you insert a query in batch list. It will be
done when the query is effectively launched.
2. Every time you delete a species or edit any state information, including add a state,
delete a state, or modify state order, of any species in the ecosystem, it is strongly
recommended to verify the query composition when you return to query panel because
the information recorded in the query batch list can not be updated.
7.2.4 Text Query Result Format
Here we explain the text form query information format.
The primitive types like Integer, Boolean and String are directly displayed. The structured
types like Map, List and Set are displayed in the following format.
Map: { <Key, Value>, <Key, Value> ... }
List: ( Item, Item ... )
Set: Same as List.
Always:
Data type: Map<String, Set<String>>
Result type: Boolean
Example:
Always Query:
States: { <sp0, (Normal, High)>, <sp1, (Normal)> }
Result: true
Meaning: Species sp0 is always in either Normal state or High state, and species sp1 is
always in Normal state.
Never:
Data type: Map<String, Set< String>>
Result type: Boolean
Example:
Never Query:
States: { <sp0, (Danger, Low)>, <sp1, (Danger)> }
Result: true
Meaning: Species sp0 is never neither in Danger state nor in Low state, and species sp1 is
never in Danger state.
Reachable:
Data1 type: Map<String, Set<String>>
Data2 type: Integer
Result type: Boolean
Example:
Reachable Query:
States: { <sp0, (Normal, Low)>, <sp1, (Normal)> }
Time: 10
Result: true
Meaning: At time point 10, it is possible that species sp0 in Normal state or Low state, and
sp1 is in Normal state.
Page 11
EcoMata User Manual
WhichDate:
Data type: Map<String, Set<String>>
Result type: Integer
Example:
Which Date Query:
States: { <sp0, (Low, Danger)>, <sp1, (Normal)> }
Result: 12
Meaning: The situation that species sp0 is in Low state or in Danger state, and species sp1 is
in Normal state can happen as early as possible at time point 12.
WhichStates:
Data type: Integer
Result type: List<Map<String, String>>
Example:
Which State Query:
Time: 10
Result:
(
{ <sp0, Normal>, <sp1, Normal>, <sp2, Low>},
{ <sp0, Normal>, <sp1, Low>, <sp2, Low> }
)
Meaning: 2 situations can happen at time point 10.
1. Species sp0 is in Normal state and species sp1 is in Normal state and species sp2 is
in Low state.
2. Species sp0 is in Normal state and species sp1 is in Low state and species sp2 is in
Low state.
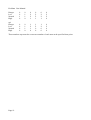
Synthesis:
Data1 type: Integer
Data2 type: Integer
Result type: Map<String, Map<String, List<Integer>>>
Example:
Synthesis:
Time Limit: 60
Time Unit: 12
Result:
{<sp0, {
<Danger, (0, 0, 0, 0, 0, 0)>, <Low, (0, 1, 2, 2, 2, 2)>,
<Normal, (1, 1, 2, 2, 2, 2)>, <High, (0, 0, 1, 1, 1, 0)>
}>
<sp1, {
<Danger, (0, 0, 1, 1, 1, 0)>, <Low, (0, 1, 2, 2, 2, 2)>,
<Normal, (0, 1, 1, 0, 0, 0)>, <High, (0, 0, 0, 0, 0, 0)>
}>}
Meaning:
Time Point:
sp0
Page 12
0
12
24
36
48
60
EcoMata User Manual
Danger
Low
Normal
High
0
0
1
0
0
1
1
0
0
2
2
1
0
2
2
1
0
2
2
1
0
2
2
0
sp1
Danger
Low
Normal
High
0
0
0
0
0
1
1
0
1
2
1
0
1
2
0
0
1
2
0
0
0
2
0
0
These numbers represent the occurrence number of each state at the specified time point.
Page 13