1
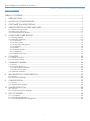
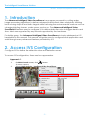
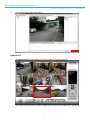
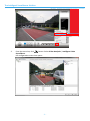
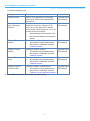
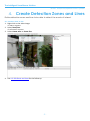
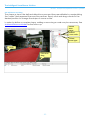
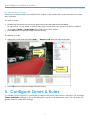
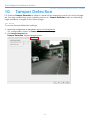
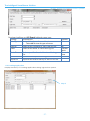
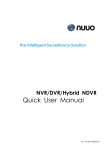
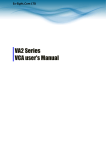
The Intelligent Surveillance Solution Intelligent Video Surveillance User Manual Ver. 4.0.0.120910.00 The Intelligent Surveillance Solution NUUO NVR/DVR/Hybrid NDVR System TABLE OF CONTENTS TABLE OF CONTENTS ............................................................................................................................. 1 1. INTRODUCTION .............................................................................................................................. 2 2. ACCESS IVS CONFIGURATION .................................................................................................... 2 3. CUSTOMIZE TRACKING DISPLAY ................................................................................................. 7 4. CREATE DETECTION ZONES AND LINES...................................................................................... 9 4.1. Create a Zone or Line ........................................................................................................................................ 9 4.2. Edit Zones and Lines ......................................................................................................................................... 10 4.3. Add and Remove Nodes ................................................................................................................................ 11 5. CONFIGURE ZONES & RULES ..................................................................................................... 11 5.1. Tracking Display ................................................................................................................................................ 13 5.2. Detection Property ........................................................................................................................................... 14 5.2.1. Presence ..................................................................................................................................................... 14 5.2.2. Enter & Exit .................................................................................................................................................. 15 5.2.3. Appear & Disappear ................................................................................................................................ 17 5.2.4. Stopped ...................................................................................................................................................... 18 5.2.5. Dwell ............................................................................................................................................................ 19 5.2.6. Direction Filter ............................................................................................................................................ 19 5.2.7. Tailgating .................................................................................................................................................... 19 5.3. Non-Detection Zone ........................................................................................................................................ 21 6. COUNTERS..................................................................................................................................... 22 6.1. Create Counters ............................................................................................................................................... 22 6.2. Counter Property .............................................................................................................................................. 23 7. CALIBRATE CAMERA ................................................................................................................... 24 7.1. Access................................................................................................................................................................. 24 7.2. Onscreen Elements .......................................................................................................................................... 25 7.2.1. 3D Graphics Overlay ................................................................................................................................ 25 7.2.2. Mouse controls .......................................................................................................................................... 26 7.3. Calibrate Camera ............................................................................................................................................ 26 8. ADVANCED IVS CONFIGURATION ........................................................................................... 29 8.1. Access................................................................................................................................................................. 29 8.2. Advanced Settings........................................................................................................................................... 30 9. CLASSIFICATION .......................................................................................................................... 32 9.1. Access................................................................................................................................................................. 32 9.2. Classification Settings....................................................................................................................................... 33 10. TAMPER DETECTION .................................................................................................................... 34 10.1. Access .............................................................................................................................................................. 34 10.2. Tamper Detection Settings ........................................................................................................................... 35 11. IVS LOG VIEWER........................................................................................................................... 36 11.1 Log Viewer ........................................................................................................................................................ 36 11.2 Counting Application ..................................................................................................................................... 37 11.3 Counting Application (Diagram) ................................................................................................................. 38 -1- The Intelligent Surveillance Solution NUUO NVR/DVR/Hybrid NDVR System 1. Introduction The Advanced Intelligent Video Surveillance is a program powered by cutting-edge image processing algorithms to deliver advanced and instant video analysis by tracking both moving objects and static targets while factoring the environmental nuances such as changing lighting, leaves, water waves, and so on. The Advanced Intelligent Video Surveillance features easy-to-configure UI to define detection rules to trigger alerts in real time. Alerts are supported by any formats supported by the hardware. For better grasp, the Advanced Intelligent Video Surveillance is simply addressed as IVS hereinafter in this manual. This manual will guide users to configure each application and walk through every advanced features provided by IVS. 2. Access IVS Configuration Configure IVS to define the detection rules and detection zones. To access IVS configuration, there are two approaches. Approach 1: 1. 2. On Main Console screen, click button. A menu opens. Select Video Analytics | Intelligent Video Surveillance. IVS opens. -2- The Intelligent Surveillance Solution NUUO NVR/DVR/Hybrid NDVR System 3. From the upper right of IVS screen, click insert. A dialog opens. Note: IVS Trail license duration is 45 days. -3- The Intelligent Surveillance Solution NUUO NVR/DVR/Hybrid NDVR System IVS license function table: Function Counting license Surveillance license People counting v Vehicle counting v Stabilizer v Tamper Detection v v Presence v Appear and disappear v Enter and exit v Dwell v Stopping v Tailgating v People counting v Vehicle counting v 4. Select a camera from the Device pull-down box. Click OK button. -4- Advanced license v v v v v v v v v v v v The Intelligent Surveillance Solution NUUO NVR/DVR/Hybrid NDVR System 5. IVS configuration screen then opens. Approach 2 1. On Main Console screen, double-click the camera to analyze videos for. The selected camera’s video image then opens full-scale in IVS window. -5- The Intelligent Surveillance Solution NUUO NVR/DVR/Hybrid NDVR System 2. From the menu bar, click button. Select Video Analytics | Intelligent Video Surveillance. IVS configuration screen then opens. -6- The Intelligent Surveillance Solution NUUO NVR/DVR/Hybrid NDVR System 3. Customize Tracking Display Customize the tracking display window to show various tracking data. To customize the tracking display: 1. Right-click on the tracking display window. A menu opens. 2. Select Display. A submenu opens. 3. Make selection from the submenu that opens. -7- The Intelligent Surveillance Solution NUUO NVR/DVR/Hybrid NDVR System Featured settings are: Setting Display Blobs Description Shows the algorithm coverage with blob. Blobs are displayed in turquoise. Display Displays all objects, including Non-Alarmed alarmed and non-alarmed, to Objects show how the detection zones and object trails intersect, so as to make optimal settings. ► Alarmed objects are marked in red. ► Non-alarmed objects are marked in yellow. Display Object Displays object height. ► This option is only available when Height the camera is calibrated. See also Calibrate Camera. Display Object Displays object speed. ► This option is only available when Speed the camera is calibrated. See also Calibrate Camera. Display Object Displays object area. ► This option is only available when Area the camera is calibrated. See also Calibrate Camera. Display Object Displays object classification. ► This option is only available when Classification the camera is calibrated. See also Calibrate Camera and Classification. 4. Press OK button to save the change and quit setting. -8- Default Deselected (Disabled) Selected (Enabled) Deselected (Disabled) Deselected (Disabled) Deselected (Disabled) Deselected (Disabled) The Intelligent Surveillance Solution NUUO NVR/DVR/Hybrid NDVR System 4. Create Detection Zones and Lines Define detection zones and lines to be able to detect the events of interest. 4.1. Create a Zone or Line 1. Right-click on the video image. A menu opens. 2. Select Zone/Line. A submenu opens. 3. Select Create zone or Create line. 4. See 4.2. Edit Zones and Lines for the follow-up. -9- The Intelligent Surveillance Solution NUUO NVR/DVR/Hybrid NDVR System 4.2. Edit Zones and Lines The shape or size of the defined detection zones and lines are editable by manipulating the "nodes" that represent the zone/line vertices. Simply click and drag a node to the desired position to change the shape of a zone or line. In order to define a complex shape, adding or removing a node may be necessary. See Add and Remove Nodes for the follow-up. Define zone name. Select zone color. Select zone type. node Click and drag - 10 - The Intelligent Surveillance Solution NUUO NVR/DVR/Hybrid NDVR System 4.3. Add and Remove Nodes Add one or more nodes to re-define the shape of the detection zones and lines to meet any scenario. To add a node: 1. Double-click on the zone or line at the point where the new node should be added. Or right-click on the zone or line at the point where the new node should be added. And select Node | Insert node from the menu that opens. 2. Press OK button to save the change and quit setting. To delete a node: 1. Right-click on the node and select Node... | Remove node from the menu that opens. Multiple node zone Multiple node line 2. Press OK button to save the change and quit setting. 5. Configure Zones & Rules To create useful outputs, it is essential to define the zones and rules to monitor. IVS features Zones and Rules settings to tune the detection zones and detection rules. This chapter will guide users to make the settings. - 11 - The Intelligent Surveillance Solution NUUO NVR/DVR/Hybrid NDVR System To access Zones & Rules settings: 1. Access IVS configuration as described in Access IVS Configuration. IVS opens showing Zones and Rules tabbed page. Zones and Rules tabbed page features the following elements: - 12 - The Intelligent Surveillance Solution NUUO NVR/DVR/Hybrid NDVR System 5.1. Tracking Display The tracking display shows all moving and static targets that are currently being tracked by IVS. Alarmed objects are marked in red and non-alarmed objects are marked in yellow. Alarmed object Detection zone Detection line Detection Property Detection zone Events history This screenshot shows two detection zones in red and a detection line in green. The tracking display shows how the trails of the objects intersect the detection zones and lines. - 13 - The Intelligent Surveillance Solution NUUO NVR/DVR/Hybrid NDVR System 5.2. Detection Property Once a detection zone or line is created, the detection property, a series of settings to define the rules for the selected zone/line, will show up on the right side of the Tracking Display. Detection Property Settings to be made first. Before proceeding to set detection property, make the following settings first: Setting Name Color Detect/ non-detect Description Dubs the created zone or line with a name. Hatches the created zone or line with a color to make it obvious. Enables the created zone/line for detection, or disables it from detection. ► See also Non-Detection Zone. Default Zone ID No. Red Detection Depending on available features and applied settings, the available rules may include the following: 5.2.1. Presence Select Presence to trigger the alarm when an object becomes present inside a zone or passes through a line. - 14 - The Intelligent Surveillance Solution NUUO NVR/DVR/Hybrid NDVR System Select Presence rule Alarmed object 5.2.2. Enter & Exit Select Enter or Exit to trigger the alarm when an object crosses from the outside to the inside or from the inside to the outside of a monitored zone. Object entering zone triggers rule Select Enter rule - 15 - The Intelligent Surveillance Solution NUUO NVR/DVR/Hybrid NDVR System Object exiting zone triggers rule Select Exit rule - 16 - The Intelligent Surveillance Solution NUUO NVR/DVR/Hybrid NDVR System 5.2.3. Appear & Disappear Select Appear or Disappear to trigger the alarm when an object appears in or disappears from the monitored zone. Different from Enter, Appear deals with an initially detected object inside the monitored zone without entering, e.g. people appearing in a doorway, or cars appearing from an underground carpark. Object appearing inside zone Select Appear rule Different from Exit, Disappear deals with an object tracked into the monitored zone and disappearing without exiting. Object disappearing inside zone Select Disappear rule - 17 - The Intelligent Surveillance Solution NUUO NVR/DVR/Hybrid NDVR System 5.2.4. Stopped Select Stopped to trigger the alarm when an object stops inside the monitored zone for longer than the defined amount of time. The stopped time is configurable in Time (secs) box. Object stopping inside zone triggers rule Set Stopped rule Set stopped time = 5 sec - 18 - The Intelligent Surveillance Solution NUUO NVR/DVR/Hybrid NDVR System 5.2.5. Dwell Select Dwell to trigger the alarm when an object dwells inside a zone for longer than the defined amount of time. Object dwelling inside zone triggers rule Select Dwell rule Set dwell time = 20 sec 5.2.6. Direction Filter Select Direction Filter to trigger the alarm when an object travels in the defined direction (within an accepted angle) through the monitored zone or over a line. Define the direction and angle in Direction and Acceptance Angle settings. Object travelling in the defined direction triggers rule Drag to change the direction and angle Select Direction Filter rule Set direction and angle 5.2.7. Tailgating Select Tailgating in the detection property to trigger the alarm when an object crosses a line or a monitored zone within a certain time after a previous object crossed the line or a monitored zone. Define the minimum allowable time between two successive objects by Threshold settings. - 19 - The Intelligent Surveillance Solution NUUO NVR/DVR/Hybrid NDVR System Object 2 follows and enters detection zone Object 1 enters detection zone Select Tailgating rule Threshold set to 5 sec - 20 - The Intelligent Surveillance Solution NUUO NVR/DVR/Hybrid NDVR System 5.3. Non-Detection Zone In some busy scenes, many objects can interfere with the detection. For example, on a windy day, moving foliage can cause false alarms. In order to mitigate such issues, create "non-detection" zones, where nothing is detected or tracked. Select Non-Detection Select Non-Detection Non-Detection Zone - 21 - The Intelligent Surveillance Solution NUUO NVR/DVR/Hybrid NDVR System 6. Counters IVS is able to count how many objects have triggered the alarms. The program features capable counting by assigning a group of detection zones or lines to a counter. IVS’s counter supports incremental, decremental and instantaneous counting. Configure the counter(s) by Counter Property that is similar to the previously mentioned Detection Property. 6.1. Create Counters To create a counter: 1. Access IVS configuration as described in Access IVS Configuration. IVS opens showing Zones and Rules tabbed page. 2. Right-click on the video image. A menu opens. 3. Select Counter | Add Counter. A counter is then added to the video image. After creating a counter, set the counter name and counter color first. Counter name Click and drag the counter to a desired position on the video image. The count - 22 - The Intelligent Surveillance Solution NUUO NVR/DVR/Hybrid NDVR System 4. 5. Set the counter name and color. Press OK button to save the change and quit setting. 6.2. Counter Property For IVS counter, a count is provoked by an alarm triggered by an object. Hence, to count how many objects have been detected (triggering the alarm), a detection zone or line needs to be created and set to detect the corresponding rule. After assigning the zone to a counter, the counter is able to count the objects detected, in the way of increment, decrement or instantaneous count. An alarmed object causes counter to increment the count. Select for incremental counting Select for instantaneous counting Select for decremental counting The contiguous count In this example the detection zone is set to trigger the alarm when an object enters it. And the counter is set to increment the count whenever the detection zone is entered. 30 objects have been counted. Setting Increment Decrement Instantaneous Description Sets the count to increment each time the detection zone triggers an alarm. Sets the count to decrement each time the detection zone triggers an alarm. Sets the counter to display the number of one or more objects that simultaneously triggers the alarm. - 23 - Default Deselected (Disabled) Deselected (Disabled) Deselected (Disabled) The Intelligent Surveillance Solution NUUO NVR/DVR/Hybrid NDVR System 7. Calibrate Camera Calibrate the camera to rectify its parameters such as height, tile angle, and vertical field of view, which is required for IVS to classify objects to different classes to be able to calculate detected object properties such as speed, height and area. 7.1. Access IVS features a Calibration tabbed page to calibrate the camera, to access this page: 1. Access IVS configuration as described in Access IVS Configuration. IVS configuration opens in Zones & Rules tabbed page. 2. Click Calibration tab. Calibration tabbed page opens. - 24 - The Intelligent Surveillance Solution NUUO NVR/DVR/Hybrid NDVR System 7.2. Onscreen Elements Use the onscreen elements on Calibration tabbed to adjust camera parameters. This section will detail these onscreen elements. 7.2.1. 3D Graphics Overlay The 3D graphics overlay is a green grid representing the ground plane featured on the video image. During calibration, the features on the video image need to match with such 3D graphics overlay. On the ground plane are a few 3D mimics to simulate the dimensions of persons. Use these mimics to verify the size of a person in the scene. Note: each grid square is 2*2 metric. Camera height and tilt angle setting Vertical Field of View setting Calibration mimic Calibration status Unit setting Restores defaults Pauses/plays video - 25 - The Intelligent Surveillance Solution NUUO NVR/DVR/Hybrid NDVR System 7.2.2. Mouse controls Use your mouse to adjust the calibration parameters: Click and drag the ground plane to change camera tilt angle. Scroll mouse wheel to adjust the camera height. Drag Camera Intrinsic Parameters slider to change camera’s vertical field of view. 7.3. Calibrate Camera Calibrate a camera to be able to estimate object parameters such as height, area, speed and classification. In some cases when you know the camera’s height, tilt angle and vertical field of view in question, simply enter the parameters to the corresponding settings and apply the changes. In case the camera parameters are unknown, calibrate the camera. This section will guide you through calibration. Step 1: Find some people in the scene 1. Find some people, or some people-sized objects in the scene. Try to find a person near the camera, and another person further away from the camera. 2. Click Pause Video button to pause the video to accurately place the mimics. Place the mimics on top of or near the people. 3. Enter in the height or estimated height of the camera if it is known. Actual height entered Place one mimic next to a person Place another mimic next to another person - 26 - The Intelligent Surveillance Solution NUUO NVR/DVR/Hybrid NDVR System Step 2: Adjust tilt angle and camera height Adjust the camera tilt angle and vertical field of view until both mimics are approximately the size of the real persons in the scene. Adjust camera the tilt angle by clicking and dragging the ground plane. Adjust camera height by scrolling mouse wheel. Adjust camera vertical field of view by dragging Vertical Field of View slider. The 3 calibration parameters will be reflected in the corresponding setting fields. Calibration Status box will reflect if the calibration is successful Calibration succeeds. - 27 - The Intelligent Surveillance Solution NUUO NVR/DVR/Hybrid NDVR System Step 3: Verify the setup The more objects in the scene which the calibration is based on, the more accurate the calibration will be. Once the camera is calibrated, objects in the video image are marked with height, area, speed and classification. To adjust the measurement units between Metric and Imperial, use Measurement Units setting. Object marked with area, height and speed. Note if the calibration goes wrong: If the mimics get lost or disappear due to an odd calibration configuration, restart the calibration by clicking Restore Defaults button. Step 4: Press OK button to save the change and quit setting. - 28 - The Intelligent Surveillance Solution NUUO NVR/DVR/Hybrid NDVR System 8. Advanced IVS Configuration In most installations, the default IVS configuration will suffice. However, in some cases, users needs some advanced IVS settings to optimize IVS performance. IVS features the advanced settings on Advanced tabbed page. 8.1. Access To access advanced IVS configuration: 1. Access IVS configuration as described in Access IVS Configuration. IVS configuration opens in Zones & Rules tabbed page. 2. Click Advanced tab. Advanced tabbed page opens. - 29 - The Intelligent Surveillance Solution NUUO NVR/DVR/Hybrid NDVR System 8.2. Advanced Settings - 30 - The Intelligent Surveillance Solution NUUO NVR/DVR/Hybrid NDVR System Featured settings on Advanced tabbed page are: Setting Camera Shake Cancellation Alarm Retrigger Time Tracker Configuration Description Default Select Enable Camera Shake Deselected Cancellation to improve IVS (Disabled) performance if the cameras are installed in vibration-oriented locations and thus suffer from shake problems. ► If camera shake is not a concern in your installation, disable this setting to have the best IVS performance. Alarm Holdoff Time sets the delay 5 seconds between two successive alarms triggered by a rule defined for an object. Sets what to track and the time to track. Featured settings are: Setting Minimum tracked object size Object Holdon Time Counting Runtime Description Defines the least size of object to track. ► Normally there is no need to modify this parameter. ► Lower the value to track smaller objects sacrificing noise immunity. Defines the time to track an object before it becomes stationary. ► IVS will forget the objects that become stationary after the defined Object Holdon Time. Default 10 pixel 60 sec Featured settings are: Setting Reset every Log every Description Sets the daily time to reset every counter Sets how often to write the counts into the log file. - 31 - Default 01:00 AM Every 30 minutes The Intelligent Surveillance Solution NUUO NVR/DVR/Hybrid NDVR System 9. Classification Once the camera is calibrated, IVS is capable of object classification and shows it on the video image. Classification relies on an object’s properties such as object area and speed. IVS configuration is pre-loaded with some most common object classes, which need not to change in most cases. In case the classification parameters need to change, IVS features classification settings on Classification tabbed page to add new object classes and change the pre-loaded classification parameters. This chapter will guide you to change the classification settings. 9.1. Access To access classification settings: 1. Access IVS configuration as described in Access IVS Configuration. IVS configuration opens in Zones & Rules tabbed page. 2. Click Classification tab. Classification tabbed page opens. - 32 - The Intelligent Surveillance Solution NUUO NVR/DVR/Hybrid NDVR System 9.2. Classification Settings Featured settings on Classification tabbed page are: Setting Add New Object Classifier Remove Object Classifier Reset Default Values Name Enable Min Area (m*m) Max Area (m*m) Min Speed (km/h) Max Speed (km/h) Description Adds a new object class. Default -- Removes the selected object class. Restore classification settings to default state. Dubs the class with a name. -- Puts the class to work. Sets the lower bound of object area. Sets the upper bound of object area. Sets the lower bound of object speed. Sets the upper bound of object speed. -Object ID. No Yes 0.0 200.0 0 200 Note that objects not fitting to any class are labeled as "Unclassified" on video images. - 33 - The Intelligent Surveillance Solution NUUO NVR/DVR/Hybrid NDVR System 10. Tamper Detection IVS features Tamper Detection to detect camera the tampering events such as blockage, de-focusing, redirecting, spray-painting and so on. Tamper Detection relies on detecting large persistent changes in the video image. 10.1. Access To access temper detection settings: 1. Access IVS configuration as described in Access IVS Configuration. IVS configuration opens in Zones & Rules tabbed page. 2. Click Tamper Detection tab. Tamper Detection tabbed page opens. - 34 - The Intelligent Surveillance Solution NUUO NVR/DVR/Hybrid NDVR System 10.2. Tamper Detection Settings Featured settings on Tamper Detection tabbed page are: Setting Enable Tamper Detection Tampered Duration until Alarm Tampered Screen Area Suppress alarm on lights on/off Description Enables Tamper Detection. Default Deselected (Disabled) 20 secs Sets how long does the video image persistently change to trigger tamper alarm. Sets how much does the video 40 % image change to trigger tamper alarm. Rules out the scenarios of great Deselected and rapid image lighting change (Disabled) such as on/off indoor lighting, which often cause false tamper alarms. ► This function is performed sacrificing the sensitivity to trigger alarms and thus isn’t recommended if fast lighting changes isn’t much a problem in your installation. - 35 - The Intelligent Surveillance Solution NUUO NVR/DVR/Hybrid NDVR System 11. IVS Log Viewer IVS was supported by Main Console’s Log Viewer to run the history and export the reports of the unusual events detected by (Main Console’s) Smart Guard. 11.1 Log Viewer To launch Log Viewer: 1. 2. On Main Console screen, click A menu opens. Select Log Viewer. button. Log Viewer then opens. 3. Click IVS Event tab. IVS Event tabbed page then opens. - 36 - The Intelligent Surveillance Solution NUUO NVR/DVR/Hybrid NDVR System Featured settings on IVS Event tabbed page are: Setting Description Rule Type Assigns the type of event to view. ► Select All to view all types of events. Device Selects the camera to view the log for. Date Selects the date to view the log for. Date Time Search Export to Sets a specific time slot to view the log for. Runs the history of the assigned events. Exports the event history to an EXCEL file. Default All All Present date Present time --- 11.2 Counting Application Display the history of Counting Application during a given time period. Step 5 - 37 - The Intelligent Surveillance Solution NUUO NVR/DVR/Hybrid NDVR System Step1: Select the mode you want from the drop-down menu for basic counting or Adv. IVS counting. Step 2: Select the channel you want to check or select All from the drop-down menu for all channels. Step 3: Select search period. View the events that happened on a particular date or during a given time period by selecting search period. For a particular date: check the Date box right and indicate the date. For a period: check the DateTime and then enter the date and time. Step 4: Click Search. Step 5: Press the button Export to. Step 6: Type the file name and choose the file format (.xls or .txt). 11.3 Counting Application (Diagram) Display the Counting Application data in diagram. Setting Increment Decrement Instantaneous Description Sets the count to increment each time the detection zone triggers an alarm. Sets the count to decrement each time the detection zone triggers an alarm. Sets the counter to display the number of one or more objects that simultaneously triggers the alarm. Counter: Increment - 38 - The Intelligent Surveillance Solution NUUO NVR/DVR/Hybrid NDVR System Counter: Decrement Counter: Instantaneous Note: Instantaneous log will count last value of the period Step1: Select the mode and channel you want to check and select counter (maximize 3). Step 2: From the drop-down menu, set up how you would like the diagram to be displayed. You have the options of one day, one month, or one year. Step 3: Select a specific date to make it the start point of the diagram. Step 4: Click Search. Step 5: Press the button Export to. Step 6: Type the file name and the file will save as BMP files. - 39 -