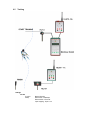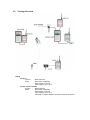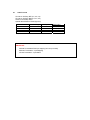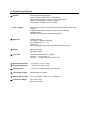
1
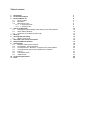
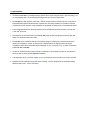
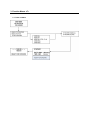
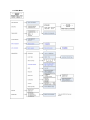
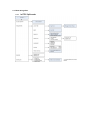
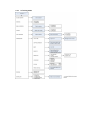
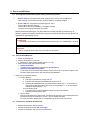
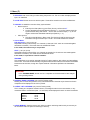
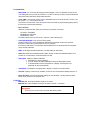
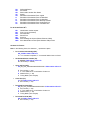
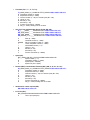
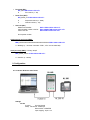
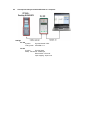
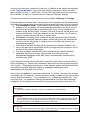
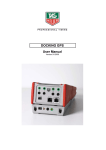
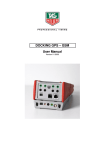
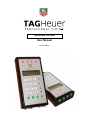
Minitimer HL 440 User Manual Version 06/2010 Table of contents 1. 2. 3. Introduction Technical description Function Menus <F> 3.1. Power on Menu 3.2. Main Menu 3.3. Menu during a Run 3.3.1. In PTB / Split mode 3.3.2. In Training mode 4. How to use Minitimer Recharge the internal battery before starting a new timing session. 4.1. 4.2. Switch ON the Minitimer. 4.3. Connection to the Martel HL 200 Printer 5. Menu (F) 6. Opening Run and Timing 6.1. RECALL function (R) 7. Download a new version of Firmware 8. RS232 and Ethernet Protocol 9. Configuration 9.1. Computer, Minitimer and a Printer 9.2. Two Minitimer Æ 8 synced Inputs 9.3. Chronoprinter 540 – Minitimer – Computer (not synced together) 9.4. Chronoprinter 540 synced with a Minitimer to a Computer 9.5. Training 9.6. Training with coach 9.7. Cable Pinouts 10. Technical specifications 11. Notes 3 4 6 6 7 8 8 9 10 10 10 10 11 13 14 15 16 19 19 20 20 21 22 23 24 25 26 1. Introduction • The Minitimer HL 440 is a professional timing system with 4 inputs using the same « high Technology » as our Chronoprinter 540. It is an essential general-purpose timer for many applications. • The HL 440 has a high precision “time base”, ideal for communication bi-directionally with a computer. It supersedes the popular PTB 605 and 606. Together with TAG Heuer software it is possible to print the calculated times and the name of the competitors on the Martel (HL 200) printer (connected to Minitimer). • It memorizes 30'000 times in 99 timing sessions with a user-selected precision between 1 second and 1/100' 000th of second. • The Minitimer can be connected to our Martel HL 200 printer enabling the printing of times on line (ON LINE) or in download mode (OFF LINE). • The HL 440 can be used at the start of a race (Alpine skiing for example) as a numerical-keyboard to identify the competitor’s number. As soon as the competitor leaves the start both the time and the competitor number will be transmitted to the timekeeper by wire connection, or by our radio transmission system (HL 670 or HL 680). • It is also an excellent backup system (manual or automatic). The competitor number can be introduced before or after the timing impulse (RECALL function) • Two Minitimers can be connected together (or to a Chronoprinter 540) to provide up to 8 input channels. • The Minitimer has a special timing mode called “Training,” which is designed for the automatic training sessions (Start, Inter 1, Inter 2 and Finish) 2. Technical description 1 2 3 4 5 1. RS 232 PC: Sub-D9f connector for bidirectional serial communication with PC. It is possible to download Online or Offline one or several sessions. This serial connector is also used for a Master/Slave syncing Output. 2. Power: External power supply to recharge the internal batteries. Power supply HL540-1 (110-220 Vac / 12 Vdc). Connection to an external 12Vdc battery is possible by using the HL520-17 cable. 3. ON/OFF power switch. 4. RS 232 (printer, display): Sub-D9f connector for the Martel HL200 Printer. It is possible to print Online or Offline one or several runs. This serial connector is also used for a Master/Slave syncing Input, or to send data to a TAG Heuer display board (Training mode) 5. Four banana jack inputs for external timing impulses and/or synchronization. Working contact (normally-open collector). Ex.: Manual push button (HL 18), photocells (HL 2-31/35) start gate (HL 7-1/3). Respect the correct polarity! The Minitimer HL 440 provides a visual (on the LCD) and audio alarm, should an external input remain in short-circuit. This feature allows you to observe the status of TAG Heuer’s new “direct-response” photocells (HL 2-31, HL 2-35 and HL 2-32 – serial number 7000 or higher), and allows the timekeepers to instantly determine if a photocell is out of alignment. 6 7 11 8 12 9 13 6. 7. 8. 9. 10. 11. 12. 13. 10 Blocking: Manual keys to unblock and block the External inputs 1 – 4. An input is blocked when the corresponding black bar is shown on the LCD display. LED Power: Two led lamps (green and red) show the battery loading progress and the external power supply function. Keyboard: to enter the time and date for synchronisation, and for introducing competitor numbers, distances and arrival windows (Training mode).. « * » Star Key “ERROR” – to cancel an incorrect number you entered or to confirm a menu option. Also used to cancel printing. « R » Key “RECALL”: to access the unassigned memorized times of a channel for identification. UP/ DOWN keys: to navigate the menu and to scroll through the unassigned memorized times. ENTER: to confirm a menu selection, time, date or competitor number. Green Keys: Manual Impulse and time-of-day synchronization. Warning The manual timing keys (1 to 4) do not guarantee timing precision. Only two simultaneous impulses can be processed at a time from the manual keys. 3. Function Menus <F> 3.1. Power on Menu 3.2. Main Menu 3.3. Menu during a Run 3.3.1. In PTB / Split mode 3.3.2. In Training mode 4. How to use Minitimer 4.1. Recharge the internal battery before starting a new timing session. Minitimer OFF and connected to the power supply HL 540-1 AC/DC: the red LED is ON while charging. The red LED turns OFF when the battery is completely charged. ¾ ¾ Minitimer ON and connected to the power supply HL 540-1 The red LED is ON while charging. The red LED is OFF when the battery is completely charged. The green LED is ON (power supply connected) Without the external power supply, the green LED turns on briefly at power up and then turns off. When the capacity of the battery reaches 30%, the green LED flashes, indicating that your Minitimer is operational for approximately 8 hours. INFORMATION The capacity of the battery can be checked via the function menu <F> PARAMETER – STATUS. IMPORTANT Never charge the device under 0°C (32°F) and over 30°C (86°F) 4.2. Switch ON the Minitimer. ¾ ¾ ¾ • 4.3. Switch ON the Minitimer The LCD illuminates for 5 seconds • Minitimer HL 440 and the Firmware version (V.A – 03) Select how the Serial output should be used • RS232 TO PRINTER The data will be configured for a serial printer (HL 200 (Martel). • RS232 TO AUXILIARY HL440 OR PC. In this mode, the synchronized data and time-of-day are sent with a “top second” signal. You’ll be able to adjust the baud rate. We recommend using 9600 Bds. Select your synchronizing method : ¾ Synchro Manual • Enter the current date and confirm with ◄┘ • Enter the time-of-day(format HH:MM) and confirm with ◄┘ • Synchronize the Minitimer with any Green Manual Impulse Key (1 – 4). If the timer is to be synchronized with another device with an external input (1 – 4), do not forget to unblock the input (Red key 1 – 4). The LCD display shows • Four black bars (▬) which indicate that all the four inputs are blocked, • The time of the day and the date ¾ Synchro Slave This will put the Minitimer in Slave mode. The Device will wait for the synchronized time-of-day information through the serial Input « Printer » from a «master» Minitimer. For more information, please refer to «configuration» at the end of this user manual. Connection to the Martel HL 200 Printer • Read the printer user’s manual carefully. • Connect the printer to the Sub-D9f on the right. • First turn on the printer, and then turn on the Minitimer. 5. Menu (F) ¾ OPEN RUN: start a new timing run after closing the previous run. The run number is displayed when input 1 is unblocked. ¾ CLOSE RUN: Exit the current run with this option. Times will be saved but cannot be modified later. ¾ SYNCHRO: to establish a new time-of-day synchronization. • Manual synchro • Enter Synchro Date (dd:mm:yy) and Time (hh:mm), confirm with ◄┘ • Synchro the Minitimer with the Manual Green Key (1 – 4) or if the system should be synchronized as along with another device from an external input (1 – 4), do not forget to unblock the associated external input (Red key 1 – 4). • Slave synchro • This will put the Minitimer in Slave mode. The Device will wait for the time-of-day information through the serial Input « Printer » from another Minitimer «master» ¾ Chrono Mode: PTB Sequential: (1 to 4) or (5 to 8) Sequential recording of time-of-Day on 4 channels ( 8 channels if 2 HL 440’s are connected together with RS232 connection). This mode does not calculate Net Times! In this mode, bib number entry is not possible. SPLIT: (1 to 4) or (5 to 8) Sequential recording of time-of-Day on 4 channels (8 channels if 2 HL 440’s are connected together with RS232 connection). This mode will not calculate Net Times. In this mode, it is possible to enter bib numbers. TRAINING: This mode allows you to perform automatic timing for Training sessions, with a Start, two intermediates and a Finish. This mode will automatically recognize the bib numbers after the start at both intermediate locations and at the finish, through the “Capture windows” information specified in the Parameters Menu. IMPORTANT In the TRAINING MODE, several runs for a competitor can be memorised for later analysis during a timing session. ¾ RANKING / RANK A SESSION: (only into the Training mode) Ranking of the current timing session or any memorized session. Note that only the best time of each competitor will be displayed on the LCD or printed. ¾ LISTING / LIST A SESSION: (only into the Training mode) This is a listing of a competitor number’s times in chronological order for the current session, or any memorized session. All the times (Inter 1, 2 and Finish) will be displayed for each run within the session. # 01 COMPETITOR 1 INTER 1 10.23 INTER 2 23.56 FINISH 42.98 ¾ CLEAR MEMORY: Clear the memory only when you start a new timing session and you are sure you do not need to retain the previous session(s) in memory! ¾ PARAMETERS : o PRECISION: you can choose the timing precision between 1 sec to 1/100’000th of second. The LCD display will show a maximum precision of 1/1’000th of second, however, all times transferred, memorized and printed are at the specified precision. o LOCK TIME: Lock-out time of the 4 inputs is selectable from 0.01 to 9.99 seconds. To enter 1.00 sec, press 1 – 0 – 0 and confirm with ◄┘. The minimum lock-out time of 0.01 sec should not be used with any mechanical triggering device (bounce may cause several impulses). o INPUT STATUS Selection of Inputs and their timing info functions info (transmit / received) UP Narrow: TRANSMIT DOWN Narrow: Received HORIZONTAL: Close The default status of the input is set as « Transmit » (after switching off) o CAPTURE WINDOWS: (only into the Training mode) The time window (min / max) automatically identifies the competitor number as he passes through the various timing points while his run is in progress. If the value is defined at 0, no restrictions are activated there is no guaranty that the competitor will be correctly identified. o BEEP: Audio Signal activation (ON/OFF). The last setting is memorized. o RS232 PC: Baud rate is selectable (2400 / 9600 / 38'400 / 57'000 and 9’600 Bds Select “Flow Control” for our radio Data / Voice transmission HL 680. o RS232 AUX : Data bus RS232 “PRINTER” ¾ TO PRINTER : printer (ON/OFF) ¾ TO AUX: Serial bus RS232 PRINTER is setup for Master/Slave mode. ¾ To HL970/HL980: will send information to a display, including Net Time (especially for the Training Mode) o LANGUAGE: The Minitimer is programmed in English , German, French and Italian o STATUS: Capacity of the memory available, number of runs memorized and battery status in %. o PRINT SETTING: print the full parameter settings of your Minitimer, including memory status, timing mode, precision and input lock time. ¾ PRINTER: o o PRINTER OFF: No output available. Serial bus is closed. PRINTER ON: Times and Data are send to the Serial « Printer » connection. IMPORTANT When you turn on the Printer, all saved data will be printed. ¾ DOWNLOAD: o o o o TO PRINTER Print all Times and data on the serial printer. TO COMPUTER Send all data to the serial connection « Computer »in a traditional protocol TO CHRONO RS232 Send Data to another Timing device (like a CP540 or Minitimer) TO RS232 AUX Send Data through the serial output « PRINTER » ¾ DUPLICATE: Allows another or several competitor N°’s to be associated with a particular start, intermediate or finish time already received. Not available for Training mode ¾ INSERT TIME: Allows you to create a particular start or finish Time–of-Day for any competitor. Not available for Training mode ¾ NUMBERING: You can select Manual or Automatic competitor numbering assigned to input 1 (Start) only Automatic: in ascending UP order Manual: enter the competitor’s N° + ENTER At any time it is possible to cancel the next competitor by pressing “0” + Enter. This is available only on the Training Mode 6. Opening Run and Timing o Enter the menu (F) and select OPEN RUN Do not forget to unblock the external input (Red key 1 – 4), if necessary. o The Minitimer records sequentially the time-of-day from each input. Each time can be matched with a competitor n° (N° + ◄┘), before the impulse, or after with the RECALL function. Note: only in Split mode. SPLIT mode: Each time can be identified with a bib number (N° + ◄┘) BEFORE the start Impulse or AFTER with the function RECALL «R» TRAINING Mode: it is important to define correctly the parameter “CAPTURE WINDOWS” (Max / Min) for the Intermediates and Finish. The time window (min / max) automatically identifies the competitor number’s expected arrival as he passes through the various timing points while his run is in progress. • For intermediate times: if the crossing time is inside of the window, the bib number of the competitor will be automatically identified to the time, and the MiniTimer will automatically calculate the Net Time. If the crossing time is outside of this window (lower or higher), the time of the day will be saved, but without identification. It will be necessary to use the function <R> (Recall) in order to correctly identify this time, if desired later. • For Finish: if crossing time is inside the window, the time-of-day will be automatically identified with bib number, and the MiniTimer will calculate the Net Time. On the other hand, if the crossing time is not within the window, two scenarios are possible: • If the time is less than the MIN value entered in the "Capture Window,” the time of the day will be memorized, but the running time will continue until the end of the window (MAX time). • If the time is greater than the MAX value entered in the "capture Window” parameter, the time of the day will be saved, but running time will automatically disappear at the MAX value, and competitor number will be identified as a “DNF.” (Do Not Finish). Defining the capture Windows: In training mode, it is possible to send one or more forerunners to establish estimated arrival times for the training course. To tell the MiniTimer that a forerunner is about to start, press the “*” key and then enter a bib N° + ENTER. The forerunner will define the times at Inter 1 and 2, and finish. As soon the forerunner crosses the finish line, the Minitimer will switch automatically to the “Capture Windows” menu, and thus allow the operator to define the MIN / MAX settings for Inter 1, 2 and Finish. On the LCD, the times set by the forerunner will be shown, so that you can fine tune the “Capture Windows” settings. The times recorded by the forerunner are not included in Rankings or Listings. It is possible to cancel the new starter, in SPLIT and TRAINING mode by entering the bib’s number “0” and valid with ◄┘. 6.2. RECALL function (R) This allows you to: o Recall all the memorized times from any input, from the buffer, with or without competitor numbers. o Review and select times not yet identified with a bib number. Example: - Press R Select Input Scroll Up / Down with the ▼ and ▲ keys. Place the black arrow with the desired time _ _ _ _ ► 16 :55 :40.789 - Enter the competitor number and confirm with ◄┘ The * symbol is associated with this N° (indicates that this time was recalled and associated with a bib number). o Recall competitor N° and modification. Example: - Enter the competitor N° Press R Select Input The competitor N° to modify will be displayed. Press (error) and enter the new competitor N°. Confirm with ◄┘ The * symbol is associated with this N° (indicates that this time was recalled and associated with a bib number)). o Direct time identification on an input - Press R - Select Input - When a new time arrives, identify it immediately by entering the competitor N° - Validate with ◄┘ o Cancel errant time - Press R - Select Input - Select the errant time by using “UP/DOWN” arrows - Press to request the change Press “0” to cancel the time Press to valid the cancelling o Change indentified time - Press R - Select Input - Select the time you want to change the identification by using “UP/DOWN” arrows - Press to request the change - Enter the new bib’s number - Validate with ◄┘ ATTENTION! A time identified with competitor “0” deletes the time. The character “C” is memorized and associated with the time. 7. Download a new version of Firmware Program downloads and new releases of the TAG Heuer firmware “up loader” are available free of charge on our website www.tagheuer-timing.com. For this operation, you need to have: • Sub-D9p cable HL 605-10 • The software «TAGHeuerFirmmanager.exe » installed on your PC. Procedure 1. Copy the software «TAGHeuerFirmManager.exe » onto your hard drive 2. Connect the HL440 with the external power supply (The HL440 should be off before plugging in the external power supply). Do not turn on the HL440 yet! 3. Connect the RS232 cable (HL605-10) to the PC and to the HL440 4. Run the software « TAGHeuerFirmManager.exe » 5. 6. 7. 8. Select the COM Port Select the file: Update (HL440_xxx.dat) Press START on the software. Power ON the HL440 The HL440 will go into a special mode « Download ». The LDC back light will be ON, but LCD will be blank. 9. As soon as the upgrade is downloaded into the HL440, validate the software with OK. 10. Remove the RS232 cable from the HL440. 11. The HL440 is ready to use. 8. RS232 and Ethernet Protocol RS232 Port settings: 2400, 9600, 38400, 57600 bds Data 8 bits, 1 stop bit, no parity Frame Format: Data + TAB + CS16 + CR + LF TAB = 0x09 CR = 0x0D LF = 0x0A CS16 is the sum of all data octets (the sum of all the data bytes – except for the characters ‘#’ if present) module 65536. The hexadecimal result is inserted in the frame with 4 ASCII characters. Example: print the text ‘Hello’ #PL Hello<TAB><CS16><CR><LF> Data: P = 0x50 L = 0x4C Space = 0x20 H = 0x48 Sum = 02B0 (hexadecimal) = CS16 e = 0x65 l = 0x6C l = 0x6C o = 0x6F Frame: 2 B 0 <CR> <LF> # P L H e l l o <TAB> 0 0x23 0x50 0x4C 0x20 0x48 0x65 0x6C 0x6C 0x6F 0x09 0x30 0x32 0x42 0x30 0x0D 0x0A Flow control If any equipment connected to the RS232 port does not allow a flow minimum of 2400 bps (ex. Radio transmission), a basic flow control is available Go into Parameters –> RS232 menu, then select « 9600bds Flow Ctrl ». Once this option is activated, the HL440 sends the first Frame and waits to receive the characters 0x06 « ACK » before sending the next one. Message list HL440 to PC Frame ID’s: AK ID OP CL DS DE TN TT* T+ T= TC IR PC command acknowledge (Every PC to CP540 message is acknowledge) HL440 Identification number Open Run Close Run Download Run Start Download Run End New Time data Unassigned Time Re-identified Time Manually Inserted Time Duplicated Time Cancelled Time Intermediate Result DR RR GR VE AN AA* A+ A= AC Differential Result Run Result Result add to another Run Result Speed Recalled or Downloaded Time: original Recalled or Downloaded Time: De-identified Recalled or Downloaded Time: Re-identified Recalled or Downloaded Time: Manually Inserted Recalled or Downloaded Time: Duplicated Time Recalled or Downloaded Time: Cancelled Time PC to HL440 Frame ID’s: #ID #PL #DL #RT #SL #BM #MC Identification number request Print Line (24 characters) Download Run Recall Time Start List Send message to all ports (RS232, Ethernet, GSM) Save Identification number (MAC address LSB) to Flash HL440 to PC Frames: Note: In the following frame, the character ‘_’ represents a space. • PC command acknowledge (AK): AK_X<TAB><CS16><CR><LF> X = ‘C’ if command completed, ‘F’ if command failed or item not found • HL440 Identification number (ID): ID_NNNNN<TAB><CS16><CR><LF> N = ID number (0 – 65535) • Open new Run (OP): OP_RR_TAA_XXXXXXXXXXXXXXXXXXX <TAB><CS16><CR><LF> R T A X Run number (1 – 99) If ‘T’ the added run is a combination of other run Added to Run (1 – 99) Timing Mode (Text 19 bytes) • Close Run (CL): CL_RR<TAB><CS16><CR><LF> R Run number (1 – 99) • Download Run Start (DS): DS_RR_TAA_XXXXXXXXXXXXXXXXXXX <TAB><CS16><CR><LF> R Run number (1 – 99) T If ‘T’ the added run is a combination of other run A Added to Run (1 – 99) X Timing Mode (Text 19 bytes) • Download Run End (DE): DE_RR<TAB><CS16><CR><LF> R Run number (1 – 99) • Time data (TN, T-, T*, T+, T=, TC): Tx_NNNN_SSSS_CC_HH:MM:SS.FFFFF_DDDDD<TAB><CS16><CR><LF> N Competitor number (0 – 9999) S Sequential number (0 – 9999) C Channel number (1 - 99) or if manual inputs (M1 – M4) H Hours (0 – 23) M Minutes (0 – 59) S Seconds (0 – 59) F Fraction of seconds (0 – 99999) D Day (0 – 32767) starting from 01.01.2000 • Inter, Diff, Run and Added Run Result (IR, DR, RR, GR): IR_I_ _ _ _NNNN_ _ _ _HH:MM:SS.FFFFF<TAB><CS16><CR><LF> RR_ZZZZ_NNNN_ _ _ _HH:MM:SS.FFFFF<TAB><CS16><CR><LF> GR_ZZZZ_NNNN_ _ _ _HH:MM:SS.FFFFF<TAB><CS16><CR><LF> DR_WWWW_LLLL_ _ _ _HH:MM:SS.FFFFF<TAB><CS16><CR><LF> Z N WWWW L I H M S F Rank (0 – 9999) Candidate number (1 – 9999) Winner competitor number (1 – 9999) Looser competitor number (1 – 9999) Intermediate number (1 - 9) Hours (0 – 23) Minutes (0 – 59) Seconds (0 – 59) Fraction of seconds (0 – 99999) • Speed (VE): VE_I_NNNN_SSS.SSS_UUUUUUU<TAB><CS16><CR><LF> I Speed number (1 – 4) N Competitor number (1 – 9999) S Speed (0.000 – 999.999) U Speed unit (Text 7 bytes) • Recalled (#RT) or downloaded Time data (#DL) (AN, A-, A*, A+, A=, AC): Ax_NNNN_SSSS_CC_HH:MM:SS.FFFFF_DDDDD<TAB><CS16><CR><LF> N Competitor number (0 – 9999) S Sequential number (0 – 9999) C Channel number (1 - 99) or if manual inputs (M1 – M4) H Hours (0 – 23) M Minutes (0 – 59) S Seconds (0 – 59) F Fraction of seconds (0 – 99999) D Day (0 – 32767) starting from 01.01.2000 • Identification number request (#ID): #ID<TAB><CS16><CR><LF> • Print Line (#PL): #PL_XXXXXXXXXXXXXXXXXXXXXXXX<TAB><CS16><CR><LF> X Text to print (24 bytes) • Download (#DL): #DL_RR<TAB><CS16><CR><LF> R Run number (1 – 99) • Recall Time (#RT): #RT_SSSS_CC<TAB><CS16><CR><LF> S C • Sequential number (0 – 9999) Channel number (1 - 99) Start List (#SL) Delete memorized list: #SLR <TAB><CS16><CR><LF> Add competitor number in the list: #SLA_NNNN<TAB><CS16><CR><LF> Close a new list: #SLC<TAB><CS16><CR><LF> N=Competitor number Send message to all ports (#BM): #BM_XXXXXXXXXXXXXXXXXXXXXXXXXXXXXXXX<TAB><CS16><CR><LF> X = Message (1 - 32 octets. characters <TAB>, <CR> are not authorized). Serial port setup (#MC): !!! factory setup!!! #MC_04660_XXXXX <TAB><CS16><CR><LF> X = Serial N° (0 – 65535) 9. Configuration 9.1 Computer, Minitimer and a Printer Settings HL 440 Synchro: Synchro Manual Setup: RS 232 PC Æ 9600 bps RS 232 AUX Æ PRINTER Input mapping : Input 1 to 4 9.2 Two Minitimer Æ 8 synced Inputs Settings HL 440 / 1 Synchro: Synchro Manual Setup: RS 232 PC Æ 9600 bps RS 232 AUX Æ TO AUX Input mapping : Input 5 to 8 HL 440 / 2 Synchro: Synchro Slave Setup: RS 232 PC Æ 9600 bps RS 232 AUX Æ VERS PRINTER Input mapping : Input 1 to 4 9.3 Chronoprinter 540 – Minitimer – Computer (not synced together) Settings CP 540 Synchro: Synchro Manual Timing mode: PTB SEQ 1 to 4 HL 440 Synchro: Settings: Synchro Manuel RS 232 PC Æ 9600 bps RS 232 AUX Æ VERS AUX Input mapping : Input 5 to 8 9.4 Chronoprinter 540 synced with a Minitimer to a Computer Settings PC 540 Synchro: Timing mode: Synchro Manuel / GPS PTB SEQ 1 à 4 HL 440 Synchro: Synchro Slave Setup: RS 232 PC Æ 9600 bps RS 232 AUX Æ TO AUX Input mapping : Input 5 to 8 9.5 Training Settings HL 440 Synchro: Setup: Manual Synchro RS 232 PC Æ 9600 bps RS 232 AUX Æ TO AUX Input mapping : Input 1 to 4 9.6 Training with coach Setting HL 440 / 1 Synchro: Setup: Manual Synchro RS 232 PC Æ 9600 bps RS 232 AUX Æ TO AUX Input mapping: Input 1 to 4 HL 440 / Coach’s monitor Synchro: Manual Synchro Setup: RS 232 PC Æ 9600 bps RS 232 AUX Æ TO AUX Input mapping: Input 1 to 4 Parameter: « Capture windows has to be set exactly as HL440 / 1 9.7 Cable Pin-outs HL 605-10: Sub-D9p, M/F (2-2, 3-3, 5-5) HL 200-10: Sub-D9p, M/M (2-3, 3-2, 5-5) HL540-10: Sub-D9p / RJ45 Special cable CP540 to HL440 (Synchro) RJ12 – CP540 3 5 1 RJ 11 Docking 2 1 Sub-D9p M 5 3 2 9 Désignation GND Rx/Tx Tx/Rx SYNC IMPORTANT No data is transmitted if the Input mapping isn’t set up correctly! Minitimer: Parameters – Input Mapping CP 540: Parameters – Input Status 10 Technical specifications ⇒ General Stand-alone sports timing system. Timing calculation (Speed) to the 1/1'600'000 sec. Timing resolution (printer – PC) from 1 sec to 1/100'000 sec Memory of 30'000 times and 99 timing sessions Sequential N°/ competitor N° from 1 to 9'999 ⇒ Inputs / Outputs Four banana jack inputs for external timing impulses (working contact, open collector) COMPUTER / Bidirectional RS232 (or to drive external display) PRINTER RS232 Expansion port available for future Docking Stations. ⇒ Keyboard Numeric keyboard Three keys UP, DOWN and ENTER Four validation keys (“1” – “4”) RECALL key Four manual toggle keys to block and unblock the external Inputs. ⇒ Display Matrix LCD display Adjustable contrast ⇒ Time Base Thermo-compensated quartz 12.8 MHz Precision: +/- 0.5 ppm at 25° C Precision: +/- 1.5 ppm between -20°C and +55°C ⇒ Operating temperature ⇒ Charging temperature - 4°F (-20°C) to +131°F (+55°C) +32°F (0°C) to +86°F (+30°C) ⇒ Operating time 38 hours (1 incoming impulse every 5 seconds) ⇒ Internal power supply Rechargeable Li-ion battery ⇒ External power supply 12 V DC by adaptor (HL540-1) or 12 V batteries ⇒ Dimensions / Weight 197 x 105 x 35 mm Minitimer only: 500g 11 Notes TAG Heuer PROFESSIONAL TIMING 6A Louis-Joseph Chevrolet 2300 la Chaux-de-Fonds Switzerland Tel : 032 919 8000 Fax : 032 919 9026 E-mail: [email protected] Http: //www.tagheuer-timing.com USA Reliable Racing Supply, Inc. 643 Upper Glen Street Queensbury, NY 12804 [email protected] www.reliableracing.com HL440 MiniTimer ADDENDUM: TRAINING MODE OPERATING INSTRUCTIONS Description: The latest firmware upgrade (HL440_vb02) includes a "Training" mode, which is designed for the automation of training sessions while minimizing errors caused by false impulses or racers abandoning the course (DNF). This mode allows you to measure up to 2 intermediate times and a finish time. An estimated arrival window can be programmed for each intermediate and finish input. Running times and NET times for intermediates and finishes are provided on the MiniTimer’s display. Net times are also provided to a scoreboard (HL970/HL980) or printer. A participant can take multiple runs during the session. The training mode is a powerful solution for both professional sports teams and self-timing venues for the general public! Menu changes: From power up, you immediately select Printer port assignment. Select from “RS232 Printer,” RS232 Data,” or “To HL970/980.” Main menu under “Timing Modes:” “Training Mode” is now included at the bottom of the list. After selecting the TRAINING MODE, go to “Parameters” and then “Capture Window.” Here you assign minimum and maximum times for Inters 1 and 2 (if desired) and finish. Ranking / Session Ranking: it is possible to view or print the ranking of a training session. Each competitor’s fastest time of the session is given in the Session Ranking. Listing / listing a session: For Listing, you can select competitor # to list all of his times from all of the runs he has taken so far for the current session. For “listing a session,” you can select a session in memory and see the time of a competitor from that specific session. Input Configuration Start: Intermediate 1: Intermediate 2: Finish: input 1 input 2 input 3 input 4 NUMBERING: You can select Manual or Automatic competitor numbering assigned to input 1 (Start) only Automatic: in ascending UP order Manual: enter the competitor’s N° + ENTER At any time it is possible to cancel the next competitor by pressing “0” + Enter. This is available only on the Training Mode Defining the capture Windows: In training mode, it is possible to send one or more forerunners to establish estimated arrival times for the training course. To tell the MiniTimer that a forerunner is about to start, press the “*” key and then enter a bib N° + ENTER. The forerunner will define the times at Inter 1 and 2, and finish. As soon the forerunner crosses the finish line, the Minitimer will switch automatically to the “Capture Windows” menu, and thus allow the operator to define the MIN / MAX settings for Inter 1, 2 and Finish. On the LCD, the times set by the forerunner will be shown, so that you can fine tune the “Capture Windows” settings. The times recorded by the forerunner are not included in Rankings or Listings. Once the capture windows (min / max) are set, each competitor will be automatically identified as he passes through the various timing points while his run is in progress. For intermediate times: if the crossing time is inside of the window, the bib number of the competitor will be automatically identified to the time, and the MiniTimer will automatically calculate the Net Time. If the crossing time is outside of this window (lower or higher), the time of the day will be saved, but without identification. It will be necessary to use the function <R> (Recall) in order to correctly identify this time, if desired later. For Finish: if crossing time is inside the window, the time of the day will be automatically identified with bib number, and the MiniTimer will calculate the net time. On the other hand, if crossing time is not within the window, two scenarios are possible: If the time is less than the MIN value entered in the "Capture Window,” the time of the day will be memorized, but the running time will continue to run to the end of the window (MAX time). The time is greater than the MAX value entered in the "capture Window” parameter, the time of the day will be saved, but running time will automatically disappear at the MAX value, and competitor number will be identified as a “DNF.” If the competitor’s finish time-of-day was a valid finish (but outside of the window), it will be necessary re - identify the competitor’s start and finish time-of-days using the <R> function. This system allows you to certify with the greater likelihood that times are properly identified, and false impulses (passages through photocells inadvertently) are not taken into account. At any time, it is possible to cancel an errant time. To do this, you select the channel concerned (“R”+ N° channel), use the “up/down” arrows to select the time you wish to cancel, and then press the “*” key, followed by “0”. Validate by pressing the “*” key one more time. It is possible to change the identification of a time with a different competitor N° through the same process (by entering any number other than “0”). IMPORTANT If the value entered in time min / max is 0, the window is completely open. IMPORTANT In the TRAINING mode, the HL440 accepts multiple times for the same competitor number from the start to the finish and for multiple runs. However, for the RANKING classification, only the best time of a competitor from all of his runs is given. IMPORTANT We also recommend that you keep track of your starting list of competitor numbers, in order to identify the ones that didn’t finish within the arrival window. On the LCD display: Line 1: displays the system information, locking status of the input, time-of-day and bib number (entered by the keypad). Line 2: displays the bib number at the start, along with the start time-of-day. Line 3: displays the bib number, the input # for the intermediate (1 or 2), the time-of-day of the Intermediate (for 2 seconds) and then the NET Time calculated by the Minitimer (for 5 seconds). Line 4: displays the bib number next to arrive at the finish line along with the running time. When the racer finishes, the time-of-day will be shown for 2 seconds, and then the Net Time will be shown for 5 seconds. Net time precision on the LCD, Printer and ext. Display (HL970/980): Parameters setting Net time expressed to: 1/10 1 sec. 1/100 .1 1/1000 .01 1/10000 .001 Wireless timing: For wireless applications, the MiniTimer is ready to go with the HL610 (impulse only) for short range projects (up to 1k line-of-sight). For long range projects, the new HL670 can be used in either impulse or data mode. This form of “traditional” wireless timing relies upon timing impulses, and can expand to include the two Intermediate timing points. For example: Simple short range system (Start – Finish), bib entry at the finish: 1 HL610X + 1 HL7-3 at the start 1 HL440 + HL2-31 + 1 HL610R at the finish Long range system with Intermediate times (bib entry at the start): 1 HL440 + 1 HL670R + 1 HL7-3 at the start 3 HL2-31 + 3 HL670X at Inters 1 & 2 and the finish The HL670 radio system in DATA MODE also provides for the addition of a 2nd MiniTimer at the finish line, and for a 3rd MiniTimer as a coach’s monitor. All time-ofday information will be shared "live" between all three HL670 transmitters connected to three MiniTimers. This allows the athlete to introduce his own competitor # at the start and see his time at the finish. Meanwhile, the coach can have his own MiniTimer to view net times, and provide instant access to Session Lists and Session Rankings anywhere on the hill that is within range of the HL670! To do this, it is necessary to program the coach’s MiniTimer with "external input data" in <settings - status entries>. In the <Settings> menu, all "Capture Window" times (min / max) must be set to 0. The MiniTimer at the start is programmed to accept impulses on CH1 only, and the MiniTimer at the finish is programmed to accept impulses on CH4 only. This system can also expand to involve Intermediates 1 and 2, by adding additional HL670 transmitters and HL440 timers.