1
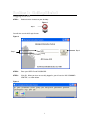
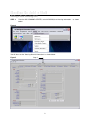
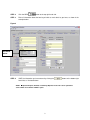
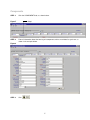
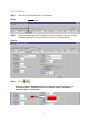
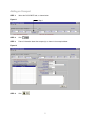
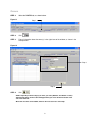
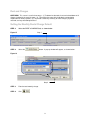
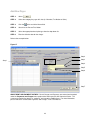
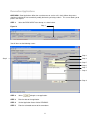
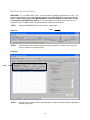
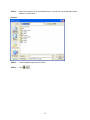
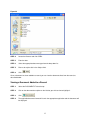
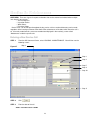
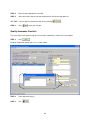
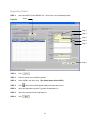
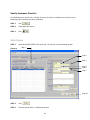
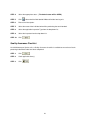
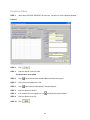
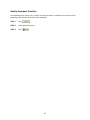
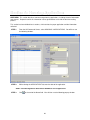
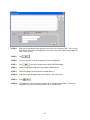
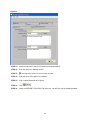
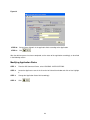
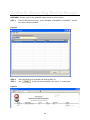
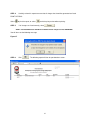
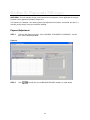
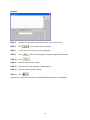
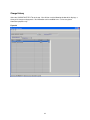
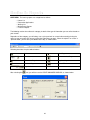
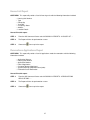
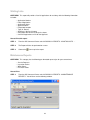
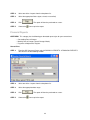
Aboriginal Information Systems
Housing
User Reference
Custom Software. Network Services. E-Business. Complete I T Solutions.
© 2005 - Advanced DataSystems Ltd.
Copyright Information
© 2005 - Advanced DataSystems Ltd.
All Rights Reserved. Reproduction, adaptations, or translation without prior written permission is
prohibited except as allowed under copyright laws.
HS-4.6.0
February 13
Notice
The information contained in this document is subject to change without notice. Advanced DataSystems
Ltd makes no warranty of any kind with respect to this information. Advanced DataSystems Ltd
specifically disclaims the implied warranty of merchantability and fitness for a particular purpose.
Advanced DataSystems Ltd shall not be liable for any direct, indirect, incidental, consequential, or other
damage alleged in connection with the furnishing or use of this information.
No part of this document may be photocopied, reproduced, or translated to another language without the
prior written consent of Advanced DataSystems Ltd.
TABLE OF CONTENTS
Section 1: Getting Started ......................................................................................................................... 1
Logging in to AIS..................................................................................................................................... 1
Section 2: Add a Unit ................................................................................................................................. 2
Adding a New Housing Unit ................................................................................................................... 2
Campaigns............................................................................................................................................ 4
Components............................................................................................................................................. 5
Fire Insurance .......................................................................................................................................... 6
Adding an Occupant ............................................................................................................................... 7
Owners...................................................................................................................................................... 8
Rent and Charges.................................................................................................................................... 9
Setting the Monthly Rental Charge Default .......................................................................................... 9
Add New Payer ...................................................................................................................................... 10
Renovation Applications ...................................................................................................................... 11
Updating A Reno Application Status ............................................................................................... 12
Maintenance Information ...................................................................................................................... 13
Adding Photos ....................................................................................................................................... 14
Adding Documents................................................................................................................................ 16
Viewing a Document Added to a Record......................................................................................... 17
Section 3: Maintenance ........................................................................................................................... 18
Entering a New Service Call ................................................................................................................. 18
Quality Assurance Checklist ............................................................................................................ 20
Inspection Orders.................................................................................................................................. 21
Quality Assurance Checklist ............................................................................................................ 22
Work Orders ........................................................................................................................................... 22
Quality Assurance Checklist ............................................................................................................ 23
Purchase Orders.................................................................................................................................... 24
Quality Assurance Checklist ............................................................................................................ 25
Section 4: Housing Application .............................................................................................................. 26
Modifying Application Status ........................................................................................................... 29
Section 5: Generating Monthly Charges................................................................................................ 30
Section 6: Payments &Charges .............................................................................................................. 32
Payment/Adjustment ......................................................................................................................... 32
Charge History ................................................................................................................................... 34
Section 7: Supplier Invoice Payments ................................................................................................... 35
Section 8: Reports ................................................................................................................................... 36
House List Report.................................................................................................................................. 37
Renovations Applications Report........................................................................................................ 37
Waiting Lists .......................................................................................................................................... 38
Maintenance Reports ............................................................................................................................ 38
Financial Reports .................................................................................................................................. 39
Section 1: Getting Started
Logging in to AIS
STEP 1:
Double click the shortcut on your desktop:
Figure 1
Step 1
You will then see the AIS Login Screen:
Figure 2
Step 3
Step 2
STEP 2:
Enter your USER ID and PASSWORD.
STEP 3:
Click OK. When you have successfully logged in, you will see the “AIS COMMAND
CENTER”, as shown below:
Figure 3
1
Section 2: Add a Unit
Adding a New Housing Unit
STEP 1:
From the AIS COMMAND CENTER, select HOUSING, then Housing Information …as shown
below:
Figure 4
You will then see the “Housing General Information” as shown below:
Figure 5
Step 2
2
STEP 2:
Click the NEW
STEP 3:
Enter all information about the housing unit with as much detail as you have, as shown in the
example below:
button at the top right hand side.
Figure 6
See NOTE
below
STEP 4:
SAVE the information you have entered by clicking the
hand side, as illustrated above.
button on the bottom right
NOTE: Special Purpose, Deleted, or Plumbing Required if the unit is to be reported as
such to INAC on the Annual “HAIRS” report.
3
Campaigns
“Campaigns” refer to mass projects. For example, if your department will be conducting a blanket water
test, and you want to include this house in the test, you can add it by doing the following:
STEP 1:
While viewing the “General” tab of a Unit, click the CAMPAIGN button next to the SAVE
button at the bottom.
STEP 2:
Check the items you wish to include.
STEP 3:
Click
.
4
Components
STEP 1:
Click the COMPONENTS tab, as shown below:
Step 1
Figure 7
STEP 2:
Enter all information about the housing unit components with as much detail as you have, as
shown in the example below:
Figure 8
STEP 3:
Click
.
5
Fire Insurance
STEP 1:
Select the FIRE INSURANCE tab, as shown below:
Figure 9
STEP 2:
Step 1
Enter all information about the fire components with as much detail as you have, including
information about the Fire Insurance Policies, as shown in the example below:
Figure 10
STEP 3:
Click
.
NOTE: By entering the REQUIRED number of Fire Extinguishers and Smoke Detectors, you
are setting a “default”. If the Number Installed is less than this number a “DEFICIENCY”
warning will appear, as shown below:
6
Adding an Occupant
STEP 1:
Select the OCCUPANTS tab, as shown below:
Figure 11
Step 1
STEP 2:
Click
STEP 3:
Enter all information about the occupant(s) as shown in the example below:
.
Figure 12
STEP 4:
Click
.
7
Owners
STEP 1:
Select the OW NERS tab, as shown below:
Figure 13
Step 1
STEP 2:
Click
STEP 3:
Enter all information about the owner(s) in the right frame of the window, as shown in the
example below:
.
Figure 14
Step 3
Step 4
STEP 4:
Click
.
NOTE: Depending on which category of owner you select (Member, First Nation or Other)
will determine which “browse” table will appear when you select the browse button at the
end of the Name field.
More than one owner can be added, however ALL must total 100% ownership.
8
Rent and Charges
OVERVIEW: This screen is used in three ways: (1) To determine the total of rent and a breakdown of all
charges included in the rental charges; (2) To maintain the name of the individual or organization
responsible for rental payments; (3) To provide a read-only summary of rental charges, payments
received, and any outstanding balances.
Setting the Monthly Rental Charge Default
STEP 1:
Select the RENT & CHARGES tab, as shown below:
Figure 15
STEP 2:
Step 1
Select the
button. A pop-up window will appear, as shown below:
Figure 16
Step 2
STEP 3:
Enter the total monthly charge.
STEP 4:
Click
.
9
Add New Payer
STEP 1:
Select
STEP 2:
Select the category the payer falls into (ie: Member, First Nation or Other.)
STEP 3:
Click the
STEP 4:
Search for the Person/First Nation.
STEP 5:
Select the appropriate description type from the drop down list.
STEP 6:
Enter the effective date for the charge.
.
at the end of the Name field.
Refer to the example below:
Figure 17
Step 2
Step 3
Step 1
Step 4
Step 5
Step 6
Step 7
ABOUT RENT AND PAYMENT HISTORY: Rental Charges and Payments are entered and recorded
under the Payments and Charges menu option under Housing on the AIS Command Center. This
screen only provides the details as “read-only” and cannot be modified here. For more information,
please refer to the section titled “Payments and Charges” in this User Manual.
10
Renovation Applications
OVERVIEW: Reno Applications differ from a maintenance or service call in that it follows the process
should an individual wish to cosmetically modify the housing unit they reside in. This screen allows you to
process the request.
STEP 1:
Select the RENO APPS Tab at the top, as shown below:
Step 1
Figure 18
You will then see the following screen:
Step 3
Step 2
Step 4
Step 5
Step 6
Step 7
Step 8
Step 9
STEP 2:
Select
STEP 3:
Enter the date of the application.
STEP 4:
Set the Application Status field to “PENDING”.
STEP 5:
Enter the estimated amount of the renovations.
to begin a new application.
11
STEP 6:
Select the appropriate System from the drop down list.
STEP 7:
Select the appropriate Funding Source from the drop down list.
STEP 8:
Enter more details of the request, if available.
STEP 9:
Click
.
Once the approval process has been completed, you will then need to enter a decision on the application,
simply by doing the following:
Updating A Reno Application Status
STEP 1:
Find the HOUSING UNIT record, and select the Reno Apps Tab.
STEP 2:
Click on the pending application listed on the left side of the screen.
STEP 3:
Select the appropriate decision from the drop down list in the field named “App Status”.
STEP 4:
Click
to save your change.
12
Maintenance Information
OVERVIEW: This is a READ-ONLY screen. You cannot enter or modify the details on this screen. The
information that appears here is entered and/or modified on the MAINTENANCE section of the Housing
Module. (Refer to the section titled “MAINTENANCE” in this User Manual for information on how
to enter and modify Maintenance details.) This screen allows you to quickly view all Service Calls,
Inspection Orders, and Work Orders entered on behalf of a particular housing unit.
STEP 1:
Select the MAINTENANCE Tab at the top, as shown below:
Step 1
Figure 19
STEP 2:
Select the options to include/exclude the maintenance types and statuses you wish to see
listed, as shown in the example below:
Figure 20
Step 2
STEP 3:
Click on the item in the list on the left to highlight it. Details of the request will be displayed in
the fields on the right.
13
Adding Photos
OVERVIEW: Digital photos can be added to a Housing Unit record.
STEP 1:
Select the PICTURES Tab at the top, as shown below:
Step 1
Figure 21
You will then see the following screen:
Figure 22
Step 2
Step 3
Step 4
Step 5
Step 7
STEP 2:
Click
.
STEP 3:
Enter the date of the Photo.
STEP 4:
Enter a descriptive title in the subject field.
14
STEP 5:
Double-click anywhere in the field labeled Picture. You will then see the Windows Browse
window, as shown below:
Figure 23
STEP 6:
Locate the digital photo and click OPEN.
STEP 7:
Click
.
15
Adding Documents
OVERVIEW: You can add documentation that is either scanned or in a readable format to any housing
unit record.
STEP 1:
Select the DOCUMENTS Tab at the top, as shown below:
Step 1
Figure 24
You will then see the following screen:
Step 2
Figure 25
Step 3
Step 5
Step 6
Step 7
Step 8
STEP 2:
Click
STEP 3:
Click
at the end of the field named “File Location”. You will then see the
Windows Browse window, as shown below:
.
16
Figure 26
STEP 4:
Locate the filename and click OPEN.
STEP 5:
Enter the date.
STEP 6:
Select the appropriate document type from the drop down list.
STEP 7:
Enter a descriptive title in the Subject field.
STEP 8:
Click
.
Once a document has been added to a record, you can view the document direct from the record, as
described below:
Viewing a Document Added to a Record
STEP 1:
Select the DOCUMENTS Tab at the top.
STEP 2:
Click on the document description on the left that you wish to view to highlight it.
STEP 3:
Click
STEP 4:
The applicable document format will launch the appropriate application and the document will
be displayed.
.
17
Section 3: Maintenance
OVERVIEW: There are 4 types of requests and orders that can be entered and maintained on multiple
units from this one screen:
o Service Requests
o Inspection Orders
o Work Orders
o Purchase Orders
“Service Calls” can be left open throughout the day, and as calls are received data entry can be made
regardless of the housing unit because the detail of the maintenance call includes which house the call is
on. All entries made from this screen are recorded and displayed in the read-only screen called
“Maintenance” under the specific unit.
Entering a New Service Call
STEP 1:
Figure 27
From the AIS Command Center, select HOUSING MAINTENANCE. You will then see the
following screen:
Step 2
Step 3
Step 4
Step 5
Step 9
Step 10
Step 11
STEP 2:
Click
STEP 3:
Enter the date of the call.
.
NOTE: The default status is OPEN.
18
STEP 4:
Click
at the end of the field named HIN#. You will then see the BROWSE
HOUSES window, as shown below:
Figure 28
STEP 5:
Type the first few numbers of the housing unit as the search criteria.
STEP 6:
Click
STEP 7:
In the list of results, click on the unit to highlight it.
STEP 8:
Click
STEP 9:
Select the appropriate Service Call Type from the drop down list.
STEP 10:
Enter a brief description of the call in the field labeled “Caller Says:”
STEP 11:
Click
. A list of search results will appear.
. You will be returned to the MAINTENANCE window.
.
The call will now be listed on the left side of the window.
Once the call has been resolved, change the status of the call to “closed” or “cancelled” and add
additional information pertaining to the action taken, as described below:
STEP 1:
Click on the call in the list on the left side of the window to highlight it. The details entered will
be displayed on the right side of the window.
STEP 2:
Select the appropriate status (“closed” or “cancelled”) from the drop down list in the field
labeled “Status”.
STEP 3:
Enter notes about the action(s) taken in the field labeled “Action Taken”.
19
STEP 4:
Enter the date completed or cancelled.
STEP 5:
Select the name of the person who completed the call from the drop down list.
OPTIONAL: You can attach a document to the call by selecting
STEP 6:
Click
.
to save your changes.
Quality Assurance Checklist
To ensure that all tasks pertaining to the call have been completed, a checklist has been added.
STEP 1:
Click
.
A pop-up window will appear with a list, as shown below:
STEP 2:
Check applicable item(s).
STEP 3:
Click
.
20
Inspection Orders
STEP 1:
Select the INSPECTION ORDERS Tab. You will then see the following window:
Step 2
Figure 29
Step 3
Step 4
Step 5
Step 6
Step 7
Step 8
STEP 2:
Click
STEP 3:
Enter the date of the scheduled Inspection.
STEP 4:
Select OPEN in the Status field. (The default status will be OPEN.)
STEP 5:
Click
STEP 6:
Select the applicable Inspection Type from the drop down list.
STEP 7:
Select the Inspector from the drop down list.
STEP 8:
Click
.
at the end of the field labeled HIN# and find the housing unit.
.
21
Quality Assurance Checklist
As with Maintenance Service calls, a Quality Assurance checklist is available to ensure that all tasks
pertaining to the inspection have been completed.
STEP 1:
Click
STEP 2:
Check applicable item(s).
STEP 3:
Click
.
.
Work Orders
STEP 1:
Figure 30
Select the WORK ORDERS Tab at the top. You will then see the following window:
Step 2
Step 3
Step 4
Step 5
Step 6
Step 7
Step 10
STEP 2:
Click
STEP 3:
Enter the date of work is scheduled to be done.
.
22
STEP 4:
Select the appropriate status. (The default status will be OPEN.)
STEP 5:
Click
STEP 6:
Enter a brief description.
STEP 7:
Select the name of the individual who will be performing the work intended.
STEP 8:
Select the applicable Inspection Type from the drop down list.
STEP 9:
Select the Inspector from the drop down list.
STEP 10:
Click
at the end of the field labeled HIN# and find the housing unit.
.
Quality Assurance Checklist
As with Maintenance Service calls, a Quality Assurance checklist is available to ensure that all tasks
pertaining to the Work Order have been completed.
STEP 1:
Click
STEP 2:
Check applicable item(s).
STEP 3:
Click
.
.
23
Purchase Orders
STEP 1:
Select the PURCHASE ORDERS Tab at the top. You will then see the following window:
Figure 31
STEP 2:
Click
STEP 3:
Enter the date of Purchase Order.
.
The default status will be OPEN.
STEP 4:
Click
STEP 5:
Enter a brief description for the PO.
STEP 6:
Click
STEP 7:
Enter the Amount of the PO.
STEP 8:
If the amount will be charged back, click
STEP 9:
Enter the details for the PO.
STEP 10:
Click
at the end of the field labeled HIN# and find the housing unit.
at the end of the field labeled Contractor/Supplier.
.
24
and locate the party/individual.
Quality Assurance Checklist
As with Maintenance Service calls, a Quality Assurance checklist is available to ensure that all tasks
pertaining to the Purchase Order have been completed.
STEP 1:
Click
STEP 2:
Check applicable item(s).
STEP 3:
Click
.
.
25
Section 4: Housing Application
OVERVIEW: This section describes how to manage housing applications, including historical information
and statuses. Reports based in this information can be generated to assist with the decision making
process.
This section has been divided into 3 sections, similar to that of a paper application and the information
collected.
STEP 1:
From the AIS Command Center, select HOUSING APPLICATIONS. You will then see
the following window:
STEP 2:
While viewing the APPLICATION Tab, enter the date of the application.
NOTE: The default Application Status will be PENDING for all new applications.
STEP 3:
Click
at the end of the Name field. You will then see the following pop-up window:
26
Figure 32
STEP 4:
Enter the first few letters of the applicant’s last name in the Surname: field. (You can also
enter the first few letters of the applicant’s first name in the Given: field to narrow down the
list of search results.)
STEP 5:
Click
STEP 6:
In the list of results, click on the applicant’s name to highlight it.
STEP 7:
Click
STEP 8:
Select the appropriate Applicant Type from the drop down list.
STEP 9:
Select the appropriate location from the drop down list.
STEP 10:
Enter the number of people who will be residing in the housing unit.
STEP 11:
Click
STEP 12:
The Applicant’s name will appear in the list on the left side of the window. Click on the
Applicant’s name and select the INCOME Tab, as shown below:
.
. You will be returned to the APPLICATION window.
.
27
Figure 33
STEP 13:
Select the applicant’s Source of Income from the drop down list.
STEP 14:
Enter the applicant’s Monthly Income.
STEP 15:
if the applicant’s income source has been verified.
STEP 16:
Enter the name of the applicant’s employer.
STEP 17:
Enter income information for a spouse.
STEP 18:
Click
STEP 19:
Select the PRESENT SITUATION Tab at the top. You will then see the following window:
.
28
Figure 34
STEP 20:
Set and enter all details in the applicable fields according to the Application.
STEP 21:
Click
.
After the decision process has been completed, set the status of the application accordingly, as described
in the following section.
Modifying Application Status
STEP 1:
From the AIS Command Center, select HOUSING APPLICATIONS.
STEP 2:
Locate the Applicants name in the list on the left side of the window and click on it to highlight
it.
STEP 3:
Change the Application Status field accordingly.
STEP 4:
Click
.
29
Section 5: Generating Monthly Charges
OVERVIEW: Charges must first be “generated” before payments can be entered.
STEP 1:
From the AIS Command Center, select HOUSING PAYMENTS & CHARGES. You will
then see the following window:
Figure 35
STEP 2:
Select the Month to be generated from the drop down list.
STEP 3:
Click
. A report will be previewed on your screen, as shown below:
Figure 36
30
STEP 4:
Carefully review this report to ensure that all charges that should be generated are listed.
PRINT OPTIONS:
Select
to print the report; or select
STEP 5:
to exit the print preview without printing.
If all charges are listed correctly, select
.
NOTE: The PROCESS button will NOT be available until the charges are first PREVIEWED.
You will then see the following message:
Figure 37
STEP 6:
Click
. The following report will then be previewed on screen:
31
Section 6: Payments &Charges
OVERVIEW: Once the monthly charges have been processed, payments can be applied to the charges.
Payments will be applied to the oldest charges first.
This feature has 2 windows: one where payment and adjustment transactions are entered; the other is a
read-only charge history listing and cannot be modified.
Payment/Adjustment
STEP 1:
From the AIS Command Center, select HOUSING PAYMENTS & CHARGES. You will
then see the following window:
Figure 38
STEP 5:
Click
. You will then see the BROWSE HOUSES window, as shown below:
32
Figure 39
STEP 6:
Type the first few numbers of the housing unit as the search criteria.
STEP 7:
Click
STEP 8:
In the list of results, click on the unit to highlight it.
STEP 9:
Click
STEP 10:
Click
STEP 11:
Enter the date of the transaction.
STEP 12:
Select the transaction type from the drop down list.
STEP 13:
Enter the amount of the transaction.
STEP 14:
Click
. A list of search results will appear.
. You will be returned to the Payments/Adjustments window.
.
.
Once you have saved this information, the field labeled Amount Owing is now updated.
33
Charge History
Select the CHARGE HISTORY Tab at the top. You will then see the following window which displays a
history of all charges and payments. No information can be modified here. It is for at-a-glance
information purposes only.
Figure 40
34
Section 7: Supplier Invoice Payments
OVERVIEW: Vendor (supplier) invoices that you receive are usually broken down in two parts: the top
half of the paper invoice provides their invoicing and billing details for their administrative purposes, such
as date of invoice, invoice number, and date payment is due. The bottom half of an invoice then details
work performed and/or parts and materials purchased and for which house the work was completed on.
This is the same format that payment details are entered into AIS, which then creates the payment and
payment details you will be processing. This information will also provide details in the financial reports
based on a per unit query.
THIS SECTION IS CURRENTLY UNDER DEVELOPMENT AND WILL BE SENT TO YOU AS SOON
AS POSSIBLE!!
35
Section 8: Reports
OVERVIEW: The housing reports are categorized as follows:
o
o
o
o
o
House List
Renovation Applications
Waiting List
Maintenance Reports
Financial Reports
The following sections describe each category in detail of the type of information you can collect based on
your records.
Regardless of the category, you will always see a “print preview” on screen before actually printing the
report so you can make sure you are printing the information you want. When the report is on screen in
“preview mode”, you will see a print toolbar at the top, as shown below:
Following describes the print toolbar buttons:
Print
Next Page
Zoom in or out
Advance to Last Page
Advance to Page 1
Stop Loading
Previous Page
Search Text
Page Indicator
After selecting the
icon, you will then see the PRINT MANAGER WINDOW, as shown below:
36
House List Report
OVERVIEW: This report will provide a list of all housing units with the following information included:
o
o
o
o
o
o
o
Housing Unit Number
Type
Ownership
Year Built
Occupancy Status
Address
Location Details.
How to Print this report:
STEP 1:
From the AIS Command Center select HOUSING REPORTS HOUSE LIST …
STEP 2:
The Report will then be previewed on screen.
STEP 3:
Choose the
icon to print the report.
Renovations Applications Report
OVERVIEW: This report will provide a list of all applications made for renovations with the following
information included:
o
o
o
o
o
o
o
Application Statuses
Housing Unit Number
Application Number
Date of Application
Occupant (Name of Applicant)
System (Housing Component Description)
Estimated Cost of Renovation
How to Print this report:
STEP 1:
From the AIS Command Center select HOUSING REPORTS RENOVATIONS
APPLICATIONS …
STEP 2:
The Report will then be previewed on screen.
STEP 3:
Choose the
icon to print the report.
37
Waiting Lists
OVERVIEW: This report will provide a list of all applications for residency with the following information
included:
o
o
o
o
o
o
o
o
o
Application Number
Date of Application
Application Status
Applicant Name
Requested Location
Type (ie: Rental)
Applicant’s Source of Income
# of People who will be residing in the home
# of Prior Applications on file for the Applicant
How to Print this report:
STEP 1:
From the AIS Command Center select HOUSING REPORTS WAITING LISTS …
STEP 2:
The Report will then be previewed on screen.
STEP 3:
Choose the
icon to print the report.
Maintenance Reports
OVERVIEW: This category has the following pre-formatted report styles for your convenience:
o
o
o
o
Service Requests
Inspection Orders
Work Orders
Purchase Orders
How to Print:
STEP 1:
From the AIS Command Center select HOUSING REPORTS MAINTENANCE
REPORTS. You will then see the following window:
38
STEP 2:
Select one of the 4 reports from the drop down list.
STEP 3:
Select the appropriate Status (open, closed, or cancelled)
STEP 4:
Click
STEP 5:
Choose the
. The report will then be previewed on screen.
icon to print the report.
Financial Reports
OVERVIEW: This category has the following pre-formatted report styles for your convenience:
o Outstanding Rent & Charges
o Monthly Rent & Charges (Actual Changes Made)
o Payments & Adjustments Register
How to Print:
STEP 1:
From the AIS Command Center select HOUSING REPORTS FINANCIAL REPORTS.
You will then see the following window:
STEP 2:
Select one of the 3 reports from the drop down list.
STEP 3:
Select the appropriate date range.
STEP 4:
Click
STEP 5:
Choose the
. The report will then be previewed on screen.
icon to print the report.
39


![[54] W, rm-pg`vzvlsggéggllslswnolq MONITOR OTHER](http://vs1.manualzilla.com/store/data/005697201_1-5cf72edac23b396dc325f3c508f97781-150x150.png)