1
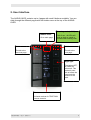
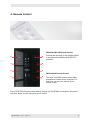
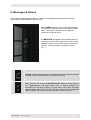
TELETASK Domotics
TDS12022 User Manual
AURUS-OLED
Booklet Glass Design Touch Panel
2010V2
TELETASK
User Manual
AURUS-OLED TDS12022
1. Content
2. User Interface ...................................................................... 4
3. General ................................................................................ 5
4. Remote Control.................................................................... 6
5. Messages & Alarms ............................................................. 7
6. Sensors – Measuring and Control ....................................... 8
7. Audio.................................................................................... 9
8. Editing Presets................................................................... 10
德利泰和贸易(北京)有限公司
3
User Manual
AURUS-OLED TDS12022
2. User Interface
The AURUS-OLED contains up to 4 pages with each 8 buttons available. You can
slide through the different pages with the hidden menu at the top of the AURUSOLED.
Cleaning mode (LONG):
Hidden menu:
Go to main page
Push 5 sec., all LEDs will
blink as long as panel is
touched with cleaning cloth.
Hidden menu:
Hidden menu:
Thumb to the
previous page
Thumb to the
next page
Night light:
Even when OFF,
all LEDs will
shine soft. This
makes it possible to locate the
panel and the
buttons in the
dark.
Features:
Infrared receiver for TELETASK
remote controls.
德利泰和贸易(北京)有限公司
4
User Manual
AURUS-OLED TDS12022
3. General
As you read this manual, you are the owner of one or more glass design switches by
TELETASK. The AURUS-OLED can be used as a basic eight button controlling touch panel
with clear feedback, or you can explore the many extra features this device can deliver.
Besides the eight main functions, visualised on the central screen, ou can easily monitor and
control the decentralised heating or cooling systems, multimedia systems, weather stations
etc…
Most of the features on this touch panels are designed to be as clear as possible but for your
reference we like to explain some of the general functions on the AURUS-OLED:
Light, device, mood: Any function that can be switch on/off, can
be controlled on the AURUS-OLED. The icon as well as the
indication LED will shine as the light, device or mood are switched
on.
Dimmer: A dimmer can be controlled on a single button. By a
SHORT push you can switch on/off the dimmer. By pressing
LONG, you can dim up or down.
Dimmer: A dimmer can also be
controlled by double buttons. Here
the LED at the up arrow will be lit
when the light is on, the LED at the
down arrow will be lit as the light is
off!
Motor: A curtain/blind/shade can be controlled by a single button.
With a SHORT push you can close/open.
By pressing LONG, you can gradually open/close (ref. dimmer).
Motor: A curtain/blind/shade can also be
controlled by twin buttons. Here the LED at the
up/open arrow will be lit when the motor is
up/open, the LED at the down/close arrow will be
lit as the item is closed!
德利泰和贸易(北京)有限公司
5
User Manual
AURUS-OLED TDS12022
4. Remote Control
TDS12501 Mini IR Remote Control
1
2
3
4
5
6
Controls the first page on the AURUS-OLED
+ the eight extra available ‘MASTER’ RCfunctions.
TDS12502 IR Remote Control
7
8
The large TDS12502 remote control adds
temperature & audio control functions. For
more info, see the user manual of your
remote control.
Every TELETASK Remote control directly controls the TELETASK touch-panel, mounted in
the room where you are using the remote control!
德利泰和贸易(北京)有限公司
6
User Manual
AURUS-OLED TDS12022
5. Messages & Alarms
The functions “Messages and Alarms” contain text messages and/or beep tones which
inform that a certain situation has occurred.
An “ALARM” always has to be deleted manually.
Take care first that the cause of the alarm is taken
away. The alarm is deleted from the different
interfaces as follows below.
A “MESSAGE” disappears automatically after 30
seconds or as soon as a new action occurs on the
particular panel. (A new action can be activating a
function, receiving another message or alarm,
etc…)
Snooze = 3 min postponed so you would have time to thumb through the
AURUS-OLED and do whatever is needed to be done.
OK = Remove the current ALARM/MESSAGE. Make sure the cause of
the message/alarm has been taken care of, before pressing ok.!
Depending on the kind of alarm, in some cases, even when the alarm
remains present and you click ‘OK’, the alarm text may not be displayed
again. Clicking ‘OK’ is only removing the text, not the cause of it.
德利泰和贸易(北京)有限公司
7
User Manual
AURUS-OLED TDS12022
6. Sensors – Measuring and Control
In most cases the AURUS-OLED will have a page, dedicated to sensors (temperature, light,
humidity, wind, …).
Selected sensor + zone: This field shows the selected sensor zone
and displays the active value in that zone.
The target value of the selected sensor can be set using the up/down
arrows. When you click the up or down arrow, the measured value
displayed will change to the target value.
↓ Cooling, now =
21°C
If your system is cooling, the LED at the down arrow will be lit, if your
system is heating, the LED at the up arrow is lit!
The ‘Presets’ of the Sensor Zone: Here you can select the most
suitable preset. In case of a temperature sensor, you can choose
between: <DAY>, <NIGHT>, <STANDBY>
Day: This is the normal temperature setting during the day, also called
the ‘comfort’ temperature.
Standby: The ‘stand-by’ value is a value which is a predefined number
of degrees different than the ‘day’ preset. In heating mode the stand-by
temperature is lower then the ‘day’ preset. In cooling mode the stand-by
temperature is higher then the ‘day’ preset.
Night: In case of cooling/heating this is your preferred temperature
setting during the night.
The ‘Mode’ of the Sensor Zone: With this button you select the mode
of the sensor if applicable. Normally only available when using
cool/heat
air-conditioning
systems.
Mode
examples
are
“cool/heat/auto…”.
Speed: When your heating or cooling system is equipped with speed
control, you can manually alter the speed by pressing LONG on the
mode selection buttons.
The ‘Zone’ selection: With this button you can scroll through the
different zones (rooms) of your house/building. Every click jumps to a
new zone and the according values for that zone are displayed and can
be changed.
Remark: each panel can be configured to show a limited number of
zones only. Please contact your system integrator for more information.
Zone On/Off: will switch the displayed sensor zone ON or OFF. In
most cases this will mean your heating/cooling system will be protected
from freezing or overheating but will not heat or cool. This feature is
particularly useful for guest- and rarely occupied rooms (energy
management feature).
德利泰和贸易(北京)有限公司
8
User Manual
AURUS-OLED TDS12022
7. Audio
Your AURUS-OLED may have a page dedicated to audio. Here you can start and edit your preferred
A/V system(s). Choose the source and control the volume, track or station.
Source selection: Here you can choose between the different sources,
available in the selected room/ audio zone.
Below the source name, the selected room/ audio zone is displayed.
Change the zone, using the zone selection button below.
Volume up/down: Changing the volume for the selected room/audio
zone.
Previous/Next: Here you can scroll through the different tracks,
stations…
Zone selection: With this button you can scroll through the different
zones integrated in your TELETASK home automation system. It
changes all values on the sensor page you’re on now.
Zone On/Off: will switch your sensor zone ON or OFF. In most cases
this will mean your heating/cooling system will be protected from
freezing or overheating but will not heat or cool.
德利泰和贸易(北京)有限公司
9
User Manual
AURUS-OLED TDS12022
8. Editing Presets
Press long on the zone-button to go to the preset configuration menu.
Example 1: temperature control – heating/cooling
9 If you want to change the presets of another temperature zone/room than the one you’re in
now, first scroll towards the correct zone by short clicking on the zone selection button (by
default in the lower-left corner).
9 Now press long on the zone-button to go to the preset configuration menu;
9 Select the desired preset: (predefined) <DAY>, <NIGHT> or <STANDBY>
9 Set temperature at heating: if a heating system has been integrated in the current zone, you
can set the preset’s target temperature for heating for he selected preset..
9 Set temperature at cooling: if a cooling system has been integrated in the current zone, you
can set the preset’s target temperature for cooling for the selected preset. (both heating and
cooling can be applicable as well)
Example 2: wind sensor, used to pull in the sun shade on the terrace if the wind is blowing
too hard.
9 In this case there’s only one preset (for example the wind speed by which the pull-in function
for outdoor sun-blinds will be executed).
9 Change the speed by which this function should be executed.
Press 'OK' or the hidden 'main menu' button to go back.
德利泰和贸易(北京)有限公司
10