1
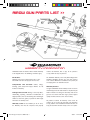
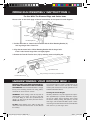
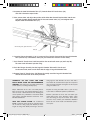
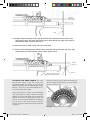
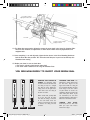
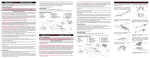
Airow Gun™
Warranty Information
Airow Gun warrants this product to be free from defects in materials and workmanship for a period of 180 days
from the original date of purchase by the initial owner/purchaser. This warranty does not apply to defects discovered
after purchase that were caused by the unauthorized modifications and alterations of our product. This warranty
will be voided if damage occurs due to improper operation, dropping the product, attempting to dismantle or modify
it, using inferior quality ammo or foreign objects, failure to carry out routine maintenance or any other cosmetic
modifications.
Airow Gun will replace, without charge, any of its Airow Gun products that have failed through defect in material or
workmanship. Airow Gun is dedicated to providing you with the ultimate in shooting products and the quality support
necessary to satisfactorily enjoy the sport.
Warranty and Repair Procedure
If you should encounter any problems with your Airow Gun, please use the following steps to initiate the warranty or
non-warranty repair process:
1. Contact the Airow Gun Customer Service line at 877-477-0293. You will be given a return authorization
number (RA). Legibly write this number on the outside of the box.
Ship or deliver your product(s) to:
Airow Gun Warranty & Repair 90554 Highway 99 North, Eugene, Oregon 97402
2. Postage and delivery charges must be prepaid.
3. Include a brief statement regarding the requested repair work. We will return ship it to you usually within 72
hours after we receive it via regular ground shipment. If you wish to have it returned using a faster service,
you can request NEXT DAY AIR or SECOND DAY AIR. You will be charged for this service and must include your
credit card number with the expiration date. Your card will be charged the difference in additional cost over
regular ground shipping service.
4. If returning within the 180-day warranty period from the date of purchase, return the Airow Gun with a copy of
the original sales receipt. Be sure to include your full name, address & phone number.
5. If your Airow Gun needs repair after the 180-day warranty period, contact Airow Gun toll free at
877-485-1707 and we will advise you how to return your gun for repair. If the gun is repairable you will be
given a return authorization number and an estimated cost of the repair plus the cost of return shipping.
Disclaimer of Liability
By accepting this archery product, buyer agrees to hold harmless the manufacturer and all associated parties from
liability for any damage to persons or property which may result, for any reason, from the use of this product.
Designed & Manufactured by Romney Motion, Inc.
Warranty & Tech Support
877-477-0293
Patent Pending • www.AirowGun.com • © 2007 Airow Gun Products
Bow-Airowgun instructions 2008.indd 1
9/7/07 1:11:49 PM
Airow Gun Parts List >>
Warranty Information
All Diamond bows are backed with a Lifetime Warranty
to the original owner. The following exclusions apply.
returned to Diamond, with a copy of the purchase
receipt, within 30 days of purchase.
Exclusions:
Warranty applies to the original owner only, is nontransferable and does not apply to internet sales.
The Diamond Warranty covers only bows bought from
Authorized Diamond Dealers and not from internet
sales. Contact Diamond to confirm that the person you
are buying from is an authorized dealer.
Components Not Covered: Cables, strings,
bearings, paint and/or film dipped finishes are not
included in warranty.
Damage Not Covered: Damage caused by abuse,
mishandling, dry-firing, alteration or modification to
original product, mod screws backing out or shooting of
arrows less than five grains per pound of draw weight
will render the warranty void.
Warranty Card: For the Warranty to be in effect,
the Warranty card must be completed and properly
Bow-Airowgun instructions 2008.indd 2
Warranty Service:
Our goal at Diamond with all warranty returns is to have
the bow shipped out the door and on it’s way back to you
within 72 hours of receiving it in our facility. You are our
greatest asset and we will strive to give you the highest
quality and most efficient service in the industry.
All products returned for warranty service must be
returned to the dealer for inspection and diagnosis
of any problem. Your Authorized Diamond Dealer can
help you determine whether factory service is required.
9/7/07 1:11:49 PM
1.
Aluminum arrow
2. Plunger
3. Nock
4. Nock clamp
5.
Detachable barrel
6. Rubber O-ring
7. Receiver
8.
Receiver mount
9. Riser mounting bracket
10. Cocking peg
11. Cocking slide hole
12. Cocking mechanism lever
13. Elevated scope mount
14. Arrow safety ring
15. Large air chamber tube
16. Front air transfer case
17. Small air chamber tube
18. Rear air transfer case
19. Paintball staging tube
20. R/L Adjustable paintball feed
21. Air pressure control valve
The bow owner is responsible for the return freight to
Diamond, and Diamond will in turn, pay for the return
freight of the repaired product. In the event that a
bow must be returned for factory service, a Return
Authorization (RA) number must first be obtained
through your dealer.
If your bow cannot be repaired, we reserve the right to
replace your bow with a newer model.
Bows returned to the factory without an
RA number will be refused. All bows
must include the following:
Disclaimer of Liability
By accepting a Diamond archery product,
buyer agrees to hold harmless Diamond
and all associated parties from liability for
any damage to persons or property, which
may result, for any reason, from the use of
this product.
A large, readable RA number printed
clearly on the outside of the box.
iamond reserves the right to make parts substitutions
D
on warranty coverage at Diamond’s sole discretion
and for any reason.
A copy of the sales receipt.
Must be sent freight prepaid.
No COD shipments will be accepted.
o not include accessories unless otherwise instructed.
D
Diamond will not be responsible for loss or damage to
any accessory left on the bow when shipped.
Warranty & Tech Support
877-477-0293
A ll methods of shipping by UPS or FED-EX only.
Sender should insure all shipments.
Bow-Airowgun instructions 2008.indd 3
9/7/07 1:11:50 PM
P A I N T B A L L
User’s Manual
ADULT SUPERVISION OF ALL CHILDREN UNDER THE AGE OF 18 IS REQUIRED. THE AIROW GUN
IS NOT RECOMMENDED FOR CHILDREN UNDER SEVEN (7) YEARS OF AGE.
<< WARNINGS AND PRECAUTIONS >>
1. The Airow Gun is not a toy. Misuse or careless
use may result in serious injury or death. For maximum safety and enjoyment, always exercise caution,
common sense, and safety rules when shooting the
Airow Gun.
7. To avoid ricochet, never shoot at the surface of water, rocks or pavement.
2. Treat the Airow Gun as if it were loaded.
Always check to see if it is loaded when removed
from storage.
8. Keep the muzzle clear. Never obstruct the
muzzle of the Airow Gun or allow it to come into contact
with the ground.
3. Never fire your Airow Gun with people
around (including yourself) who are not wearing proper paintball-approved goggles. All
persons within a 200 yard radius should always wear
eye protection.
9. Always keep your Airow Gun unloaded
until ready to fire. Be sure that it is unloaded
before cleaning.
4. Never fire your Airow Gun at the personal
property of others. Paintballs can stain and may
destroy windows of automobiles and homes.
5. Check your target and beyond. Be certain you
have a safe backstop and that no person or property
could be endangered.
6. Learn how to properly handle, load, unload,
operate, fire and care for your Airow Gun.
10. Store the Airow Gun and paintballs separately beyond the reach of children.
11. Avoid alcoholic beverages before and
during the use of the Airow Gun. Handling while
under the influence of drugs or alcohol is a criminal
disregard for public safety.
12. Your Airow Gun is designed for target
shooting and is suited for both indoor and
outdoor use. Have Fun and Shoot Safe!
continued >>
Bow-Airowgun instructions 2008.indd 4
9/7/07 1:11:52 PM
Airow Gun Assembly Instructions >>
For Use With The Diamond Edge and Cutter bows
Please refer to the back page of these instructions for full parts list and diagram.
Berger Holes
Riser Mounting Bracket
1. Position Airow Gun as shown in the illustration with the Riser Mounting Bracket (9)
over large berger holes of bow riser.
2. Align the two center holes of Riser Mounting Bracket with the berger holes.
Insert 2 bolts into the berger holes and lightly tighten.
3. Remove the Front Air Transfer Case (16) by removing screws and pulling out.
Large Air Chamber Tube
Plunger Assembly - inserted into Large Air Chamber Tube
Front Air Transfer Case (16)
Understanding your diamond bow >>
BEFORE USING YOUR NEW DIAMOND BOW,
READ AND UNDERSTAND THE FOLLOWING
STATEMENTS: Your new Diamond bow is a highly
tuned, precise shooting machine. The string, cables,
and limbs are under extreme tension.
Warning: When drawing a bow for inspection or
demonstration, never release the string at full draw
to let down. Doing so could cause personal injury or
damage the bow. Only pull back your bow with the
Airow Gun attached.
DO NOT attach anything to the cables or string that
could cause them to wear or become cut. This will void
the warranty.
Bow-Airowgun instructions 2008.indd 5
Any alteration from the factory specifications or the
adjustments outlined herein will void the factory
warranty. ALL maintenance must be performed at an
Authorized Diamond Dealer.
Setting the Peak Weight
All bows perform best at peak weight but are adjustable approximately 10 pounds downward depending on the model. When adjusting draw weight
on models without pivoting limb pockets, one full
360-degree turn on both limb bolts equals 2-5 lbs.
depending on the bow model. Do not turn limb bolts
more than 2-1/2, 360-degree turns.
9/7/07 1:11:52 PM
4. Separate the Small Air Chamber Tube (17) from the Rear Air Transfer Case (18)
and slide it forward to expose bolts.
5. Next, remove bolts and adjust the position of the Airow Gun forward. Replace bolts into the two
rear holes located directly beneath the Air Pressure Control Valve (21), and retighten bolts.
Replace Small Air Chamber Tube (17).
After removing bolts, adjust unit forward
Bolts (24)
6. Insert the Plunger Assembly (1) & (2), arrow end first, into the front end of the Large Air Chamber
Tube (refer to step 3 illustration, where you just removed the Front Air Transfer Case).
7. Push Front Air Transfer Case back into position. Do not reinstall screws yet (until step 10).
The arrow shaft will extend past the string.
8. Push the Plunger Assembly into the Large Air Chamber Tube until it hits the end.
On the arrow shaft, make a mark flush with the edge of Large Air Chamber Tube.
9. Remove Front Air Transfer Case. Pull Plunger Assembly out of the Large Air Chamber Tube
and cut the arrow shaft at the mark you made.
WARNING: DO NOT TURN THE LIMB
BOLTS MORE THAN THE RECOMMENDED
AMOUNT. This could cause the limbs to break out
of their pockets, resulting in bodily injury.
string appears slick. Remove all excess wax with a
clean cloth. We recommend that you wax every other
time you shoot your bow to lengthen the life of your
string and cable sets.
Proper lubrication of the axles and limb pockets
limits wear and tear. Add enough lubricant to these
areas to create a barrier between each working part
and to optimize the performance of the bow. NOTE:
Only industry standard lubricants should be used.
DO NOT USE WD-40.
Replace the string and cables once a year or every
2,500 shots to maintain optimum performance.
Wax the string often. We recommend
BCYML 6 synthetic string wax or an equivalent product. To wax the string, apply wax liberally to entire
length of string. Rub briskly with fingers until the
Bow-Airowgun instructions 2008.indd 6
Examine your bow for wear and tear before you
shoot (mod screws, axles, bushings, cables, cable
slide and string). If any one of these items shows
excessive wear, contact your Authorized Diamond
Dealer to have them install new Diamond replacement parts.
9/7/07 1:11:53 PM
First, push
plunger all the
way to bottom
Next, mark a line on the arrow shaft
String
10. Replace Plunger Assembly inside Large Air Chamber Tube. Replace Front Air Transfer Case
and reinstall screws. The arrow shaft should now be flush with the rear edge of the Large Air
Chamber Tube when pushed all the way in.
11. Glue and insert the nock into the end of the arrow shaft.
12. Place a plastic String Protector onto the string. Install the nock and the nock cap in the same
position where you would normally nock an arrow. Tighten screws.
Protective
Sleeve (25)
Nock
(Glue securely into arrow shaft
AFTER cutting arrow shaft to length)
ADJUSTING THE DRAW LENGTH. The Cutter
and The Edge feature a dual cam, single pivoting module system. The module in each cam has
multiple positioning holes for adjusting draw lengths
from 18” - 28”, in 1/2” increments. No bow press is
needed to change draw lengths.
Using an Allen wrench, remove the two positioning
mod screws from the module. Rotate the module
aligning the desired draw length with the machined
mark on the cam (see example). (a) Insert the mod
screw in the desired draw length hole and tighten,
then (b), place a mod screw in an open threaded
hole that is furthest away from the draw length hole
and tighten.
Bow-Airowgun instructions 2008.indd 7
Nock Cap
Repeat the process on the second cam making sure
the draw length and mod screws are in the identical
position as the first cam.
(a)
(b)
Example: Positioned for a 26” draw length.
9/7/07 1:11:53 PM
Loosen these screws to
adjust position side to side
Set Screws
Loosen these screws to adjust
height up and down
13. The Airow Gun must now be adjusted to center the arrow shaft in the Large Air Chamber Tube.
There are two directions of adjustment as shown above. Make necessary adjustments and
retighten bolts.
14. Once everything is set and adjusted, tighten the Set Screws in the Riser Mounting Bracket to
lock the Airow Gun into position. This will make small dimples in your riser but will keep the
Airow Gun from moving.
15. Before you shoot, be sure to check that:
a. The nock is properly glued into the arrow shaft.
b. The arrow shaft is centered in the Large Air Chamber Tube.
you are now ready to shoot your Airow Gun.
keeping the string in
track. Its important when
the bow is held at full draw that
the string is kept in a straight
line with the cams. Pulling the
string to the left or right of the
cams could cause the string to
become detached.
RIGHT
WRONG
WRONG
Bow-Airowgun instructions 2008.indd 8
While at full draw, quickly look
up at the top cam to make
sure that the string is centered
in the cam track. Once the
string is centered you are ready
to release the string and fire
the bow.
drawing the bow. The
bowstring is drawn back using
the first three fingers of the
right hand. Draw the string all
the way back, bringing the right
index finger near the corner
of your mouth to ensure the
maximum amount of thrust will
come from your Airow. If you
are left-handed, be sure that
your bow drawing a bow that is
built for a left-handed archer.
Aiming
the
bow.
Instinctively aim the bow with
both eyes open and release
towards the target.
9/7/07 1:11:54 PM