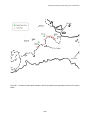
1
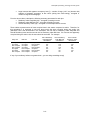
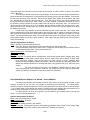
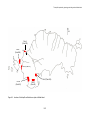
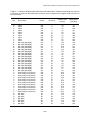
Tufted puffin productivity, phenology and chick growth
Wildlife Inventory Plan
Alaska Maritime National Wildlife Refuge
Protocol #9
Version 1.2
Parameter: Productivity, phenology and chick growth
Species: Tufted puffin
PURPOSE
To estimate annual productivity and phenology of burrow-nesting tufted puffins and to detect
between-year differences of 0.2 fledglings/pair (power = 90% at 0.1 level of significance). Seabird
reproductive parameters can serve as indicators of change in the marine ecosystem (Cairns 1987,
Montevecchi 1993). Puffins are important nearshore piscivores in the region, making them potentially
valuable indicator species of marine resources in the Bering Sea.
In addition, at some sites, to examine patterns in growth rates of horned and tufted puffin chicks
as a potential indicator of foraging conditions for adults. Chick growth rate in many seabird species has
been associated with spatial and temporal variability in food availability (e.g., Suryan et al. 2002).
BREEDING BIOLOGY
Tufted puffins (Fractercula cirrhata) are colonial, piscivorous seabirds that breed on remote
islands from California to the Chukchi Sea. Alaska supports the majority of the tufted puffin breeding
population, with highest concentrations along the eastern Aleutian Islands and the Alaska Peninsula (Piatt
and Kitaysky 2002).
Tufted puffins primarily nest in soil burrows but will also use crevices in talus slopes, among
beach boulders, and in sea cliffs. Burrows are typically located on moderate to steep slopes anywhere
from above storm tide to hundreds of meters above sea level; highest burrow densities are usually along
cliff edges and on steep slopes (Wehle 1980, Piatt and Kitaysky 2002).
Puffins lay a single egg and both parents share incubation and feeding, with one off feeding while
the other incubates or broods the chick. Chicks fledge at about 45 days of age, after which adults leave
the colony for the season. In the absence of mammalian predators, annual reproductive rates seem to be
governed principally by the quantity and quality of prey available during the nesting season (Kitaysky and
Golubova 2000, Piatt and Kitaysky 2002).
Timing of breeding varies across sites, with later phenology at higher latitudes. At colonies in the
Aleutian Islands, Alaska Peninsula, Gulf of Alaska, and Southeast Alaska, puffins generally lay eggs in
May and June, hatch chicks beginning in July, and fledge chicks beginning in August or September (see
island-specific attachments for details at each monitoring site).
Puffins forage offshore in continental shelf and slope waters, usually less than 100km from the
breeding colony. Adults eat a mix of fish and invertebrates but feed their chicks almost exclusively on
fish, which adults carry back to the colony in their bills. Each chick usually receives several meals a day
(Piatt and Kitaysky 2002a,b). Variation in parental provisioning impacts chick growth rates and may
represent fluctuations in prey supply (Kitaysky 1996).
9-1
Tufted puffin productivity, phenology and chick growth
PROCEDURE – DIRECT NEST MONITORING (AIKTAK, BULDIR, CHOWIET)
Data collection.—Tufted puffin reproductive performance is monitored by viewing individually
numbered burrows at 4-7 day intervals (depending on the time of the breeding season) using flashlights
throughout the breeding season.
Special considerations for working in tufted puffin colonies: When searching for and subsequently
re-checking nests throughout the season, approach burrow entrances quietly and illuminate nests with
your flashlight as quickly and unobtrusively as possible. Puffins are sensitive to investigator disturbance
and prone to abandon eggs as a result, especially early in incubation. Never attempt to purposefully
startle or physically move a bird in order to get a better view of nest contents.
In addition, burrows are very fragile and collapse if tread upon. In areas of high burrow density,
substrate can be especially delicate. Use caution when traversing any area with burrows. Step (or put
your knee) only on the mound of compressed dirt at the base of the burrow entrance and avoid stepping
above any entrances. When monitoring a plot, it may be helpful to crawl on hands and knees. If a plot is
on a slope, it is usually easiest to work uphill from the bottom to the top. If you do collapse a burrow,
carefully dig out the entrance, ensure you have not crushed a bird, egg, or chick, and makes repairs as
best as you can. Avoid monitoring nests for productivity in areas that appear particularly fragile.
Finally, tufted puffins often nest on steep slopes above sea cliffs, often amidst vegetation that is
easy to trip in when thick or slip on when wet. Always keep personal safety a top priority. Move carefully
and slowly when working on slopes and avoid any areas that seem potentially dangerous. Remember,
no data is more important than your own safety.
Begin searching burrows for eggs and/or incubating birds in early to mid-June (depends on site,
see island-specific details for more information). Check any marked nests you can find from previous
years and look for additional new nests. Our sample size goal is 70 (minimum) to 100 (ideal) nests with
known fate at the end of the season (based on power analysis of crevice-nesting auklets; Thompson et al.
2010). Because it is not possible to obtain known fates for all burrows, you should begin by monitoring an
extra 20 to 30 nests. (Note - due to differences in population size, nest accessibility and work load, 70
may not be possible for all species at each site. Refer to island-specific attachments for sample size
goals for each site). Reuse of nests from one year to the next may vary across sites and years, so the
number of new nests you need to find will depend on how many old nests are active in a given year.
Try to select only those burrows for which you can see the entire chamber. If there is anywhere
for the chick to hide, you may be unable to determine the fate of that chick, and the burrow will have to be
excluded from analysis (hint: if the adult bird can escape out of view when you check a nest, a chick will
probably be able do so too). To get a good view of the nest contents, you can’t afford to be timid - you
will need to shove your face as deep as possible into the guano-lined entrances and twist your head at
weird angles to see around corners or down long dark tunnels. If you are hesitant, you may not be able
to see the whole nest chamber and you won’t be able to determine for certain what happens to the nest.
To facilitate getting down on the ground and shoving your face into holes, carry your supplies in a small
fanny pack, as a backpack will severely limit your mobility (if you must carry more gear, such as extra
clothes, stash your backpack in one place while checking a group of nests and then move it as you move
to another part of the colony, rather than wearing it on your back). And don’t get discouraged if finding
good puffin burrows is slow going - natural puffin burrows are often deep and twisty, and you will probably
have to look into LOTS of nests for every one that you can see well enough to monitor.
Mark all nests with individually-numbered flags near the entrance. It is helpful to choose a
standard flag location relative to the entrance for all your nests (e.g., always putting flag at bottom left of
entrance) to avoid confusing nests. In high density areas, tunnels and nest chambers may be
everywhere, so check to make sure that the flag shaft does not pierce through into the tunnel or chamber
of another nest. Be aware that vegetation will grow throughout the season, sometimes a meter or more,
so it may be helpful to use additional markers, such as flagging tape tied around vegetation, to find nest
locations in areas of thick vegetation. Drawing a map of nest locations (see Figure 1) will also help locate
nests on subsequent visits.
After initial nest searches, check nests every 7 days throughout the breeding season,
except around expected hatching and fledging periods, when intervals should be decreased to
every 4 days to obtain more precise hatch and fledge dates. It is important to continue visiting a
burrow even after the chick has reached minimum fledging age, in order to ensure the chick fledged (and
9-2
Tufted puffin productivity, phenology and chick growth
did not die in the nest) and to calculate fledge dates and length of nestling period. Once a chick is gone,
check the nest at least one more time to ensure the nest is indeed empty and the chick wasn’t hiding
somewhere (e.g., you end up with two N codes in a row). To minimize disturbance to other birds across
the colony, try to stick to a regular route when checking burrows. To maintain optimal data integrity and
to minimize the amount of time spent searching for nests (and thus lessen disturbance to birds), it is best
for one person to check the same nests throughout the entire season.
On each visit, attempt to determine the status of all nest sites and record it in a field notebook
using the appropriate standardized code (see pages 7-9 and Figure 2). Record only what you saw and
be sure to use the standardized codes exactly as instructed. Weird and unpredictable things can happen
during observations (e.g., a chick moving between connected nests or one bird usurping anothers’ nest)
and you may want to describe every detail and feel limited by the standardized list of codes and modifiers
available. However, lengthy text explanations and comments tend to cause confusion later and cannot
be interpreted by the database used to summarize the data. Choose a code then and there and stick with
it - as the field biologist, you are the only person who can make a decision about what you saw that day.
If you absolutely must record additional information about a nest, you can enter text in the comments
section of the productivity data entry database, but keep in mind that this text is not used in any data
summary so it should not contain any information pertinent to how the reproductive success data should
be interpreted.
Never purposefully disturb a bird in your efforts to determine whether or not an egg has hatched.
Try not to illuminate a crevice with your flashlight for more than a second or two. Afterwards depart swiftly
and quietly, much as a stealthy data ninja would do. Puffins do not exhibit reliable incubating or brooding
postures, so if you see an adult bird but cannot see an egg or chick, you must record the nest status as
BU (Bird Unknown). Birds sometimes run into a crevice at your approach and then hunker down as if
incubating, so if no egg is ever seen, you must at least see the bird on two consecutive visits to assume
the presence of an egg and include it as an active nest in your sample. If you find an unattended egg and
it doesn’t look like a leftover from last year, continue to monitor it. However, if you never see a bird
attending it, exclude the nest from your sample (by manually excluding the nest as an inactive nest in the
productivity data entry database; choose “inactive nest” from the drop-down box in the “exclude for
productivity” field). If it never hatches, you won’t know if it failed or if it was an abandoned egg from the
year before. If it does hatch, it is likely the chick will hide in the same place the adult was hiding every
time you checked the egg, resulting in a crevice with unknown fate.
If you see an egg or a chick, there are a few cases when you will need to record additional
modifiers that provide more detailed information about the nest status (list of standardized code
modifiers). For eggs, record if you see an old egg clearly from last year (Ely), a broken, crushed, or
otherwise dead egg (Ed), an egg ejected from the nest (Ej), or an egg pipping just before hatch (Ep).
Similarly, for chicks, record if you see a chick in the actual act of hatching (Co), a chick still wet from
having recently hatched (Cw), or dead chick (Cd).
You must literally see the chick to record the presence of a chick; hearing it alone or seeing
eggshells/membranes is not enough. If it is close to predicted hatch, or if you see fresh eggshells or hear
chick sounds, scrutinize the nest extra carefully for a potential chick. Look for down poking up under the
adult’s wing or for tiny feet or bills sticking out. If you suspect a chick but the adult simply won’t show you
what it’s hiding, here are some tips to aid you in seeing the chick:
• Focus your flashlight on the back of the adult - a chick will sometimes react to the light and
move its head up for you to see, or sometimes it will wriggle enough that you can see the
movement, or the adult will move enough for you to see the chick itself.
• Look at the adult’s wings - sometimes they will shake or vibrate when the adult is brooding a
chick and you can eventually see the chick underneath. In particular, look for a small bill
sticking out from the top or sides of the adult’s wing.
If you still cannot see an egg or chick and have to record BU (Bird Unknown), record any supplementary
evidence of freshly-hatched eggshells (BUsh) or sounds of chick calling (BUcall; see list of standardized
code modifiers). These do not provide enough evidence of a chick to determine hatch dates, but may be
used by the database in analysis to help determine the overall fate of the nest in some cases. It is
particularly important to minimize unknown nest status codes around expected hatching or fledging dates.
In other words, it is important to see the nest contents the check before and after a chick hatches
and fledges, and to reduce the visit interval as much as possible at those times.
9-3
Tufted puffin productivity, phenology and chick growth
If your colony has multiple burrow-nesting species, you may not be able to identify the species on
the first check (e.g., an unattended egg, or a brief view of the bird’s butt without seeing enough identifying
characteristics. Continue to monitor the nest, leave the species column in your data book blank for now,
and fill in the appropriate species when it is determined (if species is never determined, use the species
code to denote unknown species; see data entry protocol for more details).
Before leaving a plot each day, check to see that your recorded status makes sense based on
what you saw last time (e.g., if you had a chick last visit, you shouldn’t have an egg this visit). Data strings
that don’t make sense will have to be discarded. If you decide a particular nest site is problematic and
should be tossed (e.g., grass grew during the season and obscured your view, or you aren’t certain of the
species), don’t erase the data from your field notebook and electronic productivity data entry database but
simply mark it as “exclude from analysis” in both places and indicate your reasons in the comments
section for that nest in the database (see Database User’s Manual).
At the end of the day (or at the very least, before you take your data notebook into the field
again), enter the day’s plot data in the productivity data entry database (see Database User’s Manual).
Data analysis.—Calculations for productivity and phenology parameters for tufted puffins are
automated in an Access database. Data should be entered and proofed as soon as possible each day
after returning from the field (see data entry protocol). Proofed data will be uploaded into the database
for analysis at the end of the season.
The below analysis summary is included to help you to understand how your codes will be
interpreted by the database. This should give you an idea of what constitutes “good” data vs. data that
have to be discarded, which should help you schedule and prioritize your data collection efforts in the
field. The intent is not to reproduce the detailed documentation for the database and analysis process.
Phenology: Dates for chick hatching and fledging are calculated using the midpoint dates. The hatch
date is the midpoint between the last time an egg was confirmed to be present and the first time a chick
was confirmed to be present (if there was no midpoint (i.e., an even number of days between visits), we
use the even Julian date closest to the midpoint). Not all nest sites are included in phenology calculations;
we require a confirmed egg and then a confirmed chick less than 7 days apart for that site to be used.
Because of this, try to project when each nest is expected to hatch and focus extra attention on getting
known statuses with short visit intervals around those times.
Occasionally, we record data that give us more exact information on hatching and fledging dates.
If you observe an event occurring (e.g., the actual hatching and fledging) during your visit, we use the day
of the observation as the date the event occurred and not the midpoint between observations. Similarly, if
a pipped egg is observed, we assume it will hatch the following day; if a wet chick is seen, we assume it
hatched that day.
Productivity: Reproductive success is calculated as the number of known fate nest sites that fledged a
chick. If a nest “fails”, we keep track of what stage this happens (egg or chick period). Determination of
the fate of eggs and chicks is not always straightforward because we visit nests only every 4-7 days. As
a result it is necessary to adopt some conventions for consistency in interpretation.
Unless you actually saw the chick departing the nest, “fledging” is determined arbitrarily based on
the age of the chick on the last date you saw it. This is determined by calculating the “egg period”, “chick
period”, and “uncertainty periods” for every nest. The “egg period” is the number of days from the first
definite observation of an egg to the last definite observation of an egg. The “chick period” is from the first
definite observation of a chick to the last definite observation of a chick. There are some rules about what
is and isn't allowed to be within the egg and chick periods but in short, the data should make logical sense
(for example, an egg in the middle of a chick period would indicate a problem with the data and the nest
site would be discarded). The “uncertainty period” accounts for both the visit interval and any visits with
unknown statuses (e.g., BU's) around hatch and fledge events.
9-4
Tufted puffin productivity, phenology and chick growth
Example 1:
Egg Period
Chick Period
11 Jun 18 Jun 24 Jun 30 Jun
BE
BE
BE
BU
3 Jul
BC
7 Jul
BC
13 Jul
BC
20 Jul
BC
Uncertainty Period
Around Hatch
24 Jul
BU
28 Jul
BU
4 Aug
N
8 Aug
N
4 Aug
N
8 Aug
N
Uncertainty Period
Around Fledge
Example 2:
Egg Period
Chick Period
11 Jun 18 Jun 24 Jun 30 Jun
BE
BE
BE
BE
3 Jul
BC
7 Jul
BC
13 Jul
BC
20 Jul
BC
24 Jul
BC
28 Jul
BC
Uncertainty Period
Around Fledge
Uncertainty Period
Around Hatch
From the length of the chick period and the uncertainty periods, we determine the minimum and
maximum possible age for the chick when it was last seen: a chick was at least as old as the length of the
chick period itself, and could possibly have been as old as the chick period + both uncertainty periods.
This information is then compared against fledging age conventions (38 days for tufted puffins) to
determine if the chick failed, fledged, or if the nest should be discarded due to too much uncertainty. If a
chick would have been too young to fledge even at its maximum potential age (chick period +
uncertainty), it is called failed. If a chick would have been old enough to fledge even at its minimum age
(chick period), it is called fledged. If the chick would have fledged or failed based on the length of the
uncertainty period, it is considered unknown fate and discarded from the sample.
In general, the larger the uncertainty period, the more likely a nest will be discarded because the
chick’s fate cannot be determined. Therefore, large check intervals and/or many BU/U statuses around
hatch and fledge dates can cause a nest to be discarded from analysis. Keep this in mind when
collecting data (e.g., keep check intervals short and take the extra seconds to look extra hard for chicks
around expected hatch or fledge dates).
A practical note for puffins, however: you WILL get BU codes and there is often nothing you can
do about it. Some birds will sit tight on their eggs/newly hatched chicks no matter what you do, and unlike
kittiwake or murre productivity where you can sit for an hour waiting for a bird to move, we keep nest
checks as brief as possible to limit disturbance to the breeding birds. In fact, it is ironic that the best, a
stealthy data ninja who sneaks up on birds without disturbing them may actually end up with more BU
codes than someone who bumbles all over the rocks creating lots of noise, making birds move off their
eggs or chicks. Never under any circumstances purposefully disturb a bird (physically or by making
noise) to see the nest contents. If hatch is expected, you can take an extra moment to look particularly
hard in that nest for clues (using the tips listed above), but in the end if the bird doesn’t move then you
have to move on to the next nest and hope for a better nest status on the next check. Monitoring more
than the target sample size of 70 to 100 nests will help make up for the inevitable loss of a number of
your nests to unknown fate/uncertainty.
After determining a fate of each nest, the database will calculate summary statistics using all
nests with a known fate (not including any nests excluded manually by the data collector or discarded by
the database due to poor quality, unknown fate, etc.). For puffins, the database will calculate:
• Nest sites with eggs (B) – number of nest sites containing any eggs
• Nest sites with chick (D) – number of nest sites containing any chicks
• Nest sites with chicks fledged (F) – number of nest sites that fledged chicks
9-5
Tufted puffin productivity, phenology and chick growth
From the above values, the following summary parameters are generated:
• Nesting success (D/B)
• Fledging success (F/D)
• Reproductive success (F/B)
Tufted puffin chicks often do not fledge before field crews leave islands at the end of the summer, so we
also calculate a maximum potential reproductive success that includes all chicks still present at last
check, even those too young to be called fledged (and thus excluded from conventional analysis). For
this, the database will also calculate:
• Nest sites w/ young chicks still present (H) – number of nest sites containing chicks too
young to determine if fledged or failed
From that, the following summary parameters are generated:
• Max. potential nesting success [(D+H)/(B+H)]
• Max. potential fledgingsuccess [(F+H)/(D+H)]
• Max. potential reproductive success [(F+H)/(B+H)]
9-6
Tufted puffin productivity, phenology and chick growth
Standardized Productivity Codes: List of Productivity Codes (TUFTED PUFFINS)
Always use CAPITAL LETTERS for productivity codes
See list of “Important Rules to Follow” for more details on correct use
B
Bird
Adult bird occupying a nest site, with no egg or chick present. Used when
the observer is sure the bird has no egg or chick (this code means a site is
confirmed empty other than the adult bird, there is no need to combine B
and N codes into BN). For kittiwakes, used between the time a nest is
constructed and the first egg is laid, or after egg(s) or chick(s) is lost.
BU Bird w/ Unknown Adult bird occupying a site, with no egg or chick visible. Used when the
observer cannot see the entire nest contents to be sure whether there is an
egg, a chick, or nothing.
BE Bird w/ Egg
Adult bird with an egg.
E
Egg present, with no adult.
Use numbers and/or “+” to indicate more than one (e.g., E2+ = at least
two eggs)
Use standardized modifiers to describe special egg status (e.g., Ed =
dead egg)
Egg
BC Bird w/ Chick
Adult bird with chick.
C
Chick
Chick present, with no adult.
Use numbers and/or “+” to indicate more than one (e.g., C2+ = at least
two chicks)
Use standardized modifiers to describe special egg status (e.g., Cd =
dead chick)
U
Unknown
Nest site with nothing clearly visible. Seldom used - only when the observer
is not sure of the nest contents (e.g., cliff nest site obscured by fog or other
birds, crevice nest site offering a poor, incomplete view, etc). If an observer
records “U” many times, especially at crucial times (hatch and fledge), the
nest site may not be included in analysis.
N
Nest
Empty nest site. Used when an egg or chick that was in the nest has been
lost and no adult is present. For kittiwakes, this code indicates that a nest
structure from the current year is physically present, either before eggs are
laid or after the nest fails.
NC Not Checked
Used between the previous and current check, when a site was not checked
(e.g., it was skipped on purpose) or could not be found on that date. This
code does not have to be used at the very beginning or end of the season
before checks begin or after checks end for a particular nest.
9-7
Tufted puffin productivity, phenology and chick growth
Standardized Productivity Codes: List of Modifiers
Always use lowercase letters for modifiers!
See list of “Important Rules to Follow” for more details on correct use
Modifiers to egg status codes
Eo Egg lay observed Observer sees egg being laid; used only when event was actually
observed, not simply suspected lay
Ep Egg pipped
Hole in egg, sometimes chick bill poking through; hatch date determined to
be following day
Ed Egg dead
Egg is obviously damaged or broken
Ej
Egg once in a nest ejected outside the nest cup
Egg ejected
Ely Egg last year
Egg assumed to be from last year from appearance or other evidence
Modifiers to chick status codes
Co Chick hatch
Observer sees chick hatch; used only when event was actually observed,
not for pipping observed eggs, observations of newly-hatched wet chicks,
or other reasons leading to suspected “probable” hatch. Do not combine
Co modifier with Cw (see below) if you observe a hatching event that
results in a wet chick; simply use Co to indicate hatch and not Cow/Cwo
Cw Chick wet
Newly-hatched wet chick observed; indicates chick hatched that day but
hatching event was not actually observed
Cd Chick dead
Chick actually observed dead (not simply disappeared from nest)
Cf
Chick actually observed in the act of flying (or jumping for murres) from the
nest; very rare!
Chick fledged
Additional clues to nest fate
sh eggshells
poop
poop
call chick calling
Presence of fresh eggshell fragments in the nest. Used ONLY with Bird
Unknown or Unknown status codes (BUsh or Ush) to give more information
about potential hatch; there is no need to use with known status codes
(such as C or N)
Presence of fresh poop in or at the entrance of the nest. Used ONLY with
Unknown status code (Upoop) to give more information about potential
presence of a chick; there is no need to use with known-status codes (such
as C or N)
Chick heard calling but not actually observed. Used ONLY with Bird
Unknown or Unknown status codes (BUcall or Ucall) to give more
information about potential presence of a chick; not appropriate to use with
known-status codes (such as C or N)
9-8
Tufted puffin productivity, phenology and chick growth
Standardized Productivity Codes: Important Rules to Follow
Use capital letters for basic productivity codes and lowercase letters for modifiers.
superscripts or subscripts for any modifiers. Do not put spaces between any characters.
Do not use
Use numbers to indicate quantities of birds, eggs, or chicks greater than one (do NOT use 1 to indicate
single numbers). Numbers should always go AFTER the code that the number describes.
e.g., B2E means two adult birds with a single egg
BE2 means a single adult bird with two eggs
Use a plus sign (+) when you can see at least some but not all nest contents in multiple-egg clutches. As
with numbers, the plus sign should always go AFTER the letter code (and when more than one, also after
the number) that is being described.
e.g., BE+ means an adult bird and at least one egg were observed but entire nest contents could
not be seen to determine if there was anything more
BE2+ means an adult bird and at least two eggs were observed but entire nest
contents could not be seen to determine if there was anything more
Some codes and modifiers can be combined when appropriate as long as order (see below) is
maintained. For instance, with multiple-egg species, if one egg hatches before another so that there is an
adult bird present with both an egg and a check, enter BEC.
The specific order in which these codes and modifiers are used is VERY IMPORTANT. The codes BEC
and BCE, or BE2+ and BE+2, may mean the same thing to us but they are NOT the same to the
computer database. Follow these rules for the correct order of codes and modifiers:
(1) Always write codes in the order of adult - egg - chick.
e.g., BE and not EB
(2) When adding modifiers (numbers, letters, or symbols that give more information), always
follow the order of: main productivity code - letter modifier - number - plus sign
e.g., BEp2+ for adult bird with at least two pipped eggs
BE2Cd for adult bird with two eggs and one dead chick
B2E+Cd for two adult birds with at least one egg and one dead chick
9-9
Tufted puffin productivity, phenology and chick growth
PROCEDURE – INDIRECT NEST MONITORING (ST. LAZARIA)
Data collection.—When burrows are too deep to view nest contents, indirect evidence of burrow
apparent occupancy at different times in the breeding season is used as an index of tufted puffin
reproductive performance. We assume that apparent occupancy during early, mid- and late season
checks represent the presence of eggs, chicks, and large chicks/potential fledglings, respectively. From
these data, three residency indices are calculated (representing surrogates of nesting, fledging, and
overall reproductive success). These data are usually collected simultaneously with population surveys
for burrow density and apparent occupancy (see Burrow-nester Population Protocol and island-specific
details).
Burrows are checked two to three (preferred) times a year, timed to coincide with incubation,
early chick-rearing, and late chick-rearing periods. Indirect monitoring of tufted puffin productivity is
generally done in conjuction with population monitoring (refer to Burrow Nester Population Protocol). On
each check, observers locate all large (>14.5 cm) burrows within specified plots and assess each for any
evidence of apparent occupancy. Burrow size is categorized as small, medium, or large (small: <9.5 cm,
medium: 9.5-14.5 cm, large: >14.5 cm) and measured using a “burrow board” (Figure 3). Measure each
entrance horizontally at the widest spot: if the smallest end of the board does not slide in to the entrance,
it is assigned to the “small” category; if the small end will slide in, it is assigned to the “medium” category;
if the largest section slides in, it is assigned to the “large” category. By definition, a burrow must be at
least 30 cm deep to be counted. Evidence of apparent occupancy is defined as the presence of one
of the following:
• feathers
• guano (often a “pocket” at the end of a tunnel)
• fish deep inside the burrow
• egg shell fragments or membrane(s)
• egg(s)
• chick(s)
• fresh vegetation (ST. LAZARIA ONLY)
• clipped vegetation or roots (ST. LAZARIA ONLY)
Also record which evidence was observed at each burrow (this will help us understand and improve the
tufted puffin protocol). Fresh digging and fish at the entrance are not indicators of occupancy (fish are
tricky because they may have been dropped by a bird flying over, so be sure fish are deep enough in a
burrow that they couldn’t have simply fallen from above before using them as evidence of occupancy). If
a puffin is encountered in a burrow, feel under the bird to determine if there is an egg or chick; work
around it carefully to minimize disturbance. There is sometimes a rudimentary nest composed of Angelica
or fern leaves. Because puffins are so susceptible to disturbance and because the soil is often soft and
prone to collapse, do not dig excavations in puffin plots.
All nests should be marked with individually-numbered flags near the entrance and mapped to
follow throughout the season. It is helpful to choose a standard flag location relative to the entrance for
all your nests (e.g., always putting flag at bottom left of entrance) to avoid confusing nests. In high
density areas, tunnels and nest chambers may be everywhere, so check to make sure that the flag shaft
does not pierce through into the tunnel or chamber of another nest.
Data analysis.—From data, tally the following for each plot:
• Large burrows with apparent occupancy Early (b) – number of large (>14.5 cm) burrows with
evidence of apparent occupancy at early check (during incubation); surrogate of number of
eggs
•
Large burrows with apparent occupancy Mid (d) – number of large (>14.5 cm) burrows with
evidence of apparent occupancy at mid check (during early chick-rearing); surrogate of
number of chicks
9-10
Tufted puffin productivity, phenology and chick growth
•
Large burrows with apparent occupancy Late (f) – number of large (>14.5 cm) burrows with
evidence of apparent occupancy at late check (during late chick-rearing); surrogate of
number of large chicks/fledglings
From the above values, calculate the following summary parameters for each plot:
• Residency Index Early-Mid (d/b) – surrogate of nesting success
• Residency Index Mid-Late (f/d) – surrogate of fledging success
• Overall Residency Index (f/b) – surrogate of overall reproductive success
These indices represent ratios of nests occupied later in the season compared to earlier. Therefore, for
this calculation it is important to use only those nests that were occupied during the earlier visit
(whichever visit is the denominator in the calculation: the first visit for Residency Index Early-Mid and
Overall Residency Index and the second visit for Residency Index Mid-Late. If a nest was not apparently
occupied during the earlier visit, the nest should be excluded. For example:
Early visit
Mid visit
Late visit
Occupied
Occupied
Not occupied
Not occupied
Occupied
Occupied
Not occupied
Occupied
Occupied
Occupied
Occupied
Not occupied
Not occupied
Not occupied
Occupied
Not occupied
Occupied
Not occupied
Occupied
Not occupied
Occupied
Use in Residency
Index Early-Mid
calculations?
Yes
Yes
No
No
Yes
Yes
No
Use in Residency
Index Mid-Late
calculations?
Yes
Yes
Yes
Yes
No
No
No
If any of you residency indices are greater than 1, you are doing something wrong!
9-11
Use in Overall
Residency Index
calculations?
Yes
Yes
No
No
Yes
Yes
No
Tufted puffin productivity, phenology and chick growth
PROCEDURES – CHICK GROWTH (AIKTAK)
Data collection.—Puffin chick growth is usually done in conjunction with monitoring for
productivity and phenology. Measuring chicks does not appear to influence chick survival, so these
chicks do not have to be separate from your productivity sample.
Before chicks hatch, assess burrows or crevices used for productivity monitoring for those that
are shallow enough to potentially reach chicks. Aim for 30 chicks to measure (at most sites, this will not
be possible because there are not enough accessible nests).
Once chicks hatch, attempt to measure each every 4-7 days during the linear growth period, from
age 5-10 days to 25-30 days or up to a mass of about 450 g (Kitaysky 1996, Gjerdrum 2001). Remove
chicks from nests by hand or using a “chick grabber”, a piece of bent wire or copper tubing with a small
hook at the end like a shepard’s crook that can slide around a chick’s tarsus and used to gently drag a
chick to the nest entrance. Be careful that the wings and/or the other foot do not become caught on rocks
or bent at an uncomfortable angle during extraction. Never remove chicks from nests for
measurements when adults are present or when it is raining.
During each measurement session, measure the following (see Figures 4 and 5):
•
Mass: Weigh chicks (g) in bird bags (or the toe of a pantyhose) using Pesola spring scales.
Be sure to weigh the empty bag after each chick weighing, because its weight can change
due to moisture or chick feces.
•
Wing chord: Measure the right wing from the bend in the wing to longest tip (fleshy stub,
pinfeather, or longest primary, depending on chick age; ignore any downy tufts stuck to the
end of wings or feathers) to the nearest 0.5 mm using a wing rule. With the right wing resting
naturally against the chick’s body, slide the wing ruler under the wing and press the vertical
stop gently against the wrist joint. Measure this distance to the nearest mm. Wing should be
relaxed, not flattened.
®
Aim for at least three measurements per chick during the linear growth period (until chick age 2530 days or mass exceeds about 450 g). If you are uncertain, play it safe and measure the chick a couple
extra times, as measurements outside the linear growth phase can always be truncated later.
Additional safety considerations for handling birds
Monitor the condition of birds you are handling at all times and look for signs of injury or stress
(e.g., panting, droopy eyelids, appearing dazed, shivering). If a bird starts having problems, release it
immediately. If you encounter a bird that appears diseased (e.g., avian pox), take care to prevent
spreading to other birds at the colony. Destroy the bird bag used with that bird (do not reuse with other
birds) and clean all measuring and banding instruments with 70% ethanol.
Data analysis.—Chick growth is summarized during the linear growth period only. In tufted
puffins, this corresponds roughly to chick age 5-10 days to 25-30 days, or up to 450 g in size (Kitaysky
1996, Gjerdrum 2001); after this age, chick size approaches an asymptote. Because you may not know
exact hatch dates and thus accurate chick ages, it is helpful to graph data for each chick and visually
inspect graphs for any leveling off towards the end of measurements. Truncate any data points that
appear to be beyond linear growth. (Note - if you have only three measurements, it may be difficult to
determine from the plot if the last measurement is outside the linear growth window; in these instances,
2
mass is a particularly useful indicator.) It may be helpful to use the r value of the linear regression line as
a guide to how close to linear your data points are. There is no concrete rule about how “good” a fit must
be to be considered linear growth and thus included in analysis but as a rule of thumb, take an extra look
2
at any chicks in which the r value is <0.80. If the poorness of fit is due to an early or late data point and
the fit can be improved markedly by removing it (see “a” below), consider that point outside of the linear
growth period and remove it. If the poorness of fit is seems to be due simply to variability in
measurements (see “b” below), consider keeping all data points. If the poorness of fit is because the
chick just didn’t seem to exhibit any linear growth at all (this can happen with dying chicks, for instance;
see “c” below), consider removing the entire chick from the sample, as we are only interested in chicks for
9-12
Tufted puffin productivity, phenology and chick growth
which we can calculate a rate of linear growth.
(a)
(b)
(c)
Once all data have been inspected and truncated to include only those measurements occurring
during the linear growth period, calculate the growth rate for each chick by running a simple linear
regression for each parameter (mass and wing chord). The slope of each regression line represents the
growth rate. Present the average annual growth rate for each species as the mean slope (and standard
deviation) of all chicks. Include only chicks that have been measured at least three times during the linear
growth phase. If a chick dies after three measurements, it can be included in the dataset.
Literature Cited
Cairns, D.K. 1987. Seabirds as indicators of marine food supplies. Biological Oceanography 5:261-271.
Gjerdrum, C. 2001. Nestling growth and parental provisioning of tufted puffins (Fratercula cirrhata) on
Triangle Island, British Columbia. MSc. thesis. Burnaby: Simon Fraser University.
Kitaysky, A.S. 1996. Behavioral, physiological and reproductive responses of alcids (Alcidae) to variation
in food availability. PhD dissertation, Irvine: University of California.
Kitaysky, A.S. and E.G. Golubova. 2000. Climate change causes contrasting trends in reproductive
performance of planktivorous and piscivorous alcids. Journal of Animal Ecology 69:248-262.
Montevecchi W.A. 1993 Birds as indicators of change in marine prey stocks. Pp 217-266 in Birds as
Monitors of Environmental Change (R.W. Furness and D.J. Greenwood, Eds.) London:
Chapman and Hall.
Piatt, J.F. and A.S. Kitaysky. 2002a. Horned puffin (Fratercula corniculata). No. 603 in The Birds of North
America (A. Poole, Ed.). Ithaca: Cornell Lab of Ornithology.
Piatt, J.F. and A.S. Kitaysky. 2002b. Tufted puffin (Fratercula cirrhata). No. 708 in The Birds of North
America (A. Poole, Ed.). Ithaca: Cornell Lab of Ornithology.
Suryan, R.M., D.B. Irons, M. Kaufman, J. Benson, P.G.R. Jodice, D.D. Roby, and E.D. Brown. 2002.
Short term fluctuations in forage fish availability and the effect on prey selection and broodrearing in the black-legged kittiwake (Rissa tridactyla). Marine Ecology Progress Series 236: 273–
287.
Thompson, N.J., H. Renner, J.H. Reynolds, and P.D. Sampson. 2010. Long-term monitoring of seabirds
on the Alaska Maritime NWR: a statistical review and analysis of productivity and hatch-timing for
black-legged kittiwake, murre, and least auklet colonies on Buldir Island. Unpublished report,
University of Washington.
Wehle, D.H.S. 1980. The breeding biology of the puffins: Tufted puffin (Lunda cirrhata), horned puffin
(Fratercula corniculata), common puffin (F. arctica), and rhinoceros auklet (Cerorhinca
monocerata). Ph.D. dissertation, University of Alaska, Fairbanks.
9-13
Tufted puffin productivity, phenology and chick growth
Figure 1. Example plot map showing tufted puffin burrow locations.
9-14
Tufted puffin productivity, phenology and chick growth
Figure 2. Example of data notebook page for recording tufted puffin productivity data.
9-15
Tufted puffin productivity, phenology and chick growth
14.5 cm
~ 9 cm
¾”
~ 7 cm
9.5 cm
Won’t fit?
< 9.5cm = Small
Smaller section fits?
9.5 – 14.5 cm = Medium
Whole thing fits?
> 14.5cm = Large
Figure 3. Diagram of burrow-measuring device and examples of burrows with entrances of different
sizes.
9-16
Tufted puffin productivity, phenology and chick growth
®
Mass - Weigh chicks using a Pesola scale. Weigh the bag and bird and then the
bag separately at end. Check bag occasionally for dryness.
Always hold by the ring
when weighing. Hold scale
at eye level in the lee of the
DON’T hold it here!
Wing chord - holding the wing next to the body and using a metal ruler with a stop,
measure to the furthest feather tip possible. Always measure the right wing.
NOT
Flattened Wing
Wing Chord
Measure from here
(primary wing coverts)
(primaries)
to here
Figure 4. Diagram of puffin chick measurements taken on the Alaska Maritime National Wildlife Refuge.
9-17
Tufted puffin productivity, phenology and chick growth
Mass
Wing chord
Figure 5. Photos showing puffin chick measurements taken on the Alaska Maritime National Wildlife Refuge.
9-18
Tufted puffin productivity, phenology and chick growth at Aiktak Island
Attachment A. Aiktak Island specifics (includes Figures A1-3 and Table A1)
PROCEDURE DETAILS SPECIFIC TO AIKTAK - PRODUCTIVITY
Aiktak Island has one of the largest populations of tufted puffins in Alaska and greater numbers
were probably present prior to the introduction of foxes earlier this century. Tufted puffin burrows ring the
perimeter of the entire island and are also present on the slopes of Southwest Slope and Gull Mountain.
On Aiktak, peak egg laying occurs in mid-June, hatch in late July or early August, and fledging in late
August through September. Adult colony attendance is highly variable; it is not uncommon to see
thousands of birds one day and nearly none the next. Since numbers of puffins at the colonies fluctuate
widely due to phases of the breeding season, times of day, and weather, reliable estimates of the actual
number of nesting birds are almost impossible to obtain.
Tufted puffin productivity and phenology is monitored in both natural and artificial burrows at
Aiktak. Procedures for checking natural and artificial burrows are identical, except that artificial burrows
require some housekeeping work at the beginning of the season. Artificial burrows usually provide better
views of the nest chamber and lids can be removed to access nests at the end of the season to ensure
known statuses. There are 82 artificial puffin burrows installed on Aiktak, distributed across six plots on
the western half of the island (Figure A1 and Table A1); however, in most years only about one quarter to
one third of artificial nests are occupied so you will likely have to use both artificial and natural burrows to
meet sample size goals.
Aim for a sample size of 100 known-fate nests at the end of the season (begin by following at
least 125 to allow for nests that will have to be discarded from the dataset for one reason or another).
Adjust your search efforts for natural burrows based on how many artificial nests are occupied in the
current year (e.g., if 25 artificial nests are occupied, you should search for about 100 good quality natural
burrows to monitor aswell). At Aiktak, there is no shortage of tufted puffin burrows, although you will likely
have to search many burrows for every one that you can get a good view of the nesting chamber
(remember, the key to finding good puffin burrows to monitor is to shove your head into holes as far as
you can, holding nothing back!).
Begin monitoring nests in early July. Start by checking all artificial burrows first, then search for
the number of addition natural burrows you need. Natural burrows monitored for productivity and
phenology can be located anywhere on the island and do not have to be the same from year to year.
Avoid following nests within density/occupancy plots but otherwise feel free to search for nests anywhere
over the island. It saves time for burrows to be somewhat consolidated so most people prefer to stick to
several high-density areas and/or try to locate all of their natural burrows in and around artificial burrow
plots. In some years, good quality nests found by previous crews will still be marked with flags and you
can reuse burrows if they are reoccupied in the current year.
Each person should have their own set of nests that they check throughout the entire season avoid swapping nests or plots partway through, as it often leads to data confusion. At the beginning of
the season, simply assign each person half the artificial nest plots (three plots each) and half the required
sample of natural burrows.
Special instructions for artificial burrows: Artificial burrows are made of large plastic flower pots (for
the nesting chamber) and a corrugated plastic tube (for the burrow entrance). The entrance of each
artificial burrow is marked on the right with a large plastic orange stake with the burrow number on it and
a tall wooden stake marked with paint or flagging tape (useful to locate nests later in the season when
vegetation grows tall). The chamber of each burrow is marked with a small yellow plastic stake and a
numbered flag (Figures A2-3).
At the beginning of the season: In late May, check the condition of all artificial burrows and
refurbish any that need repairs. Before examining each nest, look into the entrance tunnel with a
flashlight to ensure there is not a bird present. If the nest is empty, proceed with refurbishment described
below; if the nest is occupied, come back another day.
Burrow refurbishment: First, locate the chamber plug, a large tussock or chunk of sod that sits on
top of chamber lid. Make sure the chamber plug is in good condition and can easily be removed. If you
cannot remove the plug in a single unit, replace it with a new one. Use a shovel or long knife to dig up/cut
a new tussock from nearby that will fit completely over the plastic chamber lid (it is important the new plug
fully covers the lid so that the chamber remains dry). You can use a square piece of “weedblock” (soft,
9-19
Tufted puffin productivity, phenology and chick growth at Aiktak Island
permeable cloth-like material) to line the bottom of the tussock to make it easier to remove as a whole
entity in the future.
Second, check that the nest itself is in good shape. Remove the chamber plug and examine the
plastic lid beneath, checking that it is not broken and fits securely on the top of the chamber. Remove the
lid and check the inside of the chamber. If there is bare plastic at the bottom of the chamber, add some
soil. Discard any old eggs from the previous year. Then, with the lid still off, look into the chamber from
the burrow entrance to ensure you have a clear view of the contents. Sometimes soil builds up around
the entrance, making it difficult to put your head at the right angle to see into the nest. You may have to
dig out the burrow entrance a bit or cut an addition plug that allows a better view into the tunnel. Next,
check the burrow tube. Ensure that it isn’t cracked, and add soil if there are any bare plastic areas along
the bottom of the tunnel.
Finally, replace the chamber lid and the chamber plug and remark each nest. Use orange spray
paint or flagging tape to mark each wooden stake, and use a paint pen or marker to rewrite the number of
each nest on the orange entrance stake and the yellow chamber stake. Replace any missing or broken
stakes - the wooden stakes often break off over the winter and need to be replaced, but the orange and
yellow plastic stakes are usually in good condition. Also replace the flag marking each chamber with a
fresh, numbered flag.
Specific Requirements for Aiktak
Dates: Late May: Refurbish artificial burrows.
Early July: Begin checking artificial nests and searching for new natural nests.
July–late Aug/early Sept: Check nests every 4-7 days until chicks fledge (4-day intervals around
peak hatch and fledge dates; 7-day intervals otherwise
Optimal sample size: 100 (minimum 70)
Time of day: Any time.
Weather: Any weather.
Equipment needed: For artificial burrow refurbishment: about 20 tall wooden stakes, flagging tape, spray
paint, about 5 large plastic orange stakes, about 5 small plastic yellow stakes, 82 flags, paint
pens, permanent markers, copy of plot maps, long knife, shovel or trowel, flashlight, large
sections of semi-permeable material (“weed block”), about 5 chamber lids, and string (numbers of
stakes and chamber lids based on average that need to be replaced each year, may need more
or less).
For nest monitoring: Fanny pack, two flashlights (ALWAYS have a spare) with
®
extra batteries/bulbs, Rite-in-the-Rain notebook, plot maps, two pencils, flags and permanent
marker (for labeling new natural burrows during initial nest searches).
PROCEDURE DETAILS SPECIFIC TO AIKTAK – CHICK GROWTH
It is unlikely you will have 30 accessible chicks for either horned or tufted puffins at Aiktak, so just
measure as many as you can from your sample for productivity and phenology. For tufted puffins,
artificial burrows are excellent nests for measuring chick growth because chicks will not be able to escape
– if you cannot reach a chick through the entrance, carefully remove the chamber plug and chamber lid to
reach the chick through the top (be sure to secure the lid and plug again afterwards).
For either species, do not do chick growth if you are unable to get measurements on at least five
chicks – it is not worth the disturbance.
Specific Requirements for Aiktak
Dates: Late July through end of August.
Optimal sample size: 30 chicks.
Time of day: Any time.
Weather: Avoid handling chicks in wet weather.
®
Equipment needed: “Chick grabber” device, bird bag and/or pantyhose toes, Pesola scales (100g, 300g,
®
and 500g), wing rulers (150mm), Rite-in-the-Rain notebook, two pencils.
9-20
Tufted puffin productivity, phenology and chick growth at Aiktak Island
N
Plot A
(Pole 503)
Plot E
(Pole 504)
Plot G (Pole 27)
Plot C (Pole 502)
Plot B
(Pole 501)
Plot D
(Pole 80)
Figure A1. Location of tufted puffin artificial burrow plots at Aiktak Island.
9-21
Tufted puffin productivity, phenology and chick growth at Aiktak Island
Flag
Wooden
stake
2
Chamber plug
Stake (yellow)
marking
chamber plug
Stake (orange)
marking
entrance
Entrance
Burrow
plug
(optional)
Chamber lid
Chamber
Figure A2. Schematic of artificial burrow used at Aiktak Island.
9-22
Tufted puffin productivity, phenology and chick growth at Aiktak Island
a
b
c
Figure A3. Photos of an artificial tufted puffin burrow (a) from the outside, (b) with chamber plug removed, looking down on chamber lid, and (c)
with chamber plug and lid removed, looking down into chamber.
9-23
Tufted puffin productivity, phenology and chick growth at Aiktak Island
Table A1. Locations of artificial tufted puffin burrows at Aiktak Island. Distance and bearing from pole are
in reference to rebar pole that marks plot; bearing is given in degrees from magnetic north from pole to
burrow entrance.
Plot
A
A
A
A
A
A
A
A
A
A
B
B
B
B
B
B
B
B
B
B
B
B
B
B
B
B
B
C
C
C
C
C
C
C
C
C
C
C
C
D
D
D
D
D
D
D
Plot Location
Cabin
Cabin
Cabin
Cabin
Cabin
Cabin
Cabin
Cabin
Cabin
Cabin
SW Cape (SW Bight)
SW Cape (SW Bight)
SW Cape (SW Bight)
SW Cape (SW Bight)
SW Cape (SW Bight)
SW Cape (SW Bight)
SW Cape (SW Bight)
SW Cape (SW Bight)
SW Cape (SW Bight)
SW Cape (SW Bight)
SW Cape (SW Bight)
SW Cape (SW Bight)
SW Cape (SW Bight)
SW Cape (SW Bight)
SW Cape (SW Bight)
SW Cape (SW Bight)
SW Cape (SW Bight)
Petrel Valley Cove (above)
Petrel Valley Cove (above)
Petrel Valley Cove (above)
Petrel Valley Cove (above)
Petrel Valley Cove (above)
Petrel Valley Cove (above)
Petrel Valley Cove (above)
Petrel Valley Cove (above)
Petrel Valley Cove (above)
Petrel Valley Cove (above)
Petrel Valley Cove (above)
Petrel Valley Cove (above)
SW Slope
SW Slope
SW Slope
SW Slope
SW Slope
SW Slope
SW Slope
Pole #
Burrow #
Distance from
pole (m)
Bearing from
pole (deg)
503
503
503
503
503
503
503
503
503
503
501
501
501
501
501
501
501
501
501
501
501
501
501
501
501
501
501
502
502
502
502
502
502
502
502
502
502
502
502
80
80
80
80
80
80
80
1
2
3
4
5
53
54
55
56
57
6
7
8
9
10
11
12
13
14
15
36
37
38
39
40
41
42
16
17
18
19
20
21
22
23
24
25
51
52
26
27
28
29
30
31
32
3.9
3.2
7.0
7.9
5.8
2.0
7.0
7.8
8.8
9.0
12.4
18.3
25.5
27.9
14.2
12.3
3.6
9.5
4.5
22.9
3.4
6.6
8.9
17.7
15.7
6.7
4.8
44.0
45.0
20.3
10.4
7.7
26.0
25.5
32.6
45.9
47.2
54.1
48.3
14.4
13.5
11.5
13.4
17.3
15.8
16.0
37
284
260
257
37
292
248
230
243
269
318
278
271
268
147
150
330
8
80
274
256
254
144
168
162
179
140
332
331
314
164
135
165
173
166
172
175
172
172
132
118
153
199
220
223
230
9-24
Tufted puffin productivity, phenology and chick growth at Aiktak Island
Table A1 (continued). Locations of artificial tufted puffin burrows at Aiktak Island. Distance and bearing
from pole are in reference to rebar pole that marks plot; bearing is given in degrees from magnetic north
from pole to burrow entrance.
Plot
D
D
D
D
D
D
D
D
D
D
D
E
E
E
E
E
E
E
E
E
E
E
E
E
E
E
G
G
G
G
G
G
G
G
G
G
Plot Location
SW Slope
SW Slope
SW Slope
SW Slope
SW Slope
SW Slope
SW Slope
SW Slope
SW Slope
SW Slope
SW Slope
Little West Island
Little West Island
Little West Island
Little West Island
Little West Island
Little West Island
Little West Island
Little West Island
Little West Island
Little West Island
Little West Island
Little West Island
Little West Island
Little West Island
Little West Island
N Raven's Gulch
N Raven's Gulch
N Raven's Gulch
N Raven's Gulch
N Raven's Gulch
N Raven's Gulch
N Raven's Gulch
N Raven's Gulch
N Raven's Gulch
N Raven's Gulch
Pole #
Burrow #
Distance from
pole (m)
Bearing from
pole (deg)
80
80
80
80
80
80
80
80
80
80
80
504
504
504
504
504
504
504
504
504
504
504
504
504
504
504
27
27
27
27
27
27
27
27
27
27
33
34
35
43
44
45
46
47
48
49
50
68
69
70
71
72
73
74
75
76
77
78
79
80
81
82
58
59
60
61
62
63
64
65
66
67
16.4
9.4
12.2
13.6
22.5
12.7
12.1
5.3
20.2
8.1
18.7
19.8
22.0
19.1
18.7
22.2
25.6
8.2
21.1
23.0
18.9
20.3
20.4
20.4
22.1
20.4
21.9
17.7
20.1
23.7
25.3
28.6
20.2
20.1
23.7
18.2
230
178
124
102
100
132
199
255
221
177
229
306
311
316
301
299
289
176
326
332
120
137
116
132
79
116
272
259
253
238
233
221
244
274
242
267
9-25
Tufted puffin productivity and phenology at Buldir Island
Attachment B. Buldir Island specifics
PROCEDURE DETAILS SPECIFIC TO BULDIR
Tufted puffin productivity and phenology at Buldir is monitored primarily in crevices amongst
auklets and horned puffins – refer to Buldir Island Attachment in Crevice-nester Productivity Protocol for
details.
9-26
Tufted puffin productivity and phenology at St. Chowiet Island
Attachment C. Chowiet Island specifics (includes Figure C1)
PROCEDURE DETAILS SPECIFIC TO CHOWIET
Tufted puffin productivity and phenology at Chowiet Island is monitored both in burrows at South
Bay and in crevices amongst auklets and horned puffins. For those tufted puffins in crevices, refer to
Chowiet Island Attachment in Crevice-nester Productivity Protocol for more details.
On Chowiet, peak egg laying occurs in early June, hatch in mid- to late July, and fledging in late
August through early September. Adult colony attendance is highly variable; it is not uncommon to see
hundreds of birds one day and nearly none the next. Since numbers of puffins at the colonies fluctuate
widely due to phases of the breeding season, times of day, and weather, reliable estimates of the actual
number of nesting birds are almost impossible to obtain.
The majority of tufted puffin burrows on Chowiet are found at South Bay, within the glaucouswinged gull colony (Figure C1). Plan the schedule so gull and puffin and/or auklet checks are done on
the same day to minimize disturbance. It is quite convenient because you have to be there anyway for
gull work. Although you can check puffins in inclement weather, when working within gull colonies it is
best not to disturb the gulls when it is raining, especially when gull chicks are small, as the adults will
leave nests and the eggs or chicks will be exposed to the elements. Make sure you make a detailed map
of tufted puffins burrow locations and try to keep to a set path to minimize disturbance one gull work is
completed. Refer to South Bay plot maps in plot photos notebook for location of historical tufted puffin
nest locations. These areas should be checked as well as the surrounding areas to find new nests.
Begin searching for nests in late June (>20 June) and aim for a sample size of at least 30 knownfate nests at the end of the season (this includes crevice nests found in other areas). Begin by following
more than 30, if possible, to allow for nests that will have to be discarded from the dataset for one reason
or another. In good years, >40 nests have been monitored.
Each person should have their own set of nests that they check throughout the entire season avoid swapping nests partway through, as it often leads to data confusion. At the beginning of the
season, it’s probably simplest to assign each person areas to search for nests of both puffins and auklets.
Specific Requirements for Chowiet
Dates: Late June (>20 June): Search for TUPU burrows.
Late June to early Sept: Check nests every 4-7 days until chicks fledge (4-day intervals around
peak hatch and fledge dates; 7-day intervals otherwise).
Optimal sample size:
As many as you can (ideally 70-100 but this is not realistic at Chowiet, try for at
least 30 of each species).
Time of day: Any time.
Weather: Any weather, although try not to check during rain at South Bay due to disturbance to nesting
gulls and ideally when puffins are not socializing on surface of colonies. Take extra care when
rocks and vegetated slopes are wet because they can be dangerously slippery. On bright sunny
days, your eyes take a long time to adjust to dark crevices and it can be difficult to see dark
chicks against dark rocks.
Equipment needed: Fanny pack, knee pads, two bright flashlights (ALWAYS have a spare!) preferably
®
with lanyards to prevent them from getting lost down crevices, spare batteries, Rite-in-the-Rain
notebook, two pencils, maps of burrow locations, flags and permanent marker (for labeling
burrows during initial nest searches).
9-27
Tufted puffin productivity and phenology at St. Chowiet Island
Figure C1. Map of tufted puffin productivity monitoring locations on Chowiet Island.
9-28
Tufted puffin productivity and phenology at St. Lazaria Island
Attachment D. St. Lazaria Island specifics (includes Figure D1 and Table D1)
PROCEDURE DETAILS SPECIFIC TO ST. LAZARIA
Tufted puffin productivity at St. Lazaria is monitored using indirect nest monitoring on 8 plots
(Figure D1). Burrows are surveyed for evidence of activity ideally three times: during incubation (late
June to early July), early chick-rearing (mid-July to early August), and late chick-rearing (mid-August to
early September). Plots used for productivity are the same as those used for population indices and are
surveyed simultaneously (Table D1). See Burrow-nester Population Protocol for details on plots and data
collection procedures specific to St. Lazaria.
Calculate residency indices using data from the first, second, and third visits (see data analysis
on pages 11-12). In years when only two surveys are conducted, you will only be able to calculate one
residency index (i.e., if no third visit, you can only calculate an Early-Mid Residency Index).
Specific Requirements for St. Lazaria
All data collected at the same time as tufted puffin population monitoring (see Burrow-nester Population
Protocol)
9-29
Tufted puffin productivity and phenology at St. Lazaria Island
Figure D1. Locations of tufted puffin transects used for productivity and population indices at St. Lazaria
Island.
9-30
Tufted puffin productivity and phenology at St. Lazaria Island
Table D1. Summary of work conducted during three visits to tufted puffin plots for population and reproductive success indices at St. Lazaria
Island.
Visit:
1
2
3
Dates:
Late June to early July
Mid-July to early August
Mid-August to early September
Tasks:
Flag, measure size of, and count all
burrows
use for density
Check all large burrows for evidence of
apparent occupancy
use for reproductive success
(and sometimes apparent occupancy)
Check all large burrows for evidence of
apparent occupancy
use for reproductive success
and apparent occupancy
Check all large burrows for evidence of
apparent occupancy
use for reproductive success
9-31
Protocol Revision History Log
Protocol Revision History Log
Revision
Date
New
version #
Changes made
April 2015
Added stress and disease details per IACUC, minor clarifications
1.2
April 2014
Changed font to Arial, added revision history log, replaced revision date with version # on first page, added protocol
# to first page, changed number format of tables and figures in island attachments, changed page number format to
include protocol #, made minor grammatical edits, added clarification to main protocol about recording evidence
types, clarified that final calculations for indirect nest monitoring should use subset of nests occupied at earlier
visits, specified that calculations of (H) and associated summary values in direct monitoring now done in database
1.1
May 2013
Protocol developed in standardized format from historic protocols, includes Aiktak, Buldir, Chowiet and St.Lazaria
attachments
1.0
9-32


![HomeSullivan 40885B622W(3A)[BED] Instructions / Assembly](http://vs1.manualzilla.com/store/data/006934806_1-7eed6b9cc56669436b551357ae7c9d0a-150x150.png)