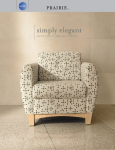
1
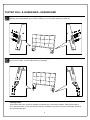
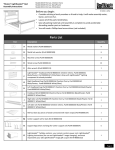
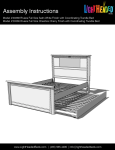
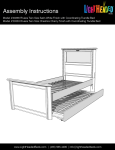
ASSEMBLY INSTRUCTION
TUFTED FULL & QUEEN BED - HEADBOARD
Headboard
Left Wooden
Frame
Right Wooden
Frame
Wooden Leg
Bolt
1/4 x 75mm
1 pc
1 pc
1 pc
2 pcs
2 pcs
Bolt
1/4 x 65mm
Flat Washer
Lock Washer
Allen Wrench
Slate
10 pcs
12 pcs
12 pcs
1 pc
2 pcs
This page lists all the contents included in the
box. Please take the time to identify the
hardware as well as the individual components
to this product. As you unpack and prepare for
assembly, place the contents on a carpeted or
padded area to protect them from damage.
1
TUFTED FULL & QUEEN BED - HEADBOARD
Step 1: Attached left Wooden Frame (B) and right Wooden Frame (C) to the Headboard (A) use Bolt (F), Lock
Washer (H) and Flat Washer (G) on holes of Slates (J). Turn the Allen Wrench (I) in Bolt (F).
Step 2: Attached Wooden Leg (D) to the Wooden Frame (B) (C) use Bolt (E), Lock Washer (H) and Flat Washer
(G) on both of holes. Turn the Allen Wrench (I) in Bolt (E).
Cleaning & Care
Treat surface with care. Surface is resistant to scratches but is not scratch resistant. Clean surfaces with a
dry or damp soft cloth. Do not use abrasive cleaners. Hardware may loosen over time. Periodically check that
all connections are tight.
2
ASSEMBLY INSTRUCTION
TUFTED FULL & QUEEN BED - FOOTBOARD & SIDE RAILS
Footboard
1 pc
Screw
Wooden Leg
Side Rails
2 pcs
Bolt
1/4" x 75mm
12 pcs
2 pcs
Bolt
1/4" x 50mm
2 pcs
5 pcs
Support Leg
6 pcs
Flat Washer
7 pcs
Wooden Slat
3 pcs
Lock Washer
7 pcs
Allen Wrench
This page lists all the contents included in the
box. Please take the time to identify the
hardware as well as the individual components
to this product. As you unpack and prepare for
assembly, place the contents on a carpeted or
padded area to protect them from damage.
1 pc
3
TUFTED FULL & QUEEN BED - FOOTBOARD & SIDE RAILS
Attached Wooden Leg(C) to the Footboard(A) use Bolt(G),
Lock Washer(J) and Flat Washer(I) on both of holes. Turn
the Allen Wrench(K) in Bolt(G).
Attached Side Rail(B) to the Headboard and Footboard(A).
Assembly Wooden Slats(E) and Support Leg (D)
as showing.
E
D
Adjustable
Cleaning & Care
Treat surface with care. Surface is resistant to scratches but is not scratch resistant. Clean surfaces with a
dry or damp soft cloth. Do not use abrasive cleaners. Hardware may loosen over time. Periodically check that
all connections are tight.
4