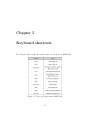
1
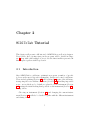
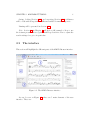
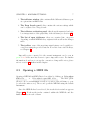
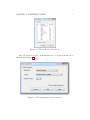
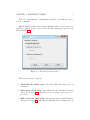
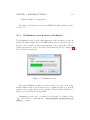
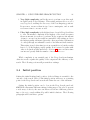
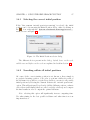
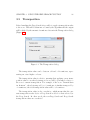
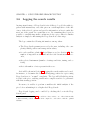
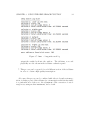
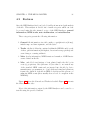
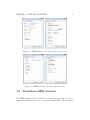
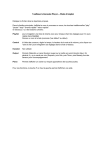
MIDIToTab v1.0 User Manual
Ragnarok Software
January 2014
Contents
1 Overview
1
1.1
Introduction . . . . . . . . . . . . . . . . . . . . . . . . . . . .
1
1.2
Features . . . . . . . . . . . . . . . . . . . . . . . . . . . . . .
2
1.3
Minimal system requirements . . . . . . . . . . . . . . . . . .
3
1.4
The Manual . . . . . . . . . . . . . . . . . . . . . . . . . . . .
3
2 MIDIToTab Tutorial
5
2.1
Introduction . . . . . . . . . . . . . . . . . . . . . . . . . . . .
5
2.2
The interface . . . . . . . . . . . . . . . . . . . . . . . . . . .
6
2.3
Opening a MIDI file . . . . . . . . . . . . . . . . . . . . . . .
7
2.3.1
Preliminary search and re-calculation . . . . . . . . . . 10
2.4
Out-of-range notes . . . . . . . . . . . . . . . . . . . . . . . . 11
2.5
Initial position
. . . . . . . . . . . . . . . . . . . . . . . . . . 12
i
CONTENTS
ii
2.6
Transposition . . . . . . . . . . . . . . . . . . . . . . . . . . . 14
2.7
Splitting a tablature into different parts . . . . . . . . . . . . . 14
2.8
Isolating a part of the tablature . . . . . . . . . . . . . . . . . 16
2.9
Changing the current instrument . . . . . . . . . . . . . . . . 18
2.10 Lyrics . . . . . . . . . . . . . . . . . . . . . . . . . . . . . . . 18
2.11 Saving and loading a tablature . . . . . . . . . . . . . . . . . . 20
2.12 Exporting a tablature . . . . . . . . . . . . . . . . . . . . . . . 20
2.13 Printing . . . . . . . . . . . . . . . . . . . . . . . . . . . . . . 21
3 Using the Deep Search function
22
3.1
Introduction . . . . . . . . . . . . . . . . . . . . . . . . . . . . 22
3.2
Overview and features . . . . . . . . . . . . . . . . . . . . . . 23
3.3
Complexity . . . . . . . . . . . . . . . . . . . . . . . . . . . . 25
3.4
Initial position
. . . . . . . . . . . . . . . . . . . . . . . . . . 26
3.4.1
Selecting the correct initial position . . . . . . . . . . . 27
3.4.2
Searching within all initial positions . . . . . . . . . . . 27
3.5
Transposition . . . . . . . . . . . . . . . . . . . . . . . . . . . 28
3.6
Logging the search results . . . . . . . . . . . . . . . . . . . . 29
3.7
The tablature evaluation panel . . . . . . . . . . . . . . . . . . 30
CONTENTS
3.8
iii
A full example . . . . . . . . . . . . . . . . . . . . . . . . . . . 31
4 The MIDI Analyzer
35
4.1
How to use
. . . . . . . . . . . . . . . . . . . . . . . . . . . . 35
4.2
Features . . . . . . . . . . . . . . . . . . . . . . . . . . . . . . 36
4.3
Standalone MIDI Analyzer . . . . . . . . . . . . . . . . . . . . 37
5 Keyboard shortcuts
39
6 FAQ and technical support
40
6.1
Frequently asked questions . . . . . . . . . . . . . . . . . . . . 40
A Links
42
B About MIDIToTab
43
C Thanks
45
Chapter 1
Overview
1.1
Introduction
Welcome to this user manual of MIDIToTab.
MIDIToTab is a complex tablature optimisation program using the latest artificial intelligence techniques to find the best fingering positions for a
given piece. Its input consists of MIDI files (.mid), a widespread file format
commonly used for creating, transcribing and exchanging music. Since most
music today is available in MIDI format, it constitutes an ideal source of
musical information.
It naturally follows that MIDIToTab is capable of, and should be used
for, transcribing music originally not written for a stringed instrument, for
instance a Mozart piano sonata, to a stringed instrument, such as the guitar.
Of course, MIDIToTab accounts for impossible notes, in other words notes
which can be played on one instrument but not another; this is the case for
instance when transcribing a piano piece to a guitar tablature: some notes
will necessarily be out of range for the guitar. If desired, MIDIToTab takes
care of adjusting these notes in such a way as to be playable on the selected
instrument.
1
CHAPTER 1. OVERVIEW
2
Apart from its unique algorithmic features, MIDIToTab is also capable
of transcribing to a vast array of instruments, including ones that are not
available in any other musical software today, such as the 8, 9 and 10 string
guitar, the lute (from 6 to 10 courses), the mandolin and many more. In
addition, MIDIToTab offers, for each of these instruments, an extensive list of
available tunings, which include not only standard but also rare and esoteric
tunings.
1.2
Features
MIDIToTab features the following innovative functions and components:
• An adjustable, in-depth tablature optimisation system presenting multiple levels of complexity and analysis,
• The conversion of out-of-range notes which can not be played on
a stringed instrument, for instance from converting a piece originally
written for the piano,
• A vast array of standard and rare stringed instruments to transcribe to as well as a wealth of tunings to choose from,
• A unique set of tools which can be used to isolate, split and transpose
a tablature as well as choose the initial positioning of the fretting hand,
log the search results for further analysis,
• The MIDI Analyzer which performs a thorough analysis of any MIDI
file and presents its various contents and characteristics in 4 main categories,
• A large number of output formats such as Power Tab (.ptb),
Adobe Acrobat (.pdf), .png, .jpeg, .bmp and so forth,
• and many more.
CHAPTER 1. OVERVIEW
1.3
3
Minimal system requirements
MIDIToTab will run on most machines, but the following specs are highly
recommended:
• Dual core CPU (quad core or higher will significantly reduce calculation
times),
• 4 GB RAM (8GB or higher are suggested),
• GPU acceleration such as CUDA or OpenCL,
• Windows 2000, XP, Vista, 7 and 8 platforms with administrator privileges for installation.
MIDIToTab is only available for PCs at the moment, but a Mac and Unix
version are being actively developed.
1.4
The Manual
The manual is split into 8 chapters, each focusing on a specific part of
MIDIToTab:
• Chapter 2 will offer a tutorial of MIDIToTab including a detailed
description of all its main functionalities with the exception of Deep
Search,
• Chapter 3 will be dedicated to Deep Search, the most important function in MIDIToTab Professional and will include a full example of
use,
• Chapter 4 will present the MIDI Analyzer and its different components,
CHAPTER 1. OVERVIEW
4
• Chapter 5 contains the list of all keyboard shortcuts available in
MIDIToTab and finally,
• Chapter 6 will be devoted to technical support and frequently asked
questions (FAQ).
Additionally, Annex A contains useful links related to MIDIToTab while
Annex B presents a brief history of MIDIToTab and Annex C lists the people
involved directly or indirectly in the project.
Chapter 2
MIDIToTab Tutorial
This chapter will present a full tutorial of MIDIToTab as well as its features.
Deep Search, due to its importance in the program, will be detailed in Chapter 3 along with a full example of how to use the functionalities presented in
this chapter together with Deep Search.
2.1
Introduction
Since MIDIToTab is a tablature optimisation program, a number of specific
tools are at the user’s disposal to manipulate, analyse and control a tablature.
These include splitting (Section 2.7) and isolating (2.8) parts of the tablature,
transposing the notes within a tablature (Section 2.6), handling impossible
notes - notes which are by default not playable on the instrument (Section
2.4), setting the initial fretting hand position on the instrument (Section 2.5),
among others.
Choosing an instrument (Section 2.3) and changing the current instrument (Section 2.9) will also be detailed together with the different instrument
and tuning choices.
5
CHAPTER 2. MIDITOTAB TUTORIAL
6
Saving, loading (Section 2.11) and exporting (Section 2.12) tablatures
will be dealt with along with the different available formats to export to.
Printing will be presented in Section 2.13.
Note: Section 3.8 in Chapter 3 will show a full example of how to use
the features presented here together with Deep Search in order to adjust the
search settings for a piece in particular.
2.2
The interface
This section will highlight the different parts of the MIDIToTab user interface.
Figure 2.1: The MIDIToTab user interface
As can be seen on Figure 2.1, there are 5 main elements of the user
interface. These are:
CHAPTER 2. MIDITOTAB TUTORIAL
7
1. The tablature window: this contains all the different tablatures open
at a given time in MIDIToTab.
2. The Deep Search panel: this contains the various settings which
can be adjusted for a Deep Search.
3. The tablature evaluation panel: this shows the numerical and verbose interpretation of the playability of the tablature (see Section 3.7).
4. The list of open tablatures: these are organised into categories
depending on which MIDI file they originate from as well as the changes
made.
5. The toolbar: some of the most important features can be quickly accessed here using the provided buttons. For a list of associated hotkeys,
see Chapter 5.
Impossible notes converted for the current instrument can be seen in
green or red if the user has chosen to ignore impossible notes. For further
information about how to set up the conversion of impossible notes, please
refer to section 2.4 further in this chapter.
2.3
Opening a MIDI file
Opening a MIDI file in MIDIToTab is done either by clicking on File→Open
MIDI file... or File→Quick open MIDI file... . The first option
allows to choose an instrument as well as a portion of the tablature to open
(or select the entire score). The second opens the MIDI file using the default
instrument.
Once the MIDI file has been selected, the track selection window appears
(Figure 2.2). It shows the tracks contained within the MIDI file and the
number of notes in each of them.
CHAPTER 2. MIDITOTAB TUTORIAL
8
Figure 2.2: The track selection window
Once the track is selected, an instrument can be chosen from the list of
instruments (Figure 2.3).
Figure 2.3: The instrument selection window
CHAPTER 2. MIDITOTAB TUTORIAL
9
There is a large amount of instruments available, each with its own selection of tunings.
Finally, when both the track and the instrument have been chosen, it is
possible to split or isolate a part of the tablature using the Part Selection
dialog (Figure 2.4)
Figure 2.4: The Part Selection dialog
This dialog presents 3 options:
1. Transcribe the entire score: this will output the entire piece as
tablature,
2. Select part of the score: this will invoke the Tablature Isolation
dialog (see Section 2.8), allowing to select a subset of the piece to be
processed,
3. Split score into equal parts: this will invoke the Split Tablature
dialog (see Section 2.7), allowing the splitting of the tablature into an
CHAPTER 2. MIDITOTAB TUTORIAL
10
adjustable number of equal parts.
Once these options have been chosen, MIDIToTab will begin the preliminary search.
2.3.1
Preliminary search and re-calculation
The preliminary search creates a first impression of the tablature; it is not in
any way the final output. It enables MIDIToTab to have a general idea about
the piece and construct an inner representation of its components. The indepth search itself is done by the Deep Search function (refer to Chapter 3
for a detailed presentation).
Figure 2.5: Preliminary search
After the preliminary search an overview of the score can be seen in the
main tablature window. It shows the notes contained in the piece in staff
notation and a rough sketch of the tablature. This tablature will later be
improved by the Deep Search algorithm.
Preliminary search can be re-started at any time by clicking on the
toolbar button or through the Actions→Quick re-calculate tab
lature... menu.
CHAPTER 2. MIDITOTAB TUTORIAL
2.4
11
Out-of-range notes
One of the features of MIDIToTab is taking into account notes which are
playable on one instrument but not another. In other words, a note which
is played on the piano and which is out of the range of the guitar can be
converted in order to fit onto the instrument. This is done applying an
increase or decrease in the pitch of the note by one or more octaves, followed
by an analysis of the context surrounding the note in order to find the best
match.
The conversion of out-of-range notes can be turned on using the Out-OfRange Notes dialog, as shown in Figure 2.6.
Figure 2.6: The Out-Of-Range Notes dialog
It is also possible to allow a certain number (or all) out-of-range notes to
be ignored, in which case they will not be taken into account by the search.
The dialog box can be opened either by clicking on the
button or the Options→Out-of-range notes... menu.
toolbar
CHAPTER 2. MIDITOTAB TUTORIAL
12
Representation of out-of-range notes
When the conversion of out-of-range notes is turned on, the notes resulting
from a conversion are shown in green on the tablature. An example is shown
in Figure 2.7.
Figure 2.7: Out-of-range notes converted
When the conversion of out-of-range notes is turned off, the impossible
notes are shown as red exclamation marks: !, as shown in Figure 2.8.
2.5
Initial position
While MIDIToTab calculates the optimal fingering positions of a given score,
it is important to define a starting position which will serve as a basis for
the transcription. This starting position is defined in terms of an area on the
neck of the guitar, such as the middle, upper or lower parts.
The initial position can be set using the Options→Preferred starting
CHAPTER 2. MIDITOTAB TUTORIAL
13
Figure 2.8: Conversion of out-of-range notes turned off
position... menu or the
toolbar button.
Figure 2.9 shows the Initial Position dialog.
Figure 2.9: The Initial Position selector dialog
The initial position can thus be set to Lower on the neck, Middle-area
and Higher on the neck. If unsure about the starting point, a Default value
can be selected.
Setting the correct initial position is also an important part of the Deep
Search mechanism, see Section 3.4.1.
CHAPTER 2. MIDITOTAB TUTORIAL
2.6
14
Transposition
It is also possible to transpose a piece by a given number of semitones. This
value varies between +12 and −12, representing an octave higher or lower.
The transposition can be applied using the
Tools→Transpose... menu.
button or through the
Figure 2.10 shows the Transposition dialog.
Figure 2.10: The Transposition dialog
Transposition is relative and cumulative, refer to Section 3.5 for more
details on how the total transposition value is calculated and how to use it
with the Deep Search function.
2.7
Splitting a tablature into different parts
Once a MIDI or MTT file has been loaded into the system, the Actions→Split
tablature... function can be used to split the current tablature into any
CHAPTER 2. MIDITOTAB TUTORIAL
15
number of equal parts. This is especially useful when it is preferable to work
on a score piece by piece or perform in-depth analyses of smaller parts.
Figure 2.11 shows the Split Tablature dialog box.
Figure 2.11: The Split Tablature function
Apart from the 3 most commonly used ways to split a score, as presented
by default on the dialog box, it is possible to define a custom split ratio using
the text box on the bottom.
Once the split ratio has been chosen, clicking on the OK button will start
splitting the tablature. The resulting parts are subsequently added to the
main tablature window and can be easily located using their respective suffixes of the form: (Part n), where n is the nth part of the split tablature.
For instance, splitting the track ”French Horn in G minor” into 3 equal
parts will produce the following output:
• French Horn in G minor (Part 1),
CHAPTER 2. MIDITOTAB TUTORIAL
16
• French Horn in G minor (Part 2), and
• French Horn in G minor (Part 3).
The Split Tablature function can also be accessed from the toolbar using
the
icon.
Splitting an already split tablature
Of course, it is possible to further split a tablature which is itself the result
of a split from a bigger tablature. Each of these resulting tablatures behaves
exactly like a normal tablature and as such can be subject to any further
modifications and analyses. They are also easily located using their suffixes.
2.8
Isolating a part of the tablature
Isolating a part of the tablature can be useful for many reasons and in many
scenarios. It is important when a subset of the piece has to be analysed,
when only a certain portion of the score is of interest or, most importantly,
when performing a Deep Search on the isolated portion of the piece (see
Section 3).
The Isolate Tablature function is a powerful tool which can be accessed
from the Actions→Isolate part of the tablature... menu or by clicking on the
icon in the toolbar.
MIDIToTab offers 2 ways to precisely isolate a part of the tablature. The
first is an isolation by percentage: by choosing the delimiting start and end
percentages from the initial tablature, a very precise result can be obtained.
However, if there is need for even better precision, the second option allows
to specify the starting and ending notes of the desired tablature. Both of
these options are part of the Isolate Tablature dialog box, which can be seen
CHAPTER 2. MIDITOTAB TUTORIAL
17
in Figure 2.12.
Figure 2.12: The Isolate Tablature function
As can be seen on the dialog box, the delimiting percentage values and
notes can be selected using a pair of sliders. Alternatively, these values can
be entered manually into the textboxes provided.
The resulting tablature can also be selected to be put into a new tab
instead of overwriting the current one. This is done by checking the Isolate
part to new tab box.
The isolation is started by clicking on the OK button, which will add
the resulting tablature to the main window. As with the Split Tablature
functionality (Section 2.7), the result can be easily located using the added
suffix. For an isolation by percentage, this suffix is: (n%-m%), where n and m
are the delimiting percentages, and (n-m) for isolation by notes, where they
CHAPTER 2. MIDITOTAB TUTORIAL
18
represent the delimiting notes.
For instance, isolating the second third of the track ”French Horn in G
minor” will result in the following tablature:
• French Horn in G minor (33%-66%).
Isolating an already isolated tablature
As with the Split Tablature function, it is of course possible to combine one
isolation with another, which will not change the behaviour of the resulting
tablature.
2.9
Changing the current instrument
It is possible to change the current instrument selected for the tablature by
clicking on the Actions→Change instrument... menu entry or the
toolbar button.
The Instrument Selection dialog (see Section 2.3) allows to choose between
a vast array of instruments.
Note: this will overwrite the current instrument and initiate a re-calculation
of the tablature. Only use if the tablature’s changes are already saved or if
you are willing to lose all changes.
2.10
Lyrics
Lyrics contained within any MIDI or MTT file can be viewed either by clickicon or using the Score→Lyrics... menu. Figure 2.13
ing on the
CHAPTER 2. MIDITOTAB TUTORIAL
19
shows the Lyrics window.
Figure 2.13: The Lyrics window
Note: lyrics can also be viewed in the MIDI Analyzer (see Chapter 4) in
the General tab.
CHAPTER 2. MIDITOTAB TUTORIAL
2.11
20
Saving and loading a tablature
Every tablature opened and modified with MIDIToTab can be saved to disk
toolbar button and loaded using the
button or
by clicking on the
through the File→Save tablature... and File→Load tablature...
menu.
MIDIToTab uses the native .mtt file format for tablature storage.
2.12
Exporting a tablature
MIDIToTab offers the following file formats for exporting a tablature:
• Power Tab (.ptb),
• Adobe Acrobat (.pdf),
• .pnm,
• .png,
• .jpg,
• .bmp,
• .xpm,
• .pcx.
Tablatures can be exported using the File→Export... menu.
CHAPTER 2. MIDITOTAB TUTORIAL
2.13
21
Printing
Tablatures can be printed either using the
toolbar button.
File→Print... menu or the
Chapter 3
Using the Deep Search function
Note: the Deep Search function is only available in the Professional version
of MIDIToTab.
3.1
Introduction
Deep Search is one of the most important functionalities of MIDIToTab Professional.
It enables the user to analyse in depth any given musical score in a variety
of ways and to study the characteristics of its different parts. Deep Search
allows the user to optimize the fretting positions on the instrument using the
latest artificial intelligence techniques in order to search for a set of fingering
positions best suited to the specifications of the user.
MIDIToTab’s Deep Search function utilizes a certain subset of artificial
intelligence, genetic algorithms.
Also known as evolutionary algorithms,
genetic algorithms use important aspects of the biological theory of evolution
in order to converge to an optimal solution. Given their strong success in
many scientific and technological fields, they are employed in many areas in
which the complexity of the problem does not allow usual techniques to be
used.
22
CHAPTER 3. USING THE DEEP SEARCH FUNCTION
23
The following pages will describe the features of Deep Search and present
their modes of use as well as give thorough examples in order for the user to
employ their functionalities to the fullest.
Finally, a complete example will be presented in order to show how to
use MIDIToTab together with Deep Search to find the best settings for any
particular piece, thereby saving a significant amount of time.
3.2
Overview and features
In order to have maximal control over the most important parts of the search
algorithm, a number of options and tools are at the user’s disposal. These
can be used to fine-tune the search and find solutions which would otherwise
be difficult to discover.
There are 4 main functionalities of Deep Search which can be adjusted
individually:
1. Complexity: the complexity of the search can be adjusted using this
tool. Complexity refers to the depth of the search itself and therefore
also to the resources allocated to it - a search with a higher complexity
will need more time to execute.
2. Initial position: the starting position of the fretting hand can be
adjusted. There are 2 options to choose here: either select the starting
position manually or let the search involve all possible initial positions
and choose the best one. Again, this latter one requires more time to
execute.
3. Transposition: a global transposition value can be applied to the
tablature using this tool. This means that the tablature resulting from
the Deep Search will be transposed by a number of semitones.
4. Log results: Logging and analysing the results of a Deep Search is
very useful in a number of ways. Section 3.6 is devoted to presenting
the logging function in detail.
CHAPTER 3. USING THE DEEP SEARCH FUNCTION
24
Figure 3.1 shows the location of these 4 features on the Deep Search panel.
Figure 3.1: The Deep Search panel and its different components
CHAPTER 3. USING THE DEEP SEARCH FUNCTION
25
The following sections will describe each of these functionalities in detail
and give examples of their use.
Please note that Deep Search is best used together with the Tablature
Isolation function (Section 2.8) and the Tablature Splitting function (Section
2.7). Please refer to these sections for detailed information on their individual use and to Section 3.8 for an example of how to use Deep Search in
conjunction with these tools.
3.3
Complexity
Complexity is one of the most significant parts of Deep Search and as such,
it is important to understand its function and how it affects the search.
There are 4 possible settings for the complexity of the Deep Search. In
the simplest of terms, the more complex the search the longer it will take,
which is a direct consequence of the fact that larger complexity requires more
resources. However, a more complex, or deeper search will yield superior
results (and sometimes different, but equally playable tablatures).
The complexity settings are:
1. Normal complexity is a time-efficient search which is best suited
for quick and thorough searches where high quality of output is not
absolutely necessary. It is better than the preliminary search (Section
2.3.1) but does not look a lot further in favour of being quicker. It can
be used efficiently to establish a general idea about a piece for a later,
deeper, analysis or simply to analyse tablatures of smaller or reduced
size. Normal complexity can also be seen as a reference point for the
other, more complex searches.
2. High complexity increases the overall depth of the search by a factor
of 1.5 from normal complexity. It is often used when time is important
but results need to have superior quality to that of normal search.
CHAPTER 3. USING THE DEEP SEARCH FUNCTION
26
3. Very high complexity enables the user to perform a very thorough,
in-depth search of the tablature. This setting analyses the score at a
very deep level, enabling the discovery of the best fingering positions.
It uses more resources than its two lower counterparts, and as such
needs more time to execute as well.
4. Ultra high complexity is the highest form of search Deep Search has
to offer. Its internal complexity is the highest of the 4 and it requires
the most amount of resources to perform. It also requires a fair amount
of time to execute but its results are unrivalled: this setting produces
the highest quality tablatures (given the other user-defined parameters
of course) through an exhaustive search of its different characteristics.
This setting is used when time is not an essential factor but the results
have to be of the highest possible quality. It is best used together with
other tools (such as Split ans Isolate - Section 3.8) since execution time
can increase greatly with the number of notes in the score.
While complexity is an essential part of the Deep Search mechanism,
other factors also regulate the quality of the output and the efficiency of the
search. The following sections will present these settings.
3.4
Initial position
Setting the initial fretting hand position of the tablature is essential to the
outcome of the search. Indeed, this initial position will serve as a starting
point for the Deep Search and as such will define the rest of the tablature.
Setting the initial position can be done in the Deep Search panel and
MIDIToTab offers many different settings for this purpose. In order to present
a wide array of choices, the user can either select from 4 different positionings or choose to search within all possible initial solutions. The following
paragraphs will detail these options.
CHAPTER 3. USING THE DEEP SEARCH FUNCTION
3.4.1
27
Selecting the correct initial position
If the ”Use current initial position setting” is selected, the initial
position can be chosen using the Initial Position dialog, either by clicking on
the
icon or through the Options→Preferred starting position...
menu, as seen on Figure 3.2.
Figure 3.2: The Initial Position selector dialog
The different choices present in the dialog, default, lower on the neck,
middle-area and higher on the neck are explained in detail in Section 2.5.
3.4.2
Searching within all initial positions
Of course, if the correct starting position is not known or there simply is
no preferred starting position, or in order to perform a full-scale search of
the tablature it is possible to set the Deep Search to execute for all possible
initial positions by selecting the ”Search within all initial positions”
option. This will perform a Deep Search of all the different positions, evaluate
each of these individually (these are called candidate solutions) and compare
the final results in order to output the optimal tablature.
Note: selecting this option will significantly increase computing time.
Use when aiming for the best possible tablature and when time is not an
important factor.
CHAPTER 3. USING THE DEEP SEARCH FUNCTION
3.5
28
Transposition
Before launching the Deep Search it is possible to apply a transposition value
to the score. This will be taken into account by the algorithm and the output
will be shifted by the amount of semitones chosen in the Transposition dialog
(Figure 3.3).
Figure 3.3: The Transposition dialog
The transposition value can be between +12 and −12 semitones, representing an octave higher or lower.
The transposition value is relative, meaning that applying a new transposition value to an already transposed score will be performed relative to
the score’s current transposition. For example, if the score ”French Horn
in G minor”, already transposed by +3 semitones, is further transposed by
−2 semitones, the total transposition value will be +1 semitone.
The transposition value is also cumulative, which means that the current transposition value before a Deep Search is added to that selected for
the Deep Search. In other words, the non-Deep Search and Deep Search
transposition values are cumulated.
CHAPTER 3. USING THE DEEP SEARCH FUNCTION
3.6
29
Logging the search results
An important feature of Deep Search is its ability to log global results together with intermediary ones; this gives an overall impression of the efficiency of the selected options and provides information on how to make the
most out of the search for a particular score. By examining these logs it is
possible to establish important conclusions about a piece either for further
analysis or simply for fine-tuning the Deep Search at a later stage.
The logs contain the following information, among others:
• The Deep Search parameters as set by the user, including: the complexity, initial position and transposition values,
• for each candidate solution1 , the tablature score (see Section 3.7), the
number of impossible notes found and the total execution time in seconds,
• the selected instrument (number of strings and frets, tuning, and so
forth),
• the total number of notes present in the score.
As it will be shown in Section 3.8, logging the search results can be used,
for instance, to determine the best initial fingering position for a piece using
Deep Search set to ”normal” complexity. The logs will tell which position
is best for the piece, enabling a much more complex search to be performed
with that starting position.
In essence, it enables to perform a smaller-scale initial analysis of the
piece before submitting it to a higher-level Deep Search.
Deep Search logging can be enabled by checking the box in the Deep
Search panel.
1
As mentioned in Section 3.4.2, a candidate solution refers to one of the solutions with
a different initial position. These are then compared to each other to find the optimal
tablature.
CHAPTER 3. USING THE DEEP SEARCH FUNCTION
3.7
30
The tablature evaluation panel
MIDIToTab features an extensive tablature evaluation system, which allows
the user to have an overall ”feel” of the produced tablature. This is presented
in the form of 3 different indicators, namely:
1. the global score: the total score given to the entire tablature by the
Deep Search process, representing the playability of the tablature in a
numerical form. This is relative to the tablature in question.
2. the tablature score: the global score normalised in accordance with the
number of notes and chords present in the score. This score is absolute;
it is comparable to that of any other score.
3. the estimated difficulty: this is a verbose output of the tablature score;
it gives an estimation of the playability of the score. The difficulty
varies from Very easy to Very hard.
Figure 3.4 shows the Evaluation Panel, which contains these indicators.
Figure 3.4: The Evaluation Panel
Tablature evaluation can not only help to estimate the difficulty of playing
a score, but also to compare scores and find the best settings for a particular
piece.
CHAPTER 3. USING THE DEEP SEARCH FUNCTION
3.8
31
A full example
This section will present a full example of use of Deep Search as well as
show the correct way to use MIDIToTab and its functionalities to their full
potential.
The MIDI file used in this example will be Demo - Long.mid, which can
also be found in the Samples folder where MIDIToTab was installed.
This file was chosen for the reason that it contains a number of musically
distinct parts - something that is fairly common in actual pieces of music.
It is composed of a first section of notes which are part of different scales, a
second, exclusively arpeggiated section and finally a third rhythm-oriented
section containing variations of chords. Moreover, the different time signature
changes which occur throughout the piece present an additional complexity
to our search.
It will now be shown how to break this piece down and find the best
fingering positions effectively using the available tools.
1. The first step is to load the file into MIDIToTab. For the sake of this
tutorial we will be using the full opening mode so that we can choose
a 6-string, 22-fret guitar tuned to EADGBE.
2. As the preliminary search concludes the tablature will appear in the
tablature window, as shown in Figure 3.5.
3. Since preliminary search just creates a ”first impression” of the tablature, we have to use the different tools at our disposal to perfect
it.
Firstly, since the piece contains three musically different sections, we
will split it into 3 portions by opening the Split Tablature window (see
Section 2.7 for more details) and selecting ”Split tablature into 3 equal
parts”.
CHAPTER 3. USING THE DEEP SEARCH FUNCTION
32
Figure 3.5: Demo - Long.mid - after the preliminary search
This will create 3 new tabs, each containing a part of the original tablature. These parts can be identified using their (Part n) suffixes.
Figure 3.6 shows the result of this operation. .
4. We will now select the second of the 3 isolated tablatures (Part 2) the arpeggio section - and determine the best initial fingering position
for it.
For this, we will use Deep Search on the ”Normal ” complexity setting
and the ”Search within all initial positions” selected. Finally, we check
the ”Log results to text file” and choose a location to save the log.
This will allow us to see, in the log file, which of the initial positions is
the best for this particular piece. We will then use this information to
launch a full Deep Search on the tablature.
5. We now examine the search log. The log file can be opened in any text
editor.
CHAPTER 3. USING THE DEEP SEARCH FUNCTION
33
Figure 3.6: Demo - Long.mid split into 3 parts
The information we are looking for here is under the ”Deep Search Log
Start” heading. The results for each of the initial fingering positions
can be found here (as well as a wealth of other information). What we
are interested in is the ”score” value (refer to Section 3.7 for detailed
information about tablature evaluation in MIDIToTab) - the lower it is
the better the quality of the tablature. Figure 3.7 shows the relevant
part of the log file.
As we can see, solution 2 provides the best quality tablature, with a
score of 286. This corresponds to the middle-area of the instrument.
6. We can now use this information to launch a full Deep Search with the
middle-area of the instrument as the starting position.
Select the initial position using the Initial Position dialog (see Section
2.5), set the Deep Search complexity to ”Ultra high” and check ”Use
current initial position setting”. The results can be logged, but are not
absolutely necessary at this point.
MIDIToTab will now perform an in-depth analysis of the tablature and
CHAPTER 3. USING THE DEEP SEARCH FUNCTION
34
Figure 3.7: Demo - Long.mid search log
output the results back into the window. The tablature score and
playability are also shown in the tablature evaluation panel.
7. This process can be repeated for each different section of the tablature
in order to obtain a high quality transcription.
Of course, this process can be combined with other tools such as transposition, isolating a part of the tablature for a transcription which is fine-tuned
to a particular area of the score, the adjustment of the conversion of out-ofrange notes, using another instrument, and so forth.
Chapter 4
The MIDI Analyzer
The MIDI Analyzer is a built-in tool which gives detailed information about
the currently active MIDI file. It also comes in a standalone version, which
can be found on the MIDIToTab website (See Annex A).
4.1
How to use
The MIDI Analyzer can be accessed through the Tools→MIDI Analyzer...
menu or the
toolbar icon.
Note: the MIDI Analyzer only opens for tabs which have been loaded
from a MIDI (.mid) file. If the current tab is not the result of a MIDI file
(such as a MIDIToTab file loaded from disk) an error message will be shown.
35
CHAPTER 4. THE MIDI ANALYZER
4.2
36
Features
Once the MIDI Analyzer has been loaded, it will perform an in-depth analysis
of the file. This analysis is divided into 4 main categories which can each
be accessed using the tabs situated on top of the MIDI Analyzer: general
information, MIDI tracks, meta information, and miscellaneous.
These categories present the following information:
1. General: file information, size, title, author, copyright notices (if any),
initial tempo and time signature, and the lyrics.
2. Tracks: the list of all tracks contained within the MIDI file and for each
of these, pitch information (the highest, lowest and average pitches) and
event changes occurring within it.
3. Meta: header information, MIDI format and a number of MIDI metaevents defined in the file.
4. Misc: embedded text (strings of text planted inside the file by its
creator), proprietary data (streams of bytes that do not match any
of the standard MIDI events and are inserted into the file by device
manufacturers, programmers etc...) in both hexadecimal and plain text
format, the duration of the file in MIDI clock ticks and the presence of
unknown MIDI events (these usually show a level of corruption in the
MIDI file).
Figure 4.1 shows the General and Tracks tabs while Figure 4.2 presents
the Meta and Misc tabs.
Most of the information output by the MIDI Analyzer can be saved to a
text file using the provided buttons.
CHAPTER 4. THE MIDI ANALYZER
37
Figure 4.1: MIDI Analyzer - the General and Tracks tabs
Figure 4.2: MIDI Analyzer - the Meta and Misc tabs
4.3
Standalone MIDI Analyzer
The MIDI Analyzer is also available as a standalone program in order to
analyse files without the need to open them in MIDIToTab. The standalone
CHAPTER 4. THE MIDI ANALYZER
38
version is identical to the MIDIToTab version, with one difference: opening a
MIDI file is done by clicking on File→Open... instead of the context-based
access in MIDIToTab.
The standalone MIDI Analyzer can be downloaded from the MIDIToTab
website: www.midi-to-tab.com .
Chapter 5
Keyboard shortcuts
The following list presents all available keyboard shortcuts in MIDIToTab:
Figure 5.1: Keyboard shortcuts in MIDIToTab
39
Chapter 6
FAQ and technical support
6.1
Frequently asked questions
• MIDIToTab() runs slow on higher settings, is this normal?
As explained in Chapter 3, MIDIToTab uses a complex genetic algorithm to calculate the optimal fingering positions for a piece. It is
natural that higher settings require more resources, including time.
However, slow performance might also indicate that your PC does not
meet the minimum requirements set by MIDIToTab - please consult Section 1.3 for more details.
It might also be useful to read the complete example in Section 3.8
which shows, in detail, how to use MIDIToTab effectively in order to
find the best possible settings for any particular piece.
Note: since processing time is proportional to the number of notes
present in the score, it might be useful to reduce this by splitting or
isolating a part of the tablature to work on it individually.
• Some notes do not appear on the staff lines after loading a MIDI file.
What is going on?
This happens if the MIDI file contains notes of very unusual length or
if the file is corrupt. This is usually the sign of an incorrectly generated
40
CHAPTER 6. FAQ AND TECHNICAL SUPPORT
41
MIDI file or an error by the file’s creator. In these cases, MIDIToTab
continues the calculations but does not show the note on the staff.
• I see letters instead of staff notes on the tablature! What’s wrong?
The font used for the rendering of staff notes has not been installed
properly. Try reinstalling MIDIToTab with administrator privileges.
• There are both green (converted) notes and red (impossible notes) on
my tablature. What’s wrong?
This means that the original MIDI file contains corrupted notes, which
can not be recovered even when the conversion of out-of-range notes
is turned on. Some MIDI editing programs are capable of correcting these errors; MIDIToTab ignores them and continues processing the
other notes normally.
• The tablature looks messy after opening a MIDI file. What happened?
The MIDI file is most likely corrupt, or the notes within it are overlapping with each other. This might be caused by the original program
used to save it or errors in the transcription. Since MIDIToTab renders
the notes according to their original MIDI length, this can lead to the
notes overlapping. Choose another version of the MIDI file or fix it
using a MIDI editor.
For any specific question related to MIDIToTab not discussed here, please
feel free to contact Ragnarok Software using the contact details on www.
midi-to-tab.com .
Appendix A
Links
MIDIToTab official website: www.midi-to-tab.com .
Ragnarok Software official website www.ragnarok-software.com .
MIDI files can be found on numerous websites, such as:
• http://mididb.com/ ,
• http://www.musicrobot.com/ ,
• http://www.cool-midi.com/free-midi-11.htm ,
• http://aitech.ac.jp/~ckelly/SMF.html,
• http://www.vanbasco.com/midisearch.html ,
• http://www.jsbach.org/websites.html ,
• http://www.classicalarchives.com/midi.html ,
• and many more.
Additionally, a large number of files in the highly recommended http:
//ultimate-guitar.com database can be converted into MIDI.
42
Appendix B
About MIDIToTab
MIDIToTab was originally developed as part of a research project at the University of East Anglia (Norwich, UK). In its early stages, MIDIToTab was
capable of transcribing and optimising monophonic MIDI files (pieces which
do not contain chords). The first demo versions featured the basic elements of
the genetic algorithm and a small user interface capable of showing tablature.
As the project developed both in scope and complexity, it was decided
that it had to be made public: indeed, further research showed that no such
tablature optimisation software existed to date, and given the usefulness
of such a program work began on many of its major components. These
included a better, improved GUI, a set of tools for isolating and splitting a
piece, encoding a vast array of instruments and finally, Deep Search.
Deep Search proved to be one of the most challenging aspects to code in
MIDIToTab; it not only had to be capable of generating high quality tablature,
but also satisfy a number of search parameters which could be adjusted by
the user. It had to be robust and flexible, and on top of all transparent to
the user.
This was no small challenge; even more so that the artificial intelligence
techniques used in MIDIToTab were resource- and time-consuming: they had
to be rendered faster and more efficient in order to be usable. It is for this
43
APPENDIX B. ABOUT MIDITOTAB
44
reason that a number of additional tools were created such as the very useful
Deep Search logging tool (Section 3.6), which made it possible to perform a
smaller-scale initial analysis of the piece before submitting it to a higher-level
Deep Search.
Deep Search was then equipped with the tablature evaluation function,
which calculated a numerical and verbose value of the playability of the
tablature. This was essential in order to inform the user of the outcome of
the search and as such, constituted a secondary output of the algorithm.
Finally, a number of additional components were added to MIDIToTab
in order to enhance usability as well as a couple of file formats which the
program could save to.
After its release, MIDIToTab is still under active development and a large
number of additional features and options are planned for further releases.
Since the aim of MIDIToTab is to convert, analyse, transcribe and optimise
musical pieces it will always be in improvement and will converge towards a
better, optimal solution to the tablature problem.
Appendix C
Thanks
Many thanks go out to all the people involved directly and indirectly in the
various parts of the project. These include:
• Aki Hietala (Daedana Design - www.daedana-design.co.uk ): the creator and designer of www.midi-to-tab.com and www.ragnarok-software.
com websites and webshops,
• Alexandre ”Trollebos” Walter : for the French translation of this user
manual,
• Dr. Gavin Cawley, professor of computational biology at the University
of East Anglia,
• Robert Allgeyer : the creator of the royalty-free MusiSync font, 2008
version, modified and used for staff notation rendering in MIDIToTab,
• Everyone involved in the making of gcc. A lot of people.
45
Index
.mtt file format, 18
MIDIToTab
features, 2
official website, 43
system requirements, 2
artificial intelligence, 21
candidate solution, 26, 27
change instrument, 7, 17
Deep Search, 21
artificial intelligence, 21
candidate solution, 26, 27
complexity, 24, 31
settings, 24
Deep Search panel, 6, 23
evaluation, 28, 31, 32
evaluation panel, 7
full example, 29
genetic algorithms, 21
initial position, 25, 31
logging, 27, 31, 45
transposition, 26
evaluation panel, 29
exporting a tablature, 19
FAQ, 41
full example, 29
genetic algorithm, 45
genetic algorithms, 21
hotkeys, 39
initial position, 12, 25
interface, 6
isolating a part of the tablature, 9,
15, 17
isolation by notes, 16
isolation by percentage, 15
keyboard shorcuts, 39
loading a tablature, 18
lyrics, 17
MIDI analyzer, 35
standalone program, 37
official website, 43
opening a MIDI file, 7
out-of-range notes, 10
preliminary search, 9, 30
printing, 19
saving a tablature, 18
split ratio, 14
splitting a tablature, 9, 14, 15, 30
system requirements, 2
tablature evaluation, 28, 32
The MIDI Analyzer, see MIDI analyzer
46
INDEX
track selection window, 7
transposition, 13, 26
cumulative, 27
relative, 26
47