1
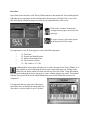
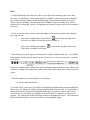
Classroom
Chapter 1: Lesson 1
© Adventus Incorporated, 2001
Chapter 1: Introductory Theory, The Treble Clef, Bar Lines, Note Values,
Rests, & The Bass Clef
Lesson 1
This lesson plan was written for use with Piano Suite Premier software, and is intended as a
guideline and procedure for 1 week (5 hours) of music instruction. For specific information on
Piano Suite Premier and how to purchase, please visit one of the following links:
http://www.adventus.com/purchase/premier.html
http://www.adventus.com/purchase/bundle.html
Lesson Overview
•
The student will begin to learn the following basic music concepts and skills which are
required to read music on the treble clef staff
•
•
•
•
•
Pitch
Notation
Time
The notes middle C to G on the treble clef staff and the position of these notes on
the piano keyboard
The student will also view a multimedia presentation in the Theory Thinker which
introduces the student to the Piano, and demonstrates proper posture and correct hand
position.
New Vocabulary
pitch, notation, time, staff, treble clef, G clef
New Material
Theory:
I-1: The Piano
I-2: Posture and Hand Position
I-3: Pitch, Notation and Time
I-4: The Notation of Pitch
1-1: The Treble or “G” Clef
Songs:
“Old Grey Goose (1)”
Procedure
Open Piano Suite and click on the Theory Thinker button in the main menu. Proceed through the
following theory topic/pages by first clicking on the desired topic ( left side of the screen ) and
then selecting the first theory page, located at the top right-hand side of the screen.
Click on the “continue” button after
viewing a theory page to proceed to the
next page.
To repeat a lesson, click on the picture
at the bottom left of the screen.
It is important to view all of the pages for each of the following topics:
•
•
•
•
•
I-1: The Piano
I-2: Posture and Hand Position
I-3: Pitch, Notation and Time
I-4: The Notation of Pitch
1-1: The Treble or “G” Clef.
(Although these lesson plans will take you to various sections of the Theory Thinker, it is
also possible to proceed through the theory topics and related pages by clicking on the
Daily Director button which is located near the top left of the screen. Using this method,
you can proceed through the theory one page at a time, without skipping any pages. This method
will also start you off at the lesson which immediately proceeds the lesson that you have last
completed.)
It is important that you play each of the theory
games that come up during the lessons until you
can achieve a correct answer 9 out of 10 times.
Likewise, you should repeat each music exercise
until a score of “good work” (or better) is achieved.
You will be using the “Wait for Note” method for
the piano exercises located in the above outlined
theory topics/pages. You will notice that when you
play a wrong note on the keyboard it is indicated
with a red “x” on the staff.
When you press the correct key on the keyboard,
the corresponding note on the staff will turn green.
You can now proceed to the next note of the song.
( For a more detailed description of the “Wait for
Note” method you may refer to the user manual or
view Piano Suite’s help file.)
After completing the theory pages, proceed to the Piano Player section of Piano Suite and
practice the song “Old Grey Goose (1)” (right hand only) using the “Wait for Note” method until
a score of “good work” or better is achieved.
Indicators of Success
•
You will achieve a score of “good work” (or better) with regards to the Theory
Thinker piano exercises and with the song “Old Grey Goose (1)”
•
You will achieve a correct answer 9 out of 10 times when playing the theory
games.
Hints
* Using the fingerings above the notes will be very helpful when learning to play a new song.
However, it is important to turn the fingerings off eventually to ensure that you are reading the
note symbols and not relying so much on the fingering. After becoming familiar to the song,
choose “Superior Settings” from the Main Menu. Within the Superior Settings form, click to
uncheck the “use fingering” option. The fingering can be turned on again when you are learning a
new piece.
* If you are not sure where to place your hands/fingers on the piano keyboard when learning a
new song you can:
•
click on the “Hand Position Video Button”
located at the top right of the
screen if it is available for the song you are learning, or
•
click on the “Hand Position Button”
This button is available for all songs.
located at the top right of the screen.
* Piano Suite gives you the option of viewing music with three different font sizes. You will find
that beginners usually prefer the large font size because it is very easy to locate a note’s position
on the staff.
Results are normally better with the Wait for Note Method using the large font size, which can be
selected by clicking on the largest note symbol in the Piano Player when you are about to practice
a piece.
* The following theory section should be reviewed often:
•
I-2: Posture and Hand Position.
You will be off to a great start if you follow the techniques and information presented within this
theory topic. It is important to begin with good playing habits from the start! It is a good idea to
remind yourself often about proper hand position during every practice session, since it takes
several weeks for your fingers to strengthen to the point where it is natural to use the correct
position. The younger the student, the longer it takes to strengthen the fingers. The Grand Staff
Battle, found in the games section, can also be used to strengthen fingers.