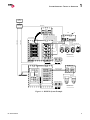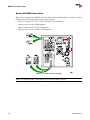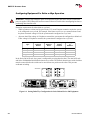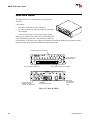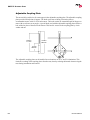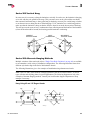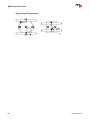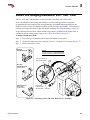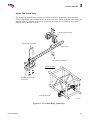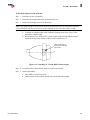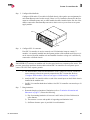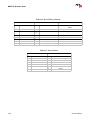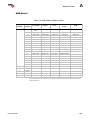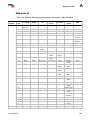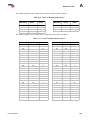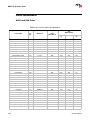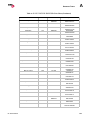
1
REFERENCE GUIDE 02.3004.0300.54 Controlling VARIKLITE® Equipment Using a DMX512 Console DMX software version 5.4 Series 200™ Series 300™ Luminaires Power Devices Interface Devices LIGHTING VL6C+™, AutoPar™, Virtuoso®, Virtuoso® DX, Virtuoso® DX2, and Visionary™ 3D are trademarks of Production Resource Group, LLC, registered in the U.S. and other countries. VARI❋LITE® is a trademark owned by Genlyte Thomas Group LLC and is registered in the United States and other countries. VL5™, VL5Arc™, VL5B™, VL6™, VL6B™, VL6C™, VL7™, VL7B™, Smart Repeater™, Series 200™, Series 300™, APS6™, C3™, DICHRO❋WHEEL™, VACU❋DEP™, VARI❋BEAM™ and the Vari-Lite Asterisk are trademarks owned by Genlyte Thomas Group LLC. All other brand or product names which may be mentioned in this manual are trademarks or registered trademarks of their respective companies. This manual is for informational use only and is subject to change without notice. Please check www.prg.com for latest version. PRG assumes no responsibility or liability for any claims resulting from errors or inaccuracies that may appear in this manual. DMX512 Reference Guide Version as of: April 16, 2008 | PRG part number: 02.3004.0300.54 Production Resource Group Dallas Office 8617 Ambassador Row, Suite 120 Dallas, Texas 75247 www.prg.com DMX512 Reference Guide ©2008 Production Resource Group, LLC. All Rights Reserved. FOREWORD Safety Notice It is extremely important to read ALL safety information and instructions provided in this manual and any accompanying documentation before installing and operating the products described herein. Heed all cautions and warnings during installation and use of this product. Safety symbols used throughout this manual are as follows: CAUTION advising of potential damage to product. WARNING advising of potential injury or death to persons. GENERAL INFORMATION PERTAINING TO PROTECTION AGAINST ELECTRICAL SHOCK, FIRE, EXPOSURE TO EXCESSIVE UV RADIATION, AND INJURY TO PERSONS CAN BE FOUND BELOW. WARNING: INSTRUCTIONS FOR CONTINUED PROTECTION AGAINST FIRE 1. Luminaires have been designed for use only with specific lamps. Note lamp type before replacing. Installing another type of lamp may be hazardous. 2. Luminaires may be mounted on any type of surface as long as mounting instructions are followed. See instructions detailed in this manual. 3. Replace fuses with same type and rating only. 4. Minimum distance from head to any flammable object is 2m. WARNING: INSTRUCTIONS FOR CONTINUED PROTECTION AGAINST ELECTRICAL SHOCK 1. Luminaires are designed for dry locations only. Exposure to rain or moisture may damage luminaire. 2. Disconnect power before servicing any equipment. 3. Servicing to be performed by qualified personnel only. WARNING: INSTRUCTIONS FOR CONTINUED PROTECTION AGAINST EXPOSURE TO EXCESSIVE ULTRAVIOLET RADIATION 1. Luminaires may use an HID type lamp which produces UV radiation. DO NOT look directly at lamp. 2. It is hazardous to operate luminaires without complete lamp enclosure in place or when lens is damaged. Lenses or UV shields shall be changed if they have become visibly damaged to such an extent that their effectiveness is impaired. 0 2. 3 0 0 4. 0 3 00 . 5 4 i DMX512 REFERENCE GUIDE WARNING: INSTRUCTIONS FOR PROTECTION AGAINST INJURY TO PERSONS 1. Exterior surfaces of the luminaire will be hot during operation. Use appropriate safety equipment (gloves, eye protection, etc.) when handling and adjusting hot equipment and components. Service and maintenance should be performed only by qualified personnel as determined by the high pressure lighting fixture manufacturer. 2. Arc lamps generate intense heat. Disconnect power and allow lamp to cool for 15 minutes before relamping. 3. Arc lamps emit ultraviolet radiation which can cause serious skin burn and eye inflammation. Additionally, arc lamps operate under high pressure at very high temperatures. Should the lamp break, there can exist a danger of personal injury and/or fire from broken lamp particles being discharged. 4. The lamp shall be changed if it has become damaged or thermally deformed. 5. Wear eye protection when relamping. 6. If lamp is touched with bare hands, clean lamp with denatured alcohol and wipe with lint-free cloth before installing or powering up the luminaire. 7. Serious injury may result from the generation of ozone by this lamp system. A proper means of venting must be provided. Revision History This manual has been revised as follows: Version Release Date BASIC April 16, 2008 Notes Initial release for DMX software version 5.4 Note that this manual was converted to the PRG format from a legacy VARI❋LITE® manual. ii 02.3004.0300.54 TABLE OF CONTENTS Table of Contents Introduction About This Manual .......................................................................................................................... 1 Additional Documentation ........................................................................................................ 1 Equipment Covered ................................................................................................................... 2 Cable/Connector Terminology .................................................................................................. 3 Customer Service ............................................................................................................................. 4 Chapter 1. System Operation Theory of Operation System Overview ............................................................................................................................. 6 AC Service ....................................................................................................................................... 8 Console Types .................................................................................................................................. 8 Fixture-Library Consoles........................................................................................................... 8 Channel Based Consoles ........................................................................................................... 9 DMX512 Modes and Patching DMX512 Modes ............................................................................................................................ 10 Series 300 Smart Repeater....................................................................................................... 10 Series 300 DMX Power Pack .................................................................................................. 12 Mode Setting Table for the DMX Power Pack ....................................................................... 13 Thumbwheel Addresses ................................................................................................................. 14 Patching.......................................................................................................................................... 14 Patching A Fixture Library Console........................................................................................ 14 Patching Channel-Based Consoles .......................................................................................... 15 Using the Console to Make Programming Easier ................................................................... 15 Luminaire Timing Channels .......................................................................................................... 16 Mini-Stepping ................................................................................................................................ 17 Luminaire Reset ............................................................................................................................. 17 Equipment Power Requirements Overview........................................................................................................................................ 18 Three-Phase Power Source ............................................................................................................ 18 Delta/Wye Configuration ........................................................................................................ 18 Input Voltage ........................................................................................................................... 19 Configuring Equipment For Delta or Wye Operation............................................................. 20 Phase Balancing....................................................................................................................... 21 Current Requirements .................................................................................................................... 22 Current Calculation ................................................................................................................. 22 Power Metering.............................................................................................................................. 23 0 2. 3 0 0 4. 0 3 00 . 5 4 iii DMX512 REFERENCE GUIDE Chapter 2. Equipment Description Power and Data Distribution Equipment AC Line Disconnect (200A) .......................................................................................................... 26 Mini AC Line Disconnect (30A) ................................................................................................... 27 Bucking Transformer ..................................................................................................................... 28 ACS Rack....................................................................................................................................... 29 Mini-ACS Rack.............................................................................................................................. 30 Repeater Box/Cheater Repeater Box ............................................................................................. 31 Smart Repeater Units ..................................................................................................................... 32 DMX200 Interface ......................................................................................................................... 34 DMX Power Pack and DPP Plus ................................................................................................... 34 Dimmers......................................................................................................................................... 35 Modular Rack Components 24-Channel Modular Rack ............................................................................................................. 36 SixPack Chassis ............................................................................................................................. 37 C3 Module...................................................................................................................................... 37 APS6 Module................................................................................................................................. 38 SPC-36 SixPack Controller............................................................................................................ 38 Luminaires VL2C Spot Luminaire.................................................................................................................... 39 VL4 Wash Luminaire..................................................................................................................... 39 VL5 Series Wash Luminaires......................................................................................................... 40 VL6 Series Spot Luminaires .......................................................................................................... 41 VL6 Color/Gobo Wheel Control ............................................................................................. 42 VL6B Color/Gobo Wheel Control .......................................................................................... 43 VL6C/VL6C+ Color/Gobo Wheel Control ............................................................................. 44 VL7 Series Spot Luminaires .......................................................................................................... 45 VL7/VL7U/VL7B/VL7UB Color/Gobo Wheel Control......................................................... 46 VLM Moving Mirror ..................................................................................................................... 46 Cables Pig Tails.......................................................................................................................................... 47 Power Input Cables ........................................................................................................................ 47 Mini-AC Disconnect to SixPack Chassis Input Cable................................................................... 47 Modular Rack to Mini-ACS Rack Input Cable.............................................................................. 48 Series 200 Trunk Cable.................................................................................................................. 48 APS Trunk Cable ........................................................................................................................... 48 Series 200 Lamp Cable .................................................................................................................. 49 Series 200 Data Link Cable ........................................................................................................... 49 Series 200 Super Lamp Run Cable ................................................................................................ 50 Series 300 Lamp Cable .................................................................................................................. 51 Series 300 Smart Lamp Plus Cable................................................................................................ 51 Data Cables .................................................................................................................................... 52 Recommended Cable Types/Manufacturers............................................................................ 53 Male Termination Connector .................................................................................................. 54 Loopback Connector ............................................................................................................... 54 iv 02.3004.0300.54 TABLE OF CONTENTS Chapter 3. System Equipment Handling Lamps............................................................................................................................................. 56 Hanging Hanging Preparation ...................................................................................................................... 57 Luminaire Orientation and Placement..................................................................................... 57 Truss Pipe ................................................................................................................................ 57 Spacing Requirements ............................................................................................................. 58 Safety Cables.................................................................................................................................. 59 Series 200 Hanging Hardware ....................................................................................................... 60 Single Truss Hook Variations ................................................................................................. 60 Series 200 Hanging Methods ......................................................................................................... 61 Series 200 Two-Point Hang (Standard)................................................................................... 61 Series 200 Three-Point Hang................................................................................................... 61 Adjustable Coupling Plate....................................................................................................... 62 Series 200 Vertical Hang......................................................................................................... 63 Series 200 Alternate Hanging Methods................................................................................... 63 Series 300 Hanging Hardware: VL5 / VL6 / VLM ....................................................................... 65 Hanging Methods: VL5 / VL6 / VLM ........................................................................................... 66 Standard Hang ......................................................................................................................... 66 Three-Point Hang .................................................................................................................... 68 Custom Hang ........................................................................................................................... 68 Series 300 Hanging Hardware: VL7.............................................................................................. 69 VL7 Vertical Hang Assemblies............................................................................................... 70 Series 300 Floor Mounting ............................................................................................................ 72 Accessories Sound Baffles ................................................................................................................................. 74 VL7 Luminaire Sound Baffle.................................................................................................. 74 VL2C Luminaire Sound Baffle and Sound Blanket................................................................ 76 System Hook-Up Overview........................................................................................................................................ 79 Fixture Orientation......................................................................................................................... 79 Series 200 Luminaires.................................................................................................................... 80 Connecting to System.............................................................................................................. 80 Series 300 Luminaires.................................................................................................................... 84 Connecting to System.............................................................................................................. 84 System Checkout Series 200 Checkout....................................................................................................................... 90 Series 300 Checkout....................................................................................................................... 91 0 2. 3 0 0 4. 0 3 00 . 5 4 v DMX512 REFERENCE GUIDE Chapter 4. Testing and Troubleshooting Troubleshooting Overview........................................................................................................................................ 94 Console Problems .......................................................................................................................... 94 Series 300 Fixture Problems .......................................................................................................... 95 Hardware Problems........................................................................................................................ 97 Test Software Operating Test Software................................................................................................................. 98 Test Software/Test Tables .............................................................................................................. 99 Error Messages ...................................................................................................................... 117 Error History.......................................................................................................................... 117 Appendix A. Reference Tables Series 300 DMX Modes............................................................................................................... 120 DMX Mode 1 ........................................................................................................................ 120 DMX Mode 2 ........................................................................................................................ 121 DMX Mode 3 ........................................................................................................................ 122 DMX Mode 4 ........................................................................................................................ 123 DMX Mode 5 ........................................................................................................................ 124 DMX Mode 6 ........................................................................................................................ 125 DMX Mode 7 ........................................................................................................................ 126 DMX Mode 8 ........................................................................................................................ 127 DMX Mode 9 ........................................................................................................................ 128 DMX Mode 10 ...................................................................................................................... 129 Channel Mapping......................................................................................................................... 131 Series 200 DMX Channels .................................................................................................... 131 VL2C Parameters .................................................................................................................. 132 VL6/VL7 Parameters............................................................................................................. 133 Timing Channels .......................................................................................................................... 137 Channel Functions ................................................................................................................. 137 Timing Channel Mapping...................................................................................................... 138 Color Reference ........................................................................................................................... 144 VL2C and VL4 Color............................................................................................................ 144 VL5 Color.............................................................................................................................. 148 VL6 Color.............................................................................................................................. 153 VL7 Color.............................................................................................................................. 154 Appendix B. Glossary Glossary of Terms ................................................................................................................. 160 Index Index............................................................................................................................................. 165 vi 02.3004.0300.54 INTRODUCTION Introduction About This Manual This manual contains instructions for installing and operating VARI❋LITE® Series 200™ and Series 300™ lighting equipment within a DMX512-controlled system. Familiarizing yourself with this information will help you get the most out of your lighting system. WARNING: It is important to read ALL accompanying safety and installation instructions to avoid damage to the product and potential injury to yourself or others. Additional Documentation Note that the products covered in this manual are serviced and maintained by Production Resource Group (PRG). All questions and inquiries regarding the items cover in this manual should be directed to your PRG representative. Refer to "Customer Service" on page 4. For additional information about the equipment covered in this manual, refer to the following PRG manuals: • VARI❋LITE® Series 200™/300™ System Installation and Checkout Manual (02.3004.0200) • VARI❋LITE® Interface Devices Service Manual (02.5014.0010) • VARI*LITE® Series 200™ ACS Equipment Service Manual (02.5006.0010) • VARI❋LITE® Series 300™ Modular Rack Service Manual (02.9640.0010) • VARI❋LITE® Series 300™ Single Channel Controller Service Manual (02.9640.0011) • VARI❋LITE® DMX Power Pack Service Manual (02.9654.0010) For more information regarding DMX512 systems, refer to the DMX512/1990 & AMX 192 Standards publication available from United States Institute for Theatre Technology, Inc. (USITT). • 0 2. 3 0 0 4. 0 3 00 . 5 4 USITT 6443 Ridings Road Syracuse, NY 13206-1111 USA 1-800-93USITT www.usitt.org 1 DMX512 REFERENCE GUIDE Equipment Covered Series 200 Equipment Series 200™ luminaires require a DMX200 Interface in order to accept DMX512 protocol. Product Part Number VL2B™ Spot Luminaire 20.5002.0004 VL2C™ Spot Luminaire 20.9637.0001 VL4™ Wash Luminaire 20.8628.0001 DMX200 Interface 20.9623.0551 Series 200™ Lamp Cable 25.7030.XXXX * Series 200™ Trunk Cable 25.7029.XXXX * Series 200™ Super Lamp Cable 25.7095.XXXX * Series 300 Equipment Series 300™ luminaires require a Smart Repeater™ Interface in order to accept DMX512 protocol. Product Part Number VL5™ Wash Luminaire 20.9634.0001 VL5Arc™ Wash Luminaire 20.9647.0001 VL5B™ Wash Luminaire 20.9634.0201 VL6™ Spot Luminaire 20.9638.0001 VL6B™ Spot Luminaire 20.9660.0001 VL6C™ Spot Luminaire 21.9674.0007 VL6C+™ Spot Luminaire 20.9674.0002 VL7™ Spot Luminaire 20.9650.0001 VL7U™ Spot Luminaire 20.9650.7000 VL7B™ Spot Luminaire 28.9650.0040 VLM™ Moving Mirror 20.9643.0001 Smart Repeater™ 20.9623.0011 Smart Repeater™ Plus 20.9623.0600 DMX Power Pack 20.9654.0001 DMX Power Pack Plus 20.9654.0002 Modular Power Distribution Rack 20.9640.0001 SixPack Chassis 21.9640.0021 APS6™ Power Supply Module 21.9640.0022 C3™ Dimmer Module 20.9640.0350.02 SPC-36™ SixPack Controller 20.9640.0201 Series 300™ Unshielded Lamp Cable 25.7040.XXXX * Series 300™ Sheilded Lamp Cable 25.7042.XXXX * Series 300™ Smart Lamp Run Cable 25.7155.XXXX * APS™ Trunk Cable 25.7043.XXXX * * Last four digits represent cable length. 2 02.3004.0300.54 INTRODUCTION Cable/Connector Terminology This manual uses American wire gauge (AWG) measurements when describing cables and connectors. For use in countries outside the U.S., or for assembling compatible cables, consult the AWG/Metric Conversion Table given below for the appropriate metric equivalent. AWG Metric Max Rated Current 2/0 67.5 mm2 225A 8/5 8.37 mm2 (5 x 6.0 mm2) 35A CAUTION: Although maximum rated currents are 225A and 35A, we recommend that continuous operating current does not exceed 150A and 20A respectively. Other common terms used when describing cables and/or connectors are as follows: Term Definition plug male connector receptacle Female connector Hubbell® five-pin, three phase connector (8/5) connector Epic® connector six-pin, three phase connector (8/5) Cam-Lok® connector single pole connector (2/0) European mains cable sizes [single core rubber insulation (HO-7RN-F)] are measured in crosssectional square millimeters. Commonly available sizes are 35 mm2 (∼150 Amp), 70 mm2 (∼250 Amp), and 95 mm2 (∼300 Amp). 0 2. 3 0 0 4. 0 3 00 . 5 4 3 DMX512 REFERENCE GUIDE Customer Service Our comprehensive technical services department ensures you get the full benefit of being a PRG customer. Whether your needs are simple or complex, our full-time staff of experienced professionals are on-hand to provide support. For assistance, contact your nearest PRG office: PRG Dallas (International Service) 8617 Ambassador Row, Suite 120 Dallas, Texas 75247 Ph: 1.214.630.1963 Fx: 1.214.630.5867 Service Fx: 214.638.2125 Service Email: [email protected] PRG Las Vegas 6050 S. Valley Vw Blvd. Las Vegas, Nevada 89118 Ph: 1.702.942.4774 Fx: 1.702.942.4775 PRG Los Angeles 9111 Sunland Blvd. Sun Valley, California 91352 Ph: 1.818.252.2600 Fx: 1.818.252.2620 PRG Nashville 8351 Eastgate Blvd. Mount Juliet, Tennessee 37122 Ph: 1.615.834.3190 Fx: 1.615.834.3192 PRG New York 7777 West Side Avenue North Bergen, New Jersey 07047 Ph: 1.201.758.4000 Fx: 1.201.758.4312 PRG Orlando 1902 Cypress Lake Dr. Orlando, Florida 32837 Phone: 1.407.855.8060 Fax: 1.407.855.8059 PRG Canada 2480 Tedlo Street Mississauga, Ontario L5A 3V3 Canada Ph: 905.270.9050 Fx: 905.270.2590 PRG Asia Asagami Fukagawa Logistics Center B-4F 2-2-1 Shiohama, Koto-ku, Tokyo, Japan 135-0043 Ph: 81.3.5439.4091 Fx: 81.3.5439.4092 PRG Europe 20-22 Fairway Drive Greenford, Middlesex, UB6 8PW Ph: +44.208.575.6666 Fx: +44.208.575.0424 For additional resources and documentation, please visit our website at: www.prg.com 4 02.3004.0300.54 1. System Operation This chapter contains operation information and instructions. • Theory of Operation • DMX512 Modes and Patching • Equipment Power Requirements 0 2 . 3 00 4 . 0 30 0 . 5 4 5 DMX512 REFERENCE GUIDE Theory of Operation System Overview Refer to Figure 1-1 on next page. Series 200 Components VARI❋LITE® Series 200™ luminaires can be controlled with DMX512 protocol using a DMX200 interface unit. The DMX200 interface converts DMX512 protocol to Series 200 comm in order to control these luminaires. The Series 200 ACS rack provides power to Series 200 luminaires through Repeater units. Spot luminaires: VL2C™ Wash luminaires: VL4™ Communication protocol: DMX512 via DMX200 unit Lamp power: internal Power: AC power from ACS rack Series 300 Components VARI❋LITE® Series 300™ luminaires are controlled from a DMX512 console via the Smart Repeater™ unit or DMX Power Pack, which converts DMX512 protocol to the VARI❋LITE protocol required to operate the luminaires. The Smart Repeater unit can be used to distribute power and data to multiple luminaires while the DMX Power Pack will only operate a single luminaire. Series 300 data, 24Vdc, and lamp power are provided by Smart Repeater units to Series 300 luminaires via lamp cables. Dimming power for VL5™/VL5B™ luminaires is provided by conventional lighting dimmers, conventional dimmers or by C3™ power supply modules, which require the use of an SPC36™ controller. Arc power for VL5Arc™/VL6™/VL7™ luminaires is provided by APS6™ power supply modules. The SPC-36 controller is optional for controlling APS6 modules. Spot luminaires: VL6™, VL6B™, VL6C™/VL6C+™, VL7™, VL7U™, VL7B™, VL7UB™ Wash luminaires: VL5™, VL5Arc™, VL5B™ Other: VLM™ moving mirror Communication protocol: Virtuoso® or DMX512 via Smart Repeater unit Lamp power: external via dimmer, APS6 module or C3 module Power: DC power from Smart Repeater unit 6 02.3004.0300.54 SYSTEM OPERATION : THEORY OF OPERATION 1 DMX CONSOLE DMX CABLE SPLITTER SPC-36 INPUT OUTPUT S200 S200 LAMP CABLE (DATA & POWER) SMART REPEATER INPUT (DATA & POWER) OUTPUT MOD RACK DMX CABLE DMX CABLE AC OUTPUT INPUT APS TRUNK CABLE (LAMP POWER) S300 LAMP RUN S300 LAMP RUN VL5 VL5B VL5ARC VL6 SERIES 300 200A DISCONNECT 2/0 PIGTAILS 2/0 PIGTAILS S200 REPEATER ACS RACK OUTPUT INPUT INPUT OUTPUT S200 TRUCK CABLE DATA & POWER DATA & POWER S200 LAMP RUN 2/0 PIGTAILS DMX200 UNIT 200A DISCONNECT VL2 2/0 PIGTAILS VL4 SERIES 200 Figure 1-1: DMX512 System Example 0 2. 3 0 0 4. 0 3 00 . 5 4 7 DMX512 REFERENCE GUIDE AC Service Note: Refer to "Cable/Connector Terminology" on page 3 for appropriate metric equivalents for cables. Power for operation of VARI❋LITE® Series 200/300 systems is provided by local house AC services or generators. The system can operate on voltages ranging from 85-260 VAC either single or three phase, 50 or 60 Hz. In some countries, a Bucking Transformer is required to step down (or up) voltages where voltage is too high, low, or unstable for the system. To connect the VARI❋LITE Series 200/300 system to the AC service, 2/0 or 8/5 mains power cables are used. These cables (five wires) are connected to the service by a qualified electrician who is usually provided by the venue. There are two types of cables available: 2/0 and 8/5 (depending on the type of equipment being used) power tails. Tails are normally 10 feet in length. An AC line disconnect or mini-AC line disconnect (30A for 8/5, 200A for 2/0) is attached to the other end of the tails to provide circuit breaker protection. Additional lengths of 2/0 or 8/5 feeder cable (20 or 80 feet) can be connected to the output of the line disconnect to provide extension of the service. Console Types DMX512 consoles can be broken down into two primary types: fixture-library based and channel based. Occasionally, a VARI❋LITE Series 200/300 system will be controlled by an architectural lighting controller. Please consult with a dealer or manufacturer for specific instructions for your architectural control device. Note: This is a reference guide for the VARI❋LITE Series 200/300 portion of your system only. For specific storing syntax, cue playback options, or other board commands, refer to the manual that came with your specific console. Fixture-Library Consoles Current state-of-the-art DMX512 consoles are software-based desks that control automated luminaires and conventional fixtures, as well as any other DMX512 devices (fogger, strobe, color scroller, etc.) in a lighting system. The advantage of a fixture-library console is that the manufacturer has "done the hard work" by creating libraries of automated fixtures and devices that the console recognizes. The properties of each device are stored in a "library," and can be patched using the identification method of the console being used. Consider using a 16-bit compatible console for very smooth movement. For even smoother response, be prepared to use a software mode that provides timing channels, see "DMX512 Modes and Patching" on page 10. This will cause the luminaires to perform much as they do under Vari-Lite protocol. You will find complete information on timing channels and how to use them in "Luminaire Timing Channels" on page 16. 8 02.3004.0300.54 SYSTEM OPERATION : THEORY OF OPERATION 1 Channel Based Consoles Older DMX512 consoles were never specifically designed to control automated luminaires of any type. These consoles typically operate in an 8-bit environment. If you are using one of these consoles, consider using the timing channels offered in Modes 2, 4, 6, 8 and 10 in our DMX 5.2 software. You will find complete information on timing channels and how to use them in "Luminaire Timing Channels" on page 16. 0 2. 3 0 0 4. 0 3 00 . 5 4 9 DMX512 REFERENCE GUIDE DMX512 Modes and Patching DMX512 Modes Series 300 Smart Repeater There are 10 software modes available for use in the Smart Repeater or Smart Repeater Plus units, allowing optimized control options for your lighting system. Following are brief descriptions of the modes and how to access them. If more information and assistance is required, consult an Account Manager, Dealer or Product Support Technician. Note: It is possible to have multiple modes in a single system, but not on a single Smart Repeater unit. Mode 1 8-bit Mode with Reset - Supports the VL5, VL5B and VL5Arc wash luminaires, the VL6 spot luminaire, and the VLM unit. To set Mode 1, set the thumb wheel to 901. Mode 1 uses one DMX512 channel for each parameter, plus a reset channel; therefore, each luminaire output port requires 8 channels for a total of 48 channels per Smart Repeater unit. Mode 2 Extended 8-Bit Mode - Supports all of the functions of Mode 1, and adds three timing channels for beam, color and focus parameters, mini-stepping for VL6 wheels and the reset channel. To set Mode 2, set the thumbwheel to 902. Mode 2 requires 11 channels per luminaire output port for a total of 66 channels per Smart Repeater unit. Mode 3 16-Bit with Reset - Supports the above luminaires and functions, but uses two channels for pan (coarse and fine) and two channels for tilt (coarse and fine). To set Mode 3, set the thumbwheel to 903. Mode 3 requires 10 channels per luminaire output port for a total of 60 channels per Smart Repeater unit. Mode 4 Extended 16-Bit - Supports all of the functions of Mode 3, and adds three timing channels for beam, color and focus parameters. To set Mode 4, set the thumbwheel to 904. Mode 4 requires 13 channels per luminaire output port for a total of 78 channels per Smart Repeater unit. Mode 5 16-Bit with Reset - Supports all of the functions of Mode 3, but adds support for the VL6B and VL6C/VL6C+ luminaires, and a strobe channel for the VL6 luminaire. To set Mode 5, set the thumbwheel to 905. Mode 5 requires 14 channels per luminaire output port for a total of 84 channels per Smart Repeater unit. Mode 6 Extended 16-Bit - Supports all of the functions of Mode 4, but adds support for the VL6B and VL6C/ VL6C+ luminaires, and a strobe channel for the VL6 luminaire. To set Mode 6, set the thumbwheel to 906. Mode 6 requires 17 channels per luminaire output port for a total of 102 channels per Smart Repeater unit. Mode 7 16-Bit with Reset - Supports all of the functions of Mode 5, but adds support for the VL7 luminaire. To set Mode 7, set the thumbwheel to 907. Mode 7 requires 17 channels per luminaire output port for a total of 102 channels per Smart Repeater unit. Mode 8 Extended 16-Bit - Supports all of the functions of Mode 6, but adds support for the VL7 luminaire. To set Mode 8, set the thumb wheel to 908. Mode 8 requires 20 channels per luminaire output port for a total of 120 channels per Smart Repeater unit. 10 02.3004.0300.54 SYSTEM OPERATION : DMX512 MODES AND PATCHING Mode 9 1 16-Bit with Reset - Supports all of the functions of Mode 7, but adds support for the VL7B luminaire. To set Mode 9, set the thumbwheel to 909. Mode 9 requires 24 channels per luminaire output port for a total of 144 channels per Smart Repeater unit. Mode 10 Extended 16-Bit - Supports all of the functions of Mode 8, but adds support for the VL7B luminaire. To set Mode 10, set the thumbwheel to 910. Mode 10 requires 27 channels per luminaire output port for a total of 162 channels per Smart Repeater unit. Setting Smart Repeater Operating Mode Setting or changing the mode of Smart Repeater or Smart Repeater Plus units is quick and easy. To set the mode: Step 1. With no signal applied (VARI❋LITE or DMX512), set thumbwheel to mode number you have chosen (1-10). Step 2. Apply power to Smart Repeater or Smart Repeater Plus unit (plug it in). After a moment, a number from 1-9 or the letter "A" (hexadecimal 10) will be seen in the seven-segment display. Your mode is now set, and will stay that way until it is reassigned. Note: The mode is stored in a battery backed-up RAM in the Smart Repeater unit. A dead battery may cause the Smart Repeater to revert to the default mode (Mode 4) on power-up. Figure 1-2: Smart Repeater Side View Remember that you may have multiple modes in your system. Modes 5 and 6 add support for the VL6B and VL6C/VL6C+ luminaires, while Modes 7-10 add support for the VL7 and VL7B spot luminaires. These modes will support other Series 300 luminaires plugged into a Smart Repeater Plus unit by blocking out the number of channels required for VL7 or VL7B spot luminaires. This must be taken into account when patching fixtures plugged into this device. Once the mode is set, re-address the Smart Repeater/Smart Repeater Plus unit and apply signal. The seven-segment display will alternately flash the letter "d" and the mode number. The "d" signifies that the Smart Repeater unit is operating using a DMX512 operating system. (The "d" will only appear once a DMX512 signal has been received.) Note: When no data is being received, the Smart Repeater unit will flash a "0" and the mode number. 0 2. 3 0 0 4. 0 3 00 . 5 4 11 DMX512 REFERENCE GUIDE Series 300 DMX Power Pack When power is applied to the DMX Power Pack, the unit detects which luminaire is connected. A fourposition switch on the front panel is used to select the mode. • Modes 1-4: operate VL6, VL5, VL5B, VLM and VL5Arc luminaires. • Modes 5 and 6: operate VL6B luminaires. • Modes 7 and 8: operate VL7/VL7U luminaires. • Modes 9 and 10: operate VL7B/VL7UB luminaires. Figure 1-3: DMX Power Pack (DPP) Note: The TERM and SW4 switch settings do not effect the DMX512 mode. 12 02.3004.0300.54 SYSTEM OPERATION : DMX512 MODES AND PATCHING 1 Mode Setting Table for the DMX Power Pack The following table illustrates the correct switch settings for Modes 1-10: Mode Number Channels Required 1 8 2 11 3 14 4 17 5 6 0 2. 3 0 0 4. 0 3 00 . 5 4 N/A 7 17 8 20 9 24 10 27 Switch Setting OFF - ON TERM 8/16 TIME SW4 OFF - ON TERM 8/16 TIME SW4 OFF - ON TERM 8/16 TIME SW4 OFF - ON TERM 8/16 TIME SW4 N/A OFF - ON TERM 8/16 TIME SW4 OFF - ON TERM 8/16 TIME SW4 OFF - ON TERM 8/16 TIME SW4 OFF - ON TERM 8/16 TIME SW4 DMX Power Pack Version Operates VL5, VL5Arc, VL5B, VL6, and VLM luminaires in 8-bit mode. Operates VL5, VL5Arc, VL5B, VL6, and VLM luminaires in 8-bit extended mode. Operates VL5, VL5Arc, VL5B, VL6, VL6B, VL6C/VL6C+ and VLM luminaires in 16-bit mode. Operates VL5, VL5Arc, VL5B, VL6, VL6B, VL6C/VL6C+ and VLM luminaires in 16-bit mode. Modes not supported. Operates VL7/VL7U luminaires. Operates VL7/VL7U luminaires in extended mode. Operates VL7B/VL7UB luminaires. Operates VL7B/VL7UB luminaires in extended mode. 13 DMX512 REFERENCE GUIDE Thumbwheel Addresses All VARI❋LITE® Series 200 luminaires, Smart Repeater units, and interface boxes have a three-digit thumbwheel address switch. The address set on this thumbwheel sets the starting address for the device. Under VARI❋LITE protocol, these addresses may not duplicate or overlap. Series 200 luminaires must be set to their DMX512 starting address, but no two luminaires may overlap addresses or use the same starting address when controlled by the same ACS rack. Since VARI❋LITE Series 300 luminaires do not have physical thumbwheel switches, their thumbwheel address is determined by the port connection at their respective Smart Repeater unit. The thumbwheel address set on the Smart Repeater unit sets the starting DMX512 address for the first port on the unit. Each successive port’s starting address and the number of DMX512 addresses allocated to each port depends on the Smart Repeater unit’s mode. Thumbwheel addresses on Smart Repeater units controlled by DMX512 may duplicate and overlap, but this is not recommended. Thumbwheel Address Switch Figure 1-4: Smart Repeater Thumbwheel Switch Patching Patching A Fixture Library Console Each automated luminaire is generally given a fixture number. Most operators have created their own system for numbering the luminaires in their system. An example would be to number the fixtures consecutively from downstage right working across each truss or batten, then moving upstage and back to stage right to the next position and continuing the process. This numbering system is generally based on the fixture’s position in the system and makes numeric sense. Alternately, each type of fixture can have a number in a range; all the VL5 wash luminaires start with 100, the VL6 spot luminaires with 200, etc. This numbering system is not necessarily based on the fixture’s position in the lighting system. The United States Institute for Theatre Technology (USITT) has also established a methodology for numbering the fixtures in a lighting system; please consult their literature for the specifics of this method. Decide upon a numbering system and then begin to patch. Patching will pair the fixture number and the DMX512 address to a control channel. When patching a VL5 or VL5B wash luminaire, do not forget to patch dimmer channel to the intensity control channel for the fixture. For example, to patch four VL5 wash luminaires, you would note the thumbwheel address of the Smart Repeater unit, decide on a control channel number, then patch this at the console using the appropriate syntax. Remember to take into account which DMX512 universe is chosen; control problems can occur if the patching does not occur in the proper universe. Many consoles currently can have up to four DMX512 universes, each with 512 channels. 14 02.3004.0300.54 SYSTEM OPERATION : DMX512 MODES AND PATCHING 1 At this point, continue to patch the fixtures and other DMX512 devices until the show is patched. It is often a good idea to check the patch in progress; that way problems can be dealt with as they occur. When you are done patching and troubleshooting your system, programming can begin. For information on troubleshooting a system, see "Testing and Troubleshooting" on page 93. Patching Channel-Based Consoles Channel-based consoles force an operator to patch fixture parameters one channel at a time. As above, once the numbering system has been determined for the fixtures, patching the console can begin. However, the fixture number will now be a "group" number. You will need to make a group of channels for each fixture and store it as the fixture number. Remember, when patching a VL5 or VL5B wash luminaire, to patch dimmer channel to the intensity control channel for the fixture. Most channel based consoles will operate only in an 8-bit environment; you should be prepared to patch at least seven channels per luminaire plus the intensity channel if using Mode 1, or up to 11 channels per luminaire if using Mode 2. Note: The VL6B, VL6C/VL6C+, VL7 and VL7B luminaires do not have a mode for 8-bit control. While they can still be controlled by an 8-bit console, the smoothing function of the second pan and tilt channel is lost. With a channel-based console, using Groups to control the positioning, color, gobo and beam shaping functions will make the job of programming your show easier. Using the Console to Make Programming Easier Though different console manufacturers use different syntax, they can all achieve the same goal: store often-used data that can be recalled at a keystroke in a manner that makes it easy to access. Libraries, focus points, groups and palettes are different manufacturers’ terms, but all refer to memory locations that can be assigned to specific parameters. Color, gobo and beam parameters (edge, diffusion, beam size) can all be stored in these groups and recalled with a few keystrokes. On consoles where this is applicable, groups can be stored in ranges, making it easier to recall information. For example, Color Groups can be stored in Groups 50 to 70, Gobo Groups in 80 to 95, and so on. The same can be said for certain other groups like libraries. Note: Some consoles define groups globally, others require the programmer to create a hard value for each fixture for the particular parameter being stored in the group. A global group is stored for a whole fixture type from only one fixture, making storing a simpler task. Many fixture-library based consoles also provide an added feature: updatable preset focus or focus points. These are special groups reserved for focus (pan/tilt) positions; however, they can be used for anything that might be changed throughout the entire cue list of a show. Any and all cues built and stored from an updatable preset focus group can be adjusted by refocusing and restoring the group. The cues then reference this group for positioning or other information as recorded. 0 2. 3 0 0 4. 0 3 00 . 5 4 15 DMX512 REFERENCE GUIDE Luminaire Timing Channels Timing channel control has been developed for VARI❋LITE® Series 200/300 luminaires to improve the timed moves of certain groups of parameters. They provide 3 timing channels, one for Focus (Pan and Tilt), one for color parameters and one for beam parameters. Timing channels support time values of up to six minutes. A timing value of zero is full speed. A time value of 100% (or 255 in DMX512) causes the associated parameter(s) to follow cue fade time rather than then timing channel. To use these channels, you must: Step 1. Create the cue, including color, gobo, edge, diffusion, etc. Step 2. Decide which fixtures and which parameter groups will use timing channels.(Timing channels work only if all channels affected by the timing channel are in the same part of the cue.) Step 3. Assign a value to the particular timing channel(s) you wish to use (see "Timing Channels" on page 137). Step 4. Create a part cue containing only the attributes chosen and their associated timing channels. Store this part cue with a fade time of zero seconds. Step 5. Store the rest of the cue using console timing. Note: Avoid changing timing channel values in a fading cue. This can cause unexpected behavior in the luminaire as the timing channel value is updated over time. Timing channel values and the final destination of the parameters affected by the timing channel should always be sent in a zero count. Timing channels can be set in either % or 0-255 (DMX512) modes, with the following values assigned. See "Timing Channels" on page 137 for more information. Note: We recommend profiles set timing channels in extended modes to a default value of 255 (full speed). . Channel Function 16 Timing Channel Focus Time Pan (Hi Byte / Lo Byte) ◆ Tilt (Hi Byte / Lo Byte) ◆ Color Time Blue ◆ Amber ◆ Magenta ◆ Color Wheel ◆ Beam Time Diffusion ◆ Lens (Edge) ◆ Rotating Gobo ◆ Fixed Gobo ◆ Beam Iris ◆ 02.3004.0300.54 SYSTEM OPERATION : DMX512 MODES AND PATCHING 1 Note: The Focus timing channel will affect only the VLM moving mirror’s pan transitions when the rotation channel is used. Mini-Stepping Mini-stepping has been added for the VL6 gobo and color wheels when an extended mode (Mode 2, 4, 6, 8 or 10) is used. Mini-stepping, which smooths wheel transitions, will be active for Wheel 1 (gobo) when the beam time channel has a value between 1 and 254. It will be active for Wheel 2 (color) when the color time channel has a value between 1 and 254. When the value is set at either 0 or 255, ministepping will be inactive. Luminaire Reset The ability to reset (recalibrate) a luminaire is available for DMX512 consoles. The reset channel will cause the associated luminaire to recalibrate when set to 33% (84 in DMX512) for three seconds and then returned to zero. (This must be done with a numeric keypad, not with an encoder or potentiometer.) When used with a DMX Power Pack (DPP) or Series 200 luminaires, this channel also allows for remote start and douse of an arc source. When the channel is set to 66% (168 in DMX512) for three seconds and then returned to zero, the lamp will douse. When set to 99% (252 in DMX512) for three seconds and then returned to zero, the lamp will strike. (This should be done with a numeric keypad not with an encoder or potentiometer.) Note: Intermediate values occurring between the command value and zero will cancel the command. 0 2. 3 0 0 4. 0 3 00 . 5 4 17 DMX512 REFERENCE GUIDE Equipment Power Requirements Overview The first consideration when hooking up a lighting system is power. Power is provided by large transformers in most permanent venues. Portable generators may be provided for other applications. Consoles, luminaires, and repeaters operate off of a single phase of power, however, the system is commonly connected to AC services that provide three phases of power. When connecting to a house service with three-phase power, the power should be distributed evenly across the breakers on the ACS rack, mini-ACS rack, and Six-pack chassis (refer to "Phase Balancing" on page 21). The following section provides guidelines for connecting VARI❋LITE® Series 200/300 equipment to an AC service. Three-Phase Power Source Delta/Wye Configuration The system is commonly connected to a three-phase AC power source. Three-phase AC power is produced by alternators which contain three separate windings designed so that the voltages induced in them are equal in amplitude and out of phase with each other by exactly 120 degrees. The outputs can be connected in one of two methods to produce a three-wire, three-phase circuit: wye-connected source and the delta-connected source. X X Z NEUTRAL Y EARTH GROUND Z DELTA SERVICE (NO NEUTRAL USED) Y WYE SERVICE EARTH (FIVE WIRE) GROUND Figure 1-5: Delta/Wye Configuration In almost all cases the power source (house service) will be wye connected, but Series 200/300 equipment may be connected either as delta or wye loads as required. The most obvious difference between delta and wye loads is that a wye load uses a neutral and a delta load does not. Note: The Series 200 powered outputs on the modular rack utilize the service neutral, and therefore must not be used with a delta service, and requires the presence of a neutral, even when connected as a delta load. 18 02.3004.0300.54 SYSTEM OPERATION : EQUIPMENT POWER REQUIREMENTS 1 There are five connections for a wye source and four connections for a delta source. Cables are often color coded to represent corresponding connections. Delta Power* Connection US Color Code Phase X Phase Y Phase Z Wye Power UK Colour Code US Color Code UK Colour Code Black Red Black Red Red Yellow Red Yellow Blue Blue Blue Blue Neutral N/A N/A White Black Ground Green Green Green Green * Not applicable in Europe. Input Voltage When the system is configured for delta operation, the input voltage to the luminaires equals the phase-to-phase voltage of the power source. When the system is configured for wye operation, the input voltage to the luminaires equals the phase-to-neutral voltage of the power source. Single-phase power can be used to operate the system by configuring the equipment for wye operation and connecting all three phase inputs to the same single-phase source. APS6 and C3 modules usually operate under three-phase power, but can also be operated under 180240 VAC, single phase mains with L1, L2, and L3 tied together at the SixPack chassis. Typical wye services in the United States produce voltages ranging from 175 to 225 VAC phase-to-phase and 90 to 130 VAC phase-to-neutral. The SixPack Chassis and the ACS rack should be placed in delta mode so that the racks produce 175 to 225 VAC to the system. AC for the system is produced across the phases. In Europe, wye services produce voltages ranging from 310 to 415 VAC phase-to-phase and 180 to 240 VAC phase-to-neutral. Since the system can not operate in voltages above 260 VAC, the SixPack Chassis and ACS rack must be placed in wye mode, thus activating the neutral and placing the system into the standard 180 to 240 VAC operating range. 0 2. 3 0 0 4. 0 3 00 . 5 4 19 DMX512 REFERENCE GUIDE Configuring Equipment For Delta or Wye Operation WARNING: Voltage high enough to injure or kill persons exists in the Series 200 ACS rack when power is applied. Verify that power has been removed from ACS rack before reconfiguring bus bars or performing other internal work. Determine requirements for either delta or wye load. • While operation as a delta load is typical in the U.S., most European countries require the system to be configured as a wye load. For example, if the house service is a wye-connected source and the phase-to-neutral voltage is 220, the system must be configured as a wye load. • Also note that if line voltage is 120 phase-to-neutral, the system must be configured as a delta load. If line voltage is 220 phase-to-neutral, the system must be configured as a wye load. VAC Phase to Neutral VAC Phase to Phase Delta/Wye Jumper Position Voltage to Modules Wye 100-130 175 - 225 Delta 175 - 225 Wye 180 - 240 310 - 415 Wye 180 - 240 Delta - 180 - 240 Delta 180 - 240 Single Phase 180 - 240 - Wye 180 - 240 Type In the Series 200 ACS rack, the system is configured by moving three bus bars. The mini-ACS rack and Series 300 Modular Rack SixPack chassis use a switch. The SixPack chassis has a switch lock that must be removed before the switch can be moved from one position to the other. This prevents accidental switching. ACS Rack Delta SixPack Chassis Delta / Wye Switch Wye Mini-ACS Rack Figure 1-6: Setting Delta/Wye Configuration in Series 200 and Series 300 Equipment 20 02.3004.0300.54 SYSTEM OPERATION : EQUIPMENT POWER REQUIREMENTS 1 Phase Balancing Repeater Boxes and SixPack chassis should be phase balanced. Phase balancing for a Repeater Box occurs when all the luminaires in a system are equally distributed across the X, Y, and Z input phases. For a SixPack chassis, phase balancing occurs when the APS6 and/or C3 modules are equally distributed across the three input phases of the unit. A balanced system draws approximately equal currents from each phase. An unbalanced system may draw much more current from one phase than from the other two phases. Note: Phase balancing is especially important when a generator is the power source for the system. However, it is always good to balance the system even when the power source is a normal house service. Phase balancing is accomplished at the Repeater Box outputs. There are nine luminaire connections on the Repeater Box, with three of them connected to each phase. To balance the system, ensure that repeater/lamp cable connections are made so that each phase has the same number of luminaires or Smart Repeater units connected. 1 2 Start on left 3 and move to right without Distribute evenly over these three phases. skipping connectors. Start here. Figure 1-7: Phase Balancing 0 2. 3 0 0 4. 0 3 00 . 5 4 21 DMX512 REFERENCE GUIDE Current Requirements Current calculations are required to ensure that the system has adequate circuit breaker safety control. The AC line disconnect has a 200A circuit breaker to handle the Series 300 Modular Racks and Series 200 ACS racks. Depending on the quantity and type of luminaires and the voltage used, the current varies. Although the maximum operating limit for the AC line disconnect is 200A, we recommend that continuous operating current does not exceed 150A. This will avoid tripping the circuit breaker. Systems drawing power in excess of 150A will require multiple modular racks, ACS racks and AC line disconnects. The same is true for the 30A mini-ACS line disconnect. We recommend that continuous operating current does not exceed 20A. Equipment current requirements vary with the AC line voltage available. Linear voltage regulators dissipate more power at higher line voltages and consume more current. Switch-mode regulators maintain constant power into a load and consume more power at lower line voltages. Some power is lost in long cable runs, resulting in lower line voltages at the equipment, with the corresponding impact on current requirements. Two factors determine the current requirements of a system: output voltage of the modular rack and ACS rack and number and type of luminaires in the system. Current Calculation The current requirements for VARI❋LITE® equipment are provided here. For Series 300 luminaires, the current requirement is expressed as the current draw on a Smart Repeater unit that is fully loaded with six luminaires with each luminaire operating all motors (a maximum power draw scenario). All VARI❋LITE® Series 200/300 AC voltage selector boards are designed to operate the equipment within one of three voltage ranges: 80 to 130 VAC, 170 to 260 VAC, or 80-260 VAC. Because of the complexities of calculating three-phase power requirements, this data will never be 100% accurate, and is intended for guidance only. It is recommended that a 20% headroom allowance be added to the final phase figures to allow for imbalances. CAUTION: Only 50 VL2B and VL2C luminaires may be connected to a Series 200 ACS rack and only nine may be connected to a mini-ACS rack due to the current requirements. CAUTION: To avoid damage to equipment and to ensure proper equipment operation, consult with local staff regarding power concerns. 22 02.3004.0300.54 SYSTEM OPERATION : EQUIPMENT POWER REQUIREMENTS Equipment 120 Volts Phase to Neutral60 Hz Wye Mode 208 Volts Phase to Phase60 Hz Delta Mode VL2C Luminaire 11.0 amps 6.5 amps 6.3 amps VL4 Luminaire 8.0 amps 4.8 amps 4.5 amps 1 240 Volts Phase to Neutral l50 Hz Wye Mode Smart Repeater 9.6 amps 5.2 amps 6.0 amps Smart Repeater Plus 12.8 amps 7.2 amps 6.5 amps DMX200 1.0 amps 0.2 amps 0.3 amps SPC-36 Controller 1.0 amps 0.2 amps 0.3 amps APS6 Module (400W) 6.7 amps 3.7 amps 3.6 amps APS6 Module (625W) 9.5 amps 5.5 amps 5.1 amps APS6 Module (700W) 11.5 amps 5.8 amps 7.4 amps C3 Module (1000W) N/A 4.7 amps 4.3 amps C3 Module (1200W) N/A 5.2 amps 5.1 amps DMX Power Pack 10.0 amps 6.0 amps 5.0 amps Power Metering WARNING: Power metering and connection to a house AC service should only be performed by qualified personnel. This personnel is typically a "house electrician" supplied by the venue or other contract electrician supplied by the venue for this purpose. This manual does not supply procedures for metering a house AC service nor does it imply that persons using this equipment are required to meter any type of house AC service. 0 2. 3 0 0 4. 0 3 00 . 5 4 23 DMX512 REFERENCE GUIDE Notes 24 02.3004.0300.54 2. Equipment Description This chapter contains detailed information on all the equipment used in a system. • Power and Data Distribution Equipment • Modular Rack Components • Luminaires • Cables 0 2 . 3 00 4 . 0 30 0 . 5 4 25 DMX512 REFERENCE GUIDE Power and Data Distribution Equipment AC Line Disconnect (200A) CAUTION: Although the maximum operating limit is 200A, we recommend that continuous operating current does not exceed 150A. The 200A AC line disconnect is a safety device containing a three-phase, 200A circuit breaker serving as a master on/off switch for the system. The unit connects to house service through a set of five, 10-foot, 2/0 pig tails. The line disconnect connects to the ACS rack through a set of five, 20-foot and/or 80-foot, 2/0 pig tail cable assemblies. One line disconnect is required for each 200A service. INPUT OUTPUT Neutral (White) X Phase (Black) Y Phase (Red) Z Phase (Blue) Ground (Green) Neutral (White) X Phase (Black) Y Phase (Red) Z Phase (Blue) Ground (Green) Bare wire to Cam-Lok Pigtail cables from House AC service Cam-Lok to Cam-Lok Pigtail cables to ACS or Mod Rack Figure 2-1: AC Line Disconnect 26 02.3004.0300.54 EQUIPMENT DESCRIPTION : POWER AND DATA DISTRIBUTION EQUIPMENT 2 Mini AC Line Disconnect (30A) CAUTION: Although the maximum operating limit is 30A, we recommend that continuous operating current does not exceed 20A. The mini (30A) AC line disconnect is a safety device containing a threephase, 30A circuit breaker serving as a master on/off switch for the system. It is similar to the 200A AC line disconnect, but is used primarily for smaller systems. The unit connects to 30A service through a 10-foot, 8/5 pig tail. There are two types of cable assemblies: receptacle connector to bare pigtails, and receptacle connector to plug connector. The mini line disconnect connects to the mini-ACS rack with a 20- or 80-foot, 8/5 cable assembly. One line disconnect is required for each 30A service. CAUTION: The mini (30A) AC disconnect is not approved for use in Europe. Power Indicator INPUT Bare wire to Hubbell connector from house AC service OUTPUT Hubbell to Epic connector to Mini-ACS Rack Figure 2-2: Mini AC Line Disconnect 0 2. 3 0 0 4. 0 3 00 . 5 4 27 DMX512 REFERENCE GUIDE Bucking Transformer Note: In Europe, the Bucking Transformer is needed only with VL2C luminaires and where the primary voltage rises above 240 VAC (245 VAC in Europe). The Bucking Transformer is used when the primary voltage is above 240 volts (or 245 volts in Europe). In Europe and Australia, among other places, primary voltages can fluctuate between 240 and 265 VAC throughout the day, causing the system to shut down. The Bucking Transformer is designed to reduce the primary voltage by 10 or 20 percent, bringing voltages within acceptable limits. Even if there is a temporary reduction in primary input voltage below 180 VAC (the lower limit), once the system is running, it will not actually shut off until the voltage falls to 160 VAC. The Bucking Transformer is only necessary where the primary voltage rises above 240 VAC (or 245 VAC in Europe). The unit connects to the system by a set of five 2/0 pig tails. It also provides a 125A circuit breaker switch. INPUT OUTPUT Neutral (White) X Phase (Black) Y Phase (Red) Z Phase (Blue) Ground (Green) Neutral (White) X Phase (Black) Y Phase (Red) Z Phase (Blue) Ground (Green) Bare wire to Cam-Lok pigtails from House AC service Cam-Lok to Cam-Lok pigtails to ACS or Mod Rack Figure 2-3: Bucking Transformer 28 02.3004.0300.54 EQUIPMENT DESCRIPTION : POWER AND DATA DISTRIBUTION EQUIPMENT 2 ACS Rack In a DMX512 controlled system the ACS rack is a power/data distribution unit for Series 200 luminaires only. The ACS rack connects to a DMX512 control console via a DMX200 interface ACS rack functions: • Receives 3-phase AC input power from a house service or modular rack via Cam-Lok to Cam-Lok pigtails. (A 200A AC disconnect should always be used in-line prior to the equipment.) • Provides AC power to the console. • Distributes data and power to the luminaires via Repeater Boxes. (Up to seven repeaters may be connected via Series 200 trunk cables.) There are two models of ACS racks: the standard ACS rack and ACS rack with backup. The ACS rack with backup has the same features as the standard rack, but has three powered output channels on the rack input panel to provide power for low current devices such as the VLD, UDM or SPC-36 controller. Note: In DMX512 controlled systems, only VL2C and VL4 luminaires may be controlled through the ACS rack. In addition, the ACS rack with backup contains a complete backup set of signal processing cards. These backup units are easily connected via a free-hang connector panel located behind the input panel access door. Power to other devices Series 200 Trunk Cables to Repeater Boxes Signal from other devices Individual lamp breaker switches AC Input Phase X 2/0 AC Input Phase Y 2/0 AC Input Phase Z 2/0 Neutral 2/0 Ground 2/0 Figure 2-4: Series 200 ACS Rack 0 2. 3 0 0 4. 0 3 00 . 5 4 29 DMX512 REFERENCE GUIDE Mini-ACS Rack The mini-ACS rack is a small rack mount version of the ACS rack. Unit features: • Provides 17 channels of power and signal. • Provides one trunk run output and eight powered lamp cable outputs. • Can be used as master or slave rack in large systems. House power connects to the mini-ACS rack through an 8/5 cable with Hubbell connectors, connected from a mini-AC line disconnect. Two other power cables are available for connection: Hubbell plug connector to bare pigtails and Epic plug connector to Hubbell receptacle connector. Individual output circuit breakers ACS R X Y Z X Y N MINI EARTH GND Z 1 2 3 4 OUTPUT BREAKERS 6 7 8 9 2 3 4 LUMINAIRE OUTPUTS 6 7 8 9 Trunk cable run to Repeater Boxes R B STATUS TRUNK OUTPUT Power output to other devices. Power and Signal output to luminaires. SERIAL NUMBER MAINS INPUT CONSOLE SELECT BAR CODE R -Y SELECT SERIES 200 SYSTEM A Y B INTERCOM X 30 AMP 3 PHASE House Power Input Hubbell connector from Mini AC Disconnect Y N G Z POWER SOURCE -Y SWITCH TYPE -N VAC - VAC POSITION Y Y 90-100 155-175 Y 100-130 175-225 Y Y 180-240 310-415 90-130 180-240 SINGLE PH90-130 Y SINGLE PH180-240 Y DATA INPUT CONSOLE A CONSOLE B Delta/Wye Power Selector Switch Signal input from consoles and other ACS racks. Figure 2-5: Mini-ACS Rack 30 02.3004.0300.54 EQUIPMENT DESCRIPTION : POWER AND DATA DISTRIBUTION EQUIPMENT 2 Repeater Box/Cheater Repeater Box Repeater Boxes receive data and power from the ACS rack and pass it along to luminaires. The Repeater Box serves as a signal and AC power distribution unit. Repeater Boxes provide the following: • Signal and power distribution for up to nine luminaires via Series 200 lamp runs. • Connects to VL2B, VL2C and VL4 luminaires, and Smart Repeaters. Attaches to trusses and pipes with a single Series 200 truss hook and a safety cable. ACS Rack Trunk Input Luminaire Outputs S200 Lamp Cable Input (Cheater Repeater Only) Figure 2-6: Repeater Box / Cheater Repeater Box Cheater Repeater Box. Can be identified by the blue outer case as well as the lamp connector and switch mounted on the same panel as the trunk connector. When the switch is pointing away from the lamp cable connector, the unit behaves as a Repeater Box. Both the power and data are supplied via the trunk cable. Any signal present at the lamp cable connector is ignored. When the switch is pointing towards the lamp cable connector, power is still supplied via the trunk cable. However, the data is received from a secondary source via the lamp cable. In most cases, the data would come from a second control console with a cheater cord. 0 2. 3 0 0 4. 0 3 00 . 5 4 31 DMX512 REFERENCE GUIDE Smart Repeater Units The Smart Repeater processing units combine electrical power and data signals from different sources and provide it for up to six Series 300 luminaires via a single connector to each luminaire. Smart Repeater features: • Receives Series 200 data signal and AC power for electronics through standard, 9-pin Series 200 lamp cable from ACS rack and sends it to connected luminaires. • Receives lamp power from conventional dimmers or APS6/C3 power supply modules through standard Socapex-type 19-pin lighting connector and sends it to connected luminaires. • Provides a thumbwheel switch for setting the starting address for the six luminaire outputs. • Provides Broadcast and Reply LEDs to monitor data traffic. • Contains test software for Series 300 luminaires. • Attaches to truss or pipes with two truss hooks and a safety cable. • Operates up to six VL5, VL5Arc, VL5B, VL6, or VLM luminaires, one on each output connector. • Operates VL6B and VL6C/VL6C+ luminaires on a limited basis. When using luminaire combinations involving the VL6B, use the point system indicated below: VL5 = 1 point VL5Arc = 1 point VL6 = 1 point VL6B = 2 points VL6C = 2 points VL6C+ = 2 points Combinations of luminaires connected to the Smart Repeater unit should not exceed 6 points. • Accepts DMX512 protocol from DMX512 control desks and translates it to Series 300 comm for DMX512 control of VARI❋LITE luminaires. Two versions of the unit are available: a standard Smart Repeater unit and a Smart Repeater Plus unit. The standard unit can operate any of the Series 300 luminaires with the exception of the VL7 Series luminaire, which can only be operated with a Smart Repeater Plus unit. Smart Repeater Plus Unit The Smart Repeater Plus unit provides power and data for VL7 Series luminaires, which require additional power not available with the standard Smart Repeater unit. The Smart Repeater Plus unit has the ability to operate all Series 300 luminaires. Operation and functionality of the Smart Repeater Plus unit is identical to the standard unit, with the addition of an active DMX512 termination switch and fan cooling. The Plus unit can control up to six VL7 luminaires. 32 02.3004.0300.54 EQUIPMENT DESCRIPTION : POWER AND DATA DISTRIBUTION EQUIPMENT 2 Output connector providing power and signal to individual luminaire via luminaire lamp cable. Circuit breaker protection for each output connector. Neon power indicator for each output. SMRTVWS Red Transmit LED indicates activity and valid data on transmit line. Trunk Cable Connector19-Pin Socapex. Accepts power from dimmer rack. Series 200 lamp cable data input. Smart Repeater AC input Indicator. Thumbwheel Switch sets start address for six output addresses to luminaires. Eight-Segment Display for diagnostics. Red Response LED indicates valid data on response lines. Red and Green LED Broadcast Indicators. Red and Green LED Reply Indicators. Smart Repeater Plus Figure 2-7: Smart Repeater / Smart Repeater Plus 0 2. 3 0 0 4. 0 3 00 . 5 4 33 DMX512 REFERENCE GUIDE DMX200 Interface The DMX200 interface unit provides control of Series 200 luminaires from a DMX512 console. • Converts DMX512 protocol to DMX200 data. • Receives power from and supplies data to the ACS rack through a special power/data "Y" cable. • Supports up to one bi-channel ACS rack using two universes of DMX512. • Designed to fit standard rack mount boxes or the modular rack. DMX Power Pack and DPP Plus The DMX Power Pack (DPP) is a portable electronics chassis that provides lamp power, and translates DMX512 protocol to Series 300 luminaire protocol. There are two versions of the DPP; one for arc lamps and one for incandescent lamps. The two versions of the DPP are indicated with either an APS6 or C3 module markings on the unit’s front panel. Two versions of the unit are available: a standard DPP unit and a DPP plus unit. The standard unit can operate any of the Series 300 luminaires with the exception of the VL7 Series luminaires, which can only be operated with a DPP plus unit. The DPP Plus includes a power supply and APS6 suitable for powering the VL7 Series luminaires. Label Note: A label at the input panel specifies APS6 or C3. 34 02.3004.0300.54 EQUIPMENT DESCRIPTION : POWER AND DATA DISTRIBUTION EQUIPMENT 2 Dimmers If there are VL5 luminaires in your system, you will also need to supply power to the dimmers that are associated with these luminaires. This is not a concern if you are using the house dimming system. However, if you are adding dimmers to your system, or are setting up all the elements of your event, you will need to power your dimmers. In general, most dimmers require three-phase power for operation. You should consult the operating manual provided by your dimmer manufacturer for the proper power requirements for your dimmers. In addition, some dimmer manufacturers reverse the ground and neutral Cam-Lok connectors on their product. You may need to provide for specific adapters between equipment. Again, consult the manufacturer or their authorized representative for plugging options and adapters. In most cases, unless specifically requested, you will not receive APS6 cable (AKA Shielded Socapex cable) with the rental of VL5 wash luminaires, unless your rental includes C3 modules and/or dimmers. Speak with your Account Manger for equipment specifics. If the VARI❋LITE® Series 200/ 300 system is being installed into an existing light plot, the Smart Repeater units may plug directly into circuits on electrics or battens using a "fan-in"; a male stage pin (or other male plug) to female Socapex adapter. You may need to supply Socapex multicore and breakouts as necessary. 0 2. 3 0 0 4. 0 3 00 . 5 4 35 DMX512 REFERENCE GUIDE Modular Rack Components 24-Channel Modular Rack The 24-Channel Modular Rack is a configurable power distribution system containing the dimmers and ballasts for Series 300 luminaires. The Modular Rack contains: • One set of Cam-Lok pigtail contacts for AC input power. • One set of Cam-Lok pigtail contacts for AC output power. • Six Epic AC connectors for SixPack Chassis power distribution. • Individual 30 Amp circuit breakers for each Epic connector. • One SPC-36 SixPack controller (optional). • Up to six SixPack chassis assemblies (four housed in the rack with up to two on top). Each SixPack chassis may contain up to six C3 (dimmer) or APS6 (ballast) modules in any combination. Mod Rack SPC-36 SixPack Controller for control of APS6 and C3 dimmer modules. SixPack Chassis Assembly for housing APS6 and C3 dimmer modules. APS6 Module for ballast power control of arc lamps. C3 Dimmer Module for incandescent lamp control. Circuit Breakers AC Power Distribution. Figure 2-8: Series 300 Modular Rack 36 02.3004.0300.54 EQUIPMENT DESCRIPTION : MODULAR RACK COMPONENTS 2 SixPack Chassis The SixPack chassis is a removable unit which holds up to six C3 (dimmer) or APS6 (ballast) modules. The modules slide-mount into the chassis and are electrically connected via euro-connectors. (Blank panel cover plates are installed in positions where modules are not installed to aid the forced air cooling.) Its capability to support both APS6 and C3 modules in any combination will allow mixing different types of Series 300 luminaires on a single Smart Repeater unit. To distribute lamp power to Series 300 luminaires, each chassis is connected to a Smart Repeater unit with a Series 300 trunk cable. Note: The LVS power supply module 110V mode of operation has been disabled. The chassis will not operate below 200 volts nominal. C3 Module The C3 dimmer module is an electronic dimmer for high wattage tungsten halogen incandescent lamps. It is used to dim VL5 and VL5B luminaire incandescent lamps. The module is designed to slide-mount into any of the front slots on the SixPack chassis, connecting electrically via euro-connectors. Since the C3 module does not have its own built-in brightness curve, the module must be used in conjunction with an SPC-36 controller, which has the brightness curve in its operating system. The SPC-36 controller outputs 0 to +10 volts DC, which corresponds to 0% and 100% output respectively. A PCB jumper allows the module’s lamp current output to be configured for 1000 or 1200 watts. 0 2. 3 0 0 4. 0 3 00 . 5 4 37 DMX512 REFERENCE GUIDE APS6 Module The APS6 power supply module is an electronic ballast for high intensity discharge arc lamps. It is used to power VL5Arc, VL6 series, and VL7 series luminaire arc lamps. The module is designed to slidemount into any of the front slots on the SixPack chassis, connecting electrically via euro-connectors. Switches on the faceplate (or PCB jumpers on older models) allow the module to be configured for a specific output wattage and enable or disable the remote start feature. If the remote start feature is desired, the modules must be used in conjunction with an SPC-36 controller. The PSET (Preset) mode enables manual control of the module. This is the normal mode of operation. Use this mode when not using an SPC-36 controller to remotely control modules from an Artisan console. The DCV (Dimmer Control Voltage) mode operates the module with 0-10Vdc control input. This mode is required when using an SPC-36 controller to remotely control modules from an Artisan console. SPC-36 SixPack Controller The SPC-36 controller is a 36-channel analog dimmer interface that will interface to APS6 and C3 modules (only). • The unit receives power through a Series 200 lamp run. • In DMX512 mode, all channels are mapped to the default type: incandescent with 0 percent preheat (0 volts output). Note: Avoid fading an SPC-36 controller channel mapped to an APS6 (remote start) up and down. This will cause shortened lamp life. APS6 channels should be set to a curve of "full at 1%" if possible. 38 02.3004.0300.54 EQUIPMENT DESCRIPTION : LUMINAIRES 2 Luminaires VL2C Spot Luminaire The VL2C spot luminaire features the following: • Metal halide arc lamp (400 watt for VL2B; 600 watt for VL2C). • Compound lens for distortion-free images with soft or hard beam edge. • 120 colors provided by DICRO❋WHEEL™ color mixing system. • Lens free aperture to eliminate glare. • Adjustable beam shape. • On-board control electronics and power supply. • Attaches to truss or pipes using two or three S200 truss hooks and a safety cable. Note: For DMX512 Modes, Channel Mapping, and Color Reference see "Reference Tables" on page 119. VL4 Wash Luminaire The VL4 wash luminaire features the following: • 400 watt metal halide arc lamp. • DICRO❋TUNE™ color filters with independent blue, amber, and magenta color control. • Mechanical dimmer for smooth full-field control. • Shutter/douser for fast blackouts, bumps, and strobe-like effects. • Textured glass diffuser. • Variable position of lamp to reflector adjusts beam angle from spot to flood. • Attaches to truss or pipes using two or three S200 truss hooks and a safety cable. Note: For luminaire DMX512 modes, channel mapping, timing and color reference, refer to "Reference Tables" on page 119. 0 2. 3 0 0 4. 0 3 00 . 5 4 39 DMX512 REFERENCE GUIDE VL5 Series Wash Luminaires All VL5, VL5B, and VL5Arc wash luminaires have the following standard features: • DICRO❋TUNE color filters with independent blue, amber, and magenta color control. • Choice of five interchangeable lens styles to customize beam output. • Attaches to truss or pipes with a single S300 truss hook and a safety cable. A floor stand is also available. • Dimming control by conventional dimmer or VARI❋LITE C3 power supply in conjunction with the SixPack chassis and SPC-36 controller. (Note the 1200W lamp can only be used with a 110V power source or a C3 dimmer module.) • VL5Arc contains internal mechanical douser for intensity control. Each individual configuration has the following features: VL5 Luminaire • High wattage (1000 or 1200 watt) incandescent lamp. • Radial diffuser. VL5B Luminaire • High wattage (1000 or 1200 watt) incandescent lamp. • Uses one standard and two pastel dichroic color filter sets. VL5Arc Luminaire • A 575 watt arc lamp. • Radial douser for mechanical dimming. Note: For luminaire DMX512 modes, channel mapping, timing and color reference, refer to "Reference Tables" on page 119. 40 02.3004.0300.54 EQUIPMENT DESCRIPTION : LUMINAIRES 2 VL6 Series Spot Luminaires All VL6, VL6B, and VL6C/VL6C+ spot luminaires have the following standard features: • Lamp power provided by APS6 power supply module in conjunction with a SixPack Chassis. • Interchangeable, user selectable color wheel assembly. • Interchangeable, user selectable gobo wheel assembly. • Aluminum-bladed dimmer mechanism for full field dimming, timed fades, and strobe effects. • Mechanical iris for continuous beam size control. • Variable beam focus. • Attaches to truss or pipes with a single S300 truss hook and a safety cable. A floor stand is also available. Each individual configuration has the following features: VL6 Luminaire • A 400 watt short arc lamp. • Choice of three lenses (narrow, medium, and wide field of view). VL6B Luminaire • A 400 watt short arc lamp. • Rotatable, indexable gobos. • A 3:1 zoom optics assembly. VL6C and VL6C+ Luminaires • A 700 watt short arc lamp • Rotatable, indexable gobos. • A 3:1 zoom optics assembly. VL6 VL6B VL6C VL6C+ Note: For luminaire DMX512 modes, channel mapping, timing and color reference, refer to "Reference Tables" on page 119. 0 2. 3 0 0 4. 0 3 00 . 5 4 41 DMX512 REFERENCE GUIDE VL6 Color/Gobo Wheel Control VL6 spot luminaire color/gobo wheels have 12 positions and are normally loaded with 11 color filters or gobos, leaving one position for open white. You can mix filters and gobos on the same wheel, or have all filters on one wheel with all gobos on the other wheel. Please advise an Account Manager if you wish to do this. The VL6 spot luminaires are supplied in standard configuration with all gobos on the front wheel (Wheel 1) and all filters on the rear wheel (Wheel 2). Color and gobo wheels in VL6 luminaires can be placed on any step position of the motor. Wheel positions are mapped to DMX512 fader positions to control 96 static positions and five spin speeds. Percent values of 0 to 95 control static positions; values 96 through 100 control spin speeds. Table 2-1: VL6 Standard Color/Gobo Wheel Positions Standard Colors (Wheel 2) 42 Standard Gobos (Wheel 1) 0 Open 0 Open 1 0240 Light Red 1 7002 Pebbles 2 0850 Dark Blue 2 7001 Globular Breakup 3 0540 Yellow 3 6001 Medium Circle 4 0820 Light Blue Green 4 5011 Night Sky 5 0150 Cool Pink 5 5501 Leaves 6 0660 Green 6 4202 Vertical Bars 7 0020 Magenta 7 4201 Horizontal Bars 8 0960 Deep Lavender 8 7015 Block Breakup 9 0320 Flesh Pink 9 7008 Waves 10 0440 Orange 10 4009 Medium Triangle 11 0990 Congo Blue 11 6006 Circle of Holes #3 02.3004.0300.54 EQUIPMENT DESCRIPTION : LUMINAIRES 2 VL6B Color/Gobo Wheel Control VL6B spot luminaire fixed color and gobo wheels have 12 positions, while the rotating gobo wheel has six positions. You can mix color filters and gobos on the same wheel, or have all filters on one wheel with all gobos on the other wheel. The VL6B spot luminaires are supplied in standard configuration with all gobos on the front wheel (Wheel 1) and all filters on the rear wheel (Wheel 2). Color and gobo wheels in VL6 luminaires can be placed on any step position of the motor. Wheel positions are mapped to DMX512 fader positions to control 96 static positions and five spin speeds. Percent values of 0 to 95 control static positions; values 96 through 100 control spin speeds. Table 2-2: VL6B Standard Color/Gobo Wheel Positions Standard Colors (Wheel 2) 0 Open Standard Gobos (Wheel 1) 0 Open Rotating Gobo Wheel 0 Open 1 0240 Light Red 1 7002 Pebbles 1 8005 5 Facet Prism 2 0850 Dark Blue 2 7025 Dust Breakup 2 6011 Circle of Ovals 3 0540 Yellow 3 6001 Medium Circle 3 4316 Hypno Spiral 4 0820 Lt. Blue Green 4 5011 Night Sky 4 6990 Spiral Stones 5 0150 Cool Pink 5 5501 Leaves 5 4305 Pinwheel 6 0660 Green 6 4202 Vertical Bars 7 0020 Magenta 7 7008 Waves 8 0960 Deep Lavender 8 7015 Block Breakup 9 0320 Flesh Pink 9 5523 Tribal Breakup 10 0440 Orange 10 5009 Liquid Texture 11 0990 Congo Blue 11 7029 Alpha Rays 0 2. 3 0 0 4. 0 3 00 . 5 4 43 DMX512 REFERENCE GUIDE VL6C/VL6C+ Color/Gobo Wheel Control The luminaire’s fixed color and gobo wheels have twelve (12) positions, while the rotating gobo wheel has six (6) positions. You can mix color filters and gobos on the same wheel, or have all filters on one wheel with all gobos on the other wheel. VL6C/VL6C+ luminaires are shipped in a standard configuration with all gobos on the front wheel (Wheel 1) and all color filters on the rear wheel (Wheel 2). Color and gobo wheels can be placed on any step position of the motor. Wheel positions are mapped to DMX512 fader positions to control 96 static positions and five (5) spin speeds. Percent values of 0 to 95 control static positions; values 96 through 100 control spin speeds. Table 2-3: VL6C/VL6C+ Standard Color/Gobo Wheel Positions Standard Colors (Wheel 2) 44 Standard Gobos (Wheel 1) 0 Open 0 Open 1 0240 Light Red 1 7002 2 0850 Dark Blue 2 3 0540 Yellow 3 Rotating Gobo Wheel 0 Open Pebbles 1 8005 4 Facet Prism 7025 Dust Breakup 2 6011 Circle of Ovals 6001 Medium Circle 3 4316 Hypno Spiral 4 0820 Lt. Blue Green 4 5011 Night Sky 4 6990 Spiral Stones 5 0150 Cool Pink 5 5501 Leaves 5 4305 Pinwheel 6 0660 Green 6 4202 Vertical Bars 7 0020 Magenta 7 7008 Waves 8 0960 Deep Lavender 8 7015 Block Breakup 9 0320 Flesh Pink 9 5523 Tribal Breakup 10 0440 Orange 10 5009 Liquid Texture 11 0990 Congo Blue 11 7029 Alpha Rays 02.3004.0300.54 EQUIPMENT DESCRIPTION : LUMINAIRES 2 VL7 Series Spot Luminaires VL7/VL7U Luminaire All VL7 luminaires have the following standard features: • A 700 watt arc lamp. • Full color spectrum, crossfadeable color mechanism. • Wheel of rotatable and indexable gobos. • Wheel for custom colors or fixed gobos. • Zoom projection lens system. • Dimmer mechanism. • Douser/strobe mechanism. • Beam size iris mechanism. • Attaches to truss using one of two types of truss clamps or vertical hang assembly. A floor stand is also available. VL7B/VL7UB Luminaire The VL7B/VL7UB spot luminaire features a rotating beam framing shutter system that replaces the fixed wheel beam size iris assembly in the VL7/VL7U luminaire. (All other features are identical.) Using shutter controls, zero is the open position and 255 is the closed position. Using rotation channels, 128 is the halfway or zero position and 0 and 255 are the end of travel stops. Note: For luminaire DMX512 modes, channel mapping, timing and color reference, refer to "Reference Tables" on page 119. 0 2. 3 0 0 4. 0 3 00 . 5 4 45 DMX512 REFERENCE GUIDE VL7/VL7U/VL7B/VL7UB Color/Gobo Wheel Control VL7 luminaire fixed color and gobo wheels have 12 positions, while the rotating gobo wheel has six positions. You can mix color filters and gobos on the same wheel, or have all filters on one wheel with all gobos on the other wheel. The VL7 luminaires are supplied in standard configuration with all gobos on the front wheel (Wheel 1) and all filters on the rear wheel (Wheel 2). Color and gobo wheels in VL7 luminaires can be placed on any step position of the motor. Wheel positions are mapped to DMX512 fader positions to control 96 static positions and five spin speeds. Percent values of 0 to 95 control static positions; values 96 through 100 control spin speeds. Table 2-4: VL7 Standard Gobo Wheel Positions Static Gobo Wheel (VL7 Only) 0 Open Rotating Gobo Wheel (VL7/VL7B) 0 Open 1 7002 Pebbles 1 8005 5 Facet Prism 2 7025 Dust Breakup 2 6011 Circle of Ovals 3 6001 Medium Circle 3 4316 Hypno Spiral 4 5011 Night Sky 4 6990 Spiral Stones 5 4305 Pinwheel 5 5501 Leaves 6 4202 Vertical Bars 7 4212 New Horizon 8 7015 Block Breakup 9 5523 Tribal Breakup 10 6501 Geometric Shapes 11 7029 Alpha Rays VLM Moving Mirror The VLM moving mirror is a fully-automated, lightweight, continuous tilt, automated mirror device. The VLM mirror features: 46 • Highly reflective dual-sided mirrored panels. • Continuous spinning on the tilt axis. • Attaches to truss or pipes with a single S300 truss hook and a safety cable. A floor stand is also available. 02.3004.0300.54 EQUIPMENT DESCRIPTION : CABLES 2 Cables Note: Refer to "Cable/Connector Terminology" on page 3 for appropriate metric equivalents. Pig Tails For AC Line Disconnect For Mini AC Line Disconnect The pig tails used for the 200A AC Line Disconnect are a set of 10-foot, 2/0 power cables with CamLok receptacle connectors on one end and bare wires on the other end. The bare wires are used to connect to the house service. The pig tails used for the 30A mini-ACS line disconnect are a set of 10-foot, 8/5 power cables with bare wires on one end and a Hubbell receptacle connector on the other. Power Input Cables The power input cables are 2/0 cables rated at 200A, using color-coded Cam-Lok connectors to denote three phases, neutral, and ground. The cables are available in 20- and 80-foot lengths with Cam-Lok connectors on both ends. The power input cable for the mini-ACS rack has a Hubbell plug on one end and a Hubbell receptacle on the other. Mini-AC Disconnect to SixPack Chassis Input Cable This input cable is used to supply power to a SixPack Chassis or a NIF unit when used with a mini-AC disconnect unit. This cable is connected to the miniAC disconnect using the Hubbell connector. To use with a NIF, the Epic connector is mated to a "modular rack-to-NIF-unit" power cable. (Note the NIF unit end of the modular rack to NIF unit power cable utilizes a single clamping mechanism.) 0 2. 3 0 0 4. 0 3 00 . 5 4 47 DMX512 REFERENCE GUIDE Modular Rack to Mini-ACS Rack Input Cable This input cable is used to supply power to a miniACS rack when used with the modular rack. This cable uses a Hubbell receptacle on one end and an Epic plug on the other. It is connected from the AUX 1 or AUX 2 Epic receptacle at the modular rack to the Hubbell plug at the mini-ACS rack. Series 200 Trunk Cable Series 200 trunk cables distribute power and data to Repeater Boxes for Series 200 luminaires. This cable uses a 41-position Pyle-National or Matrix Science connector. The cables are color-coded at each end to denote length: blue (100 feet), green (60 feet), white (30 feet). Maximum recommended length is 500 feet. APS Trunk Cable APS trunk cables (also called APS6 cables or APS6 trunk runs) distribute lamp power from SixPack chassis or conventional lighting dimmers to Smart Repeater units for Series 300 luminaires. This cable uses a 19-position Veam-Socapex compatible connector. The cables are color-coded at each end to denote length: blue (100 feet), green (60 feet), white (30 feet). This cable is similar to a standard Socapex cable except it contains special shielding for operation of VL5Arc/VL6/VL7 luminaires. When only operating VL5/VL5B luminaires on a Smart Repeater unit, industry standard 19-pin Socapex cables can be substituted for APS trunk cables. Maximum recommended length is 1000 feet. 48 02.3004.0300.54 EQUIPMENT DESCRIPTION : CABLES 2 Series 200 Lamp Cable Series 200 lamp cables are shielded cables with a 9-pin Amp CPC connector at both ends. They are used as follows: • To connect Series 200 luminaires to Repeater Boxes. • To connect interface units and Smart Repeater units to Repeater Boxes and mini-ACS racks. • To connect master ACS racks to slave ACS racks. The cables are color coded at each end to denote standard lengths. For Series 200 lamp cables: white (6 feet), red (12 feet), yellow (20 feet), orange (50 feet), blue (100 feet). Maximum recommended length is 100 feet. Series 200 Data Link Cable This cable contains only data conductors and is used only to interconnect slave ACS racks or mini-ACS racks to master ACS racks or mini-ACS racks. Data are carried on two individually shielded pairs with a common drain wire. The capacitance of the cable is very low, allowing the cable to be run for long distances with little signal degradation. Since the cable does not contain any power conductors, it must not be used for applications where connected equipment requires power. Slaving ACS racks is a signal-only operation, thereby permitting the use of this cable. This cable uses the same Amp CPC connectors as those on Series 200 lamp cables. There is a practical limit to the number of cables that can be combined before minor signal degradation occurs. No more than four cables should be strung together to maintain signal integrity. This limits the number of connections (major sources of noise) to five (three between cables and two at each connection to ACS racks). The cables are color-coded at each end to denote length: white (6 feet), red (12 feet), yellow (20 feet), orange (50 feet), blue (100 feet), violet (150 feet), brown (185 feet), green (200 feet), and gray (250 feet). Maximum recommended length is 500 feet. Note: In order to use this cable properly, the associated ACS rack must have been upgraded with the Universal Repeater Board. 0 2. 3 0 0 4. 0 3 00 . 5 4 49 DMX512 REFERENCE GUIDE Series 200 Super Lamp Run Cable Due to data signal degradation, standard Series 200 lamp cables should not be connected for lengths greater than 100 feet. The super lamp run cable assembly can be run up to 500 feet and is recommended even for short runs of Virtuoso comm. This cable contains AC and data conductors carried on three conductor, two pair composite runs. Data are carried on two individually shielded pairs with a common drain wire. The conductor to shield capacitance of the twisted pair data conductors is very low, allowing the cable to be run for long distances with little signal degradation. This cable uses the same CPC connectors as those on Series 200 lamp runs. There is a practical limit to the number of cables that can be combined before minor signal degradation occurs. No more than four cables should be strung together to maintain signal integrity. This limits the number of connections (major sources of noise) to five (three between cables and two at each end of string at equipment connection). The cables are color-coded at each end to denote length: blue (100 feet), violet (150 feet), brown (185 feet), green (200 feet), and gray (250 feet). Note: In order to use this cable properly, the associated ACS rack must have been upgraded with the Universal Repeater Board. 50 02.3004.0300.54 EQUIPMENT DESCRIPTION : CABLES 2 Series 300 Lamp Cable Series 300 lamp cables have a 16-pin Amp CPC connector at both ends and come in two types: shielded and unshielded. • The unshielded, gray-jacketed cables are used to connect VL5, VL5B, and VLM luminaires to Smart Repeater units. • The shielded, black-jacketed lamp cables are used to connect VL5, VL5B, VL5Arc, VL6, VL7 and VLM luminaires to Smart Repeater/Smart Repeater Plus units. The shielded cable has an additional shield around the power conductors. The cables are color coded at each end to denote standard lengths. For unshielded lamp cables: white (4 feet), red (8 feet), yellow (16 feet), orange (40 feet), and blue (100 feet). For shielded lamp cables: white (6 feet), red (12 feet), yellow (20 feet), orange (50 feet), blue (100 feet). Maximum recommended length is indicated below: Luminaire Cable Length VL5, VL5B, VL5Arc 300 ft. VL6 150 ft. VL6B, VL6C/VL6C+ 70 ft. VL7, VL7U, VL7B, VL7UB 32 ft. Series 300 Smart Lamp Plus Cable Series 300 Smart Lamp Plus cables have a 16-pin Amp CPC connector at both ends. The shielded, black-jacketed lamp cables are used to connect VL6B and VL7 luminaires to Smart Repeater Plus units. The shielded cable has an additional shield around the power conductors. The cables are color coded at each end to denote the two standard lengths: orange (50 feet), blue (100 feet). Maximum recommended length is 100 feet. 0 2. 3 0 0 4. 0 3 00 . 5 4 51 DMX512 REFERENCE GUIDE Data Cables Smart Repeater and DMX200 units are equipped with 5-pin XLR connectors for DATA IN and DATA THRU (out) applications. DATA IN requires a 5-pin, female XLR connector and DATA THRU requires a 5-pin, male XLR connector. When purchasing or constructing data cables, it is important that not only the correct cable type be used, but also quality cable to ensure a reliable DMX512 system. Your cabling should meet the following USITT DMX512 specification requirements: • Suitable for use with EIA485 (RS485) operation at 250k baud. • Characteristic impedance 85-150 ohms, nominally 120 ohms. • Low capacitance. • Two twisted pairs. • Foil and braid shielded. • 24 AWG min. gauge for runs up to 1000 feet (300m). • 22 AWG min. gauge for runs up to 1640 feet (500m). Note: Microphone type cables and other general purpose, two-core audio or signal cables are not suitable for use with DMX512. Refer to the USITT Recommended Practice for DMX512 guide for additional information regarding DMX512 systems. How to obtain a copy is detailed in "Additional Documentation" on page 1. The XLR 5-pin connectors should be wired as follows: Pin/Wire Code to XLR Connectors Data Thru Cable Pinout 1 5 2 3 4 Male Conn 52 Pin 1 Pin 2 Pin 3 Pin 4 Pin 5 Foil & Braided Shield 1st conductor of 1st twisted pair 2nd conductor of 1st twisted pair 1st conductor of 2nd twisted pair 2nd conductor of 2nd twisted pair Data (-) Data (+) Data (-) Data (+) Data In Cable Pinout 5 1 4 3 2 Female Conn 02.3004.0300.54 EQUIPMENT DESCRIPTION : CABLES 2 Recommended Cable Types/Manufacturers These are only a few of the suitable cable types. Any quality EIA485, twisted pair, 120 ohm, shielded cable will also work. Table 2-5: Cable Types/Manufacturers Type Pairs ZΩ∗ 1215A 2 150 PVC 1269A 2 100 8102 2 8132 2 Jacket AWG Use Temp (F) 26 IBM Type 6 Office cable 75 PTFE 22 (Solid) High Temp, Plenum cable 200 100 PVC 24 UL2919 80 120 PVC 28 UL2919 80 Belden Cables 8162 2 100 PVC 24 UL2493 60 82729 2 100 PTFE 24 High Temp, Plenum cable 200 88102 2 100 PTFE 24 High Temp, Plenum cable 200 89696 2 100 PTFE 22 High Temp, Plenum cable 200 89729 2 100 PTFE 24 High Temp, Plenum cable 200 89855 2 100 PTFE 22 High Temp, Plenum cable 200 9729 2 100 PVC 24 UL2493 60 9804 2 100 PVC 28 UL2960 60 9829 2 100 PVC 24 UL2919 80 9842 2 120 PVC 24 UL2919 80 PC224P 2 110 Polyurethane 22 Heavy Duty and Portable 105 PC224T 2 110 PVC 22 UL2464 105 PC226T 3 110 PVC 22 UL2464 Proplex Cables * Characteristic Impedance 0 2. 3 0 0 4. 0 3 00 . 5 4 53 DMX512 REFERENCE GUIDE Male Termination Connector A male XLR termination connector is required at the last luminaire (or "far end of the line") to prevent signal reflections. Signal reflections may cancel out the signal at certain line lengths, resulting in errors. The terminator is also necessary for software downloads and running tests on multiple luminaires. To construct your own connector, you will need the following components: • 5-pin, male XLR connector. • Two 1/4W 5% 120 ohm resistors. 1 5 2 3 4 Solder resistors across pins 2 & 3, and 4 & 5 Loopback Connector When transferring software versions from luminaire to luminaire, a loopback connector is required at the first luminaire in the data link. To construct your own connector, you will need the following components: 54 • 5-pin, female XLR connector. • Two small segments of 22AWG wire. 5 1 4 3 2 Solder wires across pins 2 & 4, and 3 & 5 02.3004.0300.54 3. System This chapter contains information on set-up and checkout of the system. • Equipment Handling • Hanging • Accessories • System Hook-Up • System Checkout 0 2 . 3 00 4 . 0 30 0 . 5 4 55 DMX512 REFERENCE GUIDE Equipment Handling Lamps Servicing • When handling a lamp, hold it by the ceramic base while wearing cotton gloves or finger cots. Do not touch the glass envelope (bulb). If you touch the glass with bare fingers, wipe off any fingerprints with alcohol. • Use care when opening and closing the rear door of the VL2B and VL2C luminaires. Any jarring of the rear door can undo the optical alignment of the lamp. Heat • When lamps are lit, the interior of the luminaires becomes very hot. To aid in the airflow circulation within the luminaires, after dousing the lamps, wait ten minutes before removing power to the luminaires. This will provide enough time for the equipment fan to cool off the unit. Lamp Life 56 • When operating arc lamps, allow luminaires to operate for at least 3 minutes. It takes about 3 minutes for the fill components (mercury and halogen-metal compounds) in the lamp tubes to vaporize completely. If the lamps are switched off earlier than 3 minutes, the fill components are partially vaporized. The inadequately vaporized fill components and the electrode material (tungsten) are deposited in the areas of the lamp tubes that have remained cool. As a result, the lamp tubes blacken prematurely and reduce the service lives of the lamps. • If system will be unattended for more than two hours, luminaire lamps should be doused. Standby mode should not be used for more than two hours. • For VL6 luminaires, if lamp is struck, the luminaire should be maintained in a horizontal position when not in use. • For arc lamp luminaires, heads should be tilted horizontal before starting lamps. Lamps generate light by an electrical discharge arc, whereby the electrons from two electrodes excite the fill components to give off light. Because of the alternating current "position", the electrons are alternately given off by the two electrodes. When a lamp is set in a vertical position, the halogenmetal compounds, which determine the color temperature of the lamp, collect at the top end of the glass envelope. When the lamp is started, color deviations occur since the concentration of halogen compounds is greater around the top electrode than the bottom electrode. In addition, the fill components that are difficult to vaporize congeal around the bottom electrode, thereby reducing lamp life. 02.3004.0300.54 SYSTEM : HANGING 3 Hanging Hanging Preparation Observe the following guidelines when installing truss equipment. Luminaire Orientation and Placement Luminaire hanging orientation is usually denoted on a lighting plot. A lighting plot is created in advance and represents the stage setup and desired location and orientation of luminaires. Luminaires and repeaters are generally hung from pipes or trusses, and suspended above the object of illumination. Ensure that minimum distance safety requirements are observed. The minimum distance symbol can be found on the input rating label of luminaires and specifies the minimum safe distance from the front lens to a lighted object. x.0 m x.0 = number of meters Luminaire input (pigtail) cables are used as reference points when hanging instruments. The hanging orientation of the luminaire on the truss or pipe determines which direction the luminaire will initially move from the luminaire zero position when the pan and tilt controls are manipulated from the console. All luminaires move to their zero position when they finish calibration (head and yokes halfway between stops). The input cables should have an order: all pointed stage left or stage right, or downstage luminaires one way and upstage luminaires the other. This allows the luminaires to move in a like manner when all luminaires are selected and moved at the same time. Truss Pipe Normally, Series 200 luminaires are hung with two truss hooks on a single pipe. Series 300 luminaires are hung with one double truss hook or clamp (VL7) on a single pipe. The hooks fit securely on any pipe with an outer diameter between 1 and 2 inches (25.40 to 50.80 mm). The clamp is designed for a 2 inch (50.80 mm) pipe. The use of square pipe is not recommended. Other truss-mounted equipment may only require one S200 truss hook. Truss hooks are clamped to the pipe (or truss) by turning the wing bolt, installed in one of two threaded holes. (The wing bolt should be tightened only by hand.) 0 2. 3 0 0 4. 0 3 00 . 5 4 57 DMX512 REFERENCE GUIDE Spacing Requirements To avoid collisions during pan and tilt movement, luminaires must be installed at a minimum distance from each other. Table 3-1: Luminaire-To-Luminaire Distance Requirement Luminaire Type VL2B / VL2C VL4 VL5 / VL5B / VL5Arc VL6 VL6B / VL6C / VL6C+ VL7 / VL7U / VL7B / VL7UB VLM VL2C 21.50 in 546 mm 19.50 in 495 mm 19.75 in 502 mm 19.00 in 483 mm 20.25 in 515 mm 23.75 in 603 mm 19.50 in 495 mm VL4 19.50 in 495 mm 17.50 in 445 mm 17.75 in 451 mm 17.00 in 432 mm 15.25 in 388 mm 21.75 in 552 mm 17.50 in 445 mm VL5 / VL5B / VL5Arc 19.75 in 502 mm 17.75 in 451 mm 18.00 in 457 mm 17.25 in 438 mm 18.5 in 470 mm 22.00 in 559 mm 17.75 in 451 mm VL6 19.00 in 483 mm 17.00 in 432 mm 17.25 in 438 mm 16.50 in 419 mm 17.75 in 451 mm 21.25 540 mm 17.00 in 432 mm VL6B / VL6C / VL6C+ 20.25 in 515 mm 15.25 in 388 mm 18.5 in 470 mm 17.75 in 451 mm 19.00 in 483 mm 22.5 in 572 mm 18.25 in 464 mm VL7 / VL7U / VL7B / VL7UB 23.75 in 603 mm 21.75 in 552 mm 22.00 in 559 mm 21.25 540 mm 22.5 in 572 mm 26.00 660 mm 21.75 in 552 mm VLM 19.50 in 495 mm 17.50 in 445 mm 17.75 in 451 mm 17.00 in 432 mm 18.25 in 464 mm 21.75 in 552 mm 17.50 in 445 mm Example: Find minimum distance between a VL5 luminaire & a VL6 luminaire: Step 1. On chart above, locate VL6 luminaire on top row and locate VL5 luminaire on side row. Step 2. From VL6 block on top row, follow chart down. From VL5 block on side row, follow chart to right. Step 3. Where two rows meet, locate the correct minimum distance (17.25 in. or 438 mm). CL 17.25 in (438 mm) CL VL5VL6EX 58 02.3004.0300.54 SYSTEM : HANGING 3 Safety Cables A safety cable is provided with every luminaire and repeater. There are two different safety cables available: the Series 200 cable and Series 300 cable. The cable is attached to the handle of Series 200 luminaires or the pan tube of Series 300 luminaires, looped around the truss or pipe, then re-attached to the equipment. As little slack as possible should be left. WARNING: Safety cables should always be used when hanging luminaires. Figure 3-1: Safety Cable Example 0 2. 3 0 0 4. 0 3 00 . 5 4 59 DMX512 REFERENCE GUIDE Series 200 Hanging Hardware All Series 200 luminaires and repeaters are provided with truss hooks and a safety cable. CAUTION: The wing bolt should be tightened only by hand. Do not use wrenches or other tools as this can damage the truss or the hook. Single Truss Hook Variations The Series 200 luminaires (VL2/VL4) and repeaters use the single truss hook. Multiple variations of the hook are available to accommodate a wide variety of installation configurations. S200 Single Hook 45 Degree 135 Degree 90 Degree Standard While the hanging methods for repeaters are limited to either a one- or two-hook hang, luminaires offer greater hanging flexibility. Note: Refer to "Series 200 Hanging Methods" on page 61 for hook placement illustration. The VL2C luminaire has five receptacles for connecting truss hooks. • Standard hooks in opposite corners are parallel. • Standard hooks in adjacent corners are at right angles. • A standard hook in the center receptacle is parallel to two of the corners and at a right angle to the other two. • A 90 degree hook is available so adjacent hooks can be parallel. • The 45 and 135 degree hooks allow the luminaire to be hung square with the truss pipe. The VL4 luminaire has four receptacles for connecting truss hooks. Like the VL2C luminaire, standard hooks on opposite sides are parallel, while standard hooks on adjacent sides are at right angles. The hook is inserted in the receptacle and turned 90 degrees clockwise to lock. To re-orient the hook 180 degrees, remove the truss hook, turn it 180 degrees around and re-insert the hook. When installing the truss hooks, never turn the hook more than 90 degrees, as this will damage the receptacle. 60 02.3004.0300.54 SYSTEM : HANGING 3 Series 200 Hanging Methods Series 200 Two-Point Hang (Standard) A two-point hang is the standard hanging method for Series 200 luminaires. VL2C Luminaire VL2HANG VL4 Luminaire VL4HANG Series 200 Three-Point Hang A three-point hang is required when the trusses move or tilt in any way during the show. This method of hanging prevents the luminaires from slipping or twisting on the truss and thereby altering their focus. In some cases a cross-brace and a third truss hook can be used, but in most cases an adjustable truss coupling plate will be required. Requires use of right-angle (90 degree) truss hook here 0 2. 3 0 0 4. 0 3 00 . 5 4 8.49 in 216 mm 61 DMX512 REFERENCE GUIDE Adjustable Coupling Plate The most widely used device for extra support is the adjustable coupling plate. The adjustable coupling plate provides a third point of support. The hook can be moved along a slot in the plate to accommodate trusses with 12- to 28-inch centers. The hook can also be rotated through 360 degrees to mate with cross braces at any angle. A special hook used with the adjustable coupling plates utilizes a bolt welded in place of the truss hook fastener. This hook is secured to the coupling plate by a lock washer and nut. 27.99 in 711 mm 34.00 in 864 mm 11.99 in 305 mm The adjustable coupling plate can be installed in two locations on VL2C and VL4 luminaires. This limits the overhang of the coupling plates from the truss, thereby reducing the hazard when moving the truss during installation and removal. 62 02.3004.0300.54 SYSTEM : HANGING 3 Series 200 Vertical Hang In some cases it is necessary to hang the luminaires vertically. In such a case, the luminaire is hanging on its side with the yoke parallel to the stage. This puts more stress on the yoke and the truss hooks than a normal, horizontal hang. A three-point hang is absolutely necessary for vertical hangs, whether or not the truss moves during the show. When hanging a VL2C luminaire in a vertical hang position, make sure that the luminaire is hung so that the fan drive board is not at the lowest point of the hang. This will prevent rain water or heavy condensation from collecting around the bottom of the luminaire (where the board would be located) and causing possible luminaire overheating. CORRECT VERTICAL HANG INCORRECT VERTICAL HANG INPUT CONNECTOR FAN DRIVE BOARD UP Series 200 Alternate Hanging Methods Multiple variations of the truss hook (refer to "Single Truss Hook Variations" on page 60) are available to accommodate a wide variety of installation configurations. The following illustration shows how different style hooks align in the Series 200 luminaire chassis. The following illustrations give a few examples of installation using alternate truss hooks. Note: There are many more methods of hanging luminaires that are not discussed here, as well as types of hooks and coupling plates for special applications. The following diagrams are only a few examples of alternate hanging methods. Consult your local Product Support Department or shop manager if necessary. Hang Using 45 and 135 Degree Hooks 135 45 45 45 45 0 2. 3 0 0 4. 0 3 00 . 5 4 135 HANG_45 63 DMX512 REFERENCE GUIDE Hang Using 90 Degree Hooks HANG_90 64 02.3004.0300.54 SYSTEM : HANGING 3 Series 300 Hanging Hardware: VL5 / VL6 / VLM All VL5, VL6, and VLM luminaires are provided with a truss hook and a safety cable. Series 300 luminaires can be hung horizontally or vertically from any structure designed to accommodate the load created by this moving luminaire. In standard hanging applications, the DMX512 utilizes a Series 300 double truss hook, which is bolted to the pan tube. The hook can be oriented in 45 degree increments to provide flexible mounting. (See "Standard Hang" on page 66.) A special third-point truss hook, which mounts to the pan tube in addition to the double hook, is available to provide a third point of support. (See "Three-Point Hang" on page 68.) To attach a double truss hook: Step 1. Determine type of installation and required orientation of truss hook. Step 2. At pan tube, attach truss hook using four 5/16-18 x 1" bolts and 5/16-18 nuts (Figure 3-2). Step 3. Ensure truss hook is secure. Old Style S300 Double Hook NOTE: Use four 5/16-18 x 1" Grade 5 Bolts when installing a Series 300 Double Truss Hook. 5/16-18x 1" Grade 5 Bolt (53.7001.0003) Truss Hook New Style S300 Double Hook (22.9634.0217) S300 Third-Point Truss Hook (22.9634.0195) 5/16-18 Nut w/ Nylon Insert (53.2025.0002) Pan Tube Figure 3-2: Attaching a Series 300 Truss Hook (VL6C+ Example) 0 2. 3 0 0 4. 0 3 00 . 5 4 65 DMX512 REFERENCE GUIDE Hanging Methods: VL5 / VL6 / VLM Standard Hang In standard hanging applications, the VL5, VL6, and VLM luminaires utilizes a Series 300 double truss hook, which is bolted to the pan tube and affixed to square tube or round pipe; the minimum outside dimension for a piece of pipe or tube is 1 inch (2.54 cm) and the maximum outside dimension is 2 inches (5.08 cm). CAUTION: Wing bolts should be tightened only by hand. Do not use wrenches or other tools as this can damage the truss or the hook. WARNING: A safety cable MUST be used in all hanging configurations. Step 1. Lift luminaire into mounting position (Figure 3-3 on next page). Step 2. Tighten truss hook wing bolts by hand. Ensure that luminaire is fully supported. Step 3. Install safety cable as follows (referring to Figure 3-3 DETAIL A): a. Attach one end of safety cable to pan tube. b. Loop several times around truss or pipe, leaving as little slack as possible. c. Attach other end of safety cable to pan tube. Step 66 4. Connect input pigtail cable to Series 300 Lamp Run Cable which is connected to a Smart Repeater or Smart Repeater Plus unit. 02.3004.0300.54 SYSTEM : HANGING 3 A Safety Cable MUST be used for all hanging installations and may be required by local codes. Safety cable and input pigtail cable must be dressed to avoid interference with luminaire motion. Square tube or round pipe. Minimum outside dimension for pipe or tube is 1 inch (2.54 cm). Maximum outside dimension is 2 inches (5.08 cm) DETAIL A Safety Cable Pipe or Tube Figure 3-3: Standard Series 300 Hanging Configuration and Clearances (VL6C+ Example) 0 2. 3 0 0 4. 0 3 00 . 5 4 67 DMX512 REFERENCE GUIDE Three-Point Hang A Series 300 third-point truss hook can be used to stabilize the luminaire in a three-point hanging configuration. The third-point hook is bolted to the pan tube in addition to the standard double hook. The following illustration shows how the hook is used to achieve a three-point hang. Series 300 Double Hook S300 Third-Point Truss Hook (22.9634.0195) Third-Point Hook Figure 3-4: Three-Point Hang Custom Hang Series 300 luminaires can also be hung using custom hanging devices. The pan tube's multiple mounting holes allow flexibility for placement of hardware. To attach custom hanging devices to the pan tube, the following hardware can be used: • 5/16"-18 x 1" HSCZ Grade 5 Bolt (53.7001.0003) • 5/16"-18 Zinc nut with nylon inserts (53.2025.0002) Pan Tube Top View 4.055 in 103 mm 0.375 in 9.5 mm 4.67 in 119 mm Figure 3-5: Series 300 Pan Tube Hole Dimensions 68 02.3004.0300.54 SYSTEM : HANGING 3 Series 300 Hanging Hardware: VL7 The VL7 luminaire requires a different type of truss attachment hardware than the other Series 300 luminaires. For the VL7 luminaire, two types of clamps are available: a round pipe clamp for 2" pipe applications and an adjustable clamp for square pipe or other applications. A single truss clamp, attached to the pan tube, is used for a standard horizontal hang. A vertical hang can be achieved using an appropriate vertical hang assembly in combination with a truss clamp. VL7 Round Pipe Clamp VL7 Square Pipe Clamp Figure 3-6: VL7 Clamps When installing a VL7 luminaire with the round pipe clamp, swing latch up and back as far as possible. If the latch is not in the proper position, the clamp will not fit on the pipe. Wing Knob Latch Clamp Bolt Clamp will bind on pipe. Truss Pipe HKINSTAL Correct Incorrect Figure 3-7: VL7 Round Pipe Clamp Orientation 0 2. 3 0 0 4. 0 3 00 . 5 4 69 DMX512 REFERENCE GUIDE VL7 Vertical Hang Assemblies A special vertical hang can be achieved by using a vertical hang assembly. This assembly consists of several components that attach to the truss clamp. Depending on the truss clamp, round pipe or adjustable (square pipe), a different vertical hang assembly will be required. Round Pipe Vertical Hang The Round Pipe Vertical Hang Assembly (21.9650.4115) utilizes a 2" round pipe truss clamp, an adapter, a support tube, and a standard Series 300 double truss hook. When assembled with U-Bolts and attached to the VL7 pan tube, a supported vertical hang on 2" round pipe can be obtained as shown. Spacer S300 Double Truss Hook Support Tube 5/16" U-Bolt Kit w/ Hardware Pin 3/8" U-Bolt Kit w/ Hardware Hang Adapter INSTALLED VIEW 2" Round Pipe Truss Clamp Luminaire Not Shown VERTRND Figure 3-8: VL7 Vertical Hang - Round Pipe 70 02.3004.0300.54 SYSTEM : HANGING 3 Square Pipe Vertical Hang The Square Pipe Vertical Hang Assembly (21.9650.4114) utilizes an adjustable square pipe truss clamp, a support tube, and a standard Series 300 double truss hook. When assembled with U-Bolts and attached to the VL7 pan tube, a supported vertical hang on square pipe or round pipe larger than 2" diameter can be achieved as shown. S300 Double Truss Hook 3/8" U-Bolt Kit w/ Hardware Support Tube 5/16" U-Bolt Kit w/ Hardware INSTALLED VIEW Adjustable (Square Pipe) Truss Clamp Luminaire Not Shown VERTMLTI Figure 3-9: VL7 Vertical Hang - Square Pipe 0 2. 3 0 0 4. 0 3 00 . 5 4 71 DMX512 REFERENCE GUIDE Series 300 Floor Mounting A Series 300 luminaire may be mounted in an upright floor position using a Series 300 floor stand. The floor stand (22.9634.0161) includes all necessary hardware as shown in Figure 3-10. To install floor stand: Step 1. Orient pigtail cable as shown in Figure 3-10 DETAIL B and rotate pan tube accordingly. Step 2. Secure pivoting legs to pan tube using, on each pivoting leg, one 5/16-18 bolt and nut; with two clutch disc springs, and one 1/4" flat washer between the bolt and the leg, one 1/4" flat washer between the leg and the pan tube. Be sure to install disc springs with concave surfaces facing the flat washer. Step 3. Tighten nuts and bolts until there is proper tension: just enough so pivoting legs stay in place, but not so much that the legs don’t pivot. See Figure 3-10 DETAIL A. 5/16-18 x 1" Grade 5 Bolt (one per leg) Disc springs should be installed with concave surfaces facing down S300 Floor Stand Assembly (22.9634.0161) Clutch Disc Spring (2 per pivoting leg) PIVOTING LEG 1/4" Flat Washer (two per leg) Rubber Bumper (3) PIVOTING LEG 1/4" Flat Washer (two per leg) 5/16-18 Nut w/ Nylon Insert (one per leg) FIXED LEG DETAIL A DETAIL B PIVOTING LEG Pivoting legs should be installed so that they pivot, yet stay in place after opening Pigtail Cable PIVOTING LEG PIVOTING LEG PIVOTING LEG FIXED LEG FIXED LEG Figure 3-10: Installing Floor Stand 72 02.3004.0300.54 SYSTEM : HANGING 3 Step 4. Place luminaire in desired floor position observing proper clearances. Step 5. Connect input pigtail cable to Series 300 Lamp Run Cable which is connected to a Smart Repeater or Smart Repeater Plus unit. 0 2. 3 0 0 4. 0 3 00 . 5 4 73 DMX512 REFERENCE GUIDE Accessories Sound Baffles Some hang locations require a reduced noise environment. Fan noise in the VL7 luminaire and Series 200 luminaires can be greatly reduced by using the VL7 sound baffle kit, the VL2C sound baffle (with or without sound blanket) and VL4 sound baffle. No additional hardware is used to secure the sound baffles to the luminaires when the luminaires are hung from trusses. The Series 200 sound baffles are secured to the luminaire with safety cables. For ground installations, safety cables are not required. The VL7 sound baffle mounts over the top head cover. For all uses of the sound baffles (and sound blanket), the baffle fits over the fan opening and air filter. Note the following: • It is not necessary to remove the air filters from VL2C luminaires. • It may be necessary to remove the air filters from VL4 luminaires in some cases. VL7 Luminaire Sound Baffle The VL7 sound baffle is a two piece kit consisting of the baffle itself which mounts over the top head cover and is secured with elastic cords that wrap around the head assembly; and a thin counterweight required to be installed inside the bottom cover to balance the head assembly. Sound baffle is installed over top head cover. Install counterweight in center of bottom cover against front edge of flat section. Secure with supplied velcro. Secure sound baffle with two elastic straps. Sound Baffle Counterweight Figure 3-11: Installing VL7 Sound Baffle 74 02.3004.0300.54 SYSTEM : ACCESSORIES 3 To install the optional sound baffle kit: Step 1. Disconnect power to luminaire. Step 2. Disconnect two latches and remove bottom head cover. Step 3. Install counterweight as shown in illustration. Note: The counterweight is secured to the inside of the bottom head cover with adhesive-backed velcro. Both hook and loop velcro pieces are pre-installed on one side of the counter-weight. a. At bottom of counterweight, remove adhesive backing from velcro. Leave velcro attached to counterweight. b. Inside bottom cover, at flat section, center counterweight left and right and install against front edge. Press firmly to adhere velcro to bottom cover. Install counterweight in center against front edge of flat section. Front CL CL Figure 3-12: Installing VL7 Sound Baffle Counterweight Step 4. At head assembly, install bottom head cover and secure latches. Step 5. Install sound baffle. a. Place baffle over top head covers. b. Stretch elastic cords around front and rear sections of head assembly. 0 2. 3 0 0 4. 0 3 00 . 5 4 75 DMX512 REFERENCE GUIDE VL2C Luminaire Sound Baffle and Sound Blanket The original VL2C sound baffle was modified from a rectangle to a truncated rectangle so that the luminaire will fit on a stage truss with little interference to other equipment. In addition, a sound blanket was designed to fit over the luminaire upper enclosure and sound baffle to provide additional sound isolation. It is a two piece plastic shell with an inner foam lining and attaches to the luminaire with two side buckles and three nylon straps with buckles. The sound blanket can only be used with the truncated rectangle sound baffle. The older style rectangular sound baffle can still be used without the sound blanket. Kits are available to convert rectangular sound baffles to truncated sound baffles. The modified sound baffle and sound blanket were designed primarily for the VL2C luminaire’s louder cooling fan. VL2C Sound Baffle 2BECA009 MODIFIED SOUND BAFFLE OLDER STYLE BAFFLE Figure 3-13: VL2C Sound Baffles To install VL2C sound baffle: 76 Step 1. Route safety cable around center flange of sound baffle. Step 2. Align sound baffle with air intakes. Step 3. Push up center flanges of baffle into space between fan intakes and air filters. Step 4. Push down bottom flanges of baffle into space between fan intakes and air filters. Step 5. Ensure baffle fits snugly. 02.3004.0300.54 SYSTEM : ACCESSORIES 3 VL2C Sound Blanket Sound Blanket Strap Buckles Side Buckle Modified Sound Baffle SNDBFL Figure 3-14: VL2C Sound Blanket Installation To install VL2C sound blanket: Step 1. At sound blanket, unlatch buckles from straps and buckles from side of baffle shell. Step 2. At luminaire, place sound blanket shells on luminaire and snap strap buckles. Step 3. At each side of sound blanket, secure side buckles. 0 2. 3 0 0 4. 0 3 00 . 5 4 77 DMX512 REFERENCE GUIDE Note: It may be necessary to add a piece of gaffer’s tape at the joint between the two halves to stop the yoke from catching. VL4 Sound Baffle 4ECA009 Figure 3-15: VL4 Sound Baffle To install VL4 sound blanket: Step 1. Route safety cable through eyelet in sound baffle. Step 2. Align sound baffle with air intakes. Note: Because of the baffle's tight fit, it may be necessary to remove the air filters before installation in some cases. 78 Step 3. Push down bottom flanges of baffle between bottom lips of fan intakes and air filters (if installed). Step 4. Push up top flanges of baffle between top lips of fan intakes and air filters (if installed). Step 5. Ensure that baffle fits snugly. 02.3004.0300.54 SYSTEM : SYSTEM HOOK-UP 3 System Hook-Up Overview This section contains a quick guide to safe and proper system installation. Each series of luminaires has its own section on installation and checkout. For installation information, see the following sections: • "Series 200 Luminaires" on page 80 • "Series 300 Luminaires" on page 84 These instructions are intended for persons already familiar with VARI❋LITE® equipment. Note: Some of the terms found in this section are fully explained in the remainder of this manual. For a brief definition, refer to the "Glossary" on page 159. Fixture Orientation The orientation of the fixture is determined by which way the pigtail faces as it exits the luminaire. The way a fixture is hung affects the direction it will point when it reaches its stop mechanism. If one luminaire is hung differently from the others, the position (focus) will also be different. There should be some consistent order to the way the pigtail faces: all stage left, all stage right, etc. 0 2. 3 0 0 4. 0 3 00 . 5 4 79 DMX512 REFERENCE GUIDE Series 200 Luminaires Refer also to "DMX512 System Example" on page 7. Connecting to System Series 200 luminaires will require a DMX200 interface unit in order to control them from DMX512 consoles. XLR DMX Data Cable from DMX512 source. DMX200 Translator Y Cable Data & Power DMX200 Unit OUTPUT INPUT INPUT Series 200 Trunk Cable Data & Power OUTPUT S200 Repeater Series 200 Lamp Cable Data & Power Power from Modular Rack ACS Rack Step Series 200 luminaires VL2B/VL2C, VL4 1. Locate house AC service. a. Determine location of main power service where lighting system will be connected. b. Verify with a qualified electrician (see WARNING above) that house AC service is within system operating voltages: 85 - 130 VAC or 170 - 260 VAC, single or three phase, 50 or 60 Hz. Ensure that house service can accommodate connecting 2/0 pig tails or 8/5 cables to house service lugs. Step 2. Position ACS, Mini-ACS, or SixPack chassis delta/we switches to correct setting. Refer to "Configuring Equipment For Delta or Wye Operation" on page 20. Step 3. Tie in 2/0 or 8/5 tails. a. Remove power from house service or verify that service disconnect switch is in the OFF position. b. Have a qualified electrician connect 2/0 or 8/5 pig tails to house service. 80 02.3004.0300.54 SYSTEM : SYSTEM HOOK-UP Step 3 4. Attach line disconnects to pig tail cable. a. Verify circuit breaker is in "off" position before installing line disconnect(s). b. Connect line disconnect(s) to end of AC tails (2/0 or 8/5). (Line disconnects should be easily accessible in case emergency requires shutting off power to system.) Step 5. Attach Bucking Transformer (if required). If house AC service is below 100 VAC or above 240 VAC (Europe, Japan and Australia), it may be necessary to connect Bucking Transformer between pig tails and lighting system ACS or modular racks to reduce or raise voltage to desired level. (A standard Bucking Transformer accepts only Cam-Lok style connectors.) Step 6. Run additional AC feeder cables to rack location(s). Connect additional lengths of 2/0 or 8/5 feeder cable to extend power to location of ACS rack(s), modular rack(s), or conventional dimmer area. Step 7. Make sure that Cam-Lok connections are tightly secured. High voltage is present, careful preparation should be taken. Step 8. Connect ACS, Modular or Mini-ACS Racks to feeder cables. Connect cables securely to proper input connectors. Step 9. Connect DMX200 unit to ACS rack. a. Install DMX200 interface on rack or other suitable enclosure. b. Connect DMX200 translator Y cable from DMX200 Power In/Data Out to ACS rack Power Out and Data In. c. Connect DMX input cables to five-pin XLR, DMX IN ports as needed. One connector for luminaire addresses 1 through 497 and one connector for addresses 501 through 999. One connector for luminaire addresses 1 through 497 and one for addresses 501 through 999. 7-segment display DMX Data IN Power In from ACS Rack and Data Out to ACS Rack CE Shaded items not used on DMX200 interface unit. Note: If only one universe of DMX512 is required, ensure that the XLR connector is connected to DMX512 input number one (on left). 0 2. 3 0 0 4. 0 3 00 . 5 4 81 DMX512 REFERENCE GUIDE Step 10. Hang luminaires. a. Determine hanging orientation of luminaires (refer to "Luminaire Orientation and Placement" on page 57). Ensure the following: 1) Pipe for mounting luminaires is between 1 and 2 inches (25.40 to 50.80 mm) in outer diameter. 2) The structure is secure and capable of supporting total luminaire load. 3) Sufficient clearance space is provided for each luminaire. Note: It is recommended that all luminaire input connectors be orientated facing stage left, or at least in the same direction by hanging position. b. Attach truss hooks (turn quarter-turn fastener clockwise). Do not over-turn quarter-turn fastener or truss hook receptacle assembly may be damaged. c. Set thumbwheel address to DMX starting address for the luminaire. Note: The VL2C luminaire requires 14 channels per luminaire, and the VL4 requires 15 channels per luminaire. Luminaire addresses are usually decided upon prior to the set-up of equipment. The lighting plot may contain this information. Step 11. Hang Repeater Boxes. Note: When hanging a repeater, hang so that the red and green comm LED indicators will be visible to the tech, not the audience, when the truss is raised (at trim). a. Attach Repeater Boxes to pipe or truss using Series 200 truss hooks (turn quarter-turn fastener clockwise). Refer to "Series 200 Hanging Hardware" on page 60 for more information. Do not over-turn quarter-turn fastener or truss hook receptacle assembly may be damaged. b. Attach safety cable to Repeater Box handle and verify that the unit is securely fastened to pipe or truss. Truss Pipe Safety Cable Clip 82 02.3004.0300.54 SYSTEM : SYSTEM HOOK-UP 3 Step 12. Connect Series 200 trunk cables. a. Connect plug end of Series 200 trunk cables to ACS or mini-ACS rack trunk cable outputs. b. Connect receptacle end to Repeater Box. Step 13. Connect Series 200 lamp cables. a. For Series 200 luminaires, attach plug end of Series 200 lamp cable to Repeater Box output. Remember to phase-balance Repeater Box. Refer to "Phase Balancing" on page 21. b. Connect receptacle end of lamp cable to luminaire. Make sure to use correct length of lamp cable to avoid having too much excess. Avoid using many short lamp cables connected together since the more interconnections that exist, the more noise and maintenance problems that may develop. Step 14. Perform final inspection. Ensure that all components are securely connected and that all hanging equipment’s safety cables are in use. Ensure that cabling is routed safely. Step 15. Perform system checkout and troubleshooting. For more information see "Series 200 Checkout" on page 90. 0 2. 3 0 0 4. 0 3 00 . 5 4 83 DMX512 REFERENCE GUIDE Series 300 Luminaires Refer also to "DMX512 System Example" on page 7. Connecting to System Series 300 luminaires require a Smart Repeater unit for power and control by DMX512 consoles. Step 1. Position SixPack chassis delta/wye switches to correct setting. Refer to "Configuring Equipment For Delta or Wye Operation" on page 20. Step 2. Connect Modular Rack to power source. Three-phase power will need to be supplied to the system. The maximum recommended mod rack power requirement is 200 amps, using 2/0 feeder with 4/0 Cam-Lok connectors and a 200A line disconnect. A SixPack Chassis requires 30 amps, and uses Hubbell or Epic connectors on 8/5 multicore cable. Connector choice is dependent upon location. This cable will need to be run from a house disconnect through a 30A line disconnect to the racks. WARNING: The high voltages required to run this equipment are dangerous. Electrical "tie-ins" should be handled by a qualified electrician. Note: Some equipment in Europe will work using single-phase power. Check with an Account Manager regarding your event. Modular Rack Tails Series 200 AC Line Disconnect To House Disconnect Feeder Cable 84 02.3004.0300.54 SYSTEM : SYSTEM HOOK-UP Step 3 3. Configure APS6 modules. (There are two types of APS6 modules.) a. For older APS6 modules, a blue programming jumper is used to configure the module in either PSET or DCV mode and a jumper resistor assembly is used to configure the module in either the 400W or 625W power output mode. Note: Older style APS6 modules cannot be used with the VL6C/VL6C+, VL7, VL7U, VL7B, or VL7UB luminaires, which require the 700W power output mode found on the new style modules. Jumper settings: 400W PSET operation (normal fixed level wattage) 625W PSET operation (normal fixed level wattage) 400W DCV operation (0-10Vdc input required from SPC-36 controller) 625W DCV operation (0-10Vdc input required from SPC-36 controller) 400W PSET 625W PSET 400W DCV 625W DCV Jumper Window 1) At APS6 PCB header marked JMP2, carefully remove jumper from current setting. 625W Jumper Assembly APS LVS DCV PSET JMP 1 JMP 2 Note: It is normal for jumper to hang one pin off the header in 400W DCV and 625W PSET modes. 2) Install jumper across required header pins. 0 2. 3 0 0 4. 0 3 00 . 5 4 85 DMX512 REFERENCE GUIDE b. For newer APS6 modules, a four position rotating switch on the face plate sets the output to 400, 625, or 700 watts (the fourth setting is also currently 400W). 1) Set mode switch to either PSET or DCV. CAUTION: Do not change mode or wattage with power applied to module. 2) Using 3/32 slot screwdriver (07.3005.0001), rotate power selector switch to required output according to settings listed on face plate. Power Switch Mode Switch Power Switch Settings Step 4. Configure C3 modules. The C3 module can be configured in two different output modes to accommodate both the 1000 watt and 1200 watt versions of the 120V incandescent lamps use with the VL5 and VL5B luminaires. The 8.33 mode is used with 1000W/120V lamps and the 10.0A mode is used with 1200W/120V lamps. A 0W shunt (blue programming jumper) installed at PCB determines the mode. a. At PCB, install 0W shunt (blue programming jumper) on header marked 8.33A for 1000W operation or 10.0A for 1200W operation. Blue Programming Jumper 8.33 10.0 JMP 2 86 02.3004.0300.54 SYSTEM : SYSTEM HOOK-UP Step 3 5. Configure Modular Rack. Configure APS6 and/or C3 modules in SixPack chassis with regard to port assignments for each Smart Repeater unit. In other words, if there is a VL6 luminaire connected to the first output on a Smart Repeater unit, an APS6 module should be installed in the first slot of the chassis connected to that Smart Repeater unit so that it receives power from an arc power supply module. Port 1 Port 6 Step 6. Configure SPC-36 controller. If an SPC-36 controller is used to remotely start VL6 luminaire lamps or control C3 modules, it is normally installed into the topmost position of the modular rack. However, it can be removed from the modular rack and installed elsewhere as long as it is still directly connected to a SixPack chassis. CAUTION: It is preferable to connect the SPC-36 controller’s S200 AC & DATA input to a SERIES 200 POWER OUT connector on modular rack’s breaker panel and not to a separate power source. This prevents ground-loop problems when modular rack and SPC-36 controllers are on separate power sources. DO NOT share separate grounds. a. For APS6 modules, make sure that the PSET or DCV jumper is set to DCV mode for correct wattage so that it can correctly respond to the SPC-36 controller. Refer to "Configure APS6 modules. (There are two types of APS6 modules.)" on page 85. b. Attach the SPC-36 controller cables to each of the control inputs on the SixPack chassis installed in the modular rack. c. Set SPC-36 controller thumbwheel address. One SPC-36 controller can control up to 36 modules. Step 7. Hang luminaires. a. Determine hanging orientation of luminaires (refer to "Luminaire Orientation and Placement" on page 57). Ensure the following: 1) Pipe for mounting luminaires is between 1 and 2 inches (25.40 to 50.80 mm) in outer diameter. 2) The structure is secure and capable of supporting total luminaire load. 3) Sufficient clearance space is provided for each luminaire. 0 2. 3 0 0 4. 0 3 00 . 5 4 87 DMX512 REFERENCE GUIDE Note: It is recommended that all luminaire input connectors be orientated facing stage left, or at least in the same direction by hanging position. b. Make sure that double truss hook or clamp (VL7) is oriented and bolted to pan tube correctly. Luminaire addresses are usually decided upon prior to the set-up of equipment. The lighting plot may contain this information. c. Loop safety cable around pipe two or three times leaving as little slack as possible and attach clip to opposite side of pan tube or chassis. Ensure that safety cable will not interfere with luminaire movement. Step 8. Hang and configure Smart Repeater units. Note: When hanging a repeater, hang so that the red and green comm LED indicators will be visible to the tech, not the audience, when the truss is raised (at trim). a. Attach Smart Repeater units to pipe or truss using two Series 200 truss hooks (turn quarter-turn fastener clockwise). Refer to "Series 200 Hanging Hardware" on page 60 for more information. Do not over-turn quarter-turn fastener or truss hook receptacle assembly may be damaged. b. Attach safety cable to handle and verify that unit is securely fastened to pipe or truss. c. Set thumbwheel to correct system address. Note: The Smart Repeater also requires a DMX mode, which is set at the thumbwheel. For more information on setting DMX modes, see "DMX512 Modes" on page 10. Step 9. Connect APS trunk cables and Socapex cables. Note: When using only VL5 and/or VL5B luminaires, industry-standard Socapex cables can be used in place of APS trunk cables. a. Connect plug end of APS trunk cables to SixPack chassis in modular rack outputs. b. Connect receptacle end to Smart Repeater units. Step 10. Connect cables. a. Connect plug end of Series 300 lamp cable to Smart Repeater unit. b. Connect receptacle end of lamp cable to Series 300 luminaire. Make sure to use correct length of lamp cable to avoid having too much excess. Avoid using many short lamp cables connected together since the more interconnections that exist, the more noise and maintenance problems that may develop. Dress cable to truss using either tie string or PVC tape. Ensure that cable does not impair operation of luminaires. Note: To avoid noise problems, make sure to not use the older, unshielded, gray-jacketed Series 300 lamp cable with VL5Arc and VL6 luminaires. 88 02.3004.0300.54 SYSTEM : SYSTEM HOOK-UP 3 c. Connect DMX512 cable from console or splitter. Remember to terminate the last device in any DMX512 line. Series 200 Input Cable For AC Power DMX Input from console or other DMX DMX512 termination switch for last Smart Repeater (Not available in all units) DMX Output to next DMX device or DMX terminator plug as needed APS6 Cable for lamp power d. Connect AC cable (a Series 200 connector to male power plug), which will come from a non-dim circuit or other non-voltage-controlled source. Step 11. Connect Signals to Racks a. Set up console and run the control snake. b. Plug DMX512 cables (one per universe) into the console and run them to the first DMX512 unit in line; this first device can be a DMX512 splitter, which takes one DMX512 universe in and outputs it multiple times. Or, the DMX512 cable can run directly to the dimmers and can continue on to other devices from there. Step 12. Perform final inspection. Ensure that all components are securely connected and that safety cables have been installed. Ensure that cabling is routed safely. Step 13. Perform system checkout and troubleshooting. Refer to "Series 300 Checkout" on page 91. 0 2. 3 0 0 4. 0 3 00 . 5 4 89 DMX512 REFERENCE GUIDE System Checkout Series 200 Checkout Once the system has been hung, cabled and connected to the console via the control snake: Step 1. Apply power to DMX200 unit. Verify that on switch lights. Step 2. Verify that console is powered up and patched. Step 3. Verify that red and green LEDs on DMX200 unit are blinking on and off. If they are not, at XLR input connector, verify that cable is correctly installed and fully seated. Step 4. Verify seven segment display on DMX200 unit matches DMX512 connections: Display readout "1" = connection to DMX IN #1 Display readout "2" = connection to DMX IN #2 Display readout "3" = connection to DMX IN #1 & 2 Display readout "n" = no DMX IN connection Step 5. Apply power to lights at ACS rack. Step 6. Watch luminaires calibrate. Be aware that luminaires will only calibrate if a valid if operating system is received from the DMX200 unit. Step 7. Tilt all luminaires parallel to the floor and start all lamps if not already struck. Step 8. For luminaires that do not light, try to start lamp again. If luminaire still does not light, problem may be in lamp or connections to lamp. Refer to appropriate luminaire user’s manual for troubleshooting procedures. Step 9. Perform visual check of the system. Note any lamps that have not started or appear dim or discolored. a. If lamp appears unusually dim after three minutes, douse lamp, wait five minutes, and recheck lamp mounting. Ensure that lamp is securely seated in its socket and oriented properly. Unusually dim luminaires may need to have lamp replaced. Refer to appropriate luminaire user’s manual for lamp replacement procedure. b. If any lamps still do not start, replace it. If new lamp does not start, problem may be power supply. Step 10. Perform diagnostic cues for each luminaire. 90 02.3004.0300.54 SYSTEM : SYSTEM CHECKOUT 3 Series 300 Checkout Once the system has been hung, cabled and connected to the console via the control snake: Step 1. Turn on console and ensure that DMX512 signal is applied to the entire system. Patch your console, or load your show from disk. Step 2. Apply power to the Smart Repeater units in the system, and watch the luminaires calibrate. Be aware that the luminaires will only calibrate if a valid DMX512 signal is received. Check the red LEDs on the output port side of the Smart Repeater unit to verify that signal is present. Step 3. Ensure that the operating mode for each Smart Repeater unit has been properly set. Refer to "DMX512 Modes" on page 10. Step 4. Once all the luminaires have completed their calibration procedure, select each luminaire individually and pan and tilt to ensure control. Step 5. Point arc luminaires horizontally and strike the lamps by turning on the switch on the APS6 module, or through the start/douse channel patched to the SPC36 SixPack Controller (set level to full). Step 6. Give arc luminaires an intensity to verify that they are lit. For VL5 and VL5B wash luminaires, ensure that the lamp intensity control channel matches the selected luminaire as you pan and tilt them. Step 7. Continue checking all other attributes to verify proper operation. Step 8. If there are no problems, you are now ready to begin programming. 0 2. 3 0 0 4. 0 3 00 . 5 4 91 DMX512 REFERENCE GUIDE Notes 92 02.3004.0300.54 4. Testing and Troubleshooting This chapter contains troubleshooting instructions. • Troubleshooting • Test Software 0 2 . 3 00 4 . 0 30 0 . 5 4 93 DMX512 REFERENCE GUIDE Troubleshooting Overview Occasionally there are problems when setting up a lighting system. In this section, you will find many common questions asked about VARI❋LITE® Series 200/300 equipment under DMX512 control. This section is broken down into three areas: Console Problems, Fixture Problems, and Hardware Problems. Determine where your problem exists (careful -- some problems that appear to be fixture related end up being patch related), and read the appropriate section for an answer to your question. Remember -- there are many questions, and we cannot answer all of them here, but hopefully we can point you toward a solution. Console Problems Console won’t power up. Ensure that the console is plugged into a working outlet and that the proper voltage is present. One of the Monitors isn’t working. Ensure that the monitors are plugged into a working outlet, they are securely plugged into the monitor outlet on the console and that the console has been properly setup for the number of monitors being used. My monitor display is scrolling and I can’t understand it. Ensure that the proper type of monitor (VGA, SVGA, EVGA) is connected to your console. I’ve programmed my show using an Extended Mode, and during the editing process, it’s really annoying having to wait for the cue to complete before I can work on the cue. To "disable" the timing values while updating cues, create a submaster of all the timing channels and run it to full to override any recorded timing channels. Remember to clear the sub before recording the updated cue. My patch is good, and my Smart Repeater units are addressed properly, but I can’t control any lights. Check the DMX512 connection on the back of the console to make sure it is connected to the proper DMX512 output (or universe). If you are using a splitter in a system with multiple DMX512 universes, make sure it has power is receiving signal from the proper DMX512 universe. Check Smart Repeater units for the seven-segment display showing the DMX512 mode setting and the "d" alternating. An "N" is displayed if the DMX512 data has been lost. 94 02.3004.0300.54 TESTING AND TROUBLESHOOTING : TROUBLESHOOTING 4 Series 300 Fixture Problems Why do luminaires not move as smoothly on DMX512 as they do on a VARI❋LITE console? A DMX512 control system sends out movement as incremental absolute positions. In other words, when you want a luminaire to go from 0% position (0 hex value) to an end state of 50% (127 hex value), the luminaire is told to move incrementally through each hex or per cent value until it reaches the end state. The luminaire is constantly stopping and starting. This is alleviated by using modes with extended timing channels. Under VARI❋LITE control, the luminaire knows its current position and its ending position. Once the luminaire receives a cue command from the console, it calculates how far it needs to move, how much time it has to get there, and goes without starting and stopping between its beginning and end state. I cannot get full movement from my fixtures. Make sure that there are no cables hanging down to cause interference with the luminaires. Why do some of my lights take the wrong path to a focus position (swinging out into the audience, etc.)? First check that the luminaire is hung with the proper orientation. The pigtails should all face the same direction on the same hanging position. If the luminaire is hung properly, you may have a "flipped focus." In order to avoid a "flipped focus" (when one or more fixtures move differently from others in the system), begin all preset focuses (a group of channels representing the pan and tilt values for a particular stage position) from zero position or "50/50" (pan and tilt values at 50%). This "50/50" can be stored as a group, and can be recalled before recording any other fixture’s focus information. Also remember that the luminaires will take the shortest path from one position to the next; in DMX512, this is the path described by the change in value per channel from one position to the next. In order to ensure consistent movement from luminaire to luminaire in the cueing structure, tilt each fixture first before moving the pan channel. In most cases, it is best when luminaires pan less than 180° from one focus position to another, allowing for smoother and more consistent transitions between cues. Why do my VL6 color wheels get stuck during playback? Allow a cue to complete before advancing to the next cue. Rushing or "stepping on" cues sends a confusing update of DMX512 information to the luminaire. I can control the VL5 luminaire but not the dimmer. Ensure that the remote dimmer is patched to the proper control channel for the luminaire. If there is an SPC-36 controlling C3 dimmers, check its power, thumbwheel address and all cables between it and each SixPack chassis. Also, ensure that the SPC-36 controller and dimmer are seeing a proper DMX512 signal. My lights are flickering or moving erratically. Make sure that the DMX512 lines from the console are not bundled with or run next to your feeder or other high voltage cable. If the DMX512 line must cross power cable, make sure it crosses at a 90° angle to the power cable for the best performance. 0 2. 3 0 0 4. 0 3 00 . 5 4 95 DMX512 REFERENCE GUIDE I checked my cable, but I still get flickering lights. Check each DMX512 device for termination. Only the last device on any DMX512 line must be terminated. Over termination in your system can cause bad signal to reach the lights and dimmers causing them to flicker. I checked for termination, but my lights still flicker. Check your DMX512 network. DMX512 signal is best run as a "daisy chain" from one device to another. If your system is sufficiently large, or your luminaires are spread out over a considerable distance, you may be using an splitter (or opto-isolator) to safely create a "star pattern" of isolated DMX512 runs. Again, be sure to terminate the last device on any DMX512 run. A splitter can eliminate ground loop problems that may cause flickering. Terminate Here From Console My network is good, but I still have problems. Try replacing each DMX512 cable one at a time to see if there is a bad cable in your system. My network is good, but my lights still flicker. Use a DMX512 tool (DMX512’ster, GAM Check or equivalent) to monitor the output of your console. If the data coming from the console is bad, the entire system may flicker. I’m using timing channels in Extended Mode and my lights are moving in a jerky and erratic manner. Ensure that you are not sending both timing channel values and console cue time to the Smart Repeater units. The software in the Smart Repeater unit can resolve one set timing information or the other, but not both simultaneously. Check the console manual to find the proper syntax to create a part cue with a time of zero. Now that I’ve programmed my whole show using timing channels in Extended Mode, I can’t "back into" or "skip" a cue for editing without waiting for the timing to complete. Create a submaster or group of all timing channels for all luminaires at a level of 100%. Enable this submaster or group before sending the "go back" or "go to cue" command. Don’t forget to clear the submaster or group before updating the cue. Remember a value of 100% in a timing channel causes that channel to react to cue timing. 96 02.3004.0300.54 TESTING AND TROUBLESHOOTING : TROUBLESHOOTING 4 Hardware Problems None of the lights on one of my Smart Repeater units is working. Ensure that the proper voltage is applied to the Smart Repeater unit. Ensure that the amber neon indicator next to the Series 200 male plug is on. The first few channels of the light plugged into port 1 work, but they soon control the wrong attributes, and none of the other lights work properly. Look at the end of the Smart Repeater unit next to the thumbwheel switch and check the number showing in the seven segment display. Ensure that the proper mode is selected, and the system should operate properly again. I have control of my VL6 spot luminaire, but I can’t get its lamp to strike. Check the SixPack chassis and ensure that there is an APS6 module in place. Assure its switch is turned on in the proper rack port. Ensure that you have the proper module type: an APS6 module as opposed to a C3 module. Also check that the proper APS6 cable is plugged into the SixPack chassis. I have not changed my patch or my Smart Repeater unit’s addressing, but when I power up the system, some of my lights aren’t responding the same way as in the past. Check the mode of the Smart Repeater unit(s) in question. By looking at the seven-segment display to see what number is lit. If this number is not what you were expecting, reset the mode. See "Smart Repeater Units" on page 32 for instructions. There is a battery in the Smart Repeater unit that will cause this device to default to Mode 4 if it fails . If this is the case, reset the Smart Repeater unit to the proper mode, and the patch will be correct. Then, contact an Account Manager to arrange for a replacement. The Seven Segment Display in my Smart Repeater unit does not have a number, but a letter. The number shown in the Seven Segment Display will always denote which operating mode the Smart Repeater Unit. However, it can also be used to troubleshoot your system. Other codes that will show up and what they indicate: d - DMX512 signal applied, alternates with the mode setting. n - No DMX512 signal appears only after the DMX512 O/S download. Apply DMX512 "signal, or turn on console. E - Error: Invalid start address. Re-address Smart Repeater Unit. Valid addresses are 001 - 506. C - Code: Invalid DMX512 start code. Check the integrity of your DMX512 cable -- a very rare occurrence. Note: Shows currently programmed using DMX 4.0 Software can use Mode 5 or 6 without reprogramming. The RJ-45 jumper is no longer required in DMX 5.1. 0 2. 3 0 0 4. 0 3 00 . 5 4 97 DMX512 REFERENCE GUIDE Test Software Operating Test Software Note: In default mode, only Port 1 is selected for test operations. Only luminaire connected to Port 1 will respond to test commands. To use Smart Repeater testing function: Step 1. Set Smart Repeater thumbwheel switch to 000 and connect luminaire to be tested to Port 1. (Up to six luminaires may be connected, but at least one must be connected to start test mode.) Step 2. Apply power to Smart Repeater unit. Step 3. Check LED display. Display should read [Sr uP], meaning "Smart Repeater Up." Step 4. Check LED display. Display should read [P1 F=n], which means "Port 1 Form and Function Value=n," which indicates luminaire is online at Port 1. n=7 for VL5 luminaire, n=8 for VLM moving mirror unit, and n=9 for VL6 luminaire. Luminaire goes through normal calibration, except for position it is in when it stops. Step 5. After calibration, press buttons above and below thumbwheel switch to enter desired test codes for testing particular luminaire functions. To select other ports for testing, set the thumbwheel switch to 051 and use the test parameter place on the thumbwheels switch (the hundreds digit) to select the desired ports: 0 for all ports, 1 through 6 for ports 1 through 6 respectively. Enter Test Parameters and Numbers into thumbwheel switch as shown. 7 Test Parameter 98 0 1 Test Number LED Display 02.3004.0300.54 TESTING AND TROUBLESHOOTING : TEST SOFTWARE 4 Test Software/Test Tables The following tables contain test software test numbers, parameters, error codes, and comments. Use these tables to run luminaire tests. Note: Test numbers not listed are not valid. CAUTION: Tests should not be run for more than 30 seconds, as this can further damage the luminaire. Any tests run at FULL SPEED should not be run for more than 15 seconds. Table 4-1: VL5 Family Mechanical Tests Test Number 000 Start Test 001 002 Test Parameter Error Codes/Comments 9 End Stop (Open) Pan Test 8 End Stop (Clsd) 103 No Reset (Pan) Tilt Test 7 Speed 1 (25%) 203 No Reset (Tilt) 004 Diffuser Test 6 Speed 2 (35%) 104 No Change (Pan) 005 Intensity Test (VL5Arc Only) 5 Speed 3 (45%) 204 No Change (Tilt) 4 Speed 4 (55%) 006 Blue Filter Test 3 Speed 5 (65%) 007 Amber Filter Test 2 Speed 6 (75%) 008 Magenta Filter Test 1 Speed 7 (85%) 0 Speed 8 (Full Speed) 012 All Motors (synchronized) 013 All Motors (unsynchronized) 912 End Motor (in calibration position) Table 4-2: VL5 Family Default Programs Test Number 31 37 0 2. 3 0 0 4. 0 3 00 . 5 4 Pan and Tilt VL5 Functions Test Functions 701 Pan 25% Speed 702 Tilt 25% Speed 704 Edge 25% Speed 706 Blue Filter Test 25% Speed 707 Amber Filter Test 25% Speed 708 Magenta Filter Test 25% Speed 99 DMX512 REFERENCE GUIDE Table 4-3: VL6 Spot Luminaire Mechanical Tests Test Number Test Parameter 000 Start Test 9 End Stop (Open) 103 No Reset (Pan) 001 Pan Test 8 End Stop (Clsd) 203 No Reset (Tilt) 002 Tilt Test 7 Speed 1 (25%) 104 No Reset (Pan) 004 Edge Test 6 Speed 2 (35%) 204 No Reset (Tilt) 5 Speed 3 (45%) 4 Speed 4 (55%) 3 Speed 5 (65%) 2 Speed 6 (75%) 1 Speed 7 (85%) 0 Speed 8 (Full Speed) 511 Hit Sensor When Not Expecting To. 514 Did Not Hit Sensor When Expecting To. 005 Intensity Test 9 8 100 Error Codes/Comments End Stop (Open) End Stop (Clsd) 7 Speed 1 (25%) 6 Speed 2 (35%) 5 Speed 3 (45%) 4 Speed 4 (55%) 3 Speed 5 (65%) 2 Speed 6 (75%) 1 Speed 7 (85%) 0 Speed 8 (Full Speed) 006 Wheel 1 Test 9 CW 1 Frame to Sensor 611 Hit Sensor When Not Expecting To (WH1) 007 Wheel 2 Test 8 CCW 1 Frame to Sensor (Oscillating) 614 Did Not Hit Sensor When Expecting To (WH2) 7 CW 1 Frams to Sensor (Oscillating) 711 Hit Sensor When Not Expecting To (WH2). 6 CCW 1 Frame to Sensor (Oscillating) 714 Did Not Hit Sensor When Expecting To (WH2). 5 Continuous Frame Step 4 Speed 1 spin 3 Speed 2 spin Spin Speeds Match Those 2 Speed 3 spin Achievable From Console. 1 Speed 4 spin Direction Opposite Of Spin. 02.3004.0300.54 TESTING AND TROUBLESHOOTING : TEST SOFTWARE 4 Table 4-3: VL6 Spot Luminaire Mechanical Tests (Continued) Test Number Test Parameter 0 012 All Motors (synchronized) 013 All Motors (unsynchronized) 912 End Motor (in cal. position) Error Codes/Comments Speed 5 Spin (Full Speed) Spin Speeds match those available from console Table 4-4: VL6 Spot Luminaire Default Programs Test Number 31 39 Pan and Tilt VL6 Functions Test Functions 701 Pan 25% Speed 702 Tilt 25% Speed 703 Beam 25% Speed 705 Edge 25% Speed 706 Wheel 1 Continuous Frame 707 Wheel 2 Continuous Frame Table 4-5: VL6B/VL6C/VL6C+ Spot Luminaire Mechanical Tests Test Number 000 Start Test 001 002 003 004 0 2. 3 0 0 4. 0 3 00 . 5 4 Test Parameter Error Codes/Comments 9 End Stop (OPEN) Pan Test 8 End Stop (CLOSED) 203 No Reset (TILT) Tilt Test 7 Speed 1 104 No Reset (PAN) Beam Test 6 Speed 2 204 No Reset (TILT) 5 Speed 3 (45%) 4 Speed 4 (55%) 3 Speed 5 (65%) 2 Speed 6 (75%) Lens Test 1 Speed 7 (85%) 0 Speed 8 (FULL SPEED) 7 All move to front EOT, Lens 1 cycles full travel (100%) 6 Lens 1 move to rear EOT, Lens 3 move to from EOT, Lens 2 cycles full travel (33%) 103 No Reset (PAN) 101 DMX512 REFERENCE GUIDE Table 4-5: VL6B/VL6C/VL6C+ Spot Luminaire Mechanical Tests (Continued) Test Number 005 5 Lens 1 move to rear EOT, Lens 3 move to front EOT, Lens 2 cycles full travel (66%) 4 Lens 1 move to rear EOT, Lens 3 move to front EOT, Lens 2 cycles full travel (100%) 3 All lenses move to rear EOT, Lens 3 cycles full travel (33%) 2 All lenses move to rear EOT, Lens 3 cycles full travel (66%) Error Codes/Comments 0 All synchronous (100%) 9 End Stop (OPEN) 511 Hit Sensor When Not Expecting To 8 End Stop (CLOSED) 514 Did Not Hit Sensor When Expecting To 7 Speed 1 6 Speed 2 5 Speed 3 4 Speed 4 3 Speed 5 2 Speed 6 1 Speed 7 0 Speed 8 (FULL SPEED) 006 Wheel 1 Test 9 CW 1 Frame To Sensor 611 Hit Sensor When Not Expecting To 007 Wheel 2 Test 8 CCW 1 Frame To Sensor 614 Did Not Hit Sensor When Expecting To 7 CW 1 Frame To Sensor (Osculating) 711 Hit Sensor When Not Expecting To 6 CCW 1 Frame To Sensor (Osculating) 714 Did Not Hit Sensor When Expecting To 5 Continuous Frame Step 4 Speed 1 Spin 3 Speed 2 Spin 2 Speed 3 Spin 1 Speed 4 Spin 0 Speed 5 Spin (Full Speed) 9 Wheel position is open (no gobo) 009 102 Intensity Test Test Parameter Rotating Gobos Direction Opposite of Spin Spin Speeds match those available from Console 02.3004.0300.54 TESTING AND TROUBLESHOOTING : TEST SOFTWARE 4 Table 4-5: VL6B/VL6C/VL6C+ Spot Luminaire Mechanical Tests (Continued) Test Number 010 0 2. 3 0 0 4. 0 3 00 . 5 4 Index Test Parameter 8 Gobo position 6 7 Cycle from wheel position 0 to position 3 CW, from position 3 to position 0 CCW repeatedly. Pause briefly on position 0 and 3 6 Cycle from wheel position 0 to position 2 CCW, from position 2 to position 0 CW repeatedly. Pause briefly on position 0 and 2 5 Continuous change CW to next gobo position on wheel (from 2 to 3,5 to 0) Gobos on wheels do not rotate. Pause briefly on each gobo 4 Cycle from wheel position 0 to position 2 to position 0 CW repeatedly. Pause briefly on position 0 and 2(25%) 3 Cycle from wheel position 0 to position 2 CCW, from position 2 to position 0 CW repeatedly. Pause briefly on position 0 and 2 (45%) 2 Cycle from wheel position 0 to position 2 CCW, from position 2 to position 0 CW repeatedly. Pause briefly on position 0 and 2 (45%) 1 Cycle from wheel position 0 to position 2 CCW, from position 2 to position 0 CW repeatedly. Pause briefly on position 0 and 2 (85%) 0 Cycle from wheel position 0 to position 2 CCW, from position 2 to position 0 CW repeatedly. Pause briefly on position 0 and 2 (100%) 9 Cycle from index 0 to index 30 CW, from index 30 to index 0 CCW repeatedly. Pause briefly on index 0 and 30 (85%) 8 Cycle from index 0 to index 5 CCW, from index 5 to index 0 CW repeatedly. Pause briefly on index 0 and 5 Error Codes/Comments 103 DMX512 REFERENCE GUIDE Table 4-5: VL6B/VL6C/VL6C+ Spot Luminaire Mechanical Tests (Continued) Test Number 012 All Motors (synchronized) 013 All Motors (synchronized) 912 End Motor (in cal. position) Test Parameter Error Codes/Comments 7 Cycle from index 0 to index 3 CW, from index 3 to index 0 CCW repeatedly. Pause briefly on index 0 and 3 6 Cycle from index 0 to index 6 CW, from index 6 to index 0 CCW repeatedly. Pause briefly on index 0 and 6 5 Continuous Stop/Start through 14 different index positions 4 Continuous Rotation Speed 25% 3 Continuous Rotation Speed 45% 2 Continuous Rotation Speed 65% 1 Continuous Rotation Speed 85% 0 Continuous Rotation Speed 100% Table 4-6: VL6B/VL6C/VL6C+ Spot Luminaire Default Test Programs Test Number 31 39 104 Pan and Tilt VL6B/VL6C/VL6C+ Functions Test Functions 701 Pan 25% Speed 702 Tilt 25% Speed 703 Beam 25% Speed 705 Edge 25% Speed 706 Wheel 1 Continuous Frame 707 Wheel 2 Continuous Frame 709 Rotating Gobos 02.3004.0300.54 4 TESTING AND TROUBLESHOOTING : TEST SOFTWARE Table 4-7: VL7/VL7U Mechanical Tests Test Number 000 All Stop 001 Pan Test Parameter Error Codes/Comments 9 End Stop (Closed), 65% Speed 103 No Reset (PAN) 002 Tilt 8 End Stop (Open), 65% Speed 203 No Reset (TILT) 003 Beam 7 25% Speed 104 No Reset (PAN) 6 35% Speed 204 No Reset (TILT) 5 45% Speed 4 55% Speed 3 65% Speed 2 75% Speed 1 85% Speed 004 005 Lens Intensity 0 Full Speed 7 All move to front EOT, Lens 1 cycles full travel at 100% speed (Test Type 4D) 6 Type 4C, 33% speed 5 Type 4C, 66% speed 4 Lens 1 move to rear EOT, Lens 3 moves to front EOT, Lens 2 cycles full travel at 100% speed (Test Type 4C) 3 Type 4B, 33% speed 2 Type 4B, 66% speed 1 All lenses move to rear EOT, Lens 3 cycles full travel at 100% speed (Test Type 4B) 0 All synchronous at 100% speed (Test Type 4A) 9 End Stop (Closed), 65% Speed 8 End Stop (Open), 65% Speed 7 25% Speed 6 35% Speed 5 45% Speed 4 55% Speed 3 65% Speed 2 75% Speed 1 85% Speed 0 Full Speed 006 Color Plate 1 9 Plate moves to open X &Y at 100% speed (Test Type 67D) 007 Color Plate 2 8 Type 67C, 25% speed 7 Type 67C, 50% speed 6 Type 67C, 75% speed 0 2. 3 0 0 4. 0 3 00 . 5 4 105 DMX512 REFERENCE GUIDE Table 4-7: VL7/VL7U Mechanical Tests (Continued) Test Number 008 009 106 Fixed Gobo Rotating Gobo Test Parameter 5 Plate cycles full travel at 100% speed along Y vector (Test Type 67C) 4 Type 67B, 25% speed 3 Type 67B, 50% speed 2 Type 67B, 75% speed 1 Plate cycles full travel at 100% speed along X vector (Test Type 67B) 0 Plate moves from X & Y EOT to opposite X & Y EOT syncronous, repeatedly at 100% speed (Test Type 67A) 9 Cycle from index 0 to index 1 CW, and from index 1 to index 0 CCW repeatedly. Pause briefly on index 0 and 1. (Test Type 8F) 8 Cycle from index 0 to index 11 CCW, and from index 11 to index 0 CW repeatedly. Pause briefly on index 0 and 11. (Test Type 8E) 7 Cycle from index 0 to index 6 CW, and from index 6 to index 0 CCW repeatedly. Pause briefly on index 0 and 6. (Test Type 8D) 6 Cycle from index 0 to index 6 CCW, and from index 6 to index 0 CW repeatedly. Pause briefly on index 0 and 6. (Test Type 8C) 5 Continuously index CW to next gobo position on wheel (from 2 to 3, from 11 to 0). Pause briefly on each gobo. (Test Type 8B) 4 Type 8A, 20% speed 3 Type 8A, 40% speed 2 Type 8A, 60% speed 1 Type 8A, 80% speed 0 Wheel spins CW at 100% speed (Test Type 8A) 9 Cycle from index 0 to index 1 CW, and from index 1 to index 0 CCW repeatedly. Pause briefly on index 0 and 1. (Test Type 9G) 8 Cycle from index 0 to index 5 CCW, and from index 5 to index 0 CW repeatedly. Pause briefly on index 0 and 5. (Test Type 9F) Error Codes/Comments 02.3004.0300.54 TESTING AND TROUBLESHOOTING : TEST SOFTWARE 4 Table 4-7: VL7/VL7U Mechanical Tests (Continued) Test Number 010 Strobe 013 All Async 021 Sensors 0 2. 3 0 0 4. 0 3 00 . 5 4 Test Parameter 7 Cycle from index 0 to index 3 CW, and from index 3 to index 0 CCW repeatedly. Pause briefly on index 0 and 3. (Test Type 9E) 6 Cycle from index 0 to index 6 CCW, and from index 6 to index 0 CW repeatedly. Pause briefly on index 0 and 6. (Test Type 8C) 5 Continuously index CW to next gobo position on wheel (from 2 to 3, form 5 to 0). Gobos on wheel do not rotate. Pause briefly on each gobo. (Test Type 9C) 4 Cycle gobos between orientation 0 degrees & 180 degrees repeatedly. Wheel does not move. Pause briefly at 0 and 180 degrees. (Test Type 9B) 3 Type 9A CCW, 100% speed 2 Type 9A CCW, 50% speed 1 Type 9A CCW, 25% speed 0 Spin gobos CW at 100% speed, wheel does not move. (Test Type 9A) 9 65% speed strobe to EOT stop, (closed) 8 65% speed strobe to middle position between EOT stops. (open) 7 25% strobe from open stop to closed stop repeatedly (i.e. cycling) 6 35% strobe cycling 5 45% strobe cycling 4 55% strobe cycling 3 65% strobe cycling 2 75% strobe cycling 1 85% strobe cycling 0 Full speed (100%) strobe cycling Error Codes/Comments All tests above will run asynchronously. All motors will reach respective EOT stops (if applicable) and begin motion to opposite EOT stops at each motor’s earliest opportunity. Motion will not be coordinated between motors. 9 Monitor Lens 3 Sensor 8 Monitor Lens 2 Sensor 7 Monitor Lens 1 Sensor 6 Monitor Strobe Sensor 5 Monitor Fixed Gobo Sensor 107 DMX512 REFERENCE GUIDE Table 4-7: VL7/VL7U Mechanical Tests (Continued) Test Number 022/ 023 Test Parameter Pan/Tilt 024 Form & Function Error Codes/Comments 4 Monitor Rotating Gobo Wheel Index Sensor and Gobo Orientation Sensor 3 Monitor Color Plate 2Y sensor 2 Monitor Color Plate 2X sensor 1 Monitor Color Plate 1Y sensor 0 Monitor Color Plate 1X sensor 9 Display current most significant digit (Xxxx) of the reported encoder value. Repeatedly monitored. 8 Display current second significant digit (xXxx) of the reported encoder value. Repeatedly monitored. 7 Display current third significant digit (xxXx) of the reported encoder value. Repeatedly monitored. 6 Display current least significant digit (xxxX) of the reported encoder value. Repeatedly monitored. 0 Display scrolling snapshot of each digit of the reported encoder value. Repeatedly monitored. 0 Display the form and function value of the luminaire. For the VL7, Py=F10 should be reported where y is the luminaire’s port number. Table 4-8: VL7/VL7U Default Test Programs Test Number 108 31 Pan and Tilt 39 VL7 Functions 003 Beam Test 004 Lens Test 005 Intensity Test 006 Plate 1 Test 007 Plate 2 Test 008 Fixed Gobo Test 009 Rotating Test 010 Strobe Test Test Functions 701 Pan 25% Speed 702 Tilt 25% Speed 703 Beam 25% Speed 705 Edge 25% Speed 709 Rotating Gobo 506 Wheel 1 Continuous Frame 507 Wheel 2 Continuous Frame 02.3004.0300.54 4 TESTING AND TROUBLESHOOTING : TEST SOFTWARE Table 4-9: VL7B/VL7UB Spot Luminaire Mechanical Tests Test Number Test Parameter Error Codes/Comments 000 All Stop 103 No Reset (PAN) 001 Pan Test 9 End Stop (65%) (CLSD) 203 No Reset (TILT) 002 Tilt Test 8 End Stop (65%) (OPEN) 104 No Reset (PAN) 003 Beam Test 004 Lens Test 005 Intensity Test N/A 7 All move to front EOT, Lens 1 cycles full travel (100%) 6 Lens 1 move to rear EOT, Lens 3 move to front EOT, Lens 2 cycles full travel (33%) 5 Lens 1 move to rear EOT, Lens 3 move to front EOT, Lens 2 cycles full travel (66%) 4 Lens 1 move to rear EOT, Lens 3 move to front EOT, Lens 2 cycles full travel (33%) 3 All lenses move to rear EOT, Lens 3 cycles full travel (33%) 2 All lenses move to rear EOT, Lens 3 cycles full travel (66%) 1 All lenses move to rear EOT, Lens 3 cycles full travel (100%) 0 All synchronous (100%) 9 End Stop (66%) (CLSD) 8 End Stop (66%) (OPEN) 7 Speed 1 (25%) 6 Speed 2 (35%) 5 Speed 3 (45%) 4 Speed 4 (55) 3 Speed 5 (65%) 2 Speed 6 (75%) 1 Speed 7 (85%) 0 Speed 8 (Full Speed) 006 Color Plate 1 9 Plate moves to open X & Y (100%) Test Type 67D 007 Color Plate 2 8 Plate cycles full travel (25%) along Y vector 7 Plate cycles full travel (50%) along Y vector 0 2. 3 0 0 4. 0 3 00 . 5 4 109 DMX512 REFERENCE GUIDE Table 4-9: VL7B/VL7UB Spot Luminaire Mechanical Tests (Continued) Test Number 110 008 Fixed Gobo 009 Rotating Gobos Test Parameter 6 Plate cycles full travel (75%) along Y vector 5 Plate cycles full travel (100%) along Y vector 4 Plate cycles full travel (25%) along X vector 3 Plate cycles full travel (50%) along X vector 2 Plate cycles full travel (75%) along X vector 1 Plate cycles full travel (100%) along X vector 0 Plate moves from X & Y EOT to opposite X & Y EOT synchronous repeatedly (100%) Error Codes/Comments N/A 9 Cycle from wheel position 0 to position 1 CW, from position 1 to position 0 CCW repeatedly. Pause briefly on position 0 and 1 8 Cycle from wheel position 0 to position 5 CCW, from position 5 to position 0 CW repeatedly. Pause briefly on position 0 and 5 7 Cycle from wheel position 0 to position 3 CW, from position 3 to position 0 CCW repeatedly. Pause briefly on position 0 and 3 6 Cycle from wheel position 0 to position to position 6 CCW, from position 6 to position 0 CCW repeatedly. Pause briefly on position 0 and 6 5 Continuous wheel position CW to next gobo position on wheel (from 2 to 3, 5 to 0) Gobos on wheels do not rotate. Pause briefly on each gobo 4 Cycle gobos between orientation 0° & 180° 3 Spin gobos CW (100%) wheel does not move 2 Spin gobos CW (50%) wheel does not move 02.3004.0300.54 4 TESTING AND TROUBLESHOOTING : TEST SOFTWARE Table 4-9: VL7B/VL7UB Spot Luminaire Mechanical Tests (Continued) Test Number 010 Strobe Test Test Parameter 1 Spin gobos CW (25%) wheel does not move 0 Spin gobos CW (100%) wheel does not move 9 Strobe to EOT stop (65%) (CLSD) 8 Strobe to middle position between EOT Stop (66%) (OPEN) 7 Strobe open to closed stop repeatedly (25%) (i.e. cycling) 6 Cycling (35%) 5 Cycling (45%) 4 Cycling (55%) 3 Cycling (65%) 2 Cycling (75%) 1 Cycling (85%) 0 013 021 022/ 023 0 2. 3 0 0 4. 0 3 00 . 5 4 All Async Sensors Pan/Tilt Encoders Error Codes/Comments Cycling (Full Speed) All tests above will run asynchronously. All motors will reach respective EOT stop (if applicable) and begin motion to opposite EOT stops at each motor’s earliest opportunity. Motion will not be coordinated between motor. 9 Monitor Lens 3 Sensor 8 Monitor Lens 2 Sensor 7 Monitor Lens 1 Sensor 6 Monitor Strobe Sensor 5 Monitor Fixed Gobo Sensor 4 Monitor Rotating Gobo Wheel, Wheel position Sensor and Gobo Orientation Sensor 3 Monitor Plate 2 Saturation Sensor 2 Monitor Plate 2 Color Sensor 1 Monitor Plate 1 Saturation Sensor 0 Monitor Plate 1 Color Sensor 9 Display current most significant digit (Xxxx) of the reported encoder value. Repeatedly monitored. Flashing display indicates sensor not hit. Solid display indicates sensor hit. 111 DMX512 REFERENCE GUIDE Table 4-9: VL7B/VL7UB Spot Luminaire Mechanical Tests (Continued) Test Number Test Parameter 8 Display current most significant digit (Xxxx) of the reported encoder value. Repeatedly monitored. 7 Display current most significant digit (Xxxx) of the reported encoder value. Repeatedly monitored. 6 Display current most significant digit (Xxxx) of the reported encoder value. Repeatedly monitored. 0 Display scrolling snapshot of each digit of the reported encoder. Repeatedly monitored. Error Codes/Comments 024 Form and Function 0 Display the form and function value of the luminaire. For the VL7 Py=F10 should be reported where Y is the luminaire’s port number. 071079* Shutter System Motor Test (Motors 1-9) 0 Full speed (100%) framing from open stop to closed stop repeatedly 1 motor cycling (85%) 071 Operates Motor 1 2 motor cycling (75%) 072 Operates Motor 2 3 motor cycling (65%) 073 Operates Motor 3 4 motor cycling (55%) 074 Operates Motor 4 5 motor cycling (45%) 075 Operates Motor 5 6 motor cycling (35%) 076 Operates Motor 6 7 motor cycling (25%) 077 Operates Motor 7 8 End stop motor cycling (65%) (OPEN) 078 Operates Motor 8 9 End stop motor cycling (65%) (CLSD) 079 Operates Motor 9 Shutter Motor Tests * Motors 1-8 actuate the framing blades and Motor 9 rotates the framing device. 112 02.3004.0300.54 TESTING AND TROUBLESHOOTING : TEST SOFTWARE 4 Table 4-10: VL7B/VL7UB Spot Luminaire Default Test Programs Test Number 31 39 003 Pan and Tilt VL7B Functions Beam Test Test Functions 701 Pan 25% Speed 702 Tilt 25% Speed 703 Beam 25% Speed 705 Edge 25% Speed 709 Rotating Gobos 506 Wheel 1 Continuous Frame 507 Wheel 2 Continuous Frame N/A 004 Lens Test 005 Intensity Test 006 Plate 1 Test 007 Plate 2 Test 008 Fixed Gobo Test 009 Rotating Test 010 Strobe Test N/A Table 4-11: VLM Mirror Mechanical Tests Test Number 01 Pan 02 Tilt 03 Tilt spin Test Parameter 9 End Stop (Open) 103 No Reset (Pan) 8 End Stop (Clsd) 203 No Reset (Tilt) 7 Speed 1 (25%) 104 No Change (Pan) 6 Speed 2 (35%) 204 No Change (Tilt) 5 Speed 3 (45%) 4 Speed 4 (55%) 3 Speed 5 (65%) 2 Speed 6 (75%) 9 CW Spin (Slowest) 203 No Reset (Tilt) 8 CW Spin (25%) 204 No Change (Tilt) 7 CW Spin (50%) 6 CW Spin (75%) 5 CW Spin (Full Speed) 4 CCW Spin (Slowest) 3 CCW Spin (25%) 2 CCW Spin (50%) 1 CCW Spin (75%) 0 CCW Spin (Full Speed) 12 All-Sync 1 Speed 7 (85%) 13 All-Async 0 Speed 8 (Full Speed) 0 2. 3 0 0 4. 0 3 00 . 5 4 Error Codes/Comments 113 DMX512 REFERENCE GUIDE Table 4-12: Electronics Tests Test Number 17 Test Parameter RAM 18 Timer Test Result 0 All Pass= Pn-Good 1 Internal Fail= Pn-In-Ad- / Pn-In-PA- 2 Local Fail= Pn-Lo-Ad- / Pn-Lo-PA- 3 Expansion Fail= Pn-E-Ad- / Pn-EP-PA- Result Ad=x-EP=x-Fo=x 0 All Pass= Pn Good 1 Internal Fail= Pn Er any non-zero digit Table 4-13: Manual Tests Test Number 21 Test Parameter Test Result End-of-Travel 2 Read Tilt Sensor (VLM) Static = Closed Sensor Sensors 5 Read Dimmer Sensor (VL6) Flashing = Open Sensor 6 Read Color 1 Sensor (VL6) 7 Read Color 2 Sensor (VL6) 22 Pan Encoder 9 Select MSD Display Digit 23 Tilt Encoder 8 Select 2SD Display Digit 7 Select 3SD Display Digit 6 Select LSD Display Digit 0 Snap shot Scroll Digits 24 Form And Function Display Form And Function Value VL5: F=7 VLM: F=8 VL6: F=9 25 26 27 114 Data Loop-Back Color 1 Step Mode Color 2 Step Mode 9 External Pass= 0 (Zero) 8 Internal Fail = E Increment = 1 Step CW Static = Closed Sensor Decrement = 1 Step CCW Flashing = Open Sensor Increment = 1 Step CW Static = Closed Sensor Decrement = 1 Step CCW Flashing = Open Sensor 02.3004.0300.54 TESTING AND TROUBLESHOOTING : TEST SOFTWARE 4 Table 4-14: Program Mode Selection Test Number Test Parameter 30 Enter PGM Mode 31 Test Program 32 Test Program 7 Sequential Mode 5 min. 33 Test Program 6 Sequential Mode 2 min. 34 Test Program 5 Sequential Mode 1 min. 35 Test program 4 Sequential Mode 45 sec. 36 Test Program 3 Sequential Mode 30 sec. 37 Test Program 2 Sequential Mode 20 sec. 38 Test Program 1 Sequential Mode 10 sec 39 Test Program 0 Sequential Mode 5 sec. Error Codes/Comments Parameters do not store with tests. Indicates test number for selection: flashing for deselection, P if invalid test number. 9 Synchronized Error code displays during test 8 Unsynchronized Table 4-15: VLM Default Test Programs Test Number 31 37 Pan and Tilt VL5 Functions Tests Functions 701 Pan, 25% Speed 702 Tilt, 25% Speed 704 Edge, 25% Speed 706 Color 1, 25% Speed 707 Color 2, 25% speed 708 Color 3, 25% Speed 38 VLM Spin 703 CW Spin, 50% Speed 39 VL6 Functions 703 Beam, 25% Speed 60 Packup Cue 61 Open/Bulb-Adjust Cue 0 2. 3 0 0 4. 0 3 00 . 5 4 704 Edge, 25% Speed 705 Intensity, 25% Speed 506 Color 1, Continuous Frame 507 Color 2, Continuous Frame 115 DMX512 REFERENCE GUIDE Table 4-16: Error History Selection Test Number 40 Test Parameter Error History 0 All Errors 1-9 Last Errors Test Result Sequence of three-character error codes 41 Clear Error History 42 Error History 0 All Errors Displays total number of errors. Count 1-9 Last Errors Displays errors from last test only. Set Scroll Speed 9 Scroll Speed (Slowest) 1-8 Scroll Speed (Medium) 0 Scroll Speed (Fastest) 43 non e Scrolling parallel bars Table 4-17: Port Selection Test Number 51 116 Select Port Test Parameter 0 All 1 Port 1 2 Port 2 3 Port 3 4 Port 4 5 Port 5 6 Port 6 02.3004.0300.54 TESTING AND TROUBLESHOOTING : TEST SOFTWARE 4 Error Messages All errors are accumulated and scrolled during each test; tests are not stopped by an error. The number of errors is stored and can be displayed. Error codes are displayed as follows: Table 4-18: Error Messages [Pn Er 103 - result] where P is the port number indicator n is the port number (1 through 6) Er is the error indicator 1 is the assembly number 03 is the error type result is optional If any errors are detected during calibration, the faulty mechanism is flagged as unavailable for further use. The corresponding error code and result are displayed until another test is selected. If any lamp head is manually impeded during calibration, further tests of pan/tilt mechanisms will not work properly. Detectable errors include the following: • Failure to reset to zero - [Er 103] or [Er 203]. • Encoder not changing - [Er 104] or [Er 204]. • Hit sensor when not expecting to - [Er 511], [Er 611], or [Er 711]. • Did not hit sensor when expecting to - [Er 514], [Er 614], or [Er 714]. Some standard error messages include the following: • [Er SoFT oPErATor] - Operator made a mistake, try again. • [Er SoFT SW] - Software made a mistake, try it again. • [Er HArD SW] - Software failed due to previously unknown bug, report the bug. • [Er HArD HW] - Hardware has failed; repair the Smart Repeater unit. Error History The error history retains a list of the most recent 200 error codes produced since the list was cleared. When the list becomes full, new errors overwrite the oldest errors on the list. The list can be displayed or cleared at any time. The error history does not store test results. To display error history, set thumbwheel switch to 40. Set test parameter to 0 to display all errors; set to any non-zero value to display only the errors from the last test run. To control scroll speed, test thumbwheel switch to 43 and set test parameter to select scroll speed. To clear error history, set thumbwheel switch to 41. To display the number of errors in the error history, set thumbwheel switch to 42. Set test parameter to 0 to display the total number of errors. To display the number of errors recorded for the last test run, set test parameter to any non-zero value. 0 2. 3 0 0 4. 0 3 00 . 5 4 117 DMX512 REFERENCE GUIDE Notes 118 02.3004.0300.54 APPENDIX A. Reference Tables This appendix contains the DMX512 information necessary for controlling Series 200/300 equipment. • Series 300 DMX Modes • Channel Mapping • Timing Channels • Color Reference 0 2 . 3 00 4 . 0 30 0 . 5 4 119 DMX512 REFERENCE GUIDE Series 300 DMX Modes DMX Mode 1 Table A-1: DMX512 Mode 1 (8-bit with Reset) Port Number DMX Channel 1 VL5Arc VL6 VLM 1 External Dimmer* Intensity Intensity Hi Byte Pan 2 Pan Pan Pan Lo Byte Pan 3 Tilt Tilt Tilt Hi Byte Tilt 4 Blue Blue Wheel 1 Lo Byte Tilt 5 Amber Amber Wheel 2 Rotation Speed > 6 Magenta Magenta Beam Iris Rotation Speed < 7 Diffusion Diffusion Lens (Edge) -- 8 Reset Reset Reset Reset 2 9-16 -- -- -- -- 3 17-24 -- -- -- -- 4 25-32 -- -- -- -- 5 33-40 -- -- -- -- 6 41-48 -- -- -- -- * 120 VL5 / VL5B When a DMX Power Pack is used, the first port channel controls the integral CD dimmer module for the VL5 and VL5B luminaires. 02.3004.0300.54 A REFERENCE TABLES DMX Mode 2 Table A-2: DMX512 Mode 2 (8-bit Extended) Port Number DMX Channel 1 VL5Arc VL6 VLM 1 External Dimmer* Intensity Intensity Hi Byte Pan 2 Pan Pan Pan Lo Byte Pan 3 Tilt Tilt Tilt Hi Byte Tilt 4 Blue Blue Wheel 1 Lo Byte Tilt 5 Amber Amber Wheel 2 Rotation Speed > 6 Magenta Magenta Beam Iris Rotation Speed < 7 Diffusion Diffusion Lens (Edge) -- 8 Focus Time Focus Time Focus Time Focus Time 9 Color Time Color Time Color Time -- 10 Beam Time Beam Time Beam Time -- 11 Reset Reset Reset Reset 2 12-22 -- -- -- -- 3 23-33 -- -- -- -- 4 34-44 -- -- -- -- 5 45-55 -- -- -- -- 6 56-66 -- -- -- -- * 0 2. 3 0 0 4. 0 3 00 . 5 4 VL5 / VL5B When a DMX Power Pack is used, the first port channel controls the integral CD dimmer module for the VL5 and VL5B luminaires. 121 DMX512 REFERENCE GUIDE DMX Mode 3 Table A-3: DMX513 Mode 3 (16-bit with Reset) Port Number DMX Channel 1 VL5Arc VL6 VLM 1 External Dimmer* Intensity Intensity Hi Byte Pan 2 Hi Byte Pan Hi Byte Pan Hi Byte Pan Lo Byte Pan 3 Lo Byte Pan Lo Byte Pan Lo Byte Pan Hi Byte Tilt 4 Hi Byte Tilt Hi Byte Tilt Hi Byte Tilt Lo Byte Tilt 5 Lo Byte Tilt Lo Byte Tilt Lo Byte Tilt Rotation Speed > 6 Blue Blue Wheel 1 Rotation Speed < 7 Amber Amber Wheel 2 -- 8 Magenta Magenta Beam Iris -- 9 Diffusion Diffusion Lens (Edge) -- 10 Reset Reset Reset Reset 2 11-20 -- -- -- -- 3 21-30 -- -- -- -- 4 31-40 -- -- -- -- 5 41-50 -- -- -- -- 6 51-60 -- -- -- -- * 122 VL5 / VL5B When a DMX Power Pack is used, the first port channel controls the integral CD dimmer module for the VL5 and VL5B luminaires. 02.3004.0300.54 A REFERENCE TABLES DMX Mode 4 Table A-4: DMX512 Mode 4 (16-bit Extended) Port Number DMX Channel 1 VL5Arc VL6 VLM 1 External Dimmer* Intensity Intensity Hi Byte Pan 2 Hi Byte Pan Hi Byte Pan Hi Byte Pan Lo Byte Pan 3 Lo Byte Pan Lo Byte Pan Lo Byte Pan Hi Byte Tilt 4 Hi Byte Tilt Hi Byte Tilt Hi Byte Tilt Lo Byte Tilt 5 Lo Byte Tilt Lo Byte Tilt Lo Byte Tilt Rotation Speed > 6 Blue Blue Wheel 1 Rotation Speed < 7 Amber Amber Wheel 2 -- 8 Magenta Magenta Beam Iris -- 9 Diffusion Diffusion Lens (Edge) -- 10 Focus Time Focus Time Focus Time Focus Time 11 Color Time Color Time Color Time -- 12 Beam Time Beam Time Beam Time -- 13 Reset Reset Reset Reset 2 14-26 -- -- -- -- 3 27-39 -- -- -- -- 4 40-52 -- -- -- -- 5 53-65 -- -- -- -- 6 66-78 -- -- -- -- * 0 2. 3 0 0 4. 0 3 00 . 5 4 VL5 / VL5B When a DMX Power Pack is used, the first port channel controls the integral CD dimmer module for the VL5 and VL5B luminaires. 123 DMX512 REFERENCE GUIDE DMX Mode 5 Table A-5: DMX Mode 5 (16-bit with Reset) Port Number DMX Channel VL5 / VL5B VL5Arc VL6 VL6B / VL6C / VL6C+ VLM 1 1 External Dimmer* Intensity Intensity Intensity Hi Byte Pan 2 Hi Byte Pan Hi Byte Pan Hi Byte Pan Hi Byte Pan Lo Byte Pan 3 Lo Byte Pan Lo Byte Pan Lo Byte Pan Lo Byte Pan Hi Byte Tilt 4 Hi Byte Tilt Hi Byte Tilt Hi Byte Tilt Hi Byte Tilt Lo Byte Tilt 5 Lo Byte Tilt Lo Byte Tilt Lo Byte Tilt Lo Byte Tilt Rotation Speed > 6 Blue Blue Wheel 1 Wheel 1 Rotation Speed < 7 Amber Amber Wheel 2 Wheel 2 Reset 8 Magenta Magenta Beam Iris Beam Iris -- 9 Diffusion Diffusion Lens (Edge) Lens (Edge) -- 10 Reset Reset Strobe Strobe -- 11 -- -- Reset Zoom -- 12 -- -- -- Rotating Wheel -- 13 -- -- -- Rotation/Index -- 14 -- -- -- Reset -- 2 15-28 -- -- -- -- -- 3 29-42 -- -- -- -- -- 4 43-56 -- -- -- -- -- 5 57-70 -- -- -- -- -- 6 71-84 -- -- -- -- -- * 124 When a DMX Power Pack is used, the first port channel controls the integral CD dimmer module for the VL5 and VL5B luminaires. 02.3004.0300.54 A REFERENCE TABLES DMX Mode 6 Table A-6: DMX Mode 6 (16-bit Extended) Port Number DMX Channel 1 VL5Arc VL6 VL6B / VL6C / VL6C+ VLM 1 External Dimmer * Intensity Intensity Intensity Hi Byte Pan 2 Hi Byte Pan Hi Byte Pan Hi Byte Pan Hi Byte Pan Lo Byte Pan 3 Lo Byte Pan Lo Byte Pan Lo Byte Pan Lo Byte Pan Hi Byte Tilt 4 Hi Byte Tilt Hi Byte Tilt Hi Byte Tilt Hi Byte Tilt Lo Byte Tilt 5 Lo Byte Tilt Lo Byte Tilt Lo Byte Tilt Lo Byte Tilt Rotation Speed > 6 Blue Blue Wheel 1 Wheel 1 Rotation Speed < 7 Amber Amber Wheel 2 Wheel 2 Focus Time 8 Magenta Magenta Beam Iris Beam Iris Reset 9 Diffusion Diffusion Lens (Edge) Lens (Edge) -- 10 Focus Time Focus Time Strobe Strobe -- 11 Color Time Color Time Focus Time Focus Time -- 12 Beam Time Beam Time Color Time Rotating Wheel -- 13 Reset Reset Beam Time Rotation/Index -- 14 -- -- Reset Focus Time -- 15 -- -- -- Color Time -- 16 -- -- -- Beam Time -- 17 -- -- -- Reset -- 2 18-34 -- -- -- -- -- 3 35-51 -- -- -- -- -- 4 52-68 -- -- -- -- -- 5 69-85 -- -- -- -- -- 6 86-102 -- -- -- -- -- * 0 2. 3 0 0 4. 0 3 00 . 5 4 VL5 / VL5B When a DMX Power Pack is used, the first port channel controls the integral CD dimmer module for the VL5 and VL5B luminaires. 125 DMX512 REFERENCE GUIDE DMX Mode 7 Table A-7: DMX512 Mode 7 (16-bit with Reset) Smart Repeater Plus Unit ONLY Port Number DMX Channel VL5 / VL5B VL5Arc VL6 VL6B / VL6C / VL6C+ VL7 / VL7U VLM 1 1 External Dimmer* Intensity Intensity Intensity Intensity Hi Byte Pan 2 Hi Byte Pan Hi Byte Pan Hi Byte Pan Hi Byte Pan Hi Byte Pan Lo Byte Pan 3 Lo Byte Pan Lo Byte Pan Lo Byte Pan Lo Byte Pan Lo Byte Pan Hi Byte Tilt 4 Hi Byte Tilt Hi Byte Tilt Hi Byte Tilt Hi Byte Tilt Hi Byte Tilt Lo Byte Tile 5 Lo Byte Tilt Lo Byte Tilt Lo Byte Tilt Lo Byte Tilt Lo Byte Tilt Rotation Speed > 6 Blue Blue Wheel 1 Wheel 1 Color 1 X Rotation Speed < 7 Amber Amber Wheel 2 Wheel 2 Color 1 Y -- 8 Magenta Magenta Beam Iris Beam Iris Color 2 X -- 9 Diffusion Diffusion Lens (Edge) Lens (Edge) Color 2 Y -- 10 Reset Reset Strobe Strobe Beam Iris Reset 11 -- -- Reset Zoom Lens (Edge) -- 12 -- -- -- Rotating Wheel Zoom -- 13 -- -- -- Rotation/Index Strobe -- 14 -- -- -- Reset Fixed Wheel -- 15 -- -- -- -- Rotating Wheel -- 16 -- -- -- -- Rotation/ Index -- 17 -- -- -- -- Reset -- 2 18-34 -- -- -- -- -- -- 3 35-51 -- -- -- -- -- -- 4 52-68 -- -- -- -- -- -- 5 69-85 -- -- -- -- -- -- 6 86-102 -- -- -- -- -- -- * 126 When a DMX Power Pack is used, the first port channel controls the integral CD dimmer module for the VL5 and VL5B luminaires. 02.3004.0300.54 A REFERENCE TABLES DMX Mode 8 Table A-8: DMX512 Mode 8 (16-bit Extended) Smart Repeater Plus Unit ONLY Port Number DMX Channel VL5 / VL5B VL5Arc VL6 VL6B / VL6C / VL6C+ VL7 / VL7U VLM 1 1 External Dimmer* Intensity Intensity Intensity Intensity Hi Byte Pan 2 Hi Byte Pan Hi Byte Pan Hi Byte Pan Hi Byte Pan Hi Byte Pan Lo Byte Pan 3 Lo Byte Pan Lo Byte Pan Lo Byte Pan Lo Byte Pan Lo Byte Pan Hi Byte Tilt 4 Hi Byte Tilt Hi Byte Tilt Hi Byte Tilt Hi Byte Tilt Hi Byte Tilt Lo Byte Tilt 5 Lo Byte Tilt Lo Byte Tilt Lo Byte Tilt Lo Byte Tilt Lo Byte Tilt Rotation Speed > 6 Blue Blue Wheel 1 Wheel 1 Color 1 X Rotation Speed < 7 Amber Amber Wheel 2 Wheel 2 Color 1 Y -- 8 Magenta Magenta Beam Iris Beam Iris Color 2 X -- 9 Diffusion Diffusion Lens (Edge) Lens (Edge) Color 2 Y -- 10 Focus Time Focus Time Strobe Strobe Beam Iris Focus Time 11 Color Time Color Time Focus Time Zoom Lens (Edge) -- 12 Beam Time Beam Time Color Time Rot. Wheel Zoom -- 13 Reset Reset Beam Time Rotation/ Index Strobe Reset 14 -- -- Reset Focus Time Fixed Wheel -- 15 -- -- -- Color Time Rot. Wheel -- 16 -- -- -- Beam Time Rotation/ Index -- 17 -- -- -- Reset Focus Time -- 18 -- -- -- -- Color Time -- 19 -- -- -- -- Beam Time -- 20 -- -- -- -- Reset -- 2 21-40 -- -- -- -- -- -- 3 41-60 -- -- -- -- -- -- 4 61-80 -- -- -- -- -- -- 5 81-100 -- -- -- -- -- -- 6 101-120 -- -- -- -- -- -- * 0 2. 3 0 0 4. 0 3 00 . 5 4 When a DMX Power Pack is used, the first port channel controls the integral CD dimmer module for the VL5 and VL5B luminaires. 127 DMX512 REFERENCE GUIDE DMX Mode 9 Table A-9: DMX512 Mode 9 (16-bit with Reset) Smart Repeater Plus Unit ONLY VL5 / VL5B VL5Arc VL6 VL6B / VL6C / VL6C+ VL7 / VL7U VL7B / VL7UB VLM External Dimmer* Intensity Intensity Intensity Intensity Intensity Hi Byte Pan 2 Hi Byte Pan Hi Byte Pan Hi Byte Pan Hi Byte Pan Hi Byte Pan Hi Byte Pan Lo Byte Pan 3 Lo Byte Pan Lo Byte Pan Lo Byte Pan Lo Byte Pan Lo Byte Pan Lo Byte Pan Hi Byte Tilt Port Number DMX Chan. 1 1 Hi Byte Tilt Hi Byte Tilt Hi Byte Tilt Hi Byte Tilt Hi Byte Tilt Hi Byte Tilt Lo Byte Tilt 5 Lo Byte Tilt Lo Byte Tilt Lo Byte Tilt Lo Byte Tilt Lo Byte Tilt Lo Byte Tilt Rotation Speed > 6 Blue Blue Wheel 1 Wheel 1 Color 1 X Color 1 X Rotation Speed < 7 Amber Amber Wheel 2 Wheel 2 Color 1 Y Color 1 Y -- 8 Magenta Magenta Beam Iris Beam Iris Color 2 X Color 2 X -- 9 Diffusion Diffusion Color 2 Y Color 2 Y -- 10 Reset Reset Strobe Strobe Beam Iris Lens (Edge) Reset Lens (Edge) Lens (Edge) 11 -- -- Reset Zoom Lens (Edge) Zoom -- 12 -- -- -- Rotating Wheel Zoom Strobe -- 13 -- -- -- Rotation/ Index Strobe Rotating Wheel -- 14 -- -- -- Reset Fixed Wheel Rotation /Index -- 15 -- -- -- -- Rotating Wheel Shutter 1 Left -- 16 -- -- -- -- Rotation/ Index Shutter 1 Right -- 17 -- -- -- -- Reset Shutter 2 Left -- 18 -- -- -- -- -- Shutter 2 Right -- 19 -- -- -- -- -- Shutter 3 Left -- 20 -- -- -- -- -- Shutter 3 Right -- 21 -- -- -- -- -- Shutter 4 Left -- 22 -- -- -- -- -- Shutter 4 Right -- 23 -- -- -- -- -- Shutter Rotation -- 24 -- -- -- -- -- Reset -- 2 25-49 -- -- -- -- -- -- -- 3 50-73 -- -- -- -- -- -- -- 4 74-97 -- -- -- -- -- -- -- 5 98-121 -- -- -- -- -- -- -- 6 122-144 -- -- -- -- -- -- -- * 128 4 When a DMX Power Pack is used, the first port channel controls the integral CD dimmer module for the VL5 and VL5B luminaires. 02.3004.0300.54 A REFERENCE TABLES DMX Mode 10 Table A-10: DMX512 Mode 10 (16-bit Extended) Smart Repeater Plus Unit ONLY Port Number DMX Chan. 1 2 VL5 / VL5B VL5Arc VL6 VL6B / VL6C / VL6C+ VL7 / VL7U VL7B / VL7UB VLM 1 External Dimmer* Intensity Intensity Intensity Intensity Intensity Hi Byte Pan 2 Hi Byte Pan Hi Byte Pan Hi Byte Pan Hi Byte Pan Hi Byte Pan Hi Byte Pan Lo Byte Pan 3 Lo Byte Pan Lo Byte Pan Lo Byte Pan Lo Byte Pan Lo Byte Pan Lo Byte Pan Hi Byte Tilt 4 Hi Byte Tilt Hi Byte Tilt Hi Byte Tilt Hi Byte Tilt Hi Byte Tilt Hi Byte Tilt Lo Byte Tilt 5 Lo Byte Tilt Lo Byte Tilt Lo Byte Tilt Lo Byte Tilt Lo Byte Tilt Lo Byte Tilt Rotation Speed > 6 Blue Blue Wheel 1 Wheel 1 Color 1 X Color 1 X Rotation Speed < -- 7 Amber Amber Wheel 2 Wheel 2 Color 1 Y Color 1 Y 8 Magenta Magenta Beam Iris Beam Iris Color 2 X Color 2 X -- 9 Diffusion Diffusion Lens (Edge) Lens (Edge) Color 2 Y Color 2 Y -- 10 Focus Time Focus Time Strobe Strobe Beam Iris Lens (Edge) Focus TIme 11 Color Time Color Time Focus Time Rotating Wheel Lens (Edge) Zoom -- 12 Beam Time Beam Time Color Time Rotation/ Index Zoom Strobe -- 13 Reset Reset Beam Time Focus Time Strobe Rotating Wheel Reset 14 -- -- Reset Color Time Fixed Wheel Rotation / Index -- 15 -- -- -- Beam Time Rotating Wheel Shutter 1 Left -- 16 -- -- -- Reset Rotation/ Index Shutter 1 Right -- 17 -- -- -- -- Focus Time Shutter 2 Left -- 18 -- -- -- -- Color Time Shutter 2 Right -- 19 -- -- -- -- Beam Time Shutter 3 Left -- 20 -- -- -- -- Reset Shutter 3 Right -- 21 -- -- -- -- -- Shutter 4 Left -- 22 -- -- -- -- -- Shutter 4 Right -- 23 -- -- -- -- -- Shutter Rotation -- 24 -- -- -- -- -- Focus Time -- 25 -- -- -- -- -- Color Time -- 26 -- -- -- -- -- Beam Time -- 27 -- -- -- -- -- Reset -- 28-54 -- -- -- -- -- -- -- 0 2. 3 0 0 4. 0 3 00 . 5 4 129 DMX512 REFERENCE GUIDE Table A-10: DMX512 Mode 10 (16-bit Extended) Smart Repeater Plus Unit ONLY (Continued) Port Number DMX Chan. VL5 / VL5B VL5Arc VL6 VL6B / VL6C / VL6C+ VL7 / VL7U VL7B / VL7UB VLM 3 55-81 -- -- -- -- -- -- -- 4 82-108 -- -- -- -- -- -- -- 5 109135 -- -- -- -- -- -- -- 6 136162 -- -- -- -- -- -- -- * 130 When a DMX Power Pack is used, the first port channel controls the integral CD dimmer module for the VL5 and VL5B luminaires. 02.3004.0300.54 REFERENCE TABLES A Channel Mapping Series 200 DMX Channels Table A-11: VL2C Channel Map Channel VL2C Parameter 1 Intensity 2 Pan Hi 3 Pan Lo 4 Tilt Hi 5 Tilt Lo 6 Wheel 1 7 Wheel 2 8 Beam 9 Edge 10 Gobo Wheel 11 Focus Time 12 Edge Time 13 Beam Time 14 Reset, Start and Douse Table A-12: VL4 Channel Map 0 2. 3 0 0 4. 0 3 00 . 5 4 Channel VL4 Parameter 1 Intensity 2 Pan Hi 3 Pan Lo 4 Tilt Hi 5 Tilt Lo 6 Blue 7 Amber 8 Magenta 9 Edge 10 Beam 11 Shutter 12 Focus Time 13 Color Time 14 Beam Time 15 Reset, Start and Douse 131 DMX512 REFERENCE GUIDE Parameter Mapping VL2C Parameters Table A-13: VL2C DMX Values for Color Wheels 1 & 2 Pos. Color Wheel 1 Color Wheel 2 DMX Value 1 Open (no color) Open (no color) 0-15 2 No Color Straw Magenta 16-31 3 Color Correction Light Pink 32-47 4 Lavender Pink 48-63 5 Deep Red Pale Lavender 64-79 6 Ultra Violet Red 80-95 7 Dark Violet Orange Red 96-111 8 Violet Blue Orange 112-127 9 Blue Violet Amber 128-143 10 Royal Blue Yellow 144-159 11 Blue Greenish Yellow 160-175 12 Turquoise Blue Lt. Yellow Green 176-191 13 Medium Blue Pale Yellow Green 192-207 14 Pale Med. Blue Straw 208-223 15 Pale Blue Light Straw 224-239 16 No Color Blue Pale Straw 240-255 Table A-14: VL2C DMX Values for Gobo Control 132 Gobo DMX Value 1 (open) 0-24 2 25-49 3 50-74 4 75-99 5 100-124 6 125-149 7 150-174 8 175-199 9 200-224 10 225-255 02.3004.0300.54 A REFERENCE TABLES VL6/VL7 Parameters Table A-15: VL6/VL6B/VL6C/VL6C+ & VL7/VL7U/VL7B/VL7UB DMX Values for Fixed Wheels Wheel Step/Position DMX Value % Value 0-2 0 95 3-5 94 93 Wheel Step/Position DMX Value % Value 66 77-79 30 1 65 80-81 31 6-7 2 64 82-84 32 8-10 3 63 85-86 33 11-12 4 62 87-89 34 91 13-15 5 61 90-91 35 90 16-17 6 60 92-94 36 89 18-20 7 59 95-96 37 21-22 8 58 97-99 38 87 23-25 9 57 100-101 39 86 26-28 10 56 102-104 40 85 29-30 11 55 105-107 41 31-33 12 54 108-109 42 83 34-35 13 53 110-112 43 82 36-38 14 52 113-114 44 81 39-40 15 51 115-117 45 41-43 16 50 118-119 46 79 44-45 17 49 120-122 47 78 46-48 18 48 123-124 48 77 49-50 19 47 125-127 49 51-53 20 46 128-130 50 75 54-56 21 45 131-132 51 74 57-58 22 44 133-135 52 73 59-61 23 43 136-137 53 62-63 24 42 138-140 54 71 64-66 25 41 141-142 55 70 67-68 26 40 143-145 56 69 69-71 27 39 146-147 57 72-73 28 38 148-150 58 74-76 29 37 151-152 59 0 92 88 84 80 76 72 68 67 0 2. 3 0 0 4. 0 3 00 . 5 4 0 1/2 1 1-1/2 2 2-1/2 3 3-1/2 4 4 1/2 5 5-1/2 6 6-1/2 7 133 DMX512 REFERENCE GUIDE Table A-15: VL6/VL6B/VL6C/VL6C+ & VL7/VL7U/VL7B/VL7UB DMX Values for Fixed Wheels Wheel Step/Position DMX Value % Value 153-155 60 35 156-158 34 33 DMX Value % Value 15 207-209 81 61 14 210-211 82 159-160 62 13 212-214 83 161-163 63 12 215-216 84 164-165 64 11 217-219 85 31 166-168 65 10 220-221 86 30 169-170 66 9 222-224 87 29 171-173 67 8 225-226 88 174-175 68 7 227-229 89 27 176-178 69 6 230-232 90 26 179-181 70 5 233-234 91 25 182-183 71 4 235-237 92 184-186 72 3 238-239 93 23 187-188 73 2 240-242 94 22 189-191 74 1 243-244 95 21 192-193 75 Spin 1 245-247 96 194-196 76 Spin 2 248-249 97 19 197-198 77 Spin 3 250-252 98 18 199-201 78 Spin 4 253-254 99 17 202-203 79 Spin 5 255 100 204-206 80 36 32 28 24 20 16 134 Wheel Step/Position 7-1/2 8 8-1/2 9 9-1/2 10 10-1/2 11 11-1/2 02.3004.0300.54 REFERENCE TABLES A The channel assigned to the rotating wheel selects the required gobo as follows: Table A-16: VL6/VL7 Rotating Wheel Select DMX Values Percent Values Action DMX Values Percent Values Action Open 53-76 25 Gobo 2 55 Gobo 5 27-52 15 Gobo 1 0-26 5 Open 156-255 129-153 102-128 45 Gobo 4 77-102 35 Gobo 3 The channel assigned to the rotation/index controls the gobo position as follows: Table A-17: VL6/VL7 Rotation/Index Control DMX Values % Values Action DMX Values 255 100 Fast CCW 229 254 22 228 253 21 227 99 20 226 19 225 98 18 224 17 223 252 251 250 249 248 247 97 246 245 10 216 9 215 8 214 239 7 213 238 6 212 93 5 211 4 210 92 3 209 2 208 234 233 232 91 231 230 0 2. 3 0 0 4. 0 3 00 . 5 4 8 217 235 90 5 220 11 236 4 14 243 237 3 88 7 218 94 1 2 222 219 240 Slow CW 89 221 12 95 Stop 16 13 241 Action 15 244 242 96 % Values 87 86 6 9 10 85 11 12 13 84 14 83 16 15 17 18 82 19 20 1 207 Slow CCW 206 81 21 Stop 205 80 Fast CW Stop 201-0 79-0 Index Pos. 22 135 DMX512 REFERENCE GUIDE Table A-18: VL6 Strobe Value Action 0-2 Open 3-5 Closed 6-7 Slow Random 8-10 Medium Random Table A-19: VL6B Strobe Value Action 0-2 Open 3-5 Closed 6-7 Slow Random 8-10 Medium Random 11-12 Fast Random 13-255 Where 13 is greatest interval and 255 is least interval (fastest) strobe Table A-20: VL7/VL7U/VL7B/VL7UB Strobe Value 136 Action 0-2 Open 3-5 Closed 6-7 Slow Random 8 - 10 Medium Random 11 - 12 Fast Random 13 - 255 Where 13 is longest interval and 255 is shortest interval (fastest) strobe 02.3004.0300.54 A REFERENCE TABLES Timing Channels Channel Functions Timing channel control improves the timed moves of certain groups of parameters. We provide three timing channels, one for Focus (Pan and Tilt), one for color parameters and one for beam parameters. Timing channels support time values of up to six minutes. Table A-21: Channel Function / Timing Channel Relationship Channel Function Timing Channel Focus Time Pan (Hi Byte/Lo Byte) Tilt (Hi Byte/Lo Byte) Color Time Blue Amber Magenta Color Wheel Beam Time Diffusion Beam Edge Zoom Rotating Gobo Gobo Index (HiByte/LoByte) Shutter (all 9 motors) A timing value of zero is full speed. A time value of 100% (or 255 in DMX) causes the associated parameter(s) to follow cue fade time (console time) rather than the timing channel. 0 2. 3 0 0 4. 0 3 00 . 5 4 137 DMX512 REFERENCE GUIDE Timing Channel Mapping Timing channels can be set in either % or 0-255 (DMX) modes, with the following values assigned: Table A-22: Timing Channels Map % Value 1 2 3 4 5 6 7 8 9 10 11 12 13 14 15 16 17 138 DMX = Seconds 0 1 2 3 4 5 6 7 8 9 10 11 12 13 14 15 16 17 18 19 20 21 22 23 24 25 26 27 28 29 30 31 32 33 34 35 36 37 38 39 40 41 42 43 44 Full Speed 0.2 0.4 0.6 0.8 1 1.2 1.4 1.6 1.8 2 2.2 2.4 2.6 2.8 3 3.2 3.4 3.6 3.8 4 4.2 4.4 4.6 4.8 5 5.2 5.4 5.6 5.8 6 6.2 6.4 6.6 6.8 7.0 7.2 7.4 7.6 7.8 8 8.2 8.4 8.6 8.8 02.3004.0300.54 REFERENCE TABLES A Table A-22: Timing Channels Map (Continued) % Value 18 19 20 21 22 23 24 25 26 27 28 29 30 31 32 33 34 35 36 0 2. 3 0 0 4. 0 3 00 . 5 4 DMX = Seconds 45 46 47 48 49 50 51 52 53 54 55 56 57 58 59 60 61 62 63 64 65 66 67 68 69 70 71 72 73 74 75 76 77 78 79 80 81 82 83 84 85 86 87 88 89 90 91 92 93 9 9.2 9.4 9.6 9.8 10 10.2 10.4 10.6 11 11 12 12 13 13 14 14 14 15 15 16 16 16 17 17 18 18 18 19 19 20 20 20 21 21 21 22 22 23 23 23 24 24 25 25 25 26 26 27 139 DMX512 REFERENCE GUIDE Table A-22: Timing Channels Map (Continued) % Value DMX = Seconds 37 94 95 96 97 98 99 100 101 102 103 104 105 106 107 108 109 110 111 112 113 114 115 116 117 118 119 120 121 122 123 124 125 126 127 128 129 130 131 132 133 134 135 136 137 138 139 140 141 142 27 27 28 28 29 29 29 30 30 30 31 31 32 32 32 33 33 34 34 34 35 35 36 36 36 37 37 38 38 38 39 39 39 40 40 41 41 41 42 42 43 43 43 44 44 45 45 45 46 38 39 40 41 42 43 44 45 46 47 48 49 50 51 52 53 54 55 140 02.3004.0300.54 REFERENCE TABLES A Table A-22: Timing Channels Map (Continued) % Value DMX = Seconds 56 143 144 145 146 147 148 149 150 151 152 153 154 155 156 157 158 159 160 161 162 163 164 165 166 167 168 169 170 171 172 173 174 175 176 177 178 179 180 181 182 183 184 185 186 187 188 189 190 191 46 47 47 47 48 48 49 49 49 50 50 50 51 51 52 52 52 53 53 54 54 54 55 55 56 56 56 57 57 58 58 58 59 59 59 60 60 65 65 65 70 70 75 75 75 80 80 85 85 57 58 59 60 61 62 63 64 65 66 67 68 69 70 71 72 73 74 75 0 2. 3 0 0 4. 0 3 00 . 5 4 141 DMX512 REFERENCE GUIDE Table A-22: Timing Channels Map (Continued) % Value 76 77 78 79 80 81 82 83 84 85 86 87 88 89 90 91 92 93 94 142 DMX = Seconds 192 193 194 195 196 197 198 199 200 201 202 203 204 205 206 207 208 209 210 211 212 213 214 215 216 217 218 219 220 221 222 223 224 225 226 227 228 229 230 231 232 233 234 235 236 237 238 239 240 85 90 90 95 95 95 100 100 110 110 110 120 120 120 130 130 140 140 140 150 150 160 160 160 170 170 180 180 180 190 190 200 200 200 210 210 210 220 220 230 230 230 240 240 250 250 250 260 260 02.3004.0300.54 REFERENCE TABLES A Table A-22: Timing Channels Map (Continued) % Value 95 96 97 98 99 100 0 2. 3 0 0 4. 0 3 00 . 5 4 DMX = Seconds 241 242 243 244 245 246 247 248 249 250 251 252 253 254 255 270 270 270 280 280 290 290 290 300 300 310 310 310 310 Follows Cue Data 143 DMX512 REFERENCE GUIDE Color Reference VL2C and VL4 Color Table A-23: VL2C & VL4 Color Reference VL No. Similar To VL2C (Wh 1/Wh 2) Pink Tint 101 Lux 55 Bastard Amber 103 Lux 02 Color Name 144 VL4 (DMX Values) Blue (6) Amber (7) Magenta (8) N/A 254 255 198 N/A 254 151 166 GAM Bastard Amber 104 GAM 325 N/A 255 158 163 Warm Bastard Amber 105 Lee 162 N/A 255 162 173 Pale Golden Amber 107 Lux 09 N/A 255 141 179 Light Amber 110 Lux 16, Lee 204 N/A 255 128 165 Light Flame 112 Lux 17 N/A 255 126 147 Medium Bastard Amber 115 Lux 04 N/A 255 126 147 Dark Bastard Amber 116 Lux 03 N/A N/A N/A N/A Warm Amber 122 Lee 176, Lux 01 N/A 255 141 152 Peach 125 GAM 320 255 122 135 Flesh Pink 131 Lux 34 N/A 255 160 132 Dark Pink 134 Lee 111 N/A 255 158 118 Medium Salmon 136 Lux 32 N/A 255 128 108 Salmon 138 Lux 41 N/A 254 104 90 Brite Pink 141 Lee 128 N/A 255 126 75 N/A 255 128 87 Lee 113 N/A 255 111 53 Dark Peach 145 Lee Magenta 149 Dark Salmon 151 N/A 255 97 48 Deep Salmon 155 N/A 255 105 34 Dark Red 161 4/4 N/A N/A N/A Medium Red 164 Lux 27 4/8 255 0 0 Primary Red 168 Lee 106 0/5 255 0 29 Dark Orange 173 Lux 26 0/5 255 0 46 Light Red 177 GAM 235 N/A 255 106 44 Dark Orange 181 2/6 255 90 46 Orange 183 Lux 19, Lee 164 15/6 255 0 78 Medium Amber 187 Lux 22 15/6 255 0 98 Deep Golden Amber 201 GAM 345 15/7 255 47 109 Canary 205 Lux 21 2/8 255 62 173 Light Amber 208 0/8 255 67 225 Lee Orange 212 Lee 105 2/9 255 98 255 Chrome Orange 214 Lux 15, Lee 179 15/8 255 104 198 02.3004.0300.54 A REFERENCE TABLES Table A-23: VL2C & VL4 Color Reference (Continued) Color Name VL No. Bright Yellow 219 Similar To VL2C (Wh 1/Wh 2) 1/9 VL4 (DMX Values) Blue (6) Amber (7) Magenta (8) 255 106 255 Dark Straw 221 0/9 255 100 255 Deep Amber 223 Lee 104 0/9 254 111 255 Light Yellow 225 Lee 101 2/11 N/A N/A N/A Lux 12 1/10 N/A N/A N/A 2/15 255 135 255 Lee 213, Lee 202 0/15 151 128 255 14/12 N/A N/A N/A Lee 122 13/14 0 137 255 10/9 85 87 255 Straw 237 Light Straw 239 No Color Green 245 Pale Yellow-Green 251 Fern Green 254 Yellow-Green 256 Lime Green 257 11/11 95 107 255 Primary Green 259 Lee 139 10/11 85 116 255 Light Green 261 9/11 98 143 255 Moss Green 263 9/12 N/A N/A N/A Lt. Blue Green 267 11/14 34 130 255 Kelly Green 268 Lux 94 12/14 48 126 255 Lee 124 Dark Green 270 10/13 96 117 255 Fluorescent Green 273 9/13 N/A N/A N/A Dark Fluor. Green 275 8/15 N/A N/A N/A Blue-Grass Green 281 GAM 690, GAM 440 10/14 N/A N/A N/A Medium Blue-Green 284 Lee 116 9/14 99 136 230 Dark Peacock Green 286 8/13 N/A N/A N/A Peacock Green 287 10/15 43 160 255 Dark Turquoise 289 11/15 43 165 255 Light Aqua 291 10/15 99 156 255 Lee 115 Aqua 295 8/14 108 189 255 Rosco Peacock Blue 298 Lux 73 N/A 116 140 255 Lee Steel Blue 299 Lee 117 N/A 130 136 255 1/4 CTB 301 Lee 203 N/A 210 175 255 1/2 CTB 303 Lee 202, Lux 61 N/A 255 191 255 Full CTB 307 Lee 201 15/0 146 177 255 City Blue 310 GAM 847, Polycolor 70 N/A 141 204 255 N.C. Blue 313 GAM 840, GAM 980 N/A 138 255 222 Slate Blue 318 Lee 161 N/A N/A N/A N/A Pale Blue 321 Lux 69 11/0 113 191 255 Lee Light Blue 325 Lee 118 10/0 51 203 255 Bright Blue 330 Lee 141 N/A 82 255 255 Medium Blue 342 Lee 132 9/0 103 254 169 0 2. 3 0 0 4. 0 3 00 . 5 4 145 DMX512 REFERENCE GUIDE Table A-23: VL2C & VL4 Color Reference (Continued) 146 Color Name VL No. Similar To VL2C (Wh 1/Wh 2) Sea Blue 345 Lux 68, GAM 810 11/2 VL4 (DMX Values) Blue (6) Amber (7) Magenta (8) 117 255 255 Icy Blue 350 10/2 99 255 167 Just Blue 355 Lee 79 8/0 N/A N/A N/A Primary Blue 359 Lux 83, GAM 850 9/3 N/A N/A N/A N/A Dark Steel Blue 365 7/15 N/A N/A Deep Blue 371 7/0 53 255 0 Dark Blue 374 Lee 120 8/4 71 255 46 Royal Blue 380 GAM 905 6/4 38 255 80 Dark UV 401 5/1 N/A N/A N/A Indigo 403 Lux 59 5/0 100 255 101 Lee 181 Congo Blue 406 6/1 101 255 101 Darkest Lavender 409 12/1 109 255 109 Dark Rose Purple 411 3/4 101 255 118 Deep Lavender 415 12/4 77 255 121 Lilac 418 13/4 73 255 135 Special Dark Lavender 421 10/3 74 251 136 Cool Lavender 422 11/3 101 251 152 Pale Lavender 425 13/3 N/A N/A N/A Mercury Vapor 429 13/4 46 255 118 GAM 845 Medium Violet 433 Lux 359 15/4 116 255 135 Dark Lavender 443 Lee 180 1/4 132 254 135 Lee Special Lavender 447 Lee 137 N/A 183 255 199 Twilight 451 GAM 915 N/A 145 255 255 Deep Lavender 455 GAM 948 15/3 123 255 135 Pale Lilac 461 2/4 136 255 139 Periwinkle 463 Dusty Lavender 466 No Color Lilac 468 Special Lavender 469 Dark Rose 471 Dark Fushia 474 GAM 960, GAM 970 0/3 158 255 148 15/2 181 255 199 Lux 52 1/2 216 255 165 Lux 54 N/A 211 255 189 3/1 134 255 97 Lux 358 14/1 132 255 97 15/1 255 254 67 Lee 126 15/1 155 193 64 0/1 255 193 64 Dark Follies Pink 476 Magenta 478 Hot Pink 480 Mauve 483 1/1 255 172 69 Follies Pink 489 N/A 255 163 84 Flesh Pink 491 Rose Purple 492 Carnation 494 Lux 48 N/A 255 255 115 N/A 209 255 118 N/A 255 199 131 02.3004.0300.54 A REFERENCE TABLES Table A-23: VL2C & VL4 Color Reference (Continued) Color Name VL No. No Color Pink 495 Similar To VL2C (Wh 1/Wh 2) 0/2 Blue (6) Amber (7) Magenta (8) 255 185 131 Cool Bastard Amber 496 0/2 211 255 152 Dusty Rose 497 2/2 255 175 148 Rouge 498 N/A 206 173 152 0 2. 3 0 0 4. 0 3 00 . 5 4 Lux 52, Lux 33 VL4 (DMX Values) 147 DMX512 REFERENCE GUIDE VL5 Color Note: DMX Values - First row are 0-100% values, second row are 0-255 values. Shaded boxes mean the matches are close, but not exact. "Similar To" reflects the gel indicated used with a 3200°K source. Due to the difference in color media and lamp source, color references are approximate and may vary by application. Table A-24: VL5/VL5B/VL5Arc Color Chart Color Name No. Similar To Pink Tint 101 Lux 55 Bastard Amber 103 Lux 02 GAM Bastard Amber 104 GAM 325 Warm Bastard Amber 105 Lee 162 Pale Golden Amber 107 Lux 09 Light Amber 110 Light Flame 112 Lux 16 Lee 204 Lux 17 Medium Bastard Amber Dark Bastard Amber 115 Lux 04 116 Lux 03 Warm Amber 122 Peach 125 Lee 176 Lux 01 GAM 320 Flesh Pink 131 Lux 34 Dark Pink 134 Lee 111 Medium Salmon 136 Lux 32 Salmon 138 Lux 41 Brite Pink 141 Lee 128 Dark Peach 145 Lee Magenta 149 Dark Salmon 151 148 Lee 113 VL5 DMX * VL5Arc DMX * 0/13/43 0/34-35/110-112 0/29/45 0/74-76/115-117 29/25/0 74-76/64-66/0 0/30/43 0/77-79/110-112 0/41/49 0/105-107/125-127 0/38/53 0/97-99/136-137 0/33/50 0/85-86/128-130 0/33/51 0/85-86/131-132 0/25/57 0/64-66/146-147 0/40/58 0/102-104/148-150 40/30/45 102-104/77-79/115117 0/29/63 0/74-76/161-163 0/43/65 0/110-112/166-168 0/50/75 0/128-130/192-193 0/42/90 0/108-109/230-232 0/39/73 0/100-101/187-188 0/50/100 0/128-130/255 0/46/100 0/118-119/255 0/15/36 0/39-40/92-94 0/43/33 0/110-112/85-86 0/43/50 0/110-112/128-130 0/41/47 0/105-107/120-122 0/43/50 0/110-112/128-130 0/45/50 0/115-117/128-130 0/45/55 0/115-117/141-142 0/43/53 0/110-112/136-137 0/42/52 0/108-109/133-135 0/43/56 0/110-112/143-145 0/45/60 0/115-117/153-155 15/40/60 39-40/102-104/153155 0/43/65 0/110-112/166-168 0/43/63 0/110-112/161-163 0/45/80 0/115-117/204-206 0/45/90 0/115-117/230-232 0/50/100 0/128-130/255 0/55/100 0/141-142/255 0/50/100 0/128-130/255 VL5B DMX * 0/36/29 0/92-94/74-76 0/38/29 0/97-99/74-76 0/26/25 0/67-68/64-66 0/41/29 0/105-107/74-76 0/45/32 0/115-117/82-84 0/44/35 0/113-114/90-91 0/42/33 0/108-109/85-86 0/42/34 0/108-109/87-89 0/43/37 0/110-112/95-96 0/49/41 0/125-127/105-107 0/38/38 0/97-99/97-99 0/42/45 0/108-109/115-117 0/52/48 0/133-135/123-124 0/60/50 0/153-155/128-130 02.3004.0300.54 A REFERENCE TABLES Table A-24: VL5/VL5B/VL5Arc Color Chart (Continued) Color Name No. Deep Salmon 155 Medium Red 164 Lux 27 Primary Red 168 Lee 106 Dark Orange 173 Lux 26 Light Red 177 GAM 235 Dark Orange 181 Orange 183 Lux 19 Lee 164 Medium Amber 187 Lux 22 Deep Golden Amber 201 GAM 345 Canary 205 Lux 21 Light Amber 208 Lee Orange 212 Lee 105 Chrome Orange 214 Lux 15 Lee 179 Bright Yellow 219 Dark Straw 221 Deep Amber 223 Lee 104 Light Yellow 225 Lee 101 Straw 237 Lux 12 Light Straw 239 No Color Green 245 Pale Yellow-Green 251 Fern Green 254 Yellow-Green 256 Lime Green 257 0 2. 3 0 0 4. 0 3 00 . 5 4 Similar To VL5 DMX * VL5Arc DMX * 0/55/100 0/141-142/255 50/100/100 128-130/255/255 40/100/100 102-104/255/255 0/56/100 0/143-145/255 0/50/100 0/128-130/255 0/100/90 0/255/230-232 0/100/75 0/255/192-193 0/55/100 0/141-142/255 50/100/100 128-130/255/255 0/100/100 0/255/255 0/100/100 0/255/255 25/55/100 64-66/141-142/255 0/100/90 0/255/230-232 0/100/80 0/255/204-206 0/78/72 0/199-201/184-186 0/50/63 0/128-130/161-163 0/83/57 0/212-214/146-147 0/83/50 0/212-214/128-130 0/83/50 0/212-214/128-130 0/100/40 0/255/102-104 0/100/0 0/255/0 0/75/40 0/192-193/102-104 0/56/40 0/143-145/102-104 0/58/0 0/148-150/0 0/53/5 0/136-137/13-15 0/43/0 0/110-112/0 0/75/69 0/192-193/176-178 0/70/65 0/179-181/166-168 0/82/59 0/210-211/151-152 0/100/57 0/255/146-147 0/100/53 0/255/136-137 0/100/53 0/255/136-137 0/100/50 0/255/128-130 0/100/35 0/255/90-91 0/80/40 0/204-206/102-104 0/65/41 0/166-168/105-107 0/56/41 0/143-145/105-107 0/43/40 0/110-112/102-104 0/35/10 0/90-91/26-28 100/72/0 255/184-186/0 100/85/0 255/217-219/0 Lee 213 with Lee 202 Lee 122 Lee 139 VL5B DMX * 0/100/62 0/255/159-160 0/100/54 0/255/138-140 0/75/52 0/192-193/133-135 0/100/54 0/255/138-140 0/100/50 0/255/128-130 0/87/47 0/222-224/120-122 0/75/43 0/192-193/110-112 0/100/38 0/255/97-99 0/100/30 0/255/77-79 0/80/35 0/204-206/90-91 0/100/27 0/255/69-71 0/100/0 0/255/0 0/85/20 0/217-219/51-53 0/59/27 0/151-152/69-71 0/58/0 0/148-150/0 0/53/0 0/136-137/0 0/42/0 0/108-109/0 42/35/0 108-109/90-91/0 0/55/65 0/141-142/166-168 60/60/0 153-155/153-155/0 70/100/0 179-181/255/0 0/80/100 0/204-206/255 149 DMX512 REFERENCE GUIDE Table A-24: VL5/VL5B/VL5Arc Color Chart (Continued) Color Name No. Primary Green 259 Light Green 261 Moss Green 263 Light Blue-Green 267 Kelly Green 268 Lux 94 Dark Green 270 Lee 124 Fluorescent Green 273 Dark Fluor. Green 275 Blue-Grass Green 281 Medium Blue-Green 284 Dark Peacock Green 286 Peacock Green 287 Dark Turquoise 289 Light Aqua 291 Aqua 295 Rosco Peacock Blue 298 Lux 73 Lee Steel Blue 299 Lee 117 1/4 CTB 301 Lee 203 1/2 CTB 303 Full CTB 307 Lee 202 Lux 61 Lee 201 City Blue 310 N.C. Blue 313 Slate Blue 318 GAM 847 Polycolor 70 GAM 840 with GAM 980 Lee 161 Pale Blue Lee Light Blue 321 325 Lux 69 Lee 118 150 Similar To GAM 690 with GAM 440 Lee 116 VL5 DMX * VL5Arc DMX * VL5B DMX * 100/64/0 255/164-165/0 100/60/0 255/153-155/0 100/52/0 255/133-135/0 100/64/0 255/164-165/0 100/60/0 255/153-155/0 100/51/0 255/131-132/0 100/50/0 255/128-130/0 100/45/0 255/115-117/0 87/44/0 222-224/113-114/0 100/39/0 255/100-101/0 100/44/0 255/113-114/0 100/45/0 255/115-117/0 100/46/0 255/118-119/0 100/44/0 255/113-114/0 100/43/0 255/110-112/0 0/84/100 0/215-216/255 0/65/100 0/166-168/255 0/56/100 0/143-145/255 90/35/0 230-232/90-91/0 71/40/0 182-183/102-104/0 0/58/75 0/148-150/192-193 0/50/80 0/128-130/204-206 0/52/100 0/133-135/255 0/50/75 0/128-130/192-193 0/20/100 0/51-53/255 0/49/75 0/125-127/192-193 75/0/0 192-193/0/0 65/30/0 166-168/77-79/0 100/37/0 255/95-96/0 87/0/0 222-224/0/0 100/39/0 255/100-101/0 100/25/0 255/64-66/0 Lee 115 0/38/35 0/97-99/90-91 10/25/35 26-28/64-66/90-91 85/20/0 217-219/51-53/0 90/30/0 230-232/77-79/0 0/25/75 0/64-66/192-193 60/0/0 153-155/0/0 49/34/0 125-127/87-89/0 37/25/0 95-96/64-66/0 36/0/0 92-94/0/0 47/0/0 120-122/0/0 60/0/35 153-155/0/90-91 63/0/40 161-163/0/102-104 63/0/35 161-163/0/90-91 29/0/72 74-76/0/184-186 02.3004.0300.54 A REFERENCE TABLES Table A-24: VL5/VL5B/VL5Arc Color Chart (Continued) Color Name No. Similar To VL5 DMX * VL5Arc DMX * VL5B DMX * Bright Blue 330 Lee 141 342 Lee 132 Sea Blue 345 Icy Blue 350 Lux 68 GAM 810 Lux 68 Just Blue 355 Lee 79 Primary Blue 359 Lux 83 GAM 850 Deep Blue 371 Dark Blue 374 Lee 120 Royal Blue 380 GAM 905 Indigo 403 Lux 59 Congo Blue 406 Lee 181 Darkest Lavender 409 Dark Rose Purple 411 Deep Lavender 415 Lilac 418 Special Dark Lavender Cool Lavender 421 422 100/0/0 255/0/0 65/0/0 166-168/0/0 100/0/45 255/0/115-117 100/0/50 255/0/128-130 70/0/50 179-181/0/128-130 70/0/52 179-181/0/133-135 100/0/100 255/0/255 100/0/80 255/0/204-206 67/0/89 171-173/0/227-229 55/0/55 141-142/0/141-142 57/0/60 146-147/0/153-155 52/0/70 133-135/0/179-181 60/0/55 153-155/0/141-142 55/0/40 141-142/0/102-104 57/0/45 1461-47/0/115-117 55/0/37 141-142/0/95-96 55/0/30 141-142/0/77-79 50/0/65 128-130/0/166-168 Medium Blue 78/0/0 199-201/0/0 65/0/0 166-168/0/0 Pale Lavender Mercury Vapor 425 429 Medium Violet 433 Lux 359 Dark Lavender 443 Lee 180 Lee Special Lavender Twilight 447 Lee 137 451 GAM 915 Deep Lavender 455 GAM 948 Pale Lilac 461 0 2. 3 0 0 4. 0 3 00 . 5 4 GAM 845 100/0/55 255/0/141-142 69/0/50 176-178/0/128-130 73/0/56 187-188/0/143-145 100/0/100 255/0/255 85/0/100 217-219/0/255 100/0/75 255/0/192-193 62/0/100 159-160/0/255 63/0/100 161-163/0/255 62/0/100 159-160/0/255 70/0/60 179-181/0/153-155 70/0/60 179-181/0/153-155 66/0/56 169-170/0/143-145 75/0/57 192-193/0/146-147 72/0/55 184-186/0/141-142 61/0/43 155-156/0/110-112 53/0/22 136-137/0/57-58 56/0/40 143-145/0/102-104 55/0/30 141-142/0/77-79 60/0/60 153-155/0/153-155 100/0/52 255/0/133-135 53/0/33 136-137/0/85-86 52/0/37 133-135/0/95-96 47/0/36 120-121/0/92-94 30/0/0 77-79/0/0 48/0/35 123-124/0/90-91 42/0/45 108-109/0/115-117 60/0/35 153-155/0/90-91 50/0/52 128-130/0/133-135 40/0/50 102-104/0/128-130 151 DMX512 REFERENCE GUIDE Table A-24: VL5/VL5B/VL5Arc Color Chart (Continued) Color Name No. Similar To VL5 DMX * VL5Arc DMX * VL5B DMX * Periwinkle 463 GAM 960 with GAM 970 51/0/0 131-132/0/0 Dusty Lavender 466 No Color Lilac 468 Lux 52 Special Lavender 469 Lux 54 47/0/47 120-122/0/120-122 50/0/34 128-130/0/87-89 38/0/30 97-99/0/77-79 39/0/28 100-101/0/72-73 Dark Rose 471 Dark Fuchsia 474 Dark Follies Pink 476 44/0/40 113-114/0/102-104 30/0/0 77-79/0/0 28/0/48 72-73/0/123-124 22/0/41 57-58/0/105-107 45/0/70 115-117/0/179-181 47/0/70 120-122/0/179-181 36/0/68 92-94/0/174-175 Magenta 478 Hot Pink 480 Mauve 483 Follies Pink 489 Flesh Pink 491 Rose Purple 492 0/0/46 0/0/118-119 0/29/47 0/74-76/120-122 Carnation 494 No Color Pink 495 0/32/65 0/82-84/166-168 32/40/65 82-84/102-104/166168 0/0/53 0/0/136-137 0/35/58 0/90-91/148-150 Cool Bastard Amber 496 Dusty Rose 497 Rouge 498 * 152 Lux 358 with Lux 60 Lee 126 59/0/63 151-152/0/161-163 56/0/65 143-145/0/166-168 50/0/68 128-130/0/174-175 51/0/78 131-132/0/199-201 42/0/100 108-109/0/255 42/0/70 108-109/0/179-181 0/0/77 0/0/197-198 45/0/45 115-117/0/115-117 Lux 48 with Lux 60 42/0/38 108-109/0/97-99 Lux 52 with Lux 33 35/0/40 90-91/0/102-104 0/35/53 0/90-91/136-137 10/37/53 26-28/95-96/136137 0/0/40 0/0/102-104 0/0/38 0/0/97-99 35/0/39 90-91/0/100-101 0/20/35 0/51-53/90-91 0/22/35 0/57-58/90-91 The first value adjusts blue, the second adjusts amber and the third adjusts magenta. 02.3004.0300.54 REFERENCE TABLES A VL6 Color Table A-25: VL6/VL6B/VL6C/VL6C+ Standard Colors Standard Set Similar To...* 0020 Magenta GAM 995 & GAM 155 0150 Cool Pink GAM 960 & GAM 970 0240 Light Red GAM 235 0320 Flesh Pink Lux 52 & Lux 33 0440 Orange Lux 19 & Lee 164 0540 Yellow Lee 101 & Lee 138 0660 Green Lee 139 0820 Light Blue Green Lux 69 0850 Dark Blue Lee 120 0960 Deep Lavender GAM 948 0990 Congo Blue Lee 181 Table A-26: VL6/VL6B/VL6C/VL6C+ Rental Colors Rental Access 0080 Cherry Lux 48 0335 Middle Rose Lee 110 0350 No Color Lavender Lux 55 0360 Warm Bastard Amber GAM 363 0370 Pale Lime GAM 515 & GAM 820 0390 Color Correction 3200°K 0 Green 0410 Deep Straw Lux 15 or Lee 179 0430 Deep Golden Amber GAM 345 0680 Blue-Grass GAM 690 & GAM 470 0735 Peacock Green Lee 115 0805 Sea Blue GAM 810 & Lux 68 0810 Daylight Blue Lee 201 0830 Pale Blue Lee 201 0840 Light Steel Blue GAM 840 & GAM 980 0845 Slate Blue Lux 78 & Lux 64 0865 Night Sky Blue Lux 83 & GAM 850 0870 Bright Blue Lux 79 0880 Dark Blue GAM 905 0930 Special Lavender GAM 882 & GAM 980 0970 Violet Lux 359 & Lux 51 0980 Dark Lavender Lee 180 0983 Purple GAM 950 0985 Dark Fuchsia Lux 358 & Lux 60 * 0 2. 3 0 0 4. 0 3 00 . 5 4 Similar To...* Matched to an ellipsoidal reflector spotlight with a 3200°K incandescent source. 153 DMX512 REFERENCE GUIDE VL7 Color Table A-27: VL7/VL7U/VL7B/VL7UB Color Chart Color Name 154 Number Similar To VL7 Spot DMX Pink Tint 101 Lux 55 Bastard Amber 103 Lux 02 GAM Bastard Amber 104 GAM 325 Warm Bastard Amber 105 Lee 162 Pale Golden Amber 107 Lux 09 Light Amber 110 Light Flame 112 Lux 16 Lee 204 Lux 17 Medium Bastard Amber 115 Lux 04 Dark Bastard Amber 116 Lux 03 Warm Amber 122 Peach 125 Lee 176 Lux 01 GAM 320 Flesh Pink 131 Lux 34 Dark Pink 134 Lee 111 Medium Salmon 136 Lux 32 Salmon 138 Lux 41 Brite Pink 141 Lee 128 Dark Peach 145 Lee Magenta 149 Dark Salmon 151 Deep Salmon 155 Dark Red 161 94/53/51/27 240/135/131/70 85/67/94/45 218/172/240/116 94/71/94/56 240/181/240/144 80/56/76/100 204/143/195/255 81/71/78/55 209/181/199/140 83/77/80/60 212/196/205/154 86/75/80/56 220/192/203/143 86/66/80/59 220/167/203/151 88/66/79/72 224/168/201/184 87/73/73/64 223/185/185/162 87/86/48/42 220/220/122/108 96/80/61/33 246/205/155/85 99/77/61/43 254/197/155/110 96/84/0/0 250/214/0/0 100/96/0/0 255/244/0/0 100/86/35/100 255/220/90/255 100/85/53/100 255/218/134/255 100/96/34/100 255/244/86/255 100/92/38/75 255/235/97/192 100/98/45/100 255/250/116/255 Option -Fixed Gobo Wheel Medium Red Primary Red Dark Orange 164 168 173 Lee 113 Lux 27 Lee 106 Lux 26 02.3004.0300.54 REFERENCE TABLES A Table A-27: VL7/VL7U/VL7B/VL7UB Color Chart (Continued) Color Name 0 2. 3 0 0 4. 0 3 00 . 5 4 Number Similar To VL7 Spot DMX Light Red 177 GAM 235 100/98/44/100 255/251/112/255 Dark Orange Orange 181 183 Medium Amber 187 Lux 19 Lee 164 Lux 22 Deep Golden Amber 201 GAM 345 Canary 205 Lux 21 Light Amber 208 Lee Orange 212 Lee 105 Chrome Orange 214 Lux 15 Lee 179 Bright Yellow 219 Dark Straw 221 Deep Amber 223 Lee 104 Light Yellow 225 Lee 101 Straw 237 Lux 12 Light Straw 239 No Color Green 245 Pale Yellow-Green 251 Fern Green 254 Yellow-Green 256 Lime Green 257 Primary Green 259 Light Green 261 Moss Green 263 Light Blue-Green 267 Kelly Green 268 100/100/100/100 255/255/255/255 100/92/100/100 255/223/255/255 100/85/100/100 255/217/255/255 93/83/100/100 237/212/255/255 86/100/100/100 291/255/255/255 89/86/100/100 226/219/255/255 85/82/95/100 217/209/242/255 79/90/100/100 201/230/255/255 82/99/100/100 209/252/255/255 81/78/100/100 207/199/255/255 72/84/100/100 184/214/255/255 79/67/100/100 203/170/255/255 76/79/86/50 193/201/220/128 59/56/100/6 150/143/255/16 60/85/0/0 152/216/0/0 53/78/81/70 134/199/206/178 42/100/84/87 107/255/242/255 47/100/95/100 121/255/242/255 39/97/87/100 99/247/223/255 47/100/17/86 119/255/44/219 37/100/0/63 94/255/0/160 41/73/0/0 104/184/0/0 47/80/0/47 121/203/0/121 Lee 213 & Lee 202 Lee 122 Lee 139 Lux 94 155 DMX512 REFERENCE GUIDE Table A-27: VL7/VL7U/VL7B/VL7UB Color Chart (Continued) Color Name 156 Number Similar To VL7 Spot DMX Dark Green 270 Lee 124 Fluorescent Green 273 Dark Fluor. Green 275 Blue-Grass Green 281 Medium Blue-Green 284 Dark Peacock Green 286 Peacock Green 287 Dark Turquoise 289 Light Aqua 291 Aqua 295 Rosco Peacock Blue 298 Lux 73 Lee Steel Blue 299 Lee 117 36/90/0/0 93/229/0/0 37/85/9/83 94/218/23/211 32/97/16/27 82/247/40/69 29/84/0/0 73/214/0/0 28/87/0/67 71/221/0/170 31/82/0/70 79/209/0/178 27/82/14/27 68/209/36/68 26/80/0/0 66/204/0/0 28/71/0/59 71/180/0/151 25/78/16/77 63/200/40/197 41/62/3/53 105/159/7/136 41/52/75/7 104/132/190/17 1/4 CTB 1/2 CTB 301 303 Full CTB City Blue 307 310 N.C. Blue 313 Slate Blue 318 Lee 203 Lee 202 Lux 61 Lee 201 GAM 847 Polycolor 70 GAM 840 & GAM 980 Lee 161 Pale Blue 321 Lux 69 Lee Light Blue 325 Lee 118 Bright Blue 330 Lee 141 Medium Blue 342 Lee 132 Sea Blue 345 Icy Blue 350 Lux 68 GAM 810 Lux 68 Just Blue 355 Lee 79 GAM 690 & GAM 440 Lee 116 Lee 115 77/56/20/54 196/143/52/138 27/47/30/55 70/121/77/139 26/53/10/41 67/135/26/105 22/71/9/64 56/182/23/164 28/65/9/61 72/167/23/155 44/45/11/77 112/114/28/197 0/28/9/100 0/71/24/255 0/39/7/72 0/99/16/184 12/48/13/100 30/123/32/255 02.3004.0300.54 REFERENCE TABLES A Table A-27: VL7/VL7U/VL7B/VL7UB Color Chart (Continued) Color Name 0 2. 3 0 0 4. 0 3 00 . 5 4 Number Similar To VL7 Spot DMX Primary Blue 359 Lux 83 GAM 850 Dark Steel Blue 365 Deep Blue 371 Lee 120 Dark Blue 374 GAM 905 Royal Blue 380 Lux 59 Indigo 403 Lee 181 Congo Blue 406 Darkest Lavender 409 Dark Rose Purple 411 Deep Lavender 415 Lilac 418 Special Dark Lavender 421 Cool Lavender 422 Pale Lavender 425 Mercury Vapor 429 Lux 359 Medium Violet 433 Lee 180 Dark Lavender 443 Lee 180 Lee Special Lavender 447 Lee 137 Twilight 451 GAM 915 Deep Lavender 455 GAM 948 Pale Lilac 461 Periwinkle 463 Dusty Lavender 466 No Color Lilac 468 15/84/47/85 38/215/120/217 15/100/47/100 38/255/120/255 9/100/55/57 24/255/141/146 9/100/58/90 24/255/148/230 3/100/35/100 7/255/88/25 0/92/69/100 0/234/175/255 0/100/67/100 0/255/172/255 0/83/51/100 0/211/131/255 0/78/66/69 0/200/169/253 7/85/42/55 17/216/107/139 0/76/27/41 0/194/70/104 0/74/15/100 0/189/37/255 0/58/20/100 0/147/50/255 0/76/10/62 0/195/25/167 0/79/33/45 0/202/83/115 0/71/10/67 0/181/26/170 0/72/64/61 0/183/163/155 0/0/41/41 0/0/105/105 12/71/29/38 30/180/75/97 0/84/61/70 0/214/156/178 0/77/61/45 0/197/156/114 0/0/58/64 0/0/149/163 0/39/60/38 0/99/154/97 100/57/66/42 255/145/169/106 GAM 845 GAM 960 & GAM 970 Lux 52 157 DMX512 REFERENCE GUIDE Table A-27: VL7/VL7U/VL7B/VL7UB Color Chart (Continued) Color Name Number Similar To VL7 Spot DMX Special Lavender 469 Lux 54 100/44/71/50 255/113/180/128 Dark Rose Dark Fushia 471 474 Lux 358 & Lux 60 Dark Follies Pink 476 100/62/47/100 255/157/119/255 100/69/53/100 255/177/134/255 Magenta Hot Pink Mauve Follies Pink 478 480 483 489 Flesh Pink 491 Rose Purple 492 Carnation 494 No Color Pink 495 Cool Bastard Amber 496 Dusty Rose 497 Rouge 498 Lee 126 Lux 48 & Lux 60 Lux 52 & Lux 33 100/71/48/100 255/177/124/255 0/0/59/48 0/0/152/123 100/63/59/100 255/161/150/255 100/59/59/56 255/151/150/143 100/52/59/50 255/133/150/128 85/59/53/42 217/151/134/107 80/73/53/40 205/186/134/124 96/73/53/40 244/187/134/101 Note: DMX Values - First row are 0–100% values, second row are 0–255 values. VL7 referencing is for Plate 1 Color/Plate 1 Saturation/Plate 2 Color/Plate 2 Saturation. 158 02.3004.0300.54 APPENDIX B. Glossary This glossary provides useful terms associated with Series 200/300 equipment and DMX512 systems. 0 2 . 3 00 4 . 0 30 0 . 5 4 159 DMX512 REFERENCE GUIDE Glossary of Terms Active An intensity value greater than zero (1-100%). Address A numerical "name" given to a device on a DMX512 line indicating which of 512 possible channels it will respond to. Align (lamp) The process of adjusting the lamp within the reflector to obtain the desired output quality of the beam. APS6 Module The lamp power supply (ballast) for the arc lamps found in the VL6 and VL7 spot luminaires, and in the VL5Arc wash luminaire. APS6 Trunk Cable Multi-conductor cable used to provide six circuits of arc lamp power to VARI❋LITE Series 300 luminaires. Differs from industry standard six circuit Socopex cable by using pin 19 as a shield to eliminate RF noise, which can interfere with sound systems. Can be used with incandescent lamps. Arc Lamp A type of lamp which creates light by forming an arc of electricity. Brightness is achieved by including gasses and metals within the envelope of the lamp which dissolve and give off a bright light. Arc lamps must be dimmed mechanically because electrical dimming will extinguish the arc. Arc lamps used in Series 300 luminaires will not strike when hot. Attribute An individual controllable aspect of a luminaire: pan, tilt, color, etc. Also known as "parameter." Beam 1)The size, shape and sharpness of image of the light beam as projected on stage. 2)A function of the luminaire related to the size, shape, and sharpness of the light beam, specified by beam and edge data, and use of gobos (patterns) as required. Broadcast Digital data signals transmitted from the control console to the luminaires and interface devices. The signal is received by all luminaire simultaneously and interpreted by each individually. Channel A control reference which collects a device’s associated thumbwheel address(es) (device, lamp power, etc.) and maps them to a single selectable number. Channels are assigned via the patch setup. (Also referred to as a "Control Channel") Console Timing Time value in seconds or minutes applied to an entire cue. C3 Dimmer A current sensing dimmer that can be installed in a Modular Rack SixPack Chassis to control the intensity of a VL5 or VL5B wash luminaires. Cue A programmed event that can be played back on any submaster. A cue can be a crossfade or effect. 10,000 cues can be recorded, numbered from .01 to 9999.99. Dimmer Device used to control the relative output (or intensity) of an incandescent lamp. DMX/ DMX512 The universally accepted lighting control protocol in the entertainment industry. A console uses this protocol to control specific devices in a lighting system. A DMX512 data channel is eight bits of absolute parameter data. A DMX512 data packet is a group of 512 data channels, over a value range of 256 steps. 160 02.3004.0300.54 GLOSSARY B DMX512 Cable Industry standard cable consists of two twisted pair and a shield, and 5-pin XLR style connectors. The pin out is: pin 1 = common (shield), pin 2 = data -, pin 3 = data +. The second pair (pins 4 & 5) may be used for a secondary data link; in VARI❋LITE equipment, these pins are not used. DMX Power Pack The DMX Power Pack (DPP) is a portable electronics chassis that provides lamp power and control to Series 300 luminaires. DMX Universe A group of up to 512 DMX channels. Consoles may have more than one universe, usually labeled in groups of 512. Douse To de-energize a luminaire lamp. (Douse is unrelated to intensity states.) Epic Connector A six-pin, three-phase 35 amp connector found on 8/5 wire used to provide power to a SixPack chassis. Also found on the back of a mod rack. Fan-In (Break-In) 6 male plugs to female multicore connector. In the case of Series 300 equipment, a Socapex connector. Fan-Out (Break-Out) A male multicore connector to 6 female plugs. In the case of Series 300 equipment, a Socapex connector. Feeder In the case of Series 300 equipment, 2/0 double-insulated wire, rated at 225 amps, with 4\0 Cam-Lok connectors on either end, color coded by phase, neutral and ground. Fixture Orientation Based on the direction the pigtail points as it exits the fixture. Flipped Focus When one or more fixtures inadvertently move differently from others in the system. Focus The point to which the light beam is directed. Also, a function of the luminaire related to the direction of the beam as specified by pan and/or tilt data. Frame A luminaire mechanism which allows framing of the light beam. Gobo A pattern (template) used to create backgrounds or texture when projected on to scenery or cycloramas, or to create the illusion of natural elements such as fire, windows or tree leaves. Hard Reset Restarts luminaires and reloads operating system and cue data. Home Position Pan and Tilt values at 50%. Also called "Zero Position" or a "50/50" cue or group. Hubbell Connector A five-pin, three-phase connector found on 8/5 wire, used to provide power to SixPack Chassis, when used with the proper Epic to Hubbell adapter. Indexing A function of a rotating gobo mechanism. Intensity A value placed on the relative brightness of a lighting fixture; 100% is considered "full", and 0% is considered "out". 0 2. 3 0 0 4. 0 3 00 . 5 4 161 DMX512 REFERENCE GUIDE Lamp Light source consisting of filament or electrodes, base, and envelope or "bulb". Lamp Cable Vari-Lite supplied cable that extends the fixture pigtail to a Smart Repeater unit. Luminaire Calibration The process of a luminaire finding its end stops for all parameters. MiniStepping Allows for smoother movement of color and gobo wheels in a VL6 spot luminaire. Mode Software contained within the Smart Repeater unit allowing for different control options for luminaires. Modular (Mod) Rack A power distribution and storage rack for SixPack Chassis. The mod rack is fitted for 200A Cam-Lok input, with six Epic connectors for individual outputs for up to four rack-mounted chassis and up to two auxiliary chassis. The mod rack also has a space for one SPC-36 controller for control of the modules within the chassis. Output Port One of the six plugs on the long side of a Smart Repeater unit, with port one being closest to the Socapex connector. Palette Term for groups of groups; i.e. all the color groups would be considered the Color Palette, all the beam groups would be the Beam Palette, etc. Pan The 360° movement of the luminaire around the axis of the yoke. Parameter An individual controllable aspect of a luminaire: pan, tilt, color, etc. Also known as "attribute." Part Cue Basically a "cue within a cue". A portion of a cue with a time applied that is different than the cue time. Patch The act of assigning a DMX512 channel to a control channel on a console. Pigtail Cable found at the top of a Series 300 fixture. Reply Digital data signals transmitted from each luminaire to the console. Only one luminaire may transmit at a time, in response to a request from the console. Signal Control protocol from a lighting console or interface. SixPack Chassis Case used for lamp power distribution. Each chassis can contain up to six modules - APS6 and/or C3 in any combination. Each slot in the chassis corresponds to an output port on the Smart Repeater unit. The SixPack Chassis connects to the Smart Repeater unit through an APS Cable or standard Socopex cable (if no APS6 modules are used). Show File A file containing all programmed cue data. Shutter A mechanism which controls the douser or strobe action of luminaires capable of this function. Smart Repeater The Smart Repeater unit is the hub for up to six Series 300 luminaires. The Smart Repeater unit s also an interface between the control system and the luminaires. It consolidates the three things necessary to run Series 300 luminaires into one lamp cable: Control Signal, Lamp power and Motor/Control power. 162 02.3004.0300.54 GLOSSARY B Socapex Cable Industry standard multicore cable is used to distribute lamp power to luminaires. It is often created using 19pin Socopex or Veam connectors and 12/18 cable for six 20A circuits. Splitter (Isolator) Device used to optically isolate and split a DMX512 signal. Note: A DMX "two-fer" cannot be used to divide a signal. Start To energize a luminaire arc lamp (applies to arc-lamp luminaires only). Tails In the case of Series 300 equipment, 2/0 double-insulated wire, rated at 225 amps, with 4\0 Cam-Lok connectors on one end color coded by phase, neutral and ground and bare wire on the other, or 8/5 multicore wire with a female connector (Hubbell or Epic) on one end, and bare wire on the other. Terminate/ Termination Termination refers to the dampening of DMX512 signal at the end of the transmission line. Termination is created by placing a 100 ohm resistor between pins 2 and 3 of the DMX512 line. Often, there is a switch on DMX512 devices to do this internally. If not, a terminator is provided in the form of an XLR connector with the proper resistor between pins 2 and 3 to be placed in the DMX Thru port on the device. Test Software Software resident in the Smart Repeater unit that allows for troubleshooting of a Series 300 luminaire. ThreePhase Power In order to manufacture electricity efficiently, it is created in what is known as three "phases". In other words, in its creation, the sine wave of alternating current are offset by 120°. The VARI❋LITE system runs on threephase power, as indicated by the five Cam-Lok connectors on the mod rack - Phase X, Phase Y, Phase Z, Neutral and Ground. Each phase in a 200A feed can support 200A of equipment. To adequately power the same amount of equipment on a single phase, you would need a 600A feed. Thumbwheel Switch Three digit switching device used to set the range of channels a particular Smart Repeater unit or other Series 300 hardware device looks at for control information. Also used to set the operating mode of a Smart Repeater unit. Tilt The movement of the luminaire around the axis of the tilt tube; 270° for the VL5 wash family and the VL6 and VL7 spot luminaires, and continuous in either direction for the VLM Moving Mirror. Time Control of the duration of the change of the variable parameters of VARI❋LITE automated luminaires and other devices in a lighting system. Timing Channel A Timing Channel is used in lieu of cue fade rate to determine the time it will take a luminaire to move from one setting to another. For example, a cue in which a luminaire pans from one side of stage to the other may look "steppy" if cue fade rate is used, because of the nature of the DMX512 signal. To overcome this, a timing channel causes the Smart Repeater unit and luminaire to calculate the move in time, effectively smoothing out the movement. To operate properly, the new position and timing channel levels need to be sent to the Smart Repeater in a zero count, (an instant change). VARI*LITE Color System The default color palette, available via the Color Soft Select or control keypad, which is based on a numbering system for VARI*LITE colors. Zero Position Pan and Tilt values at 50%. Also called "Home Position" or a "50/50" cue or group. 0 2. 3 0 0 4. 0 3 00 . 5 4 163 DMX512 REFERENCE GUIDE 8-Bit DMX The universally accepted lighting control protocol in the entertainment industry. A console uses this protocol to control specific devices in a lighting system. A DMX512 channel packet is eight bits of absolute parameter data. 8-bit refers to the resolution of the signal: 256 step resolution, providing channel values from 0 through 255. A DMX512 data packet is a group of 512 data channels. 16-Bit DMX To smooth out the movement of automated luminaires, the industry has adopted 16-bit DMX. This is not a change to the DMX512 specification, rather a change in the way luminaires and consoles treat DMX512 information. In practice, 16-bit DMX adds a DMX512 channel each to pan and tilt - pan coarse, pan fine, tilt coarse, tilt fine, instead of just pan and tilt. The console and luminaire combine these levels and increase the resolution of pan and tilt from 256 steps to a theoretical maximum 65,536 steps at the console level, resulting in the ability to position the luminaire more accurately. 164 02.3004.0300.54 INDEX Index A AC line disconnect 200A description 26 installation 81 30A description 27 installation 81 AC service 3-phase power source 18 current calculation 22, 23 current requirements 22, 80 delta/wye configuration 18, 19, 20 hook-up procedure 80 input voltage 19 metering 23 overview 8 phase balancing 21 requirements 18 ACS rack configuring delta/wye 20 description 29 installation 80 Mini-ACS rack 30 APS trunk cable description 48 hook-up 88 APS6 module description 38 using 85, 86, 87, 91 with Series 300 luminaires 38 B Bucking transformer description 28 installation 81 C C3 dimmer module description 37 using 86, 87 with VL5 35 Cable APS trunk 48, 88 AWG/Metric conversion 3 data 52, 53, 54 0 2. 3 0 0 4. 0 3 00 . 5 4 maximum rated current 3 pig tail 47, 80 power input 47 Series 200 data link 49 Series 200 lamp 49, 83 Series 200 super lamp run 50 Series 200 trunk 48 Series 300 lamp 51 Series 300 smart lamp plus 51 terminology 3 Cheater Repeater box description 31 installation 82 Console Channel based 9 Fixture-Library 8 patching 14 programming 15 types 8 Coupling plate S200 adjustable 62 D Data Cables overview 52, 53, 54 Delta/wye configuration 18, 19, 20 Dimmers overview 35 DMX modes DMX Power Pack 12 overview 10 Smart Repeater 10, 11 DMX Power Pack description 34 modes 12 setting DMX mode 13 DMX200 interface description 34 installation 81 DMX512 consoles 8, 9 loopback 54 modes 10 protocol 6 termination 54 165 DMX512 REFERENCE GUIDE E Error history Smart Repeater 117 Error messages Smart Repeater 117 F Floor mounting Series 300 72, 73 H Hanging hardware coupling plate 62 double hook 65 Series 200 60, 61, 62, 63, 64 Series 300 65, 68, 69, 70 single truss hook 60 third-point hook 65 VL7 69, 70, 71 Hanging installation luminaire hang procedure 82, 87 luminaire orientation and placement 57 luminaire spacing 58 reference points 57 safety cables 59, 66, 67 Series 200 45 and 135 degree hooks 63 Series 200 90 degree hook 64 Series 200 alternate 63 Series 200 coupling plate 62 Series 200 three-point 61 Series 200 two-point 61 Series 200 vertical 63 Series 300 custom 68 Series 300 standard 66, 67 Series 300 three-point 68 truss pipe 57 M Input voltage 19 Metric conversion 3 Mini AC Line Disconnect 27 Mini ACS rack configuring delta/wye 20 description 30 installation 80 Mini-Stepping 17 luminaire 17 Mirror, VLM 46 Modular rack APS6 module 38, 41, 85, 86, 87, 91 C3 dimmer module 37, 86, 87 configuring 87 configuring delta/wye 20 description 36 SixPack chassis 37 SPC-36 controller 38 L P Lamps heat 56 lamp life 56 servicing 56 Patching Channel Based consoles 15 Fixture-Library console 14 overview 14 Phase balancing 21 Pig tail cable connection 80 description 47 I 166 Lighting plot 57 Loopback connector 54 Luminaire hanging 57 mini-stepping 17 orientation 57, 79 reset 17 servicing lamps 56 spacing requirements 58 VL2C 39 VL4 39 VL5 40 VL5Arc 40 VL5B 40 VL6 41, 42 VL6B 41, 43 VL6C 41 VL6C+ 41, 44 VL7 45, 46 VL7B 45 VL7U 45 VL7UB 45 02.3004.0300.54 INDEX Pipe, truss requirements 57 round 66, 69, 70 square 66, 69, 71 Power configuring equipment for delta/wye 20 current requirements 22 delta/wye configuration 18 input voltage 19 phase balancing 21 see AC service 22 three-phase source 18 Power input cables description 47 test software 98, 99 thumbwheel address 14 Smart Repeater Plus description 32, 33 Sound baffle Series 200 74, 76, 77, 78 VL7 74, 75 Sound blanket Series 200 76, 77, 78 Spacing requirements luminaire 58 SPC-36 SixPack controller configuring 87 description 38 R T Repeater box cheater 31 description 31 installation 82 phase balancing 21 Termination connector 54 Test Software operating 99 Test software operating 98 test tables 99 Thumbwheel address 14, 82 Timing channels overview 16 Trunk cable description 48 Truss hook double hook 65 Series 200 60, 63, 64 Series 300 65 third-point hook 65 S Safety cable 59, 66, 67 Series 200 checkout 90 component overview 6 connecting to system 80 hanging hardware 60 hanging methods 61 super lamp run cable 50 system diagram 7 Series 300 checkout 91 connecting to system 84 hanging hardware 65, 68, 69, 70 lamp cable 51 smart lamp plus cable 51 Smart Repeater DMX modes 10, 11 system diagram 7 SixPack chassis configuring delta/wye 20 description 37 installation 80 phase balancing 21 Smart Repeater description 32, 33 DMX modes 10, 11 error history 117 error messages 117 installation 88 0 2. 3 0 0 4. 0 3 00 . 5 4 V Vertical hang Series 200 luminaire 63 VL2C 45/135 degree hook 63 90 degree hook 64 coupling plate 62 description 39 sound blanket 76, 77 three-point hang 61 truss hooks 60 two-point hang 61 vertical hang 63 VL4 45/135 degree hook 63 90 degree hook 64 coupling plate 62 description 39 167 DMX512 REFERENCE GUIDE sound blanket 78 truss hooks 60 two-point hang 61 vertical hang 63 VL5 description 40 dimmers 35 floor stand 72, 73 hanging hardware 65, 66 VL5Arc description 40 VL5B description 40 VL6 description 41, 42 floor stand 72, 73 hanging hardware 65, 66 standard wheel position 42 strobe values 136 VL6B description 41, 43 standard wheel position 43 strobe values 136 168 VL6C description 41 VL6C+ description 41 standard wheel position 44 VL7 description 45, 46 floor stand 72, 73 hanging hardware 69 sound baffle 74, 75 standard wheel position 46 vertical hang 70, 71 VL7B description 45 VL7U description 45 VL7UB description 45 VLM description 46 floor stand 72, 73 hanging hardware 65, 66 02.3004.0300.54