1
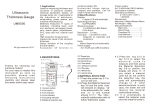
Appendix: Code table for Grains
code
grain
code
Wheat/Rye
cd01
grain
cd13
(Whole)
Wheat/Rye
Coffee
cd14
(Ground)
Paddy
Coffee Green
cd15
(Ground)
Paddy
Cocoa Beans
cd16
(Whole)
Rice
Linseed
cd17
(Milled)
Peas (Progreta)
(Ground)
Peas
(Ground)
Ground nuts Hulled
(Whole)
Grass Seed/Rye grass
cd29
(Whole)
(Whole)
Lentils
cd06
Semolina
cd18
Grass Seed/Cocksfoot
cd30
(Ground/ Whole)
Maize/Corn
cd07
cd19
cd31
Mustard Seed
cd20
(Whole)
Soya Beans
Sorghum/Milo
cd21
(Whole)
Soya Beans
Sorghum/Milo
cd22
(Ground)
Barley/Oats
Sunflower seed
cd23
(Whole)
Buckwheat
(Ground)
Brassicas/Brussels Sprout
cd35
(Whole)
(Whole)
Barley/Oats
Sugarbeet Seed
cd24
(Ground)
Clover/Red Lucerne Seed
cd34
(Ground)
cd12
(Whole)
cd33
(Whole)
cd11
Clover/White Seed
cd32
(Ground)
cd10
Flour/Soft Wheat
(Ground)
Maize/Corn
cd09
(Whole)
Oilseed Rape
(Whole)
cd08
GRAIN
MOISTURE METER
cd28
(Ground)
cd05
(Whole)
cd27
(Whole)
cd04
Flax
cd26
(Ground)
cd03
grain
cd25
(Whole)
cd02
code
Coffee
(whole/ground)
Beans/Tic/Winter
cd36
(Whole)
(Ground)
7
Just depress the /HOLD key till the symbol
`max` appears on the display. To display the
instant values, just depress the /HOLD key
again till the symbol `max` disappears on the
display.
4.6 Zero calibration
The zero feature enable the user to compensate
for the effect of changes in both temperature and
humidity. When the probe does not touch
anything besides air, the reading on the display
should be `0` or `0.0` . If not, please depress
and release the zero key to carry out zero
calibration.
5. ALARM LIMITS
5.1 There is a coded coloured LED indicating the
status of moisture. It is controlled by 2 alarm
limits. The factory settings are as follow.
AL1 =13 and AL2 =18
If the reading<AL1, the green LED is on.
If the reading>AL2, the red LED is on.
If the reading lies between AL1 and AL2, the
yellow LED is on.
Users can change the alarm limits when as per
their intention.
5.2 How to set the alarm limits
5.2.1 Depress Power key and not release it till 'AL1'
'AL2 ' appears on the Display. It is about 7 or 9
seconds from starting depressing Power key.
5.2.2 Such value can be changed to your intended
5
Green LED represents a safe, air-dry state.
Yellow LED represents a borderline State.
Red LED represents a damp state.
Range: average 6-30%
Accuracy: ± 0. 5%n or ±0.5%
Whichever is the greater
PC interface: RS232C interface
( Cable and software is not included)
Power supply: 4x1.5 AA A size
(UM-4) battery
Power off : 2 modes
Manual off at any time
Auto power off after 5 minutes from last
key operation
Operating conditions:
Temperature : 0-50
Humidity : below 90% RH
Dimensions:
Unit 165x62x26mm or
6.5x2.4x1.0 inch
Probe 368x44x25 mm or
14.5x1.7x1.0 inch
Weight: 320g
(not including batteries but
including the probe)
Standard accessories included :
Carrying case
1 pc.
Operation manual
1 pc.
Pro be .............................................1 pc.
Optional accessory
Cable and software for RS232C
2
1. FEATURES
Be a powerful and versatile instrument for
measuring and diagnosing dampness in
grains. Widely used for fast and accurate
measurement of moisture and temperature
in the process of allotment, acquisition,
storage, machining of packed grains.
Digital display gives exact reading with
no guessing or errors while a colour coded
light (LED) indicates the moisture
condition of the material. This combined
presentation of moisture measurement
helps the user to map the extent of
problems and monitor changes in
condition precisely and reliably.
Used the exclusive Micro-computer LSI
circuit and crystal time base to offer high
accuracy measurement. It can obtain
automatically the temperature corrected
moisture value.
Wide measuring range and high resolution.
Automatic power off to conserve power.
Can communicate with PC computer for
statistics and printing by the optional
cable and software for RS232C interface.
2 SPECIFICATIONS
Display 4 digits, 10 mm LCD
With colour coded LEDs indication
1
3. FRONT PANEL DESCRIPTIONS
3-1
3-3
3-2
3-4
3-6
3-7
3-9
3-10
3-11 3-8 3-5
3-1 Probe
3-2 Probe plug
3-3 Probe jack
3-4 Display
3-5 RS232C interface
3-6 Color coded LED
3-7 Plus/Hold key
3-8 Minus/Zero key
3-9 Function key
3-10 Power key
3-11 Battery compartment/ Cover
3
value by depressing the plus key or minus key.
If the second limit AL2 is less than the first limit
AL1, the setting is invalid and the factory
settings for AL1 and AL2 are restored to AL1=13
and AL2=18 automatically.
6. CONSIDERATIONS
6.1 This instrument is of very high input resistance.
Every part has good insulation. Please keep it
in a dry, dustproof place.
6.2 It is very, very difficult to accurately measure
the moisture content of grains. This is because
any grain is of organic body. The same kind of
grain in different regions or states, even in the
same region or state but in different soils has
different characteristics. That is why we first
measure the moisture content of grain by the
standard method of oven, the most accurate but
less efficient method to measure the moisture
content, then measure the moisture content
using such instruments. By calculating the bias,
we could amend the measurement value. In this
case, the measurement are more accurate and
more efficient.
7. BATTERY REPLACEMENT
When the battery symbol appears on the display, it
is time to replace the battery. Remove the
batteries and install new ones paying careful
attention to polarity..
6
4. MEASURING PROCEDURE
4.1 Depress the power key and release to power on
the meter.
4.2 To check if the grain code is right by pressing
and releasing the Function key. Such code can
be changed by the Plus/Hold key or Minus/Zero
key when the `cdxx` is on the display. Here
`cd` is the abbreviation for `code` and `xx` is
the grain code no. If keep depressing the
Plus/Hold or Minus/Zero key, the material
code will step into next code about every
second and releasing it till the grain code is
right.
4.3 Grain code selection
The grain codes are listed in the table on page 7.
if the grain to be measured is not listed in the
table, please ascertain its grain code among
`cd01` and `cd36` by the standard oven-drying
method, that is by oven-drying of commercial
samples of the grain to be measured. Write
down the code for later use.
4.4 Insert the plug (3-2) of the measurer into the
probe jack (3-3).
4.5 Insert the needles into the grain to be measured.
The reading on the display is the moisture
content. Read the moisture level value from
the display and note the moisture condition of
the material from the colour coded LED. Please
note that reading will change if needles stay in
grain longer.
4.5 To hold the max. value during measurements,
4


![[APPLICATION FUNCT.] (FUn-) menu](http://vs1.manualzilla.com/store/data/005824711_1-335fb64f289c00db4078a7c61d67b3e9-150x150.png)