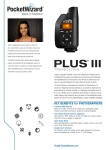
1
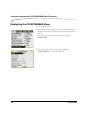
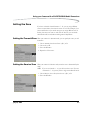
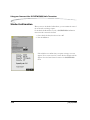
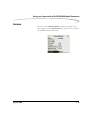
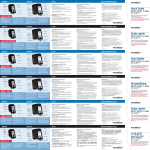
Using your KODAK PROFESSIONAL
DCS Pro SLR/n, Pro 14n, or Pro 14nx
Digital Camera with a
POCKETWIZARD Radio Transceiver
User’s Guide
P/N 4J1576
Eastman Kodak Company
343 State Street
Rochester, New York, 14650
© Eastman Kodak Company, 2004
Kodak and Kodak Professional are trademarks of Eastman Kodak Company.
Table of Contents
1 Using your Camera with a POCKETWIZARD Radio Transceiver
Overview ......................................................................................................................................................... 1-1
Initial Setup..................................................................................................................................................... 1-2
Navigating the Menus....................................................................................................................................... 1-3
Displaying the POCKETWIZARD Menu ............................................................................................................. 1-4
Choosing the POCKETWIZARD Mode ............................................................................................................... 1-5
Transmit Mode ......................................................................................................................................... 1-5
Receive Mode ........................................................................................................................................... 1-5
Relay Mode............................................................................................................................................... 1-5
Setting the Channel.......................................................................................................................................... 1-6
Setting the Zone............................................................................................................................................... 1-7
Setting the Transmit Zone ......................................................................................................................... 1-7
Setting the Receive Zone ........................................................................................................................... 1-7
Test Flash ........................................................................................................................................................ 1-8
Test Radio ....................................................................................................................................................... 1-9
Strobe Confirmation ...................................................................................................................................... 1-10
SpeedCycler Mode......................................................................................................................................... 1-11
Teach Channel............................................................................................................................................... 1-12
Version.......................................................................................................................................................... 1-13
2 POCKETWIZARD Radio Transceiver Specifications
3 FCC and IC Compliance Information
July 12, 2004
1
1
Using your Camera with a
POCKETWIZARD Radio
Transceiver
Overview
The POCKETWIZARD Radio Transceiver is a digital wireless triggering
system.
The POCKETWIZARD Radio Transceiver installed in your KODAK
PROFESSIONAL DCS Pro SLR/n, DCS Pro 14n, or DCS Pro 14nx Digital
Camera is a fully integrated camera component. You can operate the
POCKETWIZARD Radio Transceiver with camera controls and camera menu
displays.
The POCKETWIZARD Radio Transceiver is fully compatible with all other
POCKETWIZARD products including the POCKETWIZARD Classic, the
POCKETWIZARD Plus, the POCKETWIZARD MAX, and the POCKETWIZARD
MultiMAX.
The POCKETWIZARD Radio Transceiver operates with other professional
photography equipment with POCKETWIZARD Inside such as PROFOTO,
DYNA-LITE, and PHOTO CONTROL flash systems, SEKONIC Light Meters,
and the NIKON D1 series of digital cameras.
Refer to the user manual included with any of your remote POCKETWIZARD
devices for additional information.
July 12, 2004
1-1
Using your Camera with a POCKETWIZARD Radio Transceiver
Initial Setup
To use the POCKETWIZARD feature you must prepare the cameras and flash
units that you will be using. All devices must be equipped with or connected
to a POCKETWIZARD Radio Transceiver.
1. Screw the POCKETWIZARD antenna into the PC Sync terminal of any
cameras (with a POCKETWIZARD Radio Transceiver) in your setup.
CAUTION:
Do not screw the POCKETWIZARD antenna too tightly. Doing
so can damage the antenna.
2. Set the appropriate POCKETWIZARD mode in each transmitting and
receiving device (see page 1-5).
3. Set the channel and zones in the transmitting and receiving devices. If
a receiving device has no user interface, use the Teach Channel feature
on the camera to "teach" it the appropriate values (see page 1-12).
If you don’t connect the antenna to your camera (or if the antenna is
damaged), the following screen appears when you capture an image
in POCKETWIZARD mode.
1-2
July 12, 2004
Using your Camera with a POCKETWIZARD Radio Transceiver
Navigating the Menus
For more information on using menus, see the User’s Manual included with
your camera.
OK button
Menu button
Image LCD
Cancel button
Four-way switch
Menu button—Press to display menus on the Image LCD.
Image LCD—Use tabbed menus to access digital functions.
OK button—Press to confirm a selection.
Cancel button—Press to exit a menu without accepting a change.
Four-way switch—Press the left or right side to navigate between tabbed
menus or to enable or disable a cascaded menu. Press the top or bottom to
navigate among menu options.
July 12, 2004
1-3
Using your Camera with a POCKETWIZARD Radio Transceiver
Displaying the POCKETWIZARD Menu
1. Press the Menu button.
2. If the Capture tab does not appear, press and hold the Menu button
and press the left side of the Four-way switch until the Capture tab is
selected.
3. Press the top or bottom of the Four-way switch to highlight
POCKETWIZARD.
4. Press the right side of the Four-way switch to display the
POCKETWIZARD menu (or press the OK button).
1-4
July 12, 2004
Using your Camera with a POCKETWIZARD Radio Transceiver
Choosing the POCKETWIZARD Mode
• Choose Mode, then choose Off, Transmit, Receive, or Relay. (Selecting
Off turns off the POCKETWIZARD Radio Transceiver and all associated
functionality.)
Transmit Mode
When you press the Shutter Release while in Transmit mode, any remote
flash units or cameras set in Receive mode (and on the same channel and
zone as your camera) will trigger as your camera captures an image.
Receive Mode
When another POCKETWIZARD device (a camera or a POCKETWIZARD
MultiMax) is triggered, your camera receives a signal and captures an
image. (Your camera must be on the same channel and zone as the
POCKETWIZARD triggering device.)
Relay Mode
When another POCKETWIZARD device (a camera or a POCKETWIZARD
MultiMAX) is triggered, your camera receives a signal, captures an image,
and switches to Transmit mode. It then relays the trigger signal to other
cameras and associated flash units.
NOTE: In Relay mode, use one channel (see page 1-6) for the cameras
and a different channel for the flashes.
July 12, 2004
1-5
Using your Camera with a POCKETWIZARD Radio Transceiver
Setting the Channel
You must set the channel in your transmitting and receiving devices.
NOTE: Devices on the same channel work together.
You can set channels 1 - 32. Channels 17 - 32 let you set zones
(see page 1-7) and receive flash / triggering confirmation (see page 1-8).
NOTE: Flashes with POCKETWIZARD Inside do not have a user interface.
You have to set their channels using the Teach Channel function
(see page 1-12).
1. Choose Transmit or Receive, then choose Channel.
2. Press the right side of the Four-way switch to display two boxes where
you can select the channel.
3. Press the right or left side of the Four-way switch to highlight the ten’s
or the one’s position. Press the top or bottom of the Four-way switch to
increase or decrease the value.
4. Press the OK button.
1-6
July 12, 2004
Using your Camera with a POCKETWIZARD Radio Transceiver
Setting the Zone
If you have selected a channel between 17 - 32, you can assign different
zones to remote devices, then turn the zones on or off. For example, if you
have several flashes in your studio setup you can assign different zones to
flashes, then turn some zones on and some off. This way you can decide
which flashes will be used without making manual adjustments.
Setting the Transmit Zone When your camera is in Transmit mode, you can specify the zones you will
transmit to.
1.
2.
3.
4.
Choose Transmit, then choose Zone A, B, C, or D.
Choose On or Off.
Press the OK button.
Repeat for all four zones.
Setting the Receive Zone When your camera is in Receive mode, enter the zone as determined by the
setup.
NOTE: If you are on channels 1 - 16, you will not select a zone. If you are
on channels 17 - 32, you may select a single zone in Receive mode.
1. Choose Receive, choose Zone, then choose A, B, C, or D.
2. Press the OK button.
July 12, 2004
1-7
Using your Camera with a POCKETWIZARD Radio Transceiver
Test Flash
You can perform a test flash to determine that your setup is correct. If the
Strobe Confirm feature is turned on (see page 1-10), flash status (indicated
by the lightening bolt symbol) appears on the Test Flash screen. If Strobe
Confirm is turned off, only radio status appears.
1. Choose Test Flash from the POCKETWIZARD menu.
2. Press the OK button.
Any remote devices set in Receive mode perform a test flash. A screen
displays the results of the test flash.
The screen at the left is an example of results when SpeedCycler Mode
is off (see page 1-11):
Zone A—has both radio and flash confirmation. To detect an actual
burst of light from a flash, a POCKETWIZARD Flash Confirmation Cable
must be connected to the flash. Confirmation of this burst of light is
indicated by a lightening bolt symbol.
Zone B—has radio confirmation but no flash confirmation.
Zone C—failed because the zone is turned on but no radio was
found.
Zone D—is turned off.
The screen at the left is an example of results when SpeedCycler Mode
is on (see page 1-11):
Zone A and Zone B—were skipped for this shot.
Zone C—this flash has just triggered.
Zone D—is turned off.
The next flash to trigger would be Zone A. The arrow indicates the
zone triggered on this capture. The arrow rotates through all active
zones, one step per capture.
3. Make any necessary corrections to the setup and press the OK button
to test the system again.
When the setup is working properly, press the Cancel button to return
to the POCKETWIZARD menu.
1-8
July 12, 2004
Using your Camera with a POCKETWIZARD Radio Transceiver
Test Radio
The Test Radio feature is useful when you want to test your setup, but don’t
want to trigger a flash. You should always test your setup before using it.
1. Choose Test Radio from the POCKETWIZARD menu.
2. Press the OK button.
3. Make necessary adjustments (turn on devices, set channels and zones,
etc.) and press the OK button. Repeat until the setup is correct.
4. Press the Cancel button to return to the POCKETWIZARD menu.
July 12, 2004
1-9
Using your Camera with a POCKETWIZARD Radio Transceiver
Strobe Confirmation
When you turn on the Strobe Confirm feature, you can examine the status of
the strobes after each image capture.
For the Strobe Confirm feature to work, a POCKETWIZARD Confirmation
Sensor must be connected to the flash.
1. Choose Strobe Confirm, then choose On or Off.
2. Press the OK button.
If all enabled zones confirm when you capture an image, no screen
appears. If one or more zones fail, a screen like the example at the left
appears. Press the Cancel button to return to the POCKETWIZARD
menu.
1-10
July 12, 2004
Using your Camera with a POCKETWIZARD Radio Transceiver
SpeedCycler Mode
When your camera is in SpeedCycler mode, flashes in enabled zones are
triggered sequentially. All flashes in the same channel and zone go off at the
same time. For example, all flashes in Zone A are triggered with the first
capture, all flashes in Zone B in the next, etc. This allows multiple flash
units to cycle faster than a single flash can refresh.
• Choose SpeedCycler, then choose On or Off.
July 12, 2004
1-11
Using your Camera with a POCKETWIZARD Radio Transceiver
Teach Channel
To prepare devices in your setup, you must assign the appropriate channel
and zones. If devices have a user interface, you can assign the appropriate
values using that interface. Some devices (flashes) have no user interface.
Use your camera’s Teach Channel feature to assign channel and zones to
these devices.
To assign values to the remote device, it must be in Learn mode, which in
most cases is the first 7 or 30 seconds (depending upon the device
manufacturer's configuration) after you turn the remote device on. The
camera must be in Teach mode, which is activated when you select the
Teach Channel feature.
Flashes can learn more than one zone. For example, if zones A and B were
selected at the time of teaching, the flash will trigger if either zone A or B is
enabled on the transmit device. If you only want the flash to trigger in one
zone, just teach it one.
Teach each remote device separately so it will learn the appropriate channel
and zone.
1. Set up the appropriate channel (see page 1-6) and zone (see
page 1-7) on your camera.
2. Choose Teach Channel.
3. Turn on the remote device.
4. Press the OK button on your camera.
IMPORTANT: Don’t wait to press the OK button or the device will no
longer be in Learn mode.
A screen appears while the teaching is occurring.
Once the remote device has been taught, you can test the
POCKETWIZARD Radio Transceiver connection using the Test Radio
option (see page 1-9).
1-12
July 12, 2004
Using your Camera with a POCKETWIZARD Radio Transceiver
Version
The version of the POCKETWIZARD Radio Transceiver software in your
camera appears on the POCKETWIZARD menu. (The version on your menu
may be different than that shown here.)
July 12, 2004
1-13
2
POCKETWIZARD Radio
Transceiver Specifications
Modes of Operation—Off, Transmit, Receive, and Relay
Radio Channels—32 channels (344 - 354 MHz)
Line of Sight Range—1,000 ft (304.8 m) in open field
Transmit Power—1 dBm typical
Receiver Sensitivity—93 dBm for 12 dB S/N ratio (minimum)
Batteries—Uses the camera's rechargeable battery
Shutter Sync Limits—Camera limited at 1/125th
Sync Time—0.5 ms when pop-up flash is down. 1.5 ms when pop-up flash
is up.
Antenna—Rubber-covered flexible coiled spring, 3 in. (7.62 cm) in
length. The flexible antenna attaches to the front PC Sync Terminal of the
camera body
July 12, 2004
2-1
3
FCC and IC Compliance
Information
WARNING: Changes or modifications to this unit not expressly approved by
the party responsible for compliance could void the user's authority to
operate this equipment.
NOTE: This equipment has been tested and found to comply with the limits
for a Class B digital device, pursuant to Part 15 of the FCC Rules. These
limits are designed to provide reasonable protection against harmful
interference in a residential installation. This equipment generates, uses
and can radiate radio frequency energy and, if not installed and used in
accordance with the instructions, may cause harmful interference to radio
communications.
However, there is no guarantee that interference will not occur in a
particular installation. If this equipment does cause harmful interference to
radio or television reception, which can be determined by turning the
equipment off and on, the user is encouraged to try to correct the
interference by one or more of the following measures:
• Reorient or relocate the receiving antenna.
• Increase the separation between the equipment and receiver.
• Consult the dealer or an experienced radio/TV technician for help.
This device complies with Part 15 of the FCC rules and also with RSS-210 of
Industry Canada. Operation is subject to the following two conditions:
(1) this device may not cause harmful interference, and (2) this device
must accept any interference received, including interference that may
cause undesired operation.
FCC ID Number KDS- PW-KTR1
July 12, 2004
3-1
P/N 4J1576
Eastman Kodak Company
343 State Street
Rochester, NY 14653
© Eastman Kodak Company, 2004