1
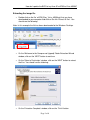
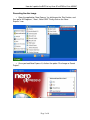
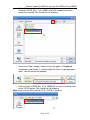
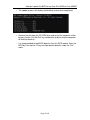
How do I update the BIOS of my Area-51 m9750 to Vista v0B08?
How do I update the BIOS of my Area-51 m9750 to Vista v0B08?
Table of Contents
Extracting the image file..................................................................2
Recording the disc image.................................................................3
Running the BIOS update.................................................................5
Page 1 of 6
How do I update the BIOS of my Area-51 m9750 to Vista v0B08?
Extracting the image file
•
Double click on the file ‘m9750_Bios_Vista_v0B08.zip’ that you have
downloaded to your computer and click on the link ‘Extract all files’. You
should see the following:
Note: In this example the file has been downloaded to the Windows Desktop.
•
On the ‘Welcome to the Compressed (zipped) Folder Extraction Wizard
window, click on the ‘NEXT’ button to continue.
•
On the ‘Select a Destination’ window, click on the ‘NEXT’ button to extract
the files. You should see the following:
•
On the ‘Extraction Complete’ window, click on the ‘Finish’ button.
Page 2 of 6
How do I update the BIOS of my Area-51 m9750 to Vista v0B08?
Recording the disc image
• Open the application ‘Nero Express’, by clicking on the ‘Start’ button, and
then go to ‘All Programs’, ‘Nero’, ‘Nero OEM’. Finally click on the ‘Nero
Express’ icon.
• Once you load Nero Express 6, click on the option ‘Disc Image or Saved
Project’.
Page 3 of 6
•
•
How do I update the BIOS of my Area-51 m9750 to Vista v0B08?
On the ‘Open’ window, click on the ‘Look in’ drop down button and select
the folder “m9750_Bios_Vista_v0B08’’ where the image file has been
previously extracted. You should see the following:
In the same ‘Open’ window, make sure that the option ‘All Supported
Compilations and Images’ is selected under the ‘Files of type’ drop down
menu. You should see the following:
Click on the file ‘m9750_Bios_Vista_v0B08.ISO’ to select it and then click
on the ‘OPEN’ button. You should see the following:
Note: make sure you have a blank CD-R / CD-RW in the drive.
•
Page 4 of 6
How do I update the BIOS of my Area-51 m9750 to Vista v0B08?
•
On the ‘Image recording – Write a premastered image’ window, click on
the ‘NEXT’ button to continue.
• Once Nero Express has finished recording the image file onto the CD, you
should see the following. Click on ‘OK’ to finish the burning process.
•
•
On the ‘Burning Process – Burn process finished successfully’ window,
click on the ‘NEXT’ button to continue.
Back on the Nero Express main screen, click on the ‘Exit’ button to
terminate the application.
Running the BIOS update
•
Before you run the BIOS update.
Make sure that your computer has the battery and the ACAdapter
o
connected.
o
Disconnect any third party peripherals connected to the computer.
Do NOT turn the computer off during the BIOS update.
o
o
Do NOT restart the computer during the BIOS update.
o
Do NOT eject the CD-ROM from the drive during the BIOS update.
•
Boot the computer up with the disc in the CD-ROM drive.
Note: you may need to change the boot sequence in the computer BIOS
in order to boot from the CD-ROM drive. Refer to the Boot Setup section
under Chapter 2, Page 7 of the User's Manual for more information.
• Once the computer boots up, read the message on the screen before you
continue.
•
At the ‘A:\>’ prompt, type ‘runme’ and hit the ‘ENTER’ key.
Page 5 of 6
How do I update the BIOS of my Area-51 m9750 to Vista v0B08?
•
The update process will display the following screen when completed.
•
Remove the disc from the CD-ROM drive and restart the computer, either
by pressing the ‘Ctrl+Alt+Del’ key combination or by turning the computer
off and then back on.
•
It is recommended to load BIOS defaults after this BIOS update. Enter the
BIOS by Pressing the F2 key and load optimal defaults under the “Exit”
menu.
Page 6 of 6