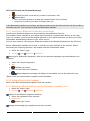
1
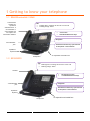
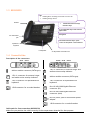
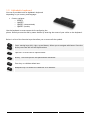
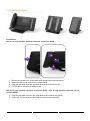
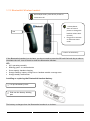
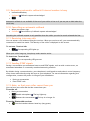
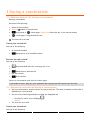
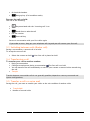
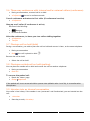
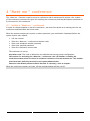
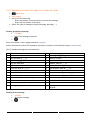
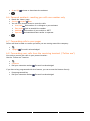
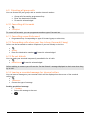
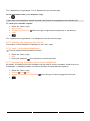
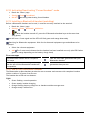
User manual 8028/8029/8038/8039/8068 e-diatonis CE/S/M/L R100 2 Recommendations on the management of password (or personal code) of your phone When connected to an external public network your e-diatonis IPBX can be subject to malicious attacks. A simple way of protecting against attack is to change your passwords regularly as you do for your PCs. Here are a few tips on choosing your password, called "personal code" (6 digits on your phone) : Do not use a too easy password (ex. 123456, 302010 ...) Take a different password for each application Your password is personal and should remain confidential, not disclose it to anyone else Never write down your password. The first thing an attacker will do is rummage through your belongings – check your diary, look under your monitor and keyboard, sift through your garbage, etc. Your phone is now correctly secure and the fraud risks are minimized. 8AL90894ZUAAed02 - 1416 3 Introduction Thank you for choosing an Orange Business Services phone. This model offers enhanced ergonomical features for more effective communication. This document describes the services offered by the following sets: 8068 8039 8038 8029 8028 The label and icons displayed on the phone depends on the type of the set. Some features are depended on the type of the set. 8068 BT 8068 8039 8038 8029 8028 IP Phone Digital Phone Colorscreen Monochrome screen Bluetooth® handset Bluetooth® Headset Two-port Gigabit Ethernet switch with Power Over Ethernet support Add-on 10/40 keys-8000 modules Audio services (hands-free, handset and headset) LCD 14 keys-8000 moduletouches-8000 Adjusting the contrast of the display Agent set / Supervisor station The labels and icons presented in this document are not contractually binding and may be modified without prior warning. 4 1 GETTING TO KNOW YOUR TELEPHONE 1.1 1.2 1.3 1.4 1.5 1.6 1.7 1.8 1.9 1.10 1.11 1.12 8 8068 BLUETOOTH® / 8068 8038/8039 8028/8029 CONNECTIVITIES WELCOMESCREENS NAVIGATION STATUSICONS / CALL ICONS PERMANENT FEATURES KEYS ALPHABETIC KEYBOARD ADD-ON MODULE CALL MANAGEMENT SCREEN BLUETOOTH® WIRELESS HANDSET 8 8 9 9 10 11 11 12 13 14 15 16 2 USINGYOURTELEPHONE 17 2.1 2.2 2.3 2.4 2.5 2.6 2.7 2.8 2.9 2.10 2.11 2.12 2.13 17 17 18 18 18 19 19 19 20 20 20 20 20 MAKING A CALL RECEIVING A CALL USING THE TELEPHONE IN “HANDS FREE“ MODE ACTIVATING THE LOUDSPEAKER DURING A CONVERSATION (RECEIVER LIFTED) -LOUDSPEAKER. CALLING YOUR CALLER BY NAME (COMPANY DIRECTORY) MAKE CALLS VIA YOUR PROGRAMMED CALL KEYS FILTERING CALLS USING THE VOICE MAILBOX REDIALING REQUESTING AUTOMATIC CALLBACK IF INTERNAL NUMBER IS BUSY CANCELLING AN AUTOMATIC CALLBACK RECEIVING INTERCOM CALLS SENDING DTMF SIGNALS MUTE, SO THAT YOUR CALLER CANNOT HEAR YOU 3 DURING A CONVERSATION 21 3.1 3.2 3.3 3.4 3.5 3.6 3.7 3.8 3.9 3.10 3.11 21 21 22 22 22 23 23 23 23 24 24 MAKING A SECOND CALL DURING A CONVERSATION ANSWERING A SECOND CALL DURING A CONVERSATION SWITCHING BETWEEN CALLS (BROKER CALL) TRANSFERRING A CALL TRANSFER A CALL TO A VOICE MAIL THREE-WAY CONFERENCE WITH INTERNAL AND/OR EXTERNAL CALLERS (CONFERENCE) PLACING A CALL ON HOLD (HOLD) PLACING AN OUTSIDE CALL ON HOLD (PARKING) INTRUSION INTO AN INTERNAL CONVERSATION STORE A NUMBER ADJUST AUDIO VOLUME 5 4 “MEET ME “ CONFERENCE 25 4.1 INITIATE A “MEET ME “ CONFERENCE 4.2 JOIN A “MEET ME “ CONFERENCE 25 26 5 SHARING 27 5.1 5.2 5.3 5.4 5.5 5.6 5.7 5.8 5.9 5.10 5.11 5.12 5.13 27 27 27 27 27 28 28 28 28 29 30 30 30 RECEIVINGSUPERVISED CALL RINGING ANSWERING THE GENERALBELL MANAGER/ASSISTANT FILTERING CALL PICK-UP OUTSIDE CALLS TO THE OPERATOR WILL RING ON YOUR TELEPHONE AND YOU CAN ANSWER THE CALL: HUNTING GROUPS CALLING AN INTERNAL CALLER ON HIS/HER PAGER ANSWERING A CALL ON YOUR PAGER CALLING A CALLER ON HIS/HER LOUDSPEAKER SENDING A WRITTEN MESSAGE TO AN INTERNAL CALLER SEND A VOICE MESSAGE COPY SENDING A RECORDED MESSAGE TO A NUMBER A DISTRIBUTION LIST BROADCASTING A MESSAGE ON THE LOUDSPEAKERS OF A STATION GROUP 6 KEEP IN TOUCH 31 6.1 6.2 6.3 6.4 6.5 6.6 6.7 6.8 6.9 6.10 6.11 6.12 6.13 6.14 6.15 6.16 31 31 31 31 31 32 32 32 33 33 33 33 33 33 34 35 SELECTING CALLS TO BEFORWARDED FORWARDING CALLS TO ANOTHER NUMBER (IMMEDIATE FORWARD) FORWARDING YOUR CALLS TO YOUR VOICE MESSAGE SERVICE WHEN YOU RETURN, CONSULT RECORDED MESSAGES ACTIVATEDISABLE THE PERSONAL ASSISTANT PERSONAL ASSISTANT: REACHING YOU WITH ONE NUMBER ONLY FORWARDING CALLS TO YOUR PAGER FORWARDING YOUR CALLS FROM THE RECEIVING TERMINAL (“FOLLOW ME“) DIVERTING ALL GROUP CALLS CANCELLING ALL FORWARDS CANCELLING A SPECIFICFORWARD FORWARDING CALLS WHEN YOUR LINE IS BUSY (FORWARD IF BUSY) DO NOT DISTURB LEAVING A RECORDED MESSAGE FOR INTERNAL CALLERS CONSULTING WRITTEN MESSAGES MESSAGE NOTIFICATION 7 MANAGINGYOUR CHARGES 36 7.1 CHARGING YOUR CALLS DIRECTLY TO BUSINESS ACCOUNTS 7.2 FINDING OUT THE COST OF AN OUTSIDE CALL MADE FOR AN INTERNAL USER FROM YOUR TERMINAL 36 36 6 8 PROGRAMMINGYOURTELEPHONE 37 8.1 8.2 8.3 8.4 8.5 8.6 8.7 8.8 8.9 8.10 8.11 8.12 8.13 8.14 8.15 8.16 8.17 8.18 8.19 8.20 8.21 8.22 8.23 8.24 37 37 37 38 39 39 39 39 39 39 40 40 40 40 41 41 41 42 42 42 43 43 43 44 INITIALIZINGYOURVOICEMAILBOX CUSTOMIZINGYOURVOICEGREETING MODIFYINGYOURPERSONAL CODE ADJUSTING THE AUDIO FUNCTIONS ADJUSTING THE CONTRAST OF THE DISPLAY (8028/8029/8038/8039) SELECTING THE WELCOME PAGE SELECTINGLANGUAGE PROGRAMMING DIRECT CALL KEYS (PERSO PAGE) DELETING DIRECT CALL KEYS (PERSO PAGE) PROGRAMMING DIRECT CALL KEYS (F1 AND F2 KEYS) DELETING DIRECT CALL KEYS (F1 AND F2 KEYS) PROGRAMMING DIRECT CALL KEYS (8028/8029) DELETING DIRECT CALL KEYS (8028/8029) PROGRAMMING AN APPOINTMENTREMINDER IDENTIFY THE TERMINAL YOU ARE ON LOCK / UNLOCKYOURTELEPHONE CONFIGURING THE AUDIO JACK OF YOUR TELEPHONE ACTIVATING/DEACTIVATING “FORCED HEADSET“ MODE INSTALLING A BLUETOOTH® HANDSET (MATCHING) USE OF THE BLUETOOTH® HANDSET INSTALLING A BLUETOOTH® HEADSET (MATCHING) USING A BLUETOOTH® HEADSET DELETING A BLUETOOTH® ACCESSORY (HEADSET, HANDSET, ETC.) CONTACTING YOUR ADMINISTRATOR 9 ACD: AGENT SET / SUPERVISOR STATION 45 9.1 9.2 9.3 9.4 9.5 9.6 9.7 9.8 9.9 9.10 45 45 45 46 46 46 46 46 47 47 AGENT SET OPEN AN AGENT SESSION (LOGIN) – AGENT SET ACD APPLICATION WELCOME SCREEN – AGENT SET THE FOUR OPERATING STATUSES OF THE AGENT SET CHANGING THE OPERATING STATUS OF THE SET – AGENT SET MODIFYING YOUR PERSONAL CODE – AGENT SET INTEGRATING ANOTHER GROUP/LEAVING A GROUP– AGENT SET CLOSE THE AGENT SESSION (LOGOUT) – AGENT SET SUPERVISOR STATION SUPERVISING GROUP MAILBOXES – SUPERVISOR STATION 10 GUARANTEE AND CLAUSES 48 10.1 SAFETY INSTRUCTIONS 10.2 "EC" DECLARATION OF COMPLIANCE 48 49 7 1 Getting to know your telephone 1.1 8068 Bluetooth® / 8068 A Bluetooth® handset for optimized communication. A wired handset is also available and can replace the Bluetooth® handset LED Flashing blue: incoming call Arrival of a new call Flashing orange: alarm Colorscreen 10 dedicatedfunctions keys Navigation 3.5 mmheadset jack Permanent feature keys: quick access to the phone’s main features Alphabetic keyboard An adjustable and stable foot Loudspeaker 1.2 8038/8039 LED Flashing blue: incoming call Arrival of a new call Flashing orange: alarm Handset Monochrome screen 10 dedicatedfunctions keys Navigation 3.5 mmheadset jack Permanent feature keys: quick access to the phone’s main features Alphabetic keyboard An adjustable and stable foot Loudspeaker 8 1.3 8028/8029 LED Flashing blue: incoming call Arrival of a new call Flashing orange: alarm Handset Monochrome screen 6 dedicated functions keys functions keys 4 programmable keys with Led and paper label Navigation 3.5 mmheadset jack Permanent feature keys: quick access to the phone’s main features Alphabetic keyboard Loudspeaker An adjustable and stable foot 1.4 Connectivities Description of the connectors 8029 / 8039 8068 / 8038 / 8028 Add-on module connector (SATA type). 1 RJ 11 connector for external ringer and audio active envelop indicator 1 RJ 11 connector for external ringer and audio active envelop indicator Add-on module connector (SATA type). 1 RJ 9 connector for alphanumerical keyboard 1 RJ 9 connector for alphanumerical keyboard 1 RJ9 connector for a corded handset One 10/100/1000 Gigabit Ethernet connector (PC) One 10/100/1000 Gigabit Ethernet connector (LAN) One DC power jack for an external power adaptor 1 RJ9 connector for a corded handset Cable path for line connection (8029/8039) Make sure you position the cable correctly in the compartment intended for that purpose: 9 1 2 4 5 3 1.5 Welcomescreens You can access all of your phone's features from these screens. The default display has three pages that you can access by pressing the page tabs at the top of the screen. The selected page is highlighted. o o o Menu Perso Info 8068 8038/8039 8028/8029 Menu page: Contains all features and applications accessible by pressing the label of the desired feature or application From this page, it is possible to adjust the ringer volume, program the time of an appointment, lock the terminal, define the default page displayed, configure voice mail, and access telephone functions such as calling back one of the last numbers or intercepting calls. Perso page: Contains call line keys (allowing supervision of calls) and programmable call keys. Info page: Contains information on the telephone and the status of its functions: name, telephone number, number of messages, activation of transfer function, appointment reminder, etc. / Transfer icon: Pressing the key next to this icon allows you to program or change the transfer function 10 1.6 Navigation OK key: Used to validate your choices and options while programming or configuring Left-right navigator: Used to move from one page to another and display information about current calls (call in progress, calls on hold, incoming call). Up-down navigator: Used to scroll through the content of a page Back/Exit key Use this key to go back to the previous step Use this key to go back to the homepage (long press) 1.7 Statusicons / Call icons Icons giving information about some specific configurations of the phone or about call status are displayed in the top bar of the screen. Headset connected Telephone locked Appointment programmed Incoming call icon Call in progress icon Call holding icon 11 1.8 Permanent features keys They are located just above the loudspeaker Mute and intercom key. During a call, press this key to stop your contact from hearing you. When idle, press this key to switch the phone to intercom mode. When you receive a call, the phone hooks off automatically and you go straight into handsfree mode. When activated, this is key blue Turn down the volume Lower the contrast Turn up the volume Increase the contrast Pressing this key answers an incoming call in handsfree mode (the key is blue). When a call is in progress, pressing this key switches from handsfree mode to headset or handset mode. Programmable keys (F1 and F2 keys).Lit when the function associated with the key is activated. A service or a direct call can be associated to these keys. Redial key: to access the 'Redial' feature. Last number redial (short press) Call back on the last 10 number dialed (long press) Guide key: Used to obtain information on functions of the “menu“ page and to program key of the “perso“ page Messaging key to access various mail services This key is lit when you have received a new voicemail, text message or callback request. 12 1.9 Alphabetic keyboard Your set is provided with an alphabetic keyboard depending on you country and language: Country variants: o AZERTY o QWERTZ o QWERTY (international) o QWERTY (nordic) Use the keyboard to enter names while configuring the phone. Directly access the dial by name feature by entering the name of your caller on the keyboard. Below is a list of the function keys that allow you to access all the symbols Cursor moving keys (left, right, up and down). Allows you to navigate edit boxes. Press the Alt key to access the left and up directions Caps lock: to write text in capital letters. Alt key. To access specific and punctuation characters. Enter key: to validate edited text. Backspace key: to delete one character in an edit box. 13 1.10 Add-on module Installation Add-on 10 keys modules (Module extension 10 touches-8000) 2 1 4 3 1. 2. 3. 4. Remove the protection of the dedicated compartment behind the set Insert the add-on correctly in the compartment Plug the provided cord into the dedicated socket behind your set Fix the add-on with the provided screw Add-on 40 keys (Module extension 40 touches-8000) / LCD 14 keys (Module extension LCD 14 touches-8000): 1. Plug the provided cord into the dedicated socket behind your phone 2. If desired, fix the foots (set and add-on) with the provided clip 14 1.11 Call management screen Incoming call icon Call in progress ,Call on hold , … Incoming call and conversation presentation screen 8068 8038 Soft keys: actions available depending on the call status Each tab corresponds to a call, the status of which is symbolized by its icon (in progress, held, arrival of new call). When a call is in progress, use the left-right navigator to look at held or incoming calls. All features are accessible while the call is displayed on the screen. Use the Up and Down arrows to move up or down a page. These functions (transfer, conference, etc.) are directly related to the status of the call consulted. For example, the transfer function will not be available between a call in progress or a held call and an incoming call. Used to switch from a telephone screen to an application screen. For example, it can be used while a call is in progress to search a number, program an appointment reminder, etc Calls can also be managed from the Perso page. While the call is in progress, press the Back/Exit key and display the Perso page. Calls in progress or waiting calls are displayed on the different line keys. It is then possible to converse with the caller of your choice by pressing the key associated to the caller. 15 1.12 Bluetooth® Wireless handset Off-hook/On-hook: press this key to take or terminate a call LED Volume/Mute: Short successive presses to change the handset volume level (3 levels) Long press to activate or deactivate mute mode Location of the battery If the Bluetooth® handset is on its base, you do not need to press the Off-hook/On-hook key to take or terminate the call. Just off-hook/on-hook the Bluetooth® handset. LED Off: operating normally Blinking green: in communication Green steady: handset charging Orange flashing: battery charge low or handset outside coverage zone Orange steady: malfunction Installing or replacing the Bluetooth® handset battery Lift up the battery cover Slide out the battery holding part The battery recharges when the Bluetooth® handset is on its base. 16 2 Usingyourtelephone 2.1 Making a call Use one of the following: Dial directly the number for your call Lift the receiver Enter the destination number Press the on-hook/off-hook key of the Bluetooth® device (Bluetooth® handset) Dial the destination number Hands free Dial the destination number Programmed line key Dial by name (enter directly the first letters of your caller name on the alphapad) Redial last number To make an external call, dial the outside line access code before dialing your contact number The duration of your external call may be limited in time by the administrator.In this case, a beep sounds and/or a message will be displayed on the screen 20 seconds before the end of the communication If the internal or outside number does not reply: Use one of the following: Interphony:Broadcast a message on the loudspeaker of the free terminal ¤Callback:Request callback to a busy terminal Text:Send a written message 2.2 Receiving a call Use one of the following: Lift the receiver Press the on-hook/off-hook key of the Bluetooth® device (Bluetooth® handset) Hands free Press the key next to the incoming call icon 17 2.3 Using the telephone in “Hands free“ mode Terminal idle: Press and release Terminateyour call You are in hands free mode Call in progress: During a conversation Press and release You are in hands free mode During a conversation, you can lift the receiver without terminating the call. 2.4 Activating the loudspeaker during a conversation (receiver lifted) Loudspeaker. During a conversation Activate loudspeaker The key lights up Adjust volume (9 levels) Deactivate loudspeaker The key is no longer lit Press and release the loudspeaker key to switch to hands free mode (light steady). 2.5 Calling your caller by name (company directory) Enter the first letters of the name Proposes a name followed by a corresponding telephone number and sequence number in list If nameis OK Make the call If name is not OK: Use one of the following: 1stname : Extend search in list List :Display the list of caller names Select the desired name Show next name (Right navigator) Show previous name (Left navigator) 18 2.6 Make calls via your programmed call keys Access the “Perso“ page Find the caller you want to call from the programmed call keys Call the chosen caller 2.7 Filtering calls using the voice mailbox This service lets you filter incoming calls to your voice mailbox. When your caller leaves his message you can choose to communicate with him Activating call screening Voice mail filtering programmed key Enter your personal password Same key to stop listening and deactivate the screening When you receive a call You hear the message left by your caller Use one of the following: Hands free to take the call Lift the receiver To stop listening only 2.8 Redialing Redialing the last number dialed (redial) (short press) Last number redial Call back on the last 10 number dialed (long press) Select the number to redial from the last 50 dialed numbers or Start the call You can also access this feature through the menu: Reach the “Menu“ page Redial list Select the number to redial from the last 50 dialed numbers 19 2.9 Requesting automatic callback if internal number is busy Internalnumberbusy Call back Callback request acknowledged Automatic callback is not available if the set of your caller is free or if you are put on hold when the set is busy 2.10 Cancelling an automatic callback When your phone rings Call back Cancellation of callback request acknowledged Canceling the callback request is only possible when the caller you tried to reach released the line. 2.11 Receiving intercom calls You can answer a call without lifting the receiver. When you receive a call, you are automatically connected in hands-free mode. The identity of the caller is displayed on the screen. To activate -Terminal idle: Corresponding LED lights up When your caller hangs up, interphony mode remains active. To deactivate -Terminal idle: The corresponding LED goes out 2.12 Sending DTMF signals During a conversation you sometimes have to send DTMF signals, such as with a voice server, an automated attendant or a remotely consulted answering machine. By default during a communication, your telephone is configured to send codes in voice frequency: enter these codes directly using the keys on your telephone. For more information regarding this configuration, contact the person in charge of your installation. During a conversation Enter DTMF code 2.13 Mute, so that your caller cannot hear you You can hear your caller but he/she cannot hear you: From the set During a conversation Disable microphone Resume the conversation The key lights up The key is no longer lit From the Bluetooth® receiver Press the handset volume/mute key (long press) 20 3 During a conversation 3.1 Making a second call during a conversation During a conversation Use one of the following: Name of second caller. New call Number of second caller (long press) or / Perso page / Programmed line key / Menu page: /Redial list/Select the No. in the last ten issued The first call is on hold Cancel your second call Use one of the following: On hook the handset Hang up key (If in handsfree mode) Recover the call on hold: Use one of the following: Key associated with the “incoming call“ icon Hands free to take the call Lift the receiver Start call key You are in conversation with your first caller again If you make an error, hang up: your telephone will ring and you will recover your first call. 3.2 Answering a second call during a conversation During a conversation, another person is trying to call you. The name or number of the caller is displayed for a few seconds Use one of the following methods to answer the displayed call o Line key for which icon is flashing o Answer The first call is on hold Cancel your second call Use one of the following: 21 On hook the handset Hang up key (If in handsfree mode) Recover the call on hold: Use one of the following: Key associated with the “incoming call“ icon Hands free to take the call Lift the receiver Start call key You are in conversation with your first caller again If you make an error, hang up: your telephone will ring and you will recover your first call. 3.3 Switching between calls (Broker call) During a conversation, a second call is on hold. To accept the second call: Select the contact on hold Your first call is placed on hold 3.4 Transferring a call To transfer your call to another number: During a conversation Calling a second person during a conversation The first call is on hold You can transfer the call immediately or wait for your contact to answer before transferring the call Transfer Transfer between two outside calls is not generally possible (depends on country concerned and system configuration). 3.5 Transfer a call to a voice mail During the call, you want to transfer your caller to the voice mailbox of another caller TransferVMU Number of second caller 22 3.6 Three-way conference with internal and/or external callers (conference) During a conversation, a second call is on hold ¤Conference You are in conference mode Cancel conference and return to first caller (If conference is active) ×Conference Hang up on all caller (If conference is active) Use one of the following: Hang up On hook the handset After the conference, to leave your two callers talking together: ×Conference Transfer 3.7 Placing a call on hold (hold) During a conversation, you wish to place the call on hold and recover it later, on the same telephone. During a conversation Hold Your call is placed on hold Recover the call on hold: Select the call on hold 3.8 Placing an outside call on hold (parking) You can place an outside call on hold and recover the call on another telephone: During a conversation Park call To recover the parked call: Reach the “Menu“ page Pickup Unparkcall If the parked call is not recovered within a preset time (default value 1 min 30), it is transferred to the operator. 3.9 Intrusion into an internal conversation Your caller’s line is busy. If the number is not “protected“ and if authorised, you can intrude into the call: ¤Intrusion Same key to exit (×Intrusion) 23 Protection against intrusion: Pressprogrammed key Enter caller’snumber Protection is cancelled when you hang up. 3.10 Store a number During a call, to save the number onto a call key: During a conversation Savetorep Press a call key on the Perso page Enter the name of your caller Apply 3.11 Adjust audio volume During a call, to adjust the volume level of the loudspeaker or receiver: During a conversation Adjust audio volume 24 4 “Meet me “ conference The “Meet me “ function is used to set up a conference with a maximum of 6 persons: the “master “ of the conference (who has the rights for initiating the conference) and the participants (maximum of 5) who meet for the conference. 4.1 Initiate a “Meet me “ conference In order for the participants to join the conference, you must first decide on a meeting time for the conference and send them the access code. When the system prompts you to enter a code or password, you are allowed 3 attempts before the system rejects your request. Lift the receiver Enter the “Meet me “ conference activation code Enter your telephone number (internal) Enter your personal password Enter the conference access code The conference is set-up. Activation code: This code is defined by the administrator during system configuration. Call number for activating the “Meet me “ conference: this call number is used by the conference master when he wishes to initiate a conference from an external set. This number must have been defined previously by the system administrator. Password: the default password cannot be used. If necessary, refer to chapter. When the conference master on-hooks, all the communications will be cut-off. 25 4.2 Join a “Meet me “ conference Once set-up by the conference master, the participants can join the “Meet me “ conference (5 participants maximum). Lift the receiver Enter the joining code for the “Meet me “ conference Enter the conference access code You are in conference mode Joining code This code is defined by the administrator during system configuration. Call number for joining the “Meet me “ conference: this call number allows the participants to join a conference from an external set. An audible beep sounds when a participant joins the conference. 2 audible beeps sound when a participant leaves the conference. You cannot join a conference if there are already the maximum numberof participants. If the conference has not yet been set up by the conference master you are put on hold until the conference is initiated (5 minutes maximum). If you cannot directly reach the conference, you have to call first an internal user or an automatic operator. This one dials the call number for joining the “Meet-me “ conference and then transfers your call (10 seconds). 26 5 Sharing 5.1 Receivingsupervised call ringing To receive the special ringing for calls to another number: Supervised call ringing programmed key Same key to cancel 5.2 Answering the generalbell When the operator is absent, outside calls to the operator are indicated by a general bell. To answer: Reach the “Menu“ page Pickup Generalbell 5.3 Manager/Assistant filtering System configuration allows “Manager/Assistant“ groups to be formed, so that the manager’s calls can be directed to one or more assistants. From the manager or assistant telephone: Filter programmed key Same key to cancel Incoming calls are filtered by a chosen person (assistant, etc.) Filtering is indicated on the manager's telephone by the icon corresponding to the “screening“ programmed key. 5.4 Call pick-up You hear a telephone ringing in an office where no-one can answer. If authorised, you can answer the call on your own telephone. If the telephone ringing is in your own pick-up group: Group call pick-up programmed key If the telephone ringing is not in your pick-up group: Reach the “Menu“ page Pickup Set Enter the number of the ringing telephone The system can be configured to prevent call pick-up on certain telephones. 5.5 Outside calls to the operator will ring on your telephone and you can answer the call: Operator help programmed key Your telephone will ring at the same time as the switchboard Same key to cancel Calls to the switchboard: Calls to the switchboard will ring on your telephone Lift the receiver 27 Operator help programmed key 5.6 Hunting groups Hunting group call: Certain numbers can form a hunting group and can be called by dialling the group number. Lift the receiver No. of group to be called Temporary exit from your hunting group: /Return into your group: Leave group programmed key Enter your group number Belonging to a group does not affect the management of direct calls. A specific telephone within a group can always be called by using its own number. 5.7 Calling an internal caller on his/her pager The number called does not answer and you know that the person called has a pager: Paging programmed key Paging in progress is displayed Your caller can answer from any telephone in the system. 5.8 Answering a call on your pager A call on your pager can be answered from any telephone within the system. Your pager beeps Answer paging programmed key Enter your group number 5.9 Calling a caller on his/her loudspeaker Your internal caller does not answer. If authorised, you can remotely activate your caller’s phone: Your caller does not reply Interphony You are connected to the loudspeaker on your caller’s phone (if he/she has the hands free function) 28 5.10 Sending a written message to an internal caller or Message SendTxtMsg Use one of the following: o Enter the number of the terminal to receive the message o Enter the first letters of the name Select the type of message to send (fixed Msg, New Msg,...) Sending predefined message FixedMsg Select the message to be sent Enter the number of the ringing telephone Language Notice that you can select the message to send by its number by selecting the option: Gotomessage The 27 standard messages are shown below: 1 Call me back 15 Meeting on ___ (*) 2 Call me back tomorrow 16 Meeting on ___ at _:_ (*) 3 Call me back at _:_ (*) 17 Out for a while 4 Call back _____ (*) 18 Absent for the rest of the day 5 Call the attendant 19 Absent, back at _:_ (*) 6 Call the assistant 20 Absent, back on ___ at _:_ (*) 7 I will call back at _:_ (*) 21 On vacation, back on ___ (*) 8 Use paging 22 External meeting 9 Please fetch your fax 23 External meeting, back on ___ (*) 10 Please fetch your mail 24 I am in room nr __ (*) 11 Please cancel your forwarding 25 In a meeting - do not disturb 12 Visitors are waiting 26 At lunch 13 You are expected at reception 27 Indisposed 14 Meeting at _:_ (*) (*) Messages to be completed using numeric keypad Sending a new message NewMsg Writeyour message 29 5.11 Send a voice message copy Voice Enter your password Display number of new and old messages Consult Select message to copy Sendcopy Enter the destination number Sendmessage When sending a copy of the message, you can also record a comment to join to the copy Record Start recording the comment Stop 5.12 Sending a recorded message to a number a distribution list Voice Enter your password Sendmessage caller’s no. or list no. or caller’s name or list name Record Start recording the comment Stop Before sending the message you can add a destination, record the message again, or replay the recording. 5.13 Broadcasting a message on the loudspeakers of a station group A message not requiring an answer can be broadcasted on the loudspeakers within your broadcast group: Off hook Number of broadcast group Speak, you have 20 seconds or Hang up The message will only be broadcast on terminals not in use and which have a loudspeaker. 30 6 Keep in touch 6.1 Selecting calls to beforwarded When a forward is applied, you can select the types of call to be forwarded: outside, internal, all. Ext/Int Select the type of Out/Int call type of call forwarded is displayed Allcalls forward internal and outside calls External Forward outside calls Internal Forward internal calls 6.2 Forwarding calls to another number (immediate forward) The number can be your home, mobile or car phone, voice mailbox or an internal extension (operator, etc.). Immediate Number to be called Forward is acknowledged You can also select the destination number of the forward through the redial feature or the individual repertory. You can make calls, but only the destination number can call you. 6.3 Forwarding your calls to your voice message service Immediate»VM Forward is acknowledged 6.4 When you return, consult recorded messages The light indicates that messages have been received Voice Enter your password Display number of new and old messages Consult Select message Display name of sender, with date, time and ranking of message Play Listen to message Clear Erase message Call Call back sender of message Sendcopy Copy message 6.5 Activatedisable the personal assistant Reach the “Menu“ page Settings Assistant 31 On or Off Activate or deactivate the assistant 6.6 Personal assistant: reaching you with one number only Reach the “Menu“ page Settings Assistant Menu You can then choose where to route the calls: InternalNr Dial number of a colleague or your assistant ExternalNr Dial an outside line number MobileNr Dial number of your mobile or DECT Operator Activatedeactivate transfer to operator 6.7 Forwarding calls to your pager Callers will thus be able to contact you while you are moving around the company: Topaging Forward is acknowledged 6.8 Forwarding your calls from the receiving terminal (“Follow me“) You wish to receive your calls in your present location: Use the “Follow me“ function. Followme Dial your extension number Forward is acknowledged If you have a key programmed with this feature, you can access the feature directly Pressprogrammed key Dial your extension number Forward is acknowledged 32 6.9 Diverting all group calls You can forward all your group calls to another internal number: Group calls forwarding programmed key Enter the destination number Forward is acknowledged 6.10 Cancelling all forwards Cancelfwd. To cancel all forwards, you can programme another type of forward too 6.11 Cancelling a specificforward Programmed key corresponding to type of forward (group or selective) 6.12 Forwarding calls when your line is busy (forward if busy) Callers can be forwarded to another telephone if you are already on the line Onbusy Enter the destination number Forward is acknowledged 6.13 Do not disturb You can make your terminal temporarily unavailable for all calls. DoNotDisturb Forward is acknowledged Callers wishing to contact you will see the “Do Not Disturb“ message displayed on their sets when they try to call. 6.14 Leaving a recorded message for internal callers You can leave a message on your terminal which will be displayed on the screen of the terminal calling you. Textanswer Choose the type of message Sending predefined message FixedMsg Select the message to be sent 33 Enter the number of the ringing telephoneLanguage Notice that you can select the message to send by its number by selecting the option: Gotomessage The 27 standard messages are shown below: 1 Call me back 15 Meeting on ___ (*) 2 Call me back tomorrow 16 Meeting on ___ at _:_ (*) 3 Call me back at _:_ (*) 17 Out for a while 4 Call back _____ (*) 18 Absent for the rest of the day 5 Call the attendant 19 Absent, back at _:_ (*) 6 Call the assistant 20 Absent, back on ___ at _:_ (*) 7 I will call back at _:_ (*) 21 On vacation, back on ___ (*) 8 Use paging 22 External meeting 9 Please fetch your fax 23 External meeting, back on ___ (*) 10 Please fetch your mail 24 I am in room nr __ (*) 11 Please cancel your forwarding 25 In a meeting - do not disturb 12 Visitors are waiting 26 At lunch 13 You are expected at reception 27 Indisposed 14 Meeting at _:_ (*) (*) Messages to be completed using numeric keypad Sending a new message NewMsg Writeyour message 6.15 Consulting written messages The light indicates that messages have been received. Number of messages received ReadTxtMsg Displays the sender’s message on the screen Readmore Displays the rest of the message and the date and time it was left Activating/Deactivating “Forced headset“ mode Use the left-right navigator to see previous and next messages Clear Erase message Call Call back sender of message SendTxtMsg Sending a written message to an internal caller. Savetorep Save the sender’s number in your directory Terminate consultation 34 6.16 Message notification A message is left in your mailbox but you are not at your desk. You can configure your telephone so that you receive notification of the message on another telephone Reach the “Menu“ page Settings Notification Press consecutively to activate/deactivate ON/OFF Choice Press consecutively to activate/deactivate Change the time slot The time slot during which notification is activated can be changed Schedule Change times 35 7 Managingyour charges 7.1 Charging your calls directly to business accounts You can charge the cost of your outside calls to business account numbers. Reach the “Menu“ page Settings My services Consultation Number of business account Numberrequired Additional services Business account code 7.2 Finding out the cost of an outside call made for an internal user from your terminal Reach the “Menu“ page Settings My services Consultation Consultation& callbacks 36 Charging informations 8 Programmingyourtelephone 8.1 Initializingyourvoicemailbox Light flashes Enter your personal code then record your name according to voice guide instructions Your personal code is used to access your voice mailbox and to lock your telephone. Your password has 6 digits. A weak personal code with 6 identical digits (000000, 111111, etc.) or a simple sequence of 6 digits (012345, 123456, etc.) will be rejected by the system. After a system upgrade, the password may still have only 4 digits. For security reasons, we recommend you use a password with 6 digits. Contact your installer for more information. 8.2 Customizingyourvoicegreeting You can replace the greeting message by a personal message Reach the “Menu“ page Settings Mailbox You can listen to the greeting, customize the greeting and set the default greeting (Listen , Recordname , Default) You can replace the greeting message by a personal message (Persmessage) You can pause, resume or stop the recording at any time 8.3 Modifyingyourpersonal code Reach the “Menu“ page Settings Options Password Old code (6 digits) New code (6 digits) As long as your voice mailbox has not been initialized, personal code is 1515. Your password has 6 digits. A weak personal code with 6 identical digits (000000, 111111, etc.) or a simple sequence of 6 digits (012345, 123456, etc.) will be rejected by the system. After a system upgrade, the password may still have only 4 digits. For security reasons, we recommend you use a password with 6 digits. Contact your installer for more information. 37 8.4 Adjusting the audio functions Reach the “Menu“ page Settings Phone Ringing Choose the tune Melody Select the melody of your choice (16 tunes) End Adjusting the ringer volume Volume Select the volume you want: (10 levels) End Activate/deactivatesilent mode Silent ON/OFF activate/deactivate End Activate/deactivate meeting mode (progressive ringing) Progressive ON/OFF activate/deactivate End Activate/deactivatediscreet ring mode Beeps 3 Beeps + Ringing ON/OFF activate/deactivate End Adjust ringer volume while a call arrives Yourtelephone rings Adjusting the ringer volume 38 8.5 Adjusting the contrast of the display (8028/8029/8038/8039) Reach the “Menu“ page Settings Phone Contrast Screen or Keys Increase or reduce the brightness of the screen or keys (of the extension unit) by pressing consecutively on the corresponding keys 8.6 Selecting the welcome page This function is used to choose the page displayed by default on the telephone. Settings Options Homepage Select the default page 8.7 Selectinglanguage Reach the “Menu“ page Settings Options Language Select the language of your choice 8.8 Programming direct call keys (Perso page) You can program keys of the perso page. Access the Perso page using the navigator If the key is not programmed yet: Select the key to program Enter the name and number to associate to the key If the key is already programmed: Select the key to program Enter the name and number to associate to the key 8.9 Deleting direct call keys (Perso page) Access the Perso page using the navigator Select the key to delete Clear 8.10 Programming direct call keys (F1 and F2 keys) Press a programmable key (F1 or F2) If the key is not programmed yet: Select the key to program 39 Enter the name and number to associate to the key If the key is already programmed: Select the key to program Enter the name and number to associate to the key 8.11 Deleting direct call keys (F1 and F2 keys) Select the key to delete Clear 8.12 Programming direct call keys (8028/8029) The phones have four programmable keys with Leds and paper labels. Led behavior may differ depending on the system configuration. For more information, contact your installer or administrator. If the key is not programmed yet: o Select the key to program o Enter the name and number to associate to the key Validate the name and number. If the key is already programmed: o o o o Select the key to program Enter the name and number to associate to the key Validate the name and number. 8.13 Deleting direct call keys (8028/8029) Select the key to delete Clear 8.14 Programming an appointmentreminder You can set the time of a temporary reminder (one within 24 hours) or a permanent reminder (every day at the same time) Reach the “Menu“ page Appointment Enter time of appointment Temporary /Permanent Select the type of appointment (temporary or permanent) 40 The “Appointment programmed“ icon is displayed on the welcome page. At the programmed time, your telephone rings: If your calls are forwarded to another terminal, the forward is not applied to the reminder call. To cancel your reminder request: Reach the “Menu“ page Appointment Temporary /Permanent Select the type of appointment (temporary or permanent) Clear The “Appointment programmed“ icon disappears from the welcome page. 8.15 Identify the terminal you are on The number of your telephone is displayed on the “Info“ page. 8.16 Lock / unlockyourtelephone This icon indicates that the phone is locked. Reach the “Menu“ page Lock Enter your password Your telephone is locked/unlocked 8.17 Configuring the audio jack of your telephone By default, the audio jack of your telephone can be used to connect a headset, hands-free kit or loudspeaker. A wideband headset can also be installed for optimized sound quality. Reach the “Menu“ page Settings Phone Jack Headset / Handsfree/ Loudspeaker Select the type of device plugged into the jack 41 8.18 Activating/Deactivating “Forced headset“ mode Reach the “Menu“ page Settings Phone ForcedHead ON/OFF activating/deactivating forced headset 8.19 Installing a Bluetooth® handset (matching) Before a Bluetooth® headset can be used, it must be correctly matched to the terminal. Reach the “Menu“ page Settings Phone Bluetooth Adddevices With the handset turned off, press the 2 Bluetooth® handset keys at the same time (long press) You will hear a 3 note signal and the LED will flash green and orange alternately Searching for Bluetooth® equipment. Wait for the detected equipment type and address to be displayed Select the relevant equipment Add The 3-note tone indicates that the handset has been installed correctly (the LED flashes green or orange depending on the battery charge level) Error messages The Bluetooth® handset emits a sequence of 4 beeps Your set is an older generation than your Bluetooth® handset The set displays an error message indicating that the set and the Bluetooth® handset are incompatible Your Bluetooth® handset is an older generation than your set 8.20 Use of the Bluetooth® handset The Bluetooth® cordless handset permits the user to answer and converse with complete freedom within a radius of 10 meter from the set. The handset has a LED and two buttons. Light Green flashing: normal operation. Green steady: handset charging. Orange flashing: battery charge low or handset outside coverage zone. Orange steady: malfunction. 42 Off-hook/On-hook and Volume/Mute keys Off-hook/On-hook: press this key to take or terminate a call. Volume/Mute: Short successive presses to change the handset volume level (3 levels) Long press to ensure your caller no longer hears you o o If the Bluetooth® handset is on its base, you do not need to press the Off-hook/On-hook key to take or terminate the call. Just off-hook/on-hook the Bluetooth® handset 8.21 Installing a Bluetooth® headset (matching) A multi-point Bluetooth headset can be provided by Orange Business Services. This headset can be matched to your mobile phone and other communication devices at the same time. For example, you can use the headset matched to your mobile and when you enter your office the headset automatically matches to your office set too. You can then answer a call using your Bluetooth headset or the Bluetooth Handset on the office set. Before a Bluetooth® headset can be used, it must be correctly matched to the terminal. Before performing the matching operation, the headset must be in detectable mode. Reach the “Menu“ page Settings Phone Bluetooth Adddevices Searching for Bluetooth® equipment. Wait for the detected equipment type and address to be displayed Select the relevant equipment Add Validate your choice Enter the PIN code of the headset * Acknowledgement message and display of the headset icon on the terminal screen *Refer to the user documentation supplied with the headset. 8.22 Using a Bluetooth® headset Refer to the user documentation supplied with the headset. 8.23 Deleting a Bluetooth® accessory (headset, handset, etc.) Reach the “Menu“ page Settings Phone Bluetooth Mydevices Display of the different equipment matched Select the equipment to be removed Remove dvc Validate your choice Message acknowledging the equipment has been removed 43 8.24 Contacting your administrator If necessary you may need to contact your administrator. Before contacting your administrator make sure you have information such as your phone's part number and software version to hand. The part number The phone's part number is located under the foot of the phone. Software version The software version can be viewed on the phone by following this path: System SWVersion A multi-point Bluetooth headset can be provided by Orange Business Services. 44 9 ACD: Agent set / Supervisor station 9.1 Agent set A call center solution allows optimum distribution of calls to agents according to their availability and skills. 9.2 Open an agent session (login) – Agent set Select the ACD application Login Select the agent and validate Depending the displayed informations, enter your password or confirm ACD application welcome screen is displayed. 9.3 ACD application welcome screen – Agent set Name of the agent set Operating status of the agent set Number of the agent set Status of the queues 4.02 means: group calls waiting the + that the queue been reached . number 4 2 sign indicates capacity has 45 9.4 The four operating statuses of the agent set An agent's availability is determined by the operating status (of which there are 4), that the agent can change at any time. These statuses are: Onduty In service, the agent is ready to receive calls. Offduty Withdrawn , the agent has withdrawn from the ACD application C.Work Additional task, the agent is performing a task concerning a call and is not taking other calls T.Absence Temporarily absent, the agent has taken a break and is not taking calls. The agent can change the operating status directly by entering codes (on all sets), by pressing the function keys on the set, or using the “Agent Assistant“ agent software on PC (if available). 9.5 Changing the operating status of the set – Agent set Changing using codes (all sets) The operating status change codes are defined when the system is configured. Contact the system administrator to obtain these codes. Enter the feature code to activate Change by function keys Press the function key of the status to be activated. Information relative to the selected status is displayed on the screen. If a refusal message is displayed, contact the system administrator. 9.6 Modifying your personal code – Agent set Password New code (6 digits) 9.7 Integrating another group/leaving a group– Agent set Groups Press the key of the group (1 to 8) to integrate (box empty) and/or press the key of the group to leave (box full) 9.8 Close the agent session (logout) – Agent set Logout 46 9.9 Supervisor station A supervisor can consult the messages left in the voice mailboxes of the call centre groups (maximum 8 groups) using the function keys on an 8/9 sets. A supervisor can also perform the agent function from the same set 9.10 Supervising group mailboxes – Supervisor station Consulting the messages: When a message is left in a group mailbox, the voice mail present indicator associated with the supervision key flashes. Press the supervision key Follow the instructions of the voice guide When a mailbox is consulted by a supervisor, the other supervisors cannot access it Supervision keys for group mailboxes and positioning on the sets: Access the Perso page to display the positioning of the supervision keys on the sets. 47 10 Guarantee and clauses 10.1 Safety Instructions Changes or modifications to the equipment not expressly approved by the party responsible for compliance could void the user's authority to operate the equipment. Magnets could affect the functioning of pacemakers and implanted heart defibrillators. Keep a safe distance between your pacemaker or implant defibrillator and the handset which includes magnetic elements: 4 centimeters (1,6 inches) at least To limit the risk of interference, people with pacemakers must keep the wireless telephone away from their equipment (minimum distance of 15 cm/6 inches) It is recommended to follow the standard acceptance procedures before using this equipment in human safety critical areas (hospitals...). The handset includes magnetic elements that may attract sharp metallic objects. To prevent injury, before each use ensure sharp metallic objects are not stuck to the earpiece and microphone. There is a danger of explosion if the battery is replaced incorrectly - use only the battery with the reference 3GV28041AB (1.2V 1500 mAh) (Bluetooth® Handset only). Battery charge (Bluetooth® Handset only): Charge the battery for about 16 hours before initial use Avoid using phones (other than cordless) during an electrical storm. There may be a remote risk of electric shock from lightning Do not use the device in environments where there is a danger of explosion Do not plug this phone into an Integrated Services Digital Network (ISDN) connection or into a regular Public Switched Telephone Network (PSTN) connection. This can result in severe damage to the phone Never allow your telephone to come into contact with water To clean your telephone, use a soft damp cloth. Never use solvents (trichlorethylene, acetone, etc.) which may damage the plastic parts of your telephone. Do not use aerosol cleaners. This product is intended to be connected to the PABX via the LAN (10/100/1000 MB) If you are connected to a POE connection do not use an external Power Supply. The PoE (Power over Ethernet) devices that supply or receive power and their connected cables must all be completely indoors. The RJ-45 jack is not used for telephone line connection The 8068 also offers a Bluetooth® Radio Interface for the Bluetooth® handset or other Bluetooth® devices -frequency range 2402-2480 MHz, Radiated Power 1mW. 48 10.2 "EC" declaration of compliance We, FRANCE TELECOM 78 rue Olivier de Serres 75505 PARIS Cedex 15 declare that the productmentioned in this note, conformto the following European Directives and Directives and European Standards: Radio and Telecommunication Terminal Equipment Directive 99/5/EEC. Exposure to Radio Frequency Signals. This equipment complies with radiation exposure limits set by FCC/ICand the European Council. This equipment has very low levels of RF energy and is deemed to be compliant without testing of the specific absorption rate (SAR). User Instructions Only use the handset in temperatures between -5°C to +45°C (23°F to 113°F). This product is intended for use in an indoor environment only. This apparatus is Hearing Aid Compatible (HAC). Acoustic shock protection Maximum sound pressure level for handset is compliant with European, US and Australian standards. Directive 2003/10/EC specifying the risks inherent in noise at work A wired handset is also available and can replace the Bluetooth® handset. Privacy Privacy of communications may not be ensured when using the Bluetooth® handset or any additionnal Bluetooth® device. Disposal The equipment must be returned to a collection point for electronic equipment waste disposal. Defective batteries must be returned to a collection point for chemical waste disposal. Copyright© 2014 All rights reserved. 49 To contact your after sales department, please dial 4couv monday to saturday from 8 a.m to 8 p.m (except bank holidays) France Télécom 78, rue Olivier de Serres - 75505 Paris Cedex 15 S.A. au capital de 10 595 541 532 € - 380 129 866 - RCS Paris Notre site internet : http://www.orange-business.com