1
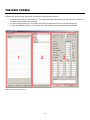
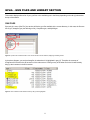
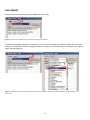
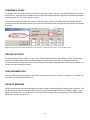
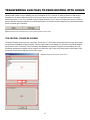
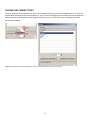
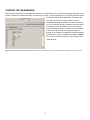
Horus Vision HKGunLoader™ Software Version 2.05 User’s Manual 1st Edition May 2014 May 15, 2014. Copyright 2014 Horus Vision, LLC. All rights reserved. Written consent of Horus Vision LLC is required to copy or use any of the material in this manual. 1 CONTENTS Introduction ........................................................................................................................................................................... 3 About HKGunLoader v2.05 .................................................................................................................................................. 4 Where to Get It ........................................................................................................................................................... 4 Requirements ........................................................................................................................................................................ 5 Connecting Kestrel with Horus to Your PC ........................................................................................................................ 6 Connecting with Bluetooth ......................................................................................................................................... 6 Connecting with Cradle .............................................................................................................................................. 6 Gun Information .................................................................................................................................................................... 7 Gun Data .................................................................................................................................................................... 7 Gun Files .................................................................................................................................................................... 7 Gun Library ................................................................................................................................................................ 8 Starting HKGunLoader ......................................................................................................................................................... 9 The Main Screen .................................................................................................................................................................. 10 GFLib – Gun Files and Library Section ............................................................................................................................. 11 Gun Files ................................................................................................................................................................. 11 Gun Library .............................................................................................................................................................. 12 Adding Library Guns to Your Gun File ..................................................................................................................... 13 GFLib Function Buttons ........................................................................................................................................... 13 Create New Gun File................................................................................................................................................ 13 Creating a Copy of the Current Gun File ................................................................................................................. 14 Deleting a Gun File .................................................................................................................................................. 14 GList – The List of Guns in a Gun File .............................................................................................................................. 15 GList Function Buttons ............................................................................................................................................. 16 Create a New Gun ................................................................................................................................................... 16 Renaming a Gun in the List...................................................................................................................................... 17 Deleting a Gun from the List .................................................................................................................................... 17 GData – Editing the Values of a Gun ................................................................................................................................. 18 Changing a Value..................................................................................................................................................... 19 Grayed Out Field ...................................................................................................................................................... 19 The Gun Name Field ................................................................................................................................................ 19 Units of Measure ...................................................................................................................................................... 19 Elevation and Windage Turret Settings ................................................................................................................... 20 Transferring Gun Files to/from Kestrel with Horus ......................................................................................................... 21 The Kestrel Transfer Screen .................................................................................................................................... 21 Choose the Correct Port .......................................................................................................................................... 22 Starting the Transmission ........................................................................................................................................ 23 Having Trouble? ....................................................................................................................................................... 24 Legal Notice ......................................................................................................................................................................... 25 Contact ................................................................................................................................................................................. 26 2 INTRODUCTION ABOUT HORUS VISION Horus Vision’s cutting-edge technology improves shooting accuracy at extended ranges and increases the likelihood of a first-round hit. Our patented reticles reduce the need for manual scope manipulation and mental calculation. Horus Vision’s simplified shooting system improves accuracy at any distance and can make anyone an expert marksman. Horus Vision’s ATrag™ ballistics software algorithms were developed and refined by the former chief of ARDEC's small-arms division, William C. Davis. Horus Vision was founded in 2000 and is headquartered in San Bruno, California. SAFETY WARNING Always use great care with all firearms. A mistake in judgment or lapse of attention can result in serious injury or death. The information in this manual, while believed to be accurate at the date of publication, is not warranted or represented to be accurate, correct, or useful for any particular purpose. Use the information in this manual with caution and common sense, and verify it with respect to your own firearms before use. The author and publishing company accept no responsibility for errors in the information presented herein, or for accidents, injuries, damage or any other problems which might arise as a result of your use of the information contained in this book, and expressly disclaim all liability for injuries, death and damages, whether direct, incidental, consequential, punitive or otherwise. 3 ABOUT HKGUNLOADER VERSION 2.05 The HKGunloader is an utility used to transfer gun information between your PC/Laptop and your Kestrel 4500 with Horus™ Ballistic Software (Kestrel with Horus). HKGunloader is not required to use your Kestrel with Horus; however, managing your guns, gundata, and gunfiles on a PC or laptop is far easier than doing it on the Kestrel with Horus unit. Additionally, having your gun information on your PC makes for a nice backup, makes it easier to share amongst friends, and/or load lessons for teaching. Lastly, the gun file format is compatible with Horus’ ATrag™ software for PDAs – you may use gun files from ATrag or use these gun files on ATrag. WHERE TO GET IT HKGunloader is a FREE utility. It may be downloaded from either the Horus Vision® website or Nielsen Kellerman website. On the Horus website, look for the Kestrel product page under software. On the NKHOME website look for Kestrels under support. NOTE: These are the only two authorized and trusted sources for this software. Please beware of any other websites offering this utility. HTTP://www.horusvision.com HTTP://www.nkhome.com Once you have downloaded the software, please follow the directions (also found on the website) to install it on your Windows PC. 4 REQUIREMENTS HKGunloader has been tested to run on PC desktops and Laptops with the following operating systems: Windows XP-SP3 Windows Vista Windows 7 Windows 8.0. There are no plans to offer this utility on Apple iOS, Linux, Ubuntu, or any other platform or operating system. 5 CONNECTING KESTREL WITH HORUS TO YOUR PC You will also need some means to connect your HK4500 and your PC so they may communicate. This may be done through Bluetooth or through Nielsen Kellerman’s Kestrel USB interface cradle, or Serial connect interface cradle. Be sure you have working communications between the two devices before you proceed further. CONNECTING WITH BLUETOOTH Most Laptops have Bluetooth built-in and are usable “as-is”, as opposed to almost all desktops which DO NOT come with Bluetooth built-in. In this case, you will need an USB Bluetooth adaptor. NOTE: we have found that not all USB Bluetooth adaptors work with the Kestrel with Horus unit. We recommend using the Kensington K33902US adapter which has proved to work best. The Nielsen Kellerman website has Bluetooth manuals which give instructions on connecting the Kestrel with Horus through Bluetooth. CONNECTING WITH CRADLE Both Bluetooth and non-Bluetooth HK4500 units can use Kestrel’s Interface Cradle to communicate with a PC. Placing the Kestrel in the cradle causes the two Infrared ports on the back of the unit to line up with the IR ports in the cradle. Communications takes place between the IR ports. The Cradle connects to your PC through either a USB or serial connector. Please be sure you know which one is most appropriate for your PC. NOTE: If using USB, make sure to download and install NK’s USB driver for the interface cradle. The driver can be found on their website under support. 6 GUN INFORMATION Gun Information is the combined physical characteristics of the gun you are using and the ammunition you are firing through that gun. This set of information will determine the projectile’s (bullet’s) behavior as it flies through the air from the muzzle to the target. ATrag – Horus Vision’ Ballistic Calculator – and all ballistic calculators, use some set of these values to predict a bullet’s flight to offer the most likely aiming solution available. GUN DATA We call these combined values that describe one gun/ammo paring Gun Data (or just plain Gun). For Kestrel with Horus, the values below make up one set of Gun Data. Data Item Gun Name Note Bore Height Abr BH Bullet Weight Ballistic Coefficient Muzzle Velocity Zero Range BW BC MV ZR Bullet Diameter Rifle Twist Rate Rifle Twist Direction Temp/MV table BC/Dist table Elevation Turret Windage Turret BD RT RTd TF/MV BC/DS Description Name you give this Gun Data Any special notes The height the center of the optical scope is above the center of the rifle bore Actual weight of the bullet The drag coefficient – usually G1 or G7 The velocity which the bullet leave the muzzle The range that the optical scope and rifle bore are aligned to match Usually known as caliber The length that the twist makes one complete revolution Twisting in a right hand or left hand direction Used to adjust MV as temperature changes Used to adjust BC as a function of distance The units to display the solution in (MILs, TMOA, or SMOA) and/or to adjust the turrets by. Including number of clicks per if applicable. GUN FILES Any computer file containing one or more Guns - also called a Gun List or Gun File. The data is stored as a text file and can be edited using any text editor, but this is not generally advised. These files have a file extension “.GUN”. The file name can be anything descriptive of the contents of the file. For instance you may have a file named my308.GUN that contains several gun data sets for different ammo that you often shoot through your AR-10. HKGunLoader will use any gun file it finds residing in the same directory as itself. As a general rule, it is well to keep the number of guns in one gun file to 50 and under. 7 GUN LIBRARY HKGunLoader comes with a database file containing over 1100 gun data sets called HKGunLoader.MDP. The file must reside in the same directory as the program. The file is downloaded along with the HKGunLoader program. If you do not have this database file, HKGunLoader will still work, you just will not have access to the library of gun data. To get a copy, download the program again from the websites above and place it in the program’s directory. 8 STARTING HKGUNLOADER All the files for running HKGunLoader need to reside in the same directory as the program file HKGunLoader.EXE. Files not in the same directory as the program file will not be recognized by the program. Everything, all the files you need, should all be contained in one directory. We will call this the Current Directory. The current directory can be located anywhere: on the main C-drive, on the desktop, or anywhere you choose to place it. The current directory, as a whole, can be copied to other locations or other PCs. With the current directory open, double click to launch (start) the HKGunLoader program by double clicking on the program’s icon or name. Figure 1: View of unzipped HKGunLoader directory. HKGunLoader requires two files to run: AtragGun.gun and HKIni.ini. A third file, the library database file: HKGunLoader.mdp should also be in the current directory. If the database file does not exist or is missing, the program can and will run without it; however, you will not have access to the 1100 guns in the library. If either the INI or GUN files are missing, then HKGunLoader will sense this and will notify you that it cannot locate the file(s) and will create a default copy of the missing file(s) for you. Simply click [OK] on the notification screen if it pops up and the program will start. Figure 2: Missing-file alerts. 9 THE MAIN SCREEN If all went well, this is the first main screen you will see. It has three main sections: the gun file and library (GFLib) section (1) – this section will either display a list of the gun files in your directory or it will show the contents of the gun library the gun list (GList) section (2) – this section is the list of gun data sets in the currently selected gun file the gun data (GData) section (3) – this section is the actual data of one gun data set and can be edited Figure 3: HKGunLoader’s main screen. 10 GFLib – GUN FILES AND LIBRARY SECTION This section displays either a list of your gun files or the available guns in the library depending on the tab (4) selected at the top of the section. GUN FILES If the tab (4) is set to [Gun File], the section will list the gun files available in the current directory. In this case, the files are AR-15.gun, AtragGun.gun (the default gun file), Compitition.gun, and My308.gun. Figure 4: A partial view of HKGunLoader’s main screen with Gun File tab selected, displaying available gun files. In the above diagram, you see that AtragGun is selected as it is highlighted in gray (5). Therefore the contents of ATragGun will be listed in the GList section of the main screen. Clicking on any of the other files in the list will instantly bring up their contents in the GList section. Figure 5: View of HKGunLoader Windows directory with gun files highlighted. 11 GUN LIBRARY Setting tab (4) in this section to [Library] will display the Gun Library. Figure 6: A partial view of HKGunLoader’s main screen with Library tab selected. The library is arranged by categories of ammunition. You can select the category you wish by clicking on the pull-down arrow (6). This will show you a list of categories. Select the category you want by clicking on the description (7). Here we select 338 Lapua Magnum. Figure 7: A partial view of HKGunLoader’s main screen with Library tab selected. Clicking the Caliber drop-down arrow reveals categories of ammunition. 12 ADDING LIBRARY GUNS TO YOUR GUN FILE Once you have the desired list of guns in your selected category and the desired gun highlighted, you may add your selection to your current Gun File by clicking on the [Add Gun] button (8). Here we selected the “Lapua 250-grain Scenar” ammunition and added it to our default file AtragGun. A pop up window will allow you to rename the ammo as Kestrel with Horus will only display names that are 12 characters long. We renamed our selected ammo to “Lap338-250”. Figure 8: A partial view of HKGunLoader’s main screen showing a renamed library gun added to user’s gun file. GFLIB FUNCTION BUTTONS At the bottom of this section are three buttons to help you with other things you may want to do with gun files. Figure 9: HKGunLoader’s Library function buttons. CREATE NEW GUN FILE Clicking on the [New Gun File] button will create a new gun file with a single entry in it - SampleGun01. A Windows File Explorer dialog box will pop up and you can name the file what you wish. In this example we named the file New.gun. Figure 10: A partial view of HKGunLoader’s main screen showing a new gun file listed under the Gun File tab. 13 CREATING A COPY OF THE CURRENT GUN FILE Clicking on the [Save Gun File As] brings up the Windows File Explorer dialog box to allow you to select a name for the copied file. Here we have the file AtragGun selected and we chose to name the copy AtragGunCopy. You will note the contents of the copied file is the same as the original. Figure 11: A partial view of HKGunLoader’s main screen showing a copied gun file under the Gun File tab. DELETING A GUN FILE Clicking on the [Delete Gun File] button will delete the highlighted file from the current directory and remove it from the GFLib list. Since AtragGunCopy is highlighted above, clicking on the delete button will remove it. Figure 12: The AtradGunCopygun file is shown to be deleted after clicking the [Delete Gun File] button. 14 GList – THE LIST OF GUNS IN A GUN FILE Section (2) of the main screen shows the list of guns, or Gun List, inside a Gun File. The top of the list shows the name of the Gun File (10) that contains this list. Click on any gun in the list and the gun data of the highlighted gun (11) will automatically be displayed in the GData section (3). Figure 13: A partial view of HKGunLoader’s main screen showing the Gun List inside a Gun File. Gun Data is shown automatically displayed for the selected Gun File, which in this case happens to be 300-WIN*. 15 GLIST FUNCTION BUTTONS At the bottom of this section are three buttons to help you with other things you may want to do with guns in your list. Figure 14: HKGunLoader’s Gun List function buttons. CREATE A NEW GUN You may wish to create a new gun. Click on the [New Gun] button. A pop up window will ask for you to give your new gun a name. We name this one “NewGun”. A window will then ask where you wish to place this new gun. You may place it only into your current gun file, into multiple gun files, or create a whole new gun file altogether where this new gun would be the only entry. This new gun will show up in the gun list of the file you placed it in. Figure 15: The process of creating a new gun is shown. 16 RENAMING A GUN IN THE LIST To rename a gun, click on the [Rename Gun] button. A pop up window will ask for you to give your gun a new name. We rename this one “NotSoNewGun”. The gun will display in the list with the new name you gave it. Figure 16: The Rename Gun window is shown being used to rename a gun file from NewGun to NotSoNewGun. DELETING A GUN FROM THE LIST To remove a gun from your gun list, highlight the gun you wish to delete and click on the [Delete Gun] button. We highlight our newly created NotSoNewGun. The program will ask for confirmation that you wish to remove the gun. NOTE: there is no recovery from this delete. The gun will be removed from your list. Figure 17: A gun file named NotSoNewGun is shown being deleted from the AtragGun list via the Delete Gun command. 17 GDATA – EDITING THE VALUES OF A GUN In the last section we selected the gun 300-WIN* (11) and its gun data was displayed in the GData section (3) of the main screen. This is the section that you can change the values for a gun. Figure 18: A partial view of HKGunLoader’s main screen shows Gun Data values, which can be manually edited by users. The superimposed red numbers are referred to on page 19 of this manual. 18 CHANGING A VALUE To change a value, click in the field that you wish to change (see number 12 in figure 18). Highlight the value in the field and type over it. All changes are immediate upon leaving the field being changed. Changes also immediately takes place in the current gun file – no need to perform a “save”. If you enter an invalid value that is out of range, a warning window will pop up and displaying the acceptable values for that field. Clicking the [OK] button will place you back in the field were the error was made with the original value restored to the field. Figure 19: The Invalid Values window appears when a user attempts to change a Gun Data value to an unacceptable number. GRAYED OUT FIELD If a field is grayed out (see number 13 in figure 18), it is due to that field value being handled by a table. The two tables are the BC vs Distance table which overrides the Ballistic Coefficient field, and the MV vs Temperature table that overrides the Muzzle Velocity field. Control can be returned to the field by clearing the table using the [Clear] button (see number 16 in figure 18) below the table. THE GUN NAME FIELD The only field that cannot be changed in this section is the Gun Name field (see number 14 in figure 18). To change the Gun Name, use the previous section GList. UNITS OF MEASURE ATrag and Kestrel with Horus are both capable of handling values in Imperial (English) and Metric units of measure. They can also handle all units in Dual mode where all values are Imperial except distance which is handled in Meters – Zero Range and BC/Dist table. You can change the unit system that you wish to edit in by changing the radio buttons [E] [M] and [D] (see number 15 in figure 18). 19 ELEVATION AND WINDAGE TURRET SETTINGS The solution and the turret setting for the optical scope can be set separately for those may want drop in MILs but adjust windage by turn the turret on the scope. Here is an example where Drop is in MILs and the wind will be given as 4 clicks per SMOA. Figure 20: A partial view of HKGunLoader’s main screen shows elevation and wind fields. 20 TRANSFERRING GUN FILES TO/FROM KESTREL WITH HORUS HKGunLoader makes it easy to manage your gun information on a PC; however, its main purpose is to load the gun information to the Kestrel 4500 with Horus. If you haven’t done so, please refer to this manual’s section Connecting Kestrel with Horus to Your PC to establish communications between your PC and your Kestrel with Horus unit. When a good connection has been made, then click the [Kestrel] button on the main screen to begin bring up the Kestrel transfer screen to transfer gun information. Figure 21: HKGunLoader’s [Kestrel] button is used to initiate the Kestrel transfer screen. THE KESTREL TRANSFER SCREEN The Kestrel Transfer screen has only a few parts. The top box (17) is the same as the GList section on the main screen and shows the available gun files for transfer. There are two buttons in the middle (19): [Transfer Guns FROM Kestrel] and [Transfer Guns TO Kestrel]. These two buttons are disabled until you have selected a communications port (18). Information transmission progress can be tracked in the status box (20). Finally, the [Done] button on the bottom of the screen will exit this screen and return to the main screen. Figure 22: HKGunLoader’s Kestrel transfer screen. 21 CHOOSE THE CORRECT PORT To select the proper communications port, click on the drop down arrow (21) and a list of available ports on your PC will be presented. Select the proper port by clicking on it. If you do not know which port your Kestrel with Horus is attached to, please review this manual’s section Connecting Kestrel with Horus to Your PC. Once a port is selected, the transfer buttons will be enabled. Figure 23: Port COM40 is shown being selected by clicking on the Kestrel transfer screen’s drop down menu. 22 STARTING THE TRANSMISSION HKGunLoader version 2.04 is compatible with all versions of Kestrel with Horus. It should automatically detect the correct version of Kestrel it is connected so there is no action on your part. You will highlight the file you wish to transfer and click the [Transfer Guns TO Kestrel] button. The buttons will turn gray again when the transfer starts to prevent accidental conflicting commands. The status box should give you information during the transfer and tell you when the transfer is done. The status in the box is mostly for trouble shooting should you ever have to call for support. It also serves as an active visual signal that data is flowing. As an example, the status box might end with the following text in it after a completed transmission. NOTE: Text on your transfer will not be an exact duplicate of the example below. Figure 24: A partial view of HKGunLoader’s Kestrel transfer screen shows buttons grayed out, which indicates that a transfer is currently in process. 23 The key things you DO want to look for are the “KESTREL READY” message and the “Transfer Complete” message. When the “Transfer Complete” message is received, you are finished and may press the [Done] button to return to the main screen. ===OPEN COM40 ===Connected to COM40 (2) Ii A K4500BT 4502B HAVING TROUBLE? B *** C 0 D 100% 1642 E Iss 4.61c F 2419 G 254 H 254 I 254 J 253 P 2030 Q 2074M R 136 50 2 8 > ===Record size (136)...Verified ===Firmware version (4.61)...Verified ===KESTREL READY=== >===Send Guns to Kestrel >===Sending 8 guns ..>Block 0..>Block 1..>Block 2..>Block 3..>Block 4..>Block 5..>Block 6..>Block 7..>Block 8..>Block 9..>Block 10..>Block 11..>Block 12..>Block 13..>Block 14..>Block 15..>Block 16..>Block 17..>Block 18..>Block 19..>Block 20..>Block 21..>Block 22..>Block 23..>Block 24..>Block 25..>Block 26..>Block 27..>Block 28..>Block 29...Done ===Waiting for final response from Kestrel........... ===Transfer Complete Figure 25: This transcription of the Kestrel transfer screen’s status box shows the “KESTREL READY” and ”TRANSFER COMPLETE” messages (highlighted here in yellow), indicating a successful transfer. HAVING TROUBLE? Sometimes you will get an erroneous message in the status box, or the transfer simply stops. The best thing to do in such a situation is to click on the [Done] button, then reenter the Kestrel screen and try again. The Kestrel with Horus unit sometimes enters a “I don’t know who’s turn it is to talk” state. This state can usually be cleared exiting the screen as the exit process forces a “reset” on the Kestrel with Horus unit. If the problem persists, and you are sure that you have a valid connection, then please call either Nielsen Kellerman or Horus Vision for support. 24 LEGAL NOTICE HORUS VISION® and the EYE OF THE FALCON logo are registered trademarks of Horus Vision, LLC and may not be used in any manner without express permission from Horus Vision, LLC. SECOND SHOT, TACTICAL SOLUTIONS and TARGETING SOLUTIONS are trademarks of Horus Vision, LLC and may not be used in any manner without express permission from Horus Vision, LLC. Horus Vision software products and written and visual materials are protected by U.S. and international copyright protection and may not be used in any manner without express permission from Horus Vision, LLC. A wide variety of scopes, reticles, software, computer systems, and other products associated with shooting and ballistics (“Horus Vision systems”) are exclusively owned by Horus Vision, LLC and are protected by issued patents in the United States, including U.S. Pat. Nos. 5,920,995, 6,032,374, 6,453,595, 6,516,699 and 6,681,512, issued foreign counterparts, as well as numerous additional pending patent applications in the United States and foreign jurisdictions, including, but not limited to Europe, Japan, Israel, Canada and Australia. Manufacture, sale, importation or use of the Horus Vision systems requires a license from Horus Vision, LLC. For more specific information on obtaining a license, please contact Horus Vision, LLC. Nothing contained herein should be construed as granting, by implication, estoppels or otherwise, any license or right to use any Horus Vision, LLC intellectual property. © 2014 Horus Vision, LLC. All rights reserved. 25 CONTACT Horus Vision, LLC 598 San Mateo Avenue San Bruno, CA 94066 Phone: 650-588-8862 Fax: 650-588-6264 E-mail: [email protected] Website: www.horusvision.com 26