1
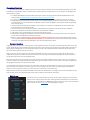
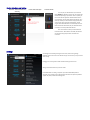
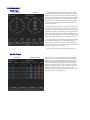
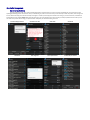
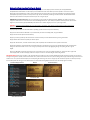
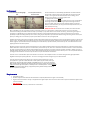
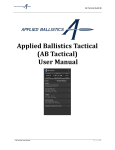
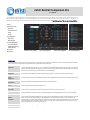
nVisti Kestrel Companion Pro For Android The nVisti Kestrel Companion App is the most versatile, accurate and user friendly dual purpose app available. This app allows for both remote viewing for firing solutions, and gun profile management on a Kestrel Applied Ballistics Device. This app also provides full access to the custom drag curve library. This page is dedicated to presenting operational requirements, along with the many features and their proper use. Kestrel Connection to iPhone is not available at this time. Features Operational Overview Main Screen Device Selection and Pairing Settings Target Engagement Single Target Multiple Targets Gun Profile Management Gun Creation/Deletion Uploading/Downloading Profiles to Kestrel Environment: Initialization screen and Menu Single Target Engagement Multiple Target Engagement Gun Profile Management Requirements: Features The following table lists the features of the Kestrel Companion app and gives a brief explanation of what they are/do. Greater detail along with directions for how to properly use all the features is given below in the instructional sections of this page. Application The Kestrel Companion Pro App uses the Ballistic Solver built in to Kestrel Device. All calculations are run on the Kestrel, and it requires a Bluetooth Kestrel in order to run. It is compatible with the Applied Ballistics and Sportsman versions. This app also supports the uploading and downloading of gun profiles to a Kestrel Device, allowing for gun profile development in the field, and the use of the custom drag curve library without the PC Profile Loader. Single Target Engagement Single Target Engagement gives you the ability to see a live feed from the Kestrel device. Including environmental factors, and gun parameters. It also allows you to adjust range to target, giving you a firing solution from your Kestrel remotely. Multiple Target Engagement This screen allows you to input up to 8 different targets. It will then generate firing solutions for each individual targets range. Gun Profile Management Build, Save, Manage, and upload/download gun profiles to your Kestrel device. Custom Drag Curves The nVisti Kestrel Companion Pro App comes pre-loaded with the complete custom drag curve library featuring over 530 bullets, and will be updated periodically in the future. Coriolis Effect & Spin Drift You can figure in Coriolis acceleration and/or gyroscopic drift (spin drift) into your solution. Both Coriolis effects and spin drift are optional features, easily disabled on the Kestrel device. See Kestrel User Manual for how to disable these. Temp - Table You can specify your load's powder temperature at the time you chronograhed along with the variation of muzzle velocity inside the temp table. The Kestrel will then automatically adjust your muzzle velocity based on its current sensor readings. Ballistic Calibration Sometimes it's not possible to accurately determine all the variables required to calculate an exact ballistic solution. As a result, the Point Of Impact (POI) predicted by the program can be a little different from where the actual bullet hits in the real world. One of the more powerful features of the Kestrel Device is the Drop Scale Factor (DSF). A user can calibrate the program based on real world observed drop data at range by inputting pairs of observed range/drop data. This is also how you correct for scope turret errors. While it may seem simple, behind the scenes complex calculations are doing more than just adjusting muzzle velocity. The trajectory is being trued. Dark Theme A dark theme is used to preserve night vision during low/limited light conditions. Metric Support Data inputs/output can be configured to use Metric units. Operational Overview The general flow of the program is designed for quick access. Guns are stored on the Kestrel, but can also be uploaded to the device from the field. This allows you to make changes on the fly, or to load any rifle on to a Kestrel device from the field, without the use of a Computer. The following sections cover the details of operation. 1. Your Kestrel Applied Ballistics must be on firmware 4.92 or higher in order to use this app. (See Kestrel User Guides/Downloads for how to update firmware) http://www.nkhome.com/support/kestrel-support/manuals-and-downloads 2. Your Kestrel must be paired to your Android device before you attempt to use this app. (See Kestrel Manual for how to pair your Kestrel) 3. Changing weapons must be performed on the Kestrel itself. You can upload/download gun profiles from this app, but you can only change the gun profile currently in use on the Kestrel itself. From AB Mode, scroll down to Gun and highlight it. Then simply press the left and right keypad arrows to change the gun. 4. The compass must be calibrated before you attempt to use this program. If your compass is not calibrated this will not work properly. (See Kestrel User Guide for how to calibrate compass). 5. For Coriolis to be correct, you must input your Latitude on the Kestrel Device itself. (Latitude is found under Environment on AB Mode). 6. Spindrift can be disabled on the Kestrel Device itself from the Environment Menu in AB Mode. 7. Target direction is set on the Kestrel Device itself, and cannot be changed from the app. 8. Units of Measure. Changing the Units of Measure on the Kestrel Device will not affect the Units in the App and vice versa. You must select the units you wish to use independently on the Device, and the App. 9. Batteries – The Kestrel Device is designed to work with Energizer Ultimate Lithium Batteries only, the use of other types of batteries can cause errors and problems. DO NOT USE ADVANCED LITHIUM BATTERIES. The use of Advanced Lithium batteries will cause compass errors, which will not allow you to use wind direction and speed capture. It will also prevent target direction capture. Common Questions Firing Solution Errors. Most of the time, if the firing solution is wrong, especially in the super-sonic trajectory, it is because of bad information input in to the program. Muzzle Velocity, and incorrect BC being the most common reasons. If you are pointing your own bullets, you can expect the BC to improved, and the firing solution to be slightly off. This can be corrected by altering your own BC, or by using the Drop Scale Factor. Whichever way you decide to do it, keep in mind, most firing solution errors are user induced. Using a suppressor. If you have a weapon that is suppressed, the easiest way to account for this, is by using the zero height, and zero offset. Zero the weapon with the suppressor on, if that is how it will most commonly be used. Then create a second profile for that weapon. Remove the suppressor and note the offset, input these in to the zero height/offset section. MV shift with Temp Shift. You do have the option to input a MV Temp Table in the weapon management system. A common error is to only test MV once, and then not account for the shift due to temperature change. One day your firing solution is spot on, then a month later it’s off. Keep in mind powder burn rates change with temperature. This needs to be accounted for. Turret Tracking Errors (Correcting For Turret Errors): This is accounted for in the DSF. You can input 1 field that is in the super-sonic range of the DSF. All other inputs need to be in the transonic to subsonic range. There is much more going on behind the scenes in the DSF than simply correcting Muzzle Velocity. It is far more complex than it seems. If you need to account for turret errors do it with the DSF function. Ballistic Calibration: Drop Scale Factor (DSF) is downloaded from the Kestrel to the Android Device, in the background. You must do a DSF calibration on the Kestrel unit itself, and this cannot be adjusted inside the app. You will not be able to see the DSF from inside the app. Main Screen From the main screen you have quick access to 4 functions. You also have the settings, which can be accessed from any screen by using your phones menu button. Pressing your devices back button from any of the function screens will return you to the Main Screen. NOTE: Before you begin to use this app, make sure your Kestrel Device is paired, and that you visit the settings menu, and properly adjust your settings. Device Selection and Pairing Main Menu – Choose Device Selection and Pairing Pick Your Device from Pop Up Connection Indicator You must pair your Kestrel Device to your Android Device BEFORE you attempt to use this app. This process may be different depending on your device. Once it is paired, you then need to tell the application which Bluetooth device is your preference. Click on Device Selection and Pairing, this is where you choose your Kestrel device. Simply tap here, and once the menu pops up tap your Kestrel device, and the program will know which device to automatically connect to. Refer to the Kestrel User Guide, and your individual devices instructions on how to pair Bluetooth devices. Also note on several screens you have a Bluetooth Connection button. Blue indicates connected, Red indicates dis-connected. Simply tap this button to activate the connection. Settings The settings are accessed by pressing the menu button, then choosing settings. Regardless of the units chosen on the Kestrel itself, you can choose any units you wish to use in the app. Changing units in the app will not affect the Kestrel settings and vice versa. Settings can be accessed from any Function Screen. Profile Downloads: This setting is important. If you want downloaded profiles to overwrite current profiles on your Android Device then switch this option. By default it appends the profile, instead of overwriting them. Target Engagement Single Target Not- Connected Connected Single Target Engagement gives you the ability to have a live feed which is updated every 1 second. You will see wind direction, and wind speeds at the top of this screen. Inside the clock direction indicator, you will see your elevation adjustment, and your windage adjustments. Note: The target direction needs to be set in the Kestrel itself, and cannot be changed via the app. At the bottom of the firing solution you will have basic Bullet, Gun, and Environmental data. More detailed data can be found on the Kestrel itself. Range adjustment: By swiping your finger up and down anywhere on this screen you can adjust the range to the target. You can also fine tune this range with the +/- buttons at the bottom of the screen. You can use the keypad to hand enter a range by clicking on the range number at the bottom, or you can adjust the range on the Kestrel itself. Note: you can adjust the swipe value changes in the settings. So that swiping changes by different increments. Anywhere from 1 to 25 yards/meters at a time. Connecting to a Kestrel: You must have already paired your Kestrel to your Android Device, AND have set it up under Device Selection and Pairing. If you have not done this, then the connection will fail. Click the Red Kestrel Icon and once it is connected/running the icon will turn Green. To disconnect it, simply touch the icon again. Do not forget to mark your target direction on the Kestrel itself. Multiple Targets Cleared Screen Computed Target Holds From this function you have the ability to input the range to 8 different targets. Once you are connected to a Kestrel Device, simply input the ranges you need. Then select Compute Holds, it will then one by one calculate your firing solution for each target. All parameters other than range must be updated on the Kestrel Device itself, including weapon selection. These ranges are saved, so if you exit the app, the next time you open it, they will remain input. You can also clear your holds using the Clear Holds button. Once you are ready, just make sure the Bluetooth Symbol is Blue indicating its connected (red indicates it is not connected), and press computer target holds. Gun Profile Management Gun Creation/Deletion You have the ability to create, store, upload, and download profiles to the Kestrel device. This section will cover Gun Management, the next section will cover uploading/downloading profiles. The Kestrel can store up to 16 different gun profiles. You will also notice you have the ability to create Temp Tables, and to change from G1 or G7. Note Custom Drag Curves lock out the ability to change this. To delete a profile simply check the box next to that gun, press the menu button, and delete the profile/profiles you have selected. NOTE: Always select the bullet first. If you create the weapon then choose a bullet, your weapon profile will be reset. Also if you exit this screen for any reason without saving, your profile will reset. Always save your work before leaving this screen. Gun Profile Management Menu Select Bullets from Here Select Caliber Select Brand Select Bullet Select Drag Curve Save Completed Profile Create As Many As You Want Uploading/Downloading Profiles to Kestrel nVisti Kestrel Companion Pro has the ability to send (upload) your current weapon profile to a Kestrel, and other Applied Ballistic Compatible Devices via Bluetooth. This does require you have a Bluetooth version of the devices you wish to upload to. There are a couple of settings that must be enabled first in order to do this. Also before you start this process ensure you have completed you have paired your device, and completed your weapon profile in the Companion Pro App. See the notes before proceeding to the demonstration. Kestrel Device Bluetooth must be on, and the Kestrel must be paired to the device you are running the app on. WARNING for Kestrel Sportsman Users: You can use this system to send a profile to a Kestrel Sportsman, HOWEVER. You need to verify you are using a G1 or G7 BC first. You can do this from the Gun Profile Management Screen. If you attempt to upload to a Kestrel Sportsman with a Custom Drag Curve, it will successfully upload, HOWEVER your BC will be set to 1.0 which will give you an error in your firing solution. WARNING – Uploading profiles will DELETE the current gun profiles on your Kestrel. If you want to save any profiles you need to “Get Profiles” before you “Send Profiles” The proper steps are shown and described below for uploading a profile to the Kestrel (or other AB devices). Step 1) On the Kestrel make sure Bluetooth is on, the Kestrel and your Device are already paired, and go to AB Mode Step 2) Connect to Kestrel (Press Connection Button). Step 3) If you have any profiles you don’t want to lose on the Kestrel then you need to download them by pressing “Get Profiles” Step 4) Check the boxes next to the profiles you want to upload. Step 5) Click “Send Profiles”, it will then indicate as each profile is uploaded, and it will delete all current profiles on the kestrel. Step 6) After uploading on the Kestrel Device from the Main Menu go to Gun Selection, the guns you just uploaded will be turned off. Double check each gun to make sure the data is correct. Turn on the gun profiles you want access to by highlighting that gun and pressing the left or right on keypad.. Step 7) From AB Mode on the Kestrel, select the gun you currently want to use. To do this, highlight the word gun, and press the left or right arrow until it displays. Note: if it does not display, make sure in step 6 it is turned on. This will be the gun used for firing solutions. IMPORTANT USER TIP: Guns can be turned on or off. Sometimes during an update, guns are turned off. Updates generally do not erase gun profiles. If a gun seems to have gone missing after an update, check the Gun Selection menu, which is found on the main menu, and see if that gun was simply turned off. Also guns can be turned off when not in use. If you own a dozen weapons, but are only taking two to the range. You can turn the guns you do not have with you off. This will help ensure you don’t accidently select the wrong gun on the Kestrel Device, but it also makes choosing weapons easier for those with multiple guns in the library. Gun Profile Management Menu AB Mode Gun Selection Menu Action Buttons At Bottom Current Gun Selection Environment: To have wind display live data highlight wind. Press the capture button once, wind is now active. Environmental factors are automatically populated when connected. However wind must be in capture mode in order to live feed, and environment must be turned on. Turning environment off will freeze the current readings, and is advised in some situations. To start wind capture mode: 1. Highlight wind on the Kestrel Device. 2. Press the Capture Button (has a camera icon on it) once. The word Wind will change to W with an Arrow. Pressing the capture button again will lock in your current wind. If you wish to use a live wind feed, example: you have the kestrel in a wind vane mount, then only press the wind capture button once, and leave wind capture running. IMPORTANT USER TIP: Environment can be turned off, from the Environment Menu, in AB Mode. If you are using a wind vane mount in the open summer sun, or sitting open on a shooting mat in the hot sun, this can cause false environmental readings. Think about how hot the scope on your weapon is, if you leave it out in the summer sun for too long. The same thing can happen to your Kestrel. It is advised that if you are leaving this device in the direct sun for prolonged periods that you turn environment off, and only turn it back on periodically to update the readings. When you turn it back on, swing it by the lanyard over your head for 20-30 seconds to get air moving over the sensors, then capture you reading, and turn it back off if you plan to place it back in the direct sun for a prolonged period. Side Note: Atmospheric inputs have historically been the least understood and caused the most trouble for shooters running ballistics programs, in particular the pressure inputs. The following discussion elaborates on the correct way to manage these variables. Basically there are two options for describing pressure to a ballistics program; 1) Enter the barometric (aka corrected) pressure and altitude, or 2) Enter the Station pressure where you are. Some definitions are in order regarding barometric and station pressure. Barometric pressure is also known as sea level corrected pressure, and is what the weather station and airports report because it's useful for pilots and making weather assessments. Barometric pressure is not the actual air pressure where you are, rather it's a number that's corrected to sea level. In order to determine the actual air pressure where you are (which is what the ballistics program cares about), you have to account for the effects of altitude. However if you have a handheld weather meter like a Kestrel, you can measure Station Pressure directly which is the actual air pressure where you are. This is the preferred method of inputting pressure data because it's one less input and relies on only one measurement instead of two. A common error is to mistake station pressure for barometric or vice versa. The consequence of this error is that the wrong air density gets applied which degrades the accuracy of trajectory predictions. This error is increasingly more severe the higher up you are above sea level. To further clarify the output from the Kestrel, here is an excerpt from the Kestrel user's manual: "Some final notes - If you wish to know the actual or station pressure for your location (such as for engine tuning), simply set the reference altitude on the BARO screen to “0”. In this case, the Kestrel Meter will not make any adjustment and will display the measured value. (Engine tuning and ballistics software sometimes refer to atmospheric or station pressure as “absolute pressure.” These applications are concerned with the actual air density, as opposed to pressure gradients relating to weather, so barometric pressure is less useful." Requirements: Android v4.2 or higher. Bluetooth support on both the Phone and Kestrel Device is required. (Bluetooth 4.0 or higher is recommended) Region and Carrier Limitations: This app is not approved for all regions and/or carriers at this time. Some carriers may choose to block this app due to the nature of its content. Not Required: You do not need GPS, Internet, or Cell Service to run calculations.