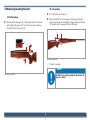
1
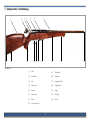
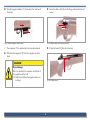
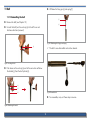
User Manual
1770 Series Models
Issue 01/2009
Contents
1 Components / Terminology..........................3
10Removing/inserting the bolt..................... 16
2 Introduction................................................. 4
10.1 Removing..................................................... 16
10.2 Inserting. ..................................................... 16
3 Key to Symbols............................................ 4
11Bolt............................................................ 17
3.1 General instructions...................................... 4
3.2 Safety instructions.......................................... 4
11.1 Dismantling the bolt.................................... 17
11.2 Cocking the bolt........................................... 18
4 General handling of firearms..................... 5
4.1
4.2
4.3
4.4
4.5
4.6
12Maintenance/cleaning.............................. 19
Important basics............................................ 5
Shooting......................................................... 6
Maintenance.................................................. 7
Transport. ...................................................... 7
Storage.......................................................... 7
Ear and eye protection................................... 7
12.1 Cleaning the barrel..................................... 19
12.2 Maintenance intervals................................. 20
13Optical sights. ........................................... 21
14Troubleshooting........................................ 21
5 Legal. .......................................................... 7
15Technical data........................................... 21
6 Intended use............................................... 8
16Disposal..................................................... 22
7 Liability........................................................ 8
17Miscellaneous............................................ 22
8 Loading/unloading..................................... 9
18Warranty card........................................... 23
8.1 Loading.......................................................... 9
8.2 Unloading.................................................... 12
9 Safety catch............................................... 14
9.1 Releasing the safety catch........................... 14
9.2 Engaging the safety catch. .......................... 15
2
1 Components / Terminology
[1]
[14]
[8]
[2]
[3]
[4]
[5]
[6]
[13] [12] [11]
[9]
[7]
[10]
[9]
[8]
Fig.1 Overview
[1]
Stock
[9]
Checkering
[2]
Bolt handle
[10]
Magazine
[3]
Bolt
[11]
Magazine holder
[4]
Safety catch
[12]
Trigger guard
[5]
Receiver
[13]
Trigger
[6]
Ejection area
[14]
Butt plate
[7]
Barrel
[15]
Muzzle
[8]
Sling swivel eyelet
3
[15]
2 Introduction
3 Key to Symbols
Dear hunting enthusiast,
In this handbook, the following symbols are used to distinguish
between general information and particularly important information:
It's important to be able to rely on the quality of a hunting rifle:
for example, exact and ever-consistent shooting performance.
With an ANSCHÜTZ barrel and the detailed, well-engineered
design of our bolt, you are guaranteed gunsmithing of the finest calibre. Our master builders from the Match Armoury craft
hunting rifles drawing on more than 150 years' experience in the
manufacture of precision rifles. But of course, tradition isn't everything. You will always be well equipped when you have an absolutely reliable, easy-to-use ANSCHÜTZ rifle.
3.1 General instructions
XX is the symbol for an instruction
99 shows the desired result
yy is the symbol for a list item
3.2 Safety instructions
You can always rely on a first-class ANSCHÜTZ hunting repeater.
Your ANSCHÜTZ rifle will be a reliable companion with unsurpassed accuracy and function at all times.
$$ identifies a safety instruction
Note!
The ANSCHÜTZ team wishes you good hunting!
An instruction indicating a specific
course of action.
Caution!
Indicates a hazardous situation that can lead to minor physical injury or material damage.
Warning!
Indicates a hazardous situation that can lead to serious physical injury or death.
4
4 General handling of firearms
$$ A firearm must only ever be used for its designated purpose.
Firearms are dangerous objects requiring the utmost care in their
storage and use. The following safety and warning instructions
must be observed without exception!
$$ Firearms owners are responsible for ensuring that their firearm is at no time, and
especially when absent, within reach of or accessible to children or other unauthorised persons.
$$ Firearms must not be handed over to unauthorised persons.
Note!
$$ Only original ANSCHÜTZ magazines may be used.
The firearms legislation of the respective territory
must be respected and complied with.
$$ The specified capacity of the magazines must not be exceeded.
$$ Modifications to the rifle or the use of non-original ANSCHÜTZ magazines and accessories can lead to malfunctions.
$$ Serious or life-threatening injuries and damage can be caused by the use of incorrect ammunition, by dirt in the barrel or by incorrect cartridge components.
4.1 Important basics
$$ Firearms modified in a way that could affect safety must not be used. If a fault or
malfunction is detected, the firearm must be unloaded and taken to an authorised
gunsmith for repair.
Note!
The use of firearms while under the influence of
drugs, alcohol or medication is not permitted.
Vision, dexterity and judgement can all be adversely
affected.
A good physical and mental constitution is a prerequisite for using a firearm.
$$ In the event of external effects (e.g. corrosion, being dropped, etc.), the firearm
must be checked by an authorised gunsmith.
$$ A firearm must always be treated with the utmost care and be protected from accidental damage.
5
4.2 Shooting
$$ Any firearm must be treated as if it were loaded.
$$ Never pick up a firearm by the trigger.
Warning!
$$ Shooting galleries must be adequately ventilated.
Danger to life and cause of physical damage!
$$ Any bullet trap in the shooting gallery must be completely safe and visible.
Aiming the rifle at people and objects.
hh When the rifle is not in use, keep the muzzle
pointing in a safe direction.
hh The muzzle of a firearm must never be held in
a direction where it can can cause damage or
endanger life.
$$ No persons may stand in the vicinity of the target during a shoot.
$$ Firearms should not be used when visibility is poor.
$$ Do not shoot into the air, at hard or smooth surfaces, at water or at targets on the
horizon.
$$ Do not shoot at targets if the shot could ricochet or be deflected in a dangerous
manner.
$$ To prevent accidents or damage to the rifle, never discharge a shot with the muzzle
held under water or against materials or objects.
$$ Only shoot with the calibre specified on the barrel of the rifle.
$$ Only new, clean, factory-charged ammunition of the calibre permitted for the rifle
may be used.
Warning!
Malfunction when shooting!
$$ The ammunition must conform to the specifications of the C.I.P.
Shot not discharged after trigger pulled.
hh Do not look down into the muzzle.
hh Keep the muzzle of the firearm pointing in a
safe direction.
hh Unload the firearm.
hh Remove residues from the barrel.
$$ Only load the rifle immediately before use.
$$ Use only original ANSCHÜTZ magazines.
6
4.6 Ear and eye protection
$$ The specified capacity of the magazines must not be exceeded.
$$ Life-threatening injuries and physical damage can be caused by the use of incorrect
ammunition, dirt in the barrel or incorrect cartridge components.
Note!
$$ Only original ANSCHÜTZ parts may be used.
For your own safety, approved ear and eye protection should be used when shooting!
Shooting without safety equipment can result in damage to the hearing and sight.
4.3 Maintenance
$$ Ensure that the rifle is unloaded before and after use or during maintenance and
cleaning.
4.4 Transport
5 Legal
$$ Firearms may only be transported in an unloaded condition and in locked containers.
Note!
$$ Only transport firearms in a clean, dry condition.
The applicable firearms legislation, regulations and
provisions for the respective territory, and also the
safety rules of the hunting and sporting organisations must be observed.
4.5 Storage
$$ Firearms that are not in use must be kept in a secure place under lock and key.
$$ Firearms must always be stored in an unloaded and uncocked condition.
$$ Ammunition must be kept in a separate place under lock and key.
7
6 Intended use
7 Liability
The 1770 repeating rifle is a hunting gun. It must only be used on
shoots and on shooting ranges (for sporting and hunting disciplines) and may only be used by persons who hold the appropriate firearms permit.
ANSCHÜTZ will accept no liability or claims for compensation for
damage of any kind arising from:
yy
yy
yy
yy
yy
yy
yy
yy
Note!
A firearm must only ever be used for its designated
purpose.
failure to comply with the instructions in this user's handbook,
improper treatment or repair,
use of non-original ANSCHÜTZ parts,
incorrect handling or care,
negligence,
removal of the sealing paint,
unauthorised tampering and
transport damage.
Caution!
Altering or tampering with the rifle or its parts is forbidden and may breach the terms of the guarantee.
Alterations of this kind can have an adverse effect on
the safe use of the product and lead to accidents that
endanger life and limb. In such cases the guarantee
is automatically void.
$$ The rifle must be examined for any changes each time before use.
8
8 Loading/unloading
Caution!
Physical damage!
8.1 Loading
After it is unlocked, the magazine can fall out of
the magazine well by itself.
hh Hold a hand below the magazine when unlocking it.
$$ Only load the rifle immediately before use.
XX Slide the magazine holder [11] forwards (in the direction of
the arrow).
XX Place the cartridge, base first, centrally on the loading spring
(in the area with the lettering) and, using the cartridge, push
the loading spring down and into the magazine (see arrows).
[10]
[11]
Fig.2 Unlocking the magazine
99 The magazine [10] is unlocked and can now be removed.
XX Withdraw the magazine [10] from the magazine recess by
hand.
Fig.3 Loading the magazine
9
99 The magazine is loaded when the base of the cartridge is
resting against the rear wall of the magazine.
Warning!
Danger to life!
Incorrect calibre in the magazine.
hh Only use the calibre specified on the barrel of
the rifle.
XX Insert the magazine (in the direction of the arrow) into the
rifle until it engages audibly.
Fig.4 Magazine loaded
$$ Only original ANSCHÜTZ magazines may be used.
$$ The specified capacity of the magazines must not be exceeded.
$$ Only cartridges of the calibre specified on the barrel of the rifle may be used.
$$ Only new, clean, factory-charged ammunition of the calibre permitted for the rifle
may be used.
$$ The ammunition must conform to the specifications of the C.I.P.
Fig.5 Inserting the magazine
99 The rifle is now loaded.
10
XX Pivot the bolt handle [2] upwards (in the direction of the arrow).
XX Close the breech [3] (direction of arrow).
[3]
[2]
Fig.8 Closing the breech
Fig.6 Pivoting the bolt handle upwards
99 The firing pin is cocked.
99 Closing the breech pushes a cartridge from the loaded magazine into the cartridge chamber.
XX Open the breech [3] (direction of arrow).
XX Pivot the bolt handle [2] downwards (direction of arrow).
[2]
[3]
Fig.7 Opening the breech
Fig.9 Pivoting the bolt handle downwards
99 Opening the breech brings a cartridge from the loaded
magazine into the feed position.
11
8.2 Unloading
Warning!
XX Pivot the bolt handle [2] upwards (in the direction of the arrow).
Danger to life!
Unintentional discharge as a result of a loaded,
unsecured rifle.
hh Keep the muzzle of the firearm pointing in a
safe direction.
hh Engage the safety catch after loading the rifle.
99 The rifle is fully loaded.
[2]
XX Engage the safety catch (see Chapter 9).
Fig.10 Pivoting the bolt handle upwards
Warning!
XX Open the breech [3] (direction of arrow).
Danger to life!
Unintentional discharge as a result of inattentiveness while engaging the safety catch or as a result
of possible malfunctions after securing.
hh Even when the safety catch is engaged, the
muzzle of a firearm must never be held in a
direction where it can can cause damage or
endanger life.
[3]
Fig.11 Opening the breech
99 Any cartridge that is still in the chamber will be ejected.
99 The rifle is fully loaded and the safety catch is engaged.
12
XX Move the safety catch [4] into the firing position (direction of
arrow).
XX Slide the magazine holder [11] forwards (in the direction of
the arrow).
[4]
[10]
[11]
Fig.12 Sliding the magazine holder forwards
Fig.13 Sliding the safety catch forwards (releasing)
99 The magazine [10] is unlocked and can now be removed.
XX Close the breech [3] (direction of arrow).
XX Withdraw the magazine [10] from the magazine recess by
hand.
Caution!
Physical damage!
After it is unlocked, the magazine can fall out of
the magazine well by itself.
hh Hold a hand below the magazine when unlocking it.
[3]
Fig.14 Closing the breech
13
9 Engaging/releasing the safety catch
XX Pull the trigger [13] (direction of arrow) and in the same sequence of actions, close the breech [3] and carefully pivot the
bolt handle [2] downwards, as shown in Fig. 16.
Note!
The safety catch can only be engaged/released
when the rifle is cocked. The general "Engage/Release" procedure is described in the following.
9.1 Releasing the safety catch
[13]
XX Close the breech [3] (direction of arrow).
Fig.15 Pulling the trigger
XX While the trigger is pulled, pivot the bolt handle [2] downwards (direction of arrow).
[3]
Fig.17 Closing the breech
[2]
Fig.16 Pivoting the bolt handle downwards
99 The rifle is unloaded and uncocked.
14
9.2 Engaging the safety catch
XX Pivot the bolt handle [2] downwards (direction of arrow).
XX Slide the safety catch [4] to the rear (direction of arrow).
[4]
[2]
Fig.18 Pivoting the bolt handle downwards
99 The rifle is cocked and locked.
Fig.20 Sliding the safety catch back
XX Move the safety catch [4] into the firing position (direction of
arrow).
99 The rifle is cocked and the safety catch is engaged.
[4]
Fig.19 Sliding the safety catch forwards (releasing)
99 The rifle is cocked and the safety catch is released.
15
10Removing/inserting the bolt
10.2 Inserting
XX Cock the bolt (see Chapter 11).
10.1 Removing
XX Bring the bolt [3] up to the receiver [5] (with the guide slot
facing downwards) while pulling the trigger and push the bolt
[3] forwards until it engages (direction of arrow).
XX Slide the bolt releasing lever [16] forwards (direction of arrow)
while pulling the trigger [13] and at the same time withdraw
the bolt [3] from the receiver [5].
[3]
[5]
[16]
[5]
[3]
Fig.22 Inserting the bolt
99 The bolt is inserted.
[13]
Note!
Fig.21 Removing the bolt
The bolt [3] can only be pushed into the receiver [5]
when it is cocked.
16
11Bolt
XX Withdraw the firing pin [s] and spring [f].
11.1 Dismantling the bolt
[f]
XX Remove the bolt (see Chapter 10).
[s]
XX Uncock the bolt (turn the end cap [x] to the left in an anticlockwise direction (arrowed).
Fig. 25 Withdrawing the firing pin and spring
[x]
99 The bolt is now dismantled and can be cleaned.
Fig.23 Uncocking the bolt
XX Push down on the end cap [x] and at the same time withdraw
the handle [y] from the bolt cylinder [z].
[x]
[y]
Fig.26 Dismantled bolt
[z]
XX To reassemble, carry out these steps in reverse.
Fig.24 Withdrawing the handle
17
11.2 Cocking the bolt
XX Pivot the bolt handle [2] downwards in a clockwise direction
until the bolt [3] is cocked (it will be clearly heard to engage).
XX Bolt [3] uncocked.
[3]
[2]
[3]
Fig.29 Pivoting the bolt handle downwards
Fig.27 Bolt uncocked
XX The bolt [3] is cocked (guide slot and firing pin form a straight
line).
XX Insert the bolt [3], nut end first, into the receiver [5].
[3]
[5]
[3]
Fig.28 Inserting the bolt
Fig.30 Bolt cocked
18
12Maintenance/cleaning
12.1 Cleaning the barrel
If the barrel is only slightly dirty, use a plastic brush to clean it.
XX Oil the plastic brush lightly and push it through the barrel
from the chamber end using a clean cleaning rod.
Warning!
Danger to life!
Danger to life from loaded firearm.
hh Ensure that the rifle is unloaded before use or
during maintenance and cleaning work.
Fig.31 Plastic brush
Note!
If the barrel is very dirty, use a bronze brush together with a suitable barrel cleaner.
After each use of the rifle, apply a thin film of oil to
the steel parts and thoroughly clean the barrel.
Note!
Pay attention to the user instructions for the cleaner!
Caution!
Injury and physical damage!
Danger of injury or physical damage as a result of
not removing the oil from the barrel and chamber.
hh Each time before shooting, any oil or foreign
objects must be removed from the barrel and
chamber.
Fig.32 Bronze brush
19
12.2 Maintenance intervals
XX Pull a woolen swab through the barrel several times to dry it.
Note!
Note!
Pay attention to the instructions supplied with the
cleaner.
It is essential to re-oil the barrel after using ammonia-containing cleaning agents, to avoid the risk of
corrosion.
After each use
yy Clean the barrel with a plastic brush and gun oil
yy Wipe the rifle (including the stock) with an oily rag
If very dirty
yy Clean the barrel with a bronze brush and a suitable barrel
cleaner
yy Wipe the rifle (including the stock) with an oily rag
Yearly
yy Take the rifle to a specialist dealer / gunsmith for inspection
20
13Optical sights
15Technical data
Note!
Operating and maintenance instructions can be
found in the respective manufacturer's documentation.
14Troubleshooting
Weight
3.4 kg
Length
106 cm
Calibre
.223 Rem.
Barrel
55 cm/22 inch (clockwise rifling/6x groove & land)
Magazine capacity
3 rounds
Trigger type
Single stage trigger (factory-set to 1200 g)
Breech type
Rotary cylinder bolt (with two-row, three-lug
locking; 2x3)
Receiver with 11 mm V-block (including tapped holes) for mounting optical sights
Warning!
In the event of malfunctions (e.g. shots not discharged, etc.) the rifle must be unloaded, secured
and taken without delay to a specialist dealer or
gunsmith.
21
16Disposal
17Miscellaneous
The disposal of the rifle must be carried out and certified by a
specialist dealer or gunsmith.
Additional information is available on the Internet at
www.anschuetz-sport.com.
ANSCHÜTZ also provides news on these and other products in
the ANSCHÜTZ Newsletter, which you can sign up to for free on
the Internet.
The original group for your rifle at 100 m is affixed to the CD
case.
www.anschuetz-sport.com
1
22
18 Warranty Card
< < < < WA R R A N T Y > > > >
After thorough testing of materials and finished parts, this
item has passed a rigid final inspection as well as proof
testing or test shooting. If, despite these precautions, there
is any failure due to defective materials or workmanship
(except broken stocks and springs) within two years, the
necessary repairs will be carried out without charge,
insofar as the item was evidently defective at the time of
purchase. No claims under warranty can be accepted if
the item has been subjected to improper use or unauthorized repair. The item will be either repaired or replaced at
our discretion. Claims for compensation – put forward for
any legal cause whatsoever – are excluded. This warranty
card – completed and stamped by your dealer – must be
returned with the item for repairs.
J.G. Anschütz GmbH & Co. KG • Jagd- und Sportwaffenfarbrik
Postfach 1128 • D-89001 Ulm/Germany • www.anschuetz-sport.
com
SERIAL-NO.:
DATE:
THIS ITEM WAS BOUGHT FROM:
Stamp and signature of dealer
23