1
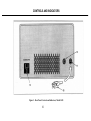
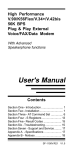
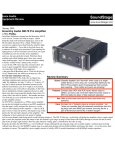
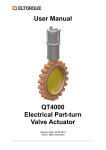
1320
Model 1420
AC Power Supply
User Manual
1420
AC Power Supply
TEST INSTRUMENT SAFETY
WARNING
An electrical shock causing 10 milliamps of current to pass through the heart will stop most human heartbeats. Voltage as low as 35
volts dc or ac rms should be considered dangerous and hazardous since it can produce a lethal current under certain conditions. Higher
voltages are even more dangerous. Your normal work habits should include all accepted practices to prevent contact with exposed high
voltage, and that will steer current away from your heart in case of accidental contact with a high voltage. You will significantly
reduce the risk factor if you know and observe the following safety precautions:
The Global Specialties Model 1420 AC Power Supply is a source of high voltage ac. The person using the
instrument should be a qualified electronics technician or otherwise trained and qualified to work with high voltage.
2. Use only a polarized 3-wire ac outlet. This assures that the power supply chassis, case, and ground terminal are connected to a
good earth ground and reduces danger from electrical shock.
3. When servicing any equipment equipped with a two-wire ac plug, treat it as “hot chassis” type and connect it to the ISOLATED
OUTPUT outlet of the ac power supply. Even some equipment with a polarized plug are considered the “hot chassis” type.
4. Never connect two pieces of “hot chassis” equipment to ISOLATED OUTPUT outlets simultaneously. There may be a serious
shock hazard between two chassis.
5. Don’t expose high voltage needlessly. Remove housings and covers only when necessary. Turn off equipment while making
test connections in high-voltage circuits. Discharge high-voltage capacitors after removing power.
6. If possible, familiarize yourself with the equipment being tested and the location of its high voltage points. However,
remember that high voltage may appear at unexpected points in defective equipment.
7. Use an insulated floor material or a large, insulated floor mat to stand on, and an insulated work surface on which to place
equipment; and make certain such surfaces are not damp or wet.
8. Use the time proven “one hand in the pocket” technique while handling an instrument probe. Be particularly careful to avoid
contacting a nearby metal object that could provide a good ground return path.
9. When testing ac powered equipment, remember that ac line voltage is usually present on some power input circuits such as the
on-off switch, fuses, power transformer, etc. any time the equipment is connected to an ac outlet, even if the equipment is
turned off.
10. Never work alone. Someone should be nearby to render aid if necessary. Training in CPR (cardio-pulmonary resuscitation)
first aid is highly recommended.
1.
TABLE OF CONTENTS
page
page
TEST INSTRUMENT SAFETY ..................... inside front cover
CIRCUIT DESCRIPTION..........................................................29
FEATURES ................................................................................ 3
MAINTENANCE AND CALIBRATION..................................30
SPECIFICATIONS ..................................................................... 4
Preventive Maintenance...............................................................30
CONTROLS AND INDICATORS ............................................. 6
Returning for Service...................................................................30
OPERATING INSTRUCTIONS .............................................. 12
Fuse Replacement........................................................................30
Precautions ................................................................................ 12
Auto-Transformer Brush Replacement........................................31
Troubleshooting: Using the AC Power Supply as an
Isolation Transformer ........................................................ 16
Calibration Adjustments..............................................................31
Performance Tests........................................................................34
Troubleshooting: Using the AC Power Supply as a
Variable AC Voltage Source........................................ ….21
Troubleshooting...........................................................................35
Troubleshooting: Using the AC Power Supply to
Measure Electrical Loads .................................................. 23
CUSTOMER SUPPORT.............................................................37
WARRANTY INFORMATION.................................................37
Using the Model 1420 as a Leakage Tester .............................. 25
Warranty Service Instructions......................................................38
Soldering Iron Temperature Control ......................................... 27
2
FEATURES
WIDE VOLTAGE RANGE
Output voltage continuously variable from 0 to 150VAC.
BUILT-IN METER
WIDE CURRENT RANGE
Model 1420
Heavy duty unit handles virtually all servicing needs.
Output current up to 3 amps continuous, 4 amps
intermittent.
protection.
Model 1420
3-1/4 inch meter. Multi-color scales. Overrange
---Model 1420 offers the following additional features--POWER LINE LEAKAGE TEST
WIDE LOAD MEASUREMENT CAPABILITY
Model 1420
Built in multi-function meter. 0-150V. Two current
ranges of 0-2A and 0-4A for improved resolution. Current
scales also calibrated in VA at 120V.
OSHA, UL, and CSA power line leakage test capability; fast
and safe measurement.
EXPANDED LEAKAGE SCALE
0-5mA (0-5000µA) leakage scale is expanded in most
commonly used 100-500µA portion, compressed to 5 mA
full scale. Overload protected.
ISOLATED OUTPUT VOLTAGE
Built-in isolation transformer for safe servicing of “hot
chassis” equipment. Two
isolated outlets on Model 1420.
CIRCUIT BREAKER OVERLOAD PROTECTION
Isolated output protected by easily reset circuit breaker.
SOLDERING IRON TEMPERATURE CONTROL
Built-in
solidsolid
state state
soldering
iron temperature
control.
Built-in
soldering
iron temperature
control
3
SPECIFICATIONS
MODEL 1420
OUTPUT ISOLATION
Leakage less than 0.1mA (25ºC, 50% relative humidity.)
VOLTAGE ADJUSTMENT RANGE
0-150VAC, with input at 120VAC
VOLTAGE/CURRENT SENSING
Sine wave average, calibrated in RMS
MAXIMUM CURRENT (Isolated)
3A continuous, 4A intermittent (0-130V). Intermittent not to
exceed 4 minutes at 4A followed by 5 minutes at 1A max.
METER SCALES
Voltage ..................................................................... :0-150V
Current:. ........................................................................ 0-2A
......................................................................... 0-4A
Volt-Amps (Voltage Set to 120) ............................ 0-240VA
................................................................. 0-480VA
Leakage ...................... 0 to 5mA (5,000µA), expanded scale
METER ACCURACY (25ºC)
Volts:......................±5% of full scale (calibrated @ 120VAC)
Current:...........................................................±5% of full scale
Leakage:............................................................±5% @ 500µA
4
FRONT PANEL CONTROLS
(Refer to Fig. 1)
1. POWER ON Switch.
2. POWER ON Pilot Light.
3. Function Switch.
LEAKAGE COM. Connects meter to measure leakage with
respect to common side of ac line. Use LEAKAGE scale on
meter. Voltage must be preset to 120VAC for accurate
leakage measurements.
LEAKAGE HOT. Connects meter to measure leakage with
respect to hot side of ac line. Use LEAKAGE scale on
meter. Voltage must be preset to 120VAC for accurate
leakage measurements.
Model 1420
Five interlocking pushbutton switches which select
function and meter scale. Pressing a button releases
the previous selection. The following selections are
available:
VOLTS. Connects meter to measure voltage at
ISOLATED OUTPUT. Use 0-150 VOLTS
scales on meter. Voltage is adjustable with AC
VOLTS control.
4. Meter. Appropriate scale is selected by function switch.
5. AC VOLTS Control. Adjusts voltage at ISOLATED
OUTPUT receptacle(s) from 0 to 150 volts.
AMPS 0 – 4. Connects meter to measure current of
ISOLATED OUTPUT. USE 0-4 AMPS scale on
meter. When voltage is set to 120 VAC, the 0-480
VA scale may be used to measure the output load
in volt-amps
AMPS 0-2. Connects meter to measure current of
ISOLATED OUTPUT. Use 0-2 AMPS scale on
meter. When voltage is set to 120VAC, the
0-240VA scale may be used to measure the
output load in volt-amps.
6
CONTROLS AND INDICATORS
Figure 1. Front Panel Controls and Indicators, Model 1420
8
CONTROLS AND INDICATORS
Figure 3. Rear Panel Controls and Indicators, Model 1420
10
OPERATING INSTRUCTIONS
PRECAUTIONS
SAFETY
The Model 1420 AC Power Supply is a source of
high voltage ac. Improper or careless use could result in fatal
electrical shock. The most commonly encountered conditions
which may pose a shock hazard are identified and corresponding
precautions listed in the TEST INSTRUMENT SAFETY section
which starts on the side front cover of this manual. Know and
observe these precautions.
become excessive and cause failure of the unit. Similarly, avoid
operating locations near sources of heat.
MAXIMUM OUTPUT VOLTAGE
CAUTION
Exceeding the maximum input voltage rating of the equipment
under test (typically 130VAC) may cause severe damage to the
equipment.
Although Model 1420 is equipped with dual isolated outlets,
only one “hot Chassis” equipment should be connected at a time.
Unless the line-to-chassis relationship is identical, a shock hazard
will exist between the two chassis.
The output voltage of the ac power supply is adjustable from 0
to 150VAC. This is very useful in certain testing situations for
stressing equipment beyond its normal operating range to
determine its breakdown point. However, for most testing and
servicing applications, input voltages higher than the maximum
specified by the manufacturer should be used with great
precaution.
INPUT POWER
These instruments are intended for use only with 120 volt,
60Hz line voltage. Do not operate from 50Hz, or 220-240 volt
power systems. The instrument may be safely operated from 100
volt, 60Hz line voltage, although the maximum output voltage
will be lower.
For normal testing and servicing, check the maximum input
voltage specification of the equipment under test and make sure
you do not adjust the output voltage of the ac power supply
higher than that value. Most ac powered equipment has a
maximum input voltage rating of 130VAC. If unsure of the
maximum rating, do not exceed 130 VOLTS. On Model 1420,
the 130-150 volt portion of the VOLTS scale is red as a reminder
that caution should be observed.
VENTILATION
The holes in the case provide convection cooling (hot air rises
and escapes through the top vents, while cool air is drawn in to
replace it through the bottom). Never block these ventilation
holes with a manual, schematic diagram, other equipment, etc. If
the air is blocked, the temperature inside the ac power supply may
12
OPERATING INSTRUCTIONS
PRECAUTIONS
Figure 5. Observe Caution Above 130V.
13
Troubleshooting: Use As Isolation Transformer
OPERATING INSTRUCTIONS
TROUBLESHOOTING: USING THE AC POWER SUPPLY AS ISOLATION TRANSFORMER
THE HAZARD
Transformerless Half-Wave Rectifier Equipment
Another commonly used transformerless power supply circuit
is a half-wave rectifier where one side of the ac power line
connects directly to the chassis (also shown in Fig. 7). Unless the
equipment is equipped with a polarized plug to prevent insertion
the “wrong” way, the chassis may be “hot” (120VAC with
respect to earth ground) and cause an electrical shock if touched.
Other Transformerless Hazards
Equipment with voltage doubler power supplies may also be of
the “hot Chassis” variety and pose the same safety hazard. In
fact, and equipment with a 2-wire ac power plug should be treated
as hazardous “hot” chassis type and the safety precautions listed
on the next page should be taken.
Test Equipment Damage Hazard
In addition, to the electrical shock hazard if the “hot” chassis is
touched, there is also a high probability of damaging any acpowered test equipment used to service the equipment. Most test
equipment with a 3-wire power cord, such as oscilloscopes and
signal generators, have an earth ground chassis (connected to
earth ground through the third wire of the ac power plug).
Touching the ground lead of any such test equipment probe to a
“hot” chassis shorts the hot side of the power line through the
ground lead and instrument. Since the path through the
instrument is intended only as a signal ground, the excessive
current of a direct power line short may cause extensive damage
to the test equipment or to the equipment under test.
Most equipment with a 2-Wire Plug is Transformerless
Most recent television receivers and other consumer products
such as stereo amplifiers, tuners, tape decks, etc. do not contain
an isolation transformer. Such products often have a plastic or
wood cabinet which completely insulates the chassis and prevents
the user from touching it. However, when the cabinet is removed
for servicing the product, the chassis is exposed and may become
an electrical shock hazard to the service technician.
Bridge Rectifier Transformerless Equipment
One of the most commonly used types of power supply circuits
in television receivers and audio equipment is the transformerless
full wave bridge rectifier shown in Fig 7. In such cases, the
chassis is always “hot”, regardless of which way the 2-wire ac
plug is inserted. Touching a “hot” chassis is hazardous and can
cause fatal electrical shock.
WARNING
Just because a unit uses a polarized power plug does not
guarantee safety. Some equipment with a bridge rectifier uses a
polarized power plug, and as mentioned above, always has a
“hot” chassis.
16
OPERATING INSTRUCTIONS
Troubleshooting: Use As Isolation Transformer
Figure 7. Servicing “Hot Chassis” Equipment Can Pose a Serious Shock Hazard.
17
Troubleshooting: Use As Isolation Transformer
THE SOLUTION
Don’t Ground the Chassis
Simply connecting a test lead from the chassis to a good earth
ground is not a satisfactory solution. If the chassis is “hot”, this
places a direct short from the “hot” side of the power line to earth
ground. Hopefully, this would only trip the circuit breaker for the
wall outlet. But a wall outlet is a very high energy source, and
before the circuit breaker is tripped, the grounding test lead may
“weld” or “disintegrate”, or severe damage may occur to the
equipment under test.
Use An Isolation Transformer
For servicing “Hot Chassis” equipment, always connect an
isolation transformer between the wall outlet and the equipment
under test. The Model 1420 AC Power Supply includes
such an isolation transformer, among its many other features.
As shown in Fig. 8, when an isolation transformer is used, the
chassis of the equipment under test is electrically isolated from
both sides of the power line. The chassis of the equipment under
test may not be grounded by connecting a test lead from the
chassis to a convenient earth ground (such as an earth ground
terminal of the test equipment).
Summary
Any piece of equipment with a 2-wire power plug may be the
“hot chassis” type, even if it is equipped with a polarized plug.
There is not disadvantage to using an isolation transformer, even
if the equipment under test already includes its own isolation
transformer. Therefore, for safety, treat all equipment with a 2wire power cord as “hot chassis” and use the ISOLATED
OPERATING INSTRUCTIONS
OUTPUT of the 1420 AC Power Supply for servicing
such equipment.
PROCEDURE
(refer to Fig. 9)
1. Turn off the 1420 AC Power Supply and set AC
Volts control to MIN.
2. Connect the power plug of the ac power supply to a 120
volt, 60 Hz ac wall outlet. The wall outlet must be the 3wire type with the third wire returned to a good earth
ground.
3. Connect any ac powered test equipment to be used to an
ac wall outlet (do not use the ISOLATED OUTPUT
receptacles of the ac power supply for test equipment).
4. Connect the ac power plug to the equipment under test to
the ISOLATED OUTPUT receptacle of the ac power
supply. This provides the isolation as shown in Fig. 8.
WARNING
CONNECT ONLY ONE “HOT CHASSIS” EQUIPMENT AT
A TIME. Unless both have an identical line-to-chassis
relationship, there is a shock hazard between two chassis.
5.
6.
7.
18
Turn the POWER ON.
Select VOLTS function and adjust AC VOLTS control to
desired voltage (typically 120V).
It is recommended that the chassis of the equipment under
test be grounded with a test lead.
Figure 8. Eliminating the Hazard of Servicing Transformerless Equipment
19
VARIABLE VOLTAGE SOURCE
Figure 9. Using the AC Power Supply as an Isolation Transformer
20
The Model 1420 AC Power Supply offers
continuously variable output voltage from 0 to 150VAC. Several
applications are listed below, but the versatile instruments may be
used in any application where an ac power source of any value
from 0 to 150 volts is required, and within the maximum current
rating of the instrument.
Using the Model 1420 AC Power Supply as shown
in Fig. 10, voltage can be set to 0 volt and slowly increased while
monitoring the current. Problems such as a defective circuit
breaker that open too soon are quickly spotted. If current reaches
its normal value (typically, about 70% of the fuse of protective
device rating) at a low voltage such as 20 volts, there is a major
short in the power supply or one of the main power distribution
circuits. If current increases to its normal value more gradually,
allowing voltage to approach 100 volts or more, an overload in
one of the circuits is probably the cause. Current that increases
sharply above a certain voltage may indicate electrical breakdown
or arcing within a component. Voltage or current measurements
in various circuits (see Fig. 10) while varying the input voltage
can help isolate the fault.
24 VOLT APPLICATIONS
Class II industrial control equipment operates from nominal 24
volt, 60 Hz ac power. Such equipment is widely used in
industrial plants. These power supplies can be adjusted to 24
volts ac for bench servicing of the equipment.
130-150 VOLT APPLICATIONS
The ability to go higher then 130 volts is indispensable in
component and equipment testing where specifications must be
exceeded to verify designs and overvoltage margins.
INPUT VOLTAGE SPECIFICATION TESTING
Most ac powered equipment is specified to operate over a
range of input voltage such as 120VAC ±10%. Complete
performance testing cannot be conducted without a variable ac
source. Some testing may merely consist of measuring regulated
dc voltages while varying the ac source voltage; with other tests
conducted at nominal line voltage.
TROUBLESHOOTING EQUIPMENT THAT BLOWS
FUSES
One of the problems with troubleshooting equipment with a
severe overload or short is that it repeatedly trips its circuit
breaker or blows fuses. Full power cannot be applied long
enough for normal voltage and waveform measurements to be
performed. The variable voltage feature permits operation at a
lower voltage that does not activate the protective device; testing
and troubleshooting can be performed with power applied.
LOW OR HIGH LINE VOLTAGE RELATED FAILURES
Occasionally, an equipment malfunctions only during
conditions of low or high line voltage. Troubleshooting of such
problems is almost impossible without a variable ac voltage
source. Model 1420 AC Power Supply serves as
a variable ac voltage source.
21
Troubleshooting: Use As Variable Voltage Source
OPERATING INSTRUCTIONS
Figure 10. Using the Variable Voltage Feature to Troubleshoot Equipment with Short Circuit
22
OPERATING INSTRUCTIONS
Troubleshooting: Load Measurement
TROUBLESHOOTING: USING THE AC POWER SUPPLY TO MEASURE ELECTRICAL LOADS
LOAD MEASUREMENT PROCEDURE
The normal electrical load or current drain for the equipment
under test is usually specified in its servicing literature. If that
information is not available, the normal current drain is typically
60% to 80% of the rated current of the circuit breaker or line fuse.
Measurement of electrical load is extremely simple when using
the Model 1420 AC Power Supply as the power source.
Refer to Fig. 11. The built-in meter may be switched to measure
the voltage and current being delivered to the equipment under
test. Multiplying the voltage times the current give the electrical
load in volt-amps.
For Model 1420 the calculations is not even required if the
measurement is made at the standard value of 120 volts. The
0-2A and 0-4A current scales are also calibrated as direct reading
0-24VA and 0-480VA scales.
DESIGN APPLICATIONS
The design goals of any ac powered electronic product include
input power requirements. Using the ac power supply as the
power source for breadboard and prototype units provides
continuous monitoring of electrical load for various circuit
configurations, at various input voltages, and at various
temperatures.
PRODUCTION TESTING
Final testing of electrical and electronics equipment nearly
always includes monitoring of electrical load in all modes of
operation. The 1420 ac power supply provides both
variable voltage and electrical load measure meant capabilities
needed in such a test station.
NOTE
The VA scales are accurate only at 120 volts. At other voltages,
use the 0-2A or 0-4A current scales and calculate the electrical
load by multiplying output voltage times output current.
SERVICING APPLICATIONS
An initial check of electrical load can often give a clue to the
problem when troubleshooting electronics equipment. If the
equipment under test is drawing considerably less current than
normal, perhaps one of the power supply voltages is absent,
disabling several circuits. If current is higher than normal, a
transistor or other component may be shorted. If current remains
higher than normal after other faults have been corrected, a leaky
filter capacitor is suspected. Such problems should be corrected
to prevent another impending failure.
ENERGY EFFICIENCY
Energy efficiency has become an important consideration in
equipment selection. Equipment with the least electrical load is
the most energy efficient. The electrical load of similar products
can be compared side by side, demonstrating energy efficiency to
a customer in terms readily understood by a layman.
23
Troubleshooting: Load Measurement
OPERATING INSTRUCTIONS
Figure 11. Measuring Electrical Load
24
OPERATING INSTRUCTIONS
Leakage Tester
USING THE MODEL 1420 AS A LEAKAGE TESTER
STANDARD LEAKAGE TEST
The equipment under test remains connected to the
ISOLATED OUTPUT, just as if it was for servicing. The voltage
was probably already preset to 120 volts at the conclusion of
servicing.
As previously mentioned, most equipment with a 2-wire ac
power plug are the “hot chassis” type. The plastic or wood cabinet
normally insulates the chassis so the user cannot touch it. Other
exposed metal parts such as antennas, antenna terminals, knob
shafts, screw heads, handles, etc. are also insulated (or isolated
with very high resistance) to protect the user from electrical shock
The permanently attached leakage probe of the ac power
supply is merely touched to each exposed metal part of the
equipment under test (antenna, terminals, tuner knob, knob shafts,
handle, screw heads, etc.)
Most equipment manufacturers specify a leakage test after
reassembly of the equipment to insure the continued protection of
the user from electrical shock.
No separate voltmeter nor conversion of results is required.
Just press the LEAKAGE button and read leakage directly from
the LEAKAGE scale of the meter in microamps (in milliamps for
higher values of leakage). See the manufacturer’s service
literature for the maximum permissible leakage. However,
leakage in excess of 500µA is considered hazardous in any
equipment. Locate and correct the cause of leakage.
The standard leakage test requires a leakage probe consisting
of a test lead in series with a 1.5kΩ, 10 watt resistor parallel by a
0.15µF capacitor. One end of the leakage probe is connected to
an earth ground. Voltage across the resistor is measured on an ac
voltmeter as the leakage probe is touched to each exposed metal
part of the equipment. An isolation transformer must not be used
during the standard leakage test, and the entire test must be
repeated with the ac power plug reversed, even if an adapter is
required to reverse the connections of a polarized plug.
The expanded scale meter gives good resolution in the normal
100 to 500µA range. Reading give up to 5mA are measured on a
compressed scale. The amount of excess leakage can be a clue to
the type of leakage path. A full scale meter reading probably
indicates a direct short to the power line, but the meter is
protected from damage.
The maximum permissible leakage specified by OSHA, UL,
and CSA is 500µA. Some manufacturers specify a lower limit for
a greater margin of safety.
The leakage probe may also be used to verify proper wiring of
equipment with polarized plug; there should be very low leakage
from the chassis to common and full scale leakage to hot.
Leakage of equipment with a 3-wire power plug is performed
in the same manner as for 2-wire equipment.
THE SIMPLER METHOD
The Model 1420 AC Power Supply includes a built-in leakage
tester that greatly simplifies the leakage test (Fig. 12).
25
Leakage Tester
OPERATING INSTRUCTIONS
Figure 12. Power Line Leakage Testing.
26
OPERATING INSTRUCTIONS
Soldering Iron Temperature Control
SOLDERING IRON TEMPERATURE CONTROL
THE NEED FOR TEMPERATURE CONTROL
Most servicing work requires the use of a soldering iron. If the
soldering iron is plugged in only when it is needed, time is wasted
waiting for the iron to heat up. But if it is left plugged in all the
time, oxidation quickly erodes the tip. Also, soldering iron
temperature varies with line voltage. Some irons reach the ideal
temperature at 105 to 110 volts. As a result, at 120 volts, some
soldering irons are too hot, which can more easily damage
components being replaced or cause separation of circuit board
plating.
oxidation of the tip. This setting keeps the iron warm enough that
it can be quickly brought to operating temperature when needed.
The temperature control is non-linear, allowing for a larger
temperature variation at the low end and more precise
temperature control at the HOT end. The exact temperature
desired can be easily achieved.
The soldering iron temperature control is entirely independent
of the isolated variable voltage output, including separate on-off
switches and pilot lights. Thus the soldering iron temperature
control feature may be used with or without the other features of
the instrument.
THE SOLUTION
(refer to Fig. 13)
SUMMARY OF PROCEDURE
(refer to Fig. 13)
1. Set the SOLDER TEMP control to OFF
2. Connect the ac power plug of the soldering iron to the
outlet on the rear panel of the Model 1420 AC Power
Supply. THIS OUTLET IS FOR A SOLDERING
IRON ONLY. Do not connect electronic equipment
here.
3. Turn the SOLDER TEMP control clockwise to the on
position. The amber pilot lamp will light.
4. Between periods of soldering iron use, reduce
temperature to minimize oxidation of the tip.
5. When ready to use the soldering iron, adjust the
SOLDER TEMP control to the desired temperature.
Experience will quickly determine the typical setting
for a given soldering iron.
The solution to the problem just described is a variable ac
voltage source. The soldering iron could be kept warm to reduce
oxidation of the tip, quickly brought to operating temperature
when needed, and adjusted to the exact temperature desired.
The Model 1420 AC Power Supply includes a built-in
soldering iron temperature control feature. A separate ac outlet is
provided on the rear panel. The output duty cycle at this outlet is
variable from about 70% to 99%, or the outlet can be switched off
when not in use. This outlet is intended for a soldering iron only.
It is not intended for transformer type soldering irons nor irons
rated at greater than 100 watts.
Temperature is adjusted with the SOLDER TEMP control on
the front panel. A relatively low temperature setting is
recommended between periods of soldering iron use to reduce
27
Soldering Iron Temperature Control
OPERATING INSTRUCTIONS
Figure 13. Using the Variable Soldering Iron Temperature Feature.
28
CIRCUIT DESCRIPTION
Refer to the separately supplied schematic diagram while
reading the following circuit descriptions.
is shunted by the VOLTAGE CAL trim pot which calibrates the
voltage scale.
VARIABLE VOLTAGE CIRCUIT
A 1-ohm current sensing resistor (two series 0.5-ohm in Model
1420) develops a voltage proportional to output current. In the
AMPS function, this voltage is applied across the meter circuit.
The meter is now shunted by the AMPS CAL trim pot which
calibrates the 2 amp current scale. In Model 1420, the 4 amp
scale is selected by sensing the voltage developed across only one
of the 0.5-ohm resistors.
Input power is applied through the POWER ON switch to
variable auto-transformer TI. The output of TI is set with the AC
VOLTS control from 0 to 150 volts. The selected amount of
voltage is applied across isolation transformer T2 to the
ISOLATED OUTPUT receptacle(s).
Model 1420 is protected by a circuit breaker CB1.
This limits the maximum input current.
Additional protection for the auto-transformer is offered by fuse
F2, which limits the maximum output current at low voltages
which would not open the protective device in the input circuit.
In Model 1420, this is a 4-amp fuse on the rear panel.
When the LEAKAGE function is selected (Model 1420 only)
the current from the leakage probe is applied to the meter circuit.
Diodes D4 and D5 are reverse biased below 500 µA for expanded
scale feature. At higher leakage current, the diodes become
forward biased and shunt part of the current to compress the
meter scale.
SOLDERING IRON TEMERATURE CONTROL CIRCUIT
METERING CIRCUIT
(Model 1420 Only) Input power is applied through triac TR1 to
the soldering iron outlet on the rear panel. Breakdown diode D1
does not gate the triac into conduction until its 30 volt threshold is
reached. Thus, the triac does not conduct for the entire input
cycle. SOLDER TEMP control R2 forms part of an RC phase
shift network which varies the phase of the trigger voltage in
relation to the anode voltage of the triac. This varies the nonconduction period, which adjusts the soldering iron temperature.
The circuit is automatically reset each time the ac passes through
zero.
Since the output of the unit is ac, the meter is connected across
a bridge rectifier to provide the dc necessary for meter operation.
The rectifier circuit senses the average level, while the meter is
calibrated to read the equivalent rms value of a sine wave voltage
the back-to-back diodes connected directly across the meter limit
maximum voltage and thus offer overrange protection.
When the VOLTS function is selected, the voltage across the
ISOLATED OUTPUT is applied to the meter circuit. The meter
29
MAINTENANCE AND CALIBRATION
Model 1420
If this instrument is severely overloaded at higher output
voltages, circuit breaker CB1 on the rear panel will trip. The unit
will stop operating and the POWER ON pilot light will go off.
Remove the overload and push the button on the circuit breaker to
reset. A severe overload at low output voltage will blow fuse F2 on
the rear panel. In this case, there will be no output but the pilot
light will stay on. If the soldering iron outlet is overloaded, internal
fuse F1 will blow. If so, the SOLDER TEMP pilot light will go off.
Fig. 15 shows the fuse locations. Replace fuse F1 only with a 1amp normal blow type 3AG. Replace fuse F2 only with a 4-amp
slow-blow type 3AG.
It is imperative that newly installed or re-installed brushes
be seated correctly on the brush track for proper operation of
the transformer. With the power off, insert a piece of garnet
paper (non-metallic) between the brush and brush track, rough
side toward the brush. A few swing of the brush over the
garnet paper will mate the brush contact face to the brush
track. Remove the garnet paper and blow away loose particles
before applying power.
CALIBRATION ADJUSTMENTS
This unit was carefully checked and calibrated at the factory
prior to shipment. Readjustment is recommended only if
repairs have been made in a circuit that affects calibration, or it
you have reason to believe the unit may be out of calibration.
Locations of the calibration adjustments are shown in Fig. 14.
.
AUTO-TRANSFORMER BRUSH REPLACEMENT
To replace the brush, unplug the instrument, then gently lift the
brush from the brush track. Grasp the old brush assembly and snap
it out of position by pulling radially. Install the new brush assembly
by lifting the spring arm and snapping the new brush assembly into
position.
Test Equipment Required
1. Multimeter, ac voltage accuracy of 0.5% or better at
120 V, 60Hz, ac current accuracy of 1% or better at
500 microamps and 2 amps, 60Hz.
2.
31
60 ohm, 240 watt resistive power supply load. Must be
capable of dissipating 2 amps at 120 VAC. A variable
electronic load of sufficient power rating may be used,
or parallel light bulbs totaling 240 watts are suitable.
MAINTENANCE AND CALIBRATION
Figure 14. Location of Fuses and Calibration Adjustments, Model 1420.
33
MAINTENANCE AND CALIBRATION
Meter LEAKAGE Calibration
1. Connect the leakage probe in series with a 220 kΩ, ¼ watt
resistor.
2. Connect a calibrated multimeter of 1% or better ac current
accuracy in series with the 220kΩ resistor and leakage
probe. Set the multimeter to measure 500µA ac current.
3. Carefully connect the other lead of the multimeter to the
hot side of the ISOLATED OUTPUT receptacle. Adjust
the AC VOLTS control for exactly 500µA on the
multimeter.
4. Select the LEAKAGE function and adjust LEAKAGE
CAL (R11) for 500µA on the built-in meter.
Meter VOLTS Calibration
1. With the power supply turned off, adjust the mechanical
zero of the meter to exact zero.
2. Connect an external multimeter of ±0.5% or better ac
voltage accuracy to the ISOLATED OUTPUT.
3.
Turn on the ac power supply and set the AC VOLTS
control for 120 volts on the multimeter
4. Set function switch to VOLTS and adjust VOLTS CAL
(R14 for Model 1420) for 120 volts
on built-in meter.
Meter AMPS Calibration
1. Connect a 60 ohm, 240 watt resistive load to the
ISOLATED OUTPUT receptacle. Parallel light bulbs
totaling 240 watts is suitable.
2. Connect a calibrated multimeter of 1% or better ac current
accuracy in series with the load to measure each current.
Set the multimeter to a 2-amp range.
3. Turn on the ac power supply and slowly increase the
output voltage until the multimeter measures 2.0 amps.
4. Set the function switch to AMPS and adjust AMPS CAL
(R12 for Model 1420) for 2.0 amps
on the built-in meter.
5. For Model 1420, adjust calibration on the 0-2A range.
The adjustment calibrates both scales. If 0-4A range is
inaccurate, replace R5 and R6 with matched equal
resistors and repeat calibration adjustment.
PERFORMANCE TESTS
The following checks test all functions of the ac power supply
for proper operation. The sequence of the checks also provides a
logical symptom and fault isolation technique for troubleshooting.
After troubleshooting and repair, these tests should be performed
to assure that all faults have been corrected.
1. Before the power supply is turned on, the meter should
rest at exact zero. If mechanical zero adjustment is
required, calibration adjustments should be rechecked.
2. Set the POWER ON switch to on. The POWER ON pilot
light should illuminate.
3. Set the function switch to VOLTS and rotate the AC
VOLTS control to minimum (fully counterclockwise).
The output should go to zero as read on the front panel
meter.
34
MAINTENANCE AND CALIBRATION
4.
5.
6.
7.
Rotate the AC VOLTS control to maximum. The control
should rotate smoothly and the output voltage should
increase smoothly to 150 volts, as read on the meter. TO
check mete calibration, measure voltage with calibrated
external meter at 120 volts and compare reading to front
panel meter.
Reduce the voltage to minimum and connect a load to the
ISOLATED OUTPUT. A load consisting of light bulbs
totaling 240 watts is preferred. Set the function switch to
AMPS and increase the AC VOLTS control until the
meter reads 2 amps (or 120 volts, whichever occurs first).
To check meter calibration, measure current with
calibrated external meter at 2.0 amps and compare to front
panel meter.
For Model 1420, check that the meter reads 2 amps on
both the 0-2A and 0-4A range.
For Model 1420, check the leakage function as follows:
a. Reduce the voltage to minimum and connect the
leakage probe to the hot side of the ISOLATED
OUTPUT.
b. Select the LEAKAGE function and slowly
increase the AC VOLTS control until meter reads
500 µA on the leakage scale. This should occur at
about 6 volts. To check meter calibration, measure
leakage current with calibrated external meter and
compare to front panel meter.
c. Increase the AC VOLTS control until the meter
reads 5mA on the leakage scale. This should
8.
occur at about 60 volts. With the reverse polarity
of LEAKAGE function, the meter should read
zero.
d. Change the leakage probe to the common side of
the ISOLATED OUTPUT and select both
polarities of the LEAKAGE function. One
polarity should read zero and the other should
indicate 5mA of leakage.
For Model 1420, check the soldering iron temperature
control function as follows:
a. Connect a load to the soldering iron outlet on the
rear panel. A lamp of 25 to 100 watts is preferred,
or a soldering iron may be used. Turn on the
SOLDER TEMP control. The amber pilot light
should illuminate.
b. Connect an ac voltmeter across the load and vary
the SOLDER TEMP control from minimum to
maximum. At 120 volts line voltage, the light
bulb intensity should vary and the voltmeter
should read from roughly 85 volts at minimum to
118 volts at maximum (this variation will not be
achieved unless a load is connected).
TROUBLESHOOTING
If the previously listed “Performance Tests” are performed in
the sequence listed, this provides a logical approach to defining
symptoms and isolating defective circuitry. The following
information may help further isolate the problem
35
2.
If no voltage is measured on external meter, check rear
panel fuse (Model 1420 ) and
replace if burned out. If fuse is okay, check
brush of variable auto-transformer. Check for open
winding in isolation transformer or open current sensing
resistor.
3. If voltage is measured on external meter, but none is
indicated on front panel meter, see troubleshooting
procedure in next paragraph.
Incorrect or No VOLTS, AMPS, or LEAKAGE Meter Reading
1. Check meter reading in all three functions to further
isolate the fault.
2. For inaccuracy, perform calibration adjustments. If no
reading or inability to adjust to correct reading, a defective
component is indicated.
3. If trouble appears in more than one mode, check bridge
rectifier diodes, meter, and series resistors. If trouble is in
one mode only, check function switch and associated
metering resistors.
SOLDER TEMP Operation Abnormal (Model 1420 Only)
1. If no SOLDER TEMP pilot light, check internal fuse F1
and replace if burned out. If fuse is good, check voltage at
soldering iron outlet. If voltage at outlet is okay, pilot
lamp is defective.
2. If pilot light is okay, but no output voltage or incorrect
output voltage, check triac TR1, breakdown diode D1,
resistors R1, R2, and R3, capacitors C1, C2, and inductor
L1.
No POWER ON Pilot Light
This symptom indicates either a fault in the primary power
circuit, or a tripped circuit breaker (Model 1420).
The following checks should isolate the
problem.
1. Make sure the unit is plugged into a “live” outlet.
2. Reset the circuit breaker (Model 1420).
3.
If the circuit breaker or fuse is okay, verify whether there
is any output from the supply; select VOLTS function and
note meter reading on 0-150V scale. If output is
available, the pilot light bulb is probably defective. If no
output is noted, the trouble is probably an open in the
power transformer primary circuit. Check continuity of
the power cord, fuseholder, POWER ON switch, variable
auto-transformer, and the wiring interconnecting these
parts.
4. If circuit breaker does not trip again, or replacement fuse
does not burn out when unit is turned on, previous fault
may have been caused by an overload connected at the
ISOLATED OUTPUT.
5. If circuit breaker trips again, or replacement fuse burns
out, check for shorted variable auto-transformer or power
transformer.
No Output-Pilot Light Okay
1. If no output voltage is indicated on the front panel meter,
check voltage at ISOLATED OUTPUT with external ac
voltmeter.
36
CUSTOMER SUPPORT
WARRANTY
Cal Test Electronics warrants this product to be
free from defective material or workmanship for a
period of 1 year from the date of original purchase.
Under this warranty, Cal Test Electronics is limited
to repairing the defective device when returned to
the factory, shipping charges prepaid, within the
warranty period.
CHANGES
Cal Test Electronics reserves the right to discontinue models, change specifications, price, or design
of this device at any time without notice and without
incurring any obligation whatsoever.
LIABILITIES
The purchaser agrees to assume all liabilities for
any damages and/or bodily injury which may result
from the use or misuse of this device by the
purchaser, his employees, or agents.
RETURNS
Units returned to Cal Test Electronics that have
been subject to abuse, misuse, damage or accident,
or have been connected, installed or adjusted
contrary to the instructions furnished by Cal Test
Electronics, or that have been repaired by unauthorized persons, will not be covered by this warranty.
NO OTHER WARRANTIES
This warranty is in lieu of all other representations
or warranties expressed or implied and no agent or
representative of Cal Test Electronics is authorized
to assume any other obligation in connection with
the sale and purchase of this device.
37
WARRANTY SERVICE INSTRUCTIONS
CALIBRATION AND REPAIR
If you have a need for any calibration or repair
services, please visit us on the web at:
globalspecialties.com. See the “Service” tab. Or
contact us via the “Contact” tab. You may also
contact us at:
GLOBAL SPECIALTIES
A Cal Test Electronics Company
22820 Savi Ranch Parkway
Yorba Linda, CA 92887
800-572-1028 or 714-221-9330
38
20150507