1
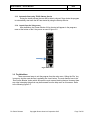
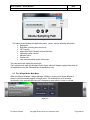
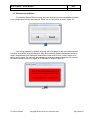
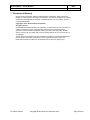
Okuma America Corporation Okuma Utilities – Screen Blocker Software User Manual Document No. - Okuma Utilities – Screen Blocker Software User Manual Date 09/08/2014 Revision History Date Version Description Author 03/17/2014 1.0.5.4 Initial release Scott Solmer 04/07/2014 1.1.5.4 ‘Widget’ functionality added Scott Solmer 05/05/2014 1.2.0.0 Logging functions updated Scott Solmer 09/08/2014 1.3.0.7 Bug Fix Scott Solmer For Public Release Copyright Okuma America Corporation 2015 Page 2 of 15 Okuma Utilities – Screen Blocker Software User Manual Date 09/08/2014 Table of Contents 1. 2. 3. Overview 4 1.1 1.2 1.3 4 4 4 Software Installation 4 2.1 2.2 2.3 2.4 4 5 5 6 5. 6. 7. System Requirements Software Requirements Installation Uninstallation Operation 3.1 3.1.1 3.1.2 3.1.3 3.1.4 3.2 3.3 3.4 3.5 3.6 3.7 4. Purpose Scope Overview 6 Starting Screen Blocker From the Start Menu From Desktop Automatic Start using THINC Startup Service Launch from the V-key menu The Main Menu The ‘Widget Mode’ Main Menu Screen Blocker Password Input Window Configure Screen Profile Management 6 6 6 7 7 7 8 9 10 11 12 Troubleshooting 12 4.1 4.2 4.3 4.4 4.5 12 12 13 13 13 Problem loading image Help, I am locked out of my machine tool! Font settings have changed The application hangs or crashes Further troubleshooting Change Log 14 5.1 5.2 5.3 5.4 14 14 14 14 Version 1.3.0.7 Version 1.2.0.0 Version 1.1.5.4 Version 1.0.5.4 Known bugs 14 6.1 6.2 6.3 14 14 14 Screen Flicker 15” screen Screen Flicker 19” screen Screen Blocker Doesn’t Cover Entire Screen Disclaimer of Warranty For Public Release 15 Copyright Okuma America Corporation 2015 Page 3 of 15 Okuma Utilities – Screen Blocker Software User Manual Date 09/08/2014 Screen Blocker User Manual 1. Overview 1.1 Purpose The Screen Blocker application was developed as a replacement for what service technicians and others have been using for decades. Namely, a piece of paper with a written message was traditionally used to cover the control screen and communicate why others should not touch the control and by whose authority. A piece of paper however, is not very effective at preventing tampering by anyone who decides to ignore the message. 1.2 Scope This manual covers the installation, general use, and troubleshooting of the Screen Blocker application. Please note that the version of Screen Blocker included with this manual might not necessarily correspond with the version of this manual as listed in the revision history. In that case the newer software version does not contain changes that 1.3 Overview Screen Blocker is essentially a high-tech piece of paper. Its contents are highly customizable and may be saved and restored. Screen Blocker does more than merely cover the screen. It also prevents anyone from accessing the control screen by using password protection. 2. Software Installation 2.1 System Requirements Microsoft .NET Framework 4.0 is required to run Screen Blocker. Therefore it is capable of running on OSP P100 to P300 series controls. If the machine control is running Windows XP, a prerequisite to installing .NET 4 is that the Windows version has Service Pack 3 (SP3). It might not be possible to upgrade the Windows Service Pack version in every instance, please consult your nearest Okuma Distribution Representative. If SP3 is currently installed on your Windows XP control, than .NET 4 may be installed without fear of harming the control. Note that in order to install the .NET framework, Windows Installer 3.1 or later is required. It is bundled with the .NET installer and will be installed automatically if not present already. For Public Release Copyright Okuma America Corporation 2015 Page 4 of 15 Okuma Utilities – Screen Blocker Software User Manual Date 09/08/2014 2.2 Software Requirements Screen Blocker requires approximately 3.5 MB of hard disk space. If the .NET framework 4 is not already installed, it may require up to 500 MB of additional hard drive space. 2.3 Installation Run “Setup_Screen_Blocker.exe” from the instillation media to display the following screen. Figure 2-1 Click the ‘Next’ button to continue the instillation. The install process will complete automatically. To complete the install, click the ‘Finish’ button. For Public Release Copyright Okuma America Corporation 2015 Page 5 of 15 Okuma Utilities – Screen Blocker Software User Manual Date 09/08/2014 2.4 Uninstallation To remove Screen Blocker, open the control panel and open ‘Add or Remove Programs’. Select Okuma Screen blocker from the list and click ‘Remove’. Figure 2-2 Click ‘Yes’ to remove Screen Blocker. The uninstall process will complete automatically. 3. Operation 3.1 Starting Screen Blocker 3.1.1 From the Start Menu Activate the start menu by using the Windows key (if using an attached keyboard) or using the key combination (Ctrl + ). Then from the Programs menu, open “OkumaUtilities.ScreenBlocker.exe” from the Okuma Okuma Screen Blocker submenu. 3.1.2 From Desktop An icon will be added to the desktop during install. Double-click this icon to launch Screen Blocker. Figure 3-1 For Public Release Copyright Okuma America Corporation 2015 Page 6 of 15 Okuma Utilities – Screen Blocker Software User Manual Date 09/08/2014 3.1.3 Automatic Start using THINC Startup Service During the install process the user will be able to choose if they desire the program to automatically start once the NC has started by using the Startup Service. 3.1.4 Launch from the V-key menu After instillation, the Screen Blocker V-Key shortcut will appear in the programs menu at the bottom of the V-key menu as seen in figure 3-2. Figure 3-2 3.2 The Main Menu There are several ways to exit the program from the main menu. Hitting the ‘Esc’ key is one way, but the most obvious is probably the ‘close’ button. The main feature here is the ‘Run Screen Blocker’ button which will open the main screen blocking feature. However there are a few interesting things that may be accessed from the help menu on this screen. Refer to the following figure 3-3. For Public Release Copyright Okuma America Corporation 2015 Page 7 of 15 Okuma Utilities – Screen Blocker Software User Manual Date 09/08/2014 Figure 3-3 The About screen displays the application name, version, and the following information: • Description • Build date (including time since built) • .NET version • Application GUID (Globally Unique IDentifier) • Operating system version • Machine name • Contact info • Link to more detailed system information The Help feature will display this document. The Log feature will open the Windows Event Viewer which will display logging information for the application under the OkumaUtilities.ScreenBlocker entry. 3.3 The ‘Widget Mode’ Main Menu When the Okuma Windows / Widget Manager (WiMan) is running, and Screen Blocker is started, it will automatically appear in widget mode. This interface has all of the same functionality of the normal main menu but is designed to work without a menu or title bar. Figure 3-4 For Public Release Copyright Okuma America Corporation 2015 Page 8 of 15 Okuma Utilities – Screen Blocker Software User Manual Date 09/08/2014 3.4 Screen Blocker When initially run, the main Screen Blocker screen will appear as follows in figure 3-5. Figure 3-5 The main screen displays the profile content as well as status and buttons along the bottom bar. Status is indicated in two ways. First, the words “Unlocked” in green or “Locked” in red appear in the middle-top of the bottom bar. Second, the progress bar underneath that text will be full when unlocked, and cycle from empty to full when locked. There are also three buttons in the bottom bar. The ‘Close’ button will close the Screen Blocker main screen when unlocked, but is disabled while the screen is locked. The ‘Configure’ button only appears when unlocked, and opens the configuration screen. The ‘Help’ button will display this document. Finally, the ‘Unlock’ button, which is hidden while unlocked, will open the password input window. For Public Release Copyright Okuma America Corporation 2015 Page 9 of 15 Okuma Utilities – Screen Blocker Software User Manual Date 09/08/2014 3.5 Password Input Window To unlock the Screen Blocker screen, the user must input the correct password (chosen in the configuration screen) and press the “Enter” key or ‘OK’ button as seen in figure 3-6. Figure 3-6 If the wrong password is entered, a prompt will be displayed to the user informing them they have entered the incorrect password. After three incorrect password attempts have been made, the password input window will close and the user must click the ‘Unlock’ button to reopen it and try again. On the fourth and subsequent incorrect password guesses, the user will be locked out and unable to try again for 30 seconds as shown in figure 3-7. Figure 3-7 For Public Release Copyright Okuma America Corporation 2015 Page 10 of 15 Okuma Utilities – Screen Blocker Software User Manual Date 09/08/2014 3.6 Configure Screen The Configure Screen is divided into two major sections: the Settings group, and the Security group. Additionally there are ‘LOCK’ and ‘CANCEL’ buttons at the bottom of the window. The Settings group contains controls that allow the user to customize profiles which determine the look of the main Screen Blocker screen. The Security group simply contains a password input and a password input confirmation box. Before the screen may be locked, a matching password string must be entered in both password input boxes. The password is limited to eight characters, and can only contain letters and or numbers. A blank or empty password is not allowed. Figure 3-8 At the top of the Settings group is the ‘Profile’ drop-down list followed by a ‘Delete’, ‘New’, and ‘Save’ button. Please refer to section 3.7 for details about profile management. The user can modify the title and the detailed message and specify a unique color and font for each. The common profile settings are ‘Background Color’ and an image. The default image is a spinning Okuma logo. The spinning action of the logo can be set to stop if the screen is unlocked. Alternatively, a custom image may be selected. To select a custom image, activate the ‘Photo’ radio button and choose an image. To change the current selected image, click in the grey photo location box. For Public Release Copyright Okuma America Corporation 2015 Page 11 of 15 Okuma Utilities – Screen Blocker Software User Manual Date 09/08/2014 3.7 Profile Management Profiles may be selected from a list of saved profiles using the drop-down ‘Profiles’ box. To delete a profile, simply click the ‘Delete’ button and the currently selected profile will be deleted. The default profile may not be deleted. Clicking the ‘Save’ button will write the current profile settings to the currently selected profile. When the ‘New’ button is clicked, the current settings will be saved as a new profile and the user will be prompted to enter a name for the new profile. User profiles are saved to a file named “USERDATA.XML” in the same directory as ‘OkumaUtilities.ScreenBlocker.exe’. This file can be manually modified using a text editor or similar tool if necessary. Also the file may be copied to another location for backup. 4. Troubleshooting 4.1 Problem loading image The error message in figure 4-1 will appear whenever the image location specified by the Picture Location in USERDATA.XML cannot be found. This will occur any time the image is moved or deleted, or if the Screen Blocker application is moved to a new machine that does not have the same directory structure as the previous machine. To fix the error, first make sure the “Photo” radio button is selected. Then click on the grey box next to Photo in the Configure Screen to select the new location. Once the new image is selected, click the save button to update the profile and remember the new location. Figure 4-1 4.2 Help, I am locked out of my machine tool! Screen Blocker is not designed to hold up production or cause delays, it is a primarily a substitute for the humble piece of paper. Therefore the password lockout security can be easily defeated by terminating the application. Hint: the task manager can still be opened even when the screen is locked. Alternatively the machine can be powered down and restarted. The Screen Blocker application will not maintain its locked status through shutdown and restart. For Public Release Copyright Okuma America Corporation 2015 Page 12 of 15 Okuma Utilities – Screen Blocker Software User Manual Date 09/08/2014 4.3 Font settings have changed The way Screen Blocker stores and retrieves font information from the user profiles, it will attempt to use the font specified in USERDATA.XML. However, if that font is not installed on the machine that Screen Blocker is currently running on, it will use a default font. This problem will only be encountered if a profile is modified and saved on one machine, then that same profile is used on another machine that does not have the same fonts. 4.4 The application hangs or crashes In the event that the Screen Blocker application appears to be frozen, first try to manually terminate the application by using the task manager (Ctrl-Alt-Del). Look for the application name “OkumaUtilities.ScreenBlocker” in the running tasks list and end the program. If the application happens to crash (terminates with an unhandled exception) please record the detailed information about the exception before contacting an Okuma representative. If you are experiencing either of these two scenarios and can re-create the occurrence, please contact an Okuma representative. 4.5 Further troubleshooting If you are experiencing problems with the application, please check the log file using the Windows Event Viewer. From the Main Menu, expand the help menu and click ‘Log’. Then find the recorded events under OkumaUtilities.ScreenBlocker. . For Public Release Copyright Okuma America Corporation 2015 Page 13 of 15 Okuma Utilities – Screen Blocker Software User Manual Date 09/08/2014 5. Change Log Changes to the Screen Blocker program are noted here. 5.1 Version 1.3.0.7 Widget mode buttons replaced to improve painting performance. “CANCEL” button in configure screen renamed to “OK”. Modified code to enable the use of animated GIF images. Added animated GIF example. Fixed constant screen flicker bug. 5.2 Version 1.2.0.0 New version of TDG.Logging.Dll included. Transparency removed from Widget Main Menu to improve refresh timing. Installer version 1.0.8 created. V-key support added. Automatic startup support added. 5.3 Version 1.1.5.4 Pagination control was added to help screen. Widget Mode added. Installer version 1.0.6 created. 5.4 Version 1.0.5.4 Initial release version created. 6. Known bugs 6.1 Screen Flicker 15” screen When the screen is locked and a user attempts to alt-tab to the OSP HMI screen or presses the machine mode buttons, some flickering of the HMI screen is normal, but should not persist for than a few seconds. Occasionally the bottom F-Key menu may appear on top of Screen Blocker, but attempts to interact with it will restore Screen Blocker. 6.2 Screen Flicker 19” screen When the screen is locked and a user attempts to alt-tab to the OSP HMI screen or presses the machine mode buttons, the V-key menu will flicker over Screen Blocker. The user can interact with the menu while it is flickering. There is no work-around at this time. 6.3 Screen Blocker Doesn’t Cover Entire Screen When the screen is locked, unlocked, and subsequently locked again the Screen Blocker window may resize itself such that it is no longer blocking certain areas of the screen. This can be resolved by closing and reopening Screen Blocker from the main window. For Public Release Copyright Okuma America Corporation 2015 Page 14 of 15 Okuma Utilities – Screen Blocker Software User Manual Date 09/08/2014 7. Disclaimer of Warranty Okuma America Corporation makes no representations or warranties, either expressed or implied, by or with respect to anything in this document, and shall not be liable for any implied warranties of merchantability or fitness for a particular purpose or for any indirect, special or consequential damages. Copyright © 2014, Okuma America Corporation. All rights reserved. GOVERNMENT RIGHTS LEGEND: Use, duplication or disclosure by the U.S. Government is subject to restrictions set forth in the applicable Okuma America Corporation license agreement and as provided in DFARS 227.7202-1(a) and 227.7202-3(a) (1995), DFARS 252.227-7013(c)(1)(ii) (Oct 1988), FAR 12.212(a) (1995), FAR 52.227-19, or FAR 52.227-14, as applicable. "Okuma America Corporation" and Okuma America Corporation’s products are trademarks of Okuma America Corporation. References to other companies and their products use trademarks owned by the respective companies and are for reference purpose only. For Public Release Copyright Okuma America Corporation 2015 Page 15 of 15